FILA 38-150 User manual

MANUAL
User
FM-756.1
www.fila.com/watch
38-150
Thank you for purchasing this watch.
Please read this manual thoroughly before using the watch!
Design of the Watch
1
Specifications
2
EL
Button [EL]
MODE
Button [M] Lap/Reset
Button [L/R]
Start/Stop/Compass
Button [S/S/C]
MODE Button [M]
• To select the display among Current Time, World Time, Alarm, Chronograph and
Timer Modes.
• If has setting display : Hold down the button to enter the Setting Display.
• In Setting display: To select among different settings.
Start/Stop/Compass Button [S/S/C]
• To select Compass Mode.
• To start or stop Chronograph / Timer running.
• To select the next city in the World Time Mode.
• In Setting Display: To increase the setting value.
Lap/Reset Button [L/R]
• To activate the ‘lap’ or ‘reset’ function in the Chronograph Mode.
• To select the previous city in the World Time Mode.
• In Setting display: To decrease the setting value.
EL Button [EL]
• To turn on the EL backlight for 3 seconds.
NOTE: Press any button to activate your Watch under Power Saving Mode. For
more information, please refer to Chapter 11.
• Compass Mode
• Chronograph Mode
• Current Time Mode
• Time System
• Calendar System
• Daily Alarm Mode
• Alarm Sound
• Backlight
• Battery
• World Time Mode
* These specifications might be changed without prior notice.
Setting Analog Watch
3
Set Time
How to Set the Analog Watch
• To set time, gently pull out the crown to the 'click' position.
• Then turn the crown either clockwise or counter clockwise until the time is
set correctly.
• When the time is set, gently push the crown back to its original position to
resume normal operation.
NOTE:
When low battery is detected, the second hand will move per 2 seconds.
Chronograph Mode - Record the Lap Records
7.2
Chronograph Stop Display
Lap Records Recall Sequence
the next
lap records
[L/R]
[L/R] [S/S/C]
[L/R]
[L/R]
1st lap record
the last lap
record
How to Recall Lap Records
• To recall the lap records, press the [L/R] button
when the Chronograph is stopped.
• Press the [S/S/C] button to move to the last lap.
How to reset the Chronograph
• When the Chronograph is stopped, press and hold
the [L/R] button to reset and all Lap records will be
reset to all zeros.
Compass Mode - Precautions
9
Precautions for using the Compass
• Keep your Watch away from magnets or any appliances which may contain
magnetic objects such as mobile phones, speakers, motors and etc.
• The Watch, like most magnetic compass, points to the magnetic north which is
slightly different from the true north. Check the 'What is Magnetic Declination'
section for more details.
• Perform the compass calibration from time to time, because the calibration can
ensure the precision of the compass.
• To achieve an accurate result, you should avoid measuring direction on the
following conditions:
1) The watch is placed close to the magnetic objects,
2) The watch is placed close to the metal objects,
3) The watch is placed close to the electrical appliances
4) The watch is placed inside a moving object or a ferroconcrete building.
Compass Mode
compass direction
bearing direction
SC
S
M
EL
LR
Timer Mode - Start / Stop the Timer
8.1
Alert:
• It will beep one per 10 second at last minute.
• It will beep one per seconds at last 5 seconds.
• It will beep for 30 seconds when reach zero.
[S/S/C]
[S/S/C]
Time r
Star t Count ing
Stop ped
Coun tin g
Coun t d ow n
to z er o
Time r Di spl ay
(Ini ti al ti me s ett ing )
ho ld
[L /R ]
An y ke y to stop b eep in g
an d re loa d
Coun tin g
Down
Dig its
run nin g
Cu rr ent
ti me
Be ep ! !
Be ep ! !
Compass Mode - Compass Directions and Bearing Directions
9.1
The Compass Directions
• The compass directions are shown in the adjacent table.
• For example, in the figure on the left, the compass direction of object B from
point A is due East. The compass direction of object C from point A is Southeast.
The compass direction of object D from point A is Northwest.
The Bearing Directions
• The Bearing direction of an object is defined as the angular difference between
North and the object. (Assume 0°for due North, and the measuring range is from
0° to 359°).
• For example, in the figure on the left, the bearing direction of object B from point
A is 90°. The bearing direction of object C from point A is 135°. The bearing
direction of object D from point A is 315°.
The Direction of an Object
• The direction of an object from a point can be specified in either compass
directions or bearing directions.
• The Watch includes both compass directions and bearing directions.
Major Function Display
4
SSC
M
EL
LR
Current Time
Mode
Alarm
Mode
[S/S/C] [M]
[M] [M]
[M]
[M]
Chronograph Mode
Major Function Display
Compass Mode World Time Mode
Timer Mode
Current Time Display - Setting the Time
5
Day of
Week
Current
Time
Date
Current Time
Display
How to Set the Current Time
• To select the setting display, press
and hold the [M] button for 2
seconds in the Current Time Mode.
In setting display, the selected item
will flash.
• In the setting display, press the [M]
button to change the selection
following the adjacent Time Setting
Sequence.
• Press [S/S/C] to increase the setting
values and [L/R] to decrease them.
• When the setting is completed, press
and hold the [M] button to exit the
setting display.
Change the Setting
Value
Change the Setting
Value at a higher
speed
[S/S/C] /
[L/R]
hold
[S/S/C] /
[L/R]
Hold
[M]
Hold
[M]
Time Setting Sequence
SecondUTC Minute Year
Month
Hour
Day
Date
Format
DST
On/Off
Key Tone
On/Off
Hour
Format
Hourly Chime
On/Off
LCD
Auto Off Contrast
LCD
Auto On
[M] [M] [M] [M]
[M]
[M]
[M]
[M]
[M][M][M]
[M] [M] [M] [M]
digits have been
selected (flashing)
Time Setting
Display
World Time Mode - City Abbreviation Code Table
5.2
World Time Mode - Time Zone
5.3
World Time Mode - Basic functions and setting
5.1
After
1 Sec.
City name
World time
City
abbreviation
Code and
UTC
After
1 Sec.
Toggle the Daylight Saving Time (DST)
• Hold down the [L/R] button to toggle the daylight saving time.
• When Daylight Saving Time is on, time will be increased by an hour.
View the World Time
• Press [M] button until enter world time mode.
• Press the [S/S/C] or [L/R] button to select the world time city. The city
name will be shown firstly and then show the city abbreviation code with
UTC afterwards.
World Time Display
Setting of the My city
• Hold the [M] button in the World time mode, the letter in the first row will flash.
• Press the [S/S/C] button to select the letter and make your own name for the
city. Then, press the [L/R] button to move the cursor to the right.
• Repeat this process until you have set the name for the user-defined city.
• Press [M] to move the setting to the UTC setting display. Press the [S/S/C] /
[L/R] button to set the correct UTC.
• When setting is completed, hold down the [M] button to finish.
[M]
[M]
Time Zone
setting
Edit My City
setting
Increase the Time Zone
setting by 30 minutes
Decrease the Time Zone
setting by 30 minutes
[S/S/C] *
[L/R] *
About UTC ( Coordinated Universal Time )
• Since the sun shines on different places on the Earth is different, the time of
different places is different. Therefore, our world is divided into several time
zones so that people in different places can get a more accurate and common
time.
• All the time zone calculations are relative to coordinated Universal Time (UTC).
For example, the time zone of London is ‘UTC +0’. Hong Kong is 8 hours ahead
the time of UTC. Therefore, Hong Kong’s time zone is ‘UTC +8’.
Hold
[M]
Note: *Hold down the [S/S/C] or [L/R] button can change the
setting at a higher speed.
Chronograph Mode- Start/ Stop the chronograph
7
Chronograph
‘All Zero’ Display
Chronograph
Running Display
Chronograph
Stop Display
M
EL SC
S
LR
[S/S/C]
[S/S/C] hold
[L/R]
[S/S/C]
digits
running
digits stop
counting
the lap number Lap time
Elapsed Time
Chronograph Mode
• The Watch includes a function to measure elapsed time, lap time -
Chronograph Mode.
• The display shows the 'All Zeros' display when the chronograph is selected
the first time or the chronograph has been reset.
Click
NOTE:
- A different sound
will be given out
when going to the
Current Time mode.
- When low battery
is detected ,
icon will be shown
for 2 seconds.
Daily Alarm Mode - Basic functions and setting
6
Alarm Mode
• There are 5 daily OR schedule alarms.
• Each schedule alarm can set a note (meeting, breakfast appointment, lunch
meeting, dinner, happy birthday, anniversary and take pill) as a reminder.
• Schedule alarm can be set to sound on a particular date.
Using the Alarm
• Press the [S/S/C] button to select different alarms.
• To turn ON/OFF an alarm, select the target alarm and press the [L/R] button to
turn it ON or OFF.
• To set an alarm, select the target alarm and hold down the [M] button to enter the
setting display.
• When the alarm is beeping, press any key to stop the sound.
NOTE
When the Schedule Alarm is selected, the date of the alarm will be scrolled once.
M
EL SC
S
LR
Alarm Mode Display
Alarm ON Alarm OFF
[L/R]
Alarm Type
Alarm No.
choose by
press
[S/S/C]
Alarm No. Alarm Type Minute * YearHour
** Note
Selection * Day * MonthNote On/Off
[M] [M] [M]
[M]:
Schedule
Alarm
[M]
[M]
[M][M]: ON
[M]: OFF
[M]
[M]: Daily Alarm
Change the Setting
Value
Change the Setting
Value at a higher
speed
[S/S/C] /
[L/R]
hold [S/S/C] /
[L/R]
Alarm Mode Display
Hold
[M]
Hold
[M]
NOTE:
* Day / Month / Year settings will only appear if a Schedule
alarm is selected in the Alarm Type setting
** Note can only be selected when the Note option is ON.
** Note Selection: Meeting, Breakfast Appointment, Lunch
Meeting, Dinner, Happy Birthday, Anniversary and Take Pill.
Chronograph Mode - Record the Lap Time
7.1
Chronograph Running
Display
Chronograph
Lap Display
Chronograph
Continuous running
To Record Lap Time
[L/R]
After 10 sec.
Lap number
increased by 1
How to Record Lap Time
• When the chronograph is counting, press
the [L/R] button once to record a lap time
(this key operation will not affect the
counting) and the lap time will be shown for
a short while. After that, the lap number will
be increased by 1.
• If there are more than 10 laps, the laps over
the 10th lap will be accumulated into the
10th lap.
(No Lap recorded)
M
EL SC
S
LR
Timer Mode - Setting the Timer
8
• The Timer starts counting from a preset value to zero and stops at zero.
Change
the Setting
Value
Change the Setting
Value at a higher
speed
[S/S/C] / [L/R] hold [S/S/C] / [L/R]
Time r Mod e
Di sp lay
Hour
Se co nd
Mi nu te
Cu rr ent
ti me
Hold
[M]
Hold
[M]
[M]
[M]
[M]
Compass Mode - Compass Directions and Bearing Directions
9.4
Magnetic Declination Compensation
• To compensate for an object's bearing, either subtract westerly (W) magnetic
declination or add easterly (E) magnetic declination with the magnetic bearing.
• Example 1: Westerly magnetic declination 23° and the compass needle points
323°.
• TB = MB - W. When MB = 323°; W =23°
• TB = 323° - 23°
• TB = 300°
• The true bearing is 300°.
• Example 2: Easterly magnetic declination 22° and the compass needle points 278°.
• TB = MB + E. When MB = 278°; E = 22°
• TB = 278° + 22°
• TB = 300°
• The true bearing is 300°.
• The Watch allows you to compensate the compass bearing at a place where the
magnetic declination is either Westerly declination or Easterly declination.
• Check the coming section "Calibrating the Compass" for more details of the setting.
Compensate the Bearing
with Westerly (W) Magnetic Declination
magnetic bearing
323°
true bearing
300°
true north
0°
magnetic declination
23°W
magnetic
north
point A
object B
True Bearing (TB) =
Magnetic Bearing (MB) - Westerly Magnetic Declination (W)
300° (TB) = 323° (MB) - 23° (W)
Compensate the Bearing
with Easterly (E) Magnetic Declination
magnetic
bearing
278°
true bearing
300°
true north
0°
magnetic declination
22°E magnetic
north
point A
object B
True Bearing (TB) =
Magnetic Bearing (MB) - Easterly Magnetic Declination (E)
300° (TB) = 278° (MB) - 22° (E)
Compass Mode - Magnetic Declination in Major Cities
9.5
NOTE: Since magnetic declinations will be changed with time, it is recommended to check the updated
data from following sites: http://www.magnetic-declination.com &
http://www.ngdc.noaa.gov/geomagmodels/Declination.jsp
No. Country/Place Major City Declination
1 Afghanistan Kabul +3E
2 Australia Canberra +12E
3 Austria Vienna +3E
4 Bahrain Manama +2E
5 Bangladesh Dhaka +0E
6 Belgium Brussels +0E
7 Brazil Brasilia -21W
8 Canada Ottawa -14W
9 Chile Santiago +3E
10 China Beijing -6W
11 China Hong Kong -2W
12 Costa Rica San Jose -1W
13 Cuba Havana -4W
14 Czech Republic Prague +3E
15 Denmark Copenhagen +3E
16 Egypt Cairo +4E
17 Finland Helsinki +8E
18 France Paris -1W
19 Germany Berlin +3E
20 Greece Athens +4E
21 Hungary Budapest +4E
22 India New Delhi +1E
23 Indonesia Jakarta +1E
24 Israel Jerusalem +4E
25 Italy Rome +2E
26 Japan Tokyo -7W
27 Jordan Amman +4E
28 Kenya Nairobi +0E
29 Korea Seoul -8W
30 Malaysia Kuala Lumpur +0E
31 Mexico Mexico City +6E
32 Nepal Kathmandu +0E
33 Netherlands Amsterdam +0E
34 New Zealand Wellington +22E
35 Norway Oslo +2E
36 Pakistan Islamabad +2E
37 Philippines Manila -1W
38 Portugal Lisbon -3W
39 Russia Moscow +10E
40 Singapore Singapore +0E
41 South Africa Cape Town -24W
42 Spain Madrid -2W
43 Sweden Stockholm +5E
44 Switzerland Bern +1E
45 Taiwan Tai-pei -4W
46 Thailand Bangkok -1W
47 UAE Abu Dhabi +2E
48 United Kingdom London -2W
49 United States Washington, DC -11W
50 United States Juneau +22E
51 United States Phoenix +11E
52 United States Little Rock +1E
53 United States Sacramento +14E
54 United States Denver +9E
55 United States Atlanta -4W
56 United States Honolulu +10E
57 United States Boston -15W
58 United States Saint Paul +1E
59 United States Jackson +0E
60 United States Santa Fe +9E
61 United States Oklahoma City +5E
62 United States Salem +16E
63 United States Harrisburg -11W
64 United States Salt Lake City +12E
Precautions for Battery
15
Battery Life
The battery in your FILA watch is estimated to last for 2 years.
Battery Replacement
If the watch is out of battery, you are recommended to go to the
authorized FILA service center for correct battery replacement in
order to retain a valid warranty and avoid any damage on the
water resistance function.
WARNING!
Always keep watch batteries away from children. If swallowed,
contact a doctor immediately. Batteries contain chemical
substances. They should be disposed of properly according to
local regulations.
Precautions for Water Resistance
14
• Water damage may occur if the push buttons are pressed
under water.
• Should water or condensation appear in the watch, please
check the watch immediately as corrosion of electronic
parts can occur inside the case.
All FILA watches are designed to withstand use as indicated on
the below chart.
Indication
Bathing,
etc
Swimming,
etc
Light spray
perspiration,
light rain, etc
3ATM
(30 meters)
5ATM
(50 meters)
10ATM
(100 meters)
Water-related use
Level of
resistance
Precautions for Straps
• Exposure to water often makes a strap fragile and it may
soon tear.
• Don’t apply perfume or moisturizers around your wrist as
the chemicals can erode the metal, leather and plastic of
watch straps.
• The strap’s condition will depend on the owner’s wearing
habits as well as the climate of the place where the person
lives. An original replacement on straps is possible to be
re-ordered through an authorized service center.
• PU straps are usually very hard wearing, please wash them
with mild soapy water only.
• There may be discoloration for light color and transparent
straps after normal wear for some time.
• In case if there is any severe or persistent skin reaction, such
as severe redness, itching, rash or hives, you should stop
wearing this watch, and consult your doctor.
12
• This watch contains electronic components. Never attempt
to open the case or remove the back cover.
• Avoid exposing the watch to extreme temperature,
chemicals which will damage the watch.
• Keep the watch away from the conditions of strong electric
field and static electricity.
• Avoid rough usage or severe impact. The watch is designed
to withstand impact under normal use. It is advisable to
subject it to severe impact or rough usage.
• Clean your watch occasionally with a soft moistened cloth
only. Avoid using chemicals, especially soap as the
waterproof gasket will corrode.
• Store the watch in a dry place when it is not in use.
Care and Maintenance
13
Low Battery Detection
• When low battery is detected, the battery-low icon ‘ ’ will appear for 2
seconds when entering the Time Mode. It is recommended to replace the battery
with a new battery.
• However, if the appearance of low-battery indicator is caused by using the Watch
under very cold condition, the indicator will disappear when normal temperature
returns.
For 3-hand movement, the second hand will move per 2 seconds during low battery.
NOTE: It is recommended to complete the battery replacement by a certified service
agency because this Watch contains delicate electronic sensors and components.
NOTE: The memory will be cleared when the battery is replaced. Follow the previous
section "Calibrating the Compass" to calibrate the compass before using the Compass.
Low Battery Detection
10
Low Battery Indication
Power Saving Mode
11
Power Saving Mode
• This Watch has a Power Saving Function which can turn off the LCD display
so that the battery can last longer.
• In the Power Saving Mode, the watch function still works normally. (i.e. The
timekeeping function is still running in Power Saving Mode.)
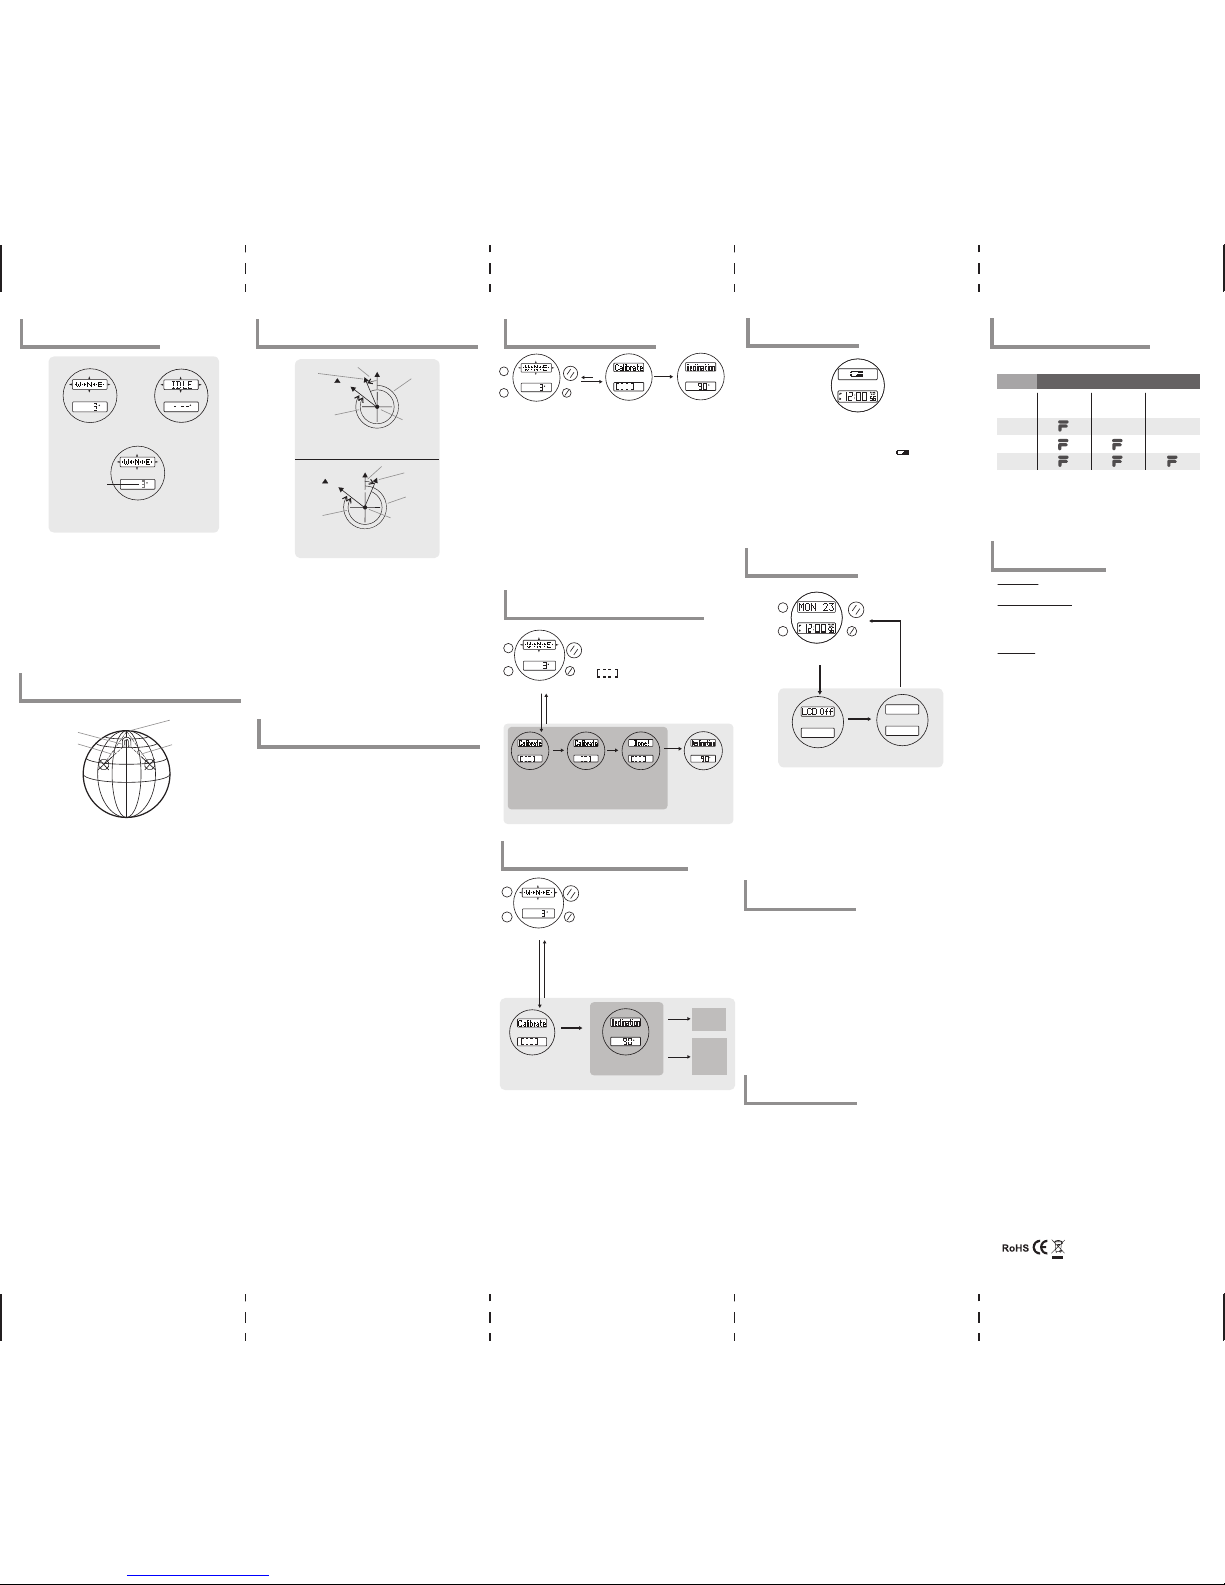
How to enter/exit the Power Saving Mode
• To enter the Power Saving Mode, hold down the [L/R] button in Current Time
Mode for about 5 seconds. “LCD Off” will be shown before it turns off.
• Press any key in Power Saving Mode to exit this mode and the LCD display
will be resumed.
hold [L/R]
for 5 seconds
Any button
Current Time Mode
M
EL SC
S
LR
Power Saving Mode
(LCD display turned off)
Magnetic Declination
Display
Compass Calibration
Rotation Calibration
Display
[M]
Change
the Setting
Value
Change
the Setting
Value at a
higher
speed
[S/S/C] /
[L/R]
hold
[S/S/C] /
[L/R]
Compass Mode - Magnetic Declination Mode
9.8
Magnetic Declination Mode
• Check the previous section "Magnetic Declination
in Major Cities" to choose the magnetic declination
of the city which is close to your current position.
The angle will be input into the Watch during the
calibration.
• To select Magnetic Declination Display, press the
[M] button in Rotation Calibration Display.
• When the current magnetic declination appears,
press the [S/S/C] or [L/R] button to increase/
decrease the value.
• When the setting is completed, hold the [M] button
to confirm the setting and exit the adjustment
display.
Compass Mode
hold [M] hold [M]
SSC
M
EL
LR
Compass Mode - Compass Rotation Calibration Mode
9.7
Rotation Calibration Display
• Hold the [M] button to enter the Compass Setting
Mode.
• Press [S/S/C] button to start calibrating the compass.
Rotate the watch horizontally until the pattern
‘ ’ in the bottom display is completed.
• ‘Done!’ will be shown when the calibration is
completed.
• Hold the [M] button to go back to the Compass
Mode or press the [M] button once to set the
magnetic declination.
Magnetic
Declination
Display
Compass Calibration
Compass Mode
Rotation
Calibration
Display
[S/S/C]
Rotation
Calibration
Complete
Display
Rotate the
Watch
Horizontally
[M]
hold [M] hold [M]
M
EL SC
S
LR
Compass Mode - Different Displays
9.2
Normal Display
• In the Compass Mode, normally the upper row of the display shows the compass
direction.
• The lower row of the display shows the bearing direction.
Remark:
Analog movement will be stopped temporarily during compass measurement.
IDLE Display
• If no key is pressed for 1 minute, the watch will go to the IDLE Mode automatically.
To activate the compass again, press any button.
Distortion Display
• If distortion is detected, the bearing direction will flash.
• Please refer to the coming section "Calibrating the Compass" to restore the
compass to normal operation when distortion is detected.
Distortion Display
Compass Mode Display
Normal Display Idle Display
flashing
Compass Mode - Compass Directions and Bearing Directions
9.3
Magnetic North
True North
Magnetic
Declination
Magnetic
Declination
What is Magnetic Declination
• The Magnetic North Pole is slightly different from the True North Pole.
• Like most magnetic compass, the Watch points to the Magnetic North Pole. On
the contrary, everything measured on a map is related to the True North Pole.
• The angular difference between Magnetic North Pole and True North Pole is
called magnetic declination. Its magnitude (degrees and minutes) and direction
(easterly and westerly) depend on where you are in the world.
• For advance compass user who intends to perform an accurate navigation, the
compass must be adjusted for magnetic declination.
• The Watch also includes a compensation setting for Magnetic Declination.
Check the coming section "Calibrating the compass - Magnetic Declination
Mode" for more details.
Magnetic Declination Information
• Most topographic maps include a small arrow which shows the magnetic north
pole and magnetic declination information.
• For the benefit of the user, this manual includes the magnetic declinations for
some major cities. Check the coming section 'Magnetic Declination at Major
Cities' for more details.
• For those cities which their names are not included in the list, please check the
online magnetic declination information at:
1.http://ngdc.noaa.gov/geomag-web/
2.http://www.geomag.nrcan.gc.ca/calc/mdcal-eng.php
When to Calibrate the Compass
• The Watch has to employ a compass calibration in one of the following
conditions:
1) The Watch is being used for the first time,
2) The battery is replaced,
3) The bearing direction digits are flashing,
4) The compass is used in a location that is apart from the place in which
the compass has been calibrated,
5) The user intends to maintain the precision of the digital compass.
How to Calibrate the Compass
• The compass calibration includes two different processes: Rotation
Calibration Mode and Magnetic Declination Setting.
• It is advisable to conduct both calibrations from time to time to achieve a
more accurate reading.
IMPORTANT: If the compass has not been calibrated, the direction made by the
compass may be inaccurate.
Magnetic
Declination
Display
Compass Calibration
Compass Mode
Rotation Calibration
Display
[M]
hold
[M]
hold
[M]
Compass Mode - Compass Calibration
9.6
M
EL SC
S
LR
FILA™ is trademark of FILA Luxembourg and
used under licence by LONGITUDE LIMITED.
Other FILA Watch manuals

FILA
FILA Smart Watch F25P User manual

FILA
FILA FILAstyle 38-105 User manual

FILA
FILA FILACTIVE 38-980 User manual

FILA
FILA FAY001CH User manual

FILA
FILA Active 38-980 User manual

FILA
FILA FILActive 38-113 User manual

FILA
FILA Smart Watch F27 User manual

FILA
FILA FCA011CH User manual

FILA
FILA SMART WATCH F29 User manual

FILA
FILA FILActive 38-110 User manual

FILA
FILA Active 38-131 User manual

FILA
FILA FILActive 38-980 User manual

FILA
FILA FILActive 38-104 Series User manual

FILA
FILA FILActive 38-131 User manual

FILA
FILA fca002ch User manual

FILA
FILA Smart Watch F24B User manual

FILA
FILA FILActive FAT003DG User manual

FILA
FILA Smart Watch F30GPS User manual

FILA
FILA FILAcasual FCD002 User manual

FILA
FILA FILActive 38-152 User manual


