Filamento Valto User manual
Sales@Filamento•com | +1 408•475-0038 | www•Filamento•com VER 190520
Integral Occupancy and
Daylight Sensor
VALTO
• RF occupancy sensitive to at least 15 meters (50 feet)
• Daylight sensor
• Tri-level dimming
• Custom IR remote control to 20 meters
• Each sensor controls its own light
• Four preset scenes for ease of programming
WARNING: Do not use controls with ballast operations
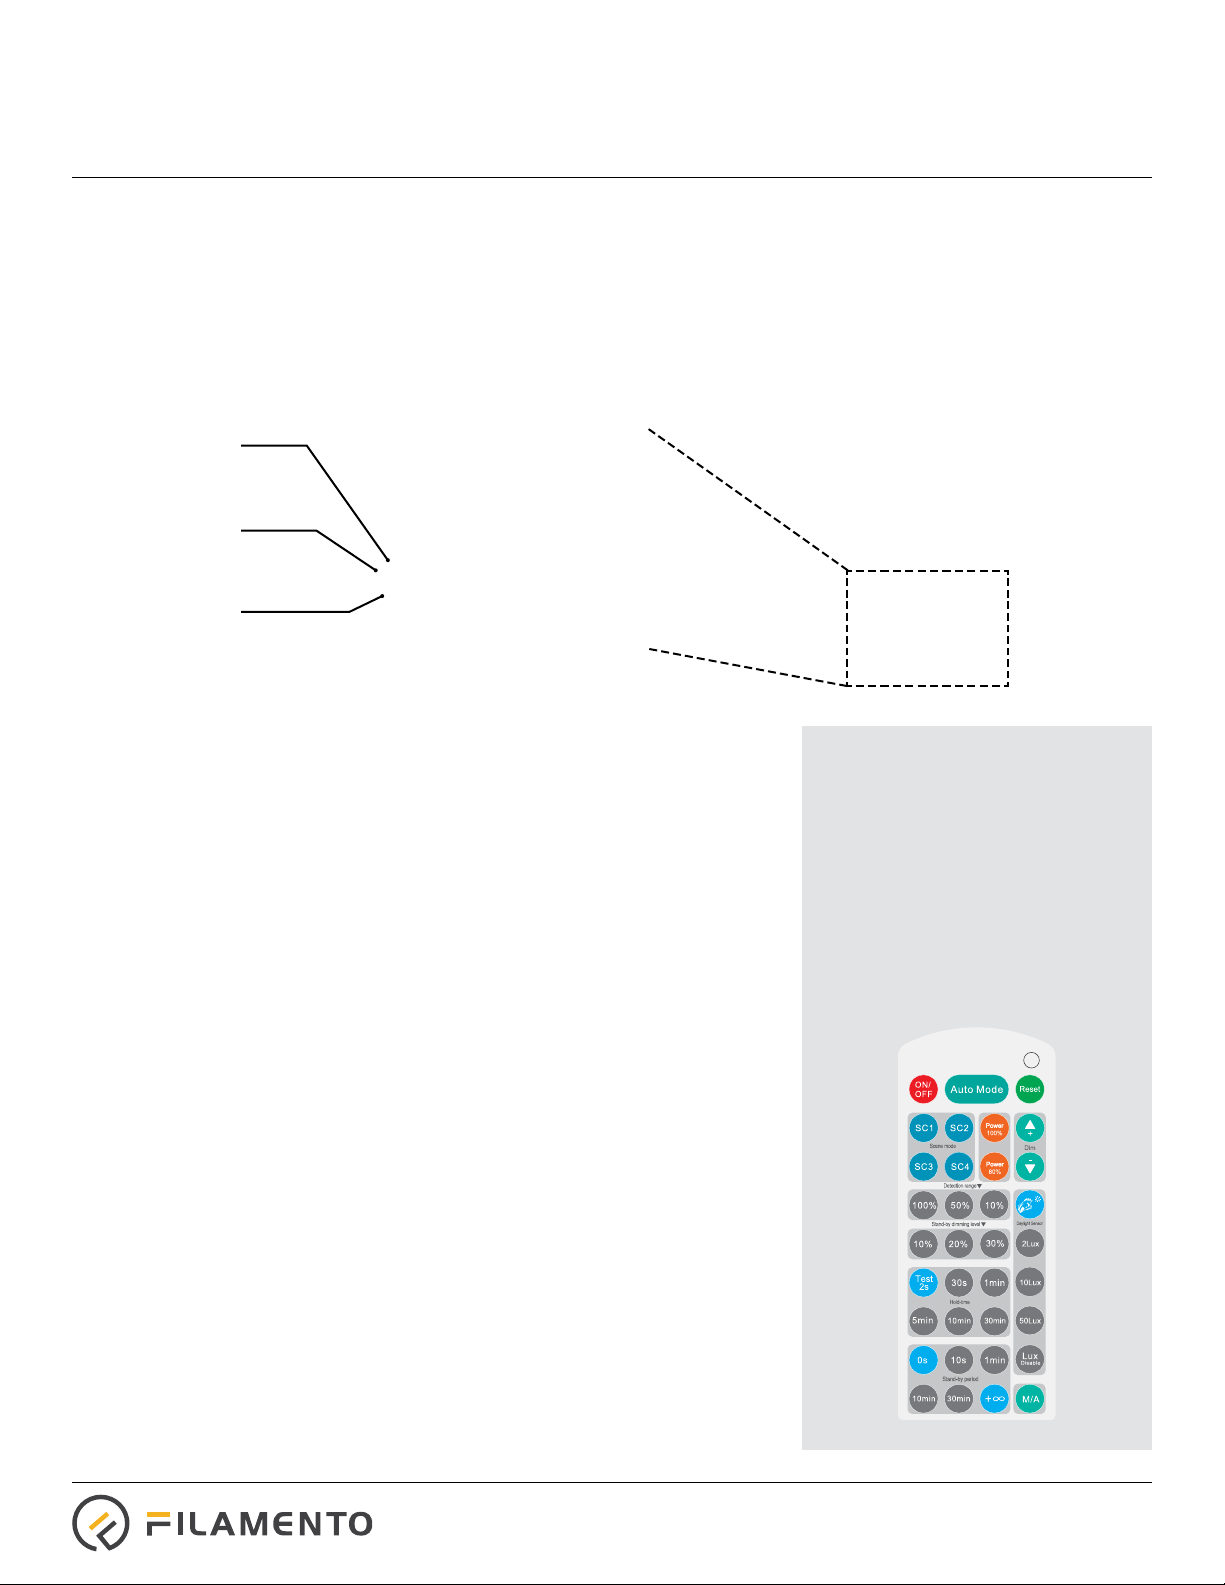
Infrared sensor to
communicate
with remote
Ambient light sensor
Radio Frequency (RF)
sensor behind cap to
enable occupancy sensor
Occupancy and Daylight Sensing
The occupancy sensor is capable of detecting motion up to at least 49 feet
(15 meters away using Radio Frequency (RF) technology. RF sensors work in high
temperature environments as well as in fully enclosed xtures, unlike traditional
PIR sensors. The sensor is compatible only when operating from direct AC
line voltage.
Sensor can control the light output to three levels of light: maximum level,
a dimmed light level and o. They have the ability to program two periods of
selectable waiting times: hold-time and stand-by period. Using the daylight sensor
to detect ambient light, the xture can turn itself o, regardless of occupancy status.
These levels, as well as motion sensitivity and hold times, are user programable
using the IR remote control.The IR remote has been custom designed for operation
in high-bay applications and will control the sensor at least 66 feet (20 meters) away.
Quick Start Instructions
• The sensor is integral to the luminaire and is installed in the front cap at
the factory.
• The sensor will work right out of the box with the default factory setting scene
of “SC1”
• The factory default “SC1” is:
• 20 minutes of hold time at maximum power when unoccupied
• After 20 minutes, the light will dim to 10% and does not switch o
• Daylight sensor is disabled.
• The use of the IR remote control is only necessary if the user wishes to congure
the sensor away from the “SC1” default.
• The sensor can be quickly set to three other preset scenes using the IR remote
control, see scene mode on page two.
IR Remote Control
• Remote is only needed if factory
default settings are not sucient
• Only one remote is need to
control multiple sensors
• The light source will ash to
acknowledge receiving
a command
• Do no use Occupancy Sensor
with controls
Sales@Filamento•com | +1 408•475-0038 | www•Filamento•com VER 190520
The light will ash to indicate the xture has received the command from the remote successfully.
The last setting is automatically saved and will remain after power-cycling the sensor.
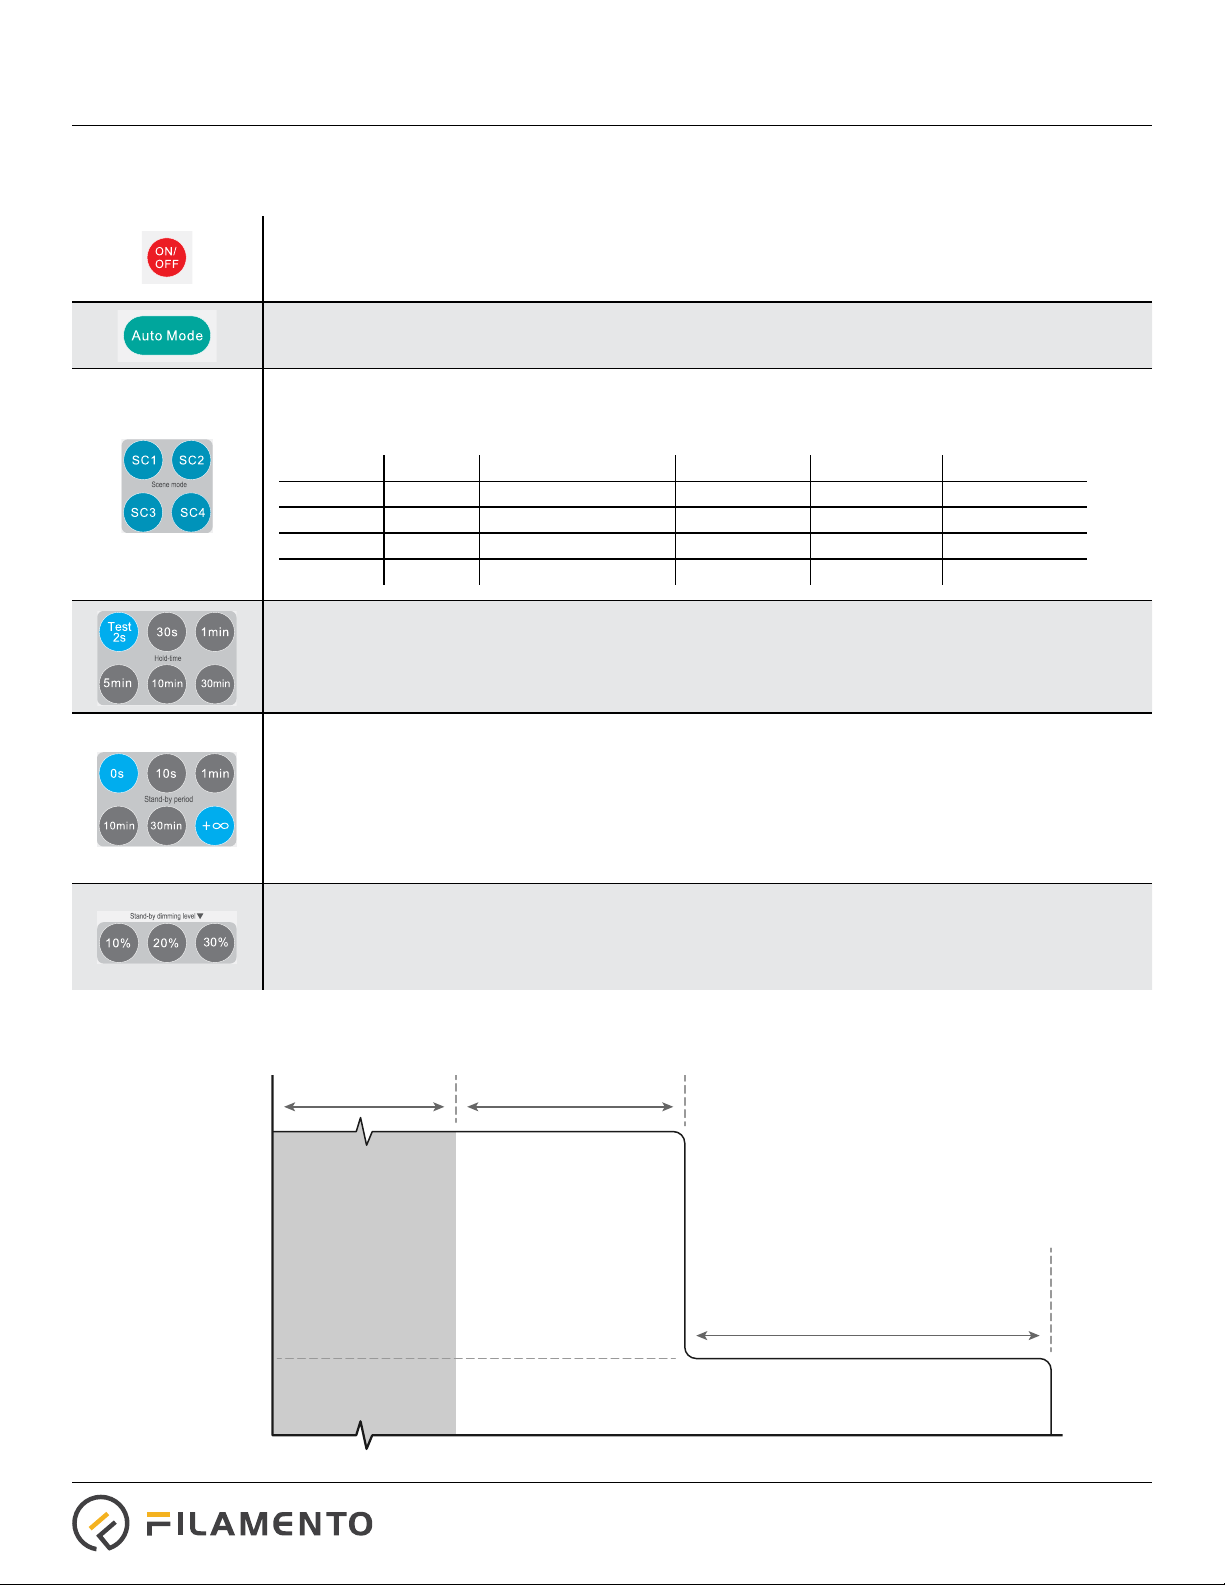
ON/OFF:
• “OFF”disables sensor; light is turned o
• “ON” light is turned on BUT the sensor is disabled. To enable the sensor, select “Auto-Mode”button.
Auto Mode:
• Activate sensor to last presets.
Scene Mode:
• SC1, SC2, SC3, SC4: Sets one of four presets that can be used to congure the xture.
See the table below for guidance.
Hold-Time Group:
• This refers to time the light will remain on at maximum light output after initial unoccupied period.
• Assigns hold time of 30 seconds, 1 minute, 5 minutes, 10 minutes or 30 minutes.
• See Figure 1 below for guidance.
Stand-By Period Group:
• This refers to time the light will remain on at dimmed light output after the Hold-time period.
• Assigns cuto period of 0 seconds, 10 seconds, 1 minute, 10 minutes, 30 minutes or 1 hour. 0 seconds
gives xture on/o control rather than dimming. (+∞) keeps the light on continously (see Figure 1
below for guidance).
• NOTE: Setting the Stand-by period to (+∞) DISABLES the ambient light sensor, which means the light
will stay on
Stand-by Dimming Level Group:
• This refers to the dimmed light level during the Stand-by period
• Assigns level of 10%, 20% or 30% for dimmed light output (of the maximum output of the xture)
after the Hold-time passes (see Figure 1 below for guidance).
Remote Operation
Figure 1: Occupancy Tri-level Dimming
Occupied @ 100%
Occupied Unoccupied
Time
Unoccupied
O
Stand-by Period Unoccupied
@ Stand-by Dimming Level
Light Output %
Maximum
Light Level
Stand-by
Dimming Level
0% O
Hold Time Unoccupied @ 100%
Preset Hold Time Stand-by Dimming Level Stand-By Period Daylight Sensor Detection Range
SC1 (default) 20 mins 10% Innity Disable 100%
SC2 10 mins 30% 10 mins Disable 100%
SC3 10 mins 30% Innity 50 Lux 100%
SC4 5 mins 10% 15 mins Disable 100%
Sales@Filamento•com | +1 408•475-0038 | www•Filamento•com VER 190520
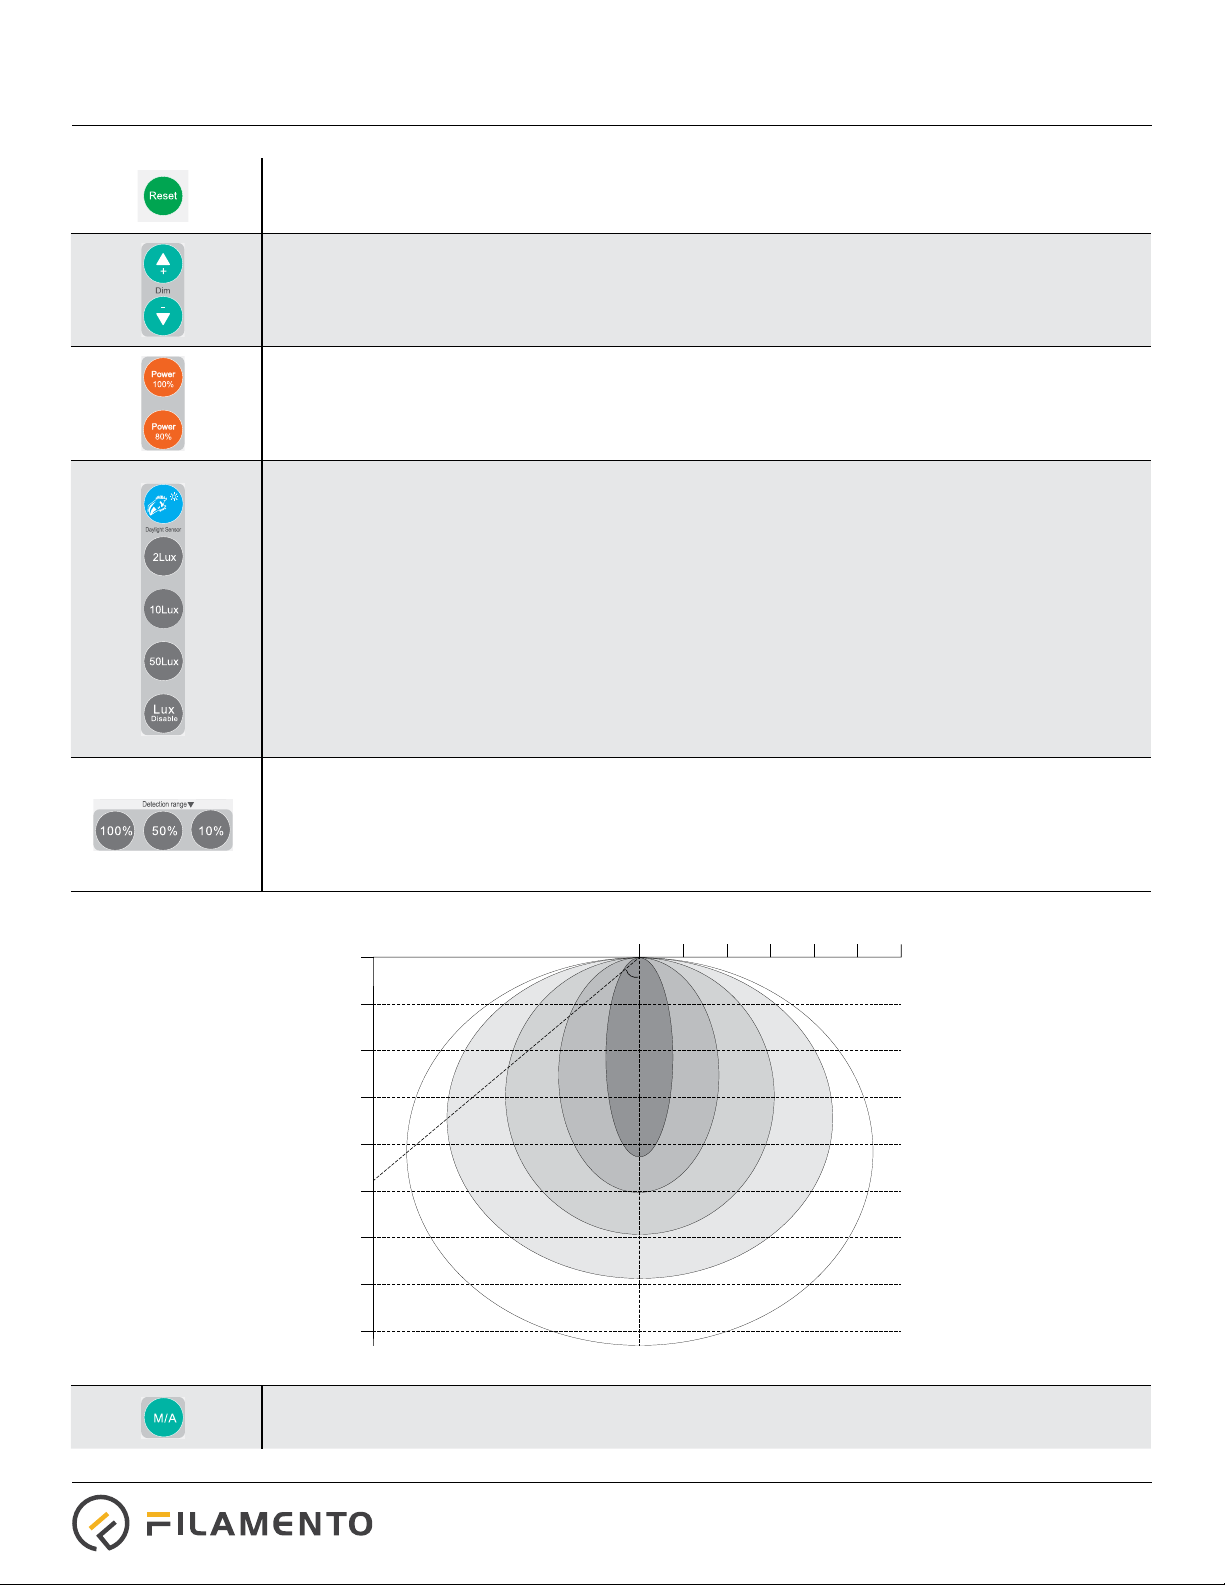
Reset:
• Returns unit to factory settings of“SC1” and “Auto-Mode”
Dim buttons:
• Adjusts lamp brightness at maximum light level.
• When the sensor is disabled and the light is on, these buttons can be used as a dimming control.
Power 100% and Power 80%:
Sets maximum light level for occupied and Hold-time periods. When the occupancy sensor is activated,
the light will return to this level.
Daylight Sensor Group:
When the ambient light level is above the set level, the motion sensor is disabled and the light
it turned o.
Blue Button:
• Sets the daylight sensor to the current ambient light level
2 Lux, 10 Lux and 50 Lux:
• Sets daylight sensor at the indicated Lux values. When enabled, the light sensor will overide the
occupancy sensor and disable the luminaire.
Lux Disable:
• Disables daylight sensor when the light level is above the present light level.
* Daylight sensor is only enabled at the end of the current occupancy cycle.
Detection Range Group:
• Assigns detection sensitivity of 10%, 50% or 100% to limit the sensitivity in which motion will activate
(use Figure 2 below for guidance)
• The sensor is very sensitive and may be activated by motion behind thin walls, on other aisles or
behind the lamp.
Figure 2: Occupancy Sensitivity
M/A:
Unused
Ceiling Mounted Detection Pattern (FT)
79 FT
69 FT
59 FT
49 FT
39 FT
30 FT
50˚
10%
30%
0 6.5 FT 13 FT 20 FT 26 FT 33 FT 39 FT
50%
75%
100%
20 FT
10 FT
Ceiling Mounting Height (FT)
Remote Operation
Sales@Filamento•com | +1 408•475-0038 | www•Filamento•com VER 190520
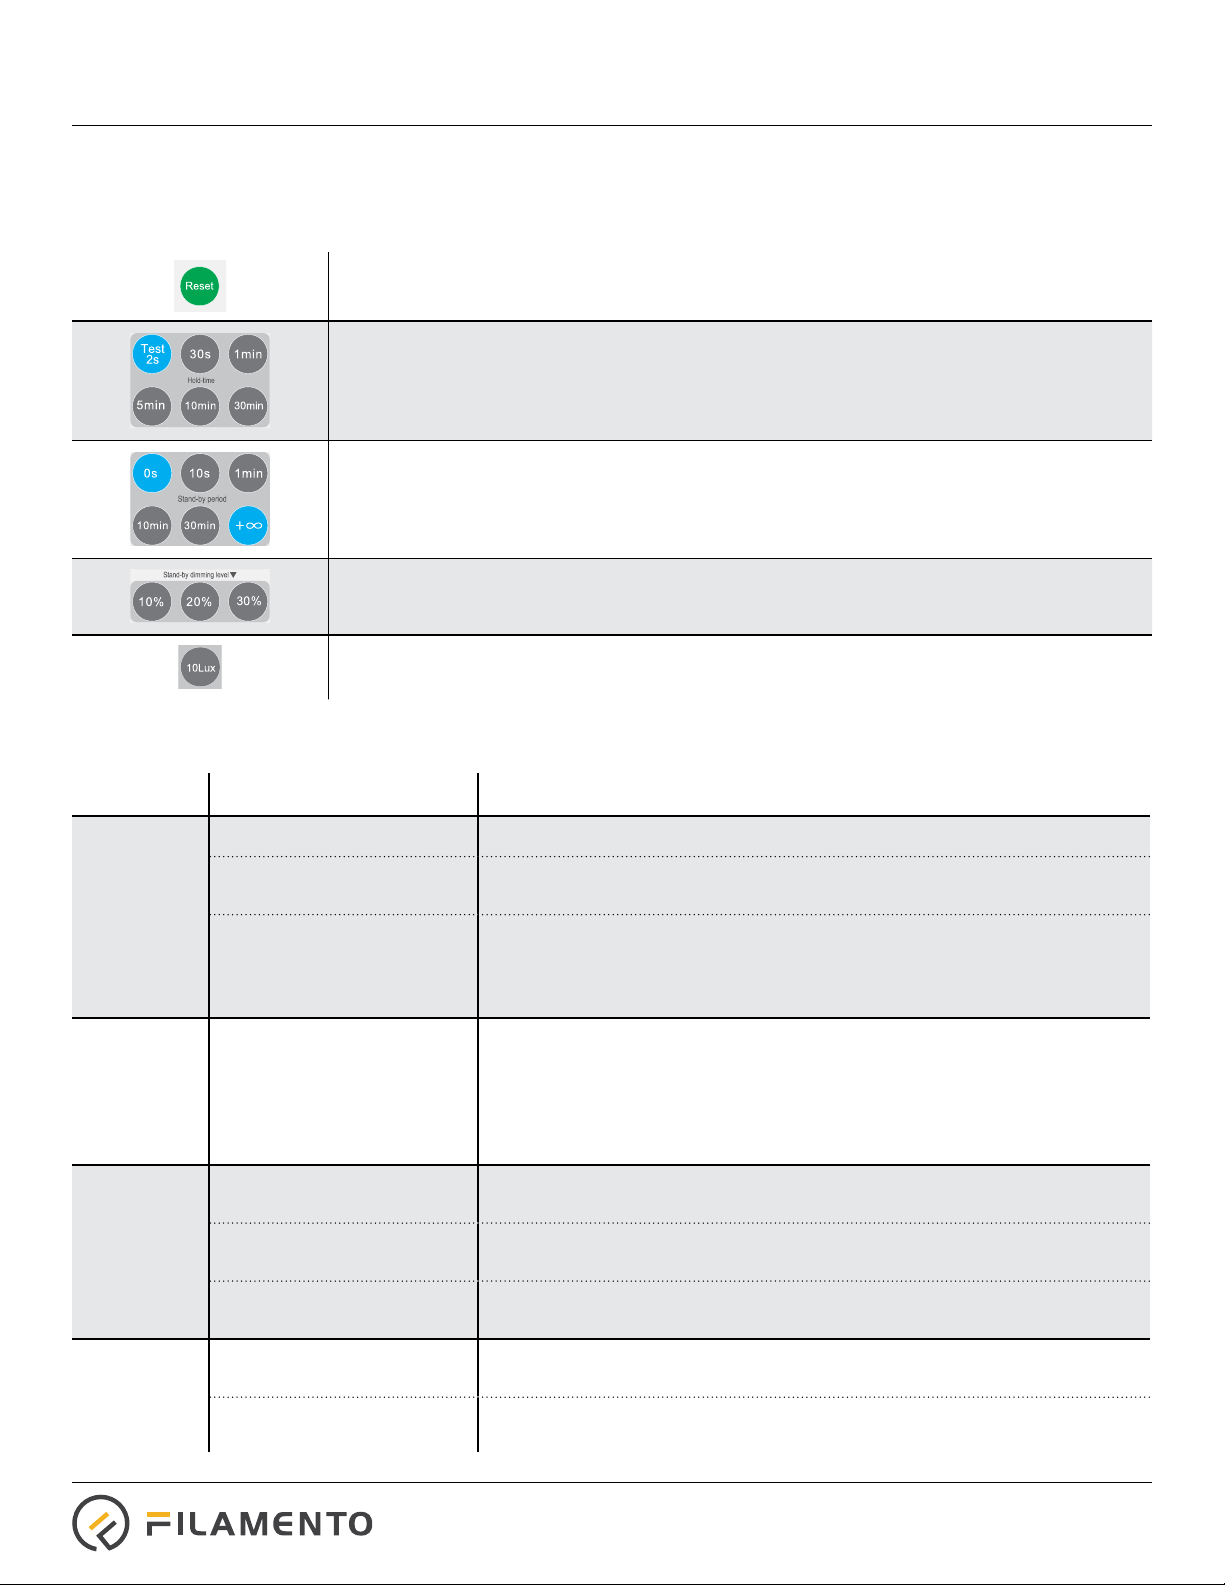
Troubleshooting
Issue Cause Possible Resolution Options
Fixture will
not light No power • Check power connection to the xture.
Sensor was disabled with the
On/O button on remote. • Press the On/O button on remote to enable light then press the“Auto
Mode”button on remote to enable sensors
Ambient light sensor was
tripped, which overides
occupancy level and keeps
the xture from lighting.
• Press“LUX Disable”to test then set ambient light level
• Wait for the ambient light level to decrease (see“Daylight sensor group”
on page three for details)
• Set ambient light to high level above current ambient
Fixture will
not dim the
light when
unoccupied
The RF motion sensor is very
sensitive. The sensor may
be tripped by motion that
is behind the lamp, through
walls or from cyclic machines
(such as fans).
• Turn o cyclic machines
• Move the xture away from walls that may have motion behind it.
• Reduce sensitivity of the sensor by selecting an option from the “Detection
range group” (see page three for details)
• Sensor has been disabled and the xture is on – enable sensor by pressing
“Auto” (see page two for details)
Fixture will
not shut o
with ambient
light
Sensor was disabled with the
On/O button on remote. • Sensor has been disabled and the xture is on. Enable sensor by pressing
“Auto” (see page two for details)
Ambient light sensor has
been disabled • Select an option from the “Daylight sensor group” that enable the sensors
(see page three for details)
Ambient light sensor level
is too low. Select a higher Lux level in the“Daylight sensor button group”
Remote will
not control
the light
No battery or the battery
is dead Install new battery
IR communication path
is too far or blocked The IR remote works on line of light within 20 meters. Ensure you have direct
line of sight within 20 meters of sensor.
Example of a Custom Sensor Setting
Follow the sequence below to set the xture to a hold time of 10 minutes, with a standard dimming of 30% for an innate period
and have an ambient light cut o of 10 Lux. After pressing each button, the xture should ash briey:
Press “Reset”to start at a known starting point of SC1
Press “10min” from the “Hold-time” group
Press “+∞” from the “Stand-by period” group
Press “30%” from the “Stand-by dimming level” group
Press “10 Lux” from the“Day light sensor” group
Remote Operation
Table of contents
Popular Accessories manuals by other brands

hager
hager Muse WGMS113SUSBKB installation manual

VAF instruments
VAF instruments Viscosense 3 Instructions for installation, operation care and maintenance

Powerfix Profi
Powerfix Profi 101006 Operation and safety notes

IMOU
IMOU DB11 quick start guide

BROWN
BROWN FireFly FY2x36-45 instructions

Siemens
Siemens SIMATIC RF300 System manual


RENPHO
RENPHO RF-SM002 user manual

Apogee Instruments
Apogee Instruments SQ-514 owner's manual

LEXMAN
LEXMAN 3276000378945 Assembly, Use, Maintenance Manual

PCB Piezotronics
PCB Piezotronics 622A01 Installation and operating manual

EUTECH INSTRUMENTS
EUTECH INSTRUMENTS CYANIDE EPOXY instruction manual

Virone
Virone DB-2 manual