FIM GARDA TILT Operating instructions

FIM s.r.l.
Via Biandrate 11
I-28060 S. Pietro Mosezzo (NO) - ITALIA
Tel.:+39-0321468433 Fax.:+39-032153201
e-mail: info@fim-umbrellas.com www.fim-umbrellas.com
Z:\Istruzioni Articoli + Schede Tecniche\ISTRUZIONI VARIE TUTTI GLI ARTICOLI\GARDA\GARDA TILT 2011\GARDA TILT -IT- 20111007.doc Pagina 1 di 3
GARDA TILT
ISTRUZIONI DI MONTAGGIO E CONSIGLI DI UTILIZZO
COME PRIMA COSA LEGGERE QUESTO MANUALE
Queste istruzioni sono fornite per permettere un facile montaggio dell'ombrellone GARDA TILT e per la Vostra sicurezza. E'
necessario che seguiate in modo preciso le istruzioni fornite.
Se ciò non avviene si possono verificare danni a cose o ferite a persone. In caso di dubbi consultate sempre una persona
tecnicamente esperta.
∆Questo simbolo indica informazioni di grande importanza. Fate molta attenzione a quanto riportato dove
appare questo simbolo. Ciò non significa che le altre informazioni riportate in questo manuale non siano
importanti.
Conservate questo manuale per un utilizzo futuro.
ISTRUZIONI IMPORTANTI PER LA SICUREZZA
∆SI APPLICA A TUTTO IN QUESTA SEZIONE
1. ISTRUZIONI
Leggete e seguite per intero tutte le istruzioni.
Si possono verificare danni o ferite se l'ombrellone non é montato e utilizzato come descritto nelle istruzioni.
Per garantire un utilizzo sicuro é molto importante che chiunque utilizzi l'ombrellone abbia letto per intero ed
in precedenza le istruzioni.
Non lasciate utilizzare l'ombrellone da nessuno che non sia pratico con gli aspetti riguardanti la sicurezza
dell'ombrellone.
2. PRECAUZIONI
L'ombrellone GARDA TILT è una protezione contro il sole, non é una protezione contro tutte le intemperie.
Esso deve essere chiuso all'arrivo di vento forte o temporali, così come in presenza di pioggia intensa o di neve.
Chiudere sempre l'ombrellone di notte, quando non si e' in casa ed ogni qual volta non lo si può controllare.
La base deve essere zavorrata con un peso minimo di 130 kg (≈286 libbre).
Rimuovere sempre la manovella dall'arganello e l’asta d’orientamento e tenerle lontano dalla portata dei
bambini.

Z:\Istruzioni Articoli + Schede Tecniche\ISTRUZIONI VARIE TUTTI GLI ARTICOLI\GARDA\GARDA TILT 2011\GARDA TILT -IT- 20111007.doc 2 / 3
ISTRUZIONI DI MONTAGGIO
COMPONENTI (fig. 1 ):
per i componenti della base fare riferimento alle fig. 2
A ombrellone"A"
B tubo ombrellone "B"
C tubo base "C"
D manovella "D"
E sacchetto ferramenta "E"
F componente "F" della base
F’ componente "F’" della base
G componente "G" della base
H componente "H" della base
I sacchetto ferramenta per la base "I"
K asta d’orientamento
MONTAGGIO DELLA BASE ALLUMINIO (fig. 2)
Estrarre il contenuto del sacchetto (I) e montare la base come indicato in fig. 2.
∆ATTENZIONE: serrare bene i bulloni della base.
Disporre mattonelle nelle apposite sedi della base.
∆ATTENZIONE: zavorrare la base con un peso di almeno 130 KG (≈286 libbre).
MONTAGGIO DELLA STRUTTURA (Fig. 3 – 6 )
1. (fig. 3) calzare il tubo dell’ombrellone (B) sul palo dell’ombrellone (A) facendo attenzione che i due bollini colorati si
trovino dalla stessa parte. Bloccare i due componenti con i bulloni (R).
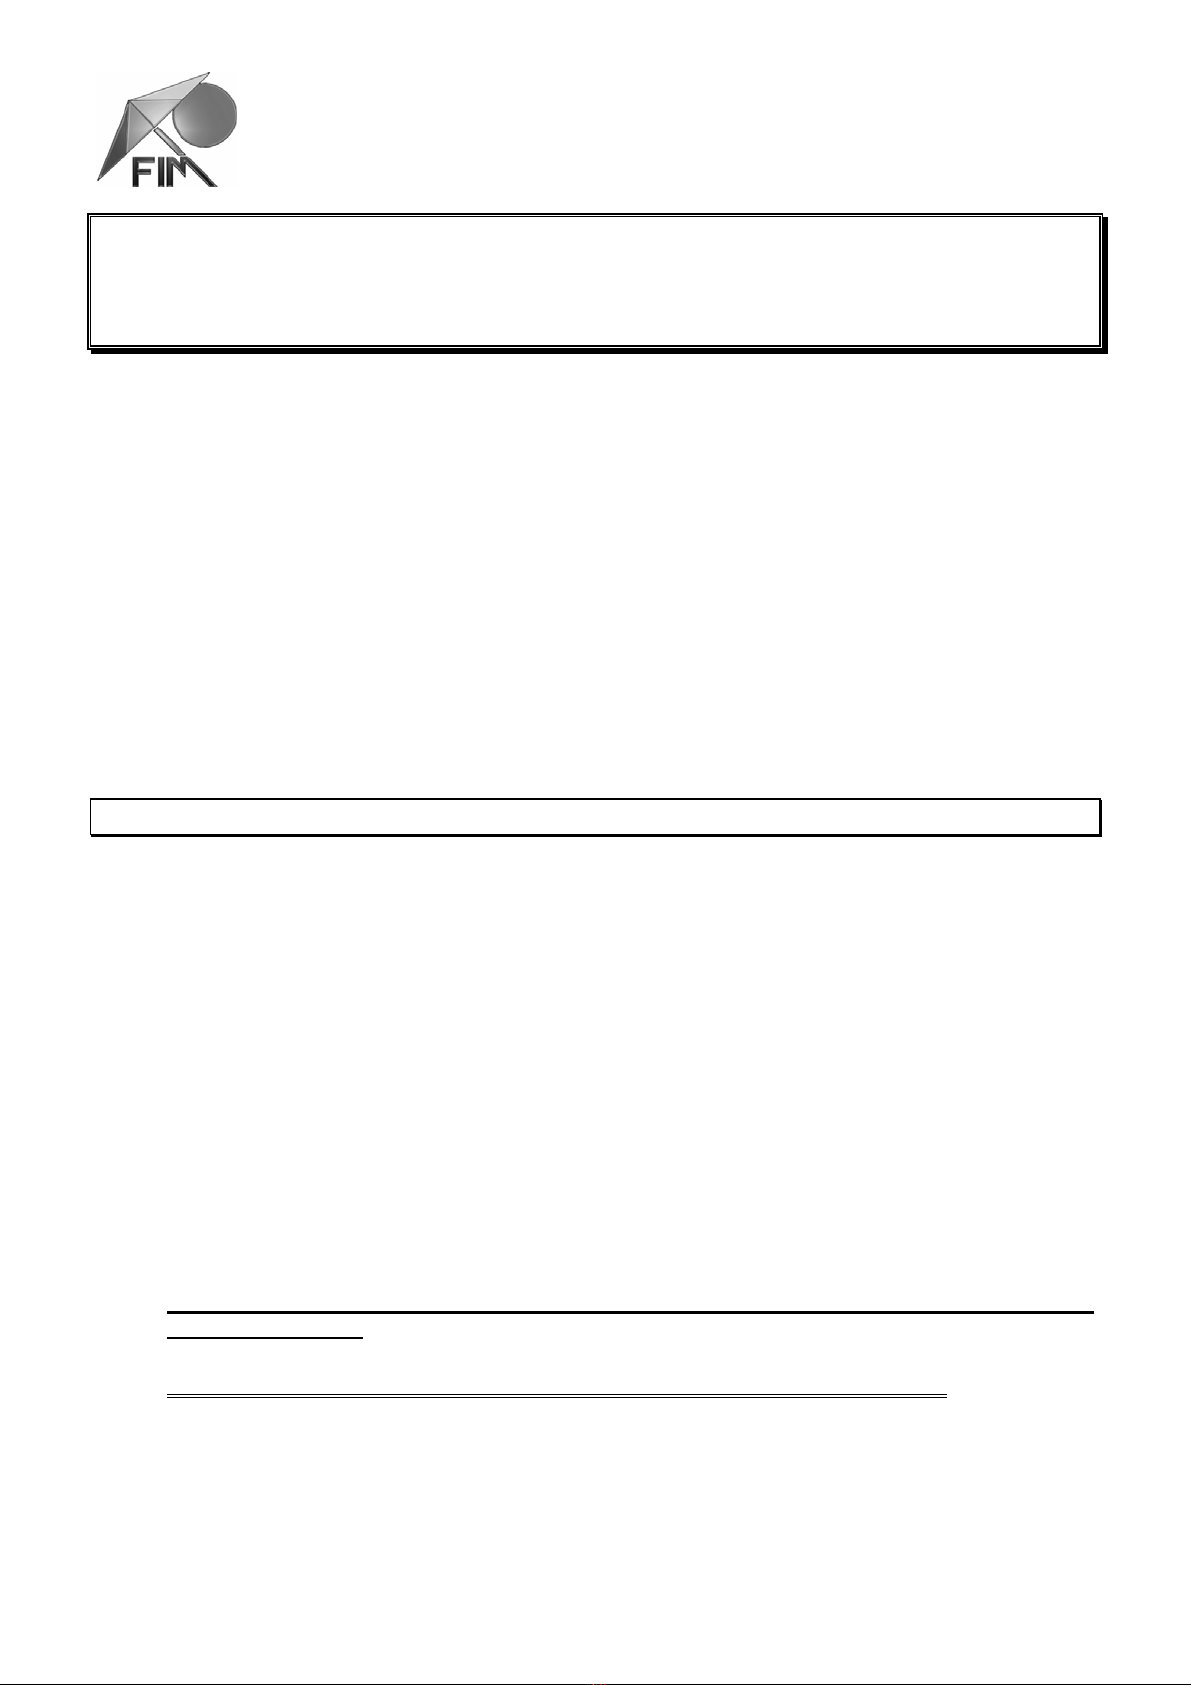
2 (fig. 4) inserire il palo dell’ombrellone (A) nel tubo della base (C).
IMPORTANTE: il palo dell’ombrellone (A) deve inserirsi a fondo nella sede quadrata dell'anello di orientamento (O).
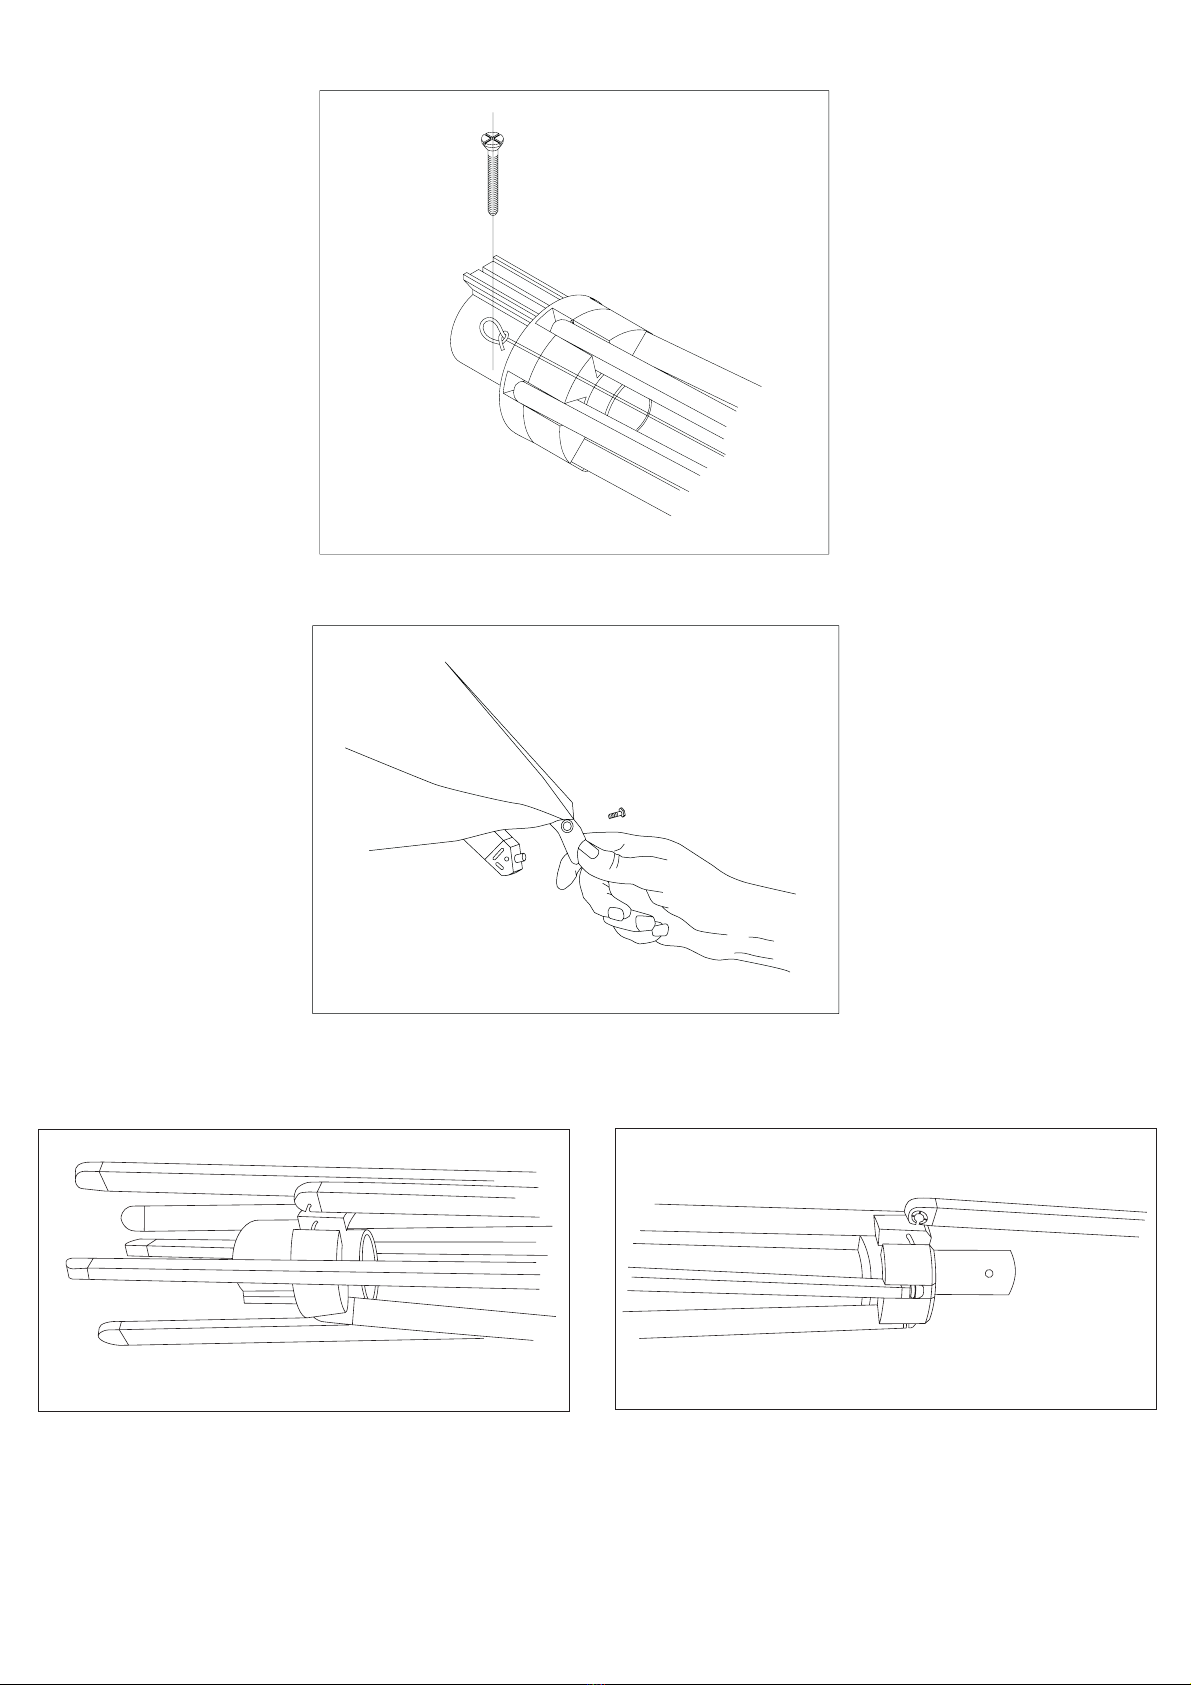
3(fig. 5) avvitare il volantino (T) nel foro filettato del palo dell’ombrellone (A).
4inserire la feritoia dell'arganello (U) nel gambo del volantino (T). Inserire quindi il perno (b) dell’arganello (U) nel
foro (b') del dell’ombrellone (A) ed avvitare a fondo il volantino (T).
5inserire la manovella (D) nell'apposito foro dell'arganello (U).
6(Fig. 6) fissare la stecca (M) alla forcellina (N) con la vite apposita.
Il Vostro ombrellone GARDA TILT è ora pronto per l'utilizzo.
COME UTILIZZARE IL VOSTRO OMBRELLONE
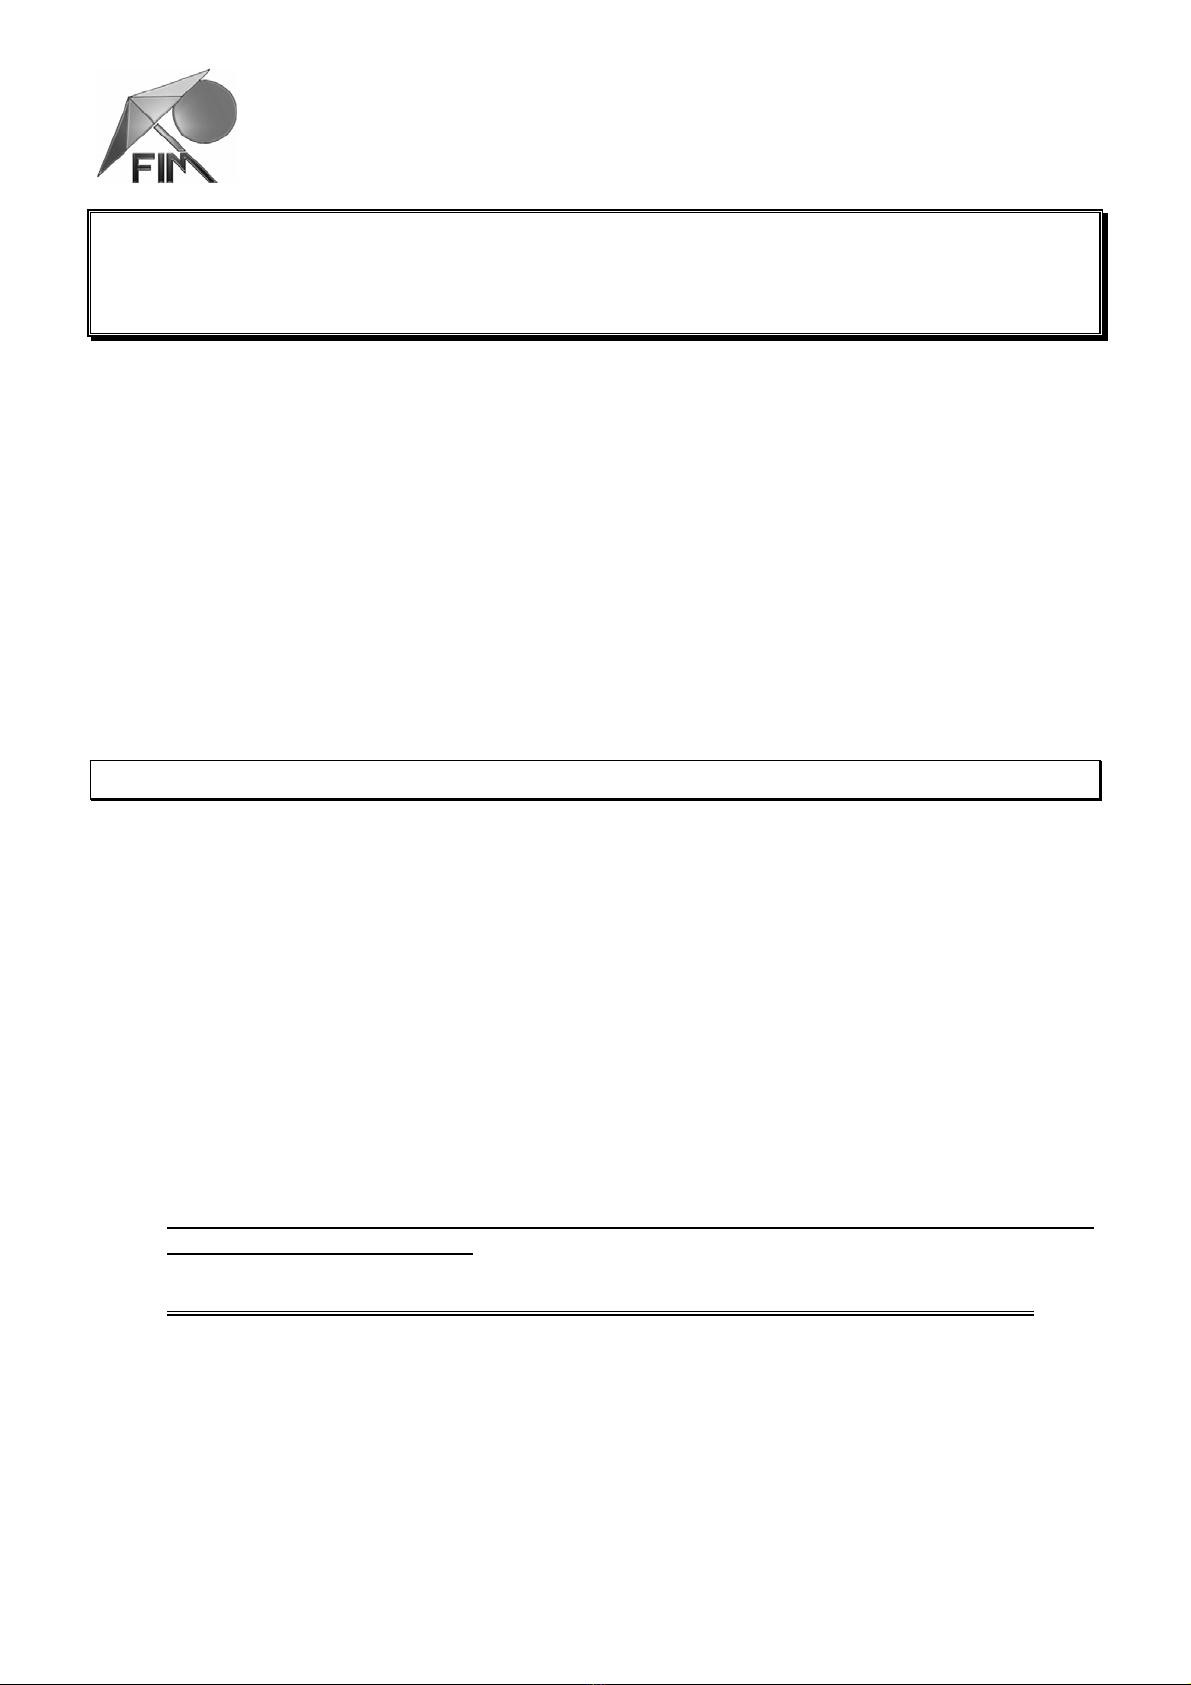
APERTURA DELL'OMBRELLONE (fig. 7 – 9)
IMPORTANTE: Prima di aprire l'ombrellone togliere il legaccio ed aprire leggermente con le mani l'ombrellone agendo sulle stecche.
Per aprire l'ombrellone ruotare gentilmente in senso orario la manovella (D) dell'arganello (U) facendo attenzione di non
sforzare il meccanismo.
(Fig. 7 & 9) Nel caso che nei pressi dell’ombrellone ci siano dei mobili che ostacolino l’apertura procedere nel modo
seguente:
1. (Fig. 8) inserire il perno della maniglia (Q) nel foro realizzato nel palo dell’ombrellone (A) e aprire l’ombrellone
ruotando in senso orario la manovella (D)
2. quando le stecche hanno superato l’altezza dei mobili (vedere come riferimento la figura 9) togliere la maniglia (Q) dal
foro realizzato nel palo dell’ombrellone (A)
3. Completare l’apertura dell’ombrellone
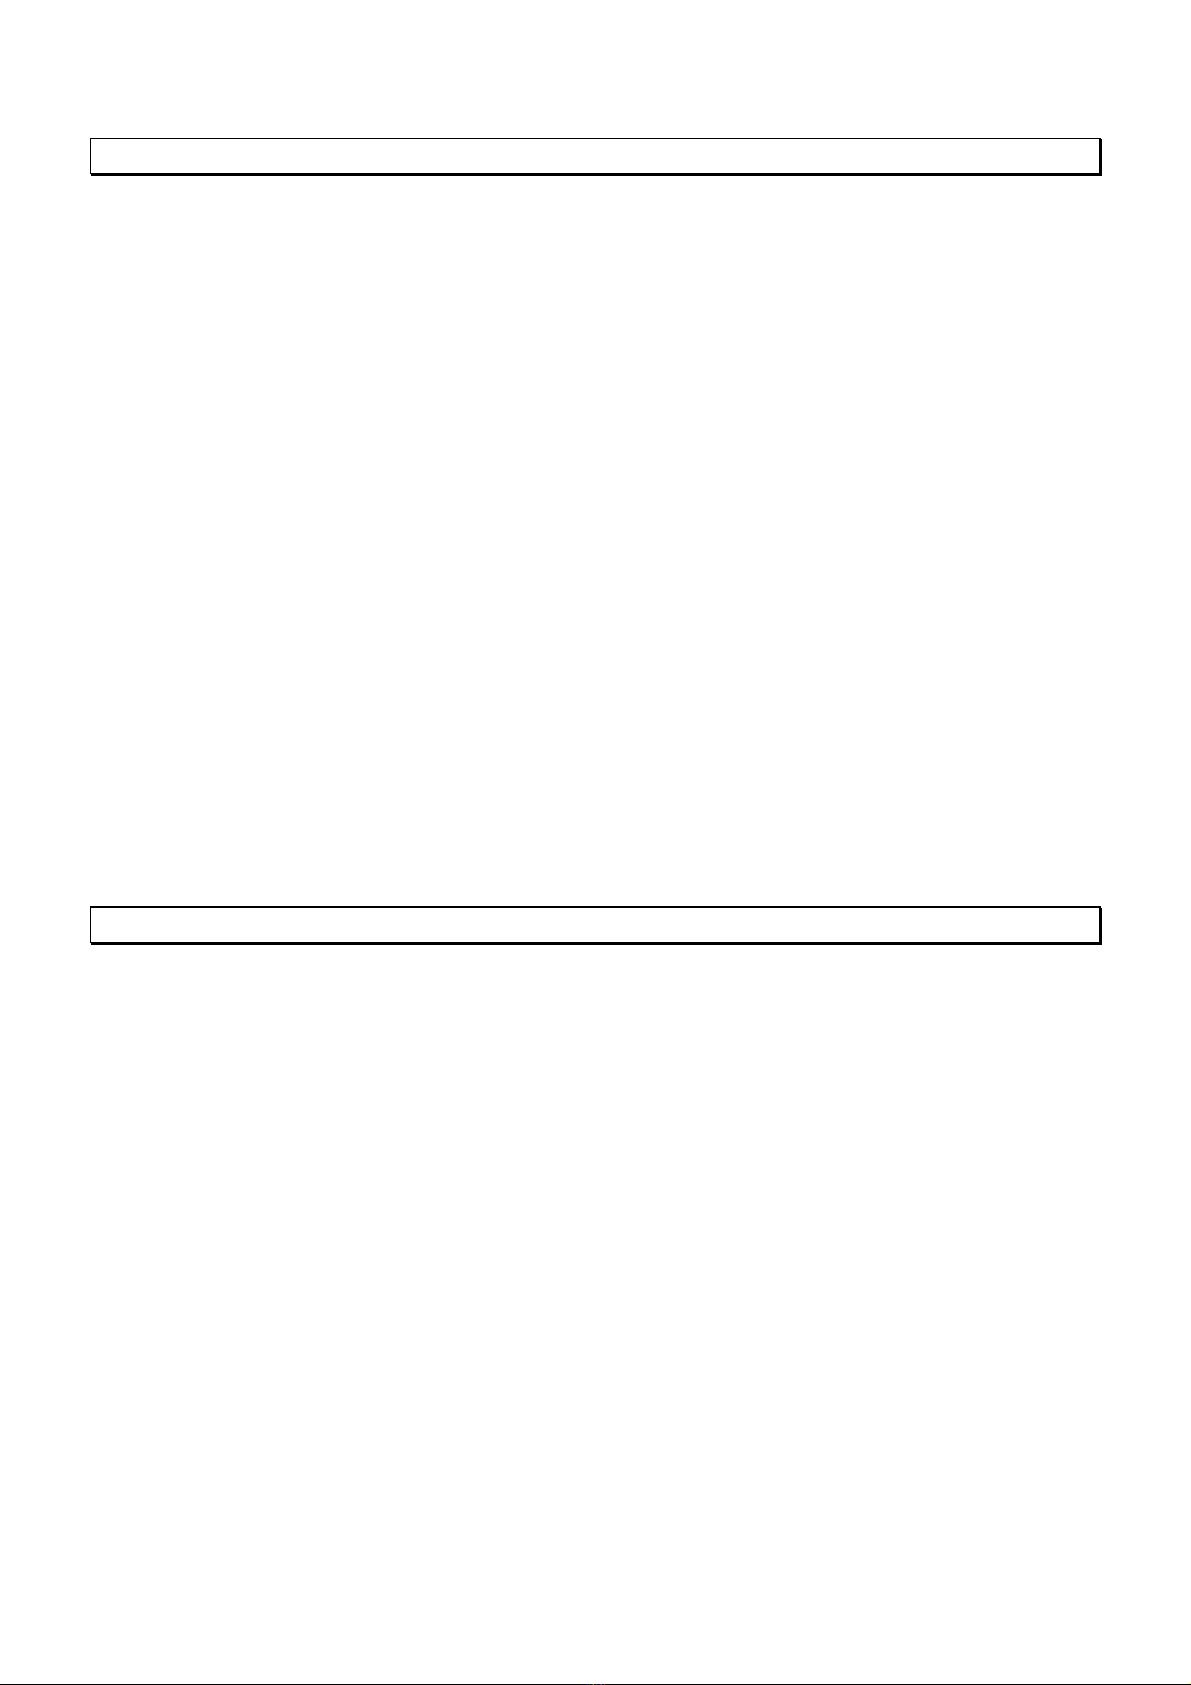
ROTAZIONE DELL'OMBRELLONE INTORNO ALLA BASE (fig. 10)
la struttura può ruotare intorno alla base di 360º e può essere fissata in 20 posizioni diverse mediante l'inserimento della
spina (S) nell'anello di orientamento (O).
INCLINAZIONE DELL'OMBRELLONE (fig. 11 - 12)
Compiere queste operazioni partendo dall’ombrellone aperto.
1. (fig. 11) ruotare in senso antiorario la manovella (D) tirando contemporaneamente verso il basso la maniglia (Q). In
questo modo il carrello scorrevole (L) si abbassa e l’ombrellone si inclina.
2. (fig. 12) quando è stata raggiunta l’inclinazione desiderata ruotare in senso orario il volantino (P) per bloccare il carrello
scorrevole (L). Se necessario tensionare la copertura ruotando la manovella (D) in senso orario.
3. Per portare l’ombrellone in posizione orizzontale sbloccare il carrello scorrevole (L) ruotando in senso antiorario il
volantino (P) e ruotando la manovella (D) in senso orario.

Z:\Istruzioni Articoli + Schede Tecniche\ISTRUZIONI VARIE TUTTI GLI ARTICOLI\GARDA\GARDA TILT 2011\GARDA TILT -IT- 20111007.doc 3 / 3
ORIENTAMENTO DELL'OMBRELLONE (fig. 13)
∆ATTENZIONE: l'operazione d’orientamento va eseguita soltanto quando l'ombrellone é aperto.
1. per orientare l’ombrellone partendo dalla posizione orizzontale, inserire l’asta d’orientamento (K) nell’asola (L).
2. Girare l’asta d’orientamento (K) in senso orario o antiorario fino a che l’ombrellone abbia raggiunto la posizione
desiderata.
∆ATTENZIONE: la possibilità d’escursione dell’ombrellone è limitata, non sforzare il movimento oltre i punti di resistenza del
meccanismo.
MANUTENZIONE E CURA
RIMOZIONE DELL'OMBRELLONE DALLA STRUTTURA (fig. 6, 14 – 15)
IMPORTANTE: portare in posizione orrizontale e chiudere l'ombrellone prima di eseguire questa operazione.
IMPORTANTE: (Fig. 6) prima di rimuovere l'ombrellone staccare la stecca (M) dalla forcellina (N) togliendo la vite. La vite va poi
subito fissata alla stecca (M) in modo da servire come riferimento per il successivo rimontaggio dell'ombrellone.
1. (Fig. 15) rimuovere la vite (V) in modo da liberare la corda (Z).
2. scogliere il nodo che si trova all'estremità della corda (Z) per poterla successivamente sfilare dal tubo dell'ombrellone.
3. (Fig. 14) rimuovere la vite (V' ) dal palo (A).
4. sfilare la corda (Z) dal tubo dell'ombrellone.
5. per rimontare l'ombrellone, eseguire in senso inverso le operazioni precedentemente descritte, aiutandosi con un filo di
ferro rigido di circa cm. 90 di lunghezza e con una estremità piegata a gancio, per infilare la corda (Z) nel tubo
dell'ombrellone. La corda (Z) va infilata nel tubo come indicato nella Fig. 14a.
RIMOZIONE DELLA COPERTURA DALL'OMBRELLONE (FIG. 14 & 16)
1. rimuovere l'ombrellone dalla struttura come descritto al paragrafo precedente.
2. (Fig. 16) rimuovere le viti (V" ) e sganciare i tiranti (X) dai terminali delle stecche (W).
3. (Fig. 14) togliere l'anello di guarnizione (R) dall'ombrellone.
4. sfilare la copertura dal tubo dell'ombrellone.
5. per rimontare la copertura, eseguire in senso inverso le operazioni precedentemente descritte.
SOSTITUZIONE DI UNA STECCA (fig. 16 – 18)
1. (Fig. 16) rimuovere la vite (V" ) e sganciare il tirante (X) dalla stecca (W).
2. (Fig. 17) sganciare la stecca (W) da sostituire dalla corona inferiore (Y' ) tirando con forza verso l'alto.
3. (Fig. 18) ruotare la stecca (W) di 180° e sganciare l'altra estremità dalla corona superiore (Y" ) tirando con forza verso
l'alto.
4. sostituire la stecca e ripetere in senso inverso le operazioni precedentemente descritte.
LAVAGGIO DELLA COPERTURA
1. rimuovere la copertura dall'ombrellone.
2. lavare la copertura a mano con detersivo neutro in acqua a max. 30 Cº
3. fare asciugare la copertura e non stirarla.
4. rimontare la copertura sulla struttura.
COME RITIRARE L'OMBRELLONE A FINE STAGIONE
A fine stagione prima di ritirare il Vostro ombrellone pulire la struttura con un panno umido e asciugarla.
∆ATTENZIONE: verificare l’integrità di tutti i componenti. Nel caso che alcune parti siano danneggiate rivolgersi
al negoziante dove e' stato fatto l'acquisto per ordinare i relativi pezzi di ricambio.
Ritoccare con della vernice le parti eventualmente spelate.
Per una perfetta conservazione dell’ombrellone durante i mesi invernali e' consigliabile ritirarlo in un locale asciutto.
IMPORTANTE: per evitare danni dovute a muffe o ossidazione non ritirare mai l’ombrellone GARDA TILT quando e bagnato o umido.
FIM s.r.l.
Via Biandrate, 11
I-28060 S. Pietro Mosezzo (NO) - ITALIA
Tel.:+39-0321468433 Fax.:+39-032153201
e-mail: info@fim-umbrellas.com www.fim-umbrellas.com
\\Fim-server\documenti\Istruzioni Articoli + Schede Tecniche\ISTRUZIONI VARIE TUTTI GLI ARTICOLI\GARDA\GARDA TILT 2011\GARDA TILT -GB-
20111007.doc 1 / 3
GARDA TILT
INSTRUCTIONS FOR ASSEMBLY AND RECOMMENDATIONS FOR USE
READ THIS HANDBOOK IMMEDIATELY
These instructions are provided to facilitate assembly of the sunshade GARDA TILT and for your safety.
It is recommended to follow the instruction carefully.
Failure to do so may result in damage to objects or injury to people. If in doubt, always consult a technically
expert person.
∆This symbol indicates very important information. Strictly follow instruction accompanied by this
symbol. This does not mean that the other information contained in this handbook is not
important.
Keep this handbook for future reference.
IMPORTANT SAFETY INSTRUCTIONS
∆APPLIES TO ALL IN THIS SECTION
1. INSTRUCTION
Please completely read and follow all the instructions.
Damage or injuries may occur if the sunshade is not assembled and used as described herein.
For safe use it is essential that anyone using the sunshade should have read all the instruction in
advance.
Only persons familiar with the safety aspects should operate this sunshade.
2. PRECAUTIONS
The sunshade GARDA TILT is intended as a sun protection, not as a protection against all bad
weathers. It must be closed and removed from the frame in case of strong winds or storms, as well
as heavy rain or snow.
Always close and remove the sunshade from its frame at night, when you are not at home or
whenever it is not under control.
The base must be ballasted with a minimum weight of 130 kg (≈286 lbs).
Always remove the orientation stick and the handle from the winch and keep them out of
children's reach.

\\Fim-server\documenti\Istruzioni Articoli + Schede Tecniche\ISTRUZIONI VARIE TUTTI GLI ARTICOLI\GARDA\GARDA TILT 2011\GARDA TILT -GB-
20111007.doc 2 / 3
ASSEMBLY INSTRUCTION
COMPONENTS (pict. 1):
for the components of the base make reference to pict. 2
A sunshade "A"
B pole of the sunshade "B"
C base tube "C"
D handle "D"
E bag of hardware "E"
F component "F" of the base
F’ component "F’" of the base
G component "G" of the base
H component "H" of the base
I bag of hardware for the base "I"
K orientation stick
ALUMINIUM BASE ASSEMBLY (pict. 2)
Take out the content of the hardware bag (I) and assemble the base as shown in pict. 2
∆CAUTION: tighten the base bolts well
Place floor slabs in the appropriate places of the base
∆CAUTION: ballast the base with a weight of at least 130 KG (≈286 lbs)
FRAME ASSEMBLY (pict. 3 - 6)
1. (pict. 3) slip the pole (B) onto the pole of the sunshade (A) taking care that the 2 coloured marks are on the same
side. Block the two parts with the bolts (R)
2. (pict. 4) insert the pole of the sunshade (A) in the base tube (C)
IMPORTANT: the pole of the sunshade (A) must be pushed all the way into the square housing of the orientation ring (O)
3. (pict. 5) insert the handwheel (T) into the threaded hole of the pole of the sunshade (A)
4. Insert the slot of the winch (U) onto the hand wheel screw (T). Then insert the winch pin (b) of the winch (U)
into the hole (b') of the pole of the sunshade (A) and screw the handwheel (T) well in
5. Insert the handle (D) into the appropriate hole of the winch (U)
6. (pict. 6) fix the rib (M) to the pin (N) with the appropriate screw
Your sunshade GARDA TILT is now ready for use.
HOW TO USE YOUR SUNSHADE
OPENING THE SUNSHADE (pict. 7 - 9)
IMPORTANT: Before opening the sunshade remove the tie string and slightly open it by pulling the ribs with your hands
To open the sunshade, gently turn the handle (D) of the winch (U) clockwise, taking care not to force the
mechanism.
(pict. 7 & 9) if there is furniture near the sunshade which could hinder the opening, proceed in the following
way:
1. (pict. 8) insert the pin of the handle (Q) into the hole made in the pole of the sunshade (A) and open the
sunshade turning the handle (D) clockwise
2. when the ribs are above the furniture (for reference see picture 9) extract the handle (Q) from the hole made in
the pole of the sunshade (A)
3. complete the opening of the sunshade
ROTATION OF THE SUNSHADE AROUND THE BASE (pict. 10)
(pict. 10) the frame rotates 360º around the base and can be fixed in 20 different positions by inserting the pin
(S) into the orientation ring (O).
INCLINATION OF THE SUNSHADE (pict. 11 – 12)
make this operation starting from the open sunshade
1. (pict. 11) rotate the handle (D) counter clockwise and at the same time pull the handle (Q) downwards. In this
way the sliding carrier (L) lowers and the sunshade inclinates.
2. (pict. 12) when the desired inclination has been reached rotate the handwheel (P) clockwise to lock the sliding
carrier (L). If needed, tension the cover by turning the handle (D) clockwise
3. to bring the sunshade in horizontal position, unlock the sliding carrier (L) by turning the handwheel (P) counter
clockwise and turning the handle (D) clockwise.

\\Fim-server\documenti\Istruzioni Articoli + Schede Tecniche\ISTRUZIONI VARIE TUTTI GLI ARTICOLI\GARDA\GARDA TILT 2011\GARDA TILT -GB-
20111007.doc 3 / 3
ORIENTATION OF THE SUNSHADE (pict. 13)
IMPORTANT: the orientation has to be done only when the sunshade is open.
1. to orientate the sunshade starting from the horizontal position, insert the orientation stick (K) into the slot (L).
2. turn the orientation stick (K) clockwise or counter clockwise until the sunshade has reached the desired position.
∆CAUTION: the excursion possibility of the sunshade is limited, so do not force the movement above the points of
resistance of the mechanism.
MAINTENANCE AND CARE
DISMOUNTING THE SUNSHADE FROM THE STRUCTURE (pict. 6, 14 – 15)
IMPORTANT: move the sunshade into the horizontal position and close it before executing this operation
IMPORTANT: (pict. 6) before dismounting the sunshade, remove the rib (M) from the pin (N). Immediately fix the screw that
has been removed to the loose rib (M), as this serves as reference for the re-assembly of the sunshade.
1. (pict. 15) remove the screw (V) in order to release the rope (Z)
2. loosen the knot at the end of the rope (Z) so that later it can be taken out of the tube of the sunshade
3. (pict. 14) remove the screw (V' ) from the pole (A)
4. extract the rope (Z) from the tube of the sunshade
5. to re-assemble the sunshade again, execute the operations explained above in inverse order, using a
approximately 90 cm long rigid iron wire with one extremity bended to a hook as help to insert the rope (Z) in
the tube of the sunshade. The rope (Z) must be inserted in the tube as shown in pict. 14a.
REMOVING THE COVER FROM THE SUNSHADE (pict. 14 & 16)
1. remove the sunshade from the structure as explained in the previous paragraph
2. (pict. 16) remove the screws (V" ) and release the tabs (X) from the ends of the ribs (W)
3. (pict. 14) remove the protection gasket (R) from the sunshade
4. remove the cover from the sunshade
5. to re-assemble the cover to the sunshade, execute the operations explained above in inverse order.
SUBSTITUTION OF A RIB (pict. 16 – 18)
1. (pict. 16) remove the screw (V" ) and release the tab (X) from the end of the rib (W)
2. (pict. 17) remove the rib (W) from the lower hub (Y' ) by pulling it forcefully upwards
3. (pict. 18) turn the rib by 180° and release the other end from the upper hub (Y" ) by pulling it forcefully
upwards
4. substitute the rib and execute the operations explained above in reverse order.
WASHING THE COVER
1. Remove the cover from the sunshade.
2. Wash the cover by hand with a neutral detergent in lukewarm water at max. 30 ºC (≈90 ºF)
3. Allow the cover to dry but do not tumble dry or iron it.
4. Place the cover again on the frame.
STORING THE SUNSHADE AT THE END OF THE SEASON
At the end of the season, before storing your parasol away, clean the frame with a damp cloth and dry it.
∆CAUTION: Check the integrity of all components. Should there be any damaged parts, contact the dealer where
it was purchased and order the relevant spare parts.
Touch up any possibly chipped parts with paint.
For perfect conservation of the parasol during the winter months it is advisable to store it in a dry room.
IMPORTANT: to avoid damage caused by mould or oxidation never store your GARDA TILT away when it is wet or damp.
FIM s.r.l.
Via Biandrate, 11
I-28060 S. Pietro Mosezzo (NO) - ITALIA
Tel.:+39-0321468433 Fax.:+39-032153201
e-mail: info@fim-umbrellas.com www.fim-umbrellas.com
\\Fim-server\documenti\Istruzioni Articoli + Schede Tecniche\ISTRUZIONI VARIE TUTTI GLI ARTICOLI\GARDA\GARDA TILT 2011\GARDA TILT -DE- 20111007.doc 1 / 3
GARDA TILT
MONTAGEANLEITUNG UND GEBRAUCHSHINWEISE
ZU ALLERERST DIESES HANDBUCH LESEN
Diese Instruktionen dienen für eine leichtere Montage des Sonnenschirmes GARDA TILT und zu Ihrer
Sicherheit.
Es ist wichtig, dass die angegebenen Anleitungen genau befolgt werden.
Sollte dies nicht geschehen, können Sachschäden oder Personenverletzungen auftreten. Im Zweifelsfalle immer
einen Sachverständigen zu Rate ziehen.
∆Dieses Symbol weist auf sehr wichtige Informationen hin. Bitte beachten Sie sehr genau die
Kapitel, bei denen dieses Symbol auftritt. Dies bedeutet nicht, dass die anderen Informationen, die
in dieser Anleitung enthalten sind, nicht wichtig sind.
Bewahren Sie dieses Handbuch für einen zukünftigen Gebrauch auf.
WICHTIGE SICHERHEITSANWEISUNGEN
∆DIESES SYMBOL GILT FÜR DIESES GANZE KAPITEL
1. ANLEITUNGEN
Alle Anleitungen gänzlich lesen und befolgen.
Wenn der Sonnenschirm nicht wie in den Anleitungen beschrieben montiert und verwendet wird,
kann es zu Schäden oder Verletzungen kommen.
Um einen sicheren Gebrauch zu garantieren, ist es sehr wichtig, dass jeder, der den Sonnenschirm
handhabt, vorher die Anleitungen genau liest.
Lassen Sie denjenigen, der sich mit den Aspekten, die die Sicherheit des Schirmes betreffen, nicht
auskennt, den Sonnenschirm nicht verwenden.
2. VORSICHTSMASSNAHMEN
Der Sonnenschirm GARDA TILT ist ein Sonnenschutz und nicht ein Schutz gegen alle Unwetter.
Bei starkem Wind, Gewitter sowie bei starkem Regen oder Schneefall muss er stets geschlossen
und vom Gestell genommen werden.
Nachts, und immer wenn man den Sonnenschirm nicht kontrollieren kann, diesen schliessen und
vom Gestell nehmen.
Der Plattenständer muss mit mindestens 130 Kg(≈286 Pds) beschwert werden.
Die Kurbel der Winde und den Orientierungsstab immer entfernen und ausser Reichweite von
Kindern aufbewahren.
\\Fim-server\documenti\Istruzioni Articoli + Schede Tecniche\ISTRUZIONI VARIE TUTTI GLI ARTICOLI\GARDA\GARDA TILT 2011\GARDA TILT -DE- 20111007.doc 2 / 3
MONTAGEANLEITUNG
BESTANDTEILE (Abb. 1): Für die Bestandteile des Plattenständers bitte Abb. 2 beachten
A Sonnenschirm "A"
B Sonnenschirm-Rohr "B"
C Basisrohr "C"
D Kurbel "D"
E Beutel mit Montagezubehör "E"
F Bestandteil (F) des Plattenständers
F‘ Bestandteil (F‘) des Plattenständers
G Bestandteil (G) des Plattenständers
H Bestandteil (H) des Plattenständers
I Beutel "I" mit Montagezubehör für Plattenständer
K Orientierungsstab
MONTAGE DES ALU- PLATTENSTÄNDERS (Abb. 2)
Den Inhalt aus dem Beutel (I) nehmen und den Plattenständer wie in Abb. 2 illustriert montieren.
∆ACHTUNG: die Schrauben des Plattenständers gut festziehen.
Waschbetonplatten cm 50x50 in die dafür vorgesehenen Plätze legen.
∆ACHTUNG: Den Plattenständer mit mindestens 130 Kg (≈286 Pds) beschweren.
MONTAGE DES GESTELLS (Abb. 3 - 6)
1. (Abb. 3) Das Sonnenschirm-Rohr (B) auf den Mast (A) aufsetzen und dabei darauf achten, dass die 2 farbigen
Markierungen sich auf der gleichen Seite befinden. Die 2 Teile mit den Schrauben (R) festmachen.
2. (Abb. 4) den Mast (A) des Sonnenschirmes auf das Basisrohr (C) aufsetzen.
WICHTIG: der Mast des Sonnenschirmes (A) muss fest in das viereckige Teil des Orientierungsringes (O) gesteckt werden.
3. (Abb. 5) Das Handrad (T) ein wenig in das Gewinde des Mastes (A) einschrauben.
4. Ritze der Winde (U) in das Handrad (T) stecken. Danach den Bolzen (b) der Winde (U) in das Loch (b’) des Mastes
(A) stecken und das Handrad (T) festziehen.
5. Die Kurbel (D) in Winde (U) stecken.
6. (Abb. 6) die Stützstrebe (M) an den Pin (N) mit der spezifischen Schraube befestigen.
Ihr Sonnenschirm GARDA TILT ist nun für den Gebrauch bereit.
BENUTZUNG IHRES SONNENSCHIRMES
ÖFFNEN DES SONNENSCHIRMS (Abb. 7 - 9)
WICHTIG: Bevor Sie den Sonnenschirm öffnen, das Schnürband entfernen und den Sonnenschirm durch Zug an den Streben von
Hand leicht öffnen.
Zum Öffnen des Sonnenschirms die Kurbel (D) der Winde (U) im Uhrzeigersinn vorsichtig drehen, wobei darauf
geachtet werden sollte, dass die Winde nicht übermäßig beansprucht wird.
(Abb. 7 & 9) sollten sich Möbelstücke in unmittelbarer Nähe des Schirmes befinden, die das Öffnen verhindern, wie
folgt vorgehen:
1. (Abb. 8) den Pin der Hantel (Q) in das Loch des Mastes (A) stecken und den Schirm öffnen, indem die Kurbel (D) im
Uhrzeigersinn gedreht wird.
2. wenn die Streben sich über den Möbeln befinden (als Hinweis siehe Abb. 9) die Hantel (Q) aus dem Loch des Mastes
(A) ziehen.
3. nun den Schirm ganz öffnen.
DREHUNG DES SONNENSCHIRMS UM DEN PLATTENSTÄNDER (Abb. 10)
Der Sonnenschirm kann um 360º um den Plattenständer gedreht und in 20 verschiedene Positionen mit dem Bolzen
(S) in dem Orientierungsring (O) arretiert werden.
NEIGUNG DES SONNENSCHIRMS (Abb.11 - 12)
diesen Vorgang vom geöffneten Schirm ausgehend, durchführen
1. (Abb. 11) die Kurbel (D) gegen den Uhrzeigersinn drehen und zugleich die Hantel (Q) nach unten ziehen. Auf diese
Weise bewegt sich der Gleiter (L) nach unten und der Schirm neigt sich.
2. (Abb. 12) wenn die gewünschte Neigung erreicht ist das Handrad (P) im Uhrzeigersinn drehen um den Gleiter (L)
festzustellen. Im Bedarfsfall den Schirmbezug nachspannen, indem die Kurbel (D) im Uhrzeigersinn gedreht wird.
um den Sonnenschirm in die Waagerechte zu bringen, den Gleiter (L) freimachen, indem man das Handrad (P) gegen, und die Kurbel (D)
im Uhrzeiegrsinn dreht.

\\Fim-server\documenti\Istruzioni Articoli + Schede Tecniche\ISTRUZIONI VARIE TUTTI GLI ARTICOLI\GARDA\GARDA TILT 2011\GARDA TILT -DE- 20111007.doc 3 / 3
ORIENTIERUNG DES SONNENSCHIRMS (Abb. 13)
∆ACHTUNG: die Orientierung des Sonnenschirmes darf nur bei geöffnetem Schirm durchgeführt werden.
1. Um den Sonnenschirm, von der waagerechten Position ausgehend, zu orientieren, den Orientierungsstab (K) in die
Öse (L) stecken.
2. den Orientierungsstab im oder gegen den Uhrzeigersinn drehen, bis der Sonnenschirm die gewünschte Position
erreicht hat.
∆ACHTUNG: der Ausschlag des Sonnenschirmes ist begrenzt, demzufolge die Bewegungen nicht über die Wiederstands-
punkte des Mechanismus beanspruchen.
WARTUNG UND PFLEGE
ENTFERNUNG DES SCHIRMES VON DER STRUKTUR (Abb. 6, 14-15)
WICHTIG: den Schirm in die waagerechte bringen und schliessen, bevor dieser Vorgang durchgeführt wird.
WICHTIG: (Abb. 6) bevor der Schirm auseinandergenommen wird, die Stützstrebe (M) vom Pin (N) lösen, indem die Schraube
entfernt wird. Die gelöste Schraube sofort wieder an die Stützstrebe (M) befestigen, da sie als Indikator beim
Wiederaufbau des Schirmes dient.
1. (Abb. 15) Die Schraube (V) losschrauben, damit das Seil (Z) freigegeben wird.
2. den Knoten am Ende des Seils (Z) lösen, so dass es später aus dem Rohr des Sonnenschirmes genommen
werden kann.
3. (Abb. 14) die Schraube (V' ) vom Mast (A) entfernen.
4. das Seil (Z) aus dem Rohr des Sonnenschirmes nehmen.
5. um den Sonnenschirm wieder zusammenzubauen, die oben angegebenen Instruktionen in umgekehrter Reihenfolge
wiederholen. Das Seil (Z) unter Zuhilfenahme eines zirka 90 cm langen steifen Drahtes wie in Abb. 14a gezeigt,
wieder in das Rohr einzuführen. Der Draht muss an einem Ende mit einer Öse versehen sein.
ENTFERNUNG DES BEZUGES VOM SCHIRM (Abb. 14 & 16)
1. den Schirm wie im vorhergehenden Kapitel beschrieben von der Struktur abnehmen.
2. (Abb. 16) die Schrauben (V") entfernen und die Laschen (X) von den Streben (W) aushaken.
3. (fig. 14) Den Dichtungsring (R) vom Schirm abnehmen.
4. Den Bezug vom Gestell abnehmen.
5. Um den Bezug wieder auf das Gestell zu montieren, die oben angegebenen Instruktionen in umgekehrter Reihenfolge
durchführen.
AUSWECHSELN EINER STREBE (Abb. 16 – 18)
1. (Abb. 16) Die Schraube (V") entfernen und die Lasche (X) von der Strebe (W) aushaken.
2. (Abb. 17) Die auszuwechselnde Strebe (W) von der unteren Krone (Y’) lösen, in dem man diese kräftig nach oben
zieht.
3. (Abb. 18) Die Strebe (W) um 180° drehen und das andere Ende aus der oberen Krone (Y") lösen, in dem man diese
kräftig nach oben zieht.
4. Die Strebe auswechseln und die oben angegebenen Instruktionen in umgekehrter Reihenfolge wiederholen.
REINIGUNG DES BEZUGES
1. Den Bezug vom Schirm nehmen.
2. Den Bezug von Hand in lauwarmem Wasser (30° C) mit einem neutralen Waschmittel waschen.
3. Den Bezug trocknen lassen ohne ihn zu schleudern oder zu bügeln.
4. Den Bezug wieder auf das Gestell montieren.
AUFBEWAHRUNG DES SONNENSCHIRMES AM ENDE DER SAISON
Bevor ihr Sonnenschirm am Ende der Saison winterfest gemacht wird, sollte das Gestell mit einem feuchten Tuch gereinigt und
getrocknet werden.
∆ACHTUNG: Überprüfen Sie die Integrität aller Bestandteile. Falls Teile beschädigt sein sollten, wenden Sie sich an den
Händler, bei dem Sie den Schirm erworben haben um die entsprechenden Ersatzteile zu bestellen.
Bessern Sie eventuell abgeblätterte Stellen mit Farbe nach.
Für eine perfekte Aufbewahrung Ihres Schirmes während der Wintermonate diesen in einem trockenen Raum
aufbewahren.
WICHTIG: Um Schäden durch Schimmel oder Rost zu vermeiden, sollten Sie Ihren Schirm GARDA TILT nie wegpacken, solange
er feucht oder nass ist.

FIM s.r.l.
Via Biandrate 11
I-28060 S. Pietro Mosezzo (NO) - ITALIA
Tel.:+39-0321468433 Fax.:+39-032153201
e-mail: info@fim-umbrellas.com www.fim-umbrellas.com
GARDA TILT
INSTRUCTIONS DE MONTAGE ET CONSEILS D’UTILISATION
COMME PREMIÈRE CHOSE LIRE CE MANUEL
Ces instructions sont fournies pour permettre un montage facile du parasol GARDA TILT et pour Votre sécurité.
Il est nécessaire que Vous suiviez de manière précise les instructions fournies.
Si cela n’est pas le cas, il peut y avoir des dommages à des objets ou des blessures a personnes. En cas de doutes,
consulter toujours une personne techniquement experte.
∆Ce symbole indique des informations de grande importance. Faire très attention à ce qui est
indiqué ou ce symbole apparaît. Cela ne signifie pas que las autres informations indiquées dans ce
manuel ne sont pas importantes.
Conservez ce manuel pour un usage futur.
INSTRUCTIONS IMPORTANTES POUR LA SECURITE’
∆S’APPLIQUE A TOUT DANS CETTE SECTION
1. INSTRUCTIONS
Lisez et suivez par entier toutes les instructions.
Il peut y avoir des dommages ou des blessures si le parasol n’est pas monté et utilisé comme décrit
dans les instructions.
Pour garantir un usage sûr, il est très important que toutes les personnes qui utilisent le parasol
aient lu au préalable et par entier les instructions.
Ne laissez pas utiliser le parasol par des personnes qui ne sont pas au courant des aspects de
sécurité du parasol.
2. PRECAUTIONS
Le parasol GARDA est une protection contre le soleil et pas une protection contre toutes les
intempéries. Il doit être fermé et enlevé de sa structure dès qu'il y a un vent fort ou un orage, ainsi
qu’en présence de pluie intense ou de la neige.
Fermer toujours le parasol et l'enlever de sa structure la nuit, quand il n'y a personne à la maison
et chaque fois qu'on ne peut pas le contrôler.
La base doit être lestée avec un poids minimum de 130 kg (≈286 Lbs).
Enlever toujours la manivelle du treuil et la tige d’orientation et les garder hors de portée des
enfants.

\\Fim-server\Documenti\Monica\Winword\Istruzioni\istruzioni varie tutti gli articoli\GARDA\GARDA TILT 2007\GARDA TILT 2007 FIM\GARDA TILT -FR-
V.01.doc 2 / 3
INSTRUCTIONS DE MONTAGE
COMPOSANTS (fig. 1): pour les composants de la base faire référence a la figure 2
A parasol (A)
B tube du parasol (B)
C tube de base (C)
D manivelle (D)
E sachet pièces détachées (E)
F composant (F) de la base
G composant (G) de la base
H composant (H) de la base
I sachet (I) pièces détachées de la base
K tige d’orientation
MONTAGE DE LA BASE EN ALUMINIUM (fig. 2)
Sortir le contenu du sachet (I) et monter la base comme indiqué dans la fig. 2.
∆ATTENTION: bien serrer les boulons de la base.
Placer des dalles dans les espaces prévus de la base.
∆ATTENTION: lester la base avec un poids minimum de 130 kg (≈286 Lbs).
MONTAGE DE LA STRUCTURE (fig. 3 - 6)
1. (fig. 3) enfiler le tube du parasol (B) dans le mat du parasol (A) faisant attention que les deux marques colorées se
trouvent du même coté. Bloquer les deux composants avec les boulons (R)
2. (fig. 4) insérer le mat du parasol (A) dans le tube de base (C).
IMPORTANT: le mat du parasol (A) doit s'insérer à fond dans le siège carré de l'anneau d'orientation (O).
3. (fig. 5) visser le volant a main (T) dans le trou fileté du mat du parasol (A)
4. insérer la languette fendue du treuil (U) dans le volant a main (T), ensuite insérer le goujon (b) du treuil (U) dans le
trou (b') du parasol (A) et visser à fond le volant a main (T).
5. insérer la manivelle (D) dans le trou spécifique du treuil (U).
6. (fig. 6) fixer la baleine de blocage (M) a la fourche (N) avec la vis spécifique.
Votre parasol GARDA TILT est maintenant prêt à l’usage.
COMMENT UTILISER LE PARASOL
OUVERTURE DU PARASOL (fig. 7 - 9)
IMPORTANT: Avant d'ouvrir le parasol, enlever le cordon et ouvrir légèrement le parasol avec les mains en écartant les baleines.
Pour ouvrir le parasol, tourner doucement en sens horaire la manivelle (D) du treuil (U), en faisant attention de ne
pas forcer le mécanisme.
(fig. 7 & 9) dans le cas que des meuble se trouvent près du parasol qui empêchent l'ouverture, procéder de la
manière suivante:
1. (fig. 8) insérer le goujon de la manette (Q) dans le trou du mat du parasol (A) et ouvrir le parasol tournant en sens
horaire la manivelle (D).
2. quand les baleines ont dépassé l'hauteur des meubles (voir comme référence la figure 9). Enlever la manette (Q)
du trou du mat du parasol (A).
3. compléter l'ouverture du parasol
ROTATION DU PARASOL AUTOUR DE LA BASE (fig. 10)
La structure peut tourner de 360º autour de la base et peut être fixée en 20 positions différentes en insérant le goujon
(S) dans l'anneau d'orientation (O).
INCLINAISON DU PARASOL (fig. 11 - 12)
∆ATTENTION: l’opération d’inclinaison doit être faite uniquement quand le parasol est ouvert.
1. (fig. 11) Tourner en sens anti-horaire la manivelle (D) en tirant contemporairement vers le bas la manette (Q). De
cette manière le support coulissant (L) s'abaisse et le parasol s'incline.
2. (fig. 12) Quand l'inclinaison désirée est atteinte, tourner en sens horaire la manette (P) pour bloquer le support
coulissant (L). Si nécessaire tensionner la toile en tournant la manivelle (D) en sens horaire.
3. Pour porter la toile en position horizontale, débloquer le support coulissant (L) en tournant en sens anti-horaire la
manette (P) et tournant la manivelle (D) en sens horaire.

\\Fim-server\Documenti\Monica\Winword\Istruzioni\istruzioni varie tutti gli articoli\GARDA\GARDA TILT 2007\GARDA TILT 2007 FIM\GARDA TILT -FR-
V.01.doc 3 / 3
ORIENTATION DU PARASOL (fig. 13)
∆ATTENTION: l’opération d’orientation doit être faite uniquement quand le parasol est ouvert.
1. pour orienter le parasol, partant de la position horizontale, insérer la tige d’orientation (K) dans l’oeillet (L).
2. tourner la tige d’orientation en sens horaire ou anti-horaire jusqu’a ce que le parasol se trouve dans la position
désirée.
∆ATTENTION: la possibilité d’excursion du parasol est limitée, ne pas forcer le mouvement au-delà les points de résistence
du mechanisme.
ENTRETIEN & SOINS
LEVÉE DU PARASOL DE LA STRUCTURE (fig. 6, 14 - 15)
IMPORTANT: Porter en position horizontale et fermer le parasol avant d'exécuter cette opération.
IMPORTANT: (fig. 6) avant d'enlever le parasol détacher la baleine de blocage (M) de la fourche (N) en enlevant la vis. La vis doit
être fixée immédiatement a la baleine (M) pour servir successivement comme référence au remontage du parasol.
1. (fig. 15) enlever la vis (V) pour libérer la corde (Z)
2. défaire le noeud qui se trouve a l'extrémité de la corde (Z) pour pouvoir l'enlever successivement du tube du
parasol.
3. (fig. 14) Enlever la vis (V') du mat (A).
4. dégager la corde (Z) du tube du parasol.
5. Pour remonter le parasol, exécuter les opérations décrites en précédence en sens inverse, en s'aidant avec un fil de
fer rigide d'environ 90 cm de longueur et avec une extrémité pliée a crochet pour enfiler la corde (Z) dans le tube du
parasol. La corde (Z) doit être enfilée comme indiqué dans la fig. 14a.
LEVÉE DE LA TOILE DU PARASOL (fig.14 & 16)
1. enlever le parasol de la structure comme décrit dans le paragraphe précédent.
2. (fig. 16) enlever les vis (V") et dégager les tirants (X) des extrémités des baleines (W).
3. (fig. 14) enlever l'anneau de garniture (R) du parasol.
4. Dégager la toile du tube du parasol.
5. pour remonter la toile, exécuter les opérations décrites en précédence en sens inverse.
SUBSTITUTION D’UNE BALEINE (fig. 16 - 18)
1. (fig. 16) enlever la vis (V") et dégager le tirant (X) de la baleine (W).
2. (fig. 17) décrocher la baleine (W) qui doit être substituée de la couronne inférieure (Y’) en tirant avec force vers le
haut.
3. (fig. 18) tourner la baleine (W) de 180° et décrocher l’autre extrémité de la couronne supérieure (Y’’) en tirant avec
force vers le haut.
4. Changer la baleine et répéter en sens inverse les opérations décrites en précédence.
LAVAGE DE LA TOILE
1. Enlever la toile du parasol.
2. Laver la toile à la main avec un détergeant neutre dans l'eau à 30 º C.
3. Faire sécher la toile et ne pas la repasser.
4. Remettre la toile sur la structure.
COMMENT RANGER LE PARASOL A LA FIN DE LA SAISON
A la fin de la saison, avant de ranger le parasol, nettoyer la structure avec un chiffon humide et bien la sécher.
∆ATTENTION: vérifier l’intégrité de tous les composants. Dans le cas que quelques pièces soient abîmées, s'adresser au
commerçant chez qui on a acheté le parasol pour commander les pièces de rechange nécessaires.
Retoucher avec de la peinture les parties éventuellement écaillées.
Pour une parfaite conservation du parasol pendant les mois d'hiver, il est conseillé de le ranger dans un local sec.
IMPORTANT: pour éviter des dommages dus a oxydation ou moisissure, ne jamais ranger le parasol quand il est mouillé ou
humide.

F'
F'
H
G
F
C
Fig. 2
A
B
Fig. 3
R
C
A
Fig. 4
O
D
Fig. 5
U
T
bb'
A
MN
L
Fig. 6
A
B
C
D
E
FGH
I
Fig. 1
K
F'
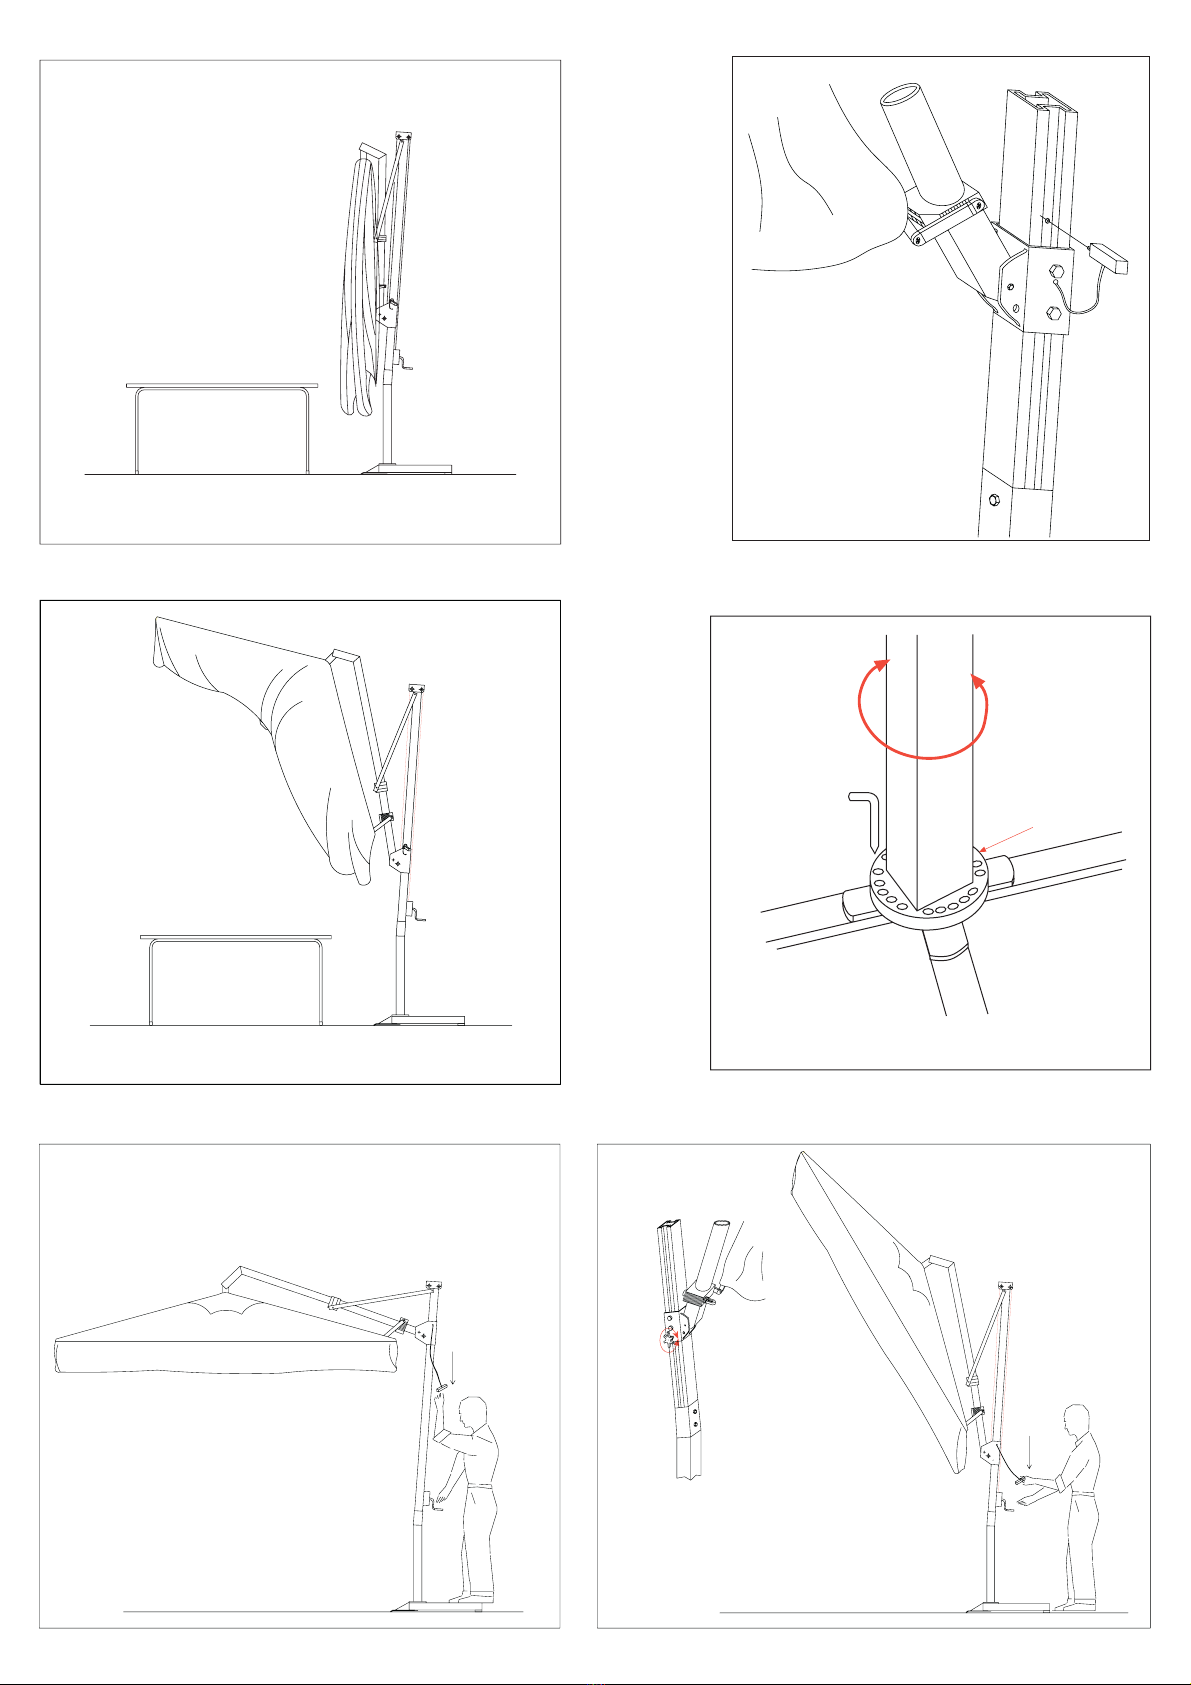
Fig. 10
A
SO
Fig. 8
D
A
Fig. 7
D
P
Fig. 12
Fig. 9
Fig. 11

Fig. 14
R
V'
A
Fig. 14a
Z
Fig. 13
L
K
K
V
Z
Y'
Fig. 15
Fig. 16
W
V''
X
Fig. 17
W
Y'
Fig. 18
W
Y''
Table of contents
Languages:
Other FIM Patio Furniture manuals


