FIMI X8 MINI User manual

Please read the user manual carefully before using and keep the manual for future reference
FIMI X8 MINI User Manual

FIMI provides X8 Mini users with tutorial videos and the following information:
1. 《FIMI X8 MINI User Manual》
2. 《FIMI X8 MINI Quick Start Manual》
3. 《FIMI X8 MINI Disclaimer and Safety Operation Instructions》
Users are advised to watch tutorial videos before using the product and read
FIMI X8 Mini Disclaimer and Safety Operation Instructions carefully and get
to know the process of using by going through FIMI X8 Mini Quick Start Manual.
For more detailed product information, please refer to FIMI X8 Mini User Manual.
Please download the firmware on the link below :https://www.fimi.com
4. Please scan the the following QR-code to download FIMI Mini App
Services & Support
1

The FIMI X8 SE Mini is a high integrated and foldable drone equipped with long
flight time, strong wind resistance, 250g-class ultra-light design and other
advanced technologies which achieve functions like long-distance remote
control, intelligent flight, precise landing, etc. The built-in 3-axis gimbal
stabilizes the camera which is able to shoot 4K video at 30 fps and performs
real-time image transmission. The easy-to-use APP enriches with smart
features like one-tap edit, and fast connection, bring you more joyful flight trip.
Product Introduction
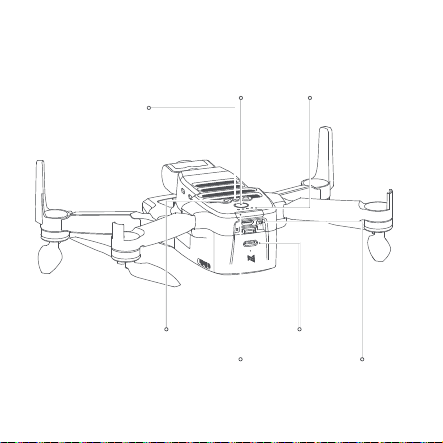
Package List
Aircraft
Instruction
Screws USB-Cable Cable
Gimbal Cover
Remote controller Battery ScrewdriverSpare Propellers
2

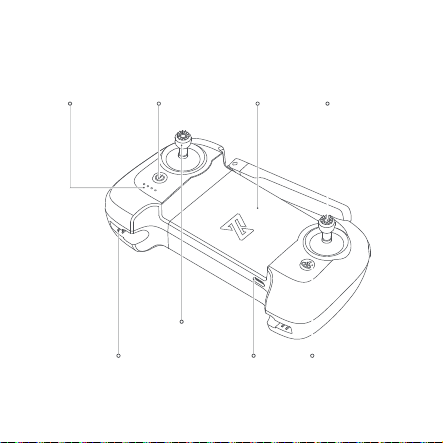
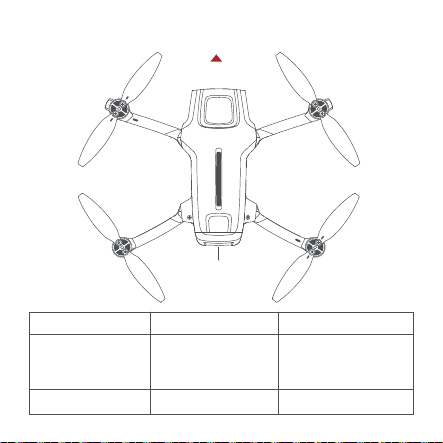
Product Overview
1 Drone
Clockwise propeller Counterclockwise propeller
Integrated gimbal cameraLanding gear Motor
3
RC
WIFI
Wi-Fi/RC switchFlight status light
TOF sensor
Optical flow camera
Power button Battery level light
Charging port
4
2 Remote controller
Right Stick
Left Stick
Auto returnCharging portStick storage slot
Mobile holderPower buttonBattery level lights
5
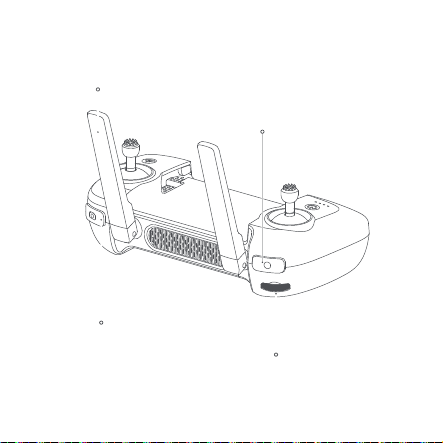
Record button
Antenna
Dial
Shoot button
6

Controller Functions
Buttons
Left stick
Right stick
RTH (Return to Home)
Photo button
Video button
Dial
Power button
1
2
3
4
5
6
7
Function description
Push stick forward to ascend
Pull stick backward to descend
Move stick left & right to Yaw CCW
Move sick right to Yaw CW
Push stick forward to Pitch (fly) drone forward
Pull stick backwards to Pitch (fly) drone backwards
Move stick left to Roll (fly) drone left
Move stick right to Roll (fly) drone right
Long press the button for over 2 seconds, and the
drone will enter RTH mode when you hear a beep.
Short press the button to cancel RTH mode
Short press to shoot the picture
Short press to start / stop recording
Adjust the pitch angle of gimbal camera
Short press to view the battery level
Short press+long press 2 seconds to power on/off
7
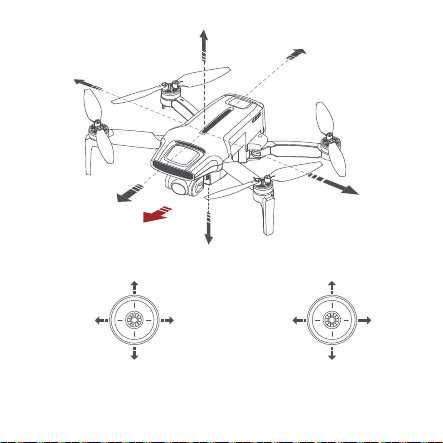
Up
Down
Counter
clockwise
Clockwise
Note: The stick mode can be set in FIMI Navi Mini app. (The default is Mode 2)
Up
Down
Drone heading
Left stick Right stick
Backward
Forward
Right
Left
Forward
Backward
RightLeft
8

Drone
Flight Mode:
GPS Mode
To achieve precise hovering, the drone is equipped with a GPS module. The intelligent
flight function works in GPS mode. Users can enable Sport Mode or Beginner Mode
in the flight settings. When the Beginner Mode is on, the flight speed, flight distance,
flight altitude and RTH altitude will be limited. In sport mode, the maximum flight speed
is 16m/s, the maximum ascending speed is 5m/s, and the maximum descending speed
is 3.5m/s.
VPU Mode (Vision Processing Unit Mode)
An Optical Flow module is also built into the drone for precise hovering and landing
at the home point. In VPU mode, the intelligent flight function is not supported. The
maximum flight speed is 10m/s (36 km/h), the maximum ascending speed is 3m/ s
(11 km/h), and the maximum descending speed is 2m/s (7 km/h). When the drone is
flying above a well-lit ground with a clear texture and the GPS signal is poor, it will
switch automatically to VPU mode.
ATTI Mode (Altitude Mode)
When the GPS signal is poor or the compass has interference, the drone enters in
ATTI mode. In this mode, the drone can start drifting horizontally and intelligent flight
mode is not supported. Therefore, in case of any accidents, we recommend flying in
an open area with good GPS signal reception. Once the drone enters in ATTI mode,
please land in a safe place as soon as possible.
9
Drone status Light status Drone lights
Initial check failed
Compass error
IMU error
Cannot take off
IMU is warmed up Self-checking Yellow lights fade in and out
Self-checking failed
Take-off forbidden
Flying error
Red lights are on
Drone Lights
Drone heading
Drone status lights
10

Compass calibration
Compass needs to be
calibrated
The drone disconnects
with the RC
Take off as normal
ATTI mode ATTI mode Red lights are on
Firmware update Firmware update The red and green light
flash at regular intervals.
Directly connect with
the phone Connecting Status light flashes in turn
Disconnect with the
phone Signal lost Yellow lights fade in and out
Pairing Pairing Tail lights turned off
Low battery warning Low battery
Take off Green lights fade in and out
Signal is lost
Extremely low battery
warning Extremely low battery
Yellow lights fade in and out
Red lights flash quickly
Red lights double flash
Compass calibrating
Compass needs to be
calibrated
Horizontal green light is on
and vertical red light is on
The red and yellow light is
flashing at regular intervals
11

Safety Protection
Failsafe Return
Failsafe return is only supported in GPS mode. When the drone and remote controller
signal is interrupted for more than 2 seconds, the flight control system built into the
drone will take over the control of your drone, plan the return path according to the
original flight path, then the drone will fly back and land at the home point. This function
works precisely if enough GPS satellites are locked, the compass has no interference
and the home point has been recorded correctly. If the wireless signal reconnects
during the failsafe return, the pilot can short press the RTH button to cancel, and the
drone will hover at the current position.
Low-power Protection
In flight, when the battery level is only enough for RTH, App advises users to return,
and the drone will return automatically after 10 seconds countdown. When the battery
level is only enough for landing, App advises users to land as soon as possible, and
the drone will land automatically after 10 seconds countdown. When the battery level
is at 15% usage left, the drone will be forced to land.
home point home point
current altitude≥return altitude
Ascend first
(the default altitude is 30m)
current altitude<return altitude
critical low battery
landing battery level
normal battery levellow battery
current battery levelRTH battery level
15%10%0% 30% 100%
12

Hovering on the Edge of No-fly-zone
The drone will automatically hover in the restricted flight area designated by the state,
such as the edge of airports, and the App will appear corresponding hints. The user
can use sticks to fly the drone from the edge of the no-fly-zone, but the drone will not
enter the no-fly-zone.
Intelligent Flight
Auto Take-off
When the conditions are right, tap the auto take-off icon on the left side of the APP
interface. In GPS mode, the drone will take off to an altitude of 4 meters and hover for
sticks control. In VPU mode, the drone will take off to an altitude of 1.2 meters and
hover for sticks control.
Auto Landing
When the conditions are right, tap the auto landing icon on the left side of the APP
interface.
Note: Users can short press the RTH button to exit intelligent flight.
No-f ly-zone
Hover
GPS Mode VPU Mode
4m
1.2m
13

Auto Return
When the drone is in flight, the user can long press the auto return button to return the
drone. When the return distance is less than 10 meters and flight altitude is less than
3 meters, the drone will ascend to 3 meters first and return to the home point; if the
flight altitude is greater than or equal to 3 meters, the drone will directly return to the
home point.
When the return distance of the drone is greater than or equal to 10 meters and the
flight altitude is less than 30 meters, the drone will ascend to 30 meters and return to
the home point; if the flight altitude is 30 meters or more, the drone will directly return
to the home point . The user can press the Auto Return button or tap the APP to the
left to exit.
Altitude
altitude <3m
distance<10m
altitude ≥3m
distanc e<10m
altitude ≥30m
distance≥10m
altitude ≤30m
distance≥10m
Distance
30m
3m
10m
home point
14

Smart Track
Smart Track is supported only in GPS mode. The user can choose Trace, Profile, or
Lock in the App menu. The drone will trace the subject chosen at the App interface at
a distance.
In Trace mode, the heading will always lock at the target and trace it from the back at
a distance.
In Profile mode, the heading will always lock at the target and trace it from the side at
a distance.
moving directionheading
moving direction
drone moving direction
heading
15
In Lock mode, the drone will hover at a place if flight speed is 0, following the target
360°. The user can also adjust flight speed, and the drone will fly around the target at
a certain distance.
Note: In Smart Trace, users should always make sure to avoid people, animals and
obstacles in the tracking path to ensure the flight safety. Users should comply with
local laws and regulations when using the function.
Spiral flight
The user selects spiral flight on app, set the center point and radius. The drone will fly
around the center point at a default speed. It the user sets a POI, the drone will lock
and shoot the POI. Fly away from the central point to set radius. Set flight speed, move
direction and heading. If the heading is free,the user can drag a rectangle around a POI
camera tracking 360°
flight speed =0m/s flight speed = 0m/s
16

If sticks are moved in flight, the flight altitude or radius will be changed.
Taking Mode 2 as example:
POI
Center point
Up
Down
Narrow radius
Expand radius
Counter
clockwise Clockwise
Direction&
Speed
Direction&
Speed
Left stick Right stick
17
Tap-fly
The user can select Tap-fly in the App. Tap map to choose a destination and set flight
speed, the drone will fly over there at a default speed in a straight line. If a point of
interest is set, the camera will be locked at the POI
Tap the map to choose a destination
Switch to image interface to drag a rectangle around the POI
Set flight altitude and speed
POI
Drone Destination
18

Course Lock
The user can select Course Lock mode in the App. The drone saves current fly direction
as heading. The user can control sticks to adjust direction of head and gimbal, but the
forward direction remains unchanged.
Tripod Mode
The max speed of the drone is 1m/s, and the max rotation speed is 60°/s. In
Tripod Mode, operation sensitivity is lowered simultaneously to shoot more
stable and smooth video.
Aerial Mode
The brake distance is lengthened and the angular speed of rotation is limited
to make sure the shooting videos are more stable and smooth
Note: Course Lock is enabled in Aerial Mode, Users can turn it on in the APP
19
Other manuals for X8 MINI
2
Table of contents


