Final Touch Icy Wine Bar with PerfectTemp User manual
EWT-4X
Warning: Changes or modifications to this unit not expressly approved by the party
responsible for compliance could void the user’s authority to operate the equipment.
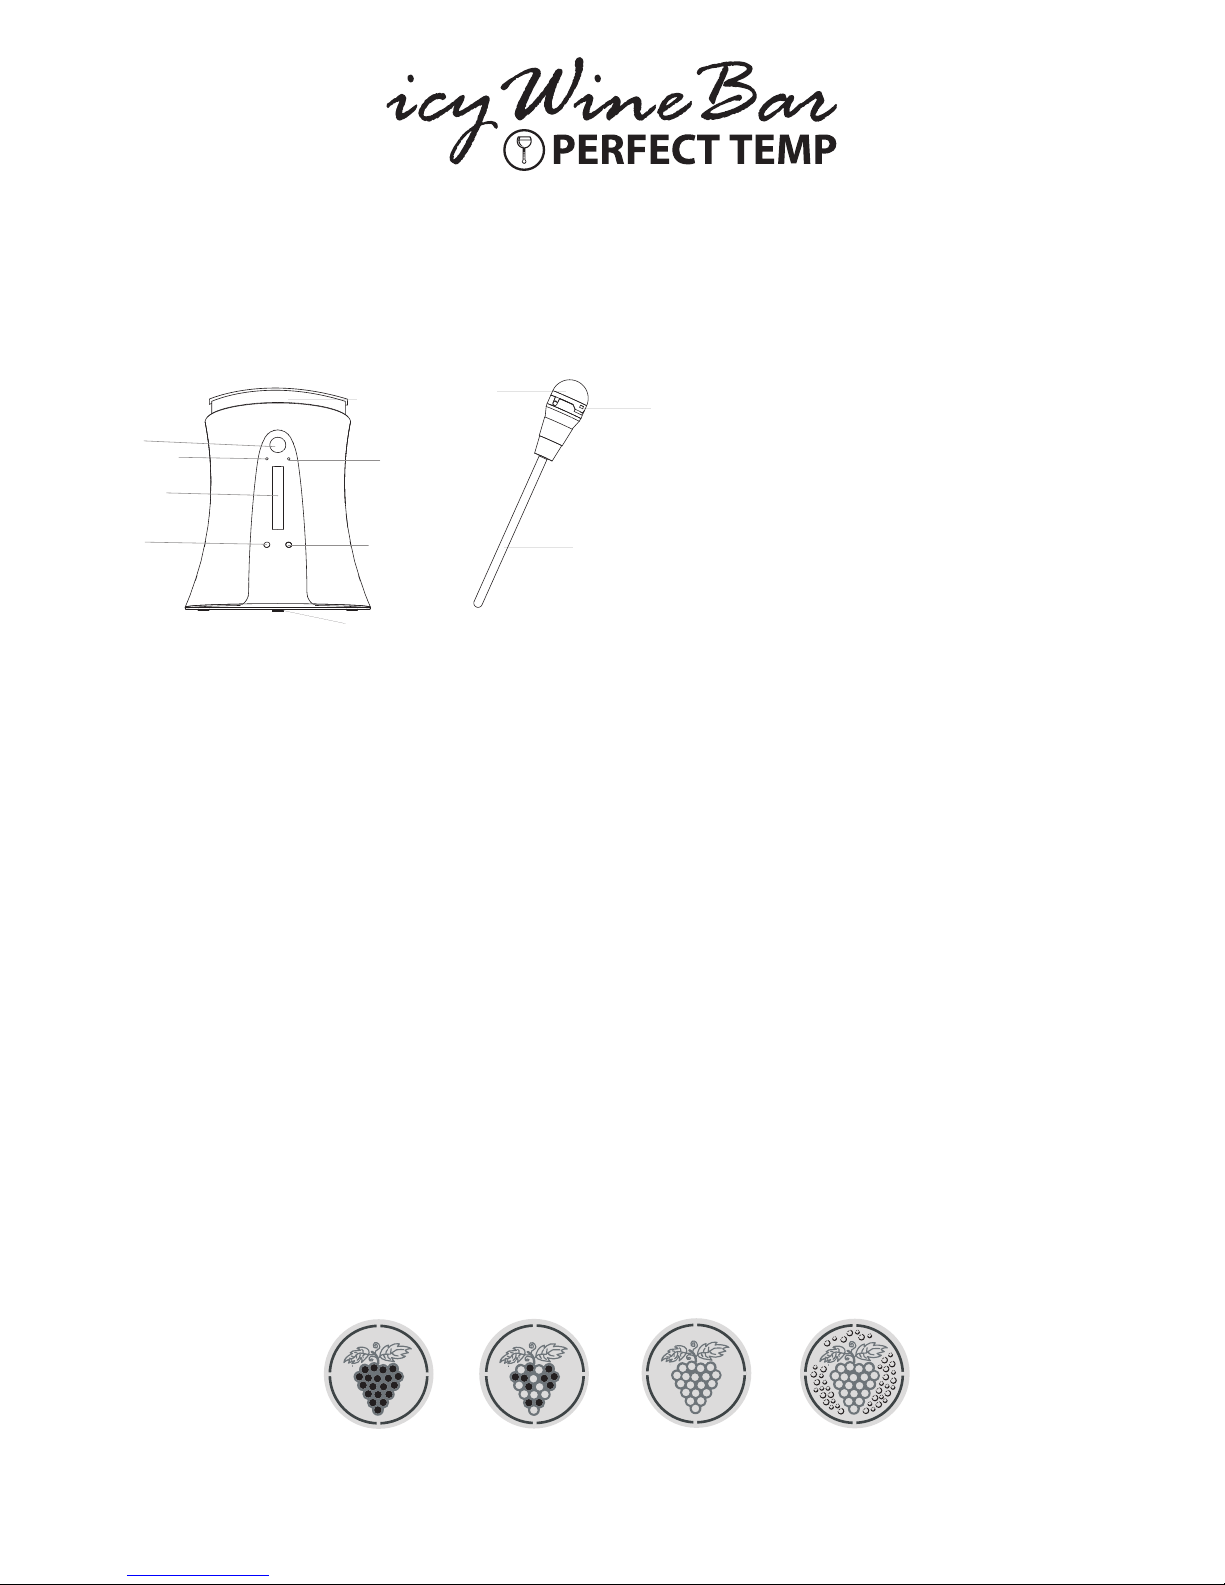
PARTS LIST / BREAKDOWN
Installing / Replacing Batteries
Main Unit (Ice Bucket)
1. Locate the battery compartment on the bottom of the unit.
2. Open the battery compartment.
3. Insert 3 “AA” size batteries (not included) into the battery compartment. Make sure that the batteries are
installed according to the correct polarity markings in the bottom of the compartment.
4. Replace the battery compartment door.
Sensor Unit (Wireless Temperature Sensor)
The icy WineBar’s Wireless Temperature Sensor comes with a battery already installed at the factory. Should the
Sensor Unit battery need to be replaced:
1. Open the Sensor Unit by removing the battery lid with a small flat head screwdriver.
2. Remove the exhausted battery and replace it with a lithium button cell “CR2032”
3. When inserting the new battery make sure that the positive “+” terminal of the battery is upwards.
4. Replace the battery lid.
BE CAREFUL WHEN INSTALLING BATTERIES INTO THE MAIN UNIT OR WIRELESS
TEMPERATURE SENSOR OF THE ICY WINEBAR. INSTALLING THE INCORRECT
BATTERIES OR REVERSING THE POLARITIES COULD CAUSE PERMANENT DAMAGES
TO THE PRODUCT.
Easy to Use (Operating instructions)
1. Insert the Wireless Temperature Sensor into your opened bottle of wine.
2. Turn on the icy WineBar by:
a. Turning the switch to the “ON” position on the Wireless Temperature Sensor
b. Pressing the “POWER” button on the Ice Bucket
3. Set the Wine Setting according to the type of opened wine bottle by pressing the “SELECT” button. Keep
pressing the select button until the correct setting appears on the LCD & screen.
Red
17°C (63°F)
Rosé
15°C (59°F)
White
10°C (50°F)
Champagne
9°C (48°F)
www.lightninglever.com
A - LCD
B - Red LED
C - Temperature Display
D - Power Button
E - Removable Ice Bucket
F - Green LED
G - Preset “Select Button”
H - Main Unit Battery Compartment
I - Sensor Battery Cover
J - Sensor “ON / OFF” Switch
K - Wireless Temperature Sensor Pickup

Easy to Use (Operating instructions) (Continued)
4. The LCD will display the temperature:
a. The single line will indicate the current temperature of the wine
b. Three lines will indicate the ideal temperature based on the setting selected in step 3.
5. Now read the color of the LED lights
a. If the red LED is lit, it means either your wine is too Cool or too Warm.
b. If the green LED is flashing it means that your wine is within ± 1°C (± 1.8°F) of the ideal serving
temperature.
c. If the green LED is solid, it means that your wine is as the perfect temperature based on the
Perfect Temp system and it’s ready to serve.
6. If the red LED is lit and the single line is above the three lines it means that your wine is too warm and it needs
to be chilled.
a. Place your wine bottle in the middle of the ice bucket and then fill it with ice uniformly around
your wine bottle for even cooling. Additionally we recommend adding water to improve the
cooling performance.
b. In approx 10 minutes a bottle of white wine at normal room temperatures (~21°C / ~70°F) should
be cooled enough, and within 4 minutes, a bottle of room temperature red wine will attain 17°C
(63°F) when using a mixture of water and ice.
THEREFORE FOR MAXIMUM COOLING EFFICIENCY WE RECOMMEND A MIXTURE OF WATER AND ICE
7. If the red LED is lit and the single line is below the three lines it means that your wine is too cool to be served
and it needs to be placed in a warmer environment. We do not recommend heating your wine. Please let your
wine stand in room temperatures to warm your wine.
LASTLY REMEMBER TO SHUT OFF THE WIRELESS TEMPERATURE SENSOR BY TURNING THE
POWER SWITCH TO “OFF” & THE ICE BUCKET UNIT BY PRESSING THE “POWER” BUTTON.
Cleaning Instructions
1. Remove the bucket insert to discard of the ice & water solution.
2. Rinse both the removable bucket insert & the Wireless Temperature Sensor under cold tap water.
IMPORTANT: rinse only the metal pickup portion of the wireless temperature sensor. If
the top portion of the sensor is exposed to liquids damage to the temperature sensor
will occur.
3. If necessary clean the Ice Bucket unit with a mild soap solution using a cloth. Wipe clean with a damp cloth.
WARNING: DO NOT SUBMERGE THE ICE BUCKET UNIT IN WATER. DOING SO WILL
PERMANENTLY DAMAGE THE ICY WINEBAR
Troubleshooting
In this section you can find solutions to common problems by trying the suggestions below.
SYMPTOM POSSIBLE CAUSE / SOLUTION
The ice bucket display is not showing any information
• The unit is off, press the power button
• The batteries are dead, replace the batteries (see
battery changing procedure above)
The unit is on but is not registering the temperature of
your wine
• The wireless temperature sensor is off, turn it on by
moving the power switch to “ON” position
• The wireless temperature sensor is more than 0.5
meters (20 inches) away from the ice bucket unit.
• The wireless temperature sensor battery is dead,
replace it (see battery changing procedure above)
NOTE: This device complies with Part 15 of the FCC Rules. Operation is subject to the following two conditions: (1) this
device may not cause harmful interference, and (2) this device must accept any interference received, including
interference that may cause undesired operation.
This equipment has been tested and found to comply with the limits for a Class B digital device, pursuant to Part 15 of
the FCC Rules. These limits are designed to provide reasonable protection against harmful interference in a residential
installation. This equipment generates, uses and can radiate radio frequency energy and, if not installed and used in
accordance with the instructions, may cause harmful interference to radio communications.
However, there is no guarantee that interference will not occur in a particular installation. If this equipment does cause
harmful interference to radio or television reception, which can be determined by turning the equipment off and on, the
user is encouraged to try to correct the interference by one or more of the following measures:
- Reorient or relocate the receiving antenna.
- Increase the separation between the equipment and receiver.
- Connect the equipment into an outlet on a circuit different from that to which the receiver is connected.
- Consult the dealer or an experienced radio/TV technician for help.
Field strength 46.6dBµV/m at 3m
www.lightninglever.com
Table of contents


