finder 1T Series User manual

1T.51
DIGITAL TOUCH SCREEN THERMOSTAT


INDEX
TECHNICAL DATA page 2
DIMENSIONS page 2
INSTALLATION page 3
WIRING DIAGRAM page 5
BATTERY page 6
START UP page 7
KEYS page 8
SYMBOLS page 9
MAIN SCREEN page 10
DAY SETTING page 10
NIGHT SETTING page 11
DISPLAY LOCK page 12
FULL LOCK MODE (WITH PIN) page 13
FROST PROTECTION FUNCTION page 15
ADVANCED MENU page 16
ADMINISTRATOR FUNCTION page 22
CALIBRATION page 25
1
TECHNICAL DATA
Power supply: 2 Alkaline Batteries 1.5 V AAA
WINTER temperature range: (+5…+37)°C
SUMMER temperature range: (+5…+37)°C
FROST protection temperature range: (+2…+8)°C
Temperature dierential ∆T: (0.1…0.9)°C
Operating modes: 2 (day & night)
Protection degree: IP20
PIN lock: Yes
Output: relay 1 CO (volt-free contact)
Contact rating: 5 A 250 V AC
Mounting: recess mount in wall or box
ADDITIONAL NOTES
There are 3 audible alerts:
- SHORT BEEP: conrmation that key is pressed
- 3 LONG BEEPS: conrmation that the information is saved
- TRILL: error
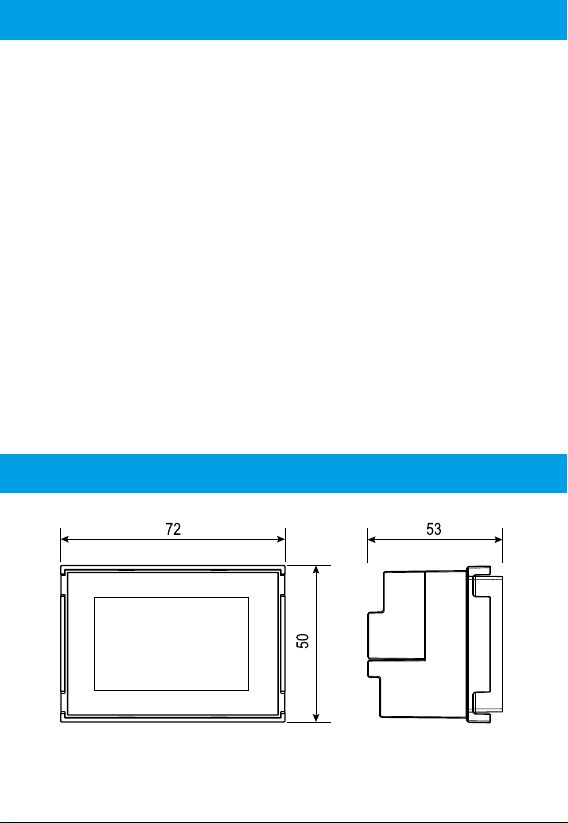
DIMENSIONS
2

INSTALLATION
SAFETY REQUIREMENTS
The installation of electrical equipment must be performed by experienced staff.
Before connecting the thermostat, make sure that the load (heater, pump,
etc.) is not connected to the supply and that the load is within the ratings
marked on the thermostat.
POSITIONING
Install the thermostat away from sources of heat (heaters, direct sunlight,
kitchens) and away from doors/windows.
Mount at about 1.5 m above the floor.
PREPARATION
Install the thermostat using the correct accessories (see the table in the
following page).
CLEANING
For cleaning - use only a damp cloth.
Extender VI
Frame A
Frame B
Thermostat
Extender BM
3

ABB: Chiara
ABB: Mylos
Ave: Serie 44
Bticino: Living, Light, Light Tech,
Livinglight, Axolute
Bticino: Matix
Gewiss: Chorus
Vimar: Arke
Vimar: Eikon, Eikon Evo, Plana
Vimar: Idea
Bticino: Livinglight Air
Frame
A
Frame
B
Extender
VI
Extender
BM
*
*
*= remove the side supports (a-b-c-d)
a
d
b
c
with 01C.51
4
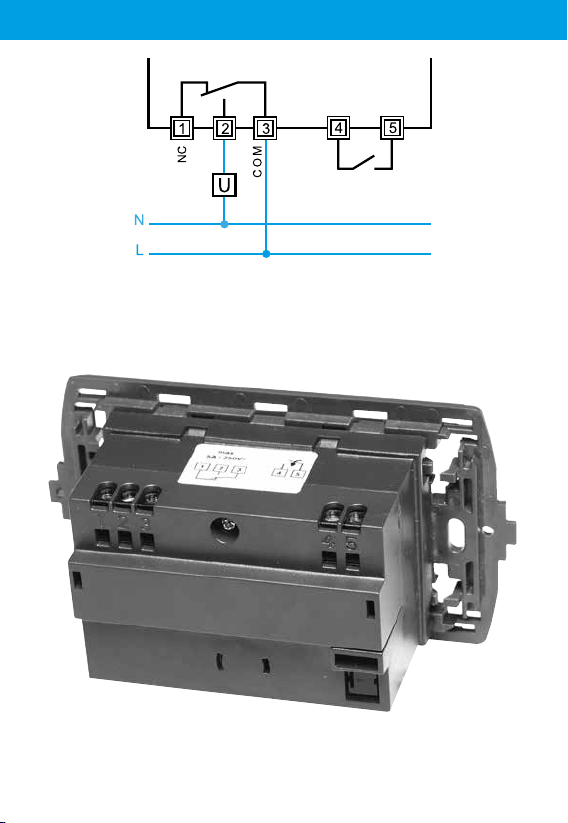
WIRING DIAGRAM
5
NO
MANUAL/REMOTE
override contact
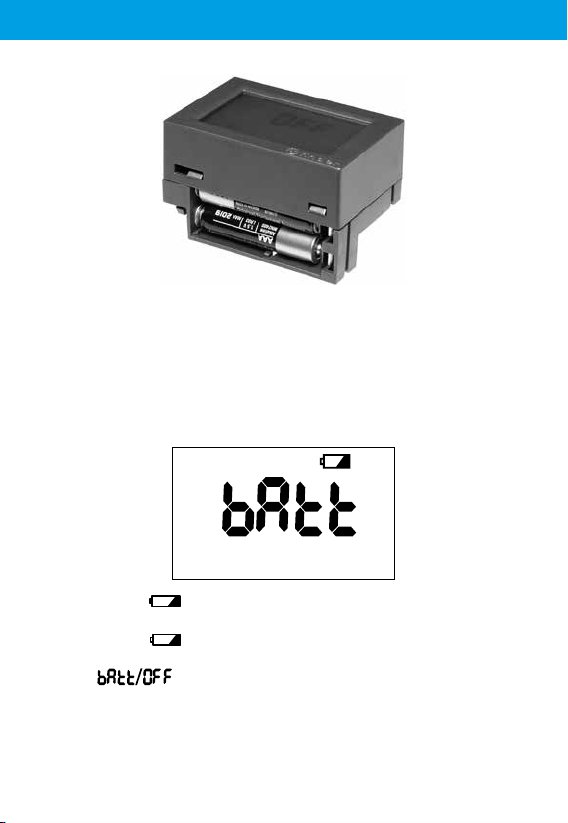
Insert the batteries into the compartment, observing the indicated polarities.
ATTENTION
- Incorrect placement of the batteries (reverse polarity) may damage the
thermostat
- If the battery charge falls below the minimum level, the thermostat is
placed in the OFF state and the output relay releases
- If the thermostat remains unused for long periods it is advisable to remove
the batteries
The thermostat provides 3 dierent reports of battery condition:
- With the battery ON (STEADY), operation of the thermostat will soon
be compromised
- With the battery FLASHING imminent replacement of batteries is
necessary
- With the FLASHING the thermostat is in the OFF state and
the output relay releases
NOTE
Replacing the batteries at the initial warning ON (STEADY) and taking no
more than 40 seconds, the date and time will not be erased
BATTERY
6

START UP
Insert the batteries and the display will show all the symbols and the software
version, for a few seconds.
After that, the main screen will be displayed
NOTE
Touch the display to illuminate the backlight.
7
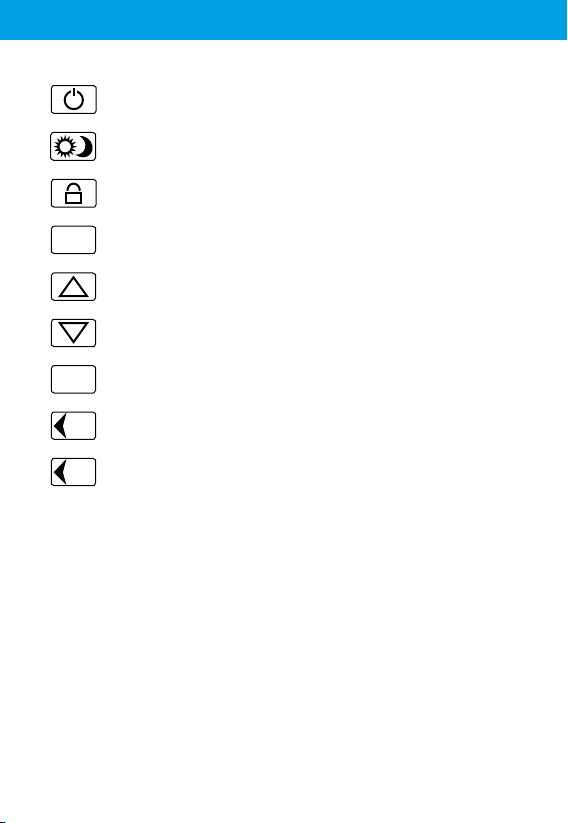
KEYS
8
Thermostat ON/OFF key
Selecting the temperature for night or for day
Pressed for 3 seconds - activates or deactivates the display lock
function
Pressed for 3 seconds - enters the advanced menu
Changes the data displayed (increase)
Changes the data displayed (decrease)
Press to conrm the information displayed on the display
Returns to the previous setting
Press for 3 seconds to exit the function
Returns to the previous setting (in the advanced menu)
Press for 3 seconds to exit the advanced menu
OK
S
E
T
S
E
T

SYMBOLS
9
Administrator set limits
Frost protection ON
Temperature dierential
Remote control
Low battery
Display only, or full thermostat, locked
Day mode
Night mode
Heating ON (in WINTER mode)
Cooling ON (in SUMMER mode)
∆T

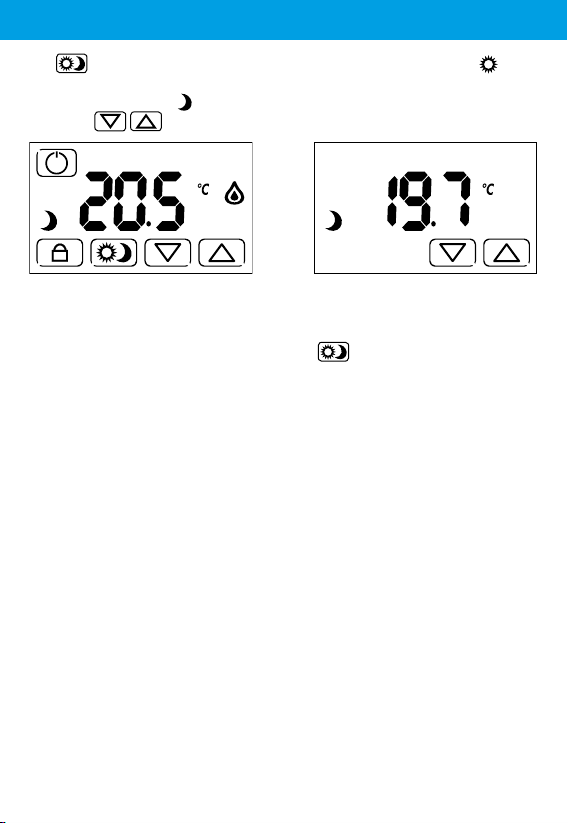
The main screen showing the operational keys for everyday use.
They are, the temperature control keys , the key (if enabled
in the advanced menu), the key to lock the product and the key,
to turn o.
with key without key
The key followed by the sun icon allows the setting of the day
temperature.
Within the main screen, using the keys allows the desired
temperature to be set
NOTE
When switching from night to day with the key (and vice versa), the set
temperature will be displayed momentarily.
This is then followed by the current measured temperature.
MAIN SCREEN
10
DAY SETTING
11
The key allows you to set a dierent temperature from the Day
temperature.
The the moon symbol shows that the night temperature can now be set
using the keys.
NOTE
When switching from day to night with the key (and vice versa), the set
temperature will be displayed momentarily.
This is then followed by the current measured temperature.
NIGHT SETTING
12
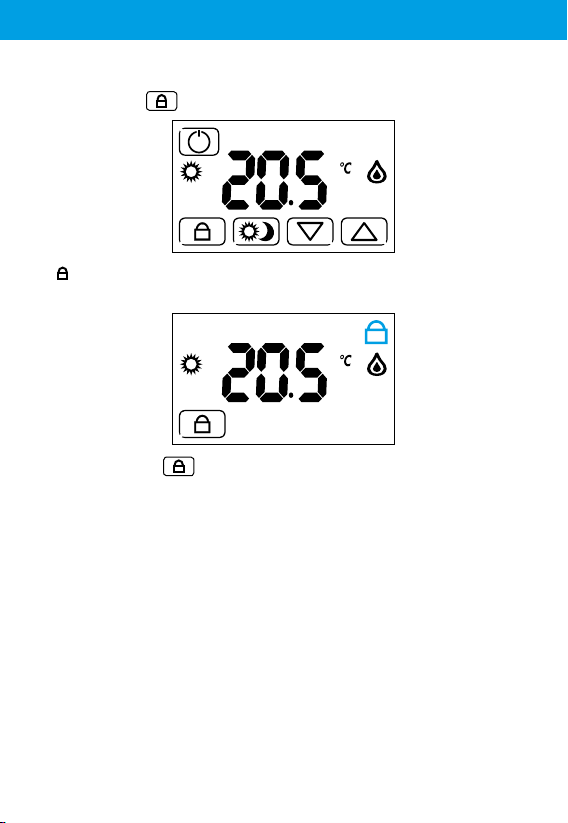
This function protects the thermostat from accidental touch, blocking ONLY
the display.
To activate, press for 3 seconds.
The symbol will then appear on the display and 3 beeps will indicate its
activation.
To deactivate, press for 3 seconds.
NOTE
To use the DISPLAY LOCK function, the PIN set in the FULL LOCK MODE
(with PIN) in the advanced menu, must be set to 000 (see page 19).
DISPLAY LOCK
13
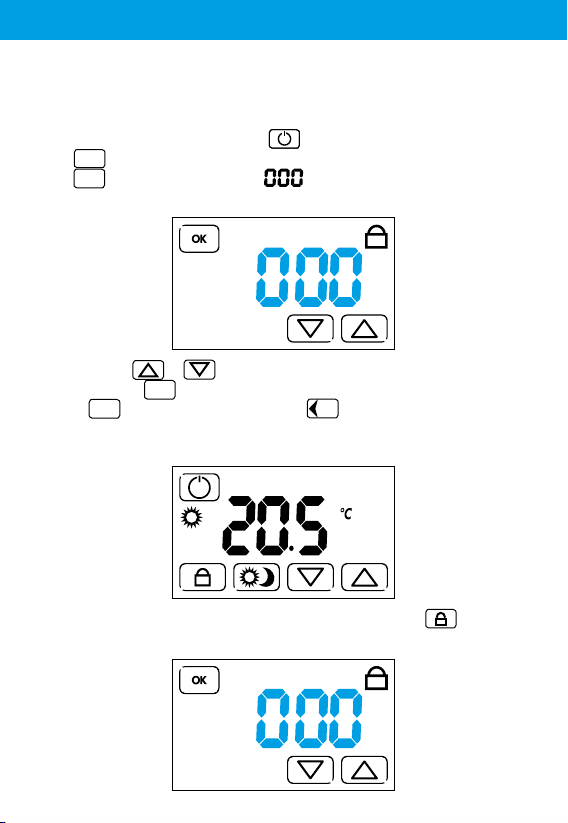
This advanced feature is used to lock the thermostat completely.
To activate it, you must set a 3-digit PIN that will be required every time you
want to lock or unlock the thermostat.
To set the PIN:
- Switch o the thermostat with the key
- Press for 3 seconds to access the ADVANCED MENU
- Press until you see the screen that will permit entry of the desired
PIN code
Then, press the or keys until the desired PIN number is reached
and conrm with . It is now possible to exit the advanced menu by
pressing several times or by pressing for 3 seconds until you hear
three beeps conrming the PIN registration.
Turn on the thermostat, and the main screen will be displayed.
To activate the FULL LOCK MODE (with PIN), hold down the key for
3 seconds. The following screen will appear.
S
E
T
OK
OK
OK S
E
T
FULL LOCK MODE (WITH PIN)

14
Use the or keys to enter the PIN previously set in the advanced
menu and press . 3 beeps will conrm the lock, and the display that
will show the following screen:
To unlock the thermostat, hold down for 3 seconds.
The display will show .
Enter your PIN and conrm with .
3 beeps conrm that the device has been unlocked.
CAUTION
After 3 failed attempts you will not be able to enter any further PIN for
20 seconds. Err will remain on the display.
NOTE
By removing and inserting the batteries, the thermostat will remain with the
display locked.
If you forget your PIN enter the il codice di sblocco 513.
Once unlocked, it is recommended that you go back to the advanced menu
to verify and/or modify your previously entered personal PIN.
OK
OK

15
FROST PROTECTION function is active when the thermostat is set to WINTER
and it is o.
It is used to protect plant and equipment from low temperatures.
When the set threshold is reached, the function will be activated and the
display will show the symbol.
At any time, press to turn on the thermostat and for the main screen to
appear.
NOTE
When the thermostat is o and then turned OFF, you can:
- Press the key for a few seconds to access the advanced menu
- By pressing the center of the display for 5 seconds, you enter the
“ADMINISTRATOR” menu, through which you can enter values for the
minimum and maximum temperature settings (see page 22).
S
E
T
FROST PROTECTION FUNCTION
16
The advanced settings are useful for customizing the thermostat.
The settings are:
1- SUMMER-WINTER MODE
2- FROST PROTECTION FUNCTION
3- TEMPERATURE DIFFERENTIAL
4- ANTI-SEIZE PUMP FUNCTION
5- FULL LOCK MODE (with PIN)
6- EXTERNAL FORCING CONTACT
7- ENERGY SAVING E1
8- RESET
To enter the advanced menu, starting from the main screen, press to turn
o the thermostat.
Hold down for 3 seconds.
1- SUMMER-WINTER MODES
The display shows one of the following screens
The symbol indicates the winter mode (heating) whilst indicates
summer mode (cooling).
You can set the desired mode using the or keys.
Conrm with to proceed to the next menu.
To exit the menu, press or the repeatedly until the OFF screen
appears.
If something has been changed, 3 beeps will conrm the change.
S
E
T
OK
S
E
TOK
ADVANCED MENU

17
2- FROST PROTECTION FUNCTION
After setting the Summer or Winter mode, pressing will show the
following screen.
With or it is possible to set the desired value, between 2°C and 8°C.
Press to conrm and proceed to the next menu.
To step back in the menu, press , whilst to exit the advance menu hold
down for 3 seconds, or press repeatedly until OFF appears on the
screen.
If something has changed, 3 beeps will conrm the change.
3- THERMAL DIFFERENTIAL
After conrming the desired frost protection value with , the following
screen appears.
The thermal dierential inuences the way the thermostat regulates - according
to the type of heating or cooling plant to be controlled.
Use or to set the desired thermal dierential value between 0.1
and 0.9.
Conrm with , and proceed to the next menu.
OK
OK
S
E
T
S
E
TOK
OK
OK
18
To return to the previous menu, press whilst to exit the advanced menu
hold down for 3 seconds, or press repeatedly, until you see the
OFF screen.
If something has changed, 3 beeps will conrm the change.
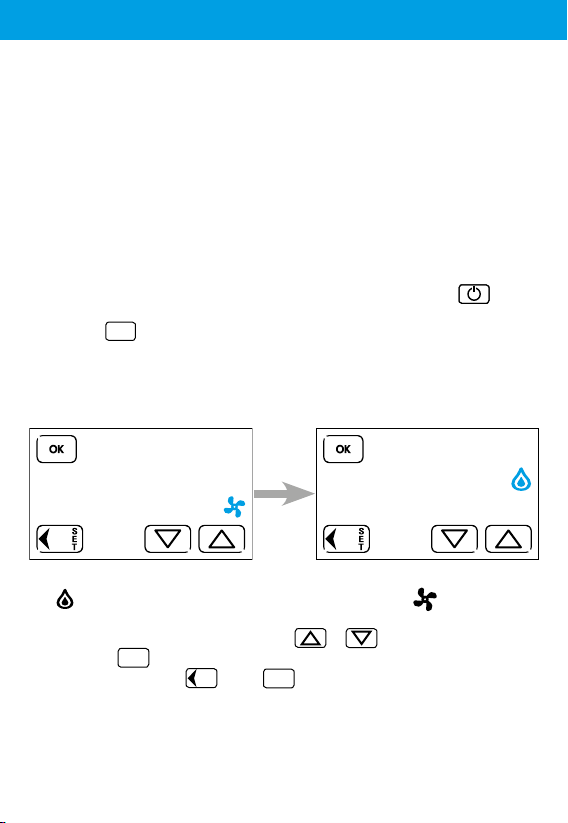
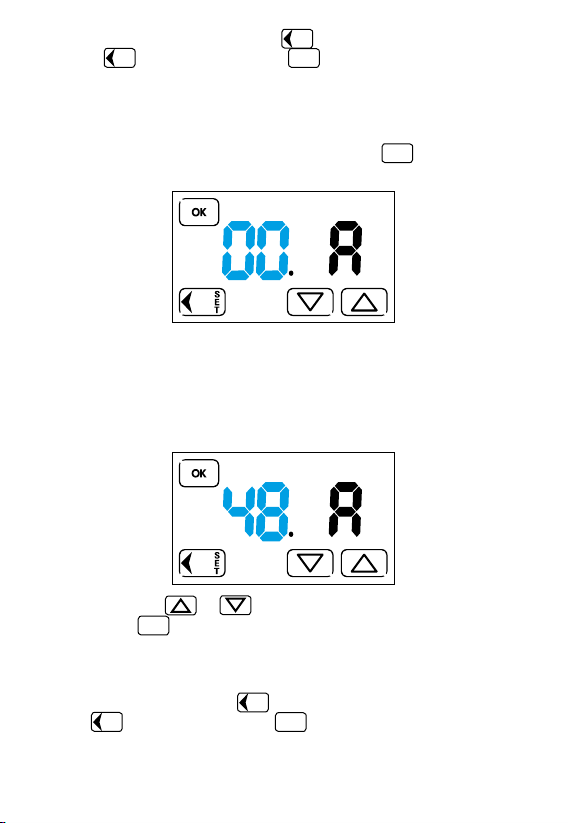
4- ANTI-SEIZE PUMP FUNCTION
After programming the thermal dierential, pressing will bring up the
following screen.
(Anti-seize function o)
The anti-seize pump function is a function that will congure the thermostat
as an asymmetrical timer. By setting a value between 1 and 99 hours, the
thermostat will close the output contact for 30 seconds, every time the
set time value has elapsed.
Example:
By setting with keys or the value 48 (48 hours = 2 days) and
conrming with , the thermostat will close the relay contact for 30 seconds,
every 2 days.
After enabling the function in the menu, the count will start after the last
switching o of the relay.
To step back in the menu press whilst to exit the Advanced Menu, press
and hold for 3 seconds, or press repeatedly, until the screen shows
OFF.
If something has been changed, 3 beeps will conrm the successful change.
Se qualcosa è stato modicato, 3 beep confermeranno l’avvenuta modica.
S
E
T
S
E
TOK
OK
OK
S
E
T
S
E
TOK
This manual suits for next models
3
Table of contents
Other finder Thermostat manuals

finder
finder BLISS WI-FI CHRONOTHERMOSTAT 1C.91 User manual

finder
finder 1C.51 User manual

finder
finder 1C.81 User manual

finder
finder 1T.31 User manual

finder
finder BLISS T 1T.91 User manual

finder
finder 1C.71 User manual

finder
finder 1C Series User manual

finder
finder Bliss 2 User manual

finder
finder 1T.41 User manual

finder
finder BLISS2 User manual
Popular Thermostat manuals by other brands


Eco-Smart
Eco-Smart PST6000 installation guide

Skytech
Skytech AC-3003 Installation and operating insctructions

Silvercrest
Silvercrest Classic Model L Operating instructions and safety advices

HeatLink
HeatLink 46544 user guide

OJ Electronics
OJ Electronics UCCG user manual

Pro 1 IAQ
Pro 1 IAQ T755 user manual