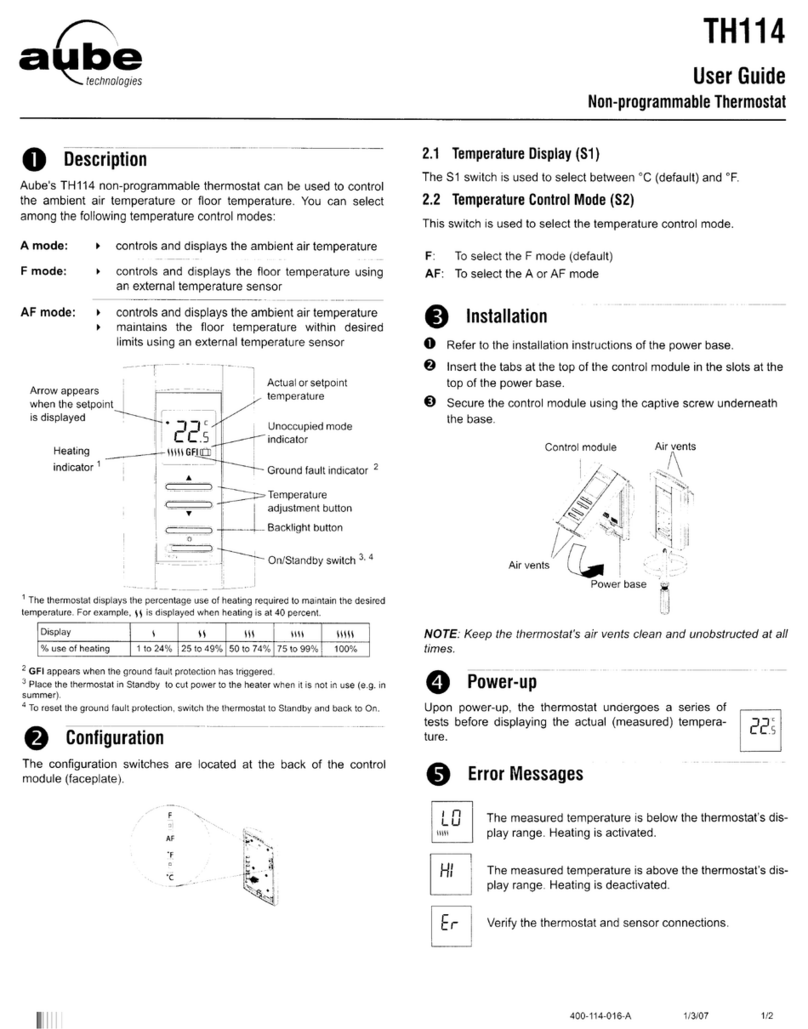
finder 1C.71 User manual

IB1C71 - 08/11
1C.71
www.findernet.com
TECHNICAL DATA
. . . . . . . . . . . . 1
DISPLAY LEGEND
. . . . . . . . . . . . 2
BASIC SETTINGS
. . . . . . . . .
. 3/4
MANUAL TEMPERATURE
SETTING
. . . . . . . . . . . . . . . . . . . . 5
SETTING THE 3
TEMPERATURE LEVELS
. . . . . . 6
PROGRAMMING
. . . . . . . . . . . . . 7
PARTY FUNCTION
. . . . . . . . . . . . 8
VACATION PROGRAM
. . . . . . . . 9
PROGRAM REVIEW AND
COPY PROGRAMMING
. . . . . . 10
FROST PROTECTION
FUNCTION . . . . . . . . . .
. . . . . . . 11
ADVANCED SETTINGS . . . . .
12/13
DISPLAY LOCK
. . . . . . . . . . . . . . 14
BATTERY
. . . . . . . . . . . . . . . . . . 15
fig. 1
fig. 2
N
L
fig. 3
Í
TOUCH SCREEN
WEEKLY PROGRAMMABLE
CHRONOTHERMOSTAT

IB1C71 - 08/11
Summer setting (cooling)
Winter setting (heating)
Heating ON
Cooling ON
Frost protection ON
Low battery
Unit of measurement
Temperature differential
Time display
Day of the week
24 hour time/temperature profile
21 3
01234567891011121314151617181920212223
1
2
3
4
5
6
7
T
T
88:88ΔT PRG
PRG
OK
OFF
OFF
OK
°C
ΔT
Exit programming / step back
Lock or unlock the display
Manual over-ride / holiday program
Display / Setting the three temperature levels
Programming / setting time and date
Confirm
Off
Increase
Decrease
TECHNICAL DATA
POWER SUPPLY: 2 ALKALINE BATTERIES 1.5 V AAA
TEMPERATURE RANGE: (+5…+37)°C
FROST PROTECTION TEMPERATURE RANGE: (+2…+8)°C
TEMPERATURE DIFFERENTIAL: (0.1...0.9)°C selectable
MINIMUM PROGRAMMING INTERVAL: 1 hour
DEGREE OF PROTECTION: IP20
OUTPUT: RELAY
CONTACT RATING: 5 A 250 V AC
MOUNTING: TO THE WALL
INSTALLATION AND CONNECTIONS
SAFETY REQUIREMENTS: before connecting to this programmable
thermostat, makesure that the load (heater, pump, etc.) is not connected to
the supply and that the load is within the ratings shown inside the thermostat.
POSITIONING : install the programmable thermostat away from sources
of heat (heaters, direct sunlight, kitchens) and from doors/windows, at a
height of about 1.5 m above the floor.
ATTENTION
During the installation do not tighten the screws too strongly, or the
base may distort.
This could impair the functionality of the touch screen.
INSTALLATION
- Press to release the small catch with the aid of a screwdriver (fig.1).
- Fix the base to the wall.
- Connect the load to the terminals following the wiring diagram (fig.2).
ELECTRICAL CONNECTIONS (fig.2)
U= equipment load
C= common terminal
NO = normally open terminal
NC = normally closed terminal
ADDITIONAL NOTES
On inserting the batteries, the display briefly shows the installed
version of the software. When the display is locked, or when showing
the main screen, touching the touch screen will display the current time.
There are 3 audible alerts:
- Short beep: confirmation that key is pressed
- 3 long beeps: confirmation that the information is saved
- Trill: error
CLEANING
For cleaning - use only a damp cloth.
DISPLAY LEGEND
1
°C
012
BASIC SETTINGS
It is possible to set or change the parameters below, following the
insertion of the batteries, or after pressing key for >2 sec.
Use the keys to modify each value and to confirm.
PRG
OK
00:h OK
10:00 OK
OK
10:y OK
12:AA OK
3 1: 8 OK 5
HOURS
MINUTES
DAY
MONTH
YEAR
SUMMER / WINTER

IB1C71 - 08/11
00:h OK
Press , and the first level of temperature will flash. Set the desired
temperature using the keys. Touch again to confirm and
to pass to next level of temperature.
Modify and confirm in the same way to set the second and third level
temperatures.
NOTE: Level 1 will be the lowest temperature of the 3 levels (minimum
setting possible is 5C) - levels 2 and 3 being progressively higher.
T
T
Successive presses to the key toggles the thermostat between
Timed mode and Manual mode. On entering Manual mode the display
initially shows the manual set-temperature which, if required, can
be modified using the keys. If the keys are not
pressed, or 2 seconds after being pressed, the display will change
to the actual room temperature and the thermostat remains in the
manual mode.
NOTE
When the Manual mode is operational the screen does not display
the time/temperature profile and other icons associated with it.
54 6
20.8 °C
01234567891011121314151617181920212223
T
18.8 °C
01234567891011121314151617181920212223
T
20.3 °C
01234567891011121314151617181920212223
T
23.6 °C
MANUAL TEMPERATURE SETTING SETTING THE 3 TEMPERATURE LEVELS
10:00 OK
OK
If DAT 0 selected on ADVENCED SETTINGS menu, the display will
show the screens below:
Press finally to return to the main screen.
T
HOURS
MINUTES
SUMMER / WINTER
OK
DAY NUMBER
NOTE
In the Dat 0 mode the DAY/MONTH/YEAR settings are replaced by a
single setting (DAY SETTING) which allows the number assigned to
the current day to be changed, using the keys.
This allows for example, day 1 to refer to Sunday, and not Monday.
3

IB1C71 - 08/11
7
NOTE: to step back, use the key. If pressed for >2 sec, programming
will be exited, saving those operations confirmed up to that moment.
Press key to enter programming menu.
Selecting the day(s) to be programmed
Starting with day 1 (Monday) blinking, move down each day in turn by
using the key.
During this process select using the key those day(s) required to
have the same time/temperature profile. (Day(s) so selected will now
appear on a black background).
With the days selected, successively press the key until the time/
temperature profile starts to blink. Then press to advance to the
profile programming stage.
Programming the 24 hour time/temperature profile
With the zero hour segment of the profile blinking, select the desired
temperature level using the keys.
Pressing the key confirms the setting and at the same time
programming advances to the next hour. This procedure is repeated
for setting the desired temperature level for each of the 24 hourly
segments.
01234567891011121314151617181920212223
OK
01234567891011121314151617181920212223
1
2
3
4
5
6
7
OK 3
5
01234567891011121314151617181920212223
1
2
4
6
7
OK
OK
PROGRAMMING
PRG
OK
OK
1
2
3
4
5
6
7
98
Following confirmation, a digital countdown plus a circular motion
graphic will be displayed. Touch to view the set temperature.
To exit from the program, press the key .
NOTE
A time period of < 100hours is programmed in hours and minutes.
A time period of 100hrs to a maximum of 9999 hours (9999=416days)
is programmed in hours.
Continue by setting the temperature and confirm with .
Time -Temperature function
This function will maintain a single specific temperature over a specific
time period. Press the key for 2 sec, then use the keys to
select the required time period and to confirm.
1:28 OK
20:8 OK
°C
24 3h
VACATION PROGRAM
T
OK
OK
To exit and cancel Party programming hold the key down.
To cancel the Party function while running, press the key once.
After setting the temperature level for the final hour that requires
modification, do not press . Simply touch no key for > 3 seconds
and the Party profile will be accepted and will run – as shown by the
display of a rectangle with clockwise movement of the segments.
(From main screen) Press or to enter into the party function.
This allows the temperature level assigned to each hour to be modified
for just the following 24hour period. These levels will not be saved or
apply beyond the 24 hour period. Starting from the current hour, set
the temperature level using the key.
Pass to the next hour by the key.
01234567891011121314151617181920212223
OK
-- --
01234567891011121314151617181920212223
OK
OK
PARTY FUNCTION
T
OK

IB1C71 - 08/11
Program Review
Press and use keys to step through and view the program
for each day, in turn. Use to return to main screen.
10 11 12
PROGRAM REVIEW AND COPY PROGRAMMING
Press for 2 sec and the display will then show any remaining
day(s)that may require copy programming - using the same procedure.
Otherwise, press to finally exit the copy programming.
Copy Programming
Press ; using the keys, select the day to be copied and
press to confirm. Then move using keys, to day(s)
requiring programming, selecting with .
The day(s) concerned will then have a black background.
Continue to press the key until the hours/temperature profile
starts to flash and then press .
The day(s) selected will then have acquired the same program.
PRG
OK
OK
OK
01234567891011121314151617181920212223
1
2
3
4
5
6
7
OK
01234567891011121314151617181920212223
1
2
3
4
5
6
7
OK 3
5
01234567891011121314151617181920212223
1
2
4
6
7
OK
In the event of the frost protection function operating, the display will
show the Heating ON and Frost protection ON .
This function protects the installation against freezing temperatures,
and is enabled only when the thermostat is set for Winter and is in
the OFF state.
FROST PROTECTION FUNCTION
OFF OFF
OF F OFF
Temperature differential: set a value between 0.1°C and 0.9°C
using the keys; confirm with .
Frost protection function: set value between 2°C and 8°C using the
keys; confirm with .
OK
OK
5.6 OK
°C
0.2 OK
°C ΔT
ADVANCED SETTINGS
Switch the thermostat to the OFF state, then press the key again
for 2 sec to set, in order:
OFF
Pump Anti-seize feature: this is an asymmetrical recycling timer
that will cyclically run the pump for 30 seconds (ON state).
Using the keys set an OFF state value between 00 and 99
hours and confirm with .
0: A OK
PRG
OK

IB1C71 - 08/11
13 14 15
8A EE
BATTERY
The thermostat provides 3 stages of battery alert:
- Battery icon is ON: the operation will be soon compromised.
- Battery icon blinking: it is necessary to change the batteries.
- BATT blinking: Both the thermostat and its output relay are in
the OFF state.
To fit/change the batteries, see fig.3.
Dispose of batteries according to local regulations.
NOTE
If the batteries are changed at the first alert, no data will be lost.
PIN (display lock): the display shows 4 digits (0000); change this
number using the keys and confirm with ;
Confirm as 0000 and the PIN is not active (PIN not required to unlock
the display). Confirm a number other than 0000 and the PIN is active
(PIN required to unlock the display).
NOTE
If you forget your PIN, insert the unlock PIN code 5137.
After which, enter "advance setting" and establish a new
PIN code.
Dat Setting: set one of the Dat codes using the keys and
Dat 0: allows day of the week and day number to be reassigned.
Dat 1: sets automatic update of daylight saving time.
Dat 2: sets no automatic update of daylight saving time.
OK
8A E 1 OK
0000 OK
DISPLAY LOCK (easy)
Press the key for 2 seconds, and 3 beeps will confirm that the
display is locked (except that touching the displayed temperature
will change it to the current time for a few seconds).
To unlock the display, press the key for 2 seconds.
01234567891011121314151617181920212223
3
20:8 °C
2300 OK
DISPLAY LOCK
DISPLAY LOCK (PIN)
Press for 2 second; the display will show 4 digit; with insert
the PIN set previously on "advance setting" menu and confirm with
to apply the lock. (Touching the displayed temperature will change it to
the current time for a few seconds).
To unlock the display press the key for 2 sec; enter the correct PIN
code and press .
Entering the wrong PIN, and the display shows ERR.
OK
OK
OK
Table of contents
Other finder Thermostat manuals
finder
finder Bliss 2 User manual
finder
finder 1C.51 User manual
finder
finder BLISS WI-FI CHRONOTHERMOSTAT 1C.91 User manual
finder
finder 1C.81 User manual
finder
finder 1T Series User manual

finder
finder 1T.41 User manual
finder
finder 1C Series User manual

finder
finder BLISS2 User manual
finder
finder BLISS T 1T.91 User manual
finder
finder 1T.31 User manual
Popular Thermostat manuals by other brands
Honeywell
Honeywell Chronotherm IV T8601D installation instructions
Danfoss
Danfoss FP735Si quick guide
MICRO-AIR
MICRO-AIR EasyTouch 355 operating manual
Heat Decor
Heat Decor HD-SWT Series quick start guide
Honeywell
Honeywell HE0118 Setup guide
Honeywell
Honeywell TROL-A-TEMP Q674B installation instructions

