FIORENTINI ASPIRIK-P User manual

Contents
1 Safety Standards......................................2
1.1
Symbols used in the instructions .............. 2
1.2
General warnings....................................... 2
1.3
Driving mode.............................................. 2
1.4
Appliances with Combustion Engine.......... 3
1.5
Compliant and Intended Use ..................... 3
1.6
Symbols on the Machine............................ 4
2 Description...............................................4
2.1
Control and operating parts ....................... 4
2.2
Identification Plate...................................... 5
3 Before putting into Service......................5
3.1
Unloading the appliance............................. 5
3.2
Drive Disengaged....................................... 5
3.3
Drive Engaged ........................................... 6
4 Commissioning........................................6
4.1
Fuelling....................................................... 6
4.2
Control Interventions.................................. 6
4.3
Positioning the Waste Container................ 6
5 Operation..................................................7
5.1
Starting the machine.................................. 7
5.2
Driving........................................................ 8
5.3
Suction ....................................................... 8
5.4
Dust Removal............................................. 8
5.5
Cleaning the Filter...................................... 9
5.6
Stopping..................................................... 9
5.7
Transport........................................9
6 Care and Maintenance.............................9
6.1
General Warnings...................................... 9
6.2
Cleaning................................................... 10
6.3
Maintenance frequency............................ 10
6.4
Battery Maintenance................................ 10
6.5
Motor Oil................................................... 11
6.6
Air Filter.................................................... 11
6.7
Spark plug................................................ 12
6.8
Hydraulic oil.............................................. 12
6.9
Transmission Belts................................... 12
7 Disposal..................................................13
8 Warranty .................................................13
9 Accessories and Spare Parts................13
10 Troubleshooting...................................14
11 Technical Specifications ....................14
rev.01
Operating instructions
ASPIRIK-P
Petrol Vers.
EN
2
1 Safety Standards
This document contains important information
relating to appliance safety.
As well as a guide for its proper use. Before
putting the unit into operation for the first time,
you must read and understand this instruction
manual carefully. Keep the instructions for
further
reference.
1.1 Symbols used in the instructions
1.2 General warnings
Immediately inform your dealer should damage be
discovered when unpacking due to transport.
Read the operating manual of the machine and
especially comply with the safety standards
before operating it.
The warning plates on the appliance provide important
information for safe use.
In addition to the operating instructions and
mandatory regulations for the prevention of
accidents in the country of use, you must observe
the general safety and operating rules.
1.3 Driving mode
HAZARD
Risk of tipping over when driving
fast on curves.
•
Drive bends at low speed.
HAZARD
Risk of tipping over on unstable
ground.
•
Only drive the appliance on
stable floors.
HAZARD
Hazard that leads directly to serious or
irreversible injuries, or even death.
WARNING
Hazard that can lead to serious or
irreversible injuries, or even death.
CAUTION
Hazard that can lead to minor
injuries.
HAZARD
Risk of tipping over in case of
excessive lateral inclination.
•
Drive on slopes no greater than 10%
diagonally to the direction of travel.
•
Comply in principle with the rules,
regulations and provisions that apply
to motor vehicles.
•
The operator must use the
appliance according to the intended
use. While driving, he must take
account of conditions on site and pay
attention to third parties (in particular
children) when using the machine.
•
The appliance must only be used by
personnel trained on its use or who
have proven to know how to use the
machine and are expressly in charge
of its use.
•
Prior to use, try using the appliance
in a non-public area.
•
It is prohibited for children or
adolescents to use the machine.
•
It is prohibited to transport other
people.
•
Remove the ignition key to prevent
unauthorised persons from using the
appliance.
•
Never leave the appliance
unintended while the engine is
running.
•
The operator may only leave the
appliance after having switched off
the engine, blocked it against
movements, engaged the brake and
removed the ignition key.
HAZARD
Risk of tipping over on steep
slopes.
•
Do not drive or operate on slopes
greater than 10%.
•
For short straight segments and with
the waste container empty, it is possible
to exceed 30% slopes (e.g. truck ascent
ramp). In any case do not operate on
slopes greater than 10%.
HAZARD
CAUTION
WARNING
HAZARD
HAZARD
HAZARD
HAZARD

EN
3
1.4 Appliances with Combustion Engine time frame, keep absolutely away
from the transmission area.
•
Open the bonnet of the appliance only
with the engine off.
•
Do not insert your fingers into the
steering column lock mechanism.
•
Do not remove the safety devices.
1.5 Compliant and Intended Use
Use this light waste vacuum cleaner only in
accordance with the directions given by
this operating manual.
Before use, check the perfect condition and safe
operation of the appliance and of the work
equipment. Otherwise it is forbidden to use it.
Before starting work, the operator must ensure that
all the safety devices are correctly placed and
functioning.
In the standard version (with coarse filter) the
appliance is suitable for suction of light waste (e.g.
jars and beverage bottles, cigarette boxes etc.).
This appliance is designed to vacuum clean
outside environments.
The appliance is not suitable to vacuum and
collect dust harmful to health.
No changes may be made to the
appliance.
Never vacuum explosive liquids, flammable gases,
or acids and solvents. This includes petrol, paint or
gasoline thinners that, together with the intake air,
may form explosive vapours or mixtures, as well as
acetone, acids and solvents that may corrode the
materials of the machine.
Reactive metal powders (e.g. aluminium,
magnesium, zinc) form explosive gases together
with strongly alkaline detergents and acids.
Do not vacuum burning objects.
It is forbidden to remain in the danger areas.
It is forbidden to use the appliance in explosive
environments.
Keep the appliance away from any easily
flammable substance.
Protect the appliance against freezing.
Any other use is considered improper use. The
manufacturer does not accept responsibility for
any damage caused by improper use. The risk
resulting from such use is the sole responsibility of
the user. Suitable use includes appropriate
operation, maintenance and repairs as specified
by the manufacturer.
CAUTION
Before commissioning the appliance,
read the operating manual supplied by
the manufacturer of the engine.
In particular observe the safety-related
warnings.
HAZARD
Risk of explosion.
•
Refuel only with the engine off.
•
Only use the fuel stated in the engine
operating instructions.
•
Do not refuel in closed
environments.
•
Do not smoke or use naked flames.
•
Make sure that the fuel does not come
into contact with hot surfaces.
WARNING
Risk of burns.
•
The gas exhaust outlet must not be
closed.
•
Do not lean over the gas exhaust
outlet.
•
Do not touch the gas exhaust outlet.
•
Before carrying out any maintenance
or repair, let the appliance cool down
sufficiently.
•
Do not touch the drive engine.
HAZARD
Risk of poisoning.
•
Exhaust gases contain carbon
monoxide, and therefore are harmful
and injurious to health and should not
be inhaled.
•
It is prohibited to use the
machine in closed environments.
HAZARD
Risk of shearing.
•
After switching off, the engine takes
about 3-4 seconds to stop completely.
During this
CAUTION
HAZARD
WARNING
HAZARD
HAZARD

EN
4
1.6 Symbols on the Machine
The following symbols are displayed on
adhesive labels on the external surfaces of the
machine. Their presence is essential to ensure
the safe use of the machine.
The operator is responsible to replace missing,
damaged or illegible labels due to wear. The
ordering code of the corresponding label is
shown below next to its description.
2
2 Description
2.1 Control and operating parts
1.
Steering column
2.
Bonnet
3.
Suction hose
4.
Flashing light
5.
Suction head
6.
Waste container
7.
Fire extinguisher
Code ET054
Crushing hazard. Keep
hands away from moving
parts of the machine or wait
until all moving parts have
stopped.
Code ET085
Burning hazard. Do not
touch surfaces near the
symbol as they are hot. Let
the engine and exhaust
system cool down before
attempting any work on the
appliance.
Risk of shearing.
Forbidden to remove the
guards and safety
devices.
Fire hazard. Do not
smoke or use naked
flames near the machine.
Keep easily flammable
materials and substances
away from the machine.
Code ET065
Code ET058
Code ET085
Code ET054

EN
5
8.
Dashboard
9.
Fuel tank
10.
Suction filter
11.
Rigid suction pipe
12.
Handle
13.
Steering column unlock lever
14.
Exhaust gas outlet
15.
Water tank for dust removal
2.2 Identification Plate
An adhesive machine identification label
containing indelible “CE” marking details is
affixed on the outside of the bonnet.
The plate must never be removed and must
always be legible. If it should be damaged, another
must be requested. The appliance cannot be
marketed without the plate.
3 Before putting into Service
3.1 Unloading the appliance
3.2 Drive Disengaged
•
Open the cardboard box.
•
The machine is fixed to a wooden platform with
belts and with brackets to lock the wheels.
•
Cut the belts and remove the wheel brackets.
The machine can then be moved and pushed
off the platform.
•
The appliance can be handled in two ways:
with or without drive engaged.
Reach the hydraulic bypass valve through the
open bottom part of the bonnet. The valve is
located at the front of the machine. Operate the
lever.
This disengages the drive and the machine
is free to move.
Do not move the machine with drive disengaged
over long tracts and at speeds exceeding 6 km/h.
HAZARD
Risk of injury and damage.
Do not use a forklift truck to unload the
appliance. Proceed as follows.
HAZARD
Risk of injury and damage.
Before releasing the drive, keep the
appliance still so that it cannot move
accidentally.
HAZARD
HAZARD
EN
6
3.3 Drive Engaged
Refuel the machine (see next paragraph).
Switch on the machine and move it by means of its
hydraulic drive (see next paragraph).
Carefully move it down from the packaging
platform.
The machine can be moved with its drive only if
unpacked outdoors.
4 Commissioning
4.1 Fuelling
Turn off the engine.
If present, remove the waste container from the
back side of the machine (see next paragraph).
Unscrew the tank cap.
Top up with suitable fuel (see engine use and
maintenance manual)
Fill the tank up to 2.5 cm below the top edge of the
filler neck.
Eliminate any spilled fuel and close the tank cap.
4.2 Control interventions
For the execution of the following controls refer to
the chapter entitled "Care and maintenance".
Check the motor oil level.
Check the level of fuel tank.
Check the level of the hydraulic oil.
Empty the waste container.
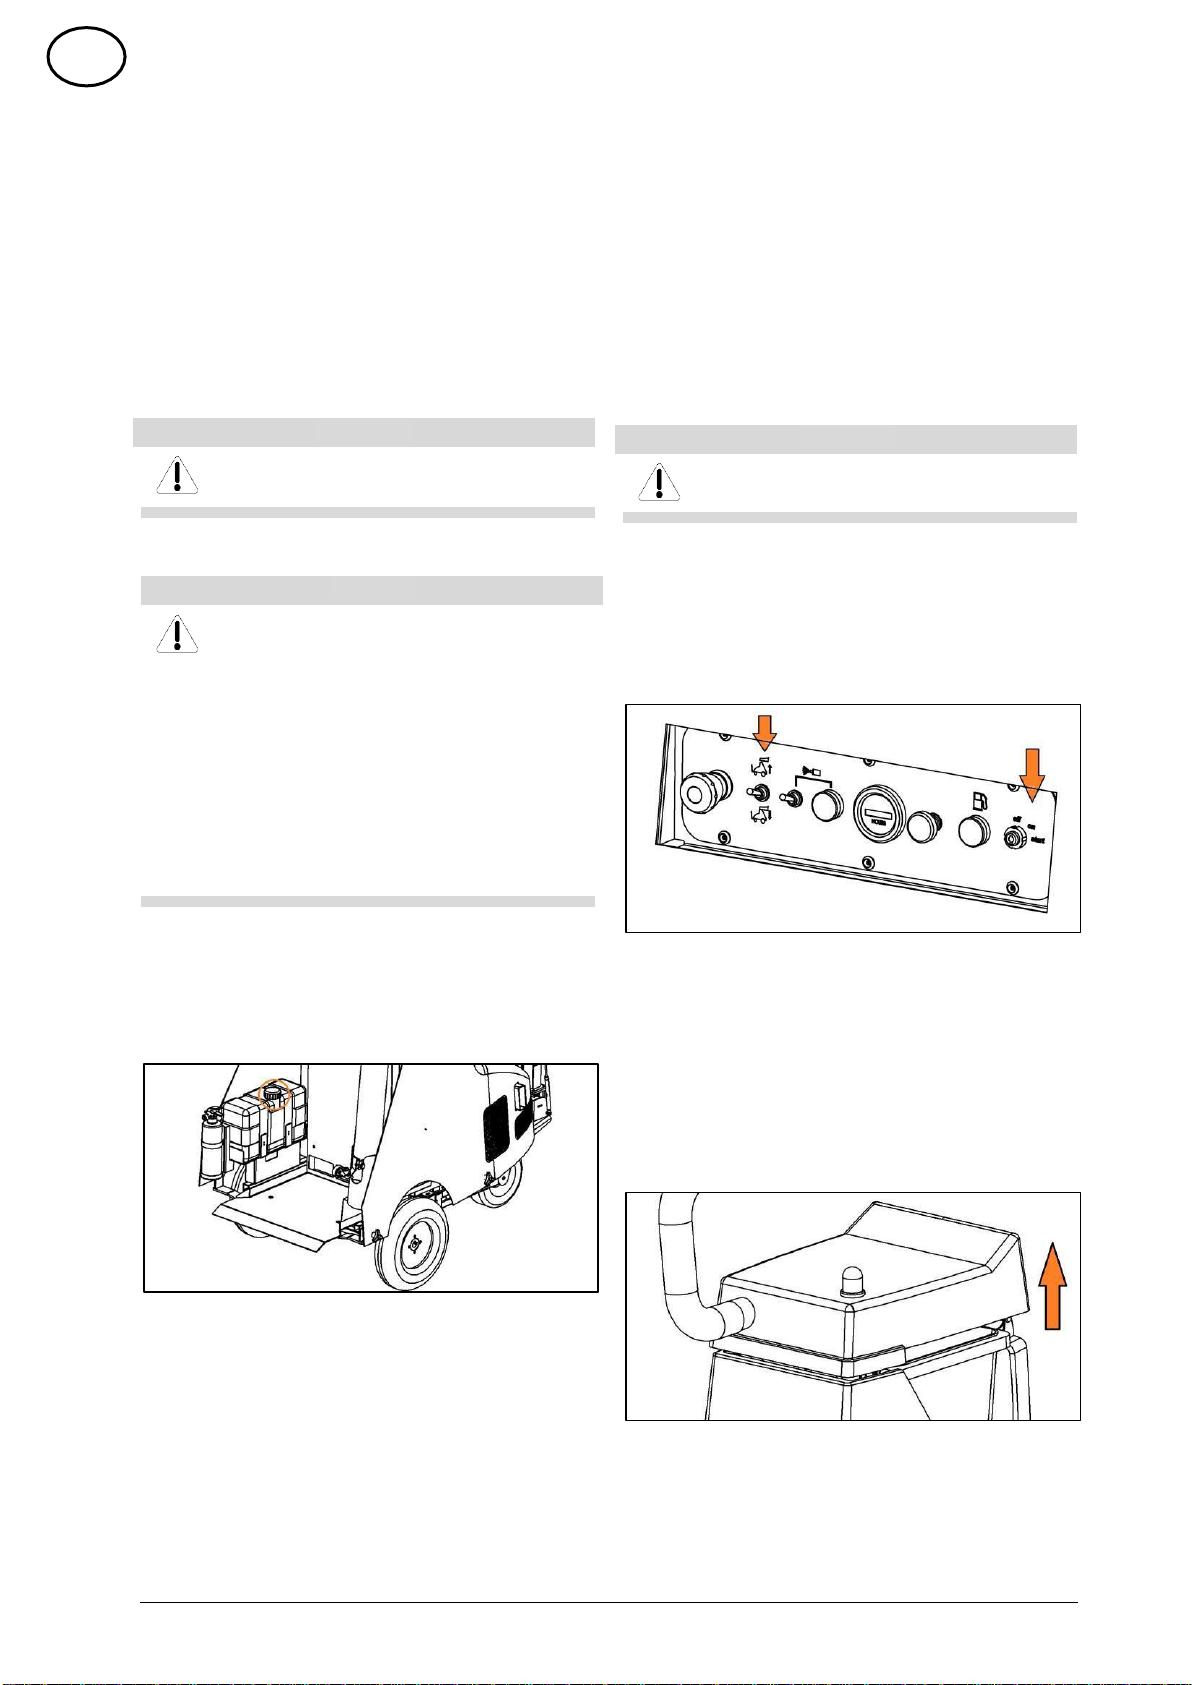
4.3 Positioning the Waste Container
To insert and remove the waste container
according to DIN EN 840-1, lift the suction head.
Press the specific switch on the
dashboard to move the head.
The head can only be enabled electrically
with the ignition key ON.
The head cannot be lifted or lowered with the
engine running. The engine can only start if the
head is properly fit on the waste container. In any
case the waste container must be positioned with
the engine off.
WARNING
Place the appliance on a level
surface.
HAZARD
Risk of explosion.
•
Refuel only with the engine off.
•
Only use the fuel stated in the engine
operating instructions.
•
Do not refuel in closed
environments.
•
Do not smoke or use naked flames.
•
Make sure that the fuel does not come
into contact with hot surfaces.
WARNING
The waste container must be positioned
with the engine off.
HAZARD
WARNING
WARNING
EN
7
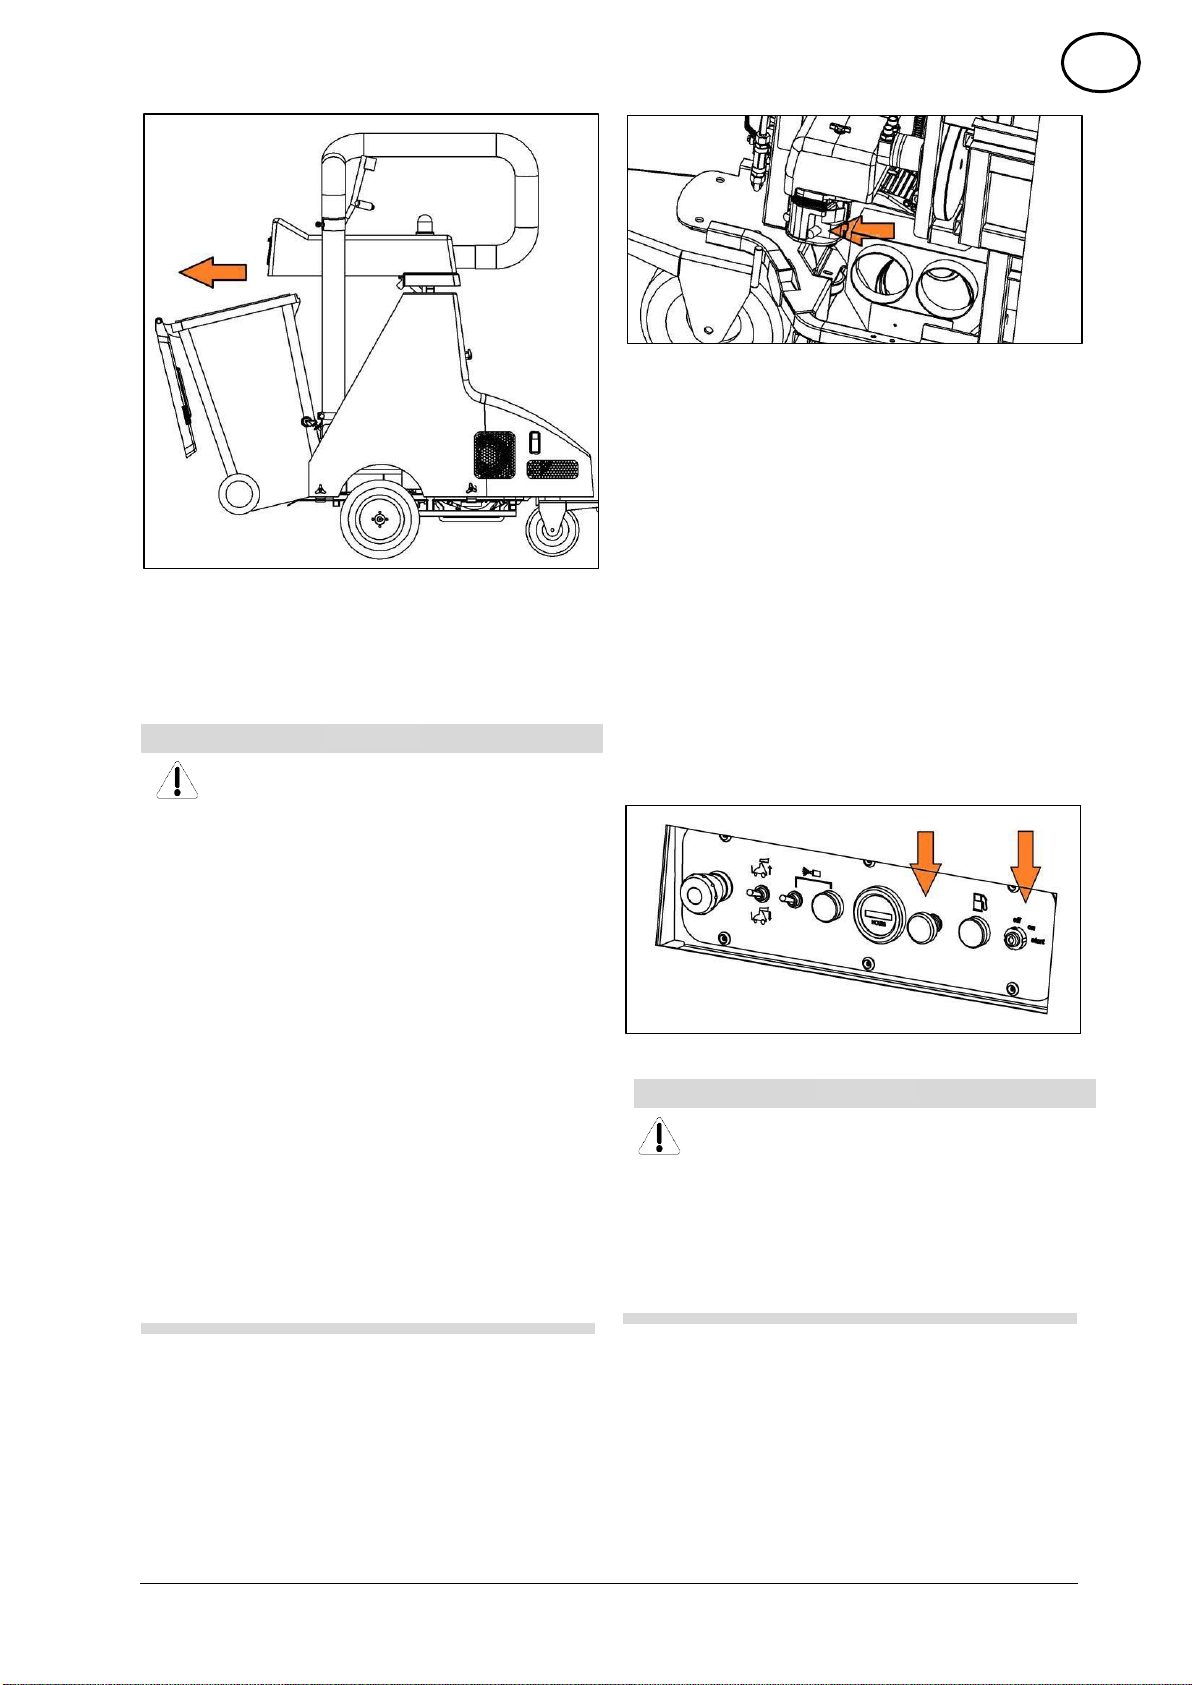
When positioning the waste container underneath
the suction head, check that the gasket fits tight
on the edge of the container.
5 Operation
5.1 Starting the machine
Open the fuel cock before starting the machine.
This can be reached through the bottom open
part of the bonnet.
Push the cock lever to ON.
Make sure that the steering column is in neutral,
that is locked in the centre position. The engine
does not start with the steering column in this
position.
Pull the Starter knob on the dashboard next to
the ignition key.
Turn and hold the ignition key in the START
position for no more than 5 seconds.
When the engine has started, put the Starter knob
back in position.
If the engine does not turn on the first try, wait
at least 10 seconds before operating the Starter
again.
The flashing light and the hour counter are
activated when the engine is running.
If the fuel level is at a minimum, the red light
between the ignition key and the starter knob
goes on.
WARNING
Even though the machine has an
isolation system of the vibrations
produced by the engine, stresses
transmitted to the hand and arm of the
operator through the steering column
cannot be eliminated completely.
Prolonged use may cause vascular
problems in the hands.
Generalised times of use cannot be
established, since they are subject to
several factors:
Predisposition to insufficient
blood circulation.
Low ambient temperature.
Grip excessively tight.
We recommend use interrupted by
pauses instead of continuous.
We recommend a medical examination
in case of regular and continuous use or
if phenomena like tingling of the hands
and cold fingers occur repeatedly.
WARNING
You do not need to adjust the engine
rpm. The rotation speed is adjusted and
preset at the factory.
Do not change speed by intervening on
the carburetor of the engine. This could
compromise the smooth and safe
operation of the machine.
WARNING
WARNING

EN
8
5.2 Driving
Pull the unlock lever and carefully move the
steering column forward or backward.
Pulling the steering column towards you moves
the machine forward.
Pushing the steering column towards the bonnet
moves the machine in reverse.
If the steering column is outside of the
central position, the unlock lever can be
released.
You can set the speed infinitely variable from the
steering column.
Direct the appliance in the desired direction by
turning the steering column to the right or to the
left, at the same time pushing it forward or
backward to adjust speed.
If you release the steering column, it goes
back automatically to the middle locked
position. The machine stops and remains
braked.
5.3 Suction
During use, empty the waste container at regular
intervals or replace it with an empty one.
Remove the suction hose from the support and
hold it by the handle.
Press the button on the handle to start the intake
flow. The suction fan stops when released.
Put the suction hose back into the support when
vacuuming is finished.
5.4 Dust Removal
The dust removal function is enabled from the
switch on the dashboard. The green light indicates
activation of the function.
Each time the suction button is pressed, a nozzle
inside the suction head sprays a small amount of
water for about three seconds. The duration of
dispensing depends on how much the
HAZARD
Do not attempt to pass over fixed
obstacles higher than 50 mm.
WARNING
Do not abruptly deactivate the
steering column as it could damage
the hydraulic system.
HAZARD
WARNING

EN
9
suction button on the handle of the suction hose is
pressed.
At regular intervals, fill the tank on the suction
hose support with water.
5.5 Cleaning the Filter
When there is a decrease in suction power,
clean or replace the filter.
Open the filter door on the rear of the suction
head.
Remove the filter and clean it with compressed air
and by shaking it or replace it if the filtered
material is excessively dirty.
5.6 Stopping
The machine can be stopped by releasing the
steering column and causing it to go to the locked
position.
The engine continues to run.
Turning ignition key to OFF and removing
it also stops the engine.
If the appliance is not used for a long period of
time, proceed as follows:
-
Place the appliance on a level surface.
-
Lock the drive by releasing the steering column.
-
Fill the fuel tank and close the petrol cock.
-
Change the motor oil.
-
Turn the ignition key to OFF and remove it.
-
Unscrew the spark plug and put about 3
cc of oil in the spark plug housing bore.
Rev up the engine a few times without the
spark plug. Screw on the spark plug.
-
Clean the unit inside and outside.
-
Store it in a sheltered and dry place.
-
Disconnect the battery.
-
Charge the battery every 2 months or so.
5.7 Transport
6 Care and Maintenance
6.1 General Warnings
Before cleaning and servicing the appliance or
replacing components, turn it off and remove the
ignition key.
WARNING
If none of the previous actions stops the
machine, press the red emergency
button on the dashboard.
HAZARD
Respect the weight of the appliance
during transport.
HAZARD
For transport on vehicles secure the
appliance according to directives in
force so that it cannot slip or tip over.
Ensure the immobility of the appliance by
locking it with belts and ropes.
The ropes must pass through the tubes of
the machine frame protruding at its
bottom.
Secure the wheels with wedges.
The appliance cannot be lifted by belts.
Use a ramp to load and unload the
appliance, using its own drive.
WARNING
HAZARD
HAZARD

EN
10
Make sure all engine and transmission parts have
stopped. After stopping the engine always wait 5
seconds.
Before carrying out any maintenance or repair, let
the appliance cool down sufficiently.
Never touch hot components such as the drive
motor and exhaust deflector.
When working on the electrical system,
disconnect the battery.
Repairs may only be performed by authorised
service centres or by experts in this field who are
familiar with all relevant safety regulations.
6.2 Cleaning
Weekly maintenance:
-
Make sure there are no fuel leaks.
-
Check the air filter.
-
Check that the moving parts move
perfectly.
Maintenance every 100 working hours:
-
Check the tightness of the fuel pipes.
-
Change motor oil (first change after 20
hours of operation).
-
Check the spark plug.
-
Check the battery acid level.
-
Check the tension, the wear and the
operation of transmission belts (poly-V).
Remove the machine bonnet to clean the inside.
Clean with a jet of compressed air.
The outside of the appliance should be cleaned
with a soft cloth and a mild detergent. Do not use
aggressive cleaning agents.
6.3 Maintenance frequency
The following maintenance operations are to be
carried out by the customer:
Daily maintenance:
-
Check the motor oil level.
-
Check the level of the transmission oil.
-
Check operation of all control parts.
-
Clean the gasket on the suction head.
The following maintenance operations are to
be carried out by customer service:
-
Perform the first inspection after 20 hours.
-
Maintenance every 100
working hours.
To keep the warranty valid, during the warranty
period, all servicing and maintenance must be
carried out by authorised Ing. O. Fiorentini S.p.A.
Service.
6.4 Battery maintenance
The machine is equipped with two 12-volt starting
batteries connected in series, type YUASA YB16
or FIAMM FB16B.
WARNING
Do not clean the appliance with a high
pressure water jet (risk of short circuit
or other electrical failures).
WARNING
All servicing and maintenance to be
undertaken by the customer must be
performed by a qualified technician.
WARNING
The operating hours counter indicates
the maintenance intervals.
HAZARD
Wear a dust mask and safety goggles.
HAZARD
Risk of explosion.
Never place tools or similar objects on
the battery, on the terminals and on the
connections of the battery cells. If
conductive it could cause a short circuit
resulting in ignition of the electric arc.
Provide adequate ventilation during
charging to ward off possible explosive
gases produced by the battery.
Always follow the instructions
of the battery charger.
WARNING
WARNING
WARNING
HAZARD
HAZARD
EN
11
For safety reasons, the appliance’s starting
batteries are shipped dry.
Generally the local dealer activates the batteries.
If this has not been done, they must be activated.
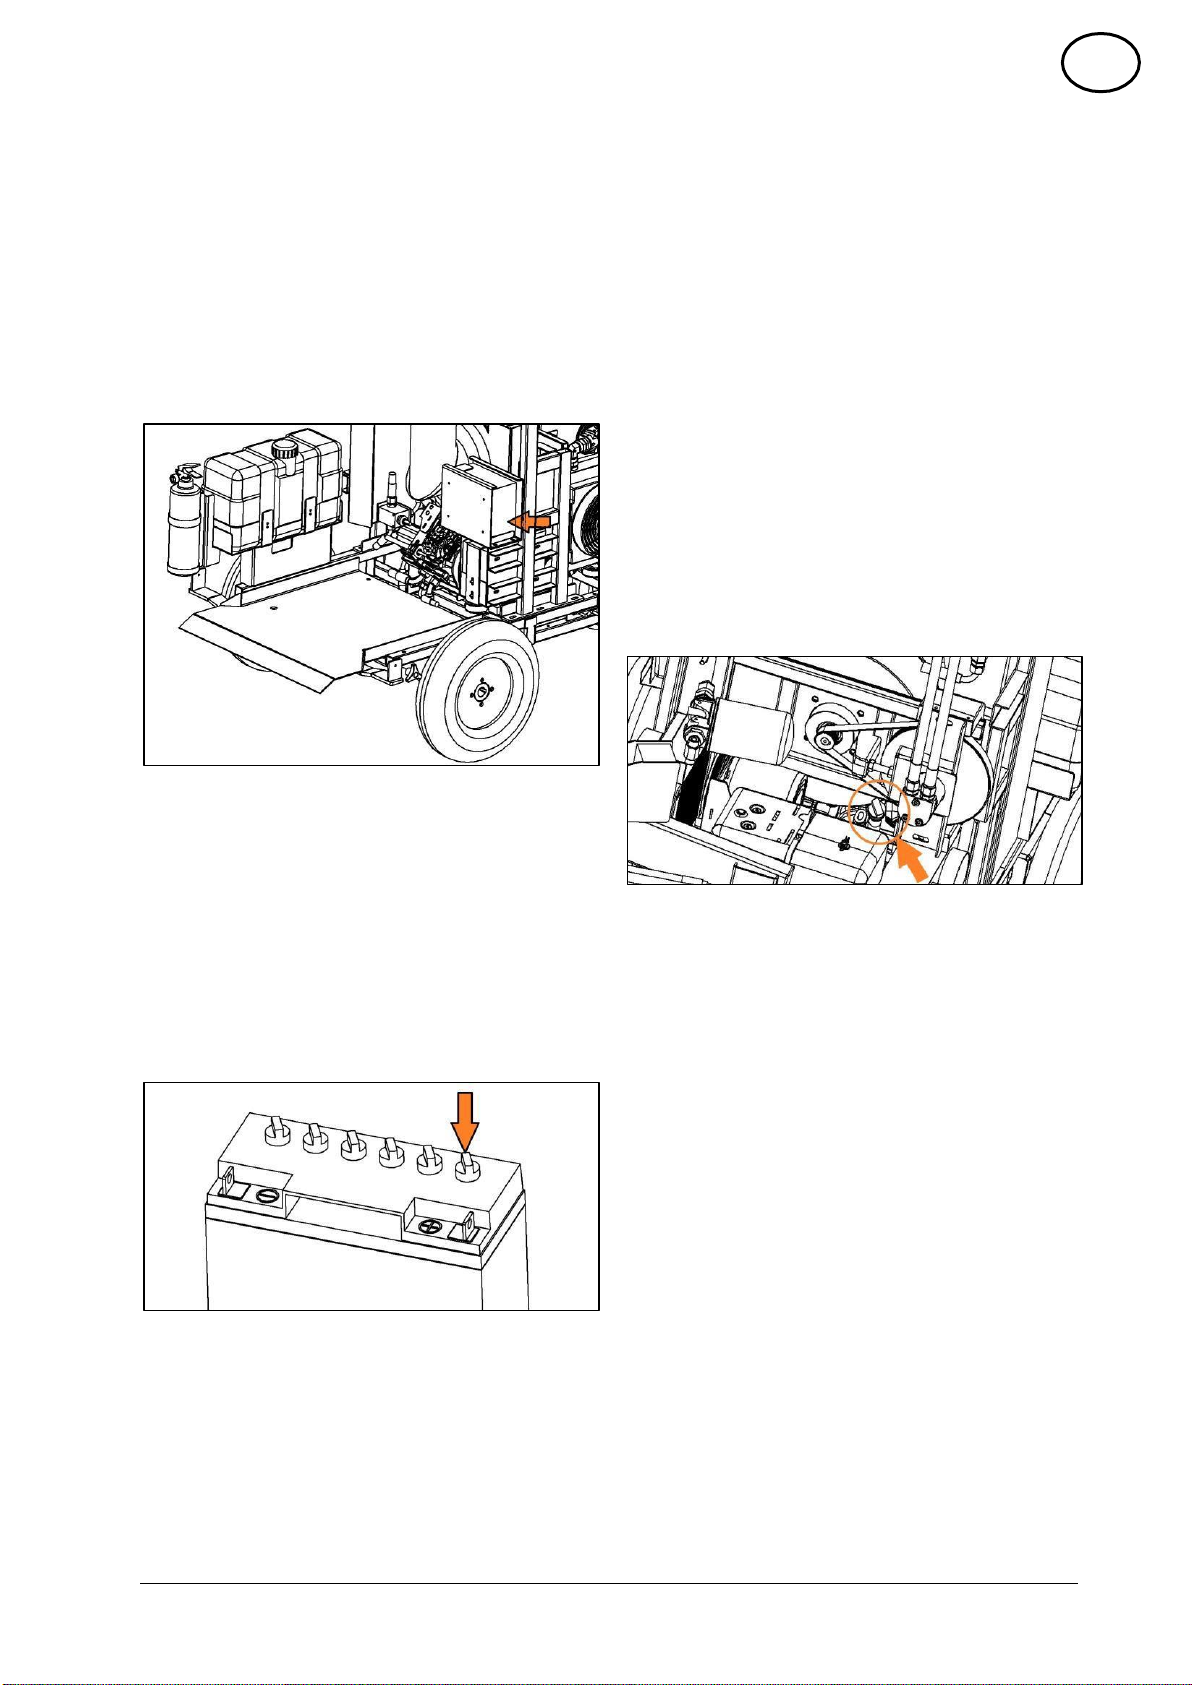
Completely extract the batteries from the
appliance.
Lift the suction head.
Extract the waste container.
Remove the engine and rear bonnet.
The battery holder is now visible.
Disassemble the battery holder.
Disconnect the battery from the electrical
system by removing the cables from the
battery terminals.
Remove them from the support by removing
the clamps.
The batteries must be activated with the acid
supplied.
Place the batteries on a horizontal plane,
unscrew and remove the top caps and vent plug.
Slowly pour the acid into each hole until it
reaches the UPPER LEVEL.
Never fill up to the top edge of the battery cover:
acid spills could occur.
Place the caps on the holes and allow the
battery to rest for about 30 minutes to allow the
activation of the plates. Press or tighten the top
caps all the way and leave the vent plug open.
If the voltage of the battery is below 12.7 Volts
charge it with an appropriate battery charger.
Refer to the user manual of the battery charger.
Remember that the two batteries are
connected in series and that the rated voltage
of the system is 24 Volts.
Periodically recheck (4-6 months) the levels of
acid and optionally restore them to UPPER
LEVEL using distilled water suitable for use with
Lead batteries.
6.5 Motor oil
The engine is equipped with a safety system
which prevents start-up if the oil level is below
the minimum allowed.
Do not check the oil level before 5 seconds
have passed since stopping the engine.
Remove the engine bonnet.
Remove the oil dipstick, recognisable by the
yellow end.
Clean the dipstick and put it back into the slot.
Check the level at the next extraction. If
necessary, add oil.
See the technical specifications for the type
of motor oil.
To change motor oil, in any case remove the
oil dipstick.
Unscrew the oil drain plug at the bottom of the
engine. Collect the used oil in a suitably sized
tray placed under the machine.
When all the oil has drained, screw the drain
plug back on and fill with motor oil.
Close the oil filler hole.
Wait at least 5 minutes.
Check the motor oil level.
6.6 Air Filter
Remove the engine bonnet.
Unscrew the wing nut.
Remove the filter cartridge, check it and clean it.
Insert the clean cartridge or a new cartridge into
the suction container.

EN
12
Tighten the wing nut.
6.7 Spark plug
Detach the spark plug connection.
Unscrew and clean the spark plug.
Screw the clean or a new spark plug.
Apply the spark plug connection.
It is possible to completely empty the hydraulic
circuit through two plugs on the bottom of the
tank.
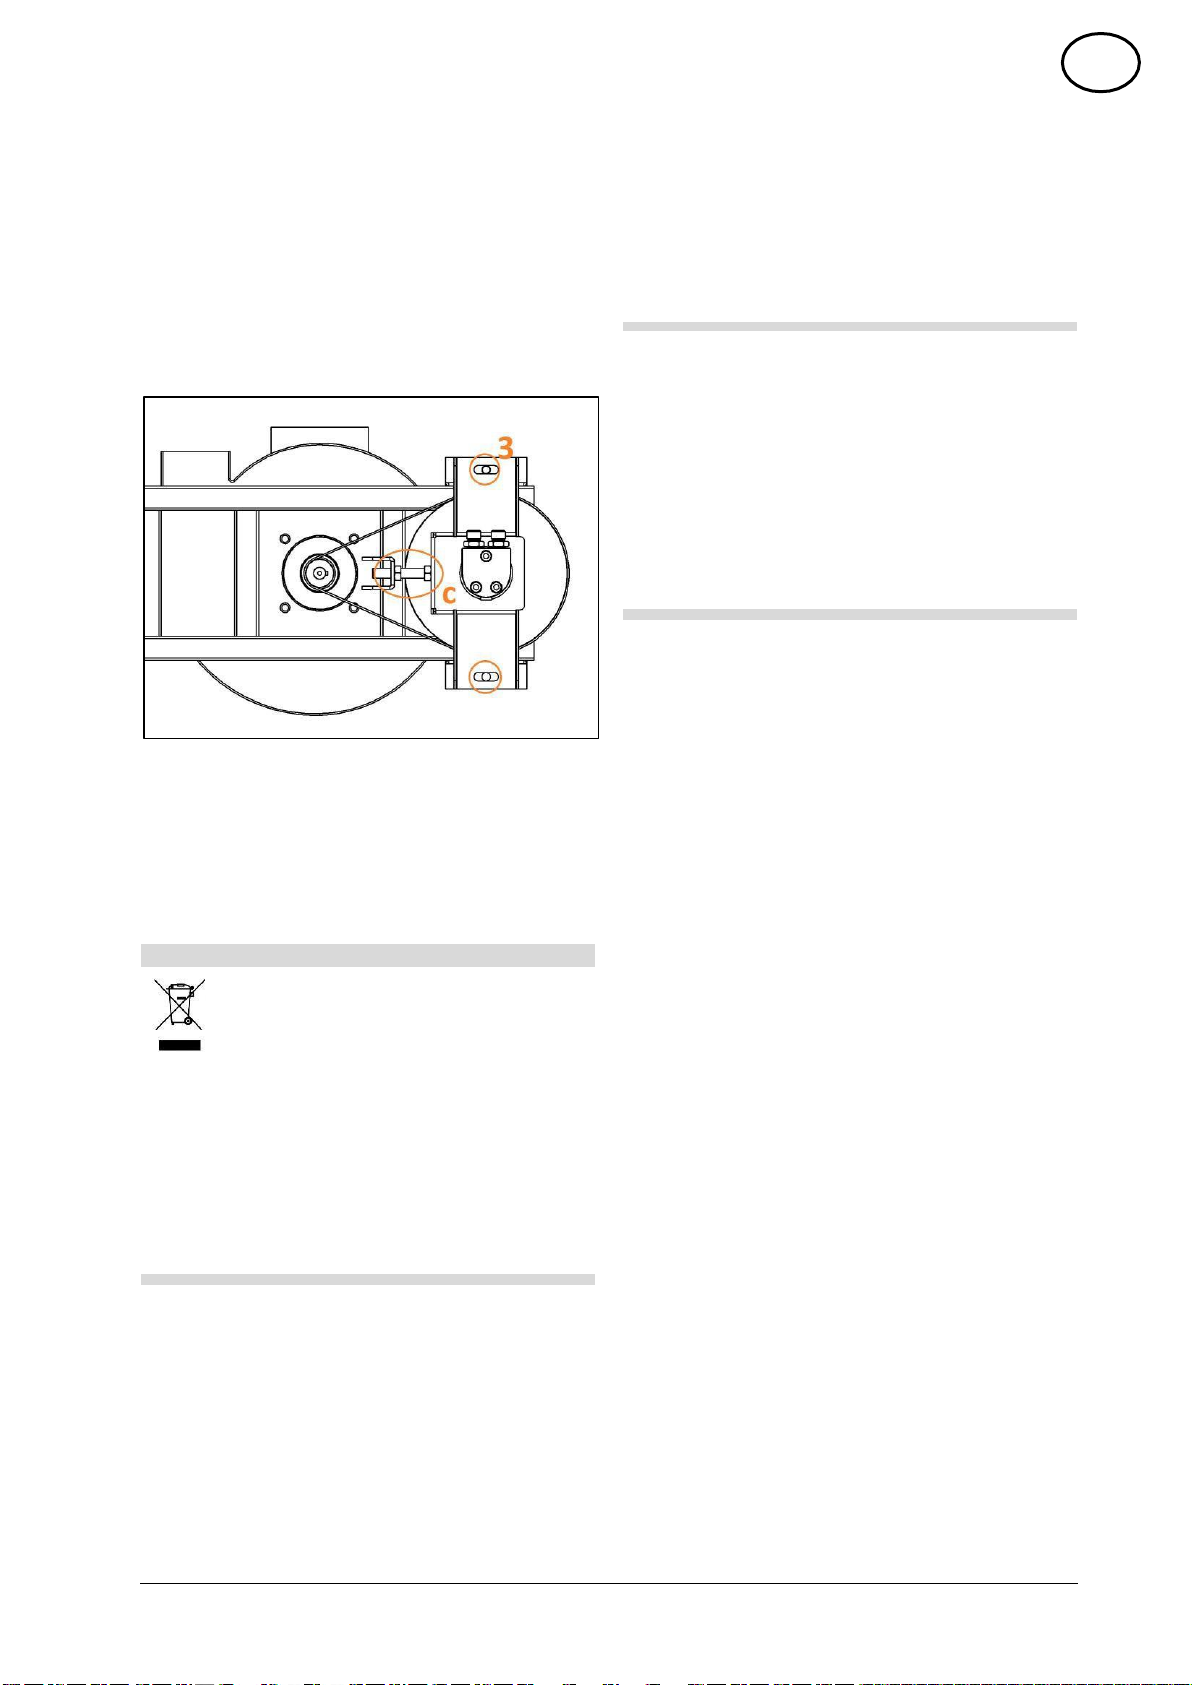
6.9 Transmission Belts
The machine has three poly-V transmission belts.
One for the intake fan, one for the pump unit and
the third for the dynamo-starter motor and battery
charger.
Periodically (approximately 300 hours of operation)
check belt tension and adjust if necessary.
The belt tensioners A and B act respectively on
the belts of the pump unit and engine dynamo.
6.8 Hydraulic Oil
Extract the waste container.
This way the hydraulic oil level and filler cap
remain visible.
In order to adjust the tension of the belts, you must
first slightly loosen the screws 1 and 2 and then
loosen the lock nut of the belt tensioning
mechanism.
Top up if the level is not correct.
See the technical specifications for the type of
hydraulic oil.
Every 500 hours of operation, replace the filter
cartridge in the hydraulic circuit.
HAZARD
Risk of injury and damage.
A belt tension meter should be used.
Incorrect belt tension can lead to rapid
wear or sudden breakage of the
component, with possible damage to
the machine and dangerous projection
of parts of the belt.
HAZARD
EN
13
For clarity of representation, the figure shows
screws 1 and 2 without the pulleys and belts
mounted. Of course you must unscrew them
without removing them.
The tension can be adjusted by screwing or
unscrewing the belt tensioner. Once you have
found the optimal value, retighten the screws 1
and 2 and the lock nut.
Similarly, the belt tensioner C and screws 3
allow you to adjust the fan belt tension.
The correct belt tension values are:
-
Fan. 390 Newton per branch.
-
Pumps. 300 Newton per branch.
-
Dynamo. 65 Newton per branch.
7 Disposal
9 Accessories and Spare Parts
Only use accessories and spare parts
approved by the manufacturer. Original
accessories and spare parts guarantee that
the appliance can be used safely and without
problems.
ING. O. FIORENTINI S.p.A.
Via Piancaldoli 1896 Firenzuola 50033
Frazione Piancaldoli (FI) –Italy
Phone (+39) 055.81.73.610
Fax (+39) 055.81.71.44
E-mail: info@ingfiorentini.it
Website: www.ingfiorentini.it -
www.fiorentinispa.com
All packaging is recyclable. The
packaging must not be disposed of
with household waste, but brought to
relative collection centres.
Discarded appliances contain valuable
recyclable materials and must be
brought to relative collection centres.
Batteries, oil, and similar substances
must not be released into the
environment. Therefore please dispose
of your discarded appliances using
separate collection systems.
8 Warranty
The Ing.O.Fiorentini S.p.A. general terms
conditions also apply to the warranty.
The manufacturer cannot be held responsible in
any way for damage resulting from unauthorised
modifications made to the appliance, from the use
of unsuitable brushes and accessories and after
use of the device other than that intended.

10 Troubleshooting
FAILURE
REMEDY
The appliance does not start.
Refuel.
Open the fuel cock.
Check the fuel system and connections.
Check the general fuse, replace if necessary.
Low battery. Recharge the battery.
Check and clean the spark plug, replace it if
necessary.
Inform the assistance service.
The engine runs irregularly.
Clean or change the air filter.
Check the fuel system and connections.
Inform the assistance service.
The engine is running, but the appliance does not
start.
Check proper functioning of the steering
column.
Check the hydraulic drive disengagement lever.
Inform the assistance service.
The engine is running, but the machine moves very
slowly.
In subzero temperatures, have the appliance heat
up for 5 minutes before using it.
Inform the assistance service.
Insufficient suction power.
Check the gasket on the suction head.
Check and clean the suction head filter.
Empty the waste container.
Inform the assistance service.
11 Technical Specifications
General Machine Data
Length x Width x Height
mm
1850 x 900 x 1600
Weight without load
kg
350
Total permitted weight
kg
450
Maximum forward speed
Km/h
6
Maximum slope allowed
%
30
Volume of waste container
l
240
Protection rating
--
IPX3
Engine
Model
--
Honda GX 270
Displacement
cc
270
Maximum power at 3600 RPM.
Kw/Hp
6.3 / 8.4
Maximum torque at 2500 RPM.
Nm
19.1
Fuel tank capacity
l
10
Starter battery
--
2x12 = 24V / 20Ah
Fuel consumption at full power
l/h
2.2

EN
15
Types of Oil
Engine SAE10W30 –API SJ
l
1.1
Hydraulic circuit AGIP OSO-46
l
12
Tyres
Front dimensions
mm
2 x Ø260x85
Front wheel pressure
bar
Full rubber
Rear dimensions
--
8” – 3.50
Rear wheel pressure
bar
Full rubber
Suction System
Filtering surface standard version
m2
0.23
Filtering surface fine dust version
m2
3
Maximum negative pressure
hPa
22.5
Maximum flow rate
l/s
470
Environmental Conditions
Temperature
°C
0..40
Humidity, non-condensing
%
0..90
Steering Column Vibrations
m/s2
0.5
Suction Tube Vibrations
m/s2
0.2
Noise emission at 3 meters
dB(A)
87
ING. O. FIORENTINI S.p.A.
Via Piancaldoli 1896 Firenzuola 50033 Frazione Piancaldoli (FI) –Italy
Phone (+39) 055.81.73.610
Fax (+39) 055.81.71.44
E-mail: info@ingfiorentini.it
Website: www.ingfiorentini.it - www.fiorentinispa.com
Table of contents
Other FIORENTINI Blower manuals

FIORENTINI
FIORENTINI SP500 NEW User manual

FIORENTINI
FIORENTINI UBF 38 User manual

FIORENTINI
FIORENTINI S 150 User manual

FIORENTINI
FIORENTINI 650 Instructions for use

FIORENTINI
FIORENTINI UBF 28 NEW Operating instructions

FIORENTINI
FIORENTINI S32B User manual

FIORENTINI
FIORENTINI MINISWEEPER Operating instructions

FIORENTINI
FIORENTINI GENIUS-14 User manual

FIORENTINI
FIORENTINI GENIUS-18 User manual


