Fired Up Corporation HHOA04-15 User manual

FUI0128_V1_260923
Electric Radiator
www.firedupcorporation.com/manual
When the heater is turned on for the first time or when it has not been
used for some time, it may release a slight, harmless odour. This odour is
a normal occurrence caused by the initial heating of the internal heating
elements and will disappear with use
INSTRUCTION MANUAL
This manual is for the following models:
HHOA04-15

CONTENTS
Safety Instructions 03-04
Installation 05-06
Display & Control Panel 05
Icons 06
Operation 06-08
Maintenance 08
Specification 08
Technical Parameters 09
Conformity 12
Guarantee & Contacts 12
02
Read ALL the instructions before use.
These instructions are for your safety. Please read
through them thoroughly before use and retain for
future reference. Failure to follow them could
cause injury and/or property damage.

SAFETY INSTRUCTIONS
• Read ALL the instructions before using this product.
• Check that the heater and all supplied accessories are present and intact.
• Always check your mains supply is the same as that indicated on the product before
connecting.
• Always disconnect the heater from the electrical supply before carrying out cleaning or
maintenance. To disconnect the heater, switch controls to OFF then remove plug from the
outlet.
• Always unplug the heater if it is going to be out of use for long periods of time.
• Do not use the heater near flammable or explosive materials.
• Do not use the heater if the casing, wire or plug are damaged.
• Avoid the use of an extension cord which may overheat and cause risk of fire. If an extension
cord is necessary, it must be rated above the maximum rated power of the appliance. Care
must be taken to arrange the cord so that it cannot be pulled or be tripped over.
• This appliance can be used by children aged from 8 years and above and persons with
reduced physical, sensory or mental capabilities or lack of experience and knowledge if
they have been given supervision or instruction concerning use of the appliance in a safe
way and understand the hazards involved.
• If the supply cord is damaged, it must be replaced by the manufacturer, its service agent or
similarly qualified persons in order to avoid a hazard.
WARNING: In order to avoid overheating,
DO NOT COVER THE HEATER
• The heater must not be located immediately below a socket outlet.
• Children of less than 3 years should be kept away unless continuously supervised.
• Cleaning and user maintenance shall not be carried out by children without supervision.
• CAUTION: In order to avoid a hazard due to inadvertent resetting of the thermal
cutout, this appliance must not be supplied through an external switching device, such as a
timer, or connected to a circuit that is regularly switched on and off by the utility.
• Fixed heaters are to be installed so that switches and other controls cannot be touched by a
person in the bath or shower.
• Children aged from 3 and less that 8 shall only switch on/off the appliance provided that it
03

has been placed or installed in its intended normal operating position and they have been
given supervision or instruction concerning use of the appliance in a safe way and
understand the hazards involved. Children aged from 3 years and less than 8 years shall not
plug in, regulate and clean the appliance or perform user maintenance.
• CAUTION: Some parts of this product can become very hot and cause burns.
Particular attention has to be given where children and vulnerable people are present.
• This heater is hot when in use. To avoid burns, do not touch hot surfaces such as surfaces
around the grille in front of the heater. Never let bare skin touch hot surfaces.
• Do not use this heater in the immediate surroundings of a bath, a shower or a swimming
pool.
• Do not use this heater if it has been dropped or if there are visible signs of damage.
Please ensure the minimum distances from the floor, ceiling and walls are observed and
adhered to.
INSTALLATION
Minimum Distances
04
≥300mm
≥300mm
≥300mm≥300mm
Wall
Top Hook x2 Heater
Wall
Plug x6
Screw x6
Bottom Hook x2

1. Drill 6 x 10mm holes in the wall according to
Diagram A.
2. Insert the Wall Plugs into the holes.
3. Screw the top hook, facing upwards, on
the wall using the screws provided.
4. Hang the radiator on the top hooks.
5. Fit the bottom hooks between 2 fins at the bottom of the raiator, ensure the hooks are
facing downwards.
6. Once hooked at the bottom, fasten the bottom hooks to the wall using the remaining
screws provided.
IMPORTANT: Before use, ensure the radiator is securely mounted to the wall.
DISPLAY & CONTROL PANEL
05
10mm 565mm
30mm
455mm
Diagram A.
0 3 6 9 12 15 18 21 24h
123 4567
°C Screen
Day Indicator
Temperature + / Timer +
Temperature - / Timer -
Open Window
Detection On/Off
Standby
On/Off
Time
Temperature
Settings / OK
Select Mode

Press the Standby key to turn the heater on or off.
Setting the Day and Time
Follow the steps below to set the day and time. The day and time must be set for the Timer
Programs to work correctly.
• Press & hold for 3 secs. - Hour setting will flash. Use +/-to select the hour (0-23).
• Press - Minutes will flash. Use +/-to select the minute (0-59).
• Press - Day will flash. Use +/-to select the day (1-7 - 1=Monday, 2=Tuesday etc.).
• Press to confirm the day and time.
Repeat this process if the time and day needs to be reset due to loss of power or unplugging
the radiator from the power source.
Temperature Setting
The screen shows the desired temperature. Use +/-to adjust the temperature up or down.
The heating icon will show when the radiator is reaching temperature. The temperature
range is 5-35°C. The temperature of Comfort Mode and ECO Mode can be adjusted.
Comfort Mode = 5-35°C
ECO Mode = Always 3.5°C less than Comfort Mode.
Anti-Frost Mode = 7°C. Cannot be adjusted.
Selecting the Mode
Press the Select Mode key to cycle through Comfort Mode, ECO Mode, Anti-Frost Mode
and Weekly Timer Program P1, P2 and P3.
Weekly Timer Programs
There are three programs which can be modified according to the desired requirements.
- This program runs Monday to Sunday, the custom program will run the same each day.
- This program runs Monday to Friday, then Saturday to Sunday. Monday to Friday will be
programmed to operate the same each day, then Saturday to Sunday will operate the same as each
other.
- This program allows Monday to Sunday to be programmed individually and is usually the
preferred program.
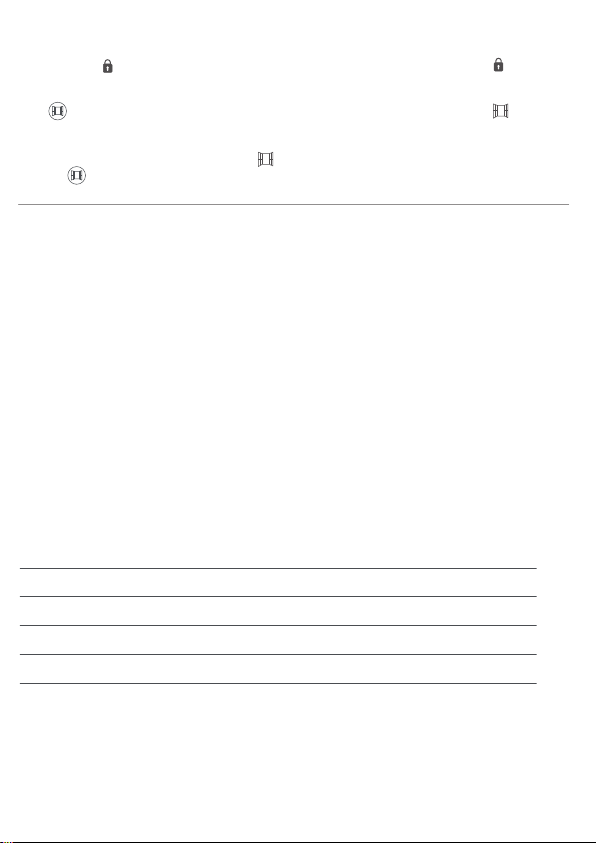
ICONS
06
Child Lock
3 x Weekly
Timer Programs
Heating
Icon
ECO
Mode
Anti-Frost
Mode
Comfort
Mode
OPERATION

0 3 6 9 12 15 18 21 24h
07
= The heater will work in Comfort Mode for the chosen hour.
= The heater will work in ECO Mode for the chosen hour.
= The heater will work in Anti-Frost Mode for the chosen hour.
Setting P1 - Monday to Sunday
Press the Select Mode key until P1 is selected.
• Press , P1 and the first hour bar will flash.
• Press to select Comfort , ECO or Anti-Frost mode.
• Use +/-to move through each hour and set a working mode for that hour. The bars across
the bottom of the screen will change to reflect the chosen mode.
• Press to confirm the timer settings and exit the Weekly Timer Program P1.
Setting P2 - Monday to Friday & Saturday to Sunday
Press the Select Mode key until P2 is selected.
• Press , P2 and the first hour bar will flash and days 1, 2, 3, 4 & 5 are shown.
• Press to select Comfort , ECO or Anti-Frost mode.
• Use +/-to move through each hour and set a working mode for that hour. The bars across
the bottom of the screen will change to reflect the chosen mode.
• Press to confirm Monday to Friday’s settings. Numbers 6 & 7 will be shown to program
Saturday to Sunday, the first hour bar will flash.
• Repeat the process to set the mode for each hour.
• Press to confirm the timer settings and exit the Weekly Timer Program P2.
Setting P3 - Individual Days
Press the Select Mode key until P3 is selected.
• Press , P3 and the first hour bar will flash and 1 willl be shown.
• Press to select Comfort , ECO or Anti-Frost mode.
• Use +/-to move through each hour and set a working mode for that hour. The bars across
the bottom of the screen will change to reflect the chosen mode.
• Press to confirm day 1’s (Monday’s) settings. The screen will then show day 2 (Tuesday) and
the first hour bar will flash.
• Repeat the process to set the mode for each hour.
• Press to move to day 3 (Wednesday) and repeat the process until day 7 (Sunday) is set.
• Press to confirm the timer settings and exit the Weekly Timer Program P3.
ECO Mode
Anti-Frost Mode
Comfort Mode
08
SPECIFICATION
Fins - 9
Supply Voltage - 220-240V, 50-60Hz
Rated Power - 1500W
Class - II
MAINTENANCE
Before cleaning, ensure the device is switched off, unplugged and allowed to completely cool.
• Use a damp cloth to clean the housing of the device and dry with a dry cloth. Do not use
abrasive cleaners.
• Use a vacuum cleaner to remove dust from the grilles
• Never immerse in water or allow water to enter the device.
STORAGE
Before storing, ensure the device is switched off, unplugged and allowed to completely cool.
If the device is not used for a long period of time, it is recommended that it is put back in the
packaging with the instruction manual and stored in a dry, well ventilated area.
Do not place any heavy objects on the radiator during storage as this may damage the appliance.
Child Lock
During any programming (in P1, P2 or P3), if there is no action for 1 minute, the screen will dim and
the Child Lock will be activated. To unlock, press and hold +& -until the lock icon disappears.
Open Window Detection
Press to turn Open Window Detection on/off. When active, the Open Window icon is shown on
screen. When the Open Window function is active, the heater will turn off if the room temperature drops
by 2°C in 2 minutes.
When this happens the Open Window icon will flash. The heater can be turned back on by
pressing .
09
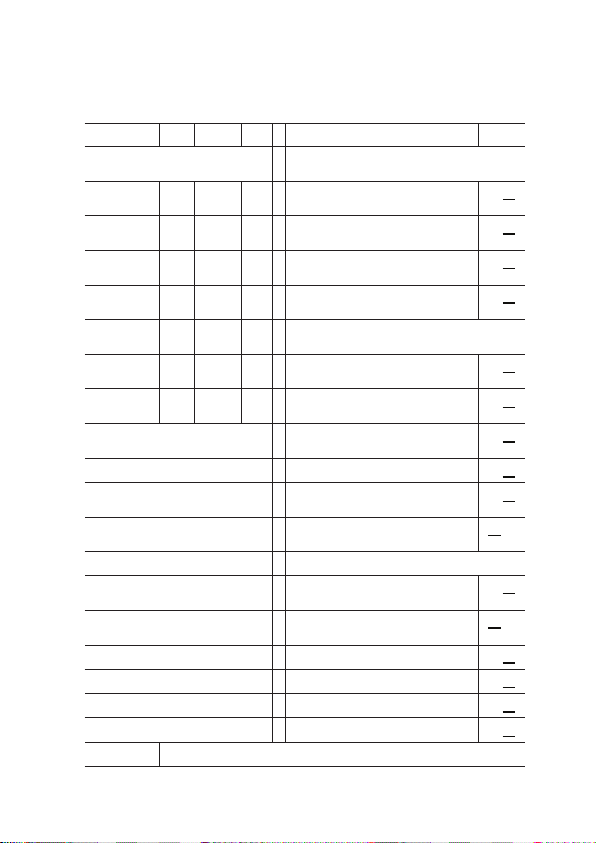
TECHNICAL PARAMETERS
[yes/no]
1.5
1.5
kW
Item ItemSymbol Value
1.5kW Unit Unit
[yes/no]
[yes/no]
[yes/no]
[yes/no]
[yes/no]
[yes/no]
[yes/no]
[yes/no]
[yes/no]
[yes/no]
[yes/no]
[yes/no]
[yes/no]
[yes/no]
[yes/no]
Information requirements for electric local space heaters
The Seasonal space heating energy efficiency of all local space heaters except commercial local space heaters ηS (%): 38
Name and address of the manufacturer or its authorised representative. (Back Page)
with black bulb sensor
with working time limitation
with adaptive start control
with distance control option
room temperature control, with open window
detection
room temperature control, with presence
detection
Contact details
In standby mode
At minimum heat
output
At Nominal heat
output
Maximum contin-
uous heat output
Minimum heat
output (indicative)
Nominal heat out-
put
Heat output
Auxiliary electri-
city consumption
Type of heat output/room temperature control (select
one)
Other control options (multiple selections possible)
Electronic room temperature control plus
week timer
Electronic room temperature control plus day
timer
with electronic room temperature control
with mechanic thermostat room temperature
control
Two or more manual stages, no room temper-
ature control
single stage heat output and no room tempera-
ture control
fan assisted heat output
electronic heat charge control with room
and/or outdoor temperature feedback
manual heat charge control with room and/or
outdoor temperature feedback
manual heat charge control, with integrated
thermostat
Type of heat input, for electric storage local space
heaters only (select one)
kW
kW
kW
kW
kW
N/A
N/A
elmax
Pmax, c
Pmin
Pnom
elmin
elSB
N/A
0

10

11
12
www.firedupcorporation.com
Fired Up Corporation Ltd
Fired Up Buildings
HD1 3LF, UK
Fired Up Corporation
(Ireland) Ltd
71, D02 P593, Dublin
AFFIX RECEIPT OR PROOF
OF PURCHASE HERE
CONFORMITY WITH DIRECTIVES
Conforms with relevant European Directives
ENVIRONMENTAL PROTECTION
• (WEEE) Waste Electrical and Electronic Equipment
Waste electrical products should not be disposed of with household waste.
Please recycle where facilities exist. Check with your Local Authority or retailer
for recycling advice.
CUSTOMER HELPLINE
GUARANTEE
For your convenience, you are not required to complete a form and return it to us in
order to validate your guarantee. However, please ensure that you retain your
receipt which will act as both proof of purchase and a guarantee validation docu
ment.We recommend that you attach your receipt to this documentation.
Your product carries a 12 month guarantee from the date of original purchase (or as
otherwise provided in writing at point of purchase). If your product fails to operate to
its specification, due to faulty workmanship or materials during the guarantee period,
we will either repair or replace the product. We will use our discretion to determine
whether to offer a repair or provide a replacement. The product will not be covered
by the guarantee if it has been misused, transformed, modified or altered in any way.
If your product fails within the guarantee period please ensure that you have all
necessary documentation available including proof or purchase (receipt or invoice
with serial number, location and date of purchase) in addition to all original undam-
aged packaging and leaflets etc. It is strongly recommended that you inspect your
product carefully before it is used or installed. For full details of your product you
should refer to the instruction manual which accompanies the product. You are
strongly advised to read this manual carefully in its entirety and to retain it for future
reference.
This product guarantee does not affect your statutory rights.
Table of contents
Other Fired Up Corporation Heater manuals


Popular Heater manuals by other brands

TCP
TCP Smart SMAWHHEAT2000WHOR705 User instructions

Merriott
Merriott EMMETI ClimaAir CA VS 7-2P manual

Costway
Costway EP24918US Series user manual

E. F. Bavis & Associates
E. F. Bavis & Associates Basic Drawer 2 installation manual

Adler Europe
Adler Europe AD 7709 user manual

Haverland
Haverland RCW Instruction & installation manual


