Fired Up Corporation NDT10-22B1 User manual

FUI0125_V1_080823
Electric Radiator
www.firedupcorporation.com/manual
This manual is for the following models:
NDT10-22B1 NDT20-22B1 Solis
When the heater is turned on for the first time or when it has not been
used for some time, it may release a slight, harmless odour. This odour is
a normal occurrence caused by the initial heating of the internal heating
elements and will disappear with use
INSTRUCTION MANUAL
M

CONTENTS
Safety Instructions 03-04
Installation 04-05
Control Panel & Icons 06
Operation 06-09
Troubleshooting 10
Care & Cleaning 10
Specification 10
Technical Parameters 11
Conformity 12
Guarantee & Contacts 12
02
Read ALL the instructions before use.
These instructions are for your safety. Please read
through them thoroughly before use and retain for
future reference. Failure to follow them could
cause injury and/or property damage.

SAFETY INSTRUCTIONS
• Read ALL the instructions before using this product.
• Check that the heater and all supplied accessories are present and in tact.
• Always check your mains supply is the same as that indicated on the product before
connecting.
• Always disconnect the heater from the electrical supply before carrying out cleaning or
maintenance. To disconnect the heater, switch controls to OFF then remove plug from the
outlet.
• Always unplug the heater if it is going to be out of use for long periods of time.
• Never leave children unsupervised in a room where the fire is ON and unguarded.
• Never insert or force items into the grills on the heater.
• Do not use the heater near flammable or explosive materials.
• Do not use the heater if the casing, wire or plug are damaged.
• Do not use outdoors. Home and indoor use only.
• Do not use an external controller with the heater. The heater must not be set to switch on
when unattended.
• Avoid the use of an extension cord which may overheat and cause risk of fire. If an extension
cord is necessary, it must be rated above the maximum rated power of the appliance. Care
must be taken to arrange the cord so that it cannot be pulled or be tripped over.
• This appliance can be used by children aged from 8 years and above and persons with
reduced physical, sensory or mental capabilities or lack of experience and knowledge if
they have been given supervision or instruction concerning use of the appliance in a safe
way and understand the hazards involved.
• If the supply cord is damaged, it must be replaced by the manufacturer, its service agent or
similarly qualified persons in order to avoid a hazard.
WARNING: In order to avoid overheating,
DO NOT COVER THE HEATER
• The heater must not be located immediately below a socket outlet.
• Children of less than 3 years should be kept away unless continuously supervised.
03
• Children aged from 3 years and less than 8 years shall only switch on/off the appliance
provided that it has been placed or installed in its intended normal operating position and
they have been given supervision or instruction concerning use of the appliance in a safe
way and understand the hazards involved. Children aged from 3 years and less than 8
years shall not plug in, regulate and clean the appliance or perform user maintenance.
• CAUTION: Some parts of this product can become very hot and cause burns.
Particular attention has to be given where children and vulnerable people are present.
• This heater is hot when in use. To avoid burns, do not touch hot surfaces such as surfaces
around the grille in front of the heater. Never let bare skin touch hot surfaces.
• Do not use this heater in the immediate surroundings of a bath, a shower or a swimming
pool.
• Do not use this heater if it has been dropped or if there are visible signs of damage.
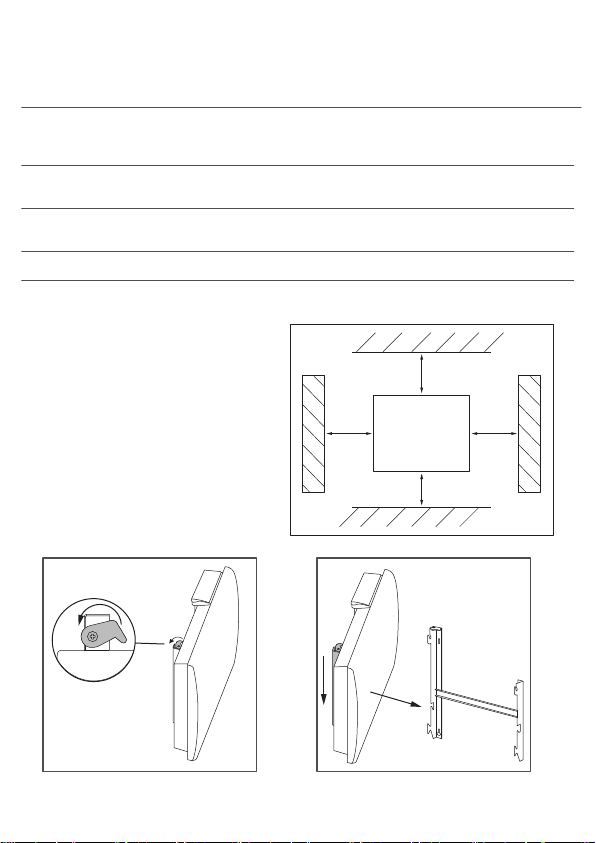
INSTALLATION
1. Loosen the screw (do not remove)
and turn the security clip to release
the bracket.
2. Push the bracket down and remove
from the hooks.
Please ensure the minimum distances
from the floor, ceiling and walls are
observed and adhered to.
Minimum Distances
≥300mm
≥250mm≥250mm
≥250mm
04

4. Hook the heater
ontothe bottom
hooks.
Push the heater
upwards to engage
the hooks.
Rotate the heater
and hook onto the
top hooks.
Push the heater
down to secure
onto the bracket.
5. Turn the security clip back to its starting
position to lock the heater onto the wall
bracket.
Tighten the screw in the security clip
back up to fix in place.
3. Place the bracket against the wall, ensure it
is level and mark the 4 holes on the wall.
Remove the bracket and drill 4 holes
approximately 35mm deep and insert the wall
plugs.
Fix the bracket to the wall using the
screws provided.
05
M
P
1234567
FP
C
F
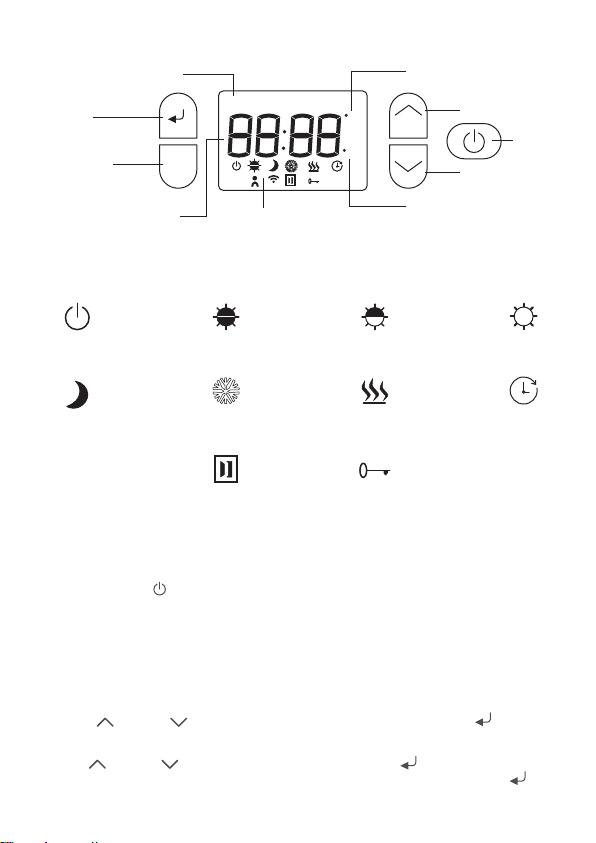
Confirm
Mode
Selection/Back
Up/Increase
Down/Decrease
ICONS
CONTROL PANEL & DISPLAY
Screen
Standby
Standby
On/Off
Day Indicator Temperature
in Celsius
Temperature
in Fahrenheit
Time/Temperature
Display
Comfort
Mode
Comfort Mode
-1°C
Comfort Mode
-2°C
ECO
Mode
Anti-Frost
Mode
Child Lock
Heating
Icon
Fil Pilote Mode
(Not Applicable on
these models)
Reset Time
Indicator
Weekly Program
Mode
P
Open Window
Function
FP
06
OPERATION
Press the Standby key to turn the heater on or off.
Day and Time Setting
Select the current day and time before use to ensure the heater is working under the correct
day and time settings.
Hold the Mode key Mto enter the time setting screen. The number “1” will flash.
Number 1-7 represent the days of the week (1 = Monday, 7 = Sunday).
Press the Up or Down keys to select the current day. Press the Confirm button to
select day and move to the “Hour” setting.
Use the Up or Down keys to select the hour. Press Confirm and the heater will move
onto setting the minute. Repeat the process to select the minute and press Confirm to
return to the home screen.

During the setting of the day and time, press Mto return to the previous step.
The device will confirm and return to the home screen automatically if there is no action for
10 Seconds.
Note: The temperature and time will be displayed alternatively on the home screen.
Selecting the Mode
Press the Mode key M to cycle through Comfort Mode, Comfort Mode -1°C, Comfort Mode
-2°C, ECO Mode, Anti-Frost Mode, Open Window Detection, Preset Programs P1 to P3, Weekly
Program Mode and Fils Pilot Mode.
The selected mode will be displayed on screen, press to confirm selection.
Temperature Adjustment
Press the Mode key Mand select Comfort Mode , press to confirm selection.
Use the Up or Down keys to adjust the temperature, the temperature range is 5-30°C. The
temperature is adjusted in 0.5°C increments. Press to confirm temperature.
Note: The device will confirm the temperature setting if there is no action for 10 seconds.
• Comfort Mode -1°C = 1°C LOWER than the set temperature in Comfort Mode .
• Comfort Mode -2°C = 2°C LOWER than the set temperature in Comfort Mode .
• ECO Mode = 3.5°C LOWER than the set temperature in Comfort Mode .
• Anti-Frost Mode = 7°C and cannot be changed.
Note: The Heater icon is shown on the screen when the heater is reaching the set temperature.
Weekly Program Setting ‘P’
The heater is set up with 4 customisable programs. P(shown on bottom left of screen) is a blank
program to be set up from scratch. P1, P2 and P3 are preset programs. (See page 08)
Press the Mode key Mand select Weekly Program mode P, press to confirm selection.
Press and hold both the Mode key Mand Confirm key together to enter setup mode for
the weekly timer. The ‘1’ on the day indicator will flash.
Select the desired day to setup the program for using the Up and Down keys. Press
to confirm the day and move forward to the hour selection. The time will show “00:59” and
the hour (00) will blink. (00:59 Means the setting is from 00:00 to 00:59).
Select the time you want to modify using the Up and Down keys. Press to confirm the
time and progress to the mode selection. The working mode icon will blink.
Using the Up and Down keys, choose between Comfort Mode , Comfort Mode -1°C
, Comfort Mode -2°C , ECO Mode or Anti-Frost Mode for the hour. Press to
comfirm the working mode and move on to the next hour of the chosen day to program.
Repeat this process until the whole day has been programmed (23:59) and press to confirm
and move onto the next desired day, the day indicator will blink and the day can be chosen.
07
Repeat the above steps until each day has been programmed. Alternatively, pressing and
holding both the Mode key Mand Confirm key together will exit the weekly timer and
confirm and save the program so far. The device will confirm and exit the weekly timer setup
if there is no action in 30 seconds.
Note: Press the Mode key Mto return to the previous step.
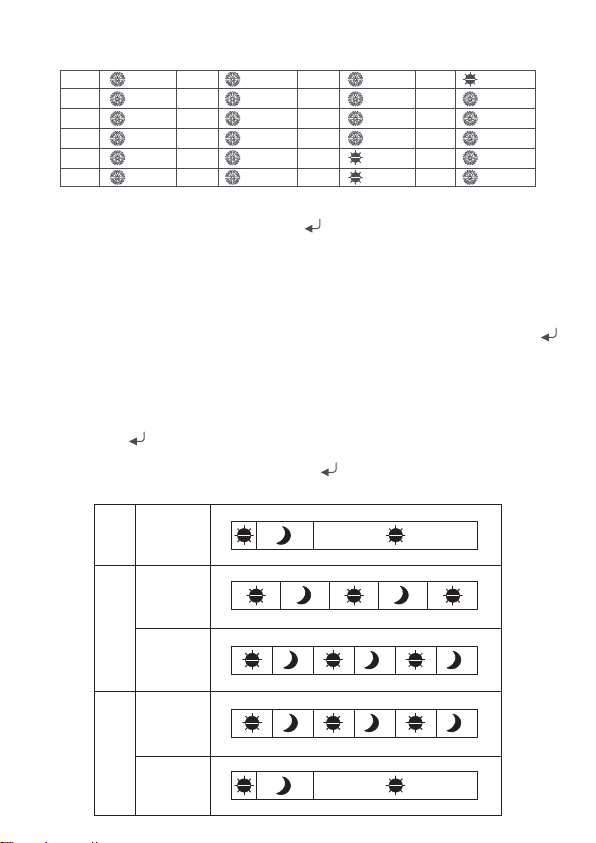
Preset Programs
The device is set up with 3 preset programs. Press Mode key Mto select a preset program, press
to confirm selection.
These programs are set to work 7 days a week 00:00 to 23:59. Please see the table on the next page
for each preset mode P1, P2 and P3.
The preset programs can also be modified. To modify these use the Mode key Mto select a preset
program and press to confirm.
Then press and hold the Mode key Mand Confirm key to enter the setup for the preset programs.
Then follow the steps in the Weekly Timer setup.
Example, if you wanted to have the heater start the day in Anti-Frost Mode and go into
Comfort Mode from 16:00 till 19:00, this is how each hour would have to be set up.
00:59
01:59
02:59
03:59
04:59
05:59
06:59
07:59
08:59
09:59
10:59
11:59
12:59
13:59
14:59
15:59
16:59
17:59
18:59
19:59
20:59
21:59
22:59
23:59
08
P1
00:59 23:59
00:00 05:59
P2
Mon-Sun
Weekday
Weekend
P3
00:59 08:59 23:59
00:00 05:59 18:59
00:59 10:59 15:59 23:59
00:00 07:59 12:59 19:59
Weekday
Weekend
00:59 23:59
00:00 07:59
00:59 08:59 15:59 23:59
00:00 05:59 11:59 17:59

Modifying the Preset Programs (P1, P2 and P3)
The preset programs can also be modified. To modify these use the Mode key Mto select a preset
program and press to confirm.
Then press and hold the Mode key Mand Confirm key to enter the setup for the preset programs.
Then follow the steps in the Weekly Timer setup.
Open Window Function
When the Open Window function is active, the heater will enter Anti-Frost Mode if the room
temperature drops quickly, as it would if a window was opened. When the room temperature
stabilises, the heater will enter Comfort Mode and begin heating up again.
To activate the Open Window function, press the Mode key Mto select the Open Window
function and press to confirm.
To cancel the Open Window function, press the Mode key Mto select a different working mode or
press the Standby key .
Child Lock
To lock the control panel, press and hold the Confirm key for 3 seconds, until the lock icon
appears. Press and hold the Confirm key again for 3 seconds to disable the lock.
When locked, the heater can still be turned off using the Standby key . If the power is disconnected,
the lock function will be disabled upon reconnecting and restarting the heater.
Fil Pilote (Pilot Wire) Mode FP
This mode is not applicable on these models.
In Case of Power Failure
If the power supply is lost, upon re-powering, the device will beep once and return to the working
mode and time before loss of power. However, the Reset Time indicator will blink to signal that
the day and time may be inaccurate and need resetting.
If the time is correct after restarting, press to confirm and the Reset Time indicator will disappear.
If the time is incorrect upon restarting, press and hold the Mode key Mto change the day and time.
The Reset Time indicator will then disappear.
Note: The heater has a memory function so there will be no need to reprogram the Weekly Program
if there is a loss of power.
09

SPECIFICATION
NDT10-22B1 NDT20-22B1
Supply Voltage - 230V~50Hz - 230V~50Hz
Rated Power - 1000W - 2000W
Class - II - II
IP - IP24 - IP24
Select Comfort Mode .
Before cleaning, ensure the device is switched off and allow to completely cool.
Use a damp cloth to clean the housing of the device. Do not use abrasive cleaners.
Clean grilles and air outlets regularly to prevent damage.
Never immerse in water or allow water to enter the device.
TROUBLESHOOTING
CARE & CLEANING
The appliance does
not heat
The appliance heats
constantly
Ensure that the circuit breakers are switched on in the
installation.
Increase the temperature setting.
Problem Solution
Ensure the heater is not in a draught/cold spot.
Reduce the temperature setting.
10
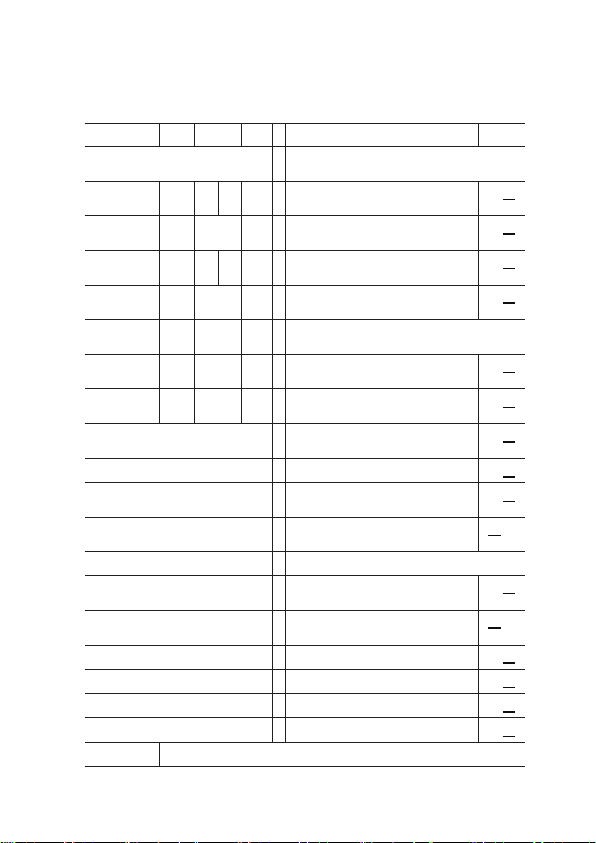
TECHNICAL PARAMETERS
[yes/no]
1 2
1 2
kW
Item ItemSymbol Value
1kW|2kW Unit Unit
[yes/no]
[yes/no]
[yes/no]
[yes/no]
[yes/no]
[yes/no]
[yes/no]
[yes/no]
[yes/no]
[yes/no]
[yes/no]
[yes/no]
[yes/no]
[yes/no]
[yes/no]
Information requirements for electric local space heaters
The Seasonal space heating energy efficiency of all local space heaters except commercial local space heaters ηS (%): 38
Name and address of the manufacturer or its authorised representative. (Back Page)
with black bulb sensor
with working time limitation
with adaptive start control
with distance control option
room temperature control, with open window
detection
room temperature control, with presence
detection
Contact details
In standby mode
At minimum heat
output
At Nominal heat
output
Maximum contin-
uous heat output
Minimum heat
output (indicative)
Nominal heat out-
put
Heat output
Auxiliary electri-
city consumption
Type of heat output/room temperature control (select
one)
Other control options (multiple selections possible)
Electronic room temperature control plus
week timer
Electronic room temperature control plus day
timer
with electronic room temperature control
with mechanic thermostat room temperature
control
Two or more manual stages, no room temper-
ature control
single stage heat output and no room tempera-
ture control
fan assisted heat output
electronic heat charge control with room
and/or outdoor temperature feedback
manual heat charge control with room and/or
outdoor temperature feedback
manual heat charge control, with integrated
thermostat
Type of heat input, for electric storage local space
heaters only (select one)
kW
kW
kW
kW
kW
N/Aelmax
Pmax, c
Pmin
Pnom
elmin
elSB
N/A
0
11

www.firedupcorporation.com
Fired Up Corporation Ltd
Fired Up Buildings
HD1 3LF, UK
Fired Up Corporation
(Ireland) Ltd
71, D02 P593, Dublin
AFFIX RECEIPT OR PROOF
OF PURCHASE HERE
CONFORMITY WITH DIRECTIVES
Conforms with relevant European Directives
ENVIRONMENTAL PROTECTION
• (WEEE) Waste Electrical and Electronic Equipment
Waste electrical products should not be disposed of with household waste.
Please recycle where facilities exist. Check with your Local Authority or retailer
for recycling advice.
CUSTOMER HELPLINE
GUARANTEE
For your convenience, you are not required to complete a form and return it to us in
order to validate your guarantee. However, please ensure that you retain your
receipt which will act as both proof of purchase and a guarantee validation docu
ment.We recommend that you attach your receipt to this documentation.
Your product carries a 12 month guarantee from the date of original purchase (or as
otherwise provided in writing at point of purchase). If your product fails to operate to
its specification, due to faulty workmanship or materials during the guarantee period,
we will either repair or replace the product. We will use our discretion to determine
whether to offer a repair or provide a replacement. The product will not be covered
by the guarantee if it has been misused, transformed, modified or altered in any way.
If your product fails within the guarantee period please ensure that you have all
necessary documentation available including proof or purchase (receipt or invoice
with serial number, location and date of purchase) in addition to all original undam-
aged packaging and leaflets etc. It is strongly recommended that you inspect your
product carefully before it is used or installed. For full details of your product you
should refer to the instruction manual which accompanies the product. You are
strongly advised to read this manual carefully in its entirety and to retain it for future
reference.
This product guarantee does not affect your statutory rights.
12
This manual suits for next models
1
Table of contents
Other Fired Up Corporation Heater manuals


Popular Heater manuals by other brands


STIEBEL ELTRON
STIEBEL ELTRON IW 120 Operation and installation

Manor
Manor Zodiac instruction manual

Royal Sovereign
Royal Sovereign Pro HUT-80 owner's manual

Coldair
Coldair PLATINUM Multi Season operating instructions

Kambrook
Kambrook KCE460 Series Instruction booklet

screwfix
screwfix E15LF1U instruction manual


