Fireye 45UV5-1000 Manual

1
Thisbulletinisdirectedtothelicensedboilerservicetechniciansandprofessionalcombustion
engineers who are experienced in the installation and operation of Fireye flame safeguard
controls.PersonsnotexperiencedwithFireyeflamesafetyproductsshouldcontactthenearest
Fireye representative, or a qualified service group for assistance. IMPROPER INSTALLA-
TION OF THESE PRODUCTS MAY BE HAZARDOUS TO LIFE AND PROPERTY.
DESCRIPTION
Fireye Type 45UV5 scanners are self-checking, flame sensing devices. When powered by a compat-
ible, self-checking Fireye control, the scanners detect the presence or absence of flames which emit
ultraviolet radiation (UV). Typical fossil fuels which emit UV include natural gas, propane, meth-
ane, butane, kerosene, light petroleum distillates and diesel fuels. For burners firing steam-atomized
oil or pulverized coal, Fireye recommends the use of infrared (IR) scanners. Fireye offers a complete
line of infrared scanners best suited for these applications.
APPLICATION
When used with a Fireye amplifier, the 45UV5 scanner provides flame failure protection on single
and multi-burner industrial applications such as electric utility boilers, power boilers and large fur-
naces or incinerators. The 45UV5 scanner monitors the flame(s) of only one burner. The pilot and
main flames may be monitored individually (2 scanners) or in combination (1 scanner). When prop-
erly sighted, the scanner should discriminate between the burner being monitored and all other burn-
ers and any background flames.
Note: Scanner response is dependent on burner configuration as well as the turbulence and spectral
characteristics of the flames. Application assistance is available on request.
CU-22
MARCH 28, 2013
45UV5 SCANNER
MODELS:
1000, 1010,
1101, 1103
(including EX and CEX Models)
APPROVED
2
PRINCIPLES OF OPERATION
The 45UV5 scanner employs a detector which is a sealed, gas filled, ultraviolet-transmitting special
glass envelope containing two electrodes connected to an AC voltage source. The detector responds
only to a portion of the ultraviolet spectrum from common flames.
When ultraviolet radiation of sufficient energy (at wavelengths shorter than those in sunlight at the
earth’s surface) falls upon the electrodes, electrons are released and the inter-electrode gas becomes
conductive. This results in an electric current flow from one electrode to the other.
The current flow in the detector starts and ends abruptly and is known as an “avalanche.” A very
intense source of UV radiation will produce several thousand avalanches or pulses per second. Less
radiation will produce fewer pulses per second. Upon total loss of flame, the detector output ceases
except for very infrequent single pulses caused by cosmic rays. The circuitry does not respond to
these infrequent pulses. Thus, the presence or absence of pulses is an indication of the presence or
absence of flame; the frequency of the pulses is a measure of flame intensity. Pulses generated by the
scanner are transmitted to a compatible Fireye control via scanner wiring.
FEATURES
The UV tube, quartz lens, power transformer and related electronic components are contained in an
aluminum enclosure which is sealed with high temperature oil-resistant gaskets. The quartz lens is a
planoconvex type which increases the scanner’s sensitivity up to 400 percent. A hinged mount is pro-
vided to permit easy access for cleaning the lens. A double screw-and-keyhole slot arrangement per-
mits quick removal of the housing from its mount. The scanner has a 1" fitting for mounting to a
threaded sight pipe and a 3/8" threaded connection for purge air.
Also included in the Type 45UV5 scanner is an electromagnetic shutter that permits a self-checking
circuit within an associated Fireye control to verify that the scanner and signal circuits are producing
valid flame presence or absence information. During the shutter closed period the detector’s optical
path is blocked from flame radiation. While the shutter is open, flame presence or absence is
detected. The resultant scanner output, while flame is detected, is a continuous, periodically inter-
rupted pulsed flame signal. This is a prerequisite for energizing the associated Fireye control’s flame
relay.
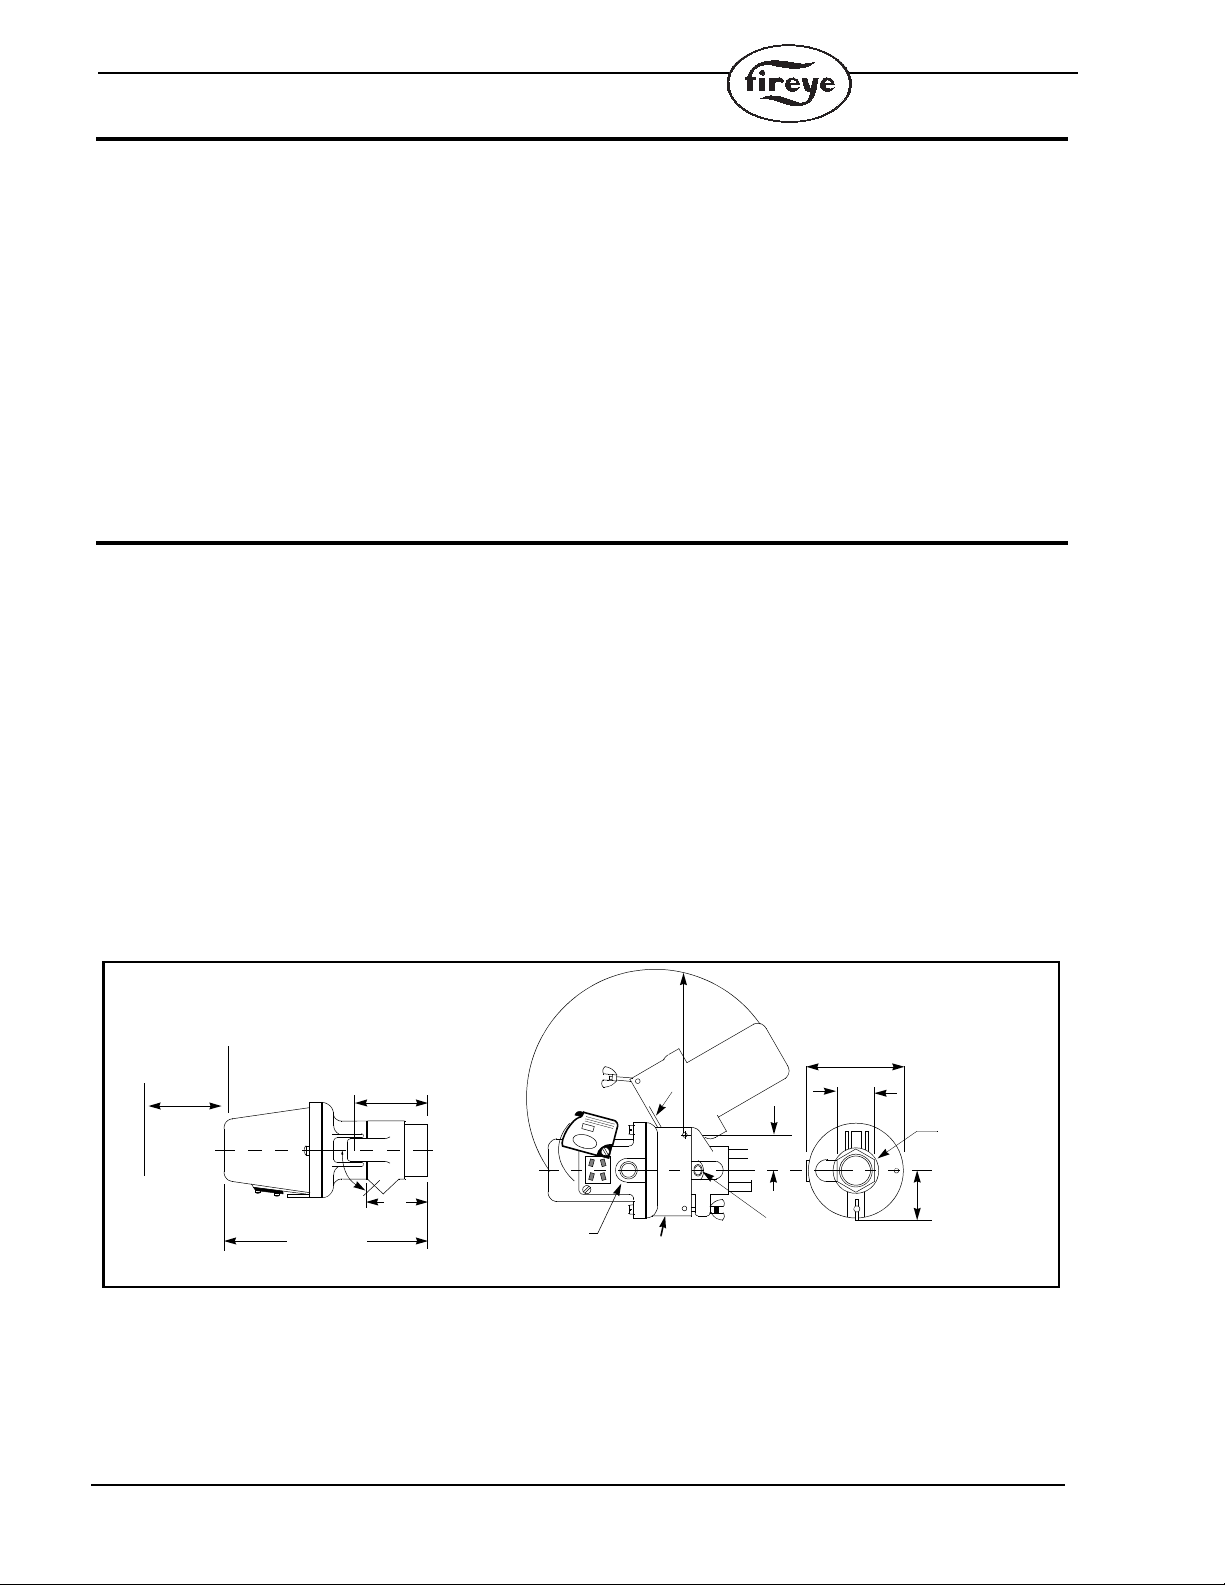
FIGURE 1. 45UV5 SCANNER DIMENSIONS
2 3/16 (56)
8 1/2 (216)
2 13/16
(72)
45
LENS
CLEARANCE FOR
CLEANING LENS
6 3/16 (158)
1 7/16
(36.5)
1/2 - 14 NPSM
FOR ELECTRICAL FITTING
4 (102)
1 11/
16
Material: ALUMINUM
HOUSING MAY BE ROTATED
AT HINGE POSITION IN 90
INCREMENTS
1-11 1/2 NPT
OR 1" BSP
SIGHT PIPE
CONNECTION
DIMENSIONS IN INCHES (MM)
2 13/32
3/8 -18 NPT
PURGE AIR CONNECTION
or 3/8 - 19 BSP
(61)
(43)
CLEARANCE
REQUIRED
REMOVE
2
(51)
TO
P/N 45UV5-1000, 45UV5-1103
(Includes p/n 61-2841-1 NPT Hinged Mounting Flange).
P/N 45UV5-1101, 45UV5-1010
(Includes p/n 61-2841-2 BSP Hinged Mounting Flange)
Hinged
Mounting Flange
(included)

3
SPECIFICATIONS
Mounting
Models are provided with 1" female thread mounting, either US NPT or British Whitworth according
to model (see table below).
Housing, Including Mounting Flange
Material: Die Cast Aluminum
Design: Hinged Mounting Flange, with air fitting to be permanently installed,
carries two 1/4 - 20 screws which may be loosened for quick removal of
the scanner housing, such as for lens cleaning.
Weight: 3.75 lbs. (1.7kg)
Electrical
Power Requirement: 4 VA AC from associated Fireye control (see note below).
Frequency: Frequency of scanner must match frequency of Fireye control and power
line supply (See Table 1).
Connection: 1/2 inch 14 NPSM tapping.
Temperature Range: Maximumoperating: 200F (93C)
Minimum operating: -40F (-40C)
Optical Range: 190 to 250 nanometers. No response to infrared radiation or visible
light.
Purge Air
Source: Clean ambient
Volume Required: 4 SCFM (113 L/min. @ 4" water column above furnace pressure
minimum) at 3/8 inch threaded housing inlet or 4 SCFM at 1 inch wye
fitting in scanner sight pipe. Temperatures near the upper limit of the
scanner operating range and/or use with dirty fuels may require up to
15 SCFM (425 L/min.).
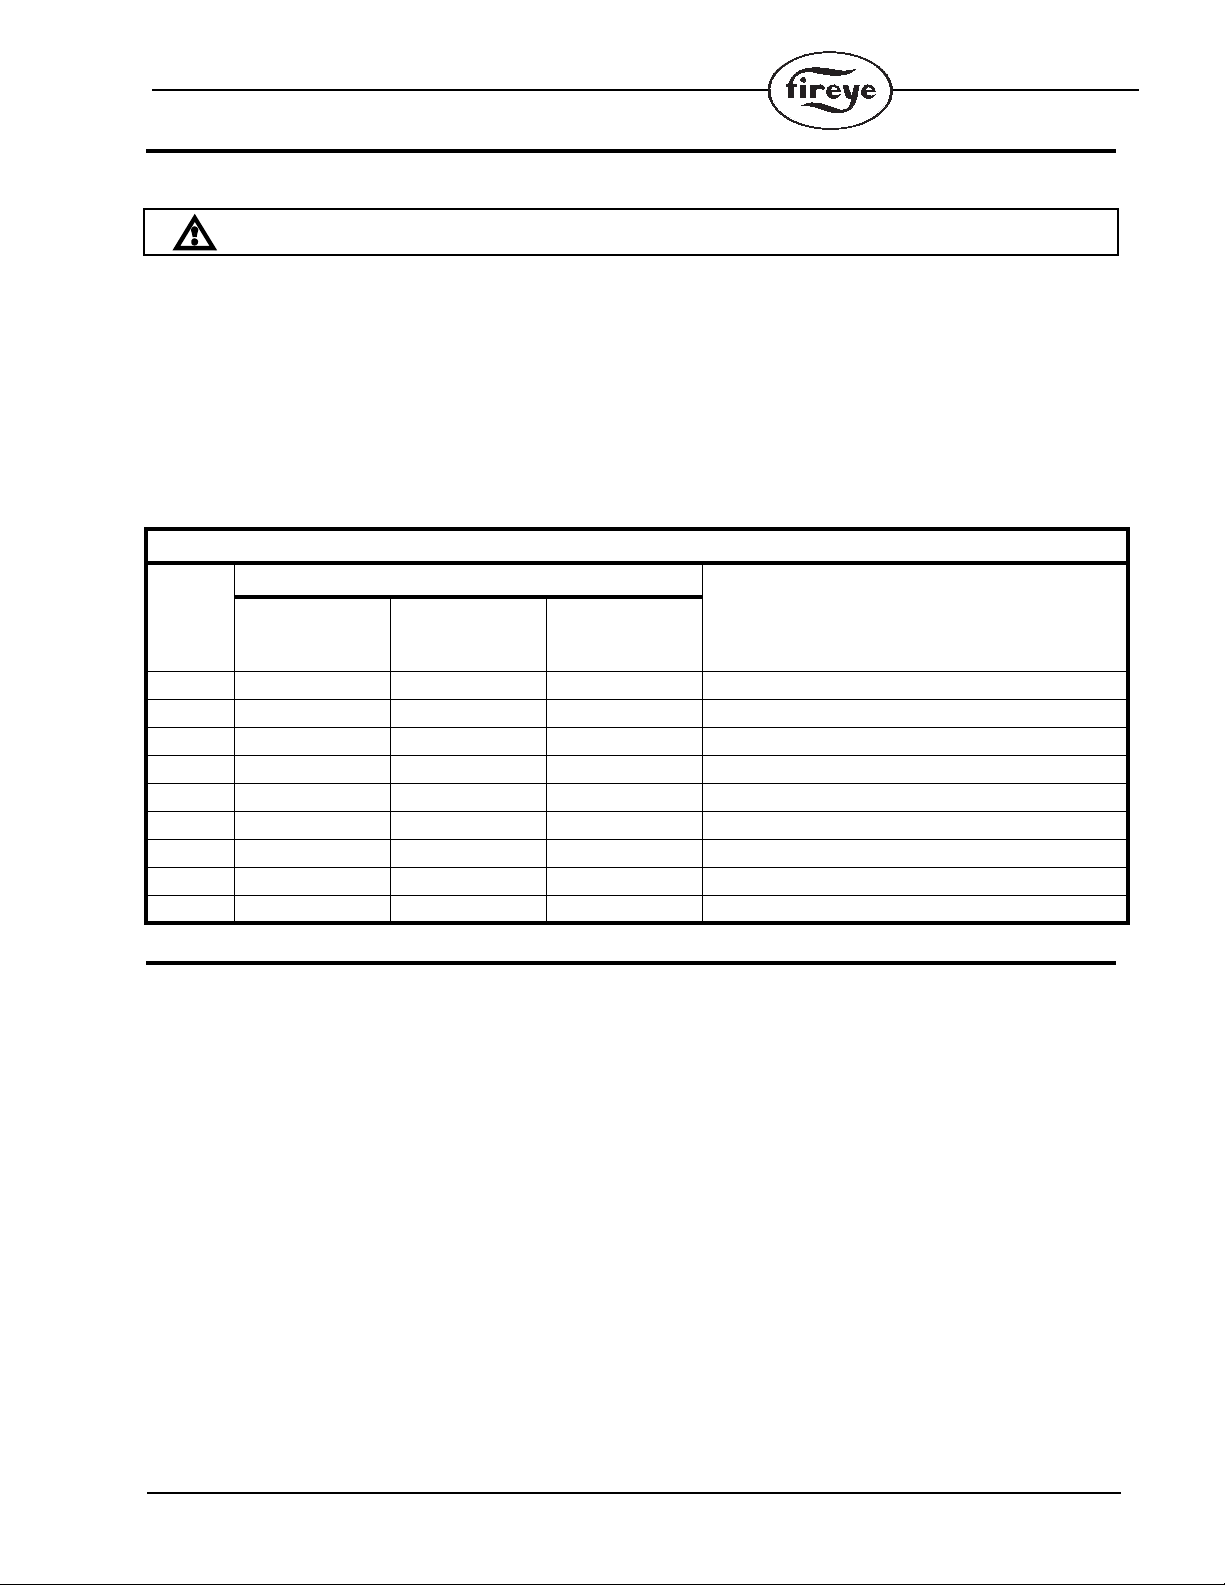
Table 1:
Specifications subject to change without notice.
IMPORTANT NOTE: The AC power source must be sinusoidal for proper scanner operation.
The application of any waveform other than a sine wave (e.g. square wave) will damage the
45UV5 scanner.
MODEL
45UV5
FREQUENCY
HZ
MOUNTING
THREADS
FM DIN APAVE
1000 60 NPT ✓✓
1010 60 BSP ✓
1101 50 BSP ✓✓
1103 50 NPT

4
Optional Mounting Configurations for Hazardous Areas
FIGURE 2. 45UV5 SCANNER IN NEC/NEMA HAZARDOUS AREA HOUSING
FIGURE 3. 45UV5 SCANNER IN ATEX HAZARDOUS AREA HOUSING
INSTALLATION
1. The best scanner sighting results are obtained when the scanner is aimed so that the scanner
(viewing) center line intersects the burner center line at a slight angle, as shown in Figure 4. The
area of maximum ultraviolet radiation is near the base of the flame envelope. If only one scanner
is used per burner, the intersection should be made so the line of sight or viewing angle can also
see the igniter flame. Consideration must be given to burner air rotation (burners have clockwise
or counterclockwise air rotation). Figure 5 illustrates how scanner location is influenced by the
igniter position and air circulation. Physical obstructions such as air register blades should not
fall within the scanner’s line of sight.
17 1/4
8.25 (210)
FIREYE FLAME SCANNER
16 3/16
(412.79)
± 3/64 (1.2)
(439.88)
7 3/4
(196.85)
1" NPT
NIPPLE
1 1/4" PLUG
1 1/4" NPT CONDUIT
ENTRY
P/N 45UV5-1000EX (Includes Model
45UV5-1000 Scanner)
P/N 45UV5-1101EX (Includes Model
45UV5-1101 Scanner)
Housing Rating:
Class I, Div. 1& 2 Groups C,D
Class II, Div. 1, Groups E, F, G
Class III
NEMA 3, 4, 7 CD, 9 EFG
Weight: Approx. 18 lb. (8.2 kg.)
(NOT FURNISHED)
P/N 45UV5-1000CEX (Includes Model
45UV5-1000 Scanner and p/n 35-128
NPT Mounting Flange).
P/N 45UV5-1101CEX (Includes Model
45UV5-1101 Scanner and p/n 35-130
BSP Mounting Flange).
Housing Rating:
Exd II C T 6
IP 66
Weight: Approx. 7.6 lb. (3.5 kg.)
DIMENSIONS IN INCHES (MM)
4.02
(102)
4.41
(112)
MOUNTING FLANGE
8.10 (206)
3/4" NPT THREADED
OPENING FOR
COMPRESSION-STYLE
CABLE GLAND
(NOT FURNISHED)
3/8" NPT
THREADED
OPENING FOR
COOLING AIR
1" THREADED
OPENING
3.56
(90)
(INCLUDED)

5
FIGURE 4. SINGLE BURNER SCANNER SIGHTING
FIGURE 5. SCANNER LOCATION VS. SECONDARY AIR ROTATION
2. An acceptable scanner location must ensure the following:
— Reliable igniter flame detection.
— Reliable main flame detection.
— Rejection of igniter flame too short or in the wrong position to ignite the main flame reli-
ably.
Note: Reliable signals must be obtained at all air flows, furnace loads (ranges of fuel firing) and
desirable fuel air ratios.
3. If combustion air enters the furnace with a rotational movement of sufficient velocity to deflect
igniter flame in the direction of rotation, position the scanner 0 to 30 degrees downstream of the
igniter and near the periphery of the throat where the ultraviolet radiation is at a maximum. (see
figures 4 and 5).
4. Having determined an approximate location for the sight tube, cut a clearance hole for a 2 inch
pipe through the burner plate. If register vanes interfere with the desired line-of-sight, the inter-
fering vane(s) should be trimmed to assure an unobstructed viewing path at all firing levels.
5. Mount scanner sight pipe by either:
— Centering a swivel mount, P/N 60-1664-3 (NPT) or 60-1664-4 (BSP) over the hole and
installing the sight pipe on the swivel mount, or
— Inserting the end of the sight pipe into the hole, aligning the pipe to the desired viewing
angle and tack welding. Welding must be adequate to temporarily support the weight of the
installed scanner. The sight pipe should be arranged to slant downward so that dirt and dust
will not collect in it.
6. When a satisfactory sighting position has been confirmed by an operating test, (see section on
alignment), the sight pipe should either be firmly welded in place or, if the swivel mount is used,
the ball position should be secured by tightening the three hex head cap screws located on the
swivel mount ring. In certain older style swivel mounts, tack welding may be required.
PRIMARY
COMBUSTION
ZONE
AIR REGISTER
BLADES
SCANNER
LINE OF
SIGHT
BURNER
THROAT
FLAME
ENVELOPE
BURNER
CENTER LINE
BASE
IGNITOR
SCANNER
MAIN BURNER
CCW ROTATION
IGNITOR
SCANNER
MAIN
CW ROTATION
BURNER

6
FIGURE 6. FLAME MUST COMPLETELY COVER SIGHT OPENING
7. The scanner viewing window must be kept free of contaminants (oil, ash, soot, dirt) and the scan-
ner temperature must not exceed the maximum rating. Both requirements will be satisfied by con-
tinuous injection of air at either the 3/8" housing inlet or at a 1" wye ahead of the swivel mount, as
shown in Figures 7, 8, and 9.
Purge air may be supplied through the 3/8" or 1" wye connection. Normally only one of the two
connections is provided with purge air and the other connection is plugged. When a Fireye sealing
coupling is used as shown in Figure 7, the 1" wye connection is used for the purge air (plug 3/8"
opening).
Under normal conditions, with clean burning fuels and moderate ambient temperature conditions,
purge air flow of approximately 4 SCFM (113 L/min.) @ 4" water column above furnace pressure
is generally adequate. Up to 15 SCFM (425 L/min.) may be required for fuels that may produce
high levels of flash or soot or for hot environments to maintain scanner internal temperature within
specification.
8. The scanner sight pipe should be as large as is practical. Ideally, the sight pipe should increase one
inch in diameter (ID) for every foot in length. Under most circumstances, a sight pipe diameter
increase of one inch should be adequate for an increase in length of three feet (1m). When apply-
ing the scanner to long sight tubes (more than three feet), minimize the use of one inch pipe. Avoid
using pipe less than one inch (ID), and avoid using stainless steel sight pipes.
9. Temperature in the scanner housing should not exceed 200F.
10. Where separate scanners are used to monitor main and igniter flames, the main flame scanner
should be sighted to not detect the igniter flame. If it does detect the igniter flame, re-aim the main
flame scanner.
PIPING ARRANGEMENTS
FIGURE 7.
BUT THISNOT THIS NOT THIS
PART NUMBER
A. SWIVEL MOUNT 60-1664-3 (NPT)
60-1664-4 (BSP)
B. 1” WYE 35-200 (NPT)
C. & E. 1” CLOSE
NIPPLES 35-201
D. SEALING COUPLING W/QUARTZ WINDOW
60-1199-1 (NPT)
60-1199-2 (BSP)
F. 3/8” PLUG 35-202
20" (500) MAX*
CEF
ABD
Note: Scanner shown is not model 45UV5

7
PIPING ARRANGEMENTS
FIGURE 8.
FIGURE 9.
ALIGNMENT AND ADJUSTMENTS
Before installing or adjusting scanners, thoroughly plan the scanning objectives in reference to the
boiler/furnace mode of operation.
The following procedures are recommended to ensure optimum flame detection and discrimination.
Flame discrimination is the ability to see the flame of only one burner or one igniter with other burn-
ers or igniters operating nearby.
These procedures should be used whenever parts are replaced, when the scanner has been moved,
when the flame shape is altered (additional fuels, new burners, burner/register modifications) as well
as on all new installations. Signal readings referred to in this procedure are as displayed on a 0-3
VDC Fireye flame signal meter. (P/N 38-54, 38-55, 38-56). 1, 2
1 If using analog bargraph meter (P/N 38-88), the flame will be properly sighted when there are 5-8 LEDs illuminated.
2 When used with the 25SU3-2000 series amplifiers and appropriate power supply, the required flame signal strength(in terms
of “pulses-per-second,” will be determined by the “Flame-On” and “Flame-Off” thresholds programmed into the amplifier.
Refer to bulletin CU-34 for additional information.
PART NUMBER
A. SWIVEL MOUNT 60-1664-3 (NPT)
60-1664-4 (BSP)
B. 1” WYE 35-200 (NPT)
35-239 (BSP)
C. HEAT INSULATING
NIPPLE 36-127-1 (NPT)
35-127-3 (BSP)
D. 3/8” PLUG 35-202
ABC
D
18 3/4" (475) MAX*
PART NUMBER
A. SWIVEL MOUNT 60-1664-3 (NPT)
60-1664-4 (BSP)
B. HEAT INSULATING
NIPPLE 35-127-1 (NPT)
35-127-3 (BSP)
C. 3/8” THREADED OPENING
A
BC
13" (330) MAX*
8
Igniter Flame Scanner
1. Apply power to scanner and associated control.
2. Start Igniter.
3. Adjust scanner sighting to detect igniter flame in the manner shown in Figure 4.
4. When flame is properly sighted and the control sensitivity properly adjusted (see Caution below)
the signal meter should register between 4 and 16. If readings fluctuate widely, readjust scanner
sighting until highest steadiest reading is obtained.
5. When the proper signal reading has been obtained, make sure that the scanner and the associated
control do not respond to the ignition spark. This is accomplished by cutting off the fuel to the
igniter and attempting to start the igniter using the spark igniter. If the system responds to the
spark, the sighting should be realigned.
CAUTION: Do not increase sensitivity any more than necessary to provide proper detection
of the minimum igniter flame. Minimum igniter flame is the minimum flame required to
ignite the main burner reliably. Be sure to test for reliable signals under maximum air flow
conditions when the igniter flame may be deflected outside the line of sight. If this occurs,
resighting is required.
Main Flame Scanner
1. Apply power to scanner and control.
2. Start igniter.
3. Adjust scanner sighting so that ignition spark and igniter flame are not detected. Test should be
conducted with maximum igniter flame and with both minimum and maximum air flow.
Note: This step may not be practical with Class 1 igniters, but may be desirable with Class 3.
4. Start main burner.
5. Adjust scanner sighting to detect main burner flame. When sighting is correct (see Figure 6), the
signal should read between 4 and 32 on a Flame Signal Meter, Fireye P/N 38-54 or 38-55, with-
out extreme fluctuations in the signal reading.
6. When proper signal is established, manually close off the main burner fuel supply. When burner
flame becomes unstable or is extinguished, the associated Fireye control should register a “No
Flame” condition.
7. Start an adjacent burner and vary its firing rate under normal air flow conditions. Make certain
that the main flame scanner on the burner not in service does not respond to the adjacent burner.
SCANNER SENSITIVITY ADJUSTMENT
Excessive scanner flame signal can affect flame discrimination and prevent the associated 25SU3 or
25SU5 control from operating properly. Weak signals may cause unnecessary burner shutdown or
alarms. The sensitivity of the 45UV5 scanner can be adjusted by one of two methods determined by
the Engineering Code of the scanner.

9
METHOD 1: 45UV5 SCANNERS WITH ENGINEERING CODE 00-03 (built through mid- 2008)
Sensitivity is adjusted by changing the position of the p/n 4-320-1 UV tube in its socket (Figure 10).
FIGURE 10. 45UV5 -ENGINEERING CODE 00-03 UV TUBE POSITION
Note: To change UV Tube position, pull tube out of eight pin (octal) socket, rotate to desired position, and then insert.
The tube has four different positions. When the electrodes are almost perpendicular to the Terminal
Board and approximately parallel to the shutter slot, the detector tube will generate maximum signal.
This is the “MAX" position shown in Figure 10. When the electrodes are 90from the "MAX" posi-
tion, minimum signal will be generated. The intermediate positions, “A and B” will yield intermedi-
ate signals. Position “A” will yield a slightly higher signal than position “B” since more electrode
will be exposed to the radiation entering the shutter slot. To adjust the signal further, use the appro-
priate sensitivity adjustment in the 25SU3 or 25SU5 control. Refer to the control bulletin for further
information. The detector is shipped in the "MAX" signal position.
If the tube position is changed in the field, and the scanner is later replaced, verify that the signal
strength is not excessive.
METHOD 2: 45UV5 SCANNERS WITH ENGINEERING CODE 04 AND HIGHER (built after mid-2008)
The sensitivity is adjusted by changing the position of the orifice plate in front of the p/n 4-290-2 or
4-314-1 UV tube. See Figure 11.
FIGURE 11. 45UV5 -ENGINEERING CODE 04 or HIGHER ORIFICE PLATE POSITION
Sensitivity adjustment - loosen but do not remove the two adjustment plate retaining nuts. Pull orifice plate back
toward retaining nuts to detach from locating pins. Slide the orifice plate up toward the shutter coil for more sensitivity
or down from the shutter coil for less sensitivity. Position the plate onto locating pins to lock in place. Tighten the
adjustment plate retaining nuts.
SCANNER WITH COVER REMOVED TO
REPLACE TUBE OR CHANGE SLOT
POSITION OF 4-320-1 TUBE
()
()
()
()
A
A
ELECTRODES
TERMINAL BOARD
UV TUBE
SHUTTER
SLOT
RECTANGULAR
MAX
MAX
B
B
Sensitivity adjustment
plate with orifices
Adjustment plate
retaining nuts (2)
UV tube
retaining
clip
UV tube,
4-290-2 or
4-314-1

10
FIGURE 12. RECOMMENDED SPARE PARTS
FIGURE 13. ACCESSORIES
FIGURE 14. ACCESSORIES
ACCESSORIES
Swivel Mount
The scanner swivel mount (P/N 60-1664-3, -4) is used to adjust the scanner sighting angle after the
scanner has been installed. The swivel mount is used as indicated in Figures 7 and 8.
Orifices
The orifice is used to restrict field of view (target area), reduce air flow, maintain air block, and
increase discrimination between flame and background radiation. The orifice is secured within the
ball of a swivel mount with an orifice retainer or the orifice can be placed within a 1 inch union (not
provided).
CD EFG
AB
CDEF G
A. Tube (see note)
B. Shutter & Bracket 61-2914-1
C. Shutter Bracket & lens (see note)
D. Gasket 29-248
E. Lens Holder 82-95
F. Lens Retainer 16-103
G. Lens Assembly (see note)
Note: Refer to MAINTENANCE section for detailed list of part numbers.
A-I. Orifices: 0.062" - 0.5" DIA
J. Orifice Retainer 34-181
K. Heat Insulating Nipple 35-127-1 (NPT)
Heat Insulating Nipple 35-127-3 (BSP)
L. Quartz Scanner Lens (see note above)
M. Sealing Quartz Window 92-48
N. Diode 101-78 A B C D E F G H I
J
K
L
M
N
A. Swivel Mount 60-1664-3 (NPT)
Swivel Mount 60-1664-4 (BSP)
B. Sealing Coupling with Quartz Window
60-1199-1 (NPT)
60-1199-2 (BSP)
AB
AB

11
The scanner should ideally sight a target area of 4 to 25 square inches (25-250cm2) of the flame
front. The flame front is a plane within the combustion space separating the region of unburned fuel
from the burning fuel. For example, if a 1/2 inch diameter orifice is placed within a mounting swivel
one foot from the scanner lens, and the swivel mount is located on the surface of a 4 foot deep wind-
box, and if the range of stable flame is 5 feet beyond the windbox, the flame front target area is 19.6
square inches as shown in figure 16 below.
ORIFICES
Figure Qty. Part Number Description
13 1 53-121 Orifice Kit: Contains following items:
13A 1 53-121-2 Orifice: Diameter = 0.062"
13B 1 53-121-3 Orifice: Diameter = 0.078"
13C 1 53-121-4 Orifice: Diameter = 0.093"
13D 1 53-121-5 Orifice: Diameter = 0.109"
13E 1 53-121-6 Orifice: Diameter = 0.125"
13F 1 53-121-7 Orifice: Diameter = 0.187"
13G 1 53-121-8 Orifice: Diameter = 0.250"
13H 1 53-121-9 Orifice: Diameter = 0.375"
13I 1 53-121-10 Orifice: Diameter = 0.500"
13J 2 34-181 Orifice Retainer
FIGURE 15. ORIFICE LOCATION
FIGURE 16. SCANNER WITH ORIFICE
Note: There is an inverse relationship between discrimination and sensitivity.
Heat Insulating Nipple
The heat insulating nipple (P/N 35-127-1, -3) is used to prevent heat transfer from the hot sight pipe
to the scanner head.
SWIVEL MOUNT
ORIFICE RETAINER
PURGE
ORIFICE
FIELD OF VIEW
FIELD OF VIEW
BALL
AIR SUPPLY
3/8" PLUG
1" SWIVEL MOUNT 60-1199-1,2 SEALING COUPLING
45UV5
5’
FLAME FRONT
.5" DIA ORIFICE
4’
10’
WINDBOX
X =DIAMETER OF TARGET AREA x= 10 ft
.5 1 ft x = 5 inches
TARGET AREA = ¼(x/2)2= 19.6 square inches
X
TARGET
AREA
FIELD OF
VIEW
19.6 SQ.IN.
1’

12
Sealing Coupling with Quartz Window
The sealing coupling, PN 60-1199-x is used whenever a coupling or seal is required for scanner pip-
ing. The quartz window blocks furnace pressure, heat, gases and soot from coming in contact with
the scanner and contaminating the lens. The size is one inch U.S. standard taper pipe thread (Sched-
ule 40, 1" NPT). When the sealing coupling is used, a 1" wye fitting must by used downstream from
it for connection of a purge air supply (plug 3/8" opening).
Electrical Accessories
The diode (101-78) is used whenever a solid state scanner (45RM1, 45RM2, 45RM4, 45FS1,or
45UVFS1) is operated with a Type 45UV5 scanner. Refer to the “Control and Scanner Wiring” sec-
tion, for further information. Fireye scanner cable Part No. 59-470 (4 conductors 18 AWG, 2 conduc-
tors 22 AWG, common shield) or Part No. 59-471 (4 conductors 18 AWG, 4 conductors 22 AWG,
common shield) is used for wiring connections between the scanner(s) and the control terminals.
Each wire is color coded for connection as follows:
BLACK “L” or AC hot terminal.
RED “1” or shutter terminal.
WHITE “C” or common terminal.
GREEN “14” or flame signal terminal.
SHIELD Connect the shield to terminal C at the control end only.
The shield at the scanner end should be left disconnected.
BLUE Not Used.
YELLOW Not Used.
BROWN (59-471 only) Not Used.
ORANGE (59-471 only) Not Used.
Note: If the application requires only model 45UV5 scanners, specify Fireye Part Number 59-470
cable. Clip and tape the blue and yellow wires.
13
MAINTENANCE
CAUTION: Disconnect or shut off electric power when working on scanner.
1. The Fireye (25SU3 or 25SU5) control and scanner should be powered at all times (except for
repair, cleaning or replacement) to reduce any harmful effects of atmospheric humidity.
2. The scanner and sight pipe must be kept clean to prevent overheating and assure optical quali-
ties.
3. When replacing or cleaning the UV tube, note the position of the tube electrodes in relation to
the rectangular slot in the shutter assembly. Replace tube in the same slot location.
4. Clean the quartz lens with glass detergent or glass cleaning agents which contain no abrasives.
After cleaning remove all cleaning films with a soft lint-free cloth.
5. Use original Fireye repair parts to maintain optimum operation
CONTROL AND SCANNER WIRING
All wiring to the scanner should be rated at 600 volts and 90C. For runs less than 1000 feet Fireye
recommends the use of scanner cable Part No. 59-470 (4 conductors 18 AWG, 2 conductors 22
AWG, common shield) or Part No. 59-471 (4 conductors 18 AWG, 4 conductors 22 AWG, common
shield). For runs in excess of 1000 feet, consult the factory. For ease of installation and occasional
service, the wires should be routed to the screw terminals in the scanner via a flexible conduit per the
following groups. Always refer to the appropriate flame safeguard control bulletin.
Group I Fireye Controls
A blocking diode, Fireye Part Number 101-78, must be used when a solid state type scanner is used
in parallel with a UV scanner. Connect the diode in series with the lead from terminal 14 in the UV
scanner as shown in Figures 16 and 20. This is to avoid damaging the solid state scanner. If the appli-
cation requires that only one scanner be in use at any time, the other unit can be removed from oper-
ation by breaking the power lead (LA or LB).
Group II Fireye Controls
If the intended use requires that the amplifier input signal come from one of two or more scanners,
the power and shutter drive signals should be switched between scanners using a single relay “S” or
selector switch. This permits the operation of one scanner at a time. As with Group I amplifiers, the
blocking diode is necessary when using the solid state scanner with a UV unit (see Figure 17).
RECOMMENDED SPARE PARTS
FIGURE PART NUMBER DESCRIPTION
Engineering Code
00-03 (Through
mid- 2008)
Engineering Code
04 and 05
(2008 to 2012)
Engineering Code
06 and higher
(July 2012)
12A 4-320-1 4-290-2 4-314-1 UV Tube
12B 61-2914-1 61-2914-1 61-2914-1 Shutter & Bracket Ass'y.
12C 61-2913-1 61-7203 61-7203 Shutter, Bracket, and Lens Ass'y. (includes 61-2914-1).
12D 29-248 29-248 29-248 Flange Gasket
12E 82-95 82-95 82-95 Lens Holder
12F 16-103 16-103 16-103 Lens Retainer (grommet)
13L 46-38 46-179 46-179 Lens
12G 61-2275-2 61-2275-4 61-2275-4 Lens Assembly (includes Holder, Retainer, and Lens)
13M 92-48 92-48 92-48 Quartz Window (Part of Sealing Coupling 60-1199-x)

14
Group III Fireye Controls (non-self-checking type)
With these amplifiers, terminal 1 on the scanner, the self-checking shutter connection, is not used. If
more than one scanner is used, power for additional units can be obtained from terminal 1 of the
amplifier through a special 0.33 F capacitor (Part No. 7-1143) and 1 meg ohm, 1/4 watt resistor.
With the connections as shown, the unwanted scanner can be turned off by breaking the power lead
at LA or 1A. As with Group I and II amplifiers, the diode must be used when a solid state scanner is
used with a UV unit. (see Figure 18).
Group IV Amplifiers (25SU3-5170 Series)
A blocking diode is not required when a solid state scanner is used with a UV unit (See Figure 19).
Notes:
1. Connect the scanner cable shield to terminal C at the control end only; the shield at the scanner
end should be left disconnected.
— Strip six inches of insulation from scanner end of cable.
— Cut off the six inches of cable shield that is visible.
— Tape the cable’s insulation where it terminates so the cable shield is not visible.
2. Flame amplifier rack, Part Number 60-1706 has a blocking diode between terminals 14A and
14D.
Group V Amplifiers (5000 Series)
A blocking diode, Fireye part number 101-78, must be used when a solid state scanner is used in par-
allel with a UV scanner. Connect the diode in series with the lead from terminal 14 in the UV scanner
as shown in figures 20 and 21.
Group VI Amplifiers (2000 Series)
A blocking diode is not required when a solid state scanner is used with a UV unit (See Figure 22).
FIGURE 17. GROUP I CONNECTIONS
NOTES:
1. DIODE - PART NUMBER. 101-78, CONNECT AS SHOWN
IN SIGNAL LEAD (14) OF UV SCANNER WHEN USING
WITH BGC SCANNER. IF TWO UV SCANNERS ARE USED,
ONE AT LOCATION A AND ONE AT LOCATION B, THE
DIODE INDICATED IS NOT REQUIRED.
2. FLAME AMPLIFIER RACK P/N 60-1706 HAS A BLOCK-
ING DIODE BETWEEN TERMINALS 14A AND 14D.
3. IF THE APPLICATION REQUIRES THAT ONLY ONE
SCANNER BE IN USE AT ANY TIME, THE OTHER UNIT CAN
BE REMOVED FROM THE OPERATION BY BREAKING THE
POWER LEAD (LA OR LB).
LA
1A
14
C
P
1
C
WHITE
BLACK
RED
GREEN
14
LB
1B
L
1
C
14
WHITE
BLACK
RED
GREEN
SHIELD SHIELD
SHIELD SHIELD
SCANNER CABLE
P/N 59-470
DIODE
(SEE NOTE)
SCANNER A
(45RM1, 2)
SCANNER B
(45UV5)
SHIELD
Group I
Self-checking units capable of operation with one or two scanners. (One 45UV5 and one solid
state 45RM1 or 45RM2 scanner may be used as shown in the figures in this document. If two
45UV5 scanners are used, one at location A and one at location B, the diode indicated is not
required. If only one scanner is used, connect the scanner as shown at scanner A position.)
25SU3 Models 4163(T), 4164(T), 4167(T), 4168(T), 4169(T), 4170, 4171.

15
FIGURE 18. GROUP II CONNECTIONS
FIGURE 19. GROUP III CONNECTIONS
NOTE:
DIODE PART NO. 101-78. CONNECT AS
SHOWN IN SIGNAL LEAD (14) OF U.V. SCAN-
NER WHEN USING WITH SOLID STATE SCAN-
NER.
LA
1A
14
C
P
1
C
WHITE
BLACK
RED
GREEN
14
L
1
C
14
WHITE
BLACK
RED
GREEN
SHIELD SHIELD
SHIELD SHIELD
DIODE
(SEE NOTE)
SCANNER A
(45RM1, 2)
SCANNER B
(45UV5)
S3
S4
S1
S2
Group II
Self-checking units capable of operation with one scanner.
25SU3 Models: 4157, 4158, 4162, 4165, 4166 (or 5166, 5168 using 60-2206-2 adapter
plate).
25SU5 Models: 4011, 4012, 4117 (or 5011, 5012, 5013 using 60-2206-1 adapter plate).
NOTES
1. DIODE - PART NUMBER 101-78. CONNECT
AS SHOWN IN SIGNAL LEAD (14) OF UV
SCANNER WHEN USING WITH SOLID STATE
SCANNER.
2. CAPACITOR - PART NUMBER 7-1143. CON-
NECT AS SHOWN TO POWER SECOND SCAN-
NER FROM ONE AMPLIFIER.
3. RESISTOR - 1 MEG OHM, 1/4 WATT
LA
1A
14
C
P
1
C
WHITE
BLACK
GREEN
14
L
1
C
14
WHITE
BLACK
GREEN
SHIELD SHIELD
SHIELD SHIELD
SCANNER A
(45RM1, 2)
SCANNER B
(45UV5)
DIODE
(SEE NOTE)
2,3
1
Group III
Non-self-checking units capable of operation with one or more scanners: One 45UV5 and one
solid state 45RM1 or 45RM2 scanner may be used as shown in the figures. If two 45UV5 scan-
ners are used, one at location A and one at location B, the diode indicated is not required. If only
one scanner is used, connect the scanner as shown at scanner position A.
25SU3 Models: 1157(T), 1158(T), 1160, 1161, 1162, 1166.
25SU5 Models: 1011, 1111(T), 1112(T), 1117.

16
FIGURE 20. GROUP IV CONNECTIONS
FIGURE 21. BLOCKING DIODE CONNECTIONS
FIGURE 22. GROUP V CONNECTIONS
LA
1A
14A
C
L
1
C
14
L
1
C
14
SCANNER A
PC CONNECTOR TERMINALS
PR20
PR4
PR1
PL1
LB
1B
14B
C
PR21
PR5
PR9
PL1
WHITE
BLACK
RED
GREEN
WHITE
BLACK
RED
GREEN
SHIELD SHIELD
SHIELD SHIELD
SCANNER B
FLAME AMPLIFIER RACK TERMINALS
(PART NUMBER. 60-1706)
SCANNER CABLE
Group IV
Self-checking units capable of operation with one or two scanners.
25SU3 Models: 5170, 5171, 5172, 5173.
ANODE CATHODE
FIREYE CONTROL
TERMINAL (NO. 14)
UV SCANNER
TERMINAL NO. 14
1
P
C
14
45RM1/2
C
14
1
L
45UV5
26
LB
1
LA
C
14
RED
BLACK
WHITE
GREEN
RED
BLACK
WHITE
101-78
GREEN
45RM4 or
45UV5
1
L
C
14
2
1
3
1
45FS1 or
45UVFS1
RED
BLACK
WHITE
GREEN
RED
BLACK
WHITE
GREEN
101-78
120 VAC
(24 VDC)
Group V
Self-checking units capable of operation with one or two scanners. If two models 45UV5 scan-
ners are used the diode is not required.
Connect scanner cable shield(s) to wiring base terminal C. The shield at the 45UV5, 45RM1, or
45RM2 scanner end is left disconnected. The shield at the 45RM4, 45FS1, or 45UVFS1 scanner
end is tied to the scanner cable quick-disconnect.
25SU3 Models: 5166, 5168 (wiring base 60-2206-2)
25SU5 Models: 5011,5012, 5013 (wiring base 60-2206-1)
26
LB
20
C
14
21
21

17
FIGURE 23. GROUP VI CONNECTIONS
Group VI
Self-checking units capable of operation with one or two scanners. Connect scanner cable
shield(s) to 25SU3 terminal D32 or Z32. The shield at the 45UV5, 45RM1, or 45RM2 scanner
end is left disconnected. The shield at the 45RM4, 45FS1, or 45UVFS1 scanner ends is tied to
the scanner cable quick-disconnect.
If only one scanner is used, connect as scanner “A”.
Wire color code refers to 59-470 or 59-471 cable. Cable 59-221 (OBSOLETE) had the same
color code, but only the green wire was shielded.
D2
D4
D6
D8
3
2
1
D32
25SU3-2100
AMPLIFIER
Z4
Z6
Z8
Z2
Z32
SCANNER
45UV5/45RM1/45RM2
“A”
(SIGNAL)
(COMMON)
(SHUTTER)
(POWER)
SHIELD
Z2
Z4 D4
D2
POWER SUPPLY
19UVPS-2120
19UVPS-2220
3
2
1
SCANNER
“B” 14
C
1
P
(SIGNAL)
(COMMON)
(SHUTTER)
(POWER)
SHIELD
7
7
14
C
1
P
QUICK DISCONNECT
PINS (IF USED)
INTERNAL
TERMINALS
INTERNAL
TERMINALS
QUICK DISCONNECT
PINS (IF USED)
Z6 D6
GREEN
WHITE
RED
BLACK
GREEN
WHITE
RED
BLACK
WIRE COLOR CODE REFERS TO 59-470 OR 59-471 CABLE.
45UV5/45RM1/45RM2
ISOLATE AND TAPE SHIELD AT SCANNER.
D2
D4
D6
D8
3
2
1
D32
25SU3-2100
AMPLIFIER
Z4
Z6
Z8
Z2
Z32
SCANNER
“A”
(SIGNAL)
(COMMON)
(SHUTTER)
(POWER)
SHIELD
Z2
Z4 D4
D2
45UV5
POWER SUPPLY
19UVPS
-2120
19UVPS-2220
3
2
1
SCANNER
“B”
45RM4/45FS1/45UVFS1
(SIGNAL)
(COMMON)
(SHUTTER)
(POWER)
SHIELD
7
7
14
C
1
L
QUICK DISCONNECT
PINS (IF USED)
INTERNAL
TERMINALS
QUICK DISCONNECT PINS
D6
Z6
GREEN
WHITE
RED
BLACK
GREEN
WHITE
RED
BLACK
WIRE COLOR CODE REFERS TO 59-470 OR 59-471 CABLE.

18
45UV5 SCANNER COMPATIBILITY CHART
FIREYE CONTROL 45UV5 MODEL FIREYE CONTROL 45UV5 MODEL
TYPE MODEL 1000, 1010
(60 HZ)
1101, 1103
(50 HZ)
TYPE MODEL 1000, 1010
(60 HZ)
1101, 1103
(50 HZ)
25SU3
1157(T) X X
25SU3
4171 X X
1158(T) X 5166 X X
1160 X X 5168 X X
1161 X 5170 X X
1162 X X 5171 X X
Series 2000 X X 5172 X X
1166 X 5173 X X
4157 X X SYSTEM 126 X X
4158 X
4162 X X
25SU5
1011 X
4163(T) X X 1111(T) X X
4164(T) X 1112(T) X
4165 X 1117 X
4166 X X 4011 X X
4167(T) X X 4012 X
4168(T) X X 4117 X X
4169T NOTE 2 NOTE 2 5011 X X
4170 X X 5012 X X
NOTE 1: Scanner and control frequency must be compatible with frequency of power line.
NOTE 2: For 25SU3 Model 4169T code 17 and earlier, use 45UV5 Model 1101 or 1103 (50HZ).For 25SU3 Model 4169T code 18 and
later use 45UV5 Model 1000 or 1010 (60HZ).
NOTE 3: With 25SU3-2000 series controls, the 120 VAC to the scanner must be provided by a separate Fireye power supply, or
modernization adapter.
NOTE 4: The AC power source must be sinusoidal for proper scanner operation. The application of any waveform other than a sine wave
(e.g. square wave) will damage the 45UV5 scanner.

19
TROUBLESHOOTING
The following steps should be performed if flame is not detected:
NOTE: Wear protective filtered lenses when viewing flame.
1. Check scanner wiring for breaks and proper connections.
2. Look down the sight pipe.
— Scanner should have an unrestricted view for all firing conditions.
— The flame’s primary combustion zone (first 1/3 of flame) should be within the scanner’s
field of view for all firing loads.
3. Clean the scanner lens with a glass detergent or glass cleaning agent which contains no abra-
sives. After cleaning remove all cleaning films with a soft lint-free cloth. (Some cleaning films
may reduce or filter UV).
4. Measure voltage across scanner terminals.
— Between terminals 14 and C there should be 70 VAC pulses of 6 microseconds (use oscillo-
scope).Between terminals L and C there should be 200 to 250 VAC for units manufactured
before 1994. For later units, there should be 130 to 150 VAC.
5. Scanner operation can be checked by aiming the scanner at a source of ultra-violet radiation,
(lighter or propane torch). The meter on the associated control should indicate flame.
6. Check to see that an external selector switch is connected to the associated control’s sensitivity/
threshold select or scanner enable terminals.
7. Reposition scanner so it is properly aligned for best flame signal.
8. If the scanner still does not indicate the presence of flame (DC voltage on Flame Signal Meter)
replace the UV tube and repeat steps 4 through 7.

20
NOTICE
When Fireye products are combined with equipment manufactured by others and/or integrated into
systems designed or manufactured by others, the Fireye warranty, as stated in its General Terms and
Conditions of Sale, pertains only to the Fireye products and not to any other equipment or to the
combined system or its overall performance.
WARRANTIES
FIREYE guarantees for one year from the date of installation or 18 months from date of manufacture
of its products to replace, or, at its option, to repair any product or part thereof (except lamps, elec-
tronic tubes and photocells) which is found defective in material or workmanship or which otherwise
fails to conform to the description of the product on the face of its sales order. THE FOREGOING
IS IN LIEU OF ALL OTHER WARRANTIES AND FIREYE MAKES NO WARRANTY OF
MERCHANTABILITY OR ANY OTHER WARRANTY, EXPRESS OR IMPLIED. Except as
specifically stated in these general terms and conditions of sale, remedies with respect to any product
or part number manufactured or sold by Fireye shall be limited exclusively to the right to replace-
ment or repair as above provided. In no event shall Fireye be liable for consequential or special dam-
ages of any nature that may arise in connection with such product or part.
FIREYE ®CU-22
3 Manchester Road MARCH 28, 2013
Derry, New Hampshire 03038 USA Supersedes July 30 2012
www.fireye.com
This manual suits for next models
12
Table of contents
Other Fireye Scanner manuals


