FIRMM GE User manual

FIRMM®Installation Guide – GE
MRI Scanners
CMC Medical Devices & Drugs S.L.
C/ Horacio Lengo n18
C.P. 29006, Málaga, Spain


© Nous Imaging, Inc. FIRMM®Installation Guide - GE Page 3
320-00201-DO-11 Revision 7Released: 02/2022
Table of Contents
1Introduction........................................................................................................................................................................4
2Safety Considerations.....................................................................................................................................................4
2.1 Definitions................................................................................................................................................................ 4
2.2 List of Warnings and Cautions .......................................................................................................................... 5
3Compatible Scanners ......................................................................................................................................................5
4Overview ............................................................................................................................................................................6
5Setting Up the FIRMM Desktop Cradle...................................................................................................................7
6Setting Up the FIRMM Tablet Computer .............................................................................................................10
7Activating your FIRMM License ............................................................................................................................ 15
8Connecting the Network............................................................................................................................................. 16
9Configuring the Network on the FIRMM Tablet Computer...........................................................................16
10 Setting up the GE Scanner Computer Transfer Script to the FIRMM Tablet Computer.......................22
11 Connecting the FIRMM Biofeedback Output to your MRI AV Display (Optional)...............................29
12 Complete the Post Installation Checklist............................................................................................................... 30
13 Symbol Glossary........................................................................................................................................................... 30
14 Technical Support.........................................................................................................................................................32

© Nous Imaging, Inc. FIRMM®Installation Guide - GE Page 4
320-00201-DO-11 Revision 7Released: 02/2022
1Introduction
Thank you for acquiring FIRMM®to address patient motion in your fMRI BOLD examinations in
research and the clinic.
Your system includes the hardware and pre-installed FIRMM software compatible with GE
scanners.
FIRMM installation is straightforward, however, if you have any questions during the process,
please contact us at:
Nous Imaging, Inc.
Technical Support
+1-844-NOUSIMG (+1-844-668-7464)
support@firmm.io
For instructions on how to use the FIRMM system please see the “FIRMM User Manual”.
2Safety Considerations
The following section contains the safety considerations associated with FIRMM use. The user needs
to become familiar with the following information in order to use FIRMM safely and effectively.
2.1 Definitions
WARNING
WARNING: Indicates a hazardous situation that, if not avoided, could result in death or
serious injury
CAUTION
Caution: Indicates a hazardous situation that, if not avoided, may result in property damage,
injury, or both.
Note: Is used to alert the user to useful information to operate the device effectively.

© Nous Imaging, Inc. FIRMM®Installation Guide - GE Page 5
320-00201-DO-11 Revision 7Released: 02/2022
2.2 List of Warnings and Cautions
All the cautions listed below are also appropriately placed throughout this Installation Guide.
WARNING - The FIRMM device is MRI Unsafe. The FIRMM device should only be
installed and operated from within the MRI control room (MR safety zone III) and
outside the 5-gauss field of the MRI scanner.
WARNING - Use of this equipment adjacent to or stacked with other equipment
should be avoided because it could result in improper operation. If such use is
necessary, the FIRMM system and the other equipment should be observed to verify
that they are operating normally.
WARNING - Use of accessories, transducers and cables other than those specified or
provided by the manufacturer of this equipment could result in increased
electromagnetic emissions or decreased electromagnetic immunity of this equipment
and result in improper operation.
WARNING - Portable RF communications equipment (including peripherals such as
antenna cables and external antennas) should be used no closer than 30 cm (12
inches) to any part of the FIRMM system including cables specified by the
manufacturer. Otherwise, degradation of the performance of this equipment could
result.
CAUTION - Charge the tablet only using the power cord provided with the system.
CAUTION - It is important the power outlet provide a proper safety ground.
3Compatible Scanners
FIRMM is compatible with GE SIGNA™ MRI Systems.
© Nous Imaging, Inc. FIRMM®Installation Guide - GE Page 6
320-00201-DO-11 Revision 7Released: 02/2022
4Overview
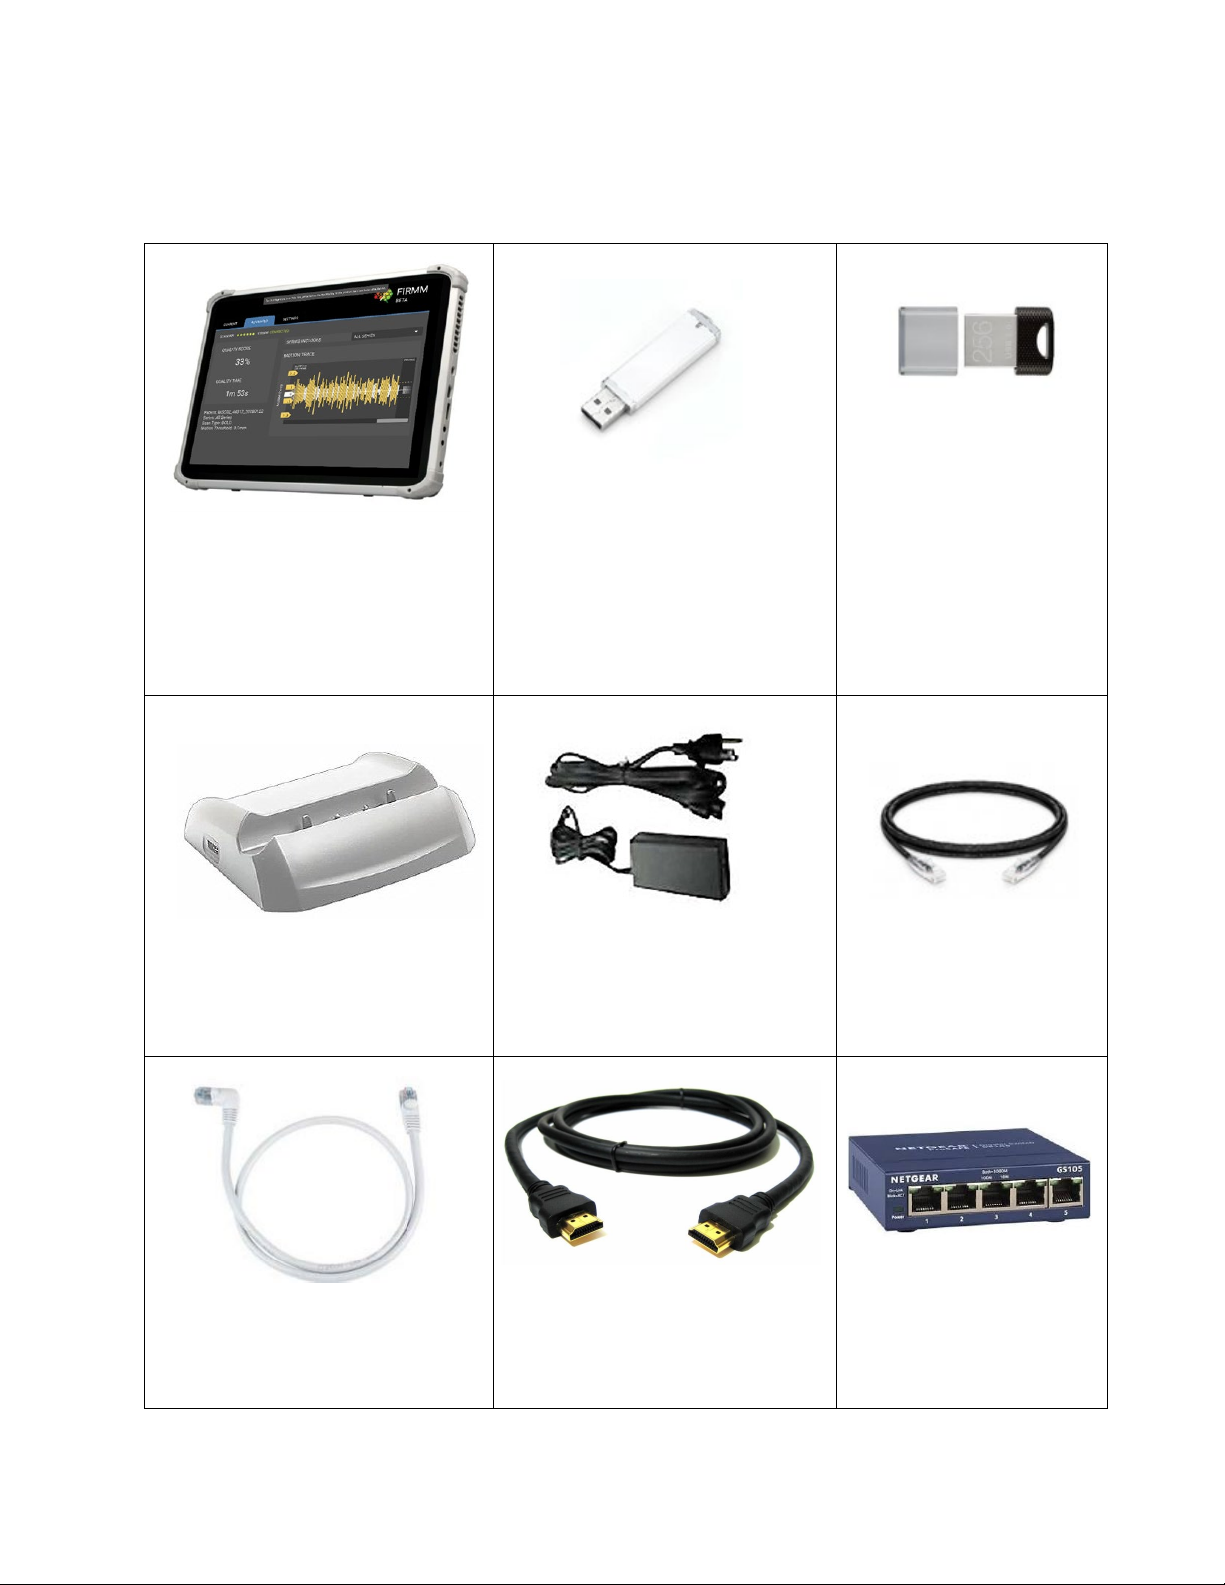
FIRMM is provided with the following hardware:
FIRMM® Tablet Computer and
Software
USB drive containing GE
Scanner Scripts (has a “G-
#.#.#” label on it)
Additional USB drive
(pre-installed in dock
port with a “DO NOT
REMOVE” label on it)
FIRMM Desktop Cradle
Power Supply
6 Foot Ethernet Cable
(straight connectors)
6 Foot Ethernet Cable (right
angle connector for tablet)
Biofeedback AV Interface
(HDMI – HDMI, 25 feet)
5-port Ethernet Switch*
© Nous Imaging, Inc. FIRMM®Installation Guide - GE Page 7
320-00201-DO-11 Revision 7Released: 02/2022
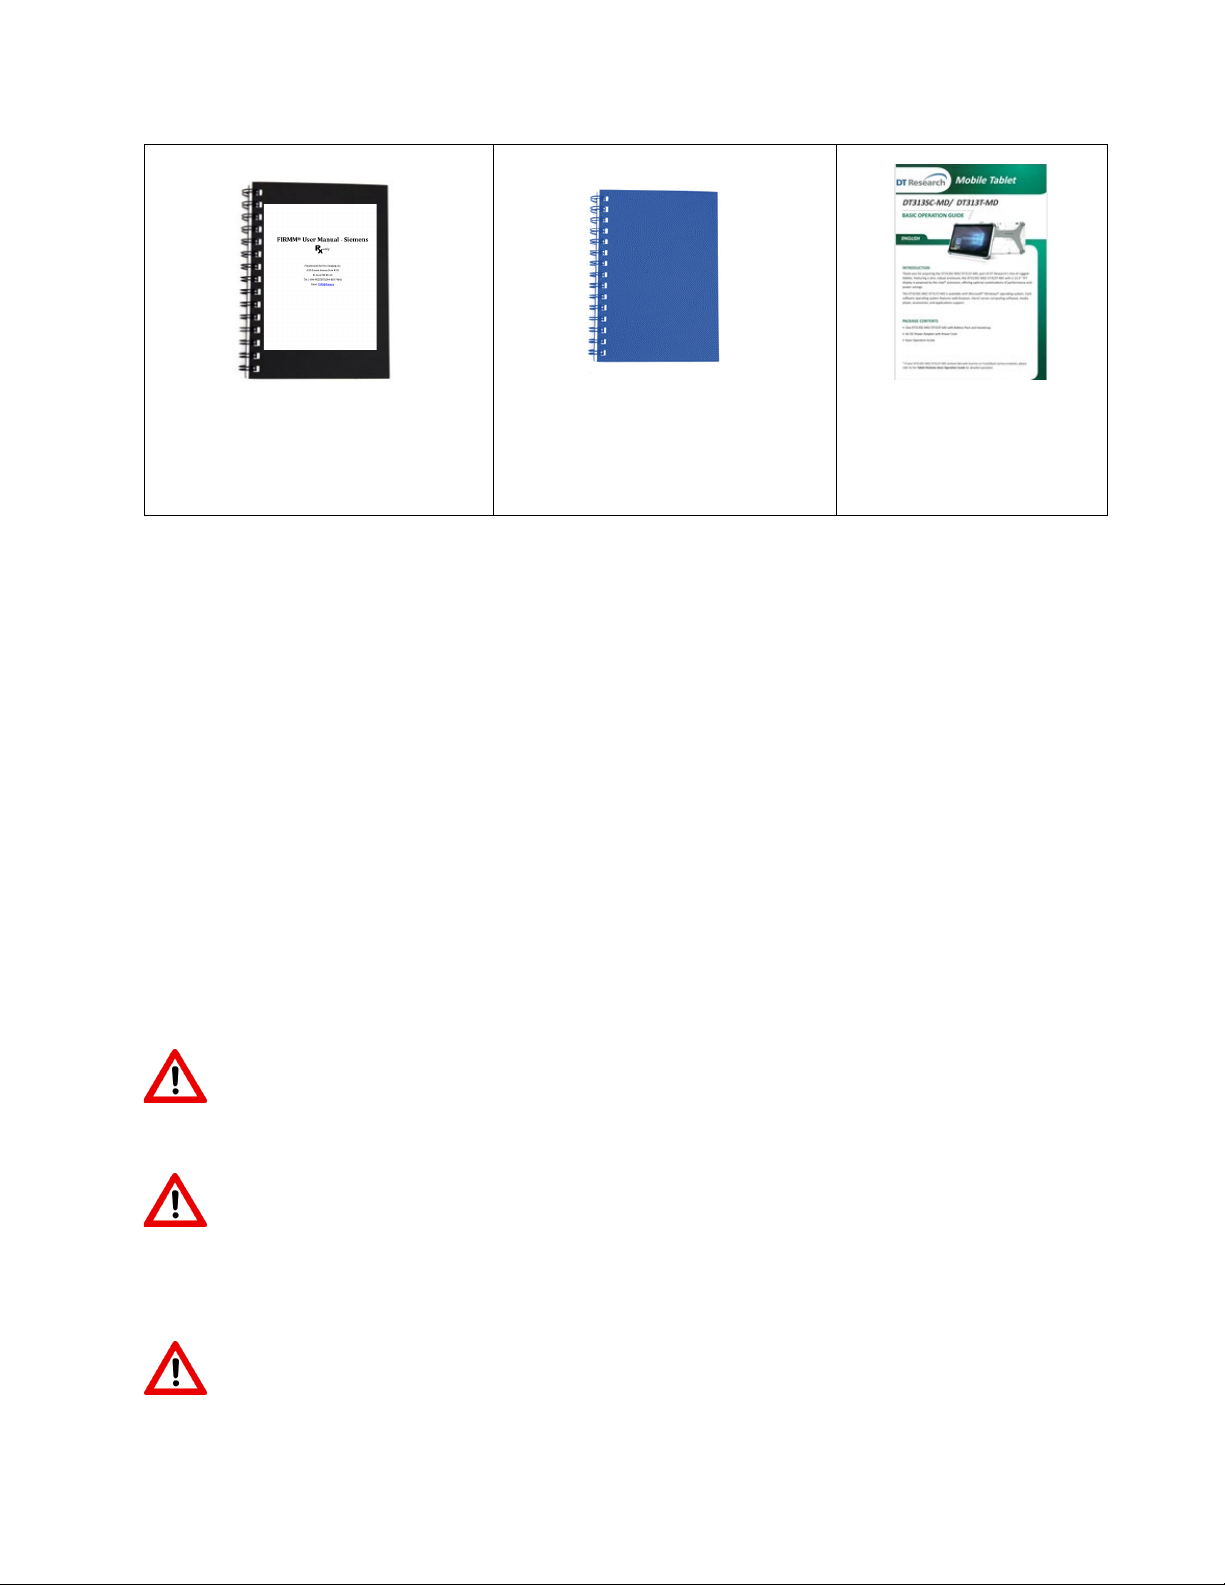
FIRMM User Manual - GE
FIRMM Installation Guide (this
document)
DT-313-MD Tablet
manual
*This switch is provided for convenience in the event that no open network jack is available.
The general process for setting up FIRMM include:
A. Setting up the Desktop Cradle
B. Setting up the Tablet Computer
C. Updating the software license (if necessary)
D. Interfacing the FIRMM system to the fMRI
E. Performing a simple test scan
F. Completing the post-installation checklist
5Setting Up the FIRMM Desktop Cradle
WARNING - The FIRMM device is MRI Unsafe. The FIRMM device should only be
installed and operated from within the MRI control room (MR safety zone III) and
outside the 5-gauss field of the MRI scanner.
WARNING - Use of this equipment adjacent to or stacked with other equipment should
be avoided because it could result in improper operation. If such use is necessary, the
FIRMM system and the other equipment should be observed to verify that they are
operating normally.
WARNING - Use of accessories, transducers and cables other than those specified or
provided by the manufacturer of this equipment could result in increased
© Nous Imaging, Inc. FIRMM®Installation Guide - GE Page 8
320-00201-DO-11 Revision 7Released: 02/2022
electromagnetic emissions or decreased electromagnetic immunity of this equipment
and result in improper operation.
WARNING - Portable RF communications equipment (including peripherals such as
antenna cables and external antennas) should be used no closer than 30 cm (12
inches) to any part of the FIRMM system including cables specified by the
manufacturer. Otherwise, degradation of the performance of this equipment could
result.
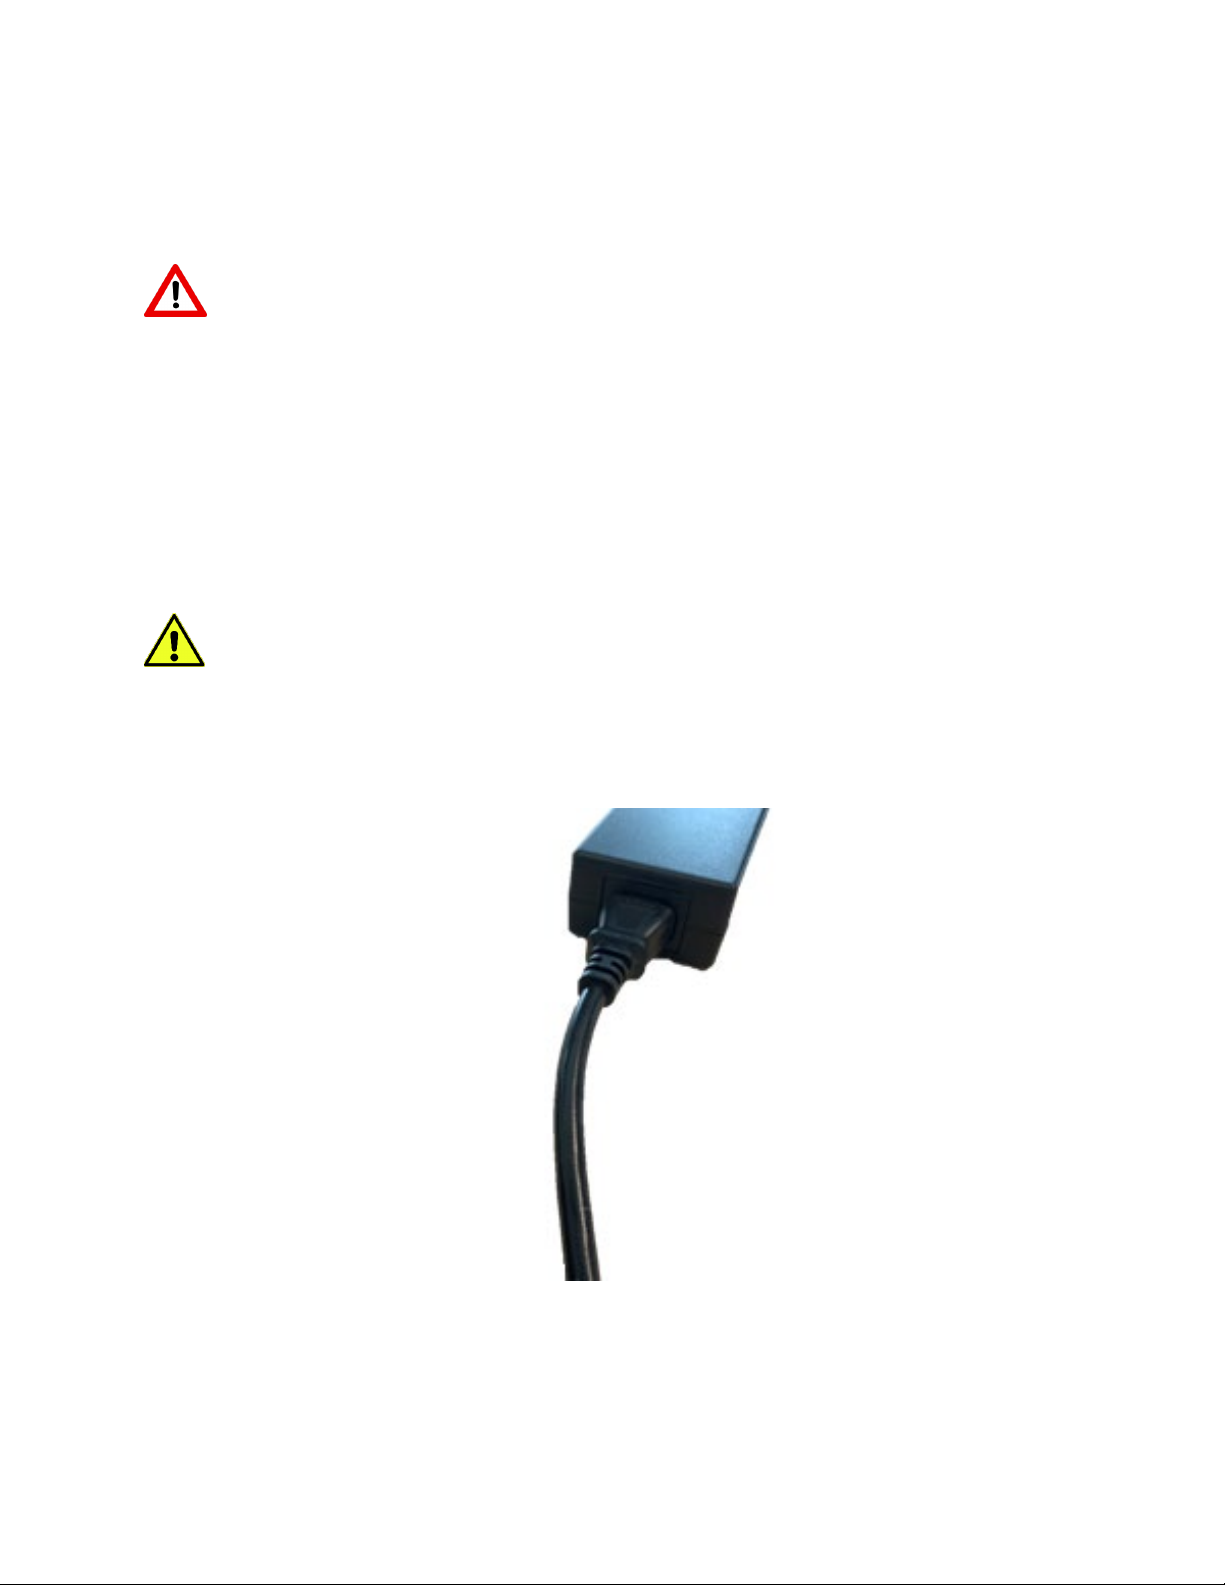
Remove the FIRMM Desktop Cradle from its separate packaging.
Remove the Power Supply and cord from the packaging.
CAUTION - Charge the tablet only using the power cord provided with the system.
Complete assembly of the power supply by inserting the AC line cord into the power supply
“brick”.

© Nous Imaging, Inc. FIRMM®Installation Guide - GE Page 9
320-00201-DO-11 Revision 7Released: 02/2022
Insert the barrel plug connector into the rear of the FIRMM Desktop Cradle as shown below.
Insert the AC connector into a power outlet (100-240 V AC).
CAUTION - It is important the power outlet provide a proper safety ground.

© Nous Imaging, Inc. FIRMM®Installation Guide - GE Page 10
320-00201-DO-11 Revision 7Released: 02/2022
Confirm there is a small USB drive already inserted in the lower USB port. It is labeled (not
shown below) with a small sticker that says “DO NOT REMOVE”.It is only to be removed if advised
by Nous Imaging service.
Note: This USB drive maintains a copy of the routine FIRMM software monitoring that can be used
to assist you if detailed analysis of your system operation becomes necessary. No protected health
information is stored on the USB drive.
6Setting Up the FIRMM Tablet Computer
Remove the high performance FIRMM Tablet Computer from its carton and remove the
protective plastic sleeve and the protective plastic screen shipping protector.
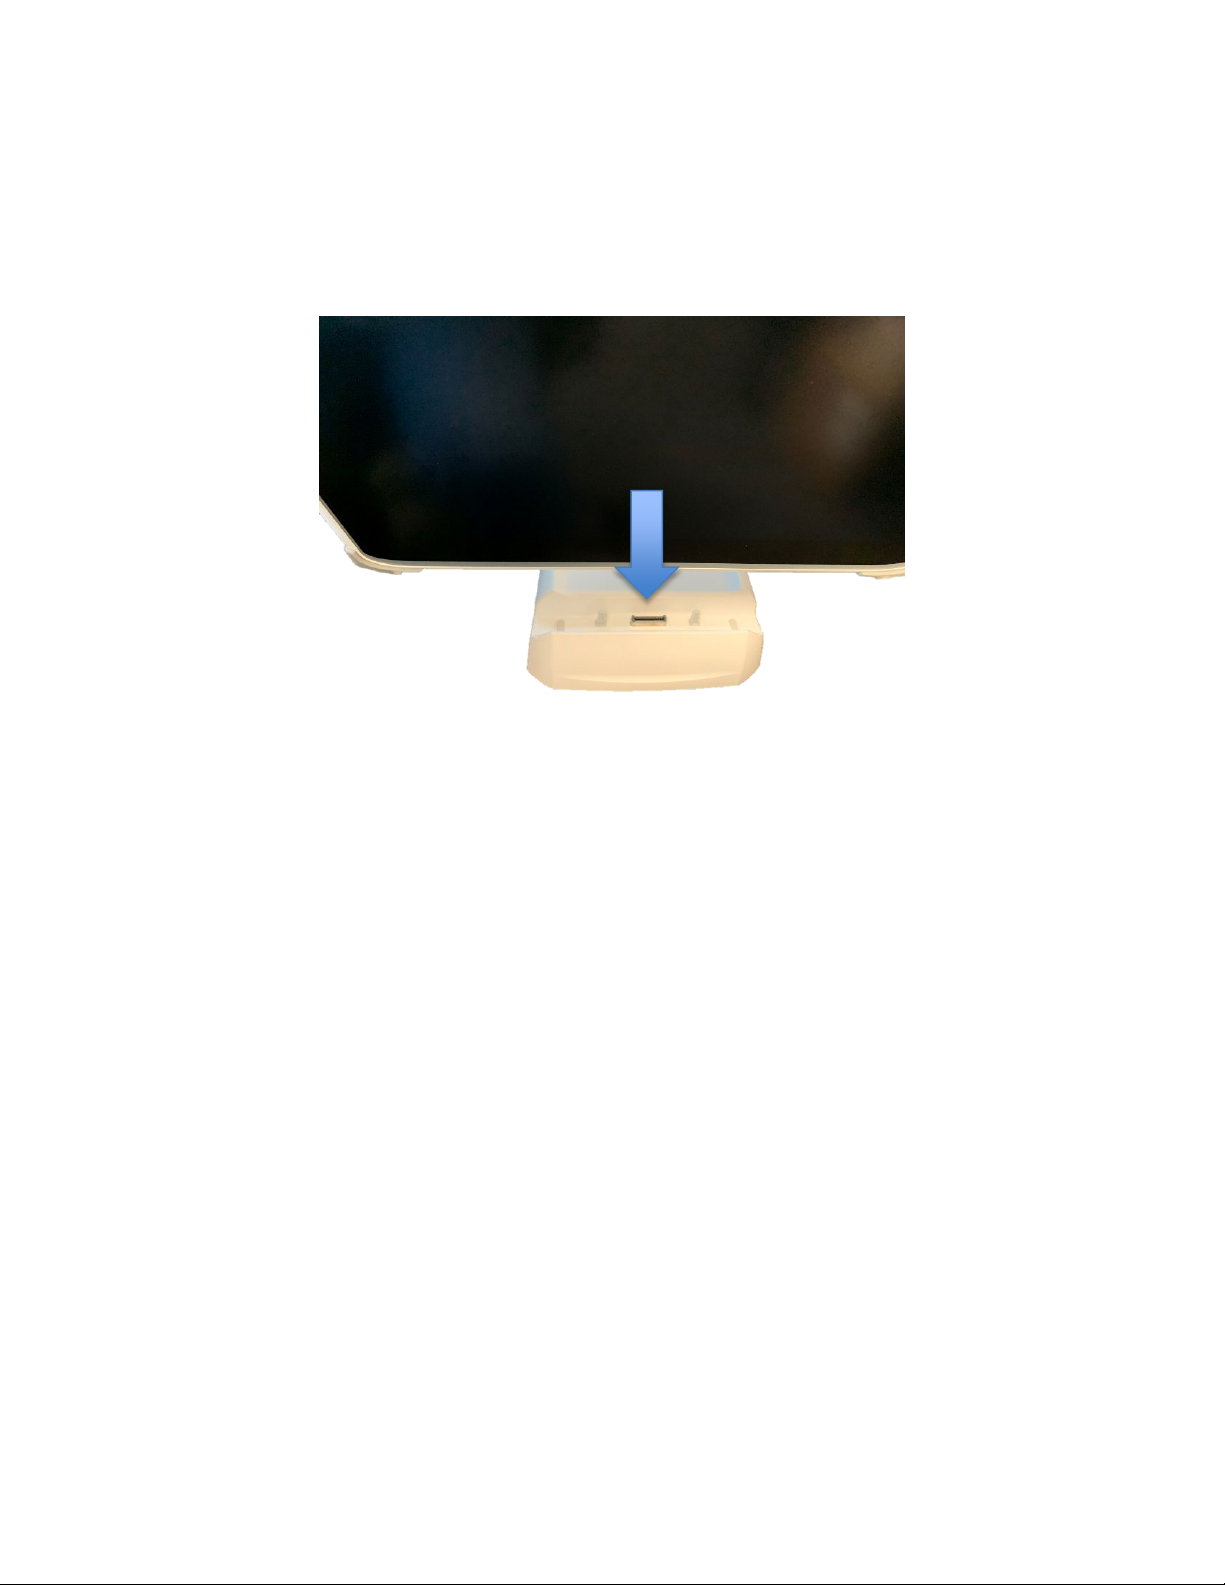
Remove the small rubber cradle connection plug on the bottom edge of the FIRMM Tablet
Computer as shown below.
© Nous Imaging, Inc. FIRMM®Installation Guide - GE Page 11
320-00201-DO-11 Revision 7Released: 02/2022
With the Desktop Cradle facing forward, insert the FIRMM Tablet Computer as shown below
taking care to align the connector and the guidance pins.
Note: The FIRMM Tablet Computer is intended to be left in its Desktop Cradle at all times.

© Nous Imaging, Inc. FIRMM®Installation Guide - GE Page 12
320-00201-DO-11 Revision 7Released: 02/2022
Insert the right-angle CAT-6 Ethernet Cable into the network interface jack on the upper
right-hand edge of the Tablet Computer as shown:
The left edge of the FIRMM Tablet Computer displays Power/Battery status (see blue arrow in
photo below). The LED should be blinking blue indicating the internal battery is charging.

© Nous Imaging, Inc. FIRMM®Installation Guide - GE Page 13
320-00201-DO-11 Revision 7Released: 02/2022
Turn on the FIRMM system by pushing and then quickly releasing the Power Button on the
lower right-hand edge of the FIRMM Tablet Computer.

© Nous Imaging, Inc. FIRMM®Installation Guide - GE Page 14
320-00201-DO-11 Revision 7Released: 02/2022
The power button location from your DT313T-MD Medical Tablet Basic Operations Guide is shown
below:
The FIRMM system will power up with the display shown below indicating it is awaiting data from
the MRI scanner.
© Nous Imaging, Inc. FIRMM®Installation Guide - GE Page 15
320-00201-DO-11 Revision 7Released: 02/2022
7Activating your FIRMM License
Your FIRMM system should come out of the box with a license that enables all its features.
You will receive updated licenses if you purchase new subscription options, or at the time you
renew a subscription for the FIRMM application. Your updated licenses are available by contacting
FIRMM Technical Support at +1-844-668-7464 or emailing support@firmm.io.
The new license key may be loaded directly into the FIRMM software as follows.
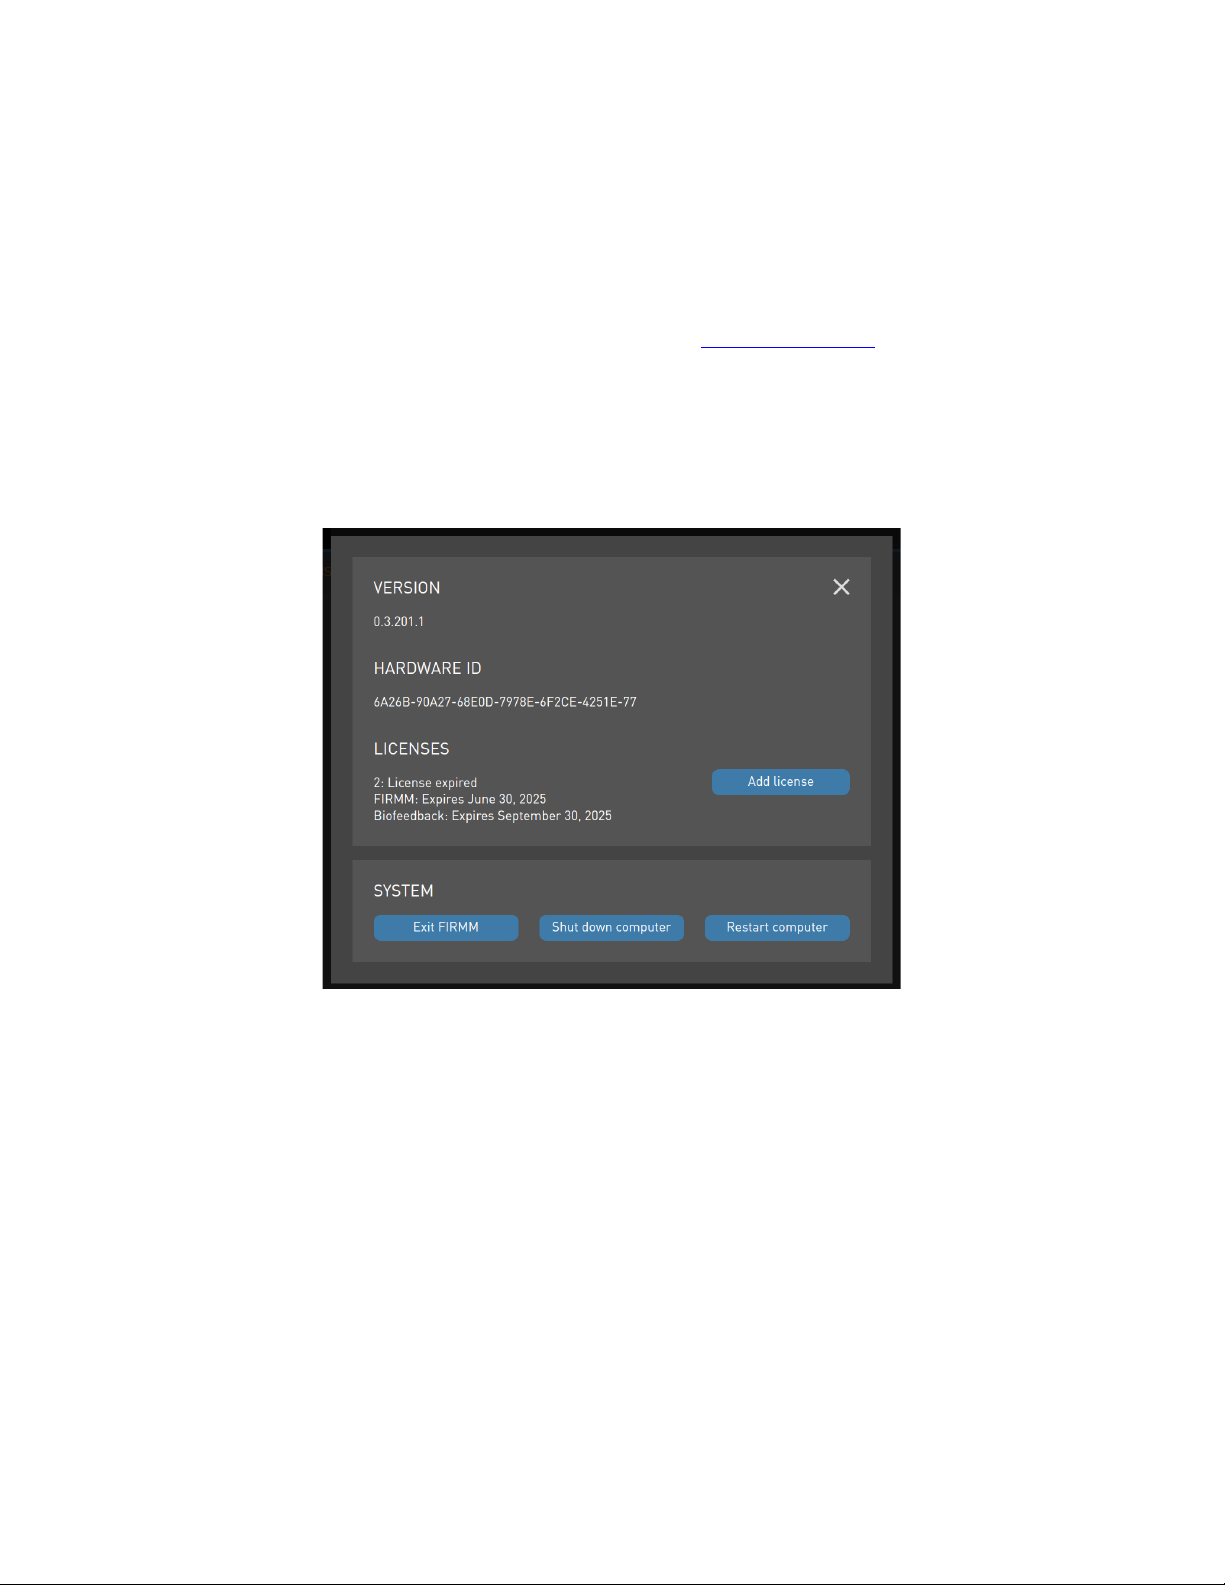
From the fMRI or Settings tabs on FIRMM, select the information icon (the yellow “i”) in the upper
righthand corner to bring up the software About screen:
Note: This is an example screenshot of About screen. The actual version will be different depending
on the version deployed on the tablet.
This screen shows you the current version of the FIRMM software, the hardware identifier for the
FIRMM Tablet Computer, and the existing license(s) on your system.
The FIRMM Technical Support engineer may ask to confirm your Hardware ID by reading it over
the phone.
The FIRMM Technical Support engineer can send you your twenty-five-character license key by
email or SMS text, or simply read it over the phone.

© Nous Imaging, Inc. FIRMM®Installation Guide - GE Page 16
320-00201-DO-11 Revision 7Released: 02/2022
Press the ”Add license” button, enter the key as shown below and press the ”Submit” button when
it is entered. You will note that FIRMM will insert a “–“ between every fifth character automatically.
The About screen will display the correct state of the new license.
8Connecting the Network
It is important to establish a high-performance network link between the GE scanner computer and
the FIRMM Tablet Computer.
The provided 6ft CAT-6 cable (or user-supplied CAT-6 cable) may be used to make a connection
from the FIRMM Tablet Computer to the appropriate ethernet network port in the MRI control
room.
The five-port network switch provided can be used if all the existing network ports in the MRI
control room are in use.
9Configuring the Network on the FIRMM Tablet Computer
Before beginning, be sure to:
1. Know the network configuration recommended by the institution’s Information Technology
department (most typically a static IP address and potentially a network submask and
gateway address).
2. Contact Nous Imaging Technical Support at +1-844-NOUSIMG (+1-844-668-7464) to
receive the passcode needed to exit the FIRMM application and access the operating system
desktop.

© Nous Imaging, Inc. FIRMM®Installation Guide - GE Page 17
320-00201-DO-11 Revision 7Released: 02/2022
The first step is to configure the FIRMM Tablet Computer with the networking information
provided by your IT.
Turn on the FIRMM tablet and navigate to the About screen using the information icon in the upper
right-hand corner of the fMRI screen.
Choose “Exit FIRMM” as shown below.
© Nous Imaging, Inc. FIRMM®Installation Guide - GE Page 18
320-00201-DO-11 Revision 7Released: 02/2022
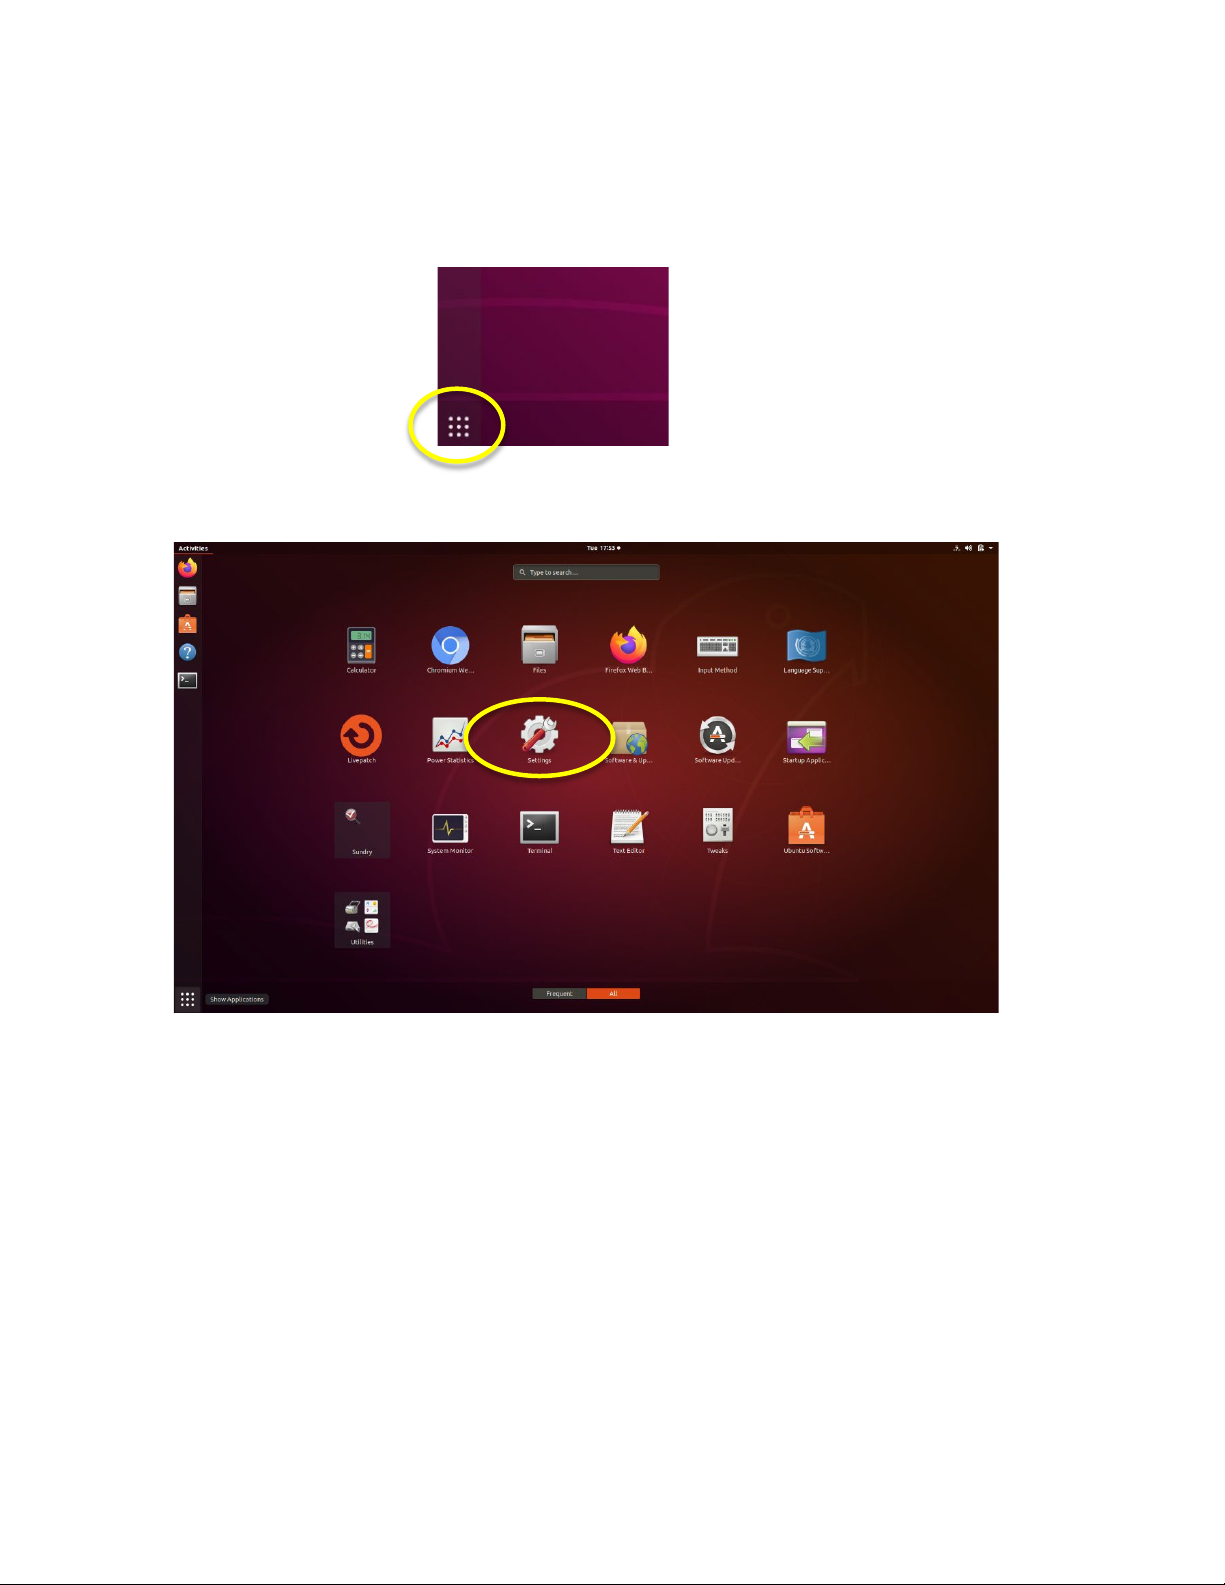
Enter the passcode provided to exit to the Operating System desktop and press “Proceed”.
From the Operating System Desktop select from the installed applications using the application
menu icon in the lower left-hand corner of the screen.
From the Application Menu choose the Settings Application:
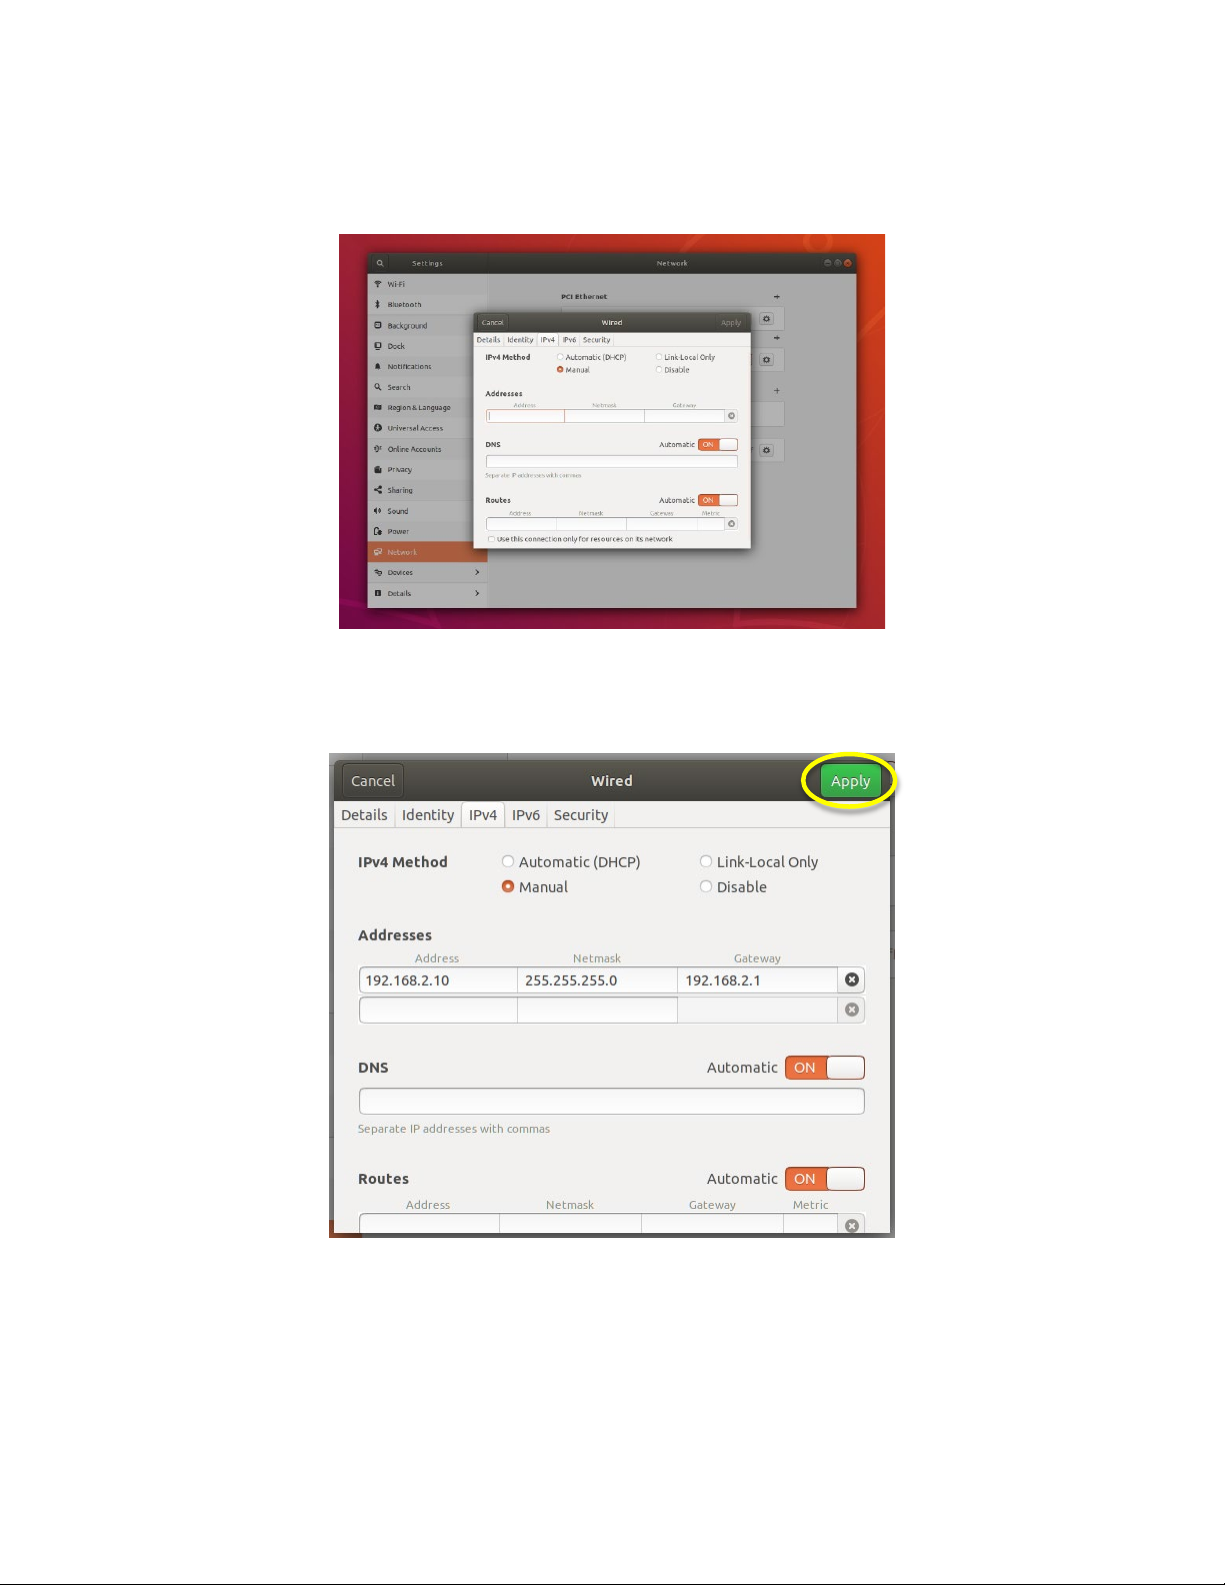
The Settings Application has a pane for entering your network configuration (yellow circle in the
figure below).

© Nous Imaging, Inc. FIRMM®Installation Guide - GE Page 19
320-00201-DO-11 Revision 7Released: 02/2022
Enable the PCI Ethernet port (this is the Ethernet Connection on the Tablet Computer) by selecting
the toolkit icon to the right of the PCI Ethernet option (blue circle).
Information Technology may have provided very specific networking instructions. The typical
pattern is to simply enter an IPV4 network address as shown below by selecting the IPV4 tab from
the Network Settings interface:
© Nous Imaging, Inc. FIRMM®Installation Guide - GE Page 20
320-00201-DO-11 Revision 7Released: 02/2022
From the IPV4 tab enter the network IP address, the netmask, and the gateway as provided by
Information Technology:
An example configuration is shown below. Press the green “Apply” button to save the settings.
Table of contents
Popular Medical Equipment manuals by other brands


Tecno-gaz
Tecno-gaz 2053-S Instructions for use

Ferno
Ferno F2 quick start guide

Great Lakes
Great Lakes Alginate Mixer instruction manual

AirMed PLUS
AirMed PLUS ADS Intelligent user manual

Vapotherm
Vapotherm precision flow Instructions for use

Human Design Medical
Human Design Medical Z1 Auto System user guide


