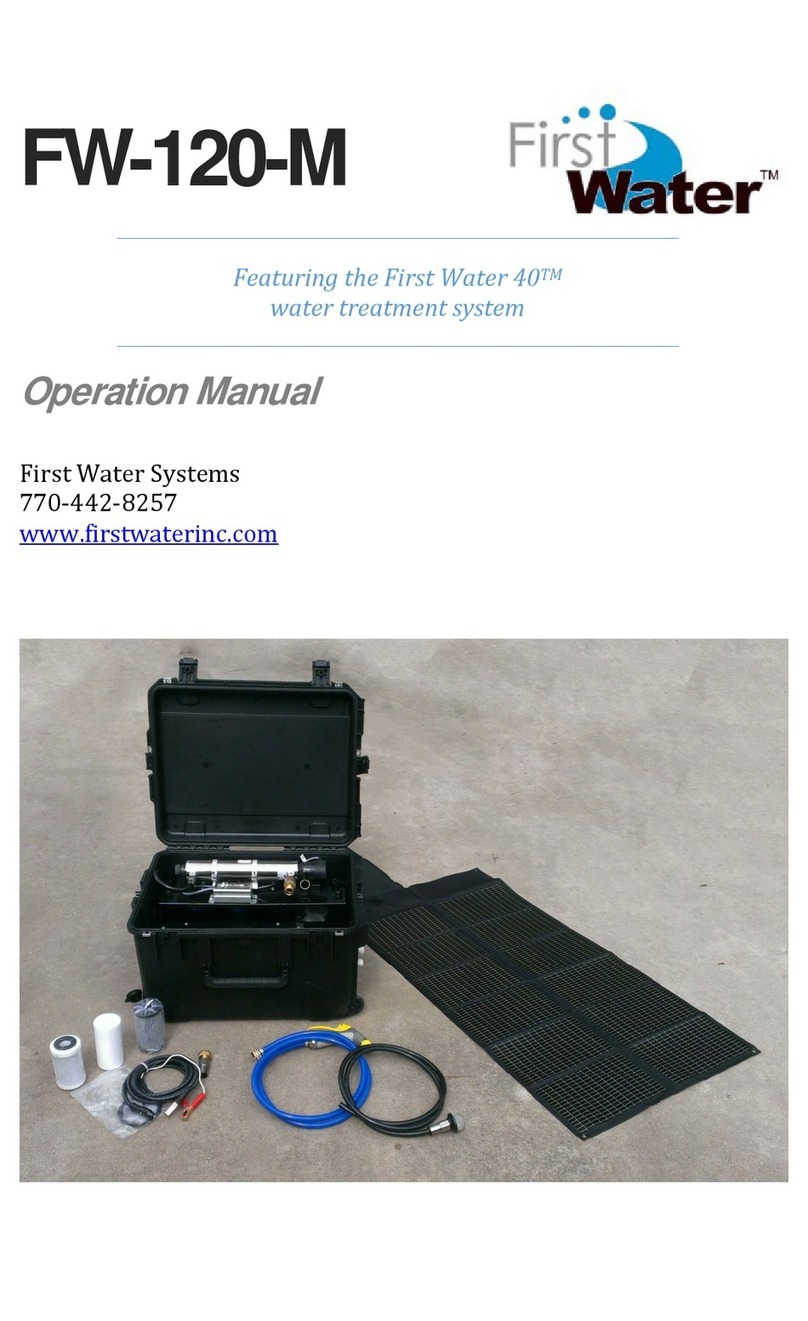
First Water FW-1200-M User manual

FW-1200-M
Operation Manual
First Water Systems
770-442-8257
www.firstwaterinc.com

Table of Contents
Operation Manual.....................................................................................1
1 Introduction ................................................................................................1
1.1 Style Conventions..............................................................................1
2 Unpacking ....................................................................................................2
2.1 Inventory .............................................................................................2
2.2 Storage ..................................................................................................3
3 Startup and Operation.............................................................................4
3.1 Water Source ......................................................................................4
3.2 Component Layout ...........................................................................5
3.3 Connections.........................................................................................5
3.4 Startup ..................................................................................................6
3.5 Operation.............................................................................................8
4 Post Operation Care ..............................................................................10
4.1 Flushing System.............................................................................. 10
4.2 Removing Filters ............................................................................ 10
4.3 Cleaning System..............................................................................10
4.4 Preparing for Storage...................................................................11
5 Special Procedures ................................................................................12
5.1 Maintenance Intervals .................................................................12
5.2 Replacing Filters ............................................................................12
5.3 Replacing UV Lamp........................................................................ 13
5.3 Replacing Quartz Sleeve .............................................................. 13
5.4 UV Lamp Disposal .......................................................................... 14
6 Troubleshooting ..................................................................................... 15
6.1 Pump will not move water.......................................................... 15
6.2 Water not flowing from Clean Water Hose ........................... 15
6.3 Water leaks from top of Canisters ...........................................15
6.4 Water leaks UV Chamber ............................................................15

Operation Manual FW-1200-M
© 2012 First Water Systems, Inc pg. 1
1 Introduction
The Operator’s Manual has been prepared to acquaint the
owner/operator with this water filtration unit, its various controls,
maintenance, and safety instructions. It is valuable for the proper
use of The FW-1200-M and should be kept with the unit at all times.
Make sure you read and understand the content of the Operator’s
Manual.
First Water Systems offers water treatment experts to assist you in
your water operation plans. You may contact us at any time to
discuss your needs. The FW-1200-M is designed to provide
microbiologically safe water for human consumption from fresh
water sources.
Used in conjunction with the Supply Station, Filling Station and Aqua
Bags, The FW-1200-M provides a complete water solution to a
variety of applications.
1.1 Style Conventions
The following style conventions will be used throughout this
operation manual.
Note: Notes present information that will enhance operator
experience.
Warning: Warnings present information that is critical to the safety
of the operator and equipment.

Operation Manual FW-1200-M
© 2012 First Water Systems, Inc pg. 2
2 Unpacking
Upon delivery of your FW-1200-M, please inspect for damage and
inventory all components.
2.1 Inventory
The FW-1200-M includes the following components:
(1) Water Purification Unit
(1) Pump
(1) Operation Manual
(1) Maintenance Kit (0.5oz silicone grease & 4 x Canister O-
Rings)
(1) Filter Wrench
(1) Filter Set, installed in canisters
(1) Filter Set, spare (FW-1200-M Bundle Only)
(2) UV/Quartz Sleeve sets, (1) installed/(1) spare
(1) 20’ Source Water Hose (green / with foot valve)
(1) 20’ Transfer Hose (green)
(1) 20’ Clean Water Hose (clear / food grade)
(1) Cam Lock to Female Garden Hose fitting
(1) Cam Lock to Male Garden Hose fitting
(2) 25’ Power Cords
(1) GFCI Pigtail

Operation Manual FW-1200-M
© 2012 First Water Systems, Inc pg. 3
2.2 Storage
The FW-1200-M should be stored ready for deployment. The
following checklist will ensure that your FW-1200-M is properly
stored.
Used filters discarded
New filters installed
Unit clean and dry
Canister O-Rings lubricated and in place
UV Lamp operational
Hoses and Accessories accounted for
Replacement filters re-ordered

Operation Manual FW-1200-M
© 2012 First Water Systems, Inc pg. 4
3 Startup and Operation
3.1 Water Source
The FW-1200-M produces microbiologically safe water from fresh
(non-saltwater) water sources. The Virus Media Filtration utilizes
adsorption properties to remove microbiology to an effective size of
0.2 microns. Microbiology removed includes viruses, bacteria, and
cysts.
Source water can come from a variety of locations. Ideal water
sources are free of sediment and turbidity and come from a
relatively known environment. As the scope of an event escalates,
less ideal water sources may be utilized.
Example water sources, from most ideal to least ideal:
1. Facility plumbing under boil water advisory.
2. Swimming or therapy pools.
3. Irrigation wells.
4. Shuttled water from fire trucks or tankers.
5. Rain water collected from roof runoff.
6. Surface water from retention ponds, lakes or streams.
The FW-1200-M does not remove chemical contaminants from water
sources. Care should be taken in using a water source from
unknown locations or uncontrolled environments.
Water supplies with known chemical additives should never be used.
Examples include water from boilers and chillers.
Water sources with high turbidity, sediment or tannin levels will
cause filters to be expended more rapidly. There is no impact on the
quality of clean water produced.

Operation Manual FW-1200-M
© 2012 First Water Systems, Inc pg. 5
3.2 Component Layout
Arrange components in the following order, flowing from source
water to water outlet:
1Water Source
2Source Water Hose (green w/ foot valve)
3Pump (Remove from Purification Unit mount and place as close
to water source as possible)
4Transfer Hose (green)
5Water Purification Unit
6Clean Water Hose (clear/food grade)
7Clean water distribution
Included Cam Lock to Garden Hose Thread adaptors may be used to
convert to conventional garden hoses at the inlet and outlet. See
section 3.3
3.3 Connections
The FW-1200-M uses 1” Cam Lock fittings as standard. Adaptors are
provided to convert to standard garden hose fittings.
Cam Lock to Female Garden Hose Thread (GHT) Fitting
oUsed on the end on the Transfer Hose (green). Using
this fitting to treat water from a pressurized source,
bypassing the pump.
Cam Lock to Male Garden Hose Thread (GHT) Fitting
oUsed at the end of the Clean Water Hose (clear).
Adapts the system outlet to standard garden hose
thread.
You may bypass the pump and treat water from existing building
pressure when under a boil water advisory or similar circumstance.

Operation Manual FW-1200-M
© 2012 First Water Systems, Inc pg. 6
3.4 Startup
Power
oSupply 120 volt power to the Pump.
oSupply 120 volt power to the UV Lamp at the Water
Purification Unit.
oThe Pump has several buttons and lights:
Power Switch: Turns Pump on and off.
Reset Button: Restarts Pump after it has gone
into alarm mode. In some cases, it may be
necessary to disconnect power to reset Pump.
Line Voltage Indicator: Illuminates when
Pump is receiving power.
Pump Operation Indicator: Illuminates when
Pump is operating.
Water Flow Alarm: Illuminates when Pump
stops due to water flow interruption.
Power must be supplied through a Ground Fault Circuit Interrupter
(GFCI) that is properly grounded. If a GFCI circuit is not available,
use the included GFCI Pigtail.
Prime
oDrop Foot Valve into water source.
oFill Source Water Hose with water from open end
opposite Foot Valve.
oAttach filled Source Water Hose to Pump Inlet.
oAttach Transfer Hose to Pump Outlet.
oOpen Pump Priming Port and fill with water.
oTurn Pump on and ensure that water flows at full
pressure.
oYou will need to repeat the Hose/Pump filling
process until a sufficient prime is established.

Operation Manual FW-1200-M
© 2012 First Water Systems, Inc pg. 7
The Foot Valve must not rest on the surface of the source water
container, especially if you are drawing from a location with heavy
sediment. Ideally, the Foot Valve is suspended several inches below
the surface of the water.
If the water source is depleted and the pump is allowed to run dry, it
will be necessary to repeat the priming process.
Water Flow
oTurn off Pump.
oConnect Transfer Hose to the Water Purification Unit
Inlet.
oOpen Main Valve and any down stream valves.
oEnsure that UV Lamp is operating by visually
inspecting the indicator light on the UV Control Box
(located in the Top Storage Compartment).
oTurn Pump on.
oWait for system to fill and water to flow from Outlet.
oLoosen each Filter Canister slightly, allowing air to
escape. Use Filter Wrench if necessary. Do Not
remove Canisters completely.
oWhen water flows from Canister threads, tighten just
enough to stop the flow (hand tight only).
Allow the system to run for 5 to 10 minutes prior to distributing
clean water. This will ensure all carbon particles are flushed and the
UV lamp has the proper contact time with water.
Water coming from the Outlet is clean, but any down stream
distribution components may be compromised. Any components
beyond the FW-1200-M should be cleaned with a 3:1 bleach solution
or other appropriate disinfectant then thoroughly rinsed before
clean water is distributed.

Operation Manual FW-1200-M
© 2012 First Water Systems, Inc pg. 8
3.5 Operation
Once water is flowing, very little maintenance is required. Someone
should be present to monitor the following:
Source water does not deplete.
Clean water storage does not overflow.
Water flow does not stop.
Filters needing to be changed.
Pausing Operation
The FW-1200-M may be turned off and on throughout an event. To
stop the flow of water, turn Main Valve to the off position. The
Pressure Switch on the Pump will automatically stop the pump
motor. If desired, you may turn off the power to the Filtration Unit to
shut off the UV Lamp.
If the system will be down for more than 4 hours, flush with clean
water for 1 minute before turning off. Do not leave standing water in
the unit for more than 36 hours.
Resuming Operation
After a pause in operation, the system may be restarted by turning
all power back on and opening the Main Valve. It may be necessary
to re-prime the Pump and bleed air from the system. It may be
necessary to reset the Pump by pressing the Reset button on the
Pump.
Filter Maintenance During Operation
Filter life will vary greatly based on the turbidity of source water.
Under optimal water conditions, a complete filter set should be
replaced every 50,000 gallons. Optimal water conditions are defined
as micro-biologically contaminated water sources with low levels of
sediment, turbidity or tannins. Increased levels of sediment,

Operation Manual FW-1200-M
© 2012 First Water Systems, Inc pg. 9
turbidity or tannins will require more frequent changes of the
sediment filter identified by observable drops in water flow. When
you notice the flow rate decrease, follow the steps below to check
filters:
Disconnect all power from the unit.
Check Foot Valve and Pump Strainer Basket for debris.
Replace the Sediment Filter in housing #1.
Restart unit and observe flow rate. If flow rate has not
improved, replace the Carbon Block Filter and Virus Media
Filter.

Operation Manual FW-1200-M
© 2012 First Water Systems, Inc pg. 10
4 Post Operation Care
4.1 Flushing System
As soon as possible after an event, flush the system by
pumping clean water for at least 5 minutes.
Remove the Source Water Hose from the source and allow
the system to pump until no water is flowing.
Disconnect all power from the Filtration Unit and Pump.
4.2 Removing Filters
Open Main Valve to relieve pressure on the Canisters.
Unscrew each Canister, using the Filter Wrench where
necessary.
Retain Canister O-Ring.
Remove and discard used Filters.
Drain water from Canisters and dry.
4.3 Cleaning System
Follow instructions above to flush and drain the system.
If sediment remains in the system, replace empty Canisters
and flush with clean water from a garden hose. Note: The UV
Lamp must be powered on for water to flow through.
Follow steps above to remove and dry filter Canisters.
Remove and drain all hoses.
Drain the UV Chamber by opening the Drain Valve located
next to Canister #4, tilt unit slightly to allow water to flow
out of the UV Chamber.

Operation Manual FW-1200-M
© 2012 First Water Systems, Inc pg. 11
Drain Pump:
oRemove Pump Strainer Basket
oRemove Pump Drain Port.
oRemove Pump Priming Port.
Discard used filters.
Rinse and dry all components.
Leaving Canisters open, allow system to air dry for at least 8
hours, longer if necessary to ensure the unit is completely
dry.
4.4 Preparing for Storage
Visually inspect the UV Bulb and Quartz Sleeve.
Inspect and lubricate each (4) Canister O-Rings with Silicone
Grease or other food grade lubricant.
Place new filters in each Canister and screw the Canisters
back on the unit.
oTighten Canisters hand tight only.
Coil and store all hoses and accessories.
The FW-1200-M should be stored ready for deployment. The
following checklist will ensure that your FW-1200-M is properly
stored.
Used filters discarded
New filters installed
Unit clean and dry
Canister O-Rings lubricated and in place
UV Lamp operational
Hoses and Accessories accounted for
Replacement filters re-ordered

Operation Manual FW-1200-M
© 2012 First Water Systems, Inc pg. 12
5 Special Procedures
5.1 Maintenance Intervals
During Operation
oClean Foot Valve and Pump Strainer Basket as
needed.
oReplace Sediment Filter as needed.
oReplace Filter Set every 50,000 gallons, or as needed
based on flow rate.
During Storage
oEvery 6 Months: Visually inspect UV Lamp operation.
oEvery 6 Months: Open Canisters to ensure unit is
stored dry.
5.2 Replacing Filters
Disconnect power from the Pump and Filtration Unit.
Open Main Valve to relieve pressure on the Canisters.
Unscrew each Canister, using the Filter Wrench where
necessary.
Retain Canister O-Ring.
Remove and discard used Filters.
Insert new Filters into Canisters.
oCanister 1: White, Solid, Sediment Filter.
oCanister 2: White, Solid, Carbon Block Filter. (Heaver
than Sediment Filter)
oCanister 3: Black, Pleated, Virus Media Filter.
oCanister 4: Empty. Specialized filter optional.
Inspect and lubricate each (4) Canister O-Rings with Silicone
Grease or other food grade lubricant.
Tighten Canisters hand tight only

Operation Manual FW-1200-M
© 2012 First Water Systems, Inc pg. 13
5.3 Replacing UV Lamp
Disconnect power from the Pump and Filtration Unit.
Loosen nut and remove PVC End Cap from UV Lamp
Chamber.
Withdraw UV Lamp approximately 2 inches.
While holding Lamp end, carefully remove Lamp socket.
Remove Lamp from Chamber.
Reinstall Lamp in reverse order.
Lamp and Quartz Sleeve are easily damaged. Exercise care when
removing or replacing lamp.
Never look directly at an illuminated UV Lamp.
5.3 Replacing Quartz Sleeve
Disconnect power from the Pump and Filtration Unit.
Shut off water supply.
Follow steps in “Replacing the UV Lamp” to remove lamp.
Unscrew Chamber Cap from each end of Chamber.
Remove Washer from both ends of the Quartz Sleeve.
Carefully remove Quartz Sleeve from Chamber. NOTE: It is
advisable to support the quartz sleeve on the opposite end
with your finger so that it does not drop to the bottom of the
chamber as it slides into the chamber.
If removing a broken Quartz Sleeve, follow the steps below:
oCarefully remove as much of the broken quartz sleeve
as possible, from each end of the chamber.
oTo remove fragments of quartz sleeve, position the
Purification Unit vertically and shake. The quartz
fragments will break and drop out of the Chamber.
oFlush water through chamber being careful to
remove all quartz fragments from the interior of the
chamber

Operation Manual FW-1200-M
© 2012 First Water Systems, Inc pg. 14
Once the quartz sleeve is removed, clean with alcohol or a
mild, non-abrasive detergent. Stubborn stains usually can be
removed with a diluted hydrochloric acid.
Reassemble in reverse order. Make sure the quartz sleeve
protrudes an equal distance past each threaded nipple.
Tighten End Caps firmly by hand only, DO NOT USE HAND
TOOLS. Tightening with hand tools is likely to cause Quartz
Sleeve to break.
Slowly restore water supply and check for leaks.
If no leaks occur, reinstall lamp.
5.4 UV Lamp Disposal
Germicidal ultraviolet lamps, like standard fluorescent lamps contain
small amounts of mercury. Mercury added lamps should not be
placed in the trash. Dispose of properly.
For further information regarding the disposal and recycling of
lamps containing mercury, along with Federal and State
requirements visit http://www.lamprecycle.org.

Operation Manual FW-1200-M
© 2012 First Water Systems, Inc pg. 15
6 Troubleshooting
6.1 Pump will not move water
Check the 120 volt power source
Check the Pump Strainer Basket for debris
Check that the Pump is primed
6.2 Water not flowing from Clean Water Hose
Follow troubleshooting steps for “Pump will not move water”
Check that Main Valve is open
Check power source to Purification Unit
Check Foot Valve for excessive debris
Check the UV Lamp and replace if necessary (The FW-1200-
M will not allow water through the system if the UV Lamp is
not operating)
6.3 Water leaks from top of Canisters
Check that each Canister O-Ring is in place and lubricated
Hand tighten Canister
A small, dripping leak is not abnormal
6.4 Water leaks UV Chamber
Inspect Quartz Sleeve for damage
Inspect Quarts Sleeve O-Rings and Washers (See “Replacing
Quartz Sleeve”)
Tighten UV Canister End Cap
Table of contents
Other First Water Water Filtration System manuals
Popular Water Filtration System manuals by other brands
Filters itm
Filters itm SEMI AUTO FL user manual
Atlas Filtri
Atlas Filtri HYDRA Instruction for installation and maintenance
Jandy
Jandy AquaPure Installation and operation manual
Zoo Med
Zoo Med Turtle Clean 15 instructions
Velcon
Velcon VF-71E installation instructions
Katadyn
Katadyn PowerSurvivor 40E owner's manual
Purofilter
Purofilter 53-WF-02PF installation instructions

Watts
Watts SmartStream UV WB002 Installation, operation and maintenance manual
ENBIO
ENBIO Magic Filter user manual
Antunes
Antunes 9700901 quick start guide
Triton
Triton IXC-850 Series User & service manual
Zen Water
Zen Water Filter and Purifier System user guide
