Fisher-Price GAMESTATION C4492 User manual

Owner’s
Manual
Model C4492 and H0127


2
TABLE OF CONTENTS
TABLE OF CONTENTS
Important Information . . . . . . . . . . . . . . . . . . . . . . . . . . . . . . . . . .3
Parts . . . . . . . . . . . . . . . . . . . . . . . . . . . . . . . . . . . . . . . . . . . . . . .8
Fasteners . . . . . . . . . . . . . . . . . . . . . . . . . . . . . . . . . . . . . . . . . . . .7
Battery Installation . . . . . . . . . . . . . . . . . . . . . . . . . . . . . . . . . . . .9
Assembly Tip . . . . . . . . . . . . . . . . . . . . . . . . . . . . . . . . . . . . . . . .10
Decoration . . . . . . . . . . . . . . . . . . . . . . . . . . . . . . . . . . . . . . . . . .11
Assembly . . . . . . . . . . . . . . . . . . . . . . . . . . . . . . . . . . . . . . . . . . .13
Game Setup
Basketball, Football, Baseball . . . . . . . . . . . . . . . . . . . . . . . . .100
Soccer, Hockey, Golf . . . . . . . . . . . . . . . . . . . . . . . . . . . . . . . .106
Care . . . . . . . . . . . . . . . . . . . . . . . . . . . . . . . . . . . . . . . . . . . . . .112
Game Play
Basketball . . . . . . . . . . . . . . . . . . . . . . . . . . . . . . . . . . . . . . . .113
Football . . . . . . . . . . . . . . . . . . . . . . . . . . . . . . . . . . . . . . . . . .115
Baseball . . . . . . . . . . . . . . . . . . . . . . . . . . . . . . . . . . . . . . . . .117
Soccer . . . . . . . . . . . . . . . . . . . . . . . . . . . . . . . . . . . . . . . . . . .119
Hockey . . . . . . . . . . . . . . . . . . . . . . . . . . . . . . . . . . . . . . . . . .121
Golf . . . . . . . . . . . . . . . . . . . . . . . . . . . . . . . . . . . . . . . . . . . . .123
Storage . . . . . . . . . . . . . . . . . . . . . . . . . . . . . . . . . . . . . . . . . . .125
Troubleshooting Guide . . . . . . . . . . . . . . . . . . . . . . . . . . . . . . . .134
Consumer Information . . . . . . . . . . . . . . . . . . . . . . . . . . . . . . . .137

3
IMPORTANT INFORMATION
•Please keep this Owner’s Manual for future reference, as it contains
important information.
•Adult assembly is required. You may need the assistance of another adult to
complete assembly.
•Approximate assembly time is 21/2-5hours. We recommend the use of a power
screwdriver to reduce assembly time.
•Be sure to assemble the GameStationTM in the room it is intended to be used.
Do not use the GameStationTM in a room with direct sunlight. Do not use the
GameStationTM outdoors.
•Tool required for assembly: Phillips screwdriver (not included).
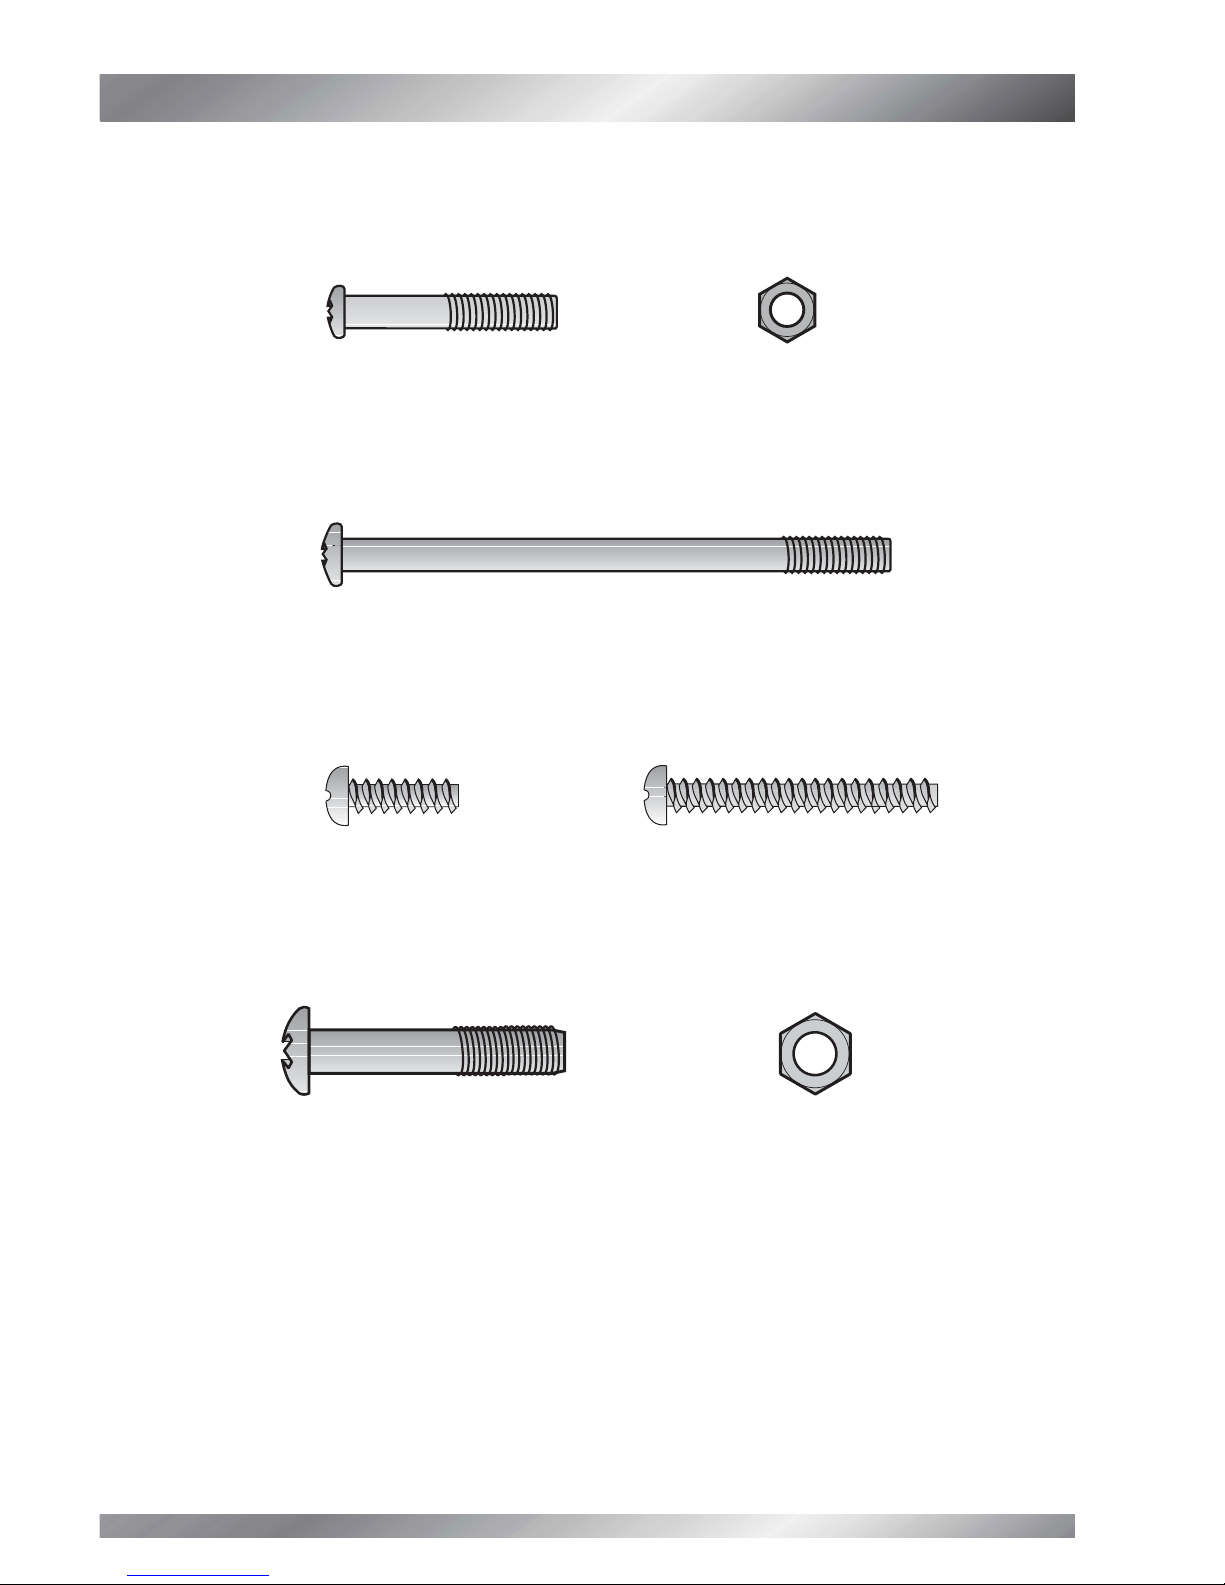
•You may find it helpful to use an adjustable wrench to hold the M5 lock nuts while
tightening the M5 bolts and a slotted screwdriver to fit the goal net binding into the clips.
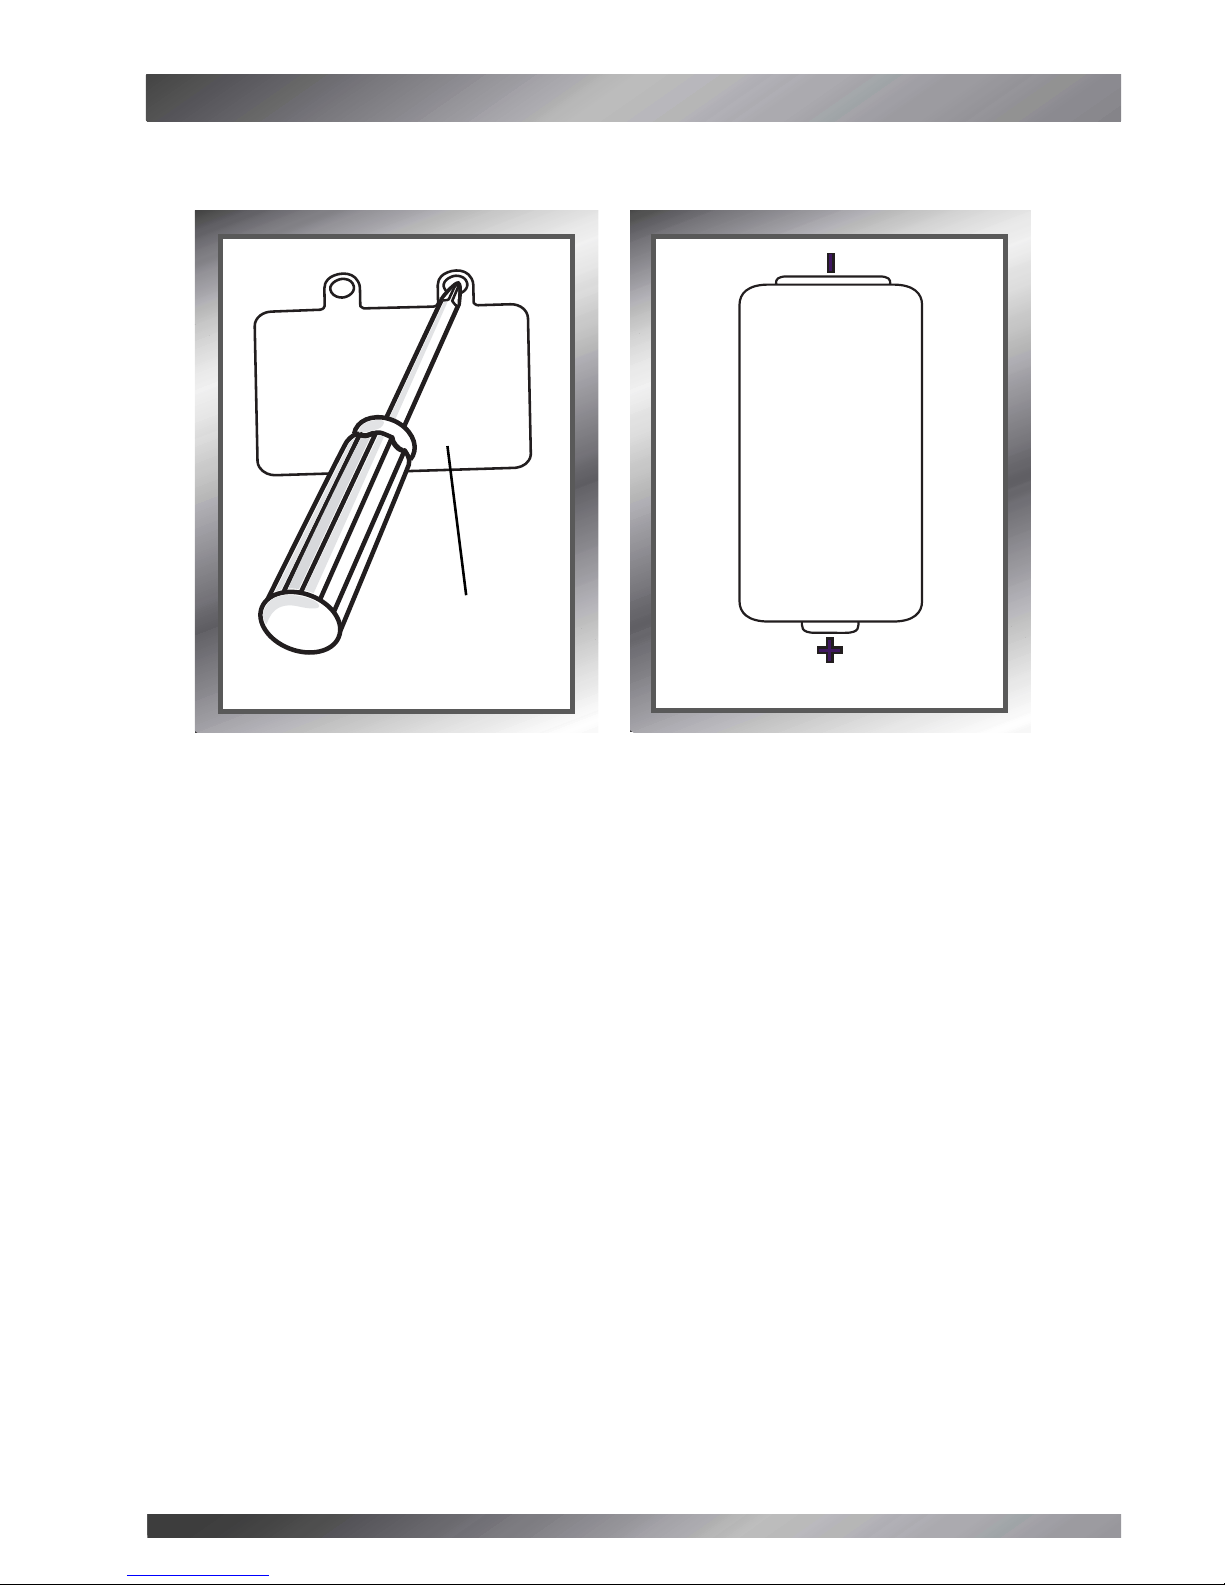
•Requires four, “C” (LR14) alkaline batteries (not included) for operation. Each fresh set of
batteries should last approximately 15 hours (of continuous use).
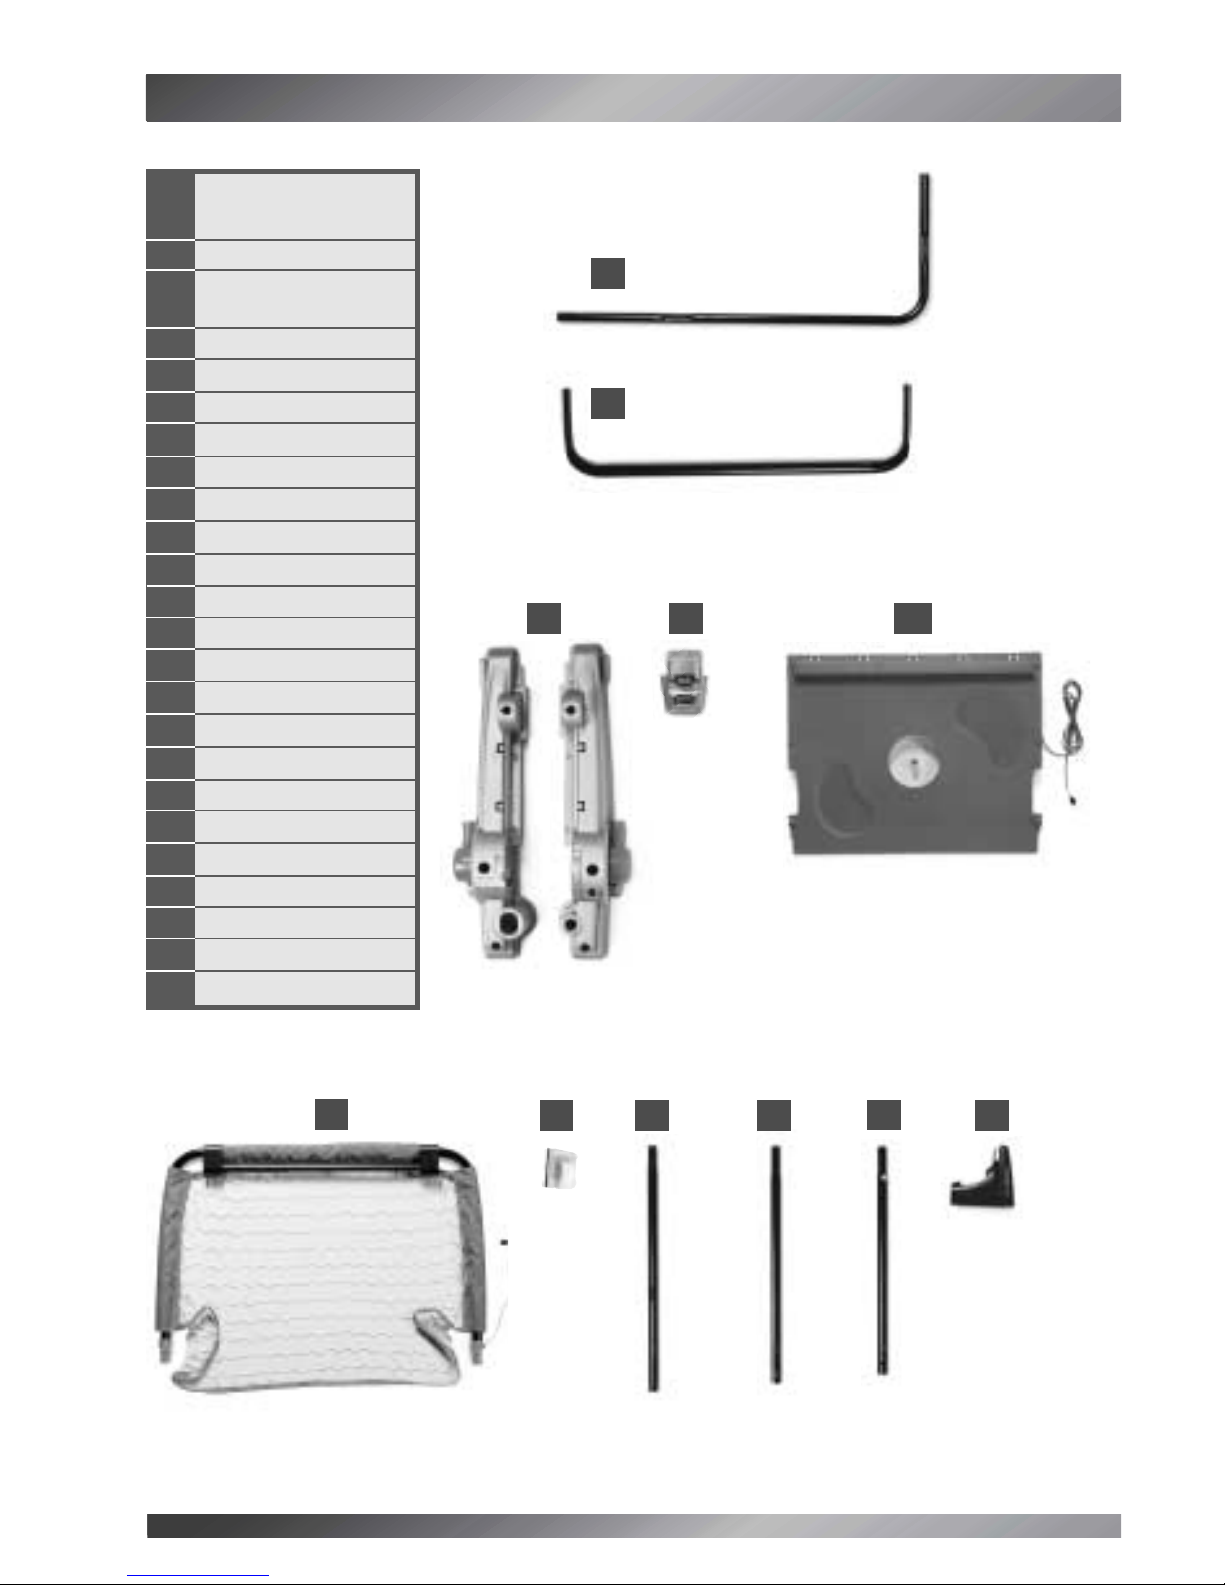
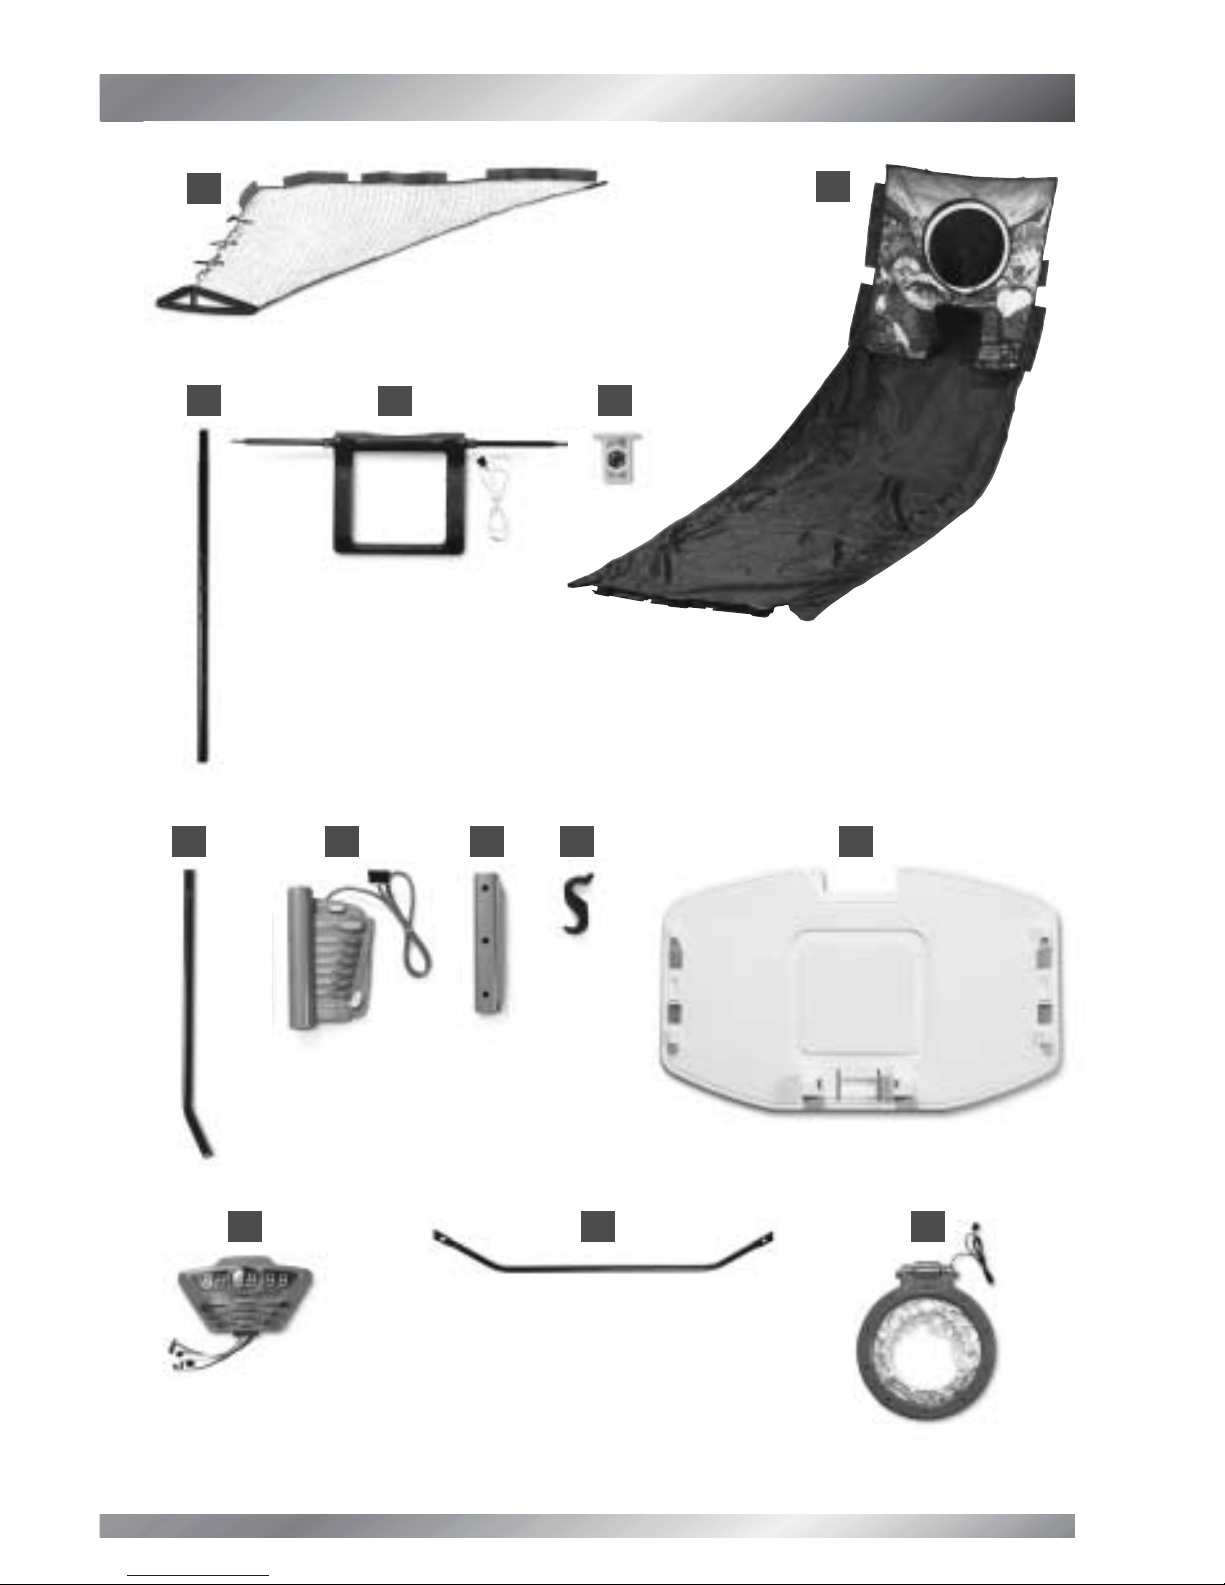
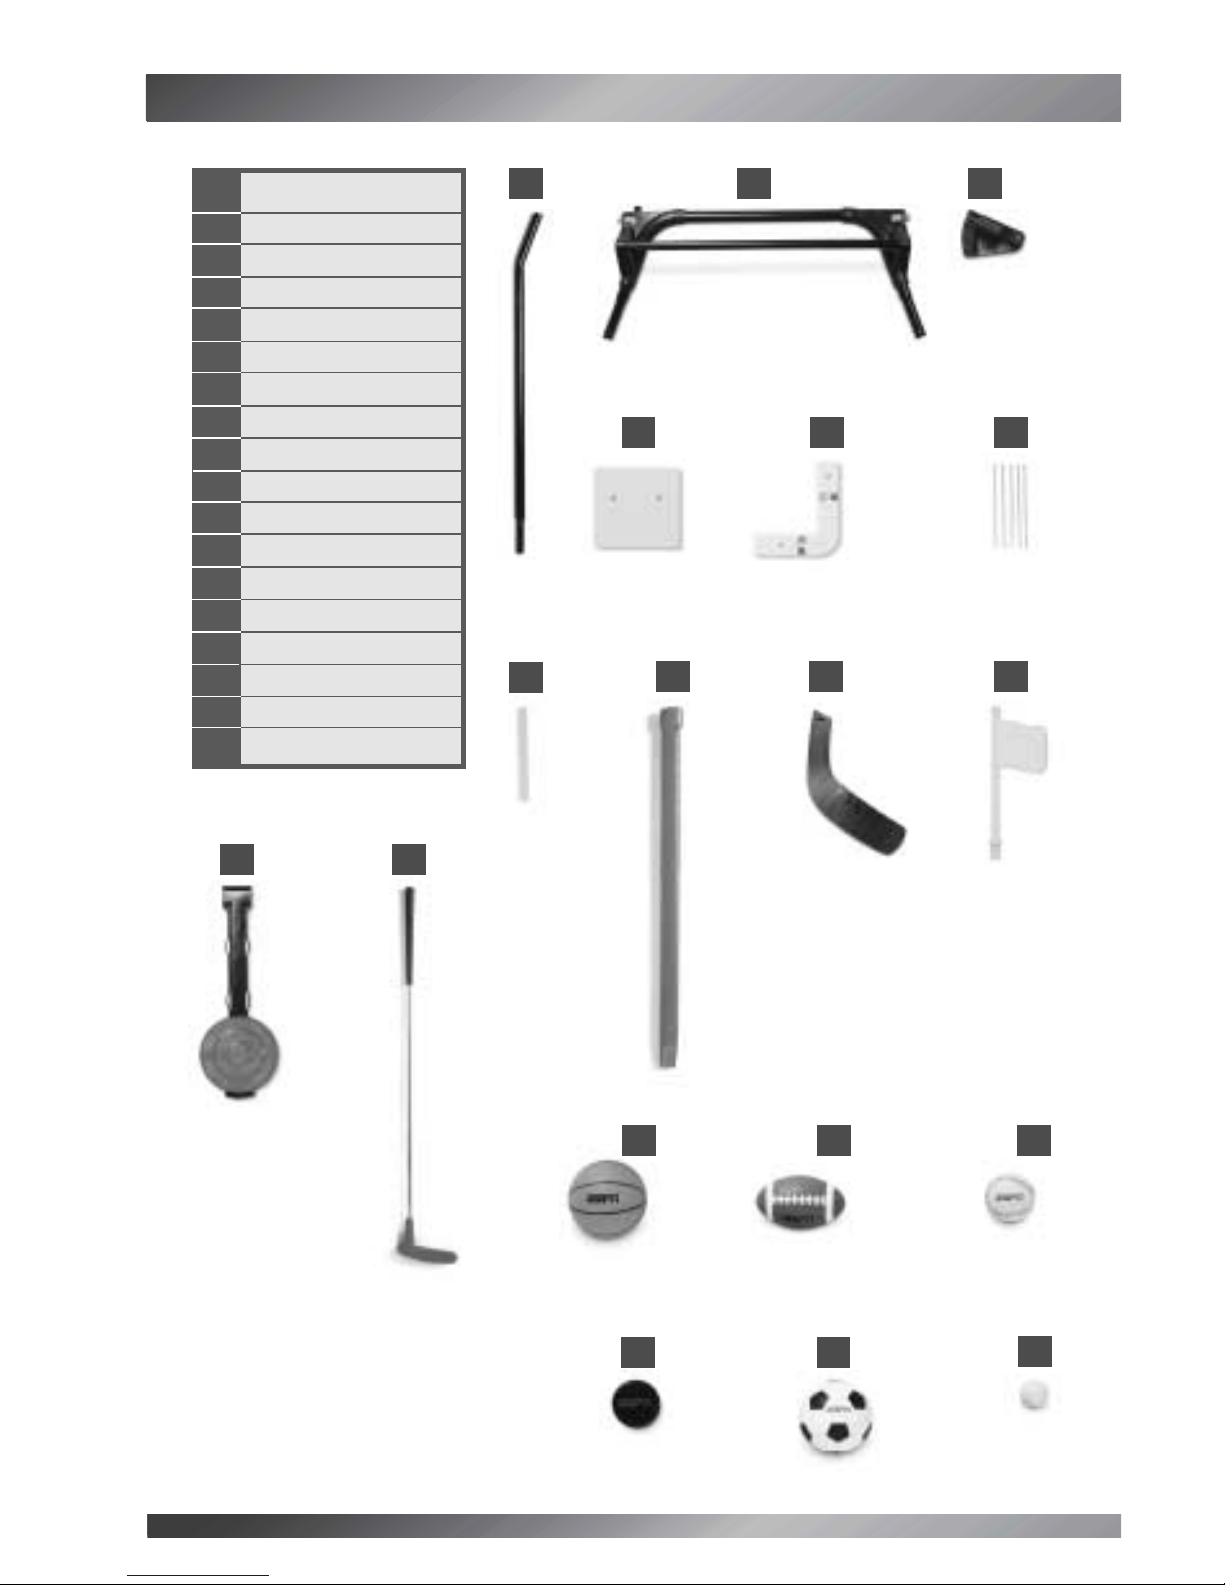
•Please identify all parts before assembly and save all packaging material until assembly
is complete to ensure that no parts are discarded.
•If you experience a problem, or are missing a part, please call us at
1-800-432-KIDS (5437) rather than return this product to the store.
Or, visit us on-line at www.fisher-price.com.
•Use only the balls and puck that are supplied with this product. Do not use with
regulation size (actual) sport balls and pucks.
•During assembly, do not step on the plastic connectors attached to the wires.
•Make sure the power switch on the back of the game selector is in the ON position.

4
WARNING
CHOKING HAZARD
– Toy contains a small ball (golf ball).
Not for children under 3 years.
CAUTION
This product contains small parts
in its unassembled state.
Adult assembly is required.

5
PARTS
PARTS
12 L Tubes
(Left and Right)
22Crossbars
32 Bases
(Left and Right)
42 Lower Net Clips
5Putting Green
6Goal
7Wire Clip
82 Net Tubes (1A, 1B)
92 Net Tubes (2A, 2B)
10 2 Net Tubes (3A, 3B)
11 2 Feet
12 2 Nets
13 Chute
14
2 Chute Tubes (4A, 4B)
15 Ball Sensor
16 2 Plugs
17 Support Tubes
18 Game Selector
19 Retainer
20 2 Upper Net Clips
21 Backboard
22 Scoreboard
23 Backboard Tube
24 Rim
1
2
45
x 2
x 2
Left Right
3
68910
x 2
11
x 2 x 2 x 2
x 2
7

6
x 2
12 13
14 15 16
18
17 19 20 21
22 23 24
x 2
x 2
x 2
x 2

PARTS
PARTS
7
Parts not shown: Label sheets.
27
28 29 30
32 33 34
38 39
x 2
x 2
x 2 x 2
26
25
x 2
35 36
37
x 2
25 Handle Tubes
26 Handle
27 Handle Pivots
28 Connector Cover
29 2 Wire Covers
30 5 Wire Ties
31 2 Chute Tabs
32 Shaft
33 Blade
34 Flag
35 Target
36 Putter
37 2 Basketballs
38 2 Footballs
39 2 Baseballs
40 Puck
41 Soccer Ball
42 Golf Ball
Tip: Add the
flag in the
Game Setup
section.
Tip: Add the
target in the
Game Setup
section.
Tip: For Model H0127, there are three extra balls
(one basketball, one football, one baseball).
40 41 42
31
x 2

8
FASTENERS
FASTENERS
M6 x 35 mm Bolt – 8
M5 x 75 mm Bolt – 2
#8 x 15 mm Screw – 25
M5 x 29 mm Bolt – 20
#8 x 37 mm Screw – 8
M5 Lock Nut – 16
M6 Lock Nut – 8
These lock nuts are not
located in a parts bag.
They are fitted inside
various plastic parts.
Tip: All fasteners shown actual size.
Note: Tighten and loosen all bolts and screws with a
Phillips screwdriver. Do not over-tighten the fasteners.
We’ve included extra fasteners for your convenience!

9
BATTERY INSTALLATION
•Loosen the screws in the battery compartment door on the back of the scoreboard.
Remove the battery compartment door.
•Insert four "C" (LR14) alkaline batteries.
•Replace the battery compartment door and tighten the screws.
Tip: When sounds or lights from the GameStationTM become faint or stop,
it’s time for an adult to change the batteries!
Battery
Compartment
Door
Tip: We recommend the use of alkaline batteries for longer battery life!
BATTERY SAFETY INFORMATION
Batteries may leak fluids that can cause a chemical burn injury or ruin your toy.
To avoid battery leakage:
•Do not mix old and new batteries or batteries of different types: alkaline, standard
(carbon-zinc) or rechargeable (nickel-cadmium).
•Insert batteries as indicated inside the battery compartment.
•Remove batteries during long periods of non-use. Always remove exhausted batteries
from the toy. Dispose of batteries safely. Do not dispose of batteries in a fire. The batteries
may explode or leak.
•Never short-circuit the battery terminals.
•Use only batteries of the same or equivalent type, as recommended.
•Do not charge non-rechargeable batteries.
•Remove rechargeable batteries from the toy before charging.
•If removable, rechargeable batteries are used, they are only to be charged
under adult supervision.
1.5V x 4
"C" (LR14)
SHOWN ACTUAL SIZE

10
ASSEMBLY TIP
ASSEMBLY TIP
•When tightening bolts in tubes, you will need to press the lock nut into the opposite side
of the tube (the hex hole). Place your thumb on the lock nut while tightening bolt with a
Phillips screwdriver.
Tip: You may want to use an adjustable wrench to hold the lock nut in place.

DECORATION
DECORATION
•Before applying the labels, wipe the surface of the scoreboard, backboard, game
selector, target and putting green with a clean, dry cloth to remove any dust or oils.
•Apply the labels as indicated in the illustrations.
Strikeouts
Down
Points
Overtime
Pitches
Attempts
50 40 30 20 10 TD
123balls 1 2strikes outs
1
4
36
5
7
8
2
11
Select Game
To Play
Select Sport
Press Start
1
2
3
START
BASKETBALL
BASEBALL
FOOTBALL
HOCKEY
SOCCER
GOLF
VOLUME
FREEPLAY
GAMEPLAY
BEATTHE CLOCK
PERFECTGAME
3 (Model C4492)
1 (Model H0127)
9 (Model C4492)
8 (Model H0127)
8 (Model C4492)
7 (Model H0127)
1 (Model C4492 Only)
10 (Model C4492)
6(Model H0127)

12
4
7
Model C4492
Model H0127
5
6
2
210
5
3
4
99

13
ASSEMBLY
ASSEMBLY
STEP 1
•Position the Ltubes on either side of a crossbar, as shown.
Tip: The L tubes are slightly different! One of the L tubes has a white dot
on the lower portion.
•Match the white dot on the crossbar with the white dot on the Ltube.
Crossbar
L Tube
L Tube
White
Dots

14
M5 Lock Nuts
M5 x 29 mm
Bolts
STEP 2
Tip: You will need to lean the assembly against
a wall or an object to complete this step.
•Insert an M5 x 29 mm bolt through the outside of the
Ltube.
•Fit an M5 lock nut, rounded side out,to the matching
hex hole in the crossbar.
•While holding the lock nut in place, tighten the bolt.
•Fit another M5 lock nut and M5 x 29 mm bolt to the
crossbar and Ltube and tighten.
Tip: If you cannot attach the M5 lock nut to the end
of the M5 x 29 mm bolt, you have assembled the crossbar incorrectly to the
L tubes. Turn the crossbar around. Make sure the white dot on the crossbar
matches the white dot on one of the L tubes.
Rounded
Side

15
ASSEMBLY
ASSEMBLY
STEP 3
Tip: You will need to lean the assembly against
a wall or an object to complete this step.
•Insert an M5 x 29 mm bolt through the outside
of the other Ltube.
•Fit an M5 lock nut, rounded side out,to the
matching hex hole in the crossbar.
•While holding the lock nut in place, tighten the bolt.
•Fit another M5 lock nut and an M5 x 29 mm bolt
to the crossbar and Ltube and tighten.
M5 Lock Nuts
M5 x 29 mm Bolts
Rounded
Side

16
STEP 4
•Fit the lower net clip into the slot in one of the bases.
Base Slot Lower Net Clip

17
ASSEMBLY
ASSEMBLY
STEP 5
•Insert three #8 x 15 mm screws into the lower net clip
and tighten.
•Repeat assembly steps 4 and 5 to assemble the other
lower net clip to the other base.
Lower Net Clip
#8 x 15 mm
Screws

18
STEP 6
•With the lower net clip facing out, slide the left base onto the tube assembly, as shown.
Tip: The left base includes a hockey stick storage area.
Lower Net
Clip
Left Base
Hockey Stick
Storage

19
ASSEMBLY
ASSEMBLY
STEP 7
•With the lower net clip facing out, slide the right base onto the tube assembly, as shown.
Right Base
Lower Net Clip
This manual suits for next models
1
Table of contents
Other Fisher-Price Fitness Equipment manuals