Fishman AIRFREE LDS9000 Use and care manual

ADMINISTRATOR MANUAL
Dispensing Innovation™
Priming/Dispensing
Only Setup Guide
PRIME • DISPENSE

3Fishman Corporation USA Toll Free 1-800-433-2115Fishman Corporation USA Toll Free 1-800-433-2115

International +00 1 508-435-2115 www.shmancorp.com 4
International +00 1 508-435-2115 www.shmancorp.com 3
Thank you for purchasing
the SmartDispenser®
THE FUTURE OF FLUID DISPENSING.
This setup guide is designed to help
Administrators program SmartDispenser®system
as “Prime Only” and “Dispense Only” units.
If you are unsure of any step or have questions,
consult your SmartDispenser®Priming/Dispensing Only
Setup Guide, contact your Fishman representative, or
call us at one of the numbers below.
US & Canada: 800-433-2115
United Kingdom: 1905 456008
Europe: +441905 456008
Worldwide: 1-508-435-2115
®

5Fishman Corporation USA Toll Free 1-800-433-2115
4Fishman Corporation USA Toll Free 1-800-433-2115
Table of Contents
1.0 Prepare your workspace for 5
the SmartDispenser®
2.0 Unpack your SmartDispenser®5
System
3.0 Hook up your SmartDispenser®6
components
4.0 Startup and Logon the 9
ProcessControl2®Mode
of SmartDispenser®
5.0 LDS™Push-To-Connect™15
Gun Assembly
6.0 Attach the Genius®Barrel 16
Reservoir to LDAV, MDAV
or SDAV Gun
7.0 Dispense Tip Locator 18
8.0 Prime the Genius®FreeFlow™22
Dispense Tip
9.0 “Priming Only” and “Dispensing Only” 24
SmartDispenser®Setup

International +00 1 508-435-2115 www.shmancorp.com 6
International +00 1 508-435-2115 www.shmancorp.com
1.0 Prepare your workspace
for the SmartDispenser®
1.1 Be sure your work area has access to electrical
power. You will not need compressed air.
The SmartDispenser®works without air.
1.2 The SmartDispenser®
utilizes a WiFi (USB
WiFi adapter included)
or Ethernet connection
via the back panel
for networking,
App downloads,
software updates
and real time
production data
over the cloud.
2.0 Unpack your
SmartDispenser®System
2.1 Remove all items from the box.
2.2 Use the checklist provided to conrm that all
components are present.
International +00 1 508-435-2115 www.shmancorp.com 5

7Fishman Corporation USA Toll Free 1-800-433-2115
3.0 Hook up your SmartDispenser®
components
3.1 Refer to the diagram to connect all components
and peripheral devices to the SmartDispenser®.
6Fishman Corporation USA Toll Free 1-800-433-2115
Q
A
B
R N
E
J
F
G
P
O
(Sold Separately)

International +00 1 508-435-2115 www.shmancorp.com 8
C
I
D
G
M
H
LK
J
Network
SmartDispenser®Components
A. LDSTM Push-to-
ConnectTM
Dispense Gun
B. Gun Connector
C. Foot Pedal
D. Foot Pedal
Connector
E. Keyboard
F. Mouse
G. USB connectors
H. Ethernet Port
I. Cisco Wireless
Connectivity
Device
J. Video Camera
K. Power Cord
L. Universal Power
Supply
M. Power Supply
Connector
N. On/Off Button
O. Power Light
P. Touch Screen
Q. Earphone
R. Earphone Port
International +00 1 508-435-2115 www.shmancorp.com 7

9Fishman Corporation USA Toll Free 1-800-433-2115
3.2 Plug SmartDispenser®Push-to-Connect™Gun
Mount Ainto gun connector Blocated on the
front of the SmartDispenser®.
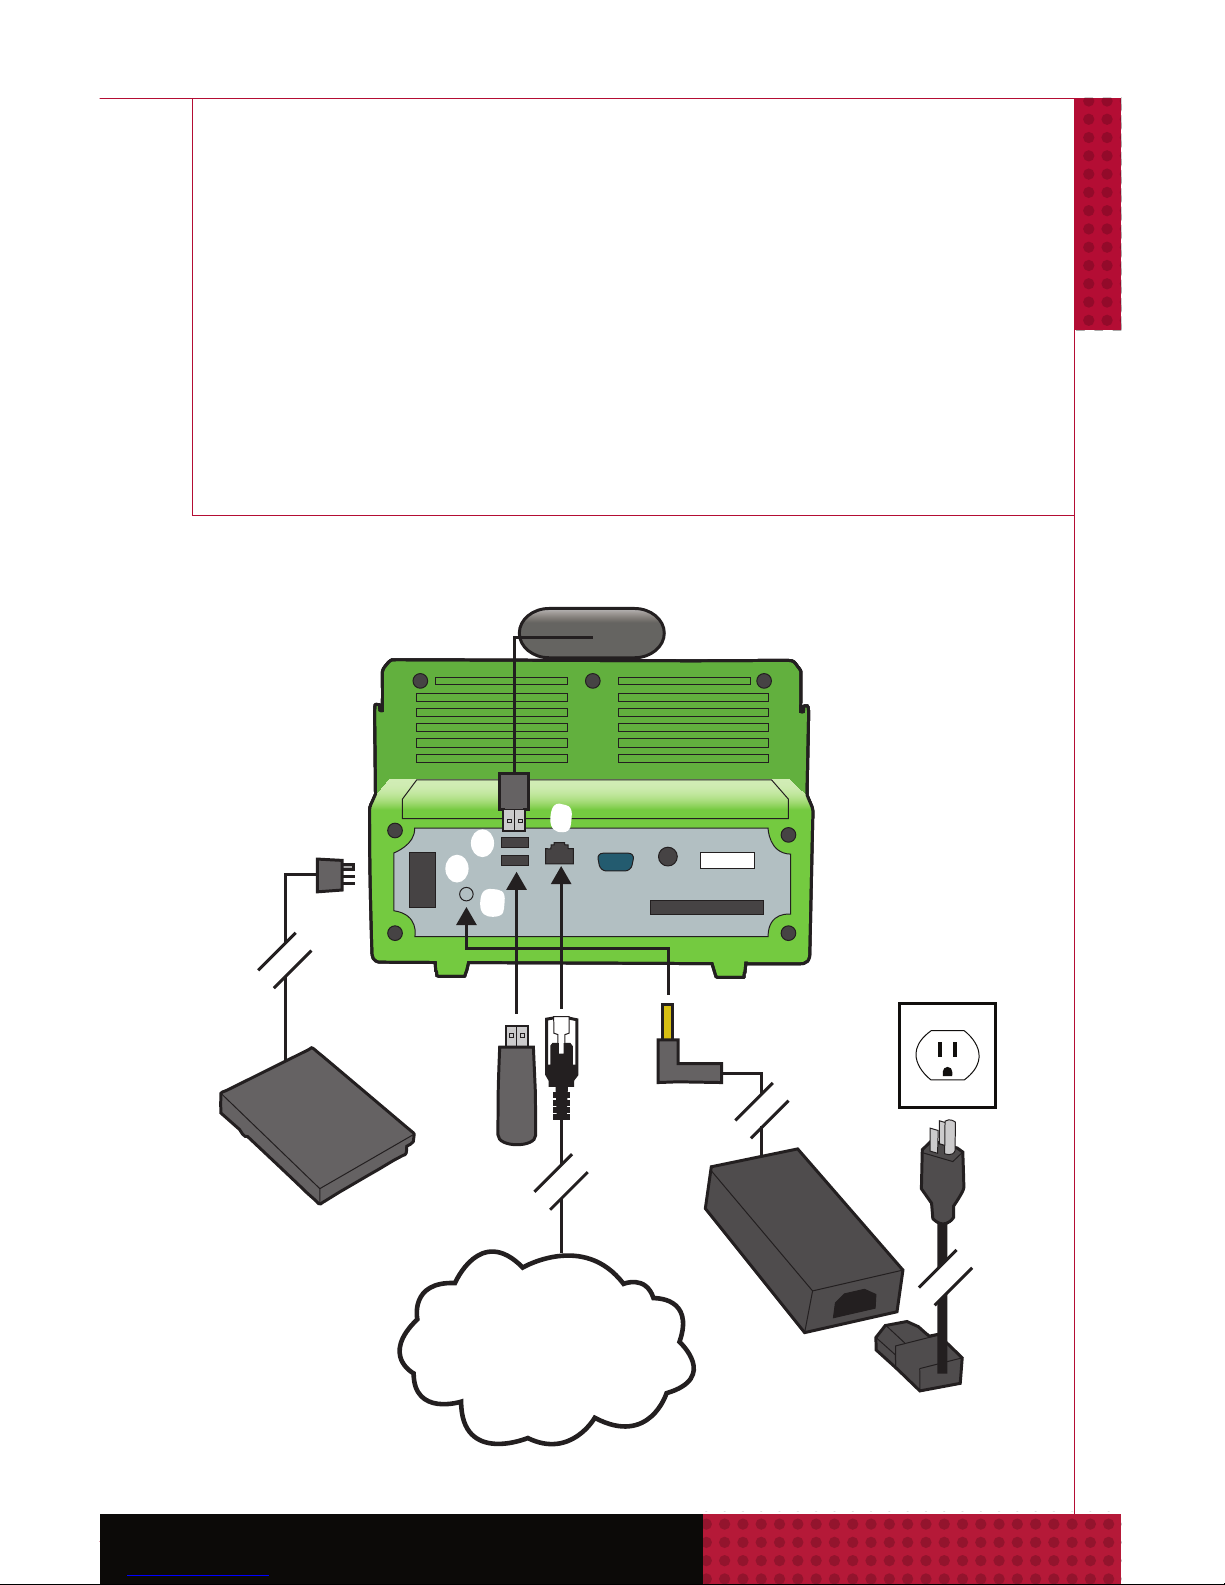
3.3 Place the foot pedal Con the oor and plug it
into the foot pedal input connector Dlocated
on the back of the SmartDispenser®.
3.4 Connect the system keyboard Eand mouse F
using one of the four USB connectors Glocated
on the front and back of the SmartDispenser®.
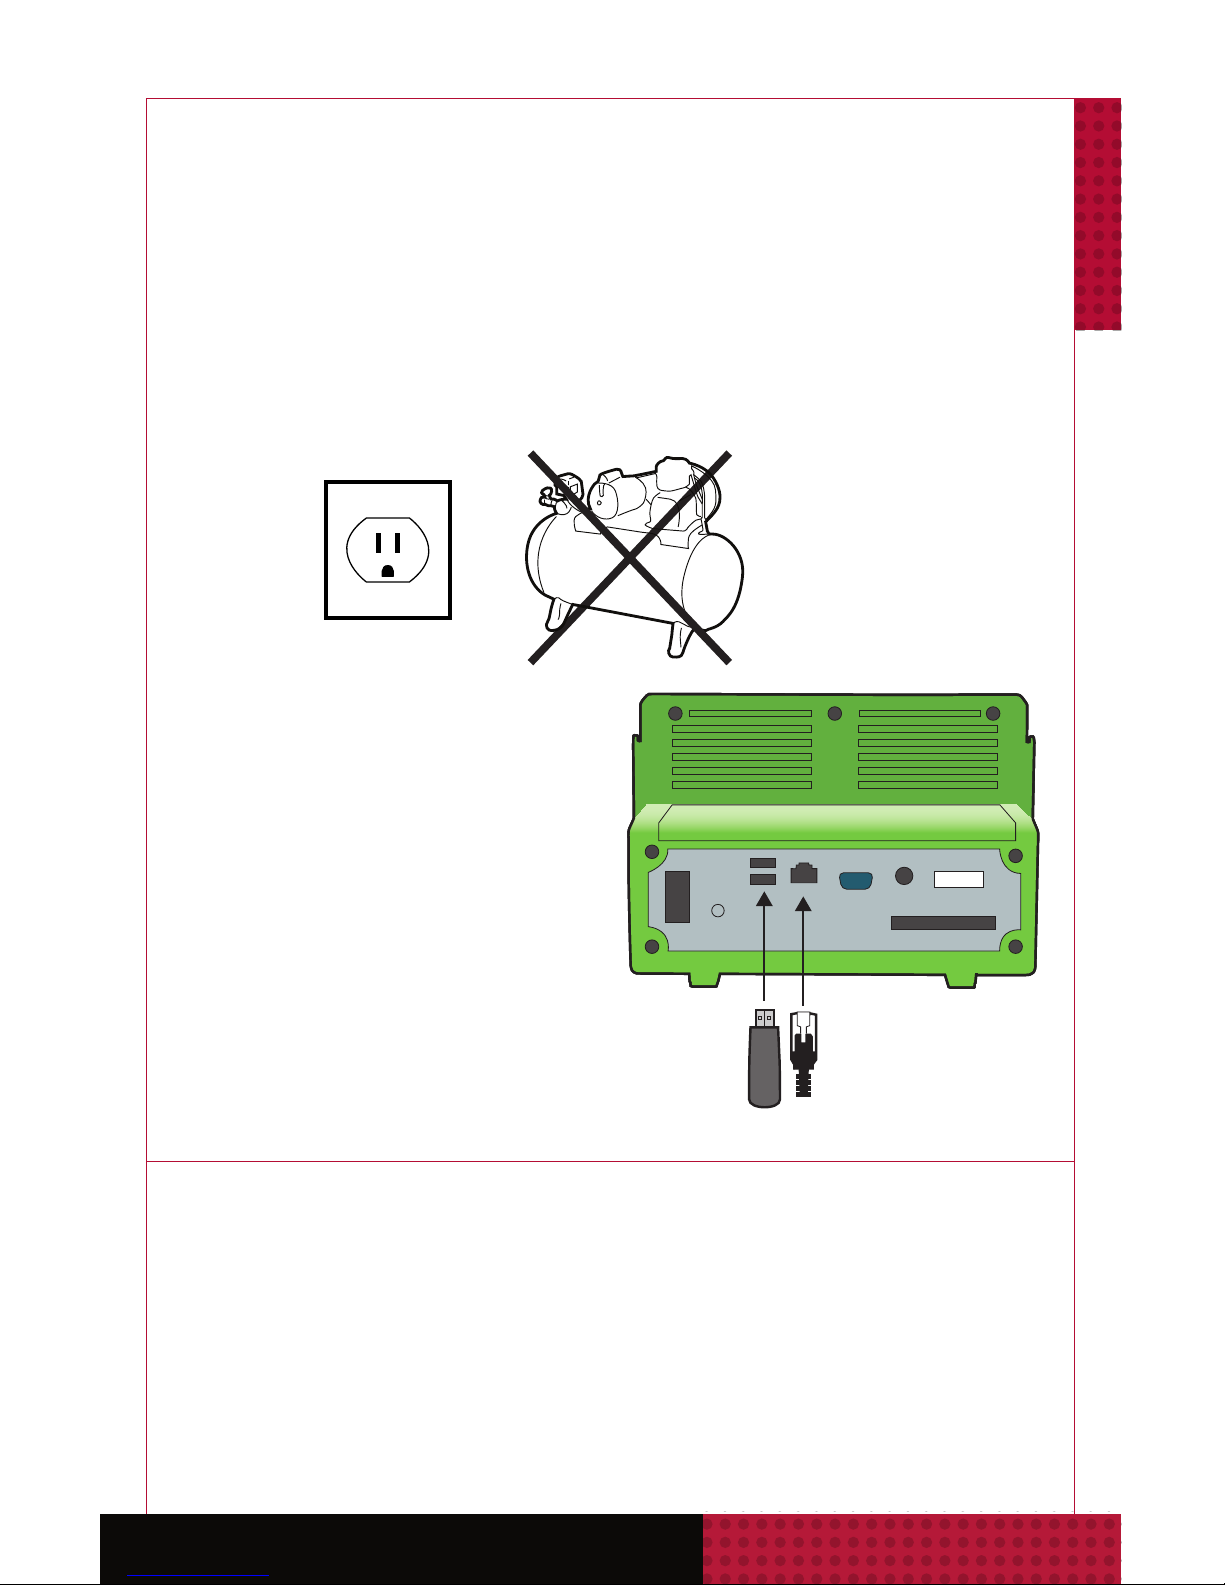
3.5 Connect your SmartDispenser®to an Ethernet
network using the Ethernet port Hfound on the
back of the unit. If you have a wireless network,
install the supplied wireless connectivity device I
in one of the USB connectors Glocated on the
front and back of the unit. (Optional)
3.6 Plug the supplied video camera Jinto one of the
four USB connectors Glocated on the front and
back of the SmartDispenser®. (Optional)
3.7 Connect the power cord Kto the universal
power supply L.
3.8 Connect the universal power supply Lto the
power supply connector Mon the back of the
SmartDispenser®. Plug the power cord Kinto
a power outlet.
3.9 Connect the 2.5mm earphone Qto earphone
port R. (Optional)
8Fishman Corporation USA Toll Free 1-800-433-2115

International +00 1 508-435-2115 www.shmancorp.com 10
International +00 1 508-435-2115 www.shmancorp.com 9
4.0 Startup and Logon to the
LDS9000®Traditional Mode
of SmartDispenser®
4.1 Press the black startup button Non the front of
the SmartDispenser®. The green power light will
illuminate O. The Windows 7 operating system
will now begin to boot up and in approximately
two minutes the Fishman Home Screen will
appear. From here you can navigate to all critical
apps and functions.

11 Fishman Corporation USA Toll Free 1-800-433-2115Fishman Corporation USA Toll Free 1-800-433-2115
4.2 The SmartDispenser®is a Windows 7-based
computer and can be left running 24/7. We
recommend that you save and close all software
applications when your work is done. Should
you choose to shut down the SmartDispenser®
you can do so by simply pressing the black start
button to initiate the proper shut down sequence
of the Windows 7 operating system.
4.3 In a few moments, you will be required
to ll a Genius®barrel and piston
with your assembly uid. Refer to
syringe lling videos for proper lling
instruction. Tap/click Video icon. On
the left navigation panel, tap click “Videos” and
select one of the listed syringe lling videos.
10 Fishman Corporation USA Toll Free 1-800-433-2115

International +00 1 508-435-2115 www.shmancorp.com 12International +00 1 508-435-2115 www.shmancorp.com
International +00 1 508-435-2115 www.shmancorp.com 11
4.4 On home screen tap/click on the
LDS9000®Traditional mode icon.
4.5
On SmartDispenser
®
Logon screen select
Administrator from drop down menu. Tap/click
password 1234, tap/click OK, tap/click Logon button.
Access the Admin button and select the Settings
tab. Conrm CORRECT settings for Machine Use
Options and Prime Step Count Transfer Method.
If Dispensing Only is selected click on the System
tab and enter a machine name.
Traditional

13 Fishman Corporation USA Toll Free 1-800-433-2115
12 Fishman Corporation USA Toll Free 1-800-433-2115
Note: There are three methods of programming numbers in
SmartDispenser®, using either using your nger to tap the
touch screen and/or the mouse to use the arrow to click on
program parameter input boxes.
1) Tap/click the input box, left/right arrows will appear.
Tap/click either arrow to increase or decrease the number.
2) Tap/click a second time to get the arrows to separate
revealing a slide bar. Tap/click either arrow to increase/
decrease the number or tap/click and hold grey slider
rectangle sliding in either direction for rapid number
change.

International +00 1 508-435-2115 www.shmancorp.com 14
International +00 1 508-435-2115 www.shmancorp.com 13
3) Tap/click and hold a third time and keypad will appear.
Tap/click “CLR” button and input the desired number.
Tap/click “Enter” button. Upon tap/click of “Enter” button
the keypad will automatically move to the next dispense
parameter.
Tip: Use the four arrow keys to move up and down from one
dispense parameter to another.
Also, use four left/right arrow keys to increase and decrease
program parameter number.
Tap/click anywhere outside the key pad to close.

14 Fishman Corporation USA Toll Free 1-800-433-2115
4.6 Prime Only – USB Conguration
4.7 On the screen the words “Prime Only” will
be visible above the illustration of a lled
syringe barrel. First, select the same syringe
barrel size used on the SmartDispenser®in
the automation system units. Any Dispense
Volume can be chosen as you will only be
utilizing the MANUAL(Auto) setting. Select
a Speed setting that is approximately 25%
of the fastest rate. Be certain that the
dispensing gun is fully retracted, the step
count at “0” and the footer buttons set to
EXTEND(Retract) and MANUAL(Auto).
Note: “Prime Only” function is available exclusively in the
Traditional 9000 menu. “Dispense Only” function is
available in both Traditional 9000 and PC2menus.

International +00 1 508-435-2115 www.shmancorp.com 16
International +00 1 508-435-2115 www.shmancorp.com 15
5. LDS™Push-to-Connect™
Gun Assembly
5.1 The LDS™Push-to-
Connect™dispense gun
are available in different
congurations.
• LDAV (Large Dot
Any Viscosity)
• MDAV (Medium Dot
Any Viscosity
• SDAV (Small Dot
Any Viscosity)
The gun connectors
are identical for easy
hook-up to the LDS™
Push-to-Connect™
dispense gun.
SurLok™
Retaining
Ring Cover
Genius®
Tip Cap
Genius®Syringe
Genius®Posilok™
Piston
Piston Hub
Lead Screw
LDAV, MDAV
or SDAV Gun

17 Fishman Corporation USA Toll Free 1-800-433-2115
16 Fishman Corporation USA Toll Free 1-800-433-2115
1/4”
6.0 Attach the Genius®Barrel
Reservoir to LDAV, MDAV
or SDAV Gun
6.1 Remove the seal from the Genius®
barrel reservoir pre-lled with
your assembly uid.
6.2 Holding the dispensing gun with the
piston hub pointed upward, place
the barrel reservoir over the piston
hub of the dispensing gun.
6.3 Holding both barrel reservoir and
dispense gun loosely, step on the
foot pedal until the barrel reservoir
ears are raised at least 1/4”
(6.35 mm) above the plate.
6.4 Manually twist the barrel reservoir
in a clockwise direction until the
luer lock connector is nger tight
and the ears of the barrel reservoir
are ush against the retaining
plate.

International +00 1 508-435-2115 www.shmancorp.com 18
International +00 1 508-435-2115 www.shmancorp.com 17
CAUTION:
Do not over-tighten the barrel reservoir. It is only
necessary to make a loose connection to bring the
barrel reservoir ush. The retaining ring holds the barrel
reservoir in place.
TIP: It may be necessary to tap/click the
EXTEND(Retract) button to RETRACT(Extend)
and step on the foot pedal to bring the ears
completely ush to the retaining plate.
If you set the switch to RETRACT(Extend),
be sure it is set back to EXTEND(Retract)
before proceeding.
6.5 Slide the retaining ring cover
over the Genius®barrel reservoir
and align the legs with the open
slots of the adapter plate.
6.6 Rotate the retaining ring cover
in a clockwise direction until it
locks in place. The barrel reservoir
is now rmly connected to the
dispenser gun.
EXTEND
(Retract)
RETRACT
(Extend)

19 Fishman Corporation USA Toll Free 1-800-433-2115
18 Fishman Corporation USA Toll Free 1-800-433-2115
7.0 Dispense Tip Locator
7.1 If you are using a LDS dispense gun in an
automated environment, secure the Dispense
Tip Locator to the gun mount bracket with
the screws provided and follow these steps
before priming the dispense tip.
7.2 Adjust the thumb screw on the rail
to approximate the height of the LDS
dispense gun with lled syringe barrel
and dispense tip attached.
Tip Locator Arm
Thumb Screw to
adjust height

International +00 1 508-435-2115 www.shmancorp.com 20
EXTEND
International +00 1 508-435-2115 www.shmancorp.com 19
7.3 Engage the tip locator arm by lifting
it 90º and lock it in place.
7.4 Use the thumb screw on the arm to
make micro height adjustments.
7.3
Tip Locator Arm
in locked postion.
7.4
Thumb Screw to
make micro
adjustments

21 Fishman Corporation USA Toll Free 1-800-433-2115
20 Fishman Corporation USA Toll Free 1-800-433-2115
7.5 When adjusted, lock the thumb wheel
into place to capture the height. Gently
tug the tip locator arm to disengage
and remove the LDS dispense gun.
7.6 Add a second LDS dispense gun with
lled syringe and dispense tip and lock
the locator arm in place. If necessary, make
a slight adjustment to the luer lock dispense
tip until it comes into contact with the end
of the thumb screw.
Locator Arm
disengaged
Thumb Wheel
locked in place
Other manuals for AIRFREE LDS9000
1
Table of contents
Other Fishman Dispenser manuals
Popular Dispenser manuals by other brands

Georgia Pacific
Georgia Pacific GP PRO 59488A reference guide

Ugolini
Ugolini Deluxe 12L UL Operator's manual

Ratiomed
Ratiomed MEG 289.1060 Original operating instructions

Follett
Follett 7CI100A Installation, operation and service manual

Ruck
Ruck 29327 instruction manual

InSinkErator
InSinkErator 2200 owner's manual