manuals.online logo
Brands
  1. Home
  2. •
  3. Brands
  4. •
  5. Fishman
  6. •
  7. Music Equipment
  8. •
  9. Fishman VTB User manual

Fishman VTB User manual

Backing Strip
We strongly advise that you reinforce the VTB mounting area with a piece of
1/16" (1.5mm) thick 1" x 2" (25 x 50mm) wood veneer, glued to the inside of
the guitar. To size the backing strip, trace the drilling template dimensions and
the shaft holes on the veneer.
Assembly
Warning: overheating can easily destroy the circuit board traces and the sur-
face-mount components on the endpin preamp. Use only a low wattage (30
watts max) soldering iron and do not overheat the components.
Fishman Acoustic Matrix & Martin Gold Plus - Rev 5.0 and up
1. Remove the components from the endpin preamp as indicated
2. Solder the new 2k resistor (supplied with your VTB) to the preamp circuit board in place of the
capacitor
3. Thread the VTB cable through the preamp barrel and solder to the preamp circuit board
White
Shield Black
Red
VTB
Active Volume, Bass & Treble Controls
Use with the Fishman Acoustic Matrix Natural I, Acoustic Matrix Natural II and
Powerjack preamps.
Installation Guide
Installation Guide
Thank you for purchasing this add-on accessory for your Fishman active pick-
up system. The VTB answers the requests from many customers who asked
for basic volume and tone shaping for their Acoustic Matrix or Powerjack sys-
tems. The spacing of the controls for the VTB is identical to our vintage AGP-
2 preamp. The VTB, along with a new Acoustic Matrix active undersaddle
pickup, makes a great upgrade or replacement for the discontinued AGP-2. If
you have comments or questions, please contact Fishman Customer Service
at www.fishman.com.
Requirements
The VTB is compatible with the following active pickup systems:
• Fishman Acoustic Matrix Natural I &II - Revision 4.0 or higher
• Fishman Powerjack - Revision 2.3 or higher
• Martin Gold Plus- Revision 4.0 or higher
• Martin ActiveJack - Revision 2.3 or higher
Please Note that Revision Numbers for each pickup are printed on the
preamp circuit board inside the endpin jack.
Note: Do not use the VTB with the discontinued Acoustic
Matrix Natural or the Acoustic Matrix Hot preamps or older
revisions of the Martin Gold Plus systems. A rectangular
metal box that encases the electronics identifies these
units.
Installation
Warning!
Installation of the VTB is to be performed only by a profes-
sional repairperson.The installer assumes responsibility for any damage
to the instrument, the VTB or the pickup system that may result from
improper installation.
Location
Determine the best location for the VTB on the side of your instrument. We
recommend the flattest possible location. The best spot is usually the top of
the shoulder on the bass-side adjacent to the neck. Avoid a location that may
interfere with the internal structural components, such as the neck block, the
top braces or the kerfed lining. When you choose a location, also be aware
that the VTB knobs must clear the interior surface of the guitar's case.
Drilling Holes
We provide a template to locate the holes for the control shafts.
1. Cut out the template and use it to verify that the VTB will fit at the desired
location inside the guitar.
2. Tape the template at the same location outside the guitar.
3. With a sharp scribe, pierce the template at the center marks for the holes.
4. Remove the template and drill 3/8" (9.5mm) holes through the side of the
guitar.
We recommend a sharp spur bit drill for this operation.
182
Remove
"182" Resistor
Remove
Capacitor
202
2k Resistor "202"
202
White
Fishman Acoustic Matrix & Martin Gold Plus - Rev 4.0
1. Remove the components from the endpin preamp as indicated
2. Solder the new 2k resistor (supplied with your VTB) to the preamp circuit board
3. Thread the VTB cable through the preamp barrel and solder to the preamp circuit board
White
Shield Black
Red
182
000
Remove
Resistor "182"
Remove
Capacitor
202
2k Resistor "202"
000
202
000
White
Fishman Powerjack, Martin Activejack - Rev 2.3
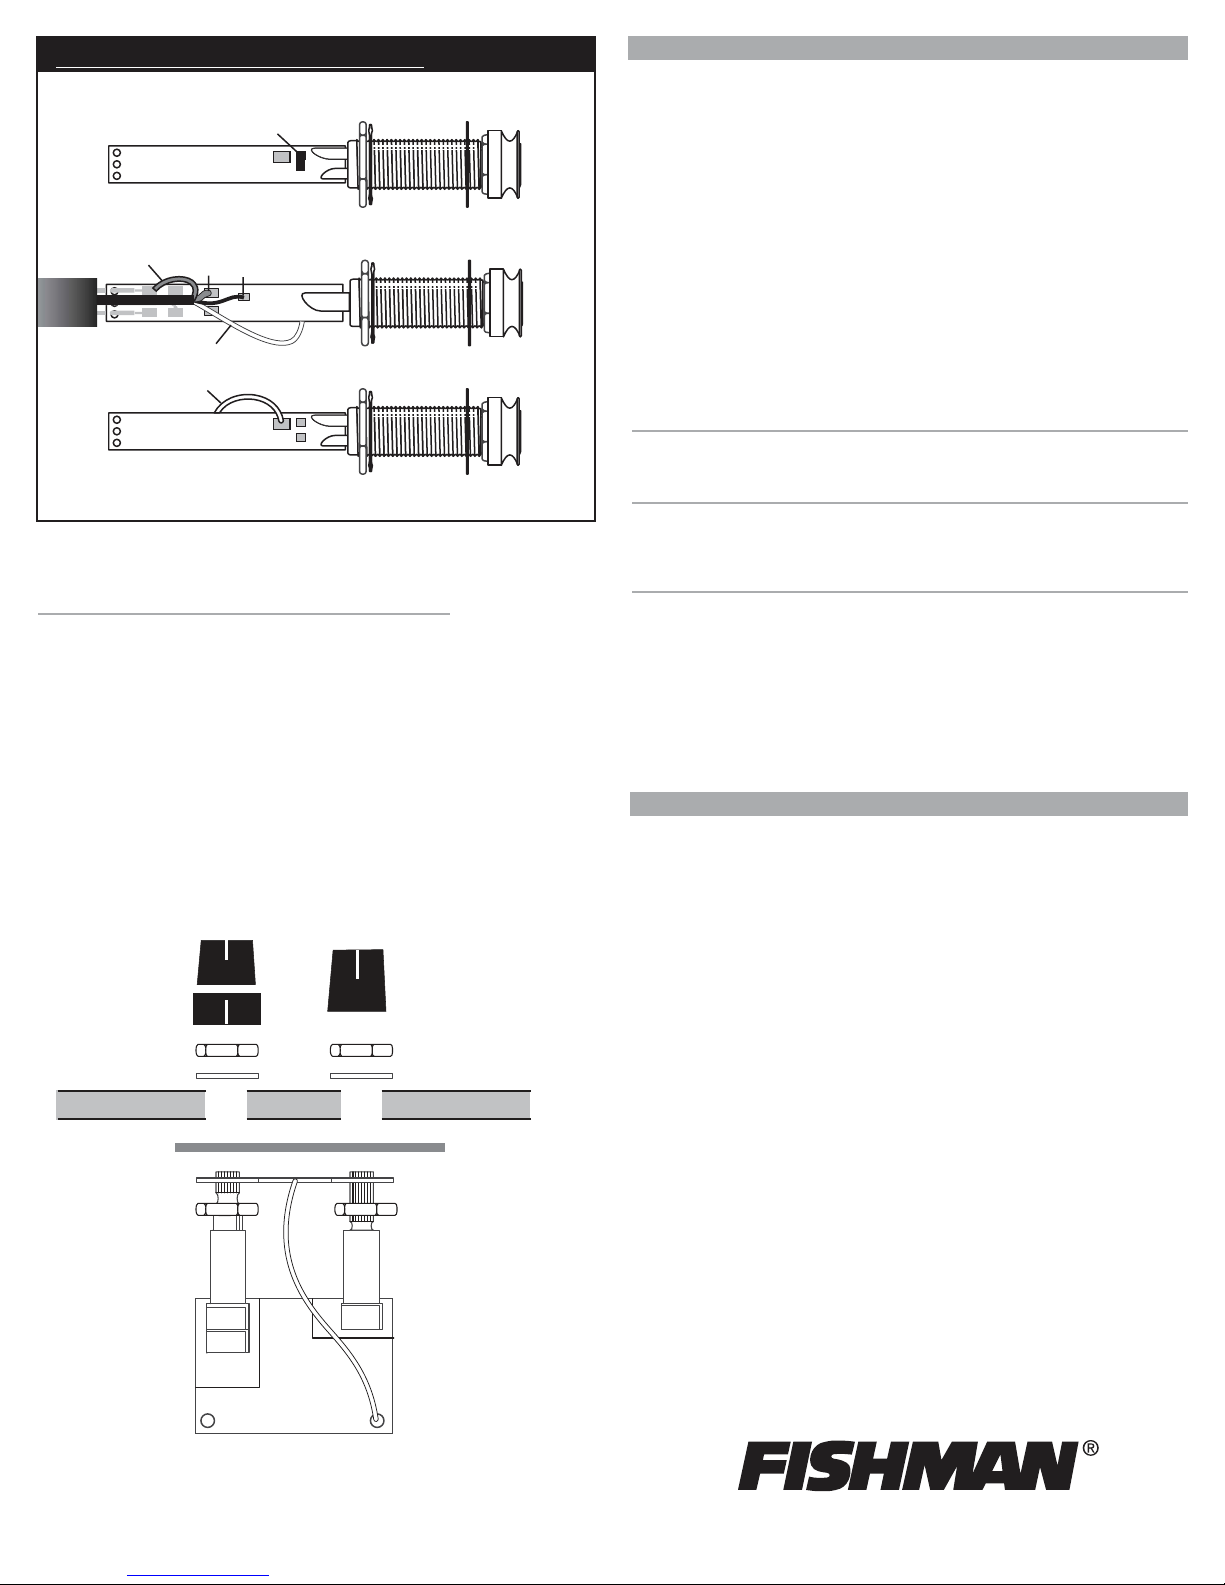
1. Remove the "000" jumper from the endpin preamp.
2. Thread the VTB cable through the preamp barrel and solder to the preamp circuit board
Finish the Job
Fasten the VTB to your instrument as shown
1. Knobs
2. Nuts
3. Washers
4. Side of guitar
5. Backing strip
6. Lock washers/ground lugs
7. Backing nuts
Remove Jumper
"000"
000
White
Shield Black
Red
White
2 - Nuts
1 - Knobs
3 - Washers
GUITAR BODY
5 - Lockwashers
with Ground Tabs
4 - Backing Strip
6 - Backing Nuts
Ground
Wire
Typical current consumption @ 9Vdc: 0.85mA
Typical 9V alkaline battery life: 500 hrs.
Input impedance (ohm): 47k
Nominal output impedance (ohm): 1k
Recommended load impedance (ohm): 10k and up
Signal gain (tone controls flat, volume at maximum): 0 dB (unity)
Maximum output level (1% THD @ 3kHz): +8dBV
Baseline noise (A-weighted, tone controls flat): -103 dBV
Baseline noise (A-weighted, tone controls full boost): -93 dBV
Signal to Noise Ratio (A-weighted, tone controls flat): 93dB (Referenced to -10dBV)
Dynamic Range (A-weighted): 111 dB
(Referenced to onset of clipping,
1% THD @ 3kHz)
Frequency response: 10Hz - 70 kHz
(Tone controls flat,
-3dB relative to 1kHz, 100k load)
Bass control:
(Outer shaft) 100 Hz @ 12 dB
Treble control:
(Inner shaft) 11 kHz @ 14 dB
Cable Color Code: Color Function
White VTB Input
Red +9V
Black VTB Output
Copper shield Ground
All specifications subject to change without notice.
Electrical Specifications
Save your original sales receipt. It is your proof of purchase if you require warranty service.
The Fishman VTB ("Product") is warranted to the original consumer purchaser to be free of defects in materials and
workmanship under normal use and service for a period of one (1) year from the date of purchase. If the Product fails
to function properly due to defects in materials or workmanship during the applicable warranty period, Fishman
Transducers Inc. ("Fishman"), at its option, will repair or replace the Product, with no charge for labor or materials.
This warranty applies only if the Product is sold and delivered within the U.S. by an authorized Fishman Dealer.
Warranty service and repair for Fishman Aura is to be made only at the factory in Wilmington MA. Unauthorized repairs
will void this warranty.
Note: For factory warranty service, the customer must prepay freight to Fishman.
To obtain factory service: A VTB repaired under warranty at the Fishman factory will be returned to the customer UPS
ground freight, prepaid by Fishman to any location within the continental United States.
Important! A Product that is returned to Fishman, which is not covered by the terms of this warranty, will be
repaired and returned C.O.D. with billing for labor, materials, return freight and insurance.
For factory service, you must deliver the VTB prepaid freight to Fishman.
1. Contact Fishman Transducers Factory Service via email ([email protected]) to obtain a Return Authorization
number (RA number). Products returned without an RA number will be refused.
2. Pack the VTB carefully. Include your shipping address (no P.O. boxes or route numbers). Also include a copy of
your sales receipt and a note that explains how to duplicate the problem. If we cannot duplicate the problem at the
Factory or verify the original purchase date, we may, at our option, charge for parts/labor and return shipping.
3. Ship the VTB freight prepaid to:
Fishman Transducers Service Department
340 Fordham Road, Wilmington, MA 01887 USA
EXCEPT AS SPECIFICALLY PROVIDED IN THIS DOCUMENT, THERE ARE NO OTHER WARRANTIES, EXPRESSED OR
IMPLIED, INCLUDING, BUT NOT LIMITED TO, IMPLIED WARRANTIES OF MERCHANTABILITY OR FITNESS FOR A
PARTICULAR PURPOSE. IN NO EVENT SHALL FISHMAN BE LIABLE FOR LOSS OF PROFITS OR INCIDENTAL, INDI-
RECT, SPECIAL, CONSEQUENTIAL OR OTHER SIMILAR DAMAGES ARISING OUT OF ANY BREACH OF WARRANTY
OR OTHER OBLIGATION CONTAINED IN THIS OWNERS' MANUAL. THE WARRANTY CONTAINED HEREIN SHALL
NOT APPLY IF THE PRODUCT HAS BEEN DAMAGED BY ALTERATION, MISUSE, ACCIDENT, NEGLECT OR USED WITH
UNAUTHORIZED ATTACHMENTS.
www.fishman.com
513-000-008 • Rev 2 • 3-15-04
Limited
Limited W
Warranty
arranty

Other Fishman Music Equipment manuals

Fishman POWERCHIP User manual

Fishman

Fishman POWERCHIP User manual

Fishman ONBOARD AURA - CUTOUT User manual

Fishman

Fishman ONBOARD AURA - CUTOUT User manual

Fishman NASHVILLE M-300 User manual

Fishman

Fishman NASHVILLE M-300 User manual

Fishman NASHVILLE PICKUP User manual

Fishman

Fishman NASHVILLE PICKUP User manual

Fishman RESONATOR GUITAR PICKUP User manual

Fishman

Fishman RESONATOR GUITAR PICKUP User manual

Fishman ELLIPSE VT - User manual

Fishman

Fishman ELLIPSE VT - User manual

Fishman RARE EARTH - User manual

Fishman

Fishman RARE EARTH - User manual

Fishman RARE EARTH - User manual

Fishman

Fishman RARE EARTH - User manual

Fishman ELLIPSE VT - User manual

Fishman

Fishman ELLIPSE VT - User manual

Fishman CLÁSICA II User manual

Fishman

Fishman CLÁSICA II User manual

Fishman ELLIPSE BLEND - User manual

Fishman

Fishman ELLIPSE BLEND - User manual

Fishman FLUENCE User manual

Fishman

Fishman FLUENCE User manual

Fishman M-200 PROFESSIONAL MANDOLIN PICKUP User manual

Fishman

Fishman M-200 PROFESSIONAL MANDOLIN PICKUP User manual

Fishman NEO-D User manual

Fishman

Fishman NEO-D User manual

Fishman ELLIPSE BLEND - User manual

Fishman

Fishman ELLIPSE BLEND - User manual

Fishman NEO-D - ANNEXE 282 User manual

Fishman

Fishman NEO-D - ANNEXE 282 User manual

Fishman ELLIPSE VT - User manual

Fishman

Fishman ELLIPSE VT - User manual

Fishman ELLIPSE BLEND - User manual

Fishman

Fishman ELLIPSE BLEND - User manual

Fishman FULL CIRCLE User manual

Fishman

Fishman FULL CIRCLE User manual

Fishman MODEL VMV User manual

Fishman

Fishman MODEL VMV User manual

Fishman TUNE-O-MATIC POWERBRIDGE - ROUTING User manual

Fishman

Fishman TUNE-O-MATIC POWERBRIDGE - ROUTING User manual

Fishman ELLIPSE BLEND - Dimensions

Fishman

Fishman ELLIPSE BLEND - Dimensions

Fishman POWERBRIDGE User manual

Fishman

Fishman POWERBRIDGE User manual

Fishman SWITCHJACK - ANNEXE 827 User manual

Fishman

Fishman SWITCHJACK - ANNEXE 827 User manual

Popular Music Equipment manuals by other brands

Imagine Videotek LLM-1770 Installation and operation manual

Imagine

Imagine Videotek LLM-1770 Installation and operation manual

Kramer VM-12HDCP user manual

Kramer

Kramer VM-12HDCP user manual

Yamaha YMR-01 Assembly instructions

Yamaha

Yamaha YMR-01 Assembly instructions

Roland GK-3 owner's manual

Roland

Roland GK-3 owner's manual

Roland VariOS user guide

Roland

Roland VariOS user guide

Russound WB-1 instruction manual

Russound

Russound WB-1 instruction manual

elysia nvelope user guide

elysia

elysia nvelope user guide

Montarbo MDI-2U user manual

Montarbo

Montarbo MDI-2U user manual

Matrix Audio Element Series quick start guide

Matrix Audio

Matrix Audio Element Series quick start guide

Roland FG-1000 owner's manual

Roland

Roland FG-1000 owner's manual

ENYA MUSIC MS user manual

ENYA MUSIC

ENYA MUSIC MS user manual

Befaco 1U STMIX user manual

Befaco

Befaco 1U STMIX user manual

CHERRY AUDIO VM901 user manual

CHERRY AUDIO

CHERRY AUDIO VM901 user manual

TC Electronic TRIPLE C quick guide

TC Electronic

TC Electronic TRIPLE C quick guide

Yamaha RY10 owner's manual

Yamaha

Yamaha RY10 owner's manual

Elgato WAVE PANELS quick start guide

Elgato

Elgato WAVE PANELS quick start guide

BOCUMA SQUIVEL SV VCF BMA 005 user manual

BOCUMA

BOCUMA SQUIVEL SV VCF BMA 005 user manual

neutral labs SCRAT v1.1 instruction manual

neutral labs

neutral labs SCRAT v1.1 instruction manual

manuals.online logo
manuals.online logoBrands
  • About & Mission
  • Contact us
  • Privacy Policy
  • Terms and Conditions

Copyright 2025 Manuals.Online. All Rights Reserved.