Fit4Home ECO-SAFE 5 User manual

1
TM-JOM-ECO5Please Keep For Future Reference
IMPORTANT - Please Read Instructions Fully Before Assembly Or Use
These instructions contain important information which will help you get the best
from your equipment and ensure safe and correct assembly, use and maintenance.
If you need help or have damaged or missing parts,
call the Customer Helpline: 0330 124 0718 (Opening hours: Mon-Fri 9:00am-6:00pm)
or Email: customerservices@fit4home.co.uk
USER MANUAL
ECO-SAFE 5 TREADMILL

2
CONTENTS
Safety Information 03
Parts List 04
Assembly Instructions 05-09
Step 1 05
Step 2 06
Step 3 07
Step 4 08
Step 5 09
Operating the Computer 10
Manual Programme 11
Folding & Unfolding 12
Bluetooth Set Up 13
Maintenance 14-17
Warm Up & Cool Down 18,19
Fit4Home 20
Declaration 21

3
IMPORTANT SAFETY INFORMATION
IMPORTANT SAFETY INFORMATION
BE SURE TO READ THE ENTIRE MANUAL BEFORE YOU ASSEMBLE OR
OPERATE YOUR MACHINE. IN PARTICULAR, NOTE THE FOLLOWING SAFETY
PRECAUTIONS:
1. Read all instructions and follow it carefully before using this equipment. Make sure the equipment is
properly assembled and tightened before use.
2. Before exercise, in order to avoid injuring the muscle, warm-up exercises are recommended.
3. Please make sure all parts are not damaged and xed well before use. This equipment should
be placed on a at surface when using. Using a mat or other covering material on the ground is
recommended.
4. Please wear proper clothes and shoes when using this equipment; do not wear clothes that might
catch any part of the equipment.
5. Do not attempt any maintenance or adjustments other than those described in this manual. Should
any problems arise, discontinue use and consult your local dealer.
6. Do not use the equipment outdoors. It is not a commercial model.
7. This equipment is for household use only.
8. Only one person at a time should use this equipment.
9. If you feel any chest pains, nausea, dizziness, or short of breath, you should stop exercising
immediately and consult your physician before continuing.
10. Care should be taken in mounting or dismounting the equipment.
11. Do not allow children to use or play on the equipment. Keep children and pets away from the
equipment while in use. This machine is designed for adults use only. The minimum free space
required for safe operation is not less than two meters.
12. The maximum weight capacity for this product is 110kgs.
WARNING: Before beginning any exercise program consult your physician. This
is especially important for the people who are over 35 years old or who have
pre-existing health problems. Read all instructions before using any tness
equipment.
CAUTION: Read all instructions carefully before operating this product. Retain
this Owner’s Manual for future reference.

4
HARDWARE LIST

5
ASSEMBLY INSTRUCTIONS
STEP 1
A. Use two M8x50 Hexagon Socket Oval Head Bolts (S1) and two M8 Nylon Nuts (S2) to secure
both Left/ Right Handlebar Support Tubes (3, 4) onto the Base Frame (1). Semi-tighten bolts with
the Allen Wrench provided.
B. Use two M8x16 Hexagon Socket Oval Head Bolts (S3) to secure both Left/Right Handlebar
Support Tubes (3, 4) onto the Base Frame (1). Semi-tighten bolts with the Allen Wrench provided.

6
ASSEMBLY INSTRUCTIONS
STEP 2
A. Remove the four Head Hex Socket Screws (S9) in the end of the Left Stand Tube and Right
Stand Tube.
B. Connect the wire that comes from the Computer Console to the Main Control Cable from the
right handlebar support of the Right Stand Tube .
C. Attach the Handlebar onto both ends of the Stand Tube, tighten the screws with the Allen Key
provided.

7
ASSEMBLY INSTRUCTIONS
STEP 3
A. Install both Handlebar Covers (S4) onto the Handlebar.
8
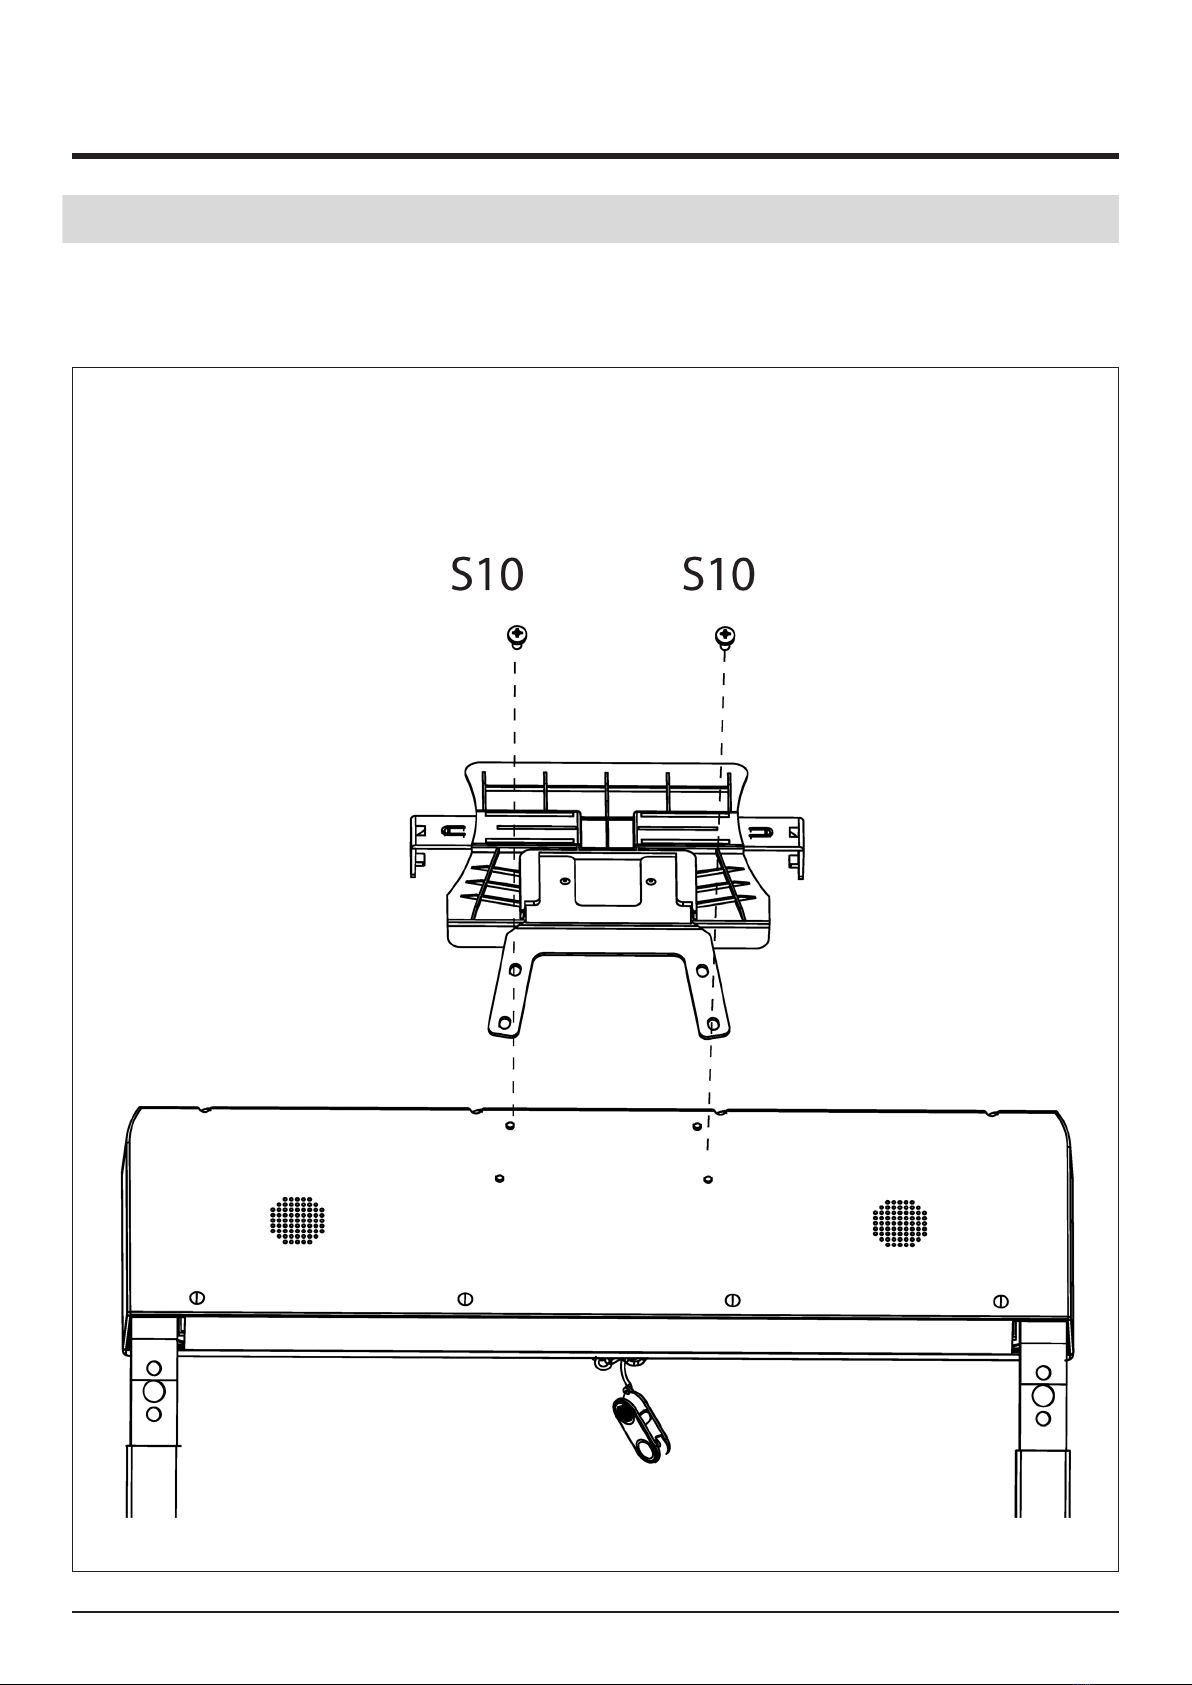
ASSEMBLY INSTRUCTIONS
STEP 4
A. Remove the four Flat Head Phillips Screw (S10) in the back of the Computer Console.
B. Attach the Tablet Holder onto the Computer Console, tighten the screws with the Allen Key
provided.

9
ASSEMBLY INSTRUCTIONS
STEP 5
A. Remove one Flat Head Phillips Screw (S10) from both sides of the Frame. Attach the Rear Left
Cover (S11) onto the left side of the Frame. Align the holes and secure the Rear Left Cover (S11)
using the one Flat Head Phillips Screws(S10), that were previously removed by Allen Wrench.
B. Align the holes and secure the Rear Right Cover (S12) using the one Flat Head Phillips Screws
(S10) that were previously removed by Allen Wrench.

10
QUICK START
Press the START button on the computer to start exercise, the LED window will countdown 3
seconds with the LED showing “3-2-1” before the running belt starts moving. The running belt
starts moving with an initial speed of 1.0 KPH. Always allow the treadmill to reach a speed of 1.0
KPH before stepping on to the running belt. You may press the SPEED + or SPEED - button on
the computer console or handlebar to increase or decrease the running speed during exercise.
The split window of SPEED will display your current running speed. The speed range is from the
minimum 1.0 KPH to the maximum 12.0 KPH.
FUNCTION BUTTONS:
START: Press the START button to start training on dierent training mode.
STOP: Press the STOP button to stop training on dierent training mode.
PROG (PROGRAM): Press the PROG button to select the pre-set training program (P01-P12)
mode before training.
MODE: Press the MODE button to select dierent functions (time, distance, or calories) for setting
exercise goals in manual program mode before training.
SPEED + (SPEED UP): Press the SPEED + button to make upward adjustments for pre-setting
target training time, distance, or calorie in manual program mode before training. Press the
SPEED + button to make upward adjustments for pre-setting target training time in pre-set
training program (P01-P12) mode before training.
SPEED - (SPEED DOWN): Press the SPEED - button to make backward adjustments for pre-
setting target training time, distance, or calorie in manual program mode before training. Press
the SPEED - button to make backward adjustments for pre-setting target training time in pre-set
training program (P01-P12) mode before training.
INSTANT SPEED (3/6): Used to reach desired speed more quickly.
DISPLAY FUNCTIONS:
TIME: Displays your elapsed workout time in minutes and seconds.
SPEED: Displays the current speed from the minimum 1.0 KPH to the maximum 12.0 KPH.
DISTANCE: Displays the accumulative distance travelled during workout.
CALORIES: Displays the total calories burned during your workout. (This data is a rough guide
for comparison of dierent exercise sessions and should not be used in medical treatment).
PULSE: Displays your current heart rate in beats per minute (BPM). To activate, grip the hand
pulse sensors during exercise and the pulse will display after 2-5 seconds. For a more accurate
reading, grip pulse sensors with both hands.
OPERATING THE COMPUTER

11
MANUAL PROGRAMME MODE
TRAINING IN MANUAL PROGRAMME MODE
You may pre-set target TIME, DISTANCE, or CALORIES in STOP mode before training.
Only one of the functions can be pre-set.
To set TIME press the MODE button on the computer console until you see the split window
of TIME begin blinking. Press the SPEED + or SPEED - button on the computer console or
handlebar to change the setting. Each increment is 1 minute. The pre-set target time range
is from 5:00 to 99:00 minutes. Once you pre-set target time, press the START button on the
computer to begin exercising.
To set DISTANCE press the MODE button on the computer console until you see the split window
of DISTANCE begin blinking. Press the SPEED + or SPEED - button on the computer console to
change the setting. The pre-set target distance range is from 0.50 to 99.5 kilometers, the default
distance is 1 kilometer.
Once you pre-set target distance, press the START button on the computer to begin exercising.
To set CALORIES press the MODE button on the computer console until you see the split window
of CALORIES begin blinking. Press the SPEED + or SPEED - button on the computer console to
change the setting.
The pre-set target calorie range is from 10 to 995 calories. Once you pre-set target calories,
press the START button on the computer to begin exercising.

12
FOLDING & UNFOLDING INSTRUCTIONS
UNFOLDING THE TREADMILL
FOLDING THE TREADMILL

13
BLUETOOTH FEATURE SET UP
HOW TO SET UP BLUETOOTH CONNECTION
STEP 1
Download the free FitShow App on
Google Play or App Store
STEP 2
Open the app and turn on the Bluetooth
in your device settings
STEP 3
Open the application on your device and
choose the device section to pair it with
the machine
STEP 4
Once the device is paired you can
start using the application in dirernt
categories
14
MAINTENANCE
WARNING
WARNING: To prevent electrical shock, please turn o and unplug the treadmill before cleaning or
performing routine maintenance.
WARNING: Always check the wear and tear components like spring knob and running belt to
prevent injury.
CLEANING
After each exercise, ensure that the unit is wiped down and any sweat is removed from the unit.
The treadmill can be cleaned with a soft cloth and mild detergent. Do not use abrasives or
solvents.
Be careful not to get excessive moisture on the display panel as this might damage the unit and
create an electrical hazard. Please keep the treadmill, especially the computer console, out of
direct sunlight to prevent damage to the screen.
STORAGE
Store the treadmill in a clean and dry indoor environment. Never leave or use the unit outdoors.
Ensure the master power switch is o and the power cord is un-plugged from wall outlet.
TROUBLESHOOTING
PROBLEM POTENTIAL CAUSES SOLUTION
Treadmill will not
start .
1. Treadmill not plugged in.
2. Safety Tether Key is not
correctly installed.
3. Circuit breaker in the house
has been tripped.
4. Treadmill circuit breaker has
been tripped.
1. Plug the power cord into a wall
outlet.
2. Reinstall the Safety Tether Key.
3. Reset the circuit breaker, or
call an electrician to replace the
circuit breaker.
4. Wait 5 minutes and then try to
restart the treadmill.
Belt slips. Belt not tight enough. Belt not tight enough.
Belt hesitates
when stepped on.
1. Not enough lubrication
applied onto the running deck.
2. Belt is too tight.
1. Apply lubricant.
2. Adjust belt tension.
Belt is not
centred.
Running belt tension not even
across the rear roller.
Centre the belt.

15
LUBRICATION
Lubricating under the running belt will ensure superior performance and extend its life
expectancy. After the rst 25 hours of use (or 2-3 months) apply some lubricant, and repeat for
every following 50 hours of use (or 5-8 months).
How to check running belt for proper lubrication
• Lift one side of the running belt and feel the top surface of the running deck.
• If the surface is slick to the touch, then no further lubrication is required.
• If the surface is dry to the touch, apply some lubricant.
How to apply lubricant
• Lift one side of running belt.
• Pour some lubricant under the centre of the running belt on the top surface of the running
deck. Run on the treadmill at a slow speed for 3 to 5 minutes to evenly distribute lubricant.
NOTE: DO NOT over lubricate running deck. Any excess lubricant that comes out should be
wiped o.
MAINTENANCE

16
MAINTENANCE
EMERGENCY STOP
Before beginning a workout session ensure that the Safety Key is properly placed onto the
Computer Console and the Safety Clip is securely attached to an article of your clothing. If you
fall the clip will pull out the SAFETY KEY from the Computer Console and the running belt will
stop immediately for emergency stop, helping to prevent injury. Replace the Safety Key onto the
Computer Console. Press the START button to begin exercise again.

17
BELT ADJUSTMENT
The running belt is pre-adjusted to the running deck at the factory, but after prolonged use it
can stretch and require readjustment. To adjust the belt, turn on the main power switch of the
treadmill and let the belt run at a speed of 6-7 MPH. Use the 6 mm Allen Wrench provided to turn
the rear roller adjustment bolts in order to centre the belt. If the running belt is shifting to the left,
turn the left adjustment bolt 1/4 turn clockwise, and the running belt should start to correct itself.
If the running belt is shifting to the right, then turn the right adjustment bolt 1/4 turn clockwise,
and the belt should start to correct itself. Keep turning the adjustment bolts until the running belt
is properly centered.
If the running belt is slipping during use, turn o and unplug the treadmill. Using the Allen Wrench
provided, turn both left and right rear roller adjustment bolts 1/4 turn clockwise, then turn the
main power switch back on and run the treadmill at a speed of 6-7 MPH. Run on to the running
belt to determine if the belt is still slipping. Repeat this procedure until the belt no longer slips.
MAINTENANCE

18
WARM UP AND COOL DOWN ROUTINE
The WARM-UP is an important part of any workout. The purpose of warming up is to prepare your body
for exercise and to minimize injuries. Warm up for two to ve minutes before aerobic exercising.It should
begin every session to prepare your body for more strenuous exercise by heating up and stretching your
muscles, increasing your circulation and pulse rate, and delivering more oxygen to your muscles.
COOL DOWN at the end of your workout, repeat these exercises to reduce soreness in tired muscles. The
purpose of cooling down is to return the body to its resting state at the end of each exercise session. A
proper cool-down slowly lowers your heart rate and allows blood to return to the heart.
HEAD ROLLS
Rotate your head to the right for one count,
you should feel a stretching sensation up the
left side of your neck. Then rotate your head
back for one count, stretching your chin to the
ceiling and letting your mouth open. Rotate
your head to the left for one count, then drop
your head to your chest for one count.
SHOULDER LIFTS
Lift your right shoulder toward your ear for one
count. Then lift your left shoulder up for one
count as you lower your right shoulder.
SIDE STRETCHES
Open your arms to the side and lift them until
they are over your head. Reach your right arm
as far toward the ceiling as you can for one
count. Repeat this action with your left arm.

19
WARM UP AND COOL DOWN ROUTINE
QUADRICEP STRETCH
With one hand against a wall for balance, reach
behind you and pull your right foot up.Bring
your heel as close to your buttocks as possible.
Hold for 15 counts and repeat with left foot.
INNER THIGH STRETCH
Sit with the soles of your feet together and
your knees pointing outward. Pull your feet as
close to your groin as possible. Gently push
your knees toward the oor. Hold for 15 counts.
TOE TOUCHES
Slowly bend forward from your waist, letting
your back and shoulders relax as you stretch
toward your toes.Reach as far as you can and
hold for 15 counts.
HAMSTRING STRETCHES
Extend your right leg. Rest the sole of your
left foot against your right inner thigh. Stretch
toward your toe as far as possible. Hold for 15
counts.Relax and then repeat with left leg.
CALF/ACHILLES STRETCH
Lean against a wall with your left leg in front of
the right and your arms forward.Keep your right
leg straight and the left foot on the oor; then
bend the left leg and lean forward by moving
your hips toward the wall.Hold, then repeat on
the other side for 15 counts.

20
FIT4HOME LTD
Fit4Home is essentially an online business which aims to provide high quality
Exercise and Fitness products to ensure all customers maintain a healthy lifestyle.
At Fit4Home we stock various dierent types of tness and exercise equipment
such as Treadmills, Cross Trainers, Weights, Exercise Bikes etc and aim to provide
an excellent service to each and every one of our valued customers. We try to cater
for every type of individual, so if you are someone who is very serious about health
and tness we can provide you with professional heavy duty products, but if you are
someone who is busy and short on space we can provide you with equipment that is
compact and aesthetically pleasing.
Fit4Home employs a dedicated customer service team to ensure the consumer is
provided with the best service and experience. For any queries or issues feel free to
contact us via e-mail or phone.
As an online business we sell our products independently via our website, and we
also trade from established markets such as Amazon and EBay. As an established
business we endeavour to earn the condence of the customer, it is for this reason
that we try our utmost best to dispatch products the same day using a next working
day delivery service to all UK mainland areas.
Along with the customer service department, Fit4Home consists of hard-working
and reliable technicians and designers who aim to meet the needs of our customers.
We oer a market leading 12 month warranty, which is simple and hassle free.
Fit4Home© Ltd
Hours of Business: 9am - 6pm
Website: www.t4home.co.uk
E-mail: customerservices@t4home.co.uk
This manual suits for next models
1
Table of contents
Other Fit4Home Treadmill manuals


