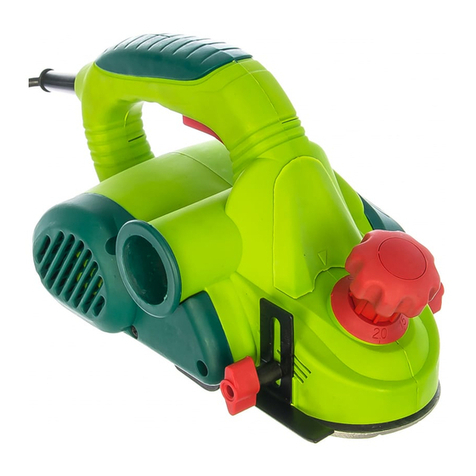
FIXTEC FPL550821 User manual

ELECTRIC PLANER
Cepilladora
FPL550821
www.fixtectools.com

English
General Power Tool Safety Warnings
Read all safety warnings and all instructions.
Failure to follow the warnings and instructions may result in electric shock, fire
and/or serious injury.
Save all warnings and instructions for future reference.
The term “power tool” in the warnings refers to your mains-operated (corded)
power tool or battery-operated (cordless) power tool.
1) Work area safety
a) Keep work area clean and well lit. Cluttered or dark areas invite
accidents.
b) Do not operate power tools in explosive atmospheres, such as in the
presence of flammable liquids, gases or dust. Power tools create
sparks which may ignite the dust or fumes.
c) Keep children and bystanders away while operating a power tool.
Distractions can cause you to lose control.
2) Electrical safety
a) Power tool plugs must match the outlet. Never modify the plug in
any way. Do not use any adapter plugs with earthed (grounded)
power tools. Unmodified plugs and matching outlets will reduce risk of
electric shock.
b) Avoid body contact with earthed or grounded surfaces, such as
pipes, radiators, ranges and refrigerators. There is an increased risk of
electric shock if your body is earthed or grounded.
c) Do not expose power tools to rain or wet conditions. Water entering a
power tool will increase the risk of electric shock.
d) Do not abuse the cord. Never use the cord for carrying, pulling or
unplugging the power tool. Keep cord away from heat, oil, sharp
edges and moving parts. Damaged or entangled cords increase the risk
of electric shock.
e) When operating a power tool outdoors, use an extension cord
suitable for outdoor use. Use of a cord suitable for outdoor use reduces
the risk of electric shock.
f) If operating a power tool in a damp location is unavoidable, use a
residual current device (RCD) protected supply. Use of an RCD
reduces the risk of electric shock.
3) Personal safety
a) Stay alert, watch what you are doing and use common sense when
operating a power tool. Do not use a power tool while you are tired
or under the influence of drugs, alcohol or medication. A moment of
inattention while operating power tools may result in serious personal injury.
b) Use personal protective equipment. Always wear eye protection.
Protective equipment such as dust mask, non-skid safety shoes, hard hat, or

hearing protection used for appropriate conditions will reduce personal
injuries.
c) Prevent unintentional starting. Ensure the switch is in the
off-position before connecting to power source and/or battery pack,
picking up or carrying the tool. Carrying power tools with your finger on
the switch or energizing power tools that have the switch on invites
accidents.
d) Remove any adjusting key or wrench before turning the power tool
on. A wrench or a key left attached to a rotating part of the power tool may
result in personal injury.
e) Do not overreach. Keep proper footing and balance at all times. This
enables better control of the power tool in unexpected situations.
f) Dress properly. Do not wear loose clothing or jewellery. Keep your
hair, clothing and gloves away from moving parts. Loose clothes,
jewellery or long hair can be caught in moving parts.
g) If devices are provided for the connection of dust extraction and
collection facilities, ensure these are connected and properly used.
Use of dust collection can reduce dust-related hazards.
4) Power tool use and care
a) Do not force the power tool. Use the correct power tool for your
application. The correct power tool will do the job better and safer at the
rate for which it was designed.
b) Do not use the power tool if the switch does not turn it on and off.
Any power tool that cannot be controlled with the switch is dangerous and
must be repaired.
c) Disconnect the plug from the power source and/or the battery pack
from the power tool before making any adjustments, changing
accessories, or storing power tools. Such preventive safety measures
reduce the risk of starting the power tool accidentally.
d) Store idle power tools out of the reach of children and do not allow
persons unfamiliar with the power tool or these instructions to
operate the power tool. Power tools are dangerous in the hands of
untrained users.
e) Maintain power tools. Check for misalignment or binding of moving
parts, breakage of parts and any other condition that may affect the
power tool’s operation. If damaged, have the power tool repaired
before use. Many accidents are caused by poorly maintained power tools.
f) Keep cutting tools sharp and clean. Properly maintained cutting tools
with sharp cutting edges are less likely to bind and are easier to control.
g) Use the power tool, accessories and tool bits etc. in accordance with
these instructions, taking into account the working conditions and
the work to be performed. Use of the power tool for operations different
from those intended could result in a hazardous situation.
5) Service

a) Have your power tool serviced by a qualified repair person using
only identical replacement parts. This will ensure that the safety of the
power tool is maintained.
Safety Warnings for Planer
Wait for the cutter to stop before setting the tool down. An exposed
rotating cutter may engage the surface leading to possible loss of control
and serious injury.
Hold the power tool by insulated gripping surfaces only, because
the cutter may contact its own cord. Cutting a “live” wire may make
exposed metal parts of the power tool “live” and could give the operator an
electric shock.
Use clamps or another practical way to secure and support the
workpiece to a stable platform. Holding the work by your hand or
against the body leaves it unstable and may lead to loss of control.
Use suitable detectors to determine if utility lines are hidden in the
work area or call the local utility company for assistance. Contact
with electric lines can lead to fire and electric shock. Damaging a gas line
can lead to explosion. Penetrating a water line causes property damage or
may cause an electric shock.
Do not reach into the saw dust ejector with your hands. They could be
injured by rotating parts.
Apply the machine to the workpiece only when switched on.
Otherwise there is danger of kickback when the cutting tool jams in the
workpiece.
When working, always hold the planer in such a manner that the
planer base plate faces flat on the workpiece. Otherwise the planer
can become wedged and lead to injuries.
Never plane over metal objects, nails or screws. The planer blade and
the blade shaft can become damaged and lead to increased vibrations.
Product Description and Specifications
Read all safety warnings and all instructions. Failure to follow the warnings
and instructions may result in electric shock, fire and/or serious injury.
While reading the operating instructions, unfold the graphics page for the
machine and leave it open.
Intended Use
The machine is intended for planing of firmly supported wooden materials, such
as beams and boards. It is also suitable for beveling edges and rebating.
Product Features
The numbering of the product features refers to the illustration of the machine
on the graphics page.

1 Depth adjustment knob
2 On/Off switch
3 Lock-on button
4 Lock nut
5 Planer base plate
6 Belt cover
Technical Data
Electric Planer
Voltage 220-240V ~ 50-60Hz 100-120V ~ 50-60Hz
Rated power 550 W 550W
No load speed 15800 min
-1
15800 min
-1
Planing depth 0-1mm 0-1 mm
Adjustable rebating
depth 0-9mm 0-9 mm
Planing width, max. 82 mm 82 mm
Weight 2.42 Kg 2.42 Kg
Protection class 回/II 回/II
Assembly
CAUTION:
• Always be sure that the tool is switched off andunplugged before adjusting or
checking function onthe tool.
Adjusting depth of cut

Depth of cut may be adjusted by simply turning the knobon the front of the tool
so that the pointer points thedesired depth of cut.
Switch action
CAUTION:
• Before plugging in thetool, always check to seethat the switch trigger actuates
properly and returnsto the "OFF" position when released.
For tool with lock button
CAUTION:
• Switch can be locked in "ON" position for ease ofoperator comfort during
extended use. Applycaution when locking tool in "ON" position andmaintain firm
grasp on tool.
To start the tool, simply pull the switch trigger. Releasethe switch trigger to stop.
For continuous operation, pull the switch trigger and thenpush in the lock button.
To stop the tool from the locked position, pull the switch
trigger fully, then release it.
CAUTION:
• Do not pull the switch trigger hard withoutdepressing the lock-off button. This
can causeswitch breakage.
Foot

After a cutting operation, raise the back side of the tooland a foot comes under
the level of the rear base. Thisprevents the tool blades to be damaged.
CAUTION:
• Always be sure that the tool is switched off andunplugged before carrying out
any work on the tool.
Removing or installing planer blades
CAUTION:
• Tighten the blade installation bolts carefully whenattaching the blades to the
tool. A loose installationbolt can be dangerous. Always check to see theyare
tightened securely.
• Handle the blades very carefully. Use gloves orrags to protect your fingers or
hands whenremoving or installing the blades.
• Use only the Makita wrench provided to remove orinstall the blades. Failure to
do so may result inovertightening or insufficient tightening of theinstallation
bolts. This could cause an injury.
For tool with conventional planer blades
1. Socket wrench
2. Bolts

1. Bolts
2. Drum
3. Planer blade
4. Drum cover
5. Adjusting plate
1. Inside edge of guage plate
2. Blade edge
3. Planer edge
4. Adjusting plate
5. Screws
6.Heel
7.Back side of guage base
8.Gauge plate
9.Gauge base
To remove the blades on the drum, unscrew theinstallation bolts with the
socket wrench. The drum covercomes off together with the blades.
To install the blades, first clean out all chips or foreignmatter adhering to the
drum or blades. Use blades of thesame dimensions and weight, or
drumoscillation/vibration will result, causing poor planingaction and,
eventually, tool breakdown.
Place the blade on the gauge base so that the bladeedge is perfectly flush
with the inside edge of the gaugeplate. Place the adjusting plate on the blade,
then simplypress in the heel of the adjusting plate flush with the backside of
the gauge base and tighten two screws on theadjusting plate. Now slip the
heel of the adjusting plateinto the drum groove, then fit the drum cover on
it.
Tighten all the installation bolts evenly and alternatelywith the socket
wrench.
Repeat the above procedures for the other blade.
For tool with mini planer blades 1.Socket wrench
2. Bolts
1. Remove the existing blade, if the

tool has been inuse, carefully clean the drum surfaces and thedrum cover. To
remove the blades on the drum,
unscrew the three installation bolts with the socketwrench. The drum
covercomes off together withthe blades.
2. To install the blades, loosely attach the adjustingplate to the set plate with the
screws and set themini planer blade on the gauge base so that the
cutting edge of the blade is perfectly flush with theinside flank of the gauge plate.
3. Set the adjusting plate/set plate on the gauge baseso that the planer blade
locating lugs on the setplate rest in the mini planer blade groove, thenpress in
the heel of the adjusting plate flush withthe back side of the gauge base and
tighten thescrews.
4. It is important that the blade sits flush with theinside flank of the gauge plate,
the planer bladelocating lugs sit in the blade groove and the heel of
the adjusting plate is flush with the back side of thegauge base. Check this
alignment carefully toensure uniform cutting.
5. Slip the heel of the adjusting plate into the grooveof the drum.
6. Set the drum cover over the adjusting plate/setplate and screw in the three
bolts so that a gapexists between the drum and the set plate to slide
the mini planer blade into position. The blade willbe positioned by the planer
blade locating lugs onthe set plate.

7. The blade's lengthwise adjustment will need to bemanually positioned so that
the blade ends areclear and equidistant from the housing on one sideand the
metal bracket on the other.
8. Tighten the three bolts (with the socket wrenchprovided) and rotate the drum
to checkclearances between the blade ends and the toolbody.
9. Check the three bolts for final tightness.
10. Repeat procedures 1 - 9 for the other blade.
For the correct planer blade setting
Your planing surface will end up rough and uneven,unless the blade is set
properly and securely. The blademust be mounted so that the cutting edge is
absolutelylevel, that is, parallel to the surface of the rear base.
Refer to some examples below for proper and impropersettings.
OPERATION
Hold the tool firmly with one hand on the knob and theother hand on the
switch handle when performing thetool.
Planing operation

First, rest the tool front base flat upon the workpiecesurface without the
blades making any contact. Switch onand wait until the blades attain full
speed. Then move thetool gently forward. Apply pressure on the front of tool
atthe start of planing, and at the back at the end of planing.
Planing will be easier if you incline the workpiece instationary fashion, so
that you can plane somewhatdownhill.
The speed and depth of cut determine the kind of finish.The power planer
keeps cutting at a speed that will notresult in jamming by chips. For rough
cutting, the depth ofcut can be increased, while for a good finish you
shouldreduce the depth of cut and advance the tool more slowly.
Shiplapping (Rabbeting)
To make a stepped cut as shown in the figure, use theedge fence (guide rule).
Draw a cutting line on the workpiece. Insert the edgefence into the hole in
the front of the tool. Align the bladeedge with the cutting line.
Adjust the edge fence until it comes in
contact with theside of the workpiece, then
secure it by tightening thescrew.
When planing, move the tool with the edge
fence flushwith the side of the workpiece.

Otherwise uneven planingmay result.
Maximum shiplapping (rabbeting) depth is 9
mm
You may wish to add to the length of the fence
byattaching an extra piece of wood. Convenient
holes areprovided in the fence for this purpose,
and also forattaching an extension guide (optional accessory).
NOTE:
The shape of the guide rule is differ from country tocountry. In some country,
the guide rule is not included asa standard accessory.
Chamfering
To make a chamfering cut as shown in the figure, alignthe "V" groove in the
front base with the edge of theworkpiece and plane it.
MAINTENANCE
CAUTION:
• Always be sure that the tool is switched off andunplugged before
attempting to perform inspectionor maintenance.
• Never use gasoline, benzine, thinner, alcohol or thelike. Discoloration,
deformation or cracks mayresult.
Sharpening the planer bladesFor conventional blades only
Always keep your blades sharp for the best performancepossible. Use the
sharpening holder (optional accessory)to remove nicks and produce a fine
edge.

First, loosen the two wing nuts on the holder and insertthe blades (A) and
(B), so that they contact the sides (C)and (D). Then tighten the wing nuts.
Immerse the dressing stone in water for 2 or 3 minutes before sharpening.
Hold the holder so that the both blades contact the dressing stone for
simultaneous sharpening at the same angle.
Replacing carbon brushes
Remove and check the carbon brushes regularly.Replace when they wear
down to the limit mark. Keepthe carbon brushes clean and free to slip in the
holders.
Both carbon brushes should be replaced at the sametime. Use only identical
carbon brushes.

Use a screwdriver to remove the chip cover or nozzle.
Use a screwdriver to remove the brush holder caps. Takeout the worn carbon
brushes, insert the new ones andsecure the brush holder caps.
To maintain product SAFETY and RELIABILITY, repairs,any other
maintenance or adjustment should beperformed by original Service Centers,
alwaysusing original replacement parts.
DISPOSAL
Do not dispose of power tools into household waste! According the
European Guideline 2002/96/EC for Waste Electrical and Electronic
Equipment and its implementation into national right, power tools that are
no longer usable must be collected separately and disposed of in an
environmentally correct manner.

Exploding View

Spare Part List
No. Description No. Description
1 CROSS RECESSED PAN HEAD
TAPPING SCREW M4X22 33 CROSS RECESSED PAN HEAD
TAPPING SCREW ST4.2X14
2 BELT COVER 34 HANDLE COVER
3 POLY BELT 35 BALL BEARING 608
4 V-PULLEY (BIG) 36 FRONT BASE
5 V-PULLEY (SMALL) 37 RUBBER PACKING
6 CROSS RECESSED PAN HEAD
TAPPING SCREW ST4.2X20 38 ADJUST SPRING
7 BRACKET 39 HEXAGON HEADED BOLT M6X18
8 BALL BEARING 6000 40 FLAT WASHER ¢6.4X¢11X1.6
9 CROSS RECESSED PAN HEAD
TAPPING SCREW ST4.8X12 41 DRUM PLATE
10 BASE 42 CROSS ECESSED PAN HEAD
SCREW M4X4
11 ARMATURE 43 ADJUST PLATE
12 CROSS RECESSED PAN HEAD
TAPPING SCREW ST4.2X60 44 BLADE
13 BALL BEARING 627 45 DRUM BODY
14 SPRING WASHER ¢4 46 GUIDE RULE
15 STATOR 47 SHARPENING HOLDER ASSY
16 BRUSH HOLDER COVER 48 GUAGE ACCESSORY
17 CARBON BRUSH 5X8X11 49 SOCKET WRENCH
18 BRUSH HOLDER
19 MAIN HOUSING
20 BEARING COVER
21 CROSS RECESSED PAN HEAD
TAPPING SCREW ST4.2X8
22 CROSS RECESSED PAN HEAD
TAPPING SCREW ST4.2X16
23 CLIP COVER
24 KNOB
25 FLAT WASHER ¢10.3X¢
20X1.2
26 LOCKED SCREW
27 SWITCH
28 CROSS RECESSED PAN HEAD
TAPPING SCREW ST4.2X8
29 BAFFLE PLATE
30 CORD GUARD
31 CORD
32 STRAIN RELIEF

Español
ADVERTENCIAS GENERALES EN MATERIA DE SEGURIDAD
Lea todas las instrucciones y advertencias en materia de seguridad. El
incumplimiento de las consignas contenidas en las advertencias e instrucciones
puede provocar descargas eléctricas, incendios y/o lesiones corporales graves.
Conserve todas las advertencias e instrucciones para poderlas consultar en el
futuro. El término “herramienta eléctrica” utilizado en las advertencias se
refiere a la herramienta eléctrica (con cable) alimentada desde la red eléctrica o
a la herramienta eléctrica (sin cable) alimentada por una batería.
Zona de trabajo
▪Mantenga la zona de trabajo limpia y ordenada. Las zonas desordenadas y
poco iluminadas favorecen los accidentes de trabajo.
▪No utilice herramientas eléctricas en atmósferas potencialmente explosivas,
así como en presencia de líquidos, gases o polvos inflamables. Las herramientas
eléctricas provocan chispas que pueden inflamar polvos o humos.
▪Mantenga alejados a los niños y otras personas mientras utilice la
herramienta eléctrica.El distraerse puede hacerle perder el control de la
máquina.
Seguridad eléctrica
▪La tensión de alimentación debe corresponder a aquella la indicada en la
placa de características.
▪El enchufe de la máquina debe encajar en la toma de corriente. No se debe
modificar de manera alguna el enchufe. No utilice ningún adaptador con
herramientas eléctricas puestas a tierra. El uso de enchufes no modificados y de
tomas de corriente adecuadas reduce el riesgo de una descarga eléctrica.
▪Evite el contacto físico con superficies puestas a tierra como tubos,radiadores,
hornos y refrigeradores. Si su cuerpo está conectado a tierra, el riesgo una
descarga eléctrica es mayor.
▪Evite exponer las herramientas eléctricas a la lluvia y la humedad. La
penetración de agua en los aparatos eléctricos aumentará el riesgo de una
descarga eléctrica.
▪No dañe el cable. Nunca utilice el cable para transportar, tirar o desconectar
la herramienta eléctrica. Mantenga el cable lejos de fuentes de calor, aceite,
bordes afilados o piezas en movimiento. Un cable dañado o enredado aumenta
el riesgo de descargas eléctricas.
▪Cuando trabaje con una herramienta eléctrica al exterior, utilice un cable
prolongador apto para una utilización al exterior. Este tipo de cable reduce el
riesgo de una descarga eléctrica mortal.
▪Si se debe utilizar una herramienta eléctrica en un lugar húmedo, utilice una
alimentación protegida por un dispositivo de corriente residual (RCD). El uso de
tal dispositivo reduce el riesgo de descargas eléctricas.

Seguridad para las personas
▪Esté atento. Concéntrense en el trabajo que esté realizando y utilice las
herramientas eléctricas con sensatez. No utilice el aparato cuando esté cansado
o bajo los efectos de narcóticos, alcohol o fármacos. Un momento de inatención
mientras se utiliza una herramienta eléctrica puede provocar graves lesiones
corporales.
▪Utilice equipo de seguridad. Lleve siempre gafas de protección. Un equipo de
seguridad adecuado tal como una máscara contra el polvo, calzado de
seguridad antideslizante,casco de protección o auriculares de protección
reducirá el riesgo de lesions personales.
▪Evite la puesta en marcha involuntaria. Asegúrese que el interruptor esté
apagado antes de enchufar la herramienta. Llevar una herramienta eléctrica
con el dedo puesto en el interruptor o bien, conectar una herramienta eléctrica
cuando el interruptor está en posición de encendido favorece los accidentes.
▪Retire las llaves de ajuste antes de encender la herramienta. Una llave que
quede en una pieza móvil de la herramienta puede provocar lesiones
corporales.
▪No se sobrestime. Mantenga siempre un apoyo firme con los pies. Esto
permitirá un mejor control de la herramienta en situaciones inesperadas.
▪Lleve ropa adecuada. No lleve ropa holgada ni joyas. Mantenga el cabello, la
ropa y los guantes lejos de las piezas en movimiento. La ropa holgada, las joyas
y el cabello largo pueden engancharse en las piezas en movimiento.
▪Si se proporciona dispositivos para conectar equipos de extracción y
recolección de polvo, asegúrese que éstos estén conectados y utilizados de
manera correcta. El uso de este tipo de equipos puede reducir los riesgos
debidos al polvo.
Uso y cuidados de las herramientas eléctricas
▪No fuerce la herramienta. Utilice para su trabajo la herramienta eléctrica
adecuada. Con la herramienta adecuada podrá trabajar mejor y de manera más
segura, al ritmo para el que ésta ha sido diseñada.
▪No utilice ninguna herramienta eléctrica, cuyo interruptor esté defectuoso.
Una herramienta eléctrica que no se pueda encender y apagar es peligrosa y se
le debe reparar.
▪Desconecte el enchufe de la toma de corriente antes de efectuar un ajuste
cualquiera en la herramienta, de cambiar accesorios o de guardar la
herramienta. Estas medidas de seguridad preventiva reducen el riesgo de
puesta en marcha accidental de la herramienta.
▪Guarde las herramientas que utilice fuera del alcance de los niños. No permita
que una persona no familiarizada con estas instrucciones utilice la herramienta.
Las herramientas eléctricas son peligrosas en manos de una persona no
capacitada.
▪Mantenimiento. Verifique la alineación o la unión de las piezas móviles, la
ausencia de piezas y cualquier otra situación que pudiere afectar el

funcionamiento de la herramienta. Si la herramienta estuviere dañada, hágala
reparar antes de utilizarla. Muchos accidents se deben a falta de
mantenimiento.
▪Mantenga las herramientas de corte limpias y afiladas. Unas herramientas de
corte en buen estado y afiladas son más fáciles de manejar y se agarrotan
menos.
▪Utilice la herramienta eléctrica, los accesorios, la herramienta de corte, etc. de
conformidad con estas instrucciones y como se indica para cada tipo de
herramienta.
Tenga en cuenta siempre las condiciones de trabajo y el trabajo en sí. El uso
inadecuado de las herramientas eléctricas puede conducir a situaciones
peligrosas.
Servicio
▪Las intervenciones de servicio en su herramienta eléctrica deben ser
efectuadas por personas cualificadas que utilicen únicamente piezas de
repuesto estándar. De esta manera, se cumplirá con las normas de seguridad
necesarias.
Advertencias de seguridad para la cepilladora
▪Espere a que el cortador se detenga antes de dejar la herramienta. Un cortador
giratorio expuesto puede engancharse con la superficie y provocar una posible
pérdida de control y lesiones graves.
▪Sujete la herramienta eléctrica únicamente por las superficies de agarre
aisladas, ya que el cortador puede entrar en contacto con su propio cable.
Cortar un cable "vivo" puede hacer que las partes metálicas expuestas de la
herramienta eléctrica estén "energizadas" y podría dar al operador una
descarga eléctrica.
▪Utilice abrazaderas u otra forma práctica de asegurar y apoyar la pieza de
trabajo en una plataforma estable. Sostener el trabajo con la mano o contra el
cuerpo lo deja inestable y puede provocar la pérdida de control.
▪Utilice detectores adecuados para determinar si las líneas de servicios públicos
están ocultas en el área de trabajo o llame a la compañía de servicios públicos
local para obtener ayuda. El contacto con líneas eléctricas puede provocar
incendios y descargas eléctricas. Dañar una línea de gas puede provocar una
explosión. La penetración de una línea de agua provoca daños a la propiedad o
puede provocar una descarga eléctrica.
▪No introduzca las manos en el expulsor de polvo de sierra. Podrían resultar
lesionados por piezas giratorias.
▪Aplique la máquina a la pieza de trabajo solo cuando esté encendida. De lo
contrario, existe el peligro de retroceso cuando la herramienta de corte se
atasca en la pieza de trabajo.
▪Cuando trabaje, sujete siempre la cepilladora de tal manera que la placa base
de la cepilladora quede plana sobre la pieza de trabajo. De lo contrario, la

cepilladora puede atascarse y provocar lesiones.
▪Nunca cepille sobre objetos metálicos, clavos o tornillos. La cuchilla de la
cepilladora y el eje de la cuchilla pueden dañarse y provocar un aumento de las
vibraciones.
1 botón de ajuste de profundidad
2 interruptor de encendido / apagado
3 Botón de bloqueo para el interruptor de encendido
4 Contratuerca
5 Placa base cepilladora
6 Funda de cinturón
Datos Técnicos
Cepilladora
Voltaje 220-240V ~ 50-60Hz 100-120V ~ 50-60Hz
Potencia 550 W 550W
Velocidad en vacío 15800 min-1 15800 min-1
Planing depth 0-1 mm 0-1 mm
Adjustable rebating
depth 0-9 mm 0-9 mm
Planing width, max. 82 mm 82 mm
Peso 2.42 Kg 2.42 Kg
clase de protección 回/II 回/II
Table of contents
Languages:
