FLAVIA Creation 150 TM User manual

FLAVIA® Creation 150TM/MC
User Guide
Manuel d’utilisation
English/Français
www.myflavia.com
MD

CONTENTS
PAGE
Safety Precautions.................................................................. 1, 2
Installation of your Brewer ................................................... 3
FLAVIA® Brewer Layout ......................................................... 4
Setting up your Brewer ......................................................... 5, 6
Getting the most from your Brewer ................................... 7
Preparing a Beverage/Drink ................................................ 8
Brewing a Cappuccino/Latte............................................... 9
Daily care of your Brewer ..................................................... 10
Weekly care of your Brewer................................................. 11
Water Filter Replacement..................................................... 12
Periodic Maintenance ............................................................ 13
Troubleshooting...................................................................... 14, 15

SAFETY PRECAUTIONS
GENERAL USE
We at Mars Drinks are committed to safety in all aspects of our product design, manufacture,
installation and service.
These warnings are provided in the interests of safety in order to prevent harm or injury to those
using the appliance or to any other persons and/or property. Please be sure to read all safety
instructions carefully and ensure anyone who is involved with routine cleaning and loading also
reads them. Keep for future reference.
This system has been designed and manufactured in accordance with legislation relating to safety
and EMC requirements.
• Thissystemisforindooruseonly.Neverplaceoutside,orallowtofreeze.Iffreezingoccurs,do
not switch on, contact customer service.
• Anambienttemperaturerangeof+41°F(+5°C)to+86°F(+30°C)isrecommendedforsystem
location.
• Donotinstallwhereawaterjetcouldbeused.
• PlaceoutofthereachofChildren.Childrenandpersonswithreducedphysical,sensory
or mental capabilities, or persons unfamiliar with the equipment should only use it under
supervision.Notobservingtheseprecautionsmaycauseburns,electricshockorotherinjury.
• EnsuretherearoftheBrewercanbeaccessedeasilytoallowisolationoftheelectricalsupply.
• Donotuseapplianceforotherthanintendeduse,topreventmalfunctionorinjury
• Donotplaceapplianceorcordneargas/electricburners,riskofdamage
• Neverusetheapplianceataltitudesabove6500ft(2000m).Riskofmalfunction
• Ensureapplianceiskeptonalevelsurfaceatleast3”(75mm)fromedgeofsurface.
• Donotdrapecordoverthecountertoportabletopwhereitcanbepulledonbychildrenor
tripped over unintentionally causing injury.
• Neverattempttochangethespecicationormodifytheapplianceinanyway.Anyattemptto
dosomayresultinreorinjury.
• Theuseofaccessoryattachmentsnotrecommendedbytheappliancemanufacturermay
resultinre,electricshockorinjurytopersons.
• Undernocircumstancesshouldyouattempttoperformanyservicingorrepairsonthis
appliance.InexperiencedpersonsmaycauseRiskofinjuryormalfunction.Alwayscallcustomer
service.
• Toprotectagainstriskofelectricshock,alwaysunplugappliancewhennotinuseandbefore
cleaning.
• Tounplugtheappliance,switchtheappliance“OFF”(“0”onthePowerSwitch),thenremove
the plug from the wall outlet.
• Donottouchhotsurfaces,allowappliancetocoolbeforeputtingonortakingopartsand
beforecleaning.Riskofburns.
• Onlycleanspeciedareasasinstructed,toavoiddamagetoappliance
• Neveroverlltheappliancewithwaterasthismayresultinelectricshock.
1
1

2
SAFETY PRECAUTIONS
• Donotuseappliancewithsodiumsoftenedwater.Softenedwatercanaectdispensing
pressure causing packs to split and risk of scalding.
• Donotputmilk,alcoholoranythingotherthancold,freshwaterintheWaterReservoir.This
mayThiscouldimpairsafetyandwillresultinseriousdamagetotheBrewer.
• Drainthecoldwatertankandkeepuprightfortransportationandstorage.Donotmovewhen
fullofwater.Waterspillscausecansliphazards.
• Neverusepacksthathavebeenstoredintherefrigeratororfreezerastheymaysplitduring
vending.
• Neverusepacksthatappeardamagedinanyway.astheymaysplitduringvending.
• NeverusetheappliancewithoutplacingacupontheCupStandbeneaththewateroutlet.
• Ensurethatthecupormugisofadequatesizeforthedrinkyouarebrewing.Failuretodoso
may lead to overflow which could cause burns.
• Neverremovethecupduringthebrewingcycleasthismaycauseburns.
• NeveropenthePackDoorduringthebrewingcycleasthismaycauseburns.
• Nevertilt,shakeorturntheBrewerupsidedown,asthismayresultinspillageand/orserious
damage to the machine.
• Observelocalrecommendationsrelatingtoregularinspectionandtestingofthisappliance.
• Thesystemisashtestedbeforeitleavesthemanufacturingpremises.Repeatedashtesting
can damage insulation.
ELECTRICAL SUPPLY AND CORD
• Neverdoanythingthatmightcausedamagetothecordorplug,(suchasmodifythem,place
hotorheavyobjectsonthem,bendthem,stretchthem,ortwistthem).Iftheapplianceisused
whendamaged,electricalshortcircuitorremayresult.Ifinneedofrepairpleasecontact
customer service
• Donotimmersecord,plugsorapplianceinwaterorotherliquid,toprotectagainstre,electric
shock and injury to persons
• Donotoperateanyappliancewithadamagedcordorplugoraftertheappliancemalfunctions,
or has been damaged in any manner. Contact customer service or point of purchase.
• Theappliancemustbeearthed.Failuretodosomayresultinelectricshock.
• Makesuretheplugiscorrectlyinsertedinthepowersocket.Anunsafeplugmaycauseelectric
shockorgenerateheatresultinginre.Donotuseadamagedplugorloosepowersocket.
• Powersocketmustnotbeusedinconjunctionwithotherappliances.Whenusedalongsideother
appliances,heatgeneratedmayresultinre.
• Neverplugorunplugtheappliancewithwethands.Thismayresultinelectricshock.
• RemovetheplugfromtheACoutletonlywhentheBrewerisswitchedo(notinuse).
Deterioratinginsulationmayresultinelectricshockand/orre.
• WhenunpluggingtheBrewer,alwayspullbythePlug–NOTTHECORD!

INSTALLATION OF YOUR FLAVIA® BREWER
BREWER DIMENSIONS
Height – 14.4” (365mm) Width – 9.1” (231mm) Depth – 13.5” (344mm)
ELECTRICAL SUPPLY
Itisimportantthatyouhaveapowersupplyreadysothatwecaninstallyournewsystemquickly
and eciently.
Youwillneedtosupplyasuitablyratedandprotected(i.e.viaRCDand/orMCB)incomingsupply.
TheBrewermustbeconnectedtothesupplyviaanearthedwallsocket,ideallyincorporatinga
switch.
PleaserefertotheratinglabelontheBrewerfordetailsofthesupplyvoltage,frequencyand
powerratingrequiredtooperatetheBrewer.
Useonlyonesystempersocketandensureitisearthed.
Yoursystemcomessuppliedwithamainslead,69”(1.75m)inlength.Onlythisleadshouldbe
used, no old leads should be re-used.
Donotuseextensioncables;plugsuppliedmainsleaddirectlyintosocket.
3
Note: Ifyouareunsureaboutanyinstallationrequirements,consultanelectrician.
4
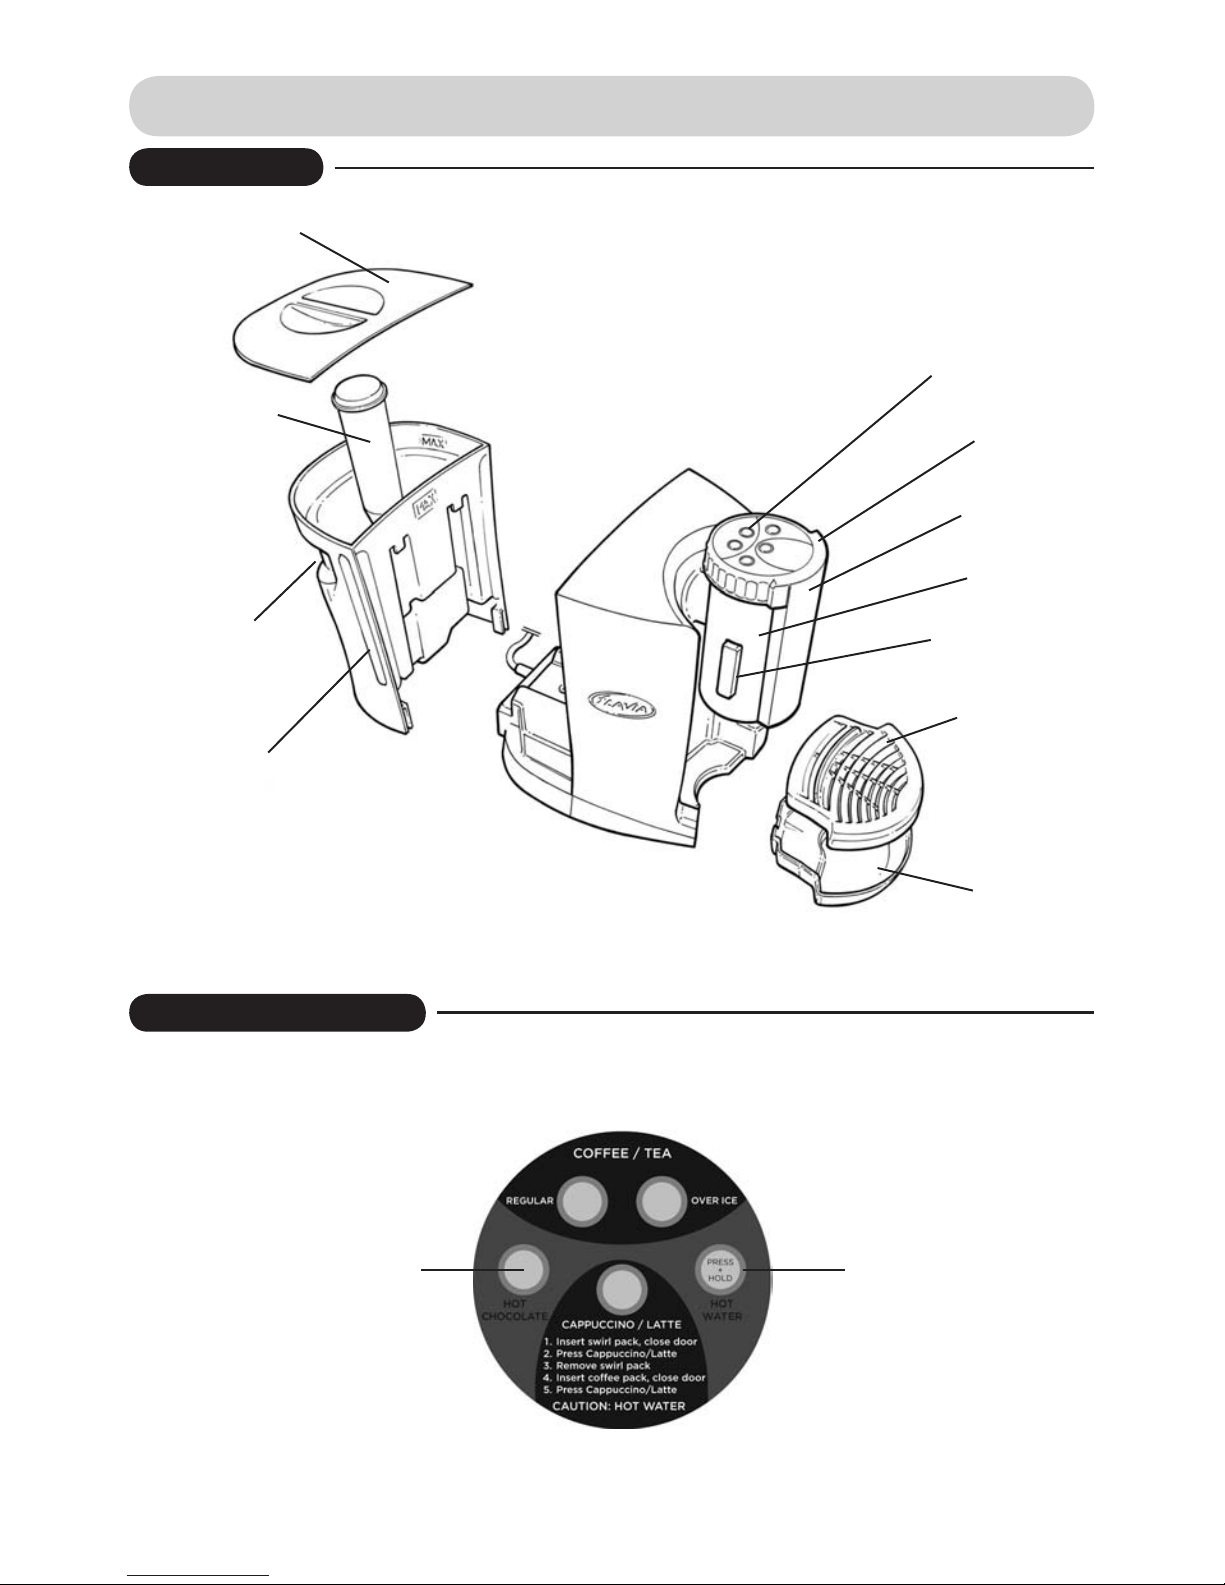
BREWER LAYOUT
Cold Tank Lid*
Water Filter*
Cold Tank*
Water Level
indicator
User Interface
*Items available as spare parts
Grip Ring
Pack Door*
Brew Head
Height Adjust
Button
Cup Stand*
Drip Tray*
TheuserInterfacecomprisesdrinkselectionbuttonsandlightstoindicateBrewerstatus
EXTERIOR
USER INTERFACE
Drink Selection Button Indicator Light
5
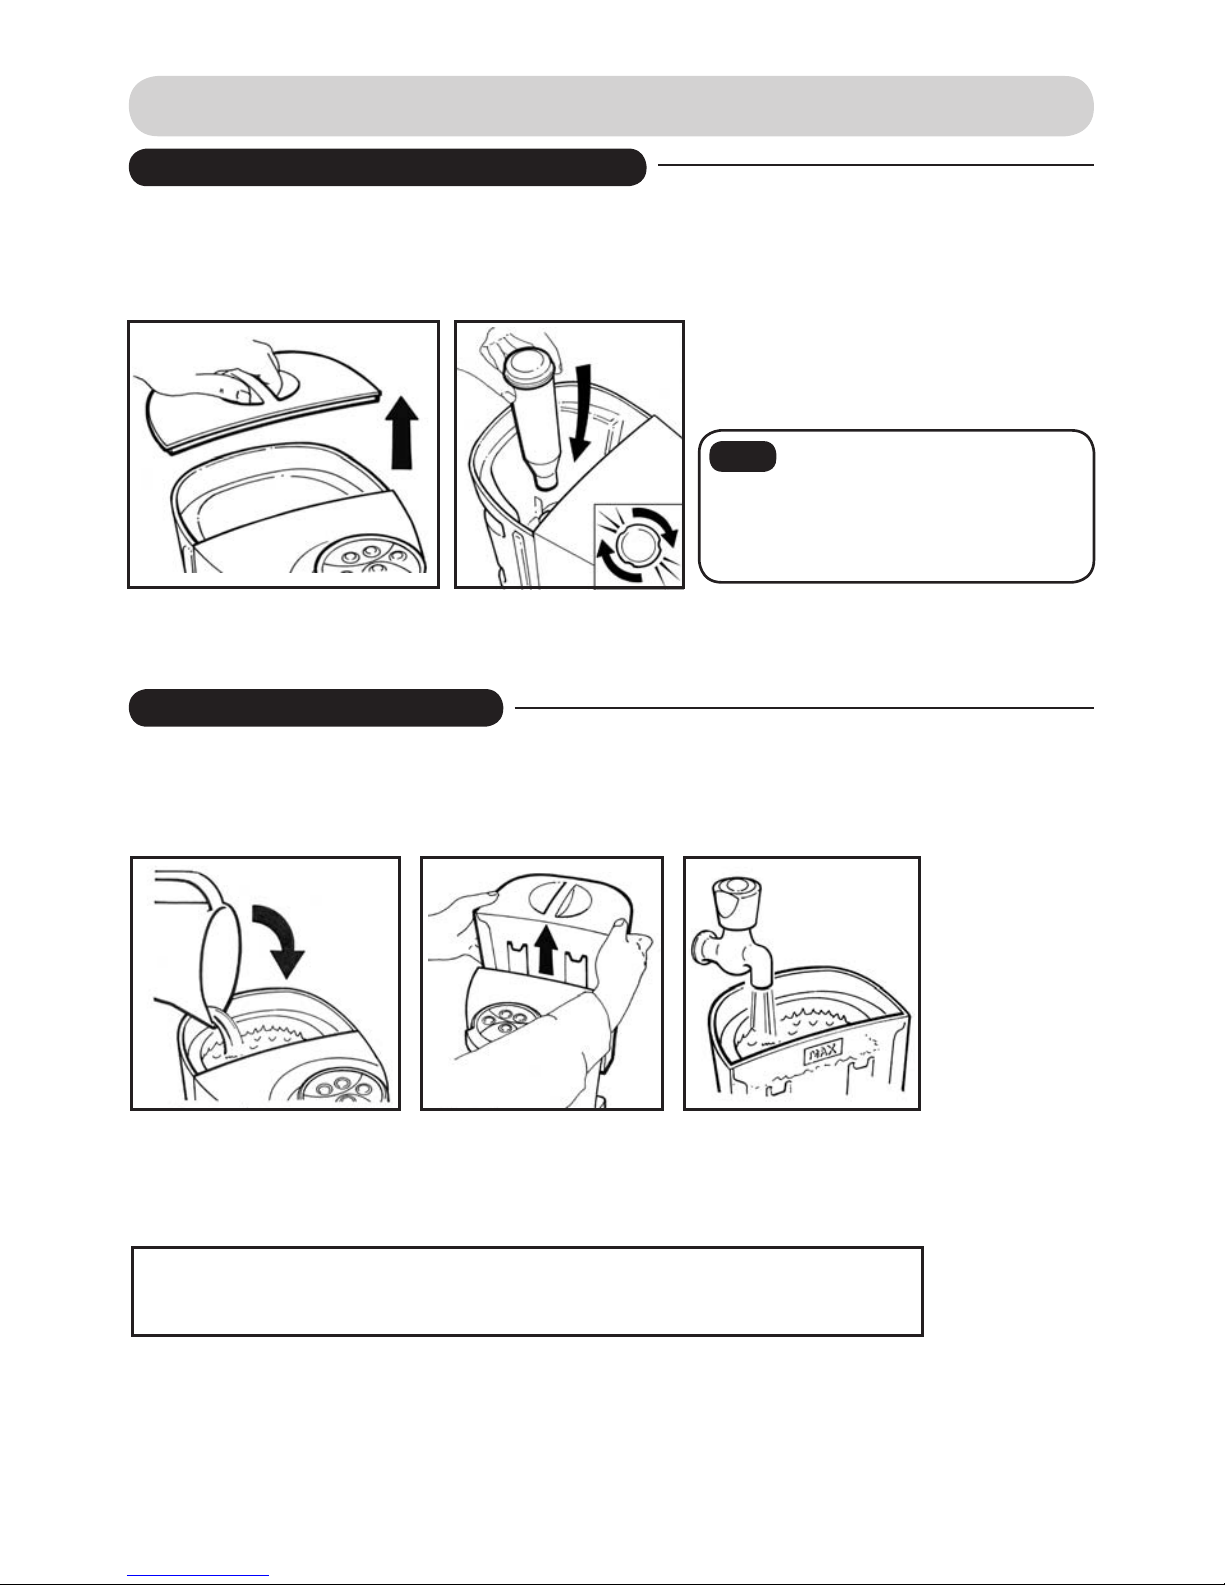
SETTING UP YOUR BREWER
INSTALLING THE WATER FILTER
YourBreweristtedwithaWaterFiltertoensurethewaterusedinbrewingyourbeveragesis
of optimal quality. To maintain the quality of beverages brewed, while protecting and extending
thelifeofyourBrewer,youwillneedtoreplacethislterperiodically.Thefrequencyof
replacement depends on the number of drinks brewed.
Note: AtthetopoftheWaterFilter
cartridge there is a rotating ‘date cap’
which may be set to serve as
a reminder of the anticipated
replacement date.
Step 1:RemovetheCold
Tank Lid.
Step 2:InserttheWaterFilterandrotateitclockwisetoengage
withthebayonettting.ReplaceColdTankLid.
FOR SUBSEQUENT CHANGES OF THE
WATER FILTER PLEASE REFER TO
THE SECTION HEADED WATER FILTER
REPLACEMENT
FILLING WITH WATER
WhentheBrewerrequiresrellingwithwater,alltheindicatorlightswillashquickly.
TheColdTankcanbelledwithajugordetachedfromtheBrewerandlleddirectlyfroma
faucet.
Carefullyllthereservoirwithdrinkingwater(nohigherthanthe“MAX”level)
During operation the water level may be monitored via the water level indicators on either side of
the Cold Tank
Volumeofwaterrequiredtollto‘MAX’levelfrom‘LOW’levelindication.
WithFilterFitted=108oz(3,2L)

6
SETTING UP YOUR BREWER
Beverages cannot be brewed until the Brewer has been primed. The priming cycle fills the boiler
with water and flushes the system through. After this your Brewer will be ready for use.
Note: Before
priming your
Brewerensure
that the Cold Tank
hasbeenlledto
the“MAX”level.
Step 1:PlugtheBrewerintotheACoutlet.
Step 2: RemovetheDripTrayfromtheBrewer
and place a large container of at least
70oz(2.0L)underthedrinksdispensearea.
TheheightoftheBrewHeadheightcanbe
adjusted if necessary by pressing the button
onthesideoftheBrewHeadandslidingitup
or down.
Step 3:Pressandholddownthe‘HOTCHOCOLATE’and
‘HOTWATER’selectionbuttons
Step 4: While continuing to hold down the two buttons
settheswitchonthebackoftheBrewertothe‘ON’
position.
70floz
(2,0L)
Step 5: When the indicator lights of the two buttons being held illuminate,
releasethemandthe‘HOTWATER’indicatorlightwillilluminate.
Ifthesestepsarecompletedsuccessfullythe‘HotWater’indicatorlightwill
nowbeonsteadily.TheBrewerisnowreadytobeginthePRIMEcycle.
Step 6:NowPressthe‘HOTWATER’buttontobeginthePRIMEcycle.
PRIMING YOUR BREWER
Note:
The priming cycle will be paused if the machine detects that a freshpack is inserted, the Pack Door
is opened or the water level is low. Ensure that the Pack Door is closed and no freshpack is present
andtheColdTankislledwithCOLDwater.Resumetheprimingcyclebypressingthe‘HotWater’
button.
Ifbrewerisswitchedobeforetheprimecycleiscompletedtheentireprocessmustberepeated.
IftheBrewerdidnotenterprimingmodesuccessfully,the‘HOTCHOCOLATE’and‘HOTWATER’
indicator lights will flash quickly in unison.
Ifthishappens,switchotheBrewerandrepeatsteps3-5untilthe‘HOTWATER’indicatorlightis
on steadily.
TheBrewerwillnotenterprimingmodeifthePackDoorisopenorafreshpackhasbeeninserted.
TheBrewerwillstarttopumpwater,andthe‘HotWater’indicatorlightwillashslowly.Afterseveral
seconds water will be dispensed into the container. The water jet may be seen to ‘splutter’ for a short
while at the start, this is normal.
TheBrewerwillautomaticallystoppumpingafterabout2minutesafterwhichthePrimecycleis
complete.TheBrewerwillpumpapproximately60oz(1.7L)ofwaterintothecollectingcontainer.
The system is now primed and will begin to heat the water. While the water is heating, all this
indicator lights will flash slowly. When complete all the indicator lights will be on steadily.
YourBrewerisnowreadytostartmakingdrinks.
Note: Priming can be pausedandresumedbypressingthe‘HOTWATER’button.

7
GETTING THE MOST FROM YOUR BREWER
PURE WATER FOR THE FINEST TASTING BEVERAGES EVERY TIME
Foragreat-tastinghotbeverageineverycup,replacetheFLAVIA®ltereverysixmonths.
FLAVIA®ltercartridgeswillhelpprotectyourFLAVIA®CREATIONTMBrewerandextenditslife.
Theorganicionexchangersandactivatedcharcoalwithinthelterreduceheavymetalsandother
contaminants, as well as substances such as chlorine, which could impair the flavor and aroma
ofyourhotbeverage.Theltergoesstraightinthereservoiranddoesnotrequireanyadditional
accessoriestoinstall.Italsodoesnottakeuptakeupanyextraworktopspace.
Pleasereferto‘WATERFILTERREPLACEMENT’sectionofthisguideforinformationonhowto
replaceorobtainanewWaterFilter.
Ifunopened,yourpackswillremainfreshandcontinuetomakeexcellentdrinksrightuptothe
best before date shown on the back of the pack.
• Packsshouldbestoredinacooldryplace.
• Packsshouldnotbestoredinarefrigeratororfreezer.
SELECTING YOUR CUP
Toavoidspillageorburns,pleaseensurethatyoualwaysusethecorrectsizecupormug.This
shouldgiveaminimaldistancefromtherimofthecuptotheundersideofthelter-packwhen
inserted. To minimise vending mess please avoid rounded bottom cups.
PACKS
BREW HEAD ADJUSTMENT AND TRAVEL MUG FACILITY
YoucaneasilyadaptyourBrewerto
accommodate your favourite mug or
cup by simply adjusting the height of
theBrewHead.TheDripTraycanalso
be removed to accommodate your
travel mug.
Note: PositiontheBrewHeadclosetothetopofyourcupormugtominimizethesplash
fromtheBrewer.
CAUTION:Pleasebeawarethattheminimumcupsizeforuseyour
Brewertoavoidoverowis11oz(325ml).
1. TheuseofFLAVIA®papercupsisrecommended.Alternativecupsmay
beusedprovidingtheyareofsimilarproportionstoref.Handweigha
minimumof5g.
2. Useofcupsthatdonotmeettherecommendedcriteria
may result in overflow or mess creation.
3. Forfurtheradviceoncupsandmugssuitableforusewithyour
BrewerpleasecontactcustomerserviceoryourlocalFLAVIA®supplier.
(Ref. H)
3.3” (83mm)
2.2” (56mm)
4.1”(104mm)
Minimum
weight 5g
8
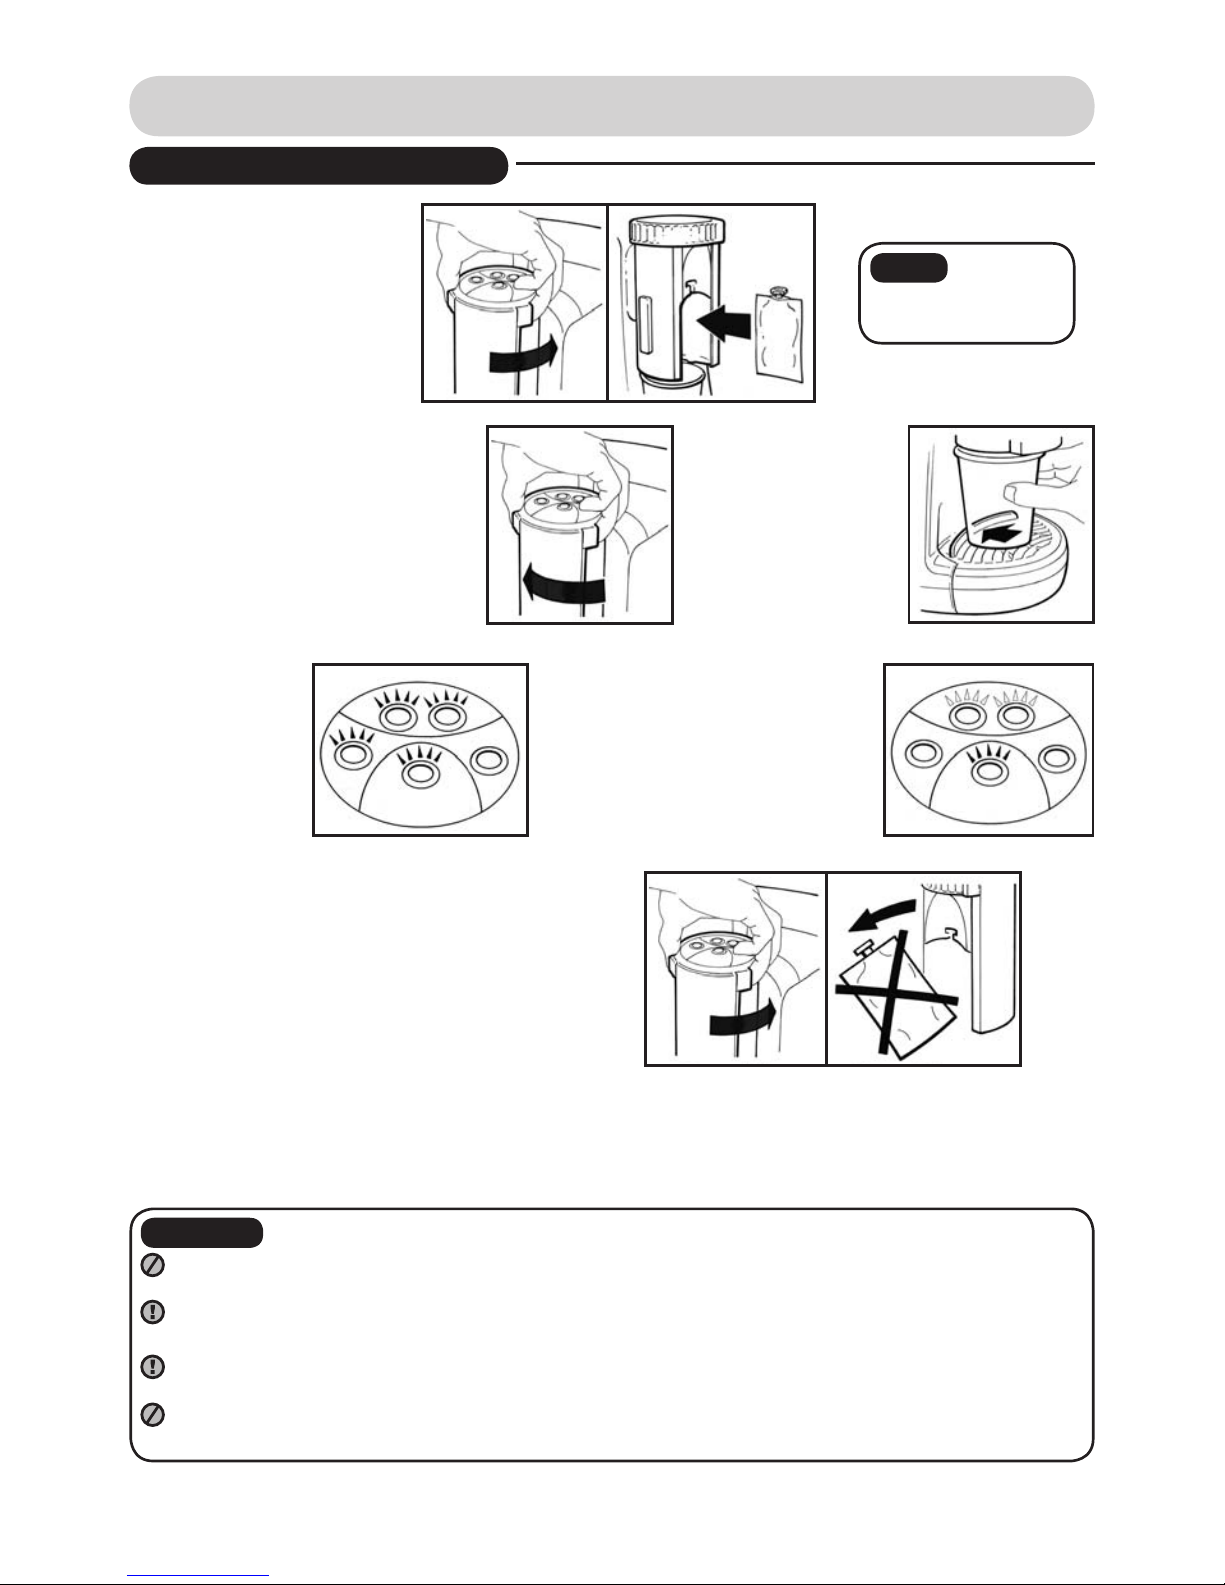
PREPARING A BEVERAGE/DRINK
5.
When brewing is complete,
the indicator lights will
flash in an arrow pattern
to indicate that the used
freshpack should be removed.
CAUTION:
• Do not open the Pack Door, attempt to remove the pack or press drink selection buttons
before brewing is complete, this will interrupt the brewing process.
• Pressing the drink selection button during brewing will interrupt the brewing process. The
BrewerwillNOTcompleteaninterruptedbrew.
• Take care when removing the freshpackafteraninteruptedbrewasitwillbeHOT,andmay
dripHOTwater.
• Do not remove the Cold Tank from the product during brewing as this will reduce the
volume of the drink and subsequent drinks brewed.
Aftereachvend,theboilerwillheatwateruptheoptimumtemperatureforthenextdrinktobe
brewed.DuringthistimethealltheIndicatorlightswillashslowly.Theremaybeashortdelay
beforethenextbeveragecanbebrewed.WhentheBrewerisreadyalltheindicatorlightswillbe
on steadily.
Note: Always
useGripRingto
operate Pack Door
4.
Press the drink
selection button
of your chosen
freshpack.
6.
TurntheGripRinganti-clockwisetoopenthe
Pack Door and remove the used freshpack for
disposal.
Take care when removing the pack
immediately after the brewing process as it
will be HOT.
1.
OpenthePackDoorby
turningtheGripRinganti-
clockwise and insert your
chosen freshpack.
2.
Close Pack Door by turning the
GripRingclockwise.Pleasenote
that some resistance may be felt
as the Pack Door is closed. This is
normal;thisstepis“piercing”the
pack seal.
3.
Place a cup
centrally on the
CupStandand
push back until
it touches the
backstop.
BREWING BEVERAGES

BREWING A CAPPUCCINO/LATTE
9
4.
Press the
Cappuccino/
Latte drink
selection
button.
1.
OpenthePack
Door by turning
theGripRing
anti-clockwise
and insert a
Cappuccino/Latte
Swirlpack.
2.
Close Pack
Door by
turning he
GripRing
clockwise.
3.
Place a cup
centrally on the
CupStandand
push back until
it touches the
backstop.
6.
OpenthePackDoorbyturningtheGripRinganti-clockwiseand
removetheCappuccino/Latteswirlpack.Insertacoeefreshpack
andclosethePackDoorbyturningtheGripRingclockwise.Please
note that some resistance may be felt as the Pack Door is closed. This
isnormal;thisstepis“piercing”thepackseal.
8.
Whenbrewingiscomplete,TurntheGripRing
anti-clockwise to open the Pack Door and remove
the used freshpack for disposal.
HOT WATERFACILITY
Withnofreshpackinplace,pressandholdthe‘HOTWATER’button.Hotwaterwillbegintoow
whilstthebuttonispressed.Releasethebuttontostopthewaterow.Thehotwaterdispensewill
automaticallystopafteramaximumvendvolumehasbeenreachedifthebuttonisnotreleased.
CappuccinoandLattedrinksaremadeusingtwopacks,rstlyaCappuccino/LatteSwirlpack
followedbythecoeeofyourchoice.It is important that the packs are placed in the correct
order. Please see the packs for further information.
5.
Afterbrewingthe
Cappuccino/Latte swirl
pack the indicator lights
will flash in an arrow
pattern.
7.
Press the Cappuccino/Latte swirl drink
selection button and your drink will now be
freshlylteredandbrewedintoyourcup.
Note:
Alwaysuse
GripRingto
operate Pack
Door.
CAUTION:
Take care when
removing pack
immediately after
brewing as it will
beHOT.
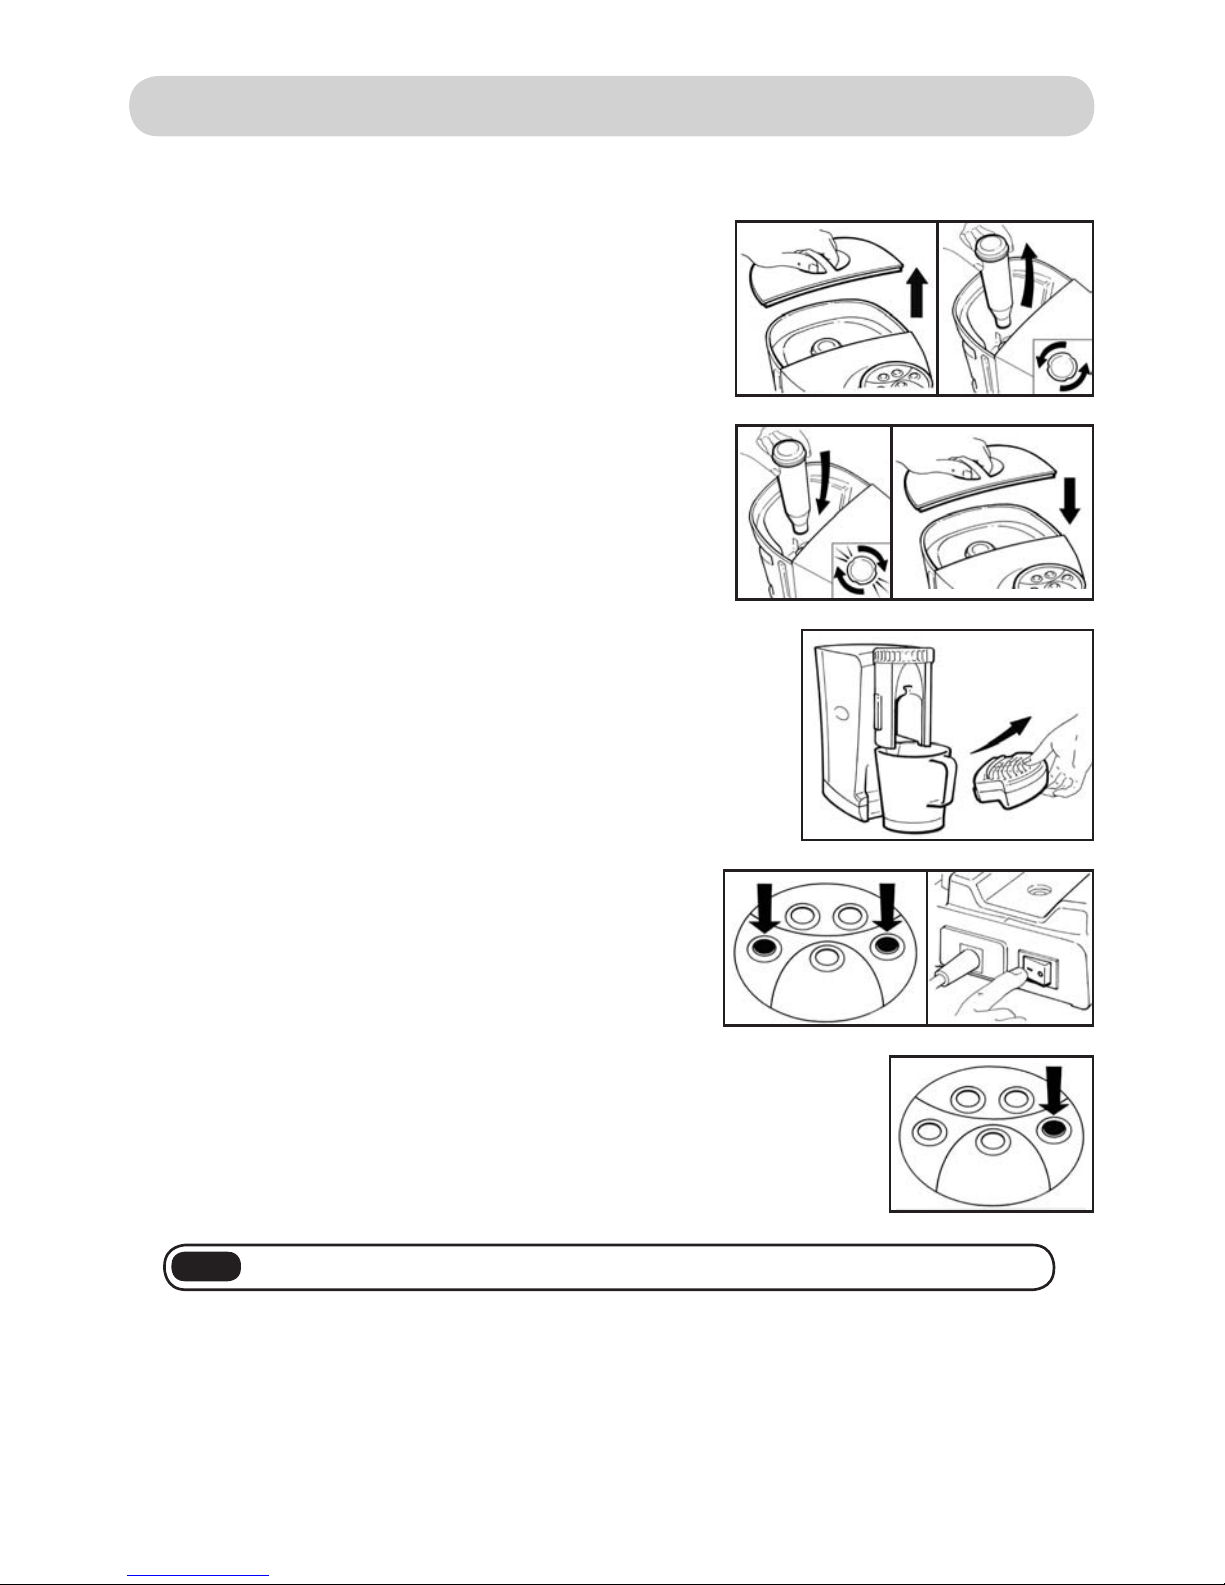
Step 2: SeparatetheDripTrayandCup
Standandcleantheminwarmsoapy
water. Wipe the surrounding area of the
Brewercleanwithacleandampcloth.
Step 3: Reassembleandreplace
Drip Tray.
10
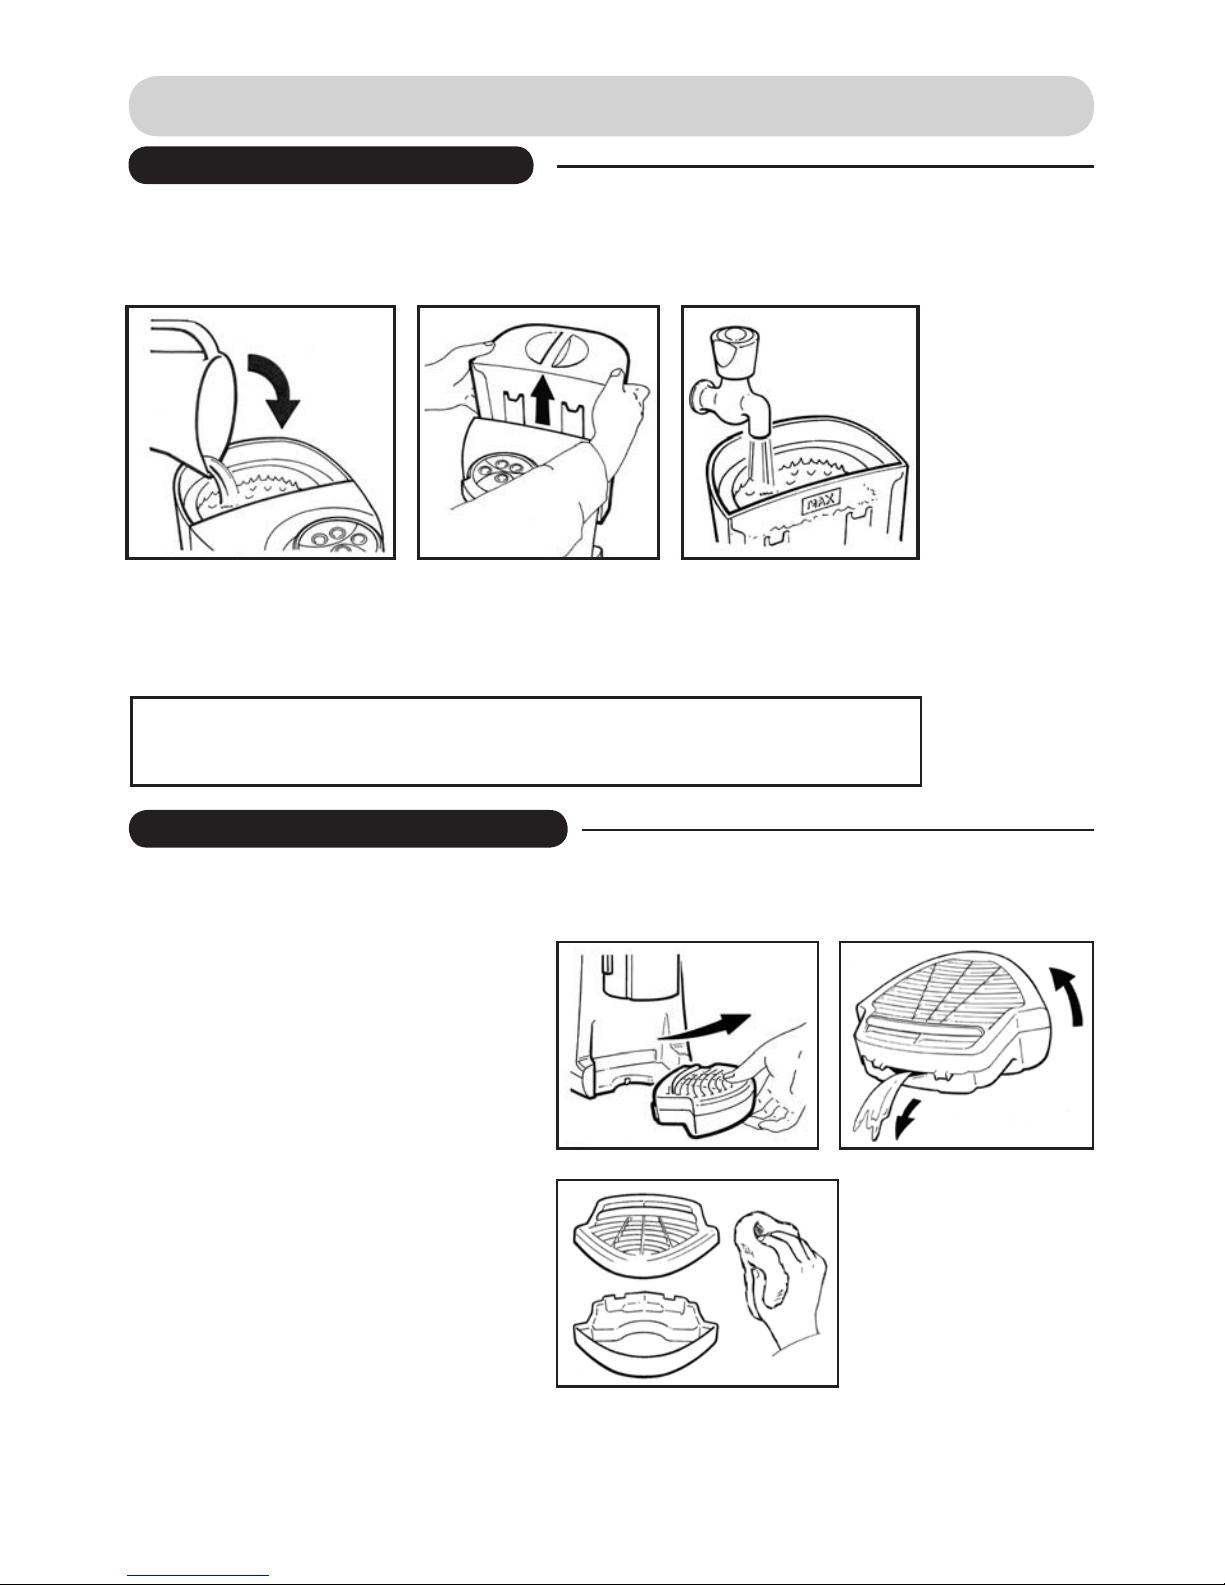
DAILY CARE OF YOUR BREWER
REFILLING WITH WATER
EMPTYING THE DRIP TRAY
Step 1: Lift out the Drip Tray and drain
liquid contents.
WhentheBrewerrequiresrellingwithwater,alltheindicatorlightswillashquickly.
TheColdTankcanbelledwithajugordetachedfromtheBrewerandlleddirectlyfroma
faucet.
Carefullyllthereservoirwithdrinkingwater(nohigherthanthe“MAX”level)
During operation the water level may be monitored via the water level indicators on either side of
the Cold Tank.
YourBrewerdoesnottellyouwhenthe Drip Tray is full, so make sure that you check it regularly.
TheDripTrayandCupStandaredishwasher safe.
Volumeofwaterrequiredtollto‘MAX’levelfrom‘LOW’levelindication.
WithFilterFitted=108oz(3,2L)

11
WEEKLY CARE OF YOUR BREWER
WipetheoutsideoftheBrewerwithacleandampcloth.
GENERAL CLEANING
To maintain cleanliness of the brew chamber the Pack Door can be removed. The Pack Door
shouldonlybettedandremovedinopenposition.
The Pack Door is dishwasher safe.
• Donotwashwithexcessiveamountsofwater,it
couldgetintotheBrewercausingamalfunction.
• Do not use strong detergents.
• Donotapplyanyproductsthatcontainbenzene,
theymaydamagethesurfaceofyourBrewer.
• Do not clean with brushes or scouring agents as this
maydamagethesurfaceofyourBrewer.
• Do not use cleaning agents as they may leave a
residueontheBrewer.
• Take care not to get soapy water into the water tank,
asthiswillaectdrinktaste.
PACK DOOR REMOVAL
CAUTION: DonotattempttooperatetheBrewerwithoutthePackDoorFitted.
Step 1: Openthe
Pack Door by turning
theGripRinganti-
clockwise.
Step 2: Pull the Pack
Door straight down
to remove it from the
BrewHead.
Step 3:Tore-tthe
Pack Door, push the
door straight up until a
click is felt.
12
WATER FILTER REPLACEMENT
Therecommendedreplacementfrequencyisapproximately1600beveragesorsixmonths,
whichevercomesrst.PleasecontactCustomerServicefordetailsonhowtoorderreplacement
FLAVIA®Filters.
Step 2:Insertthereplacementlterandrotateclockwise
toengagewiththebayonetttinginsidethecoldwater
reservoir.ReplacetheColdTankLid.
Step 3: Thenewlterwillneedtobe‘Flushed’.RemovetheDrip
TrayfromtheBrewerandplacealargecontainerinthedispense
area.AdjustBrewHeadheightifnecessarybypressingthebutton
onthesideoftheBrewHeadandslidingitupordown.
Step 4: EnsurethattheBrewerislledwithwateruptothe
“MAX”level,toensurethatthereisenoughwaterintheBrewerto
completethe‘Flush’cycle.
Step 1:RemovetheColdTankLidtoaccesstheWaterFilter.
Removetheusedlterbyturningitcounter-clockwise.
Step 6:NowPressthe‘HotWater’buttontobegintheFLUSHcycle.The
Brewerwillstarttopumpwater,andafterseveralsecondswaterwillbe
dispensed into the container. The water jet may be seen to ‘splutter’ for a
short while at the start, this is normal.
Step 5: TurntheBrewerothenpressandholdthe‘HOT
CHOCOLATE’and‘HOTWATER’buttons.
TurntheBrewerbackonwhilstcontinuingtoholdthe
twobuttonsastheBrewerpowersup.
When the indicator lights of the buttons being held down
illuminate,releasethemandthe‘HotWater’indicator
light will illuminate.
TheBrewerwillautomaticallystoppumpingafterabout2minutesafterwhichtheFlushcycle
iscomplete.TheBrewerwillpumpapproximately60oz(1.7L)ofwaterintothecollecting
container.
Thesystemisnowushedandwillbegintoheatthewater.Alltheindicatorlightswillashslowly
whilethewaterheats.Whencompletealltheindicatorlightswillbeonsteadily.YourBreweris
now ready to continue making drinks.
70floz
(2,0L)
Note: The flush cycle can be pausedandresumedbypressingthe‘HOTWATER’button.

13
PERIODIC MAINTENANCE
Regularde-scalingwillprolongthelifeofyourBrewerandwillensureoptimalbrewing
performanceforthelifeofyourBrewer.ItisrecommendedthattheBrewerbede-scaledatleast
onceeverysixweeks.
DESCALING YOUR BREWER
CAUTION: Take care when removing the pack immediately after the
brewingprocessasitwillbeHOT.
Step 1:RemovetheWaterFilterfromtheColdTank.
Step 2: FilltheColdTankuptothe“MAX”indicationlinewithwhitewine
vinegar or descaler diluted in water according to the descaler manufacturer’s
guidelines.
Step 3:RemovetheDripTrayfromtheBrewerandplacealarge
container in the dispense area.
Step 4: TurnontheBrewerandwaituntilthedrinkindicator
lights are lit steadily.
Step 6: Pressthe‘REGULAR’buttonandallowthemachineto
complete a brew cycle.
Step 7: OpenthePackDoorandremovethepack.
IftheBrewerhasbeenusedandthereforeprimed,itshouldonlybeusedorstoredinafrostfree
environment to prevent it from becoming damaged.
BeforestoringtheBreweryoushouldremoveandemptytheColdtank.Afteraperiodofstorage
or if the system is left unused for a period greater than one week we recommend that you rinse
theColdTankthoroughlyandperforma‘FLUSH’cyclewithfreshcleanwatertocleansethe
Brewer.
STORAGE
Step 5: OpenthePackDoorandinsert
aUSEDhotchocolateorswirlpack
intotheBrewHeadandclosethePack
Door.
DO NOT USE a COFFEE or TEA pack.
Repeatsteps5-7untilthewaterreservoirisempty.Iffurtherdescalingisrequired,relltheColdTank
withaNEWmixtureofdescalerorwhitewinevinegarandrepeatsteps5-7untilColdTankisempty.
AfterdescalingyourBrewerwerecommendushingyourBrewerwithfreshwaterusingthe
‘Flush’cycledescribedinthesection‘WATERFILTERREPLACEMENT’,threetimes.
AfterushingyourBrewerwithwater,replacetheWaterFilterandDripTray.
70floz
(2,0L)

14
TROUBLE SHOOTING
ThesophisticateddesignofyourFLAVIA®BrewermakesitunlikelythatyourBrewerwilldevelopafault.
However,ifyouarehavingtroubleusingyourBrewerpleaserefertothetablebelowforadviceonhow
toresolveproblemsforyourself.Ifyourproblemisnotlistedbelowpleasecontactcustomerservice.
The Brewer does not operate.
The 5 Indicator Lights flash quickly.
The ‘HOT CHOCOLATE’ and ‘HOT WATER’
Indicator Lights flash quickly in unison.
The Brewer will not enter the priming mode.
The ‘HOT WATER’ indicator light is on
steadily and the machine is not making any
noise.
The 5 Indicator Lights flash slowly.
The Brewer does not brew beverages after
pressing selection button.
The Brewer does not deliver hot water after
pressing and holding ‘HOT WATER’ button.
None of the Indicator Lights are illuminated.
The REGULAR and OVER ICE buttons
flash in an alternating pattern with the
CAPPUCINNO/LATTE button.
Check that the Plug is correctly inserted in to
the socket.
CheckthatthePowerSwitchisintheON
position.
CheckthattheColdTankiscorrectlytted
tothemachineand/orlledtothe“MAX”
indication line.
TheBrewerhasnotbeenprimed.
TheBrewermustbeprimedwithwater
beforeusingitforthersttime.
PrimetheBrewerbyfollowingthe
instructionsonpage6.
DONOTswitchtheBreweroduring
priming.Iftheprimecycleisnotcompleted
fully it must be re-started.
Ensure there is no pack inserted and that the
Pack Door is fully closed.
Followtheinstructionscarefullyonpage6to
enter the priming mode.
The priming or flush cycle has been paused.
Pressthe‘HOTWATER’buttontoresumethe
priming cycle.
TheBrewerisheatingthewatertothe
optimumtemperatureforbrewing;thismay
takeupto90seconds.
Ensure that the pack in inserted fully and that
the Pack Door is fully closed.
Ensure there is no pack inserted and that the
Pack Door is fully closed.
Check that the Plug is correctly inserted in to
thesocketandthatthePowerSwitchisinthe
ONposition.
IftheBrewerhasseennoactivityfor120
minutesitwillenter‘PowerSave’mode.
To‘wake’theBrewerpressanySelection
ButtonoropenthePackDoor.
This is indicates that a pack inserted into the
Brewermustberemoved.Removethepack
tocontinueusingtheBrewer.
PROBLEM SOLUTION

TROUBLE SHOOTING
Partsavailableassparesareidentiedonpage5withanasterisk*.Pleasecontactcustomer
servicetopurchasesparesforyourBrewer.Besidesthepartsidentied,theBrewerhasno
other user-serviceable parts.
SPARE PARTS
15
The Indicator Lights display a sequence
other than those mentioned above.
The Pack Door cannot be closed.
The pack cannot be pierced.
The Brewer makes a “pop” sound shortly
after the Selection button is pressed.
The amount of beverage dispensed is
repeatedly too small/high and/or is
dispensing too slowly
Water leaks from the Brewer.
Liquid splashes out of, or misses the cup
altogether.
Contact Customer service.
CheckthatthePackDooriscorrectlytted
totheBrewer.Refertopage11forfurther
information.
Note: When closing the Pack Door after
inserting a pack, you will feel some resistance.
Closing the Pack Door will pierced the seal of
the freshpack and is perfectly normal.
Check that the pack is correctly inserted, and
thatthePackDooriscorrectlyttedtothe
Brewer.
Occasionallya“pop”maybeheardatthe
startofabeveragebeingbrewed;thisis
normalandisconrmationoftheoptimal
freshness of your beverage.
TheBrewerisdesignedtobeusedwiththe
WaterFiltersupplied.Ensurethisisinstalled
intheColdTank.ReplacementWaterFilters
can be purchased by contacting customer
service.
The boiler and internal parts of the machine
mayhavebecomeblockedwithscale.Refer
tothesectionDE-SCALINGYOURBREWER
onpage13forfurtherinformation.
Ensure the Pack Door is fully closed when
brewing beverages.
EnsuretheColdTankhasnotbeenlled
beyondthe“MAX”indicationline.
Ensure the Drip Tray is not overflowing.
Inallothercases,switchoandunplugthe
Brewerimmediatelyandcontactcustomer
service.
EnsuretheBrewHeadisasclosetothetop
of the cup as possible during brewing.
Ensure your cup or mug is placed in the
centreoftheCupStand.

CONTENTS
PAGE
Conseils de sécurité ............................................................... 1, 2
Installation de votre appareil à boisson............................ 3
Composition de l’appareil à boissons................................ 4
Installation de l’appareil à boissons ................................... 5, 6
Comment profiter au maximum de l’appareil.................. 7
Préparer une Boisson............................................................. 8
Préparer un Cappuccino/Latte............................................ 9
Entretien quotidien ................................................................ 10
Entretien hebdomadaire ....................................................... 11
Remplacer le filtre à eau ....................................................... 12
Entretien périodique.............................................................. 13
En cas de problèmes.............................................................. 14, 15

CONSEILS DE SECURITE
OPERATION GENERALE
ChezMarsDrinks,nousavonslasécuritéàcœurpourtouslesaspectsdelaconception,dela
fabrication,del’installationetdelaréparationdenosproduits.
Cesavertissementssontfournisdansl’intérêtdelasécuritédechacun,and’éviterlerisquede
dommagesmatérielsoucorporelsauxpersonnesutilisantl’appareiloun’importequellesautres
personneset/oupropriété.Liseztouteslesinstructionsdesécuritésoigneusementetassurez-vous
quetoutespersonnesimpliquéesdanslenettoyageetl’utilisationdel’appareilleslisentégalement.
Lesconserverpourfutureréférence.
Lesystèmeaétéconçuetfabriquéconformémentàlalégislationrelativeàlasécuritéetaux
règlements de la EMC.
• Cesystèmedoitêtreutiliséàl’intérieurseulement.Neleplacezjamaisàl’extérieur.Sil’appareila
étéexposéaugel,communiquezavecleserviceàlaclientèle.
• Onrecommandedeplacercesystèmeàunendroitoùlatempératureambiantesesitueentre
+41°F(+5°C)et+86°F(+30°C).
• N’installezpascetappareillàoùunjetd’eaupourraitêtreutilisé.
• Placezcetappareilhorsdeportéedesenfants.Lesenfantsetlespersonnesauxfacultésréduites,
qu’elles soient physiques, sensorielles ou mentales, et les personnes qui ne connaissent pas
bien cet appareil ne devraient s’en servir que sous supervision. Le fait de ne pas observer ces
précautionspeutcauserdesbrûlures,deschocsélectriquesoud’autresblessures.
• Assurez-vousquel’arrièredel’appareilpeutêtreaccédéfacilementpourpermettrel’isolementde
l’alimentationélectrique.
• N’utilisezpasl’appareilpourautrechosequecepourquoiilaétéconçu.Defaçonàéviterune
défaillancefonctionnelleoudesdommagescorporels.
• Neplacezpasl’appareiloulecordonélectriqueprèsd’unesourcedechaleur(gazouélectrique),
risquededommagesmatériels.
• N’utilisezjamaisl’appareilàunealtitudedeplusde6500ft(2000m).Risquededéfaillance
fonctionnelle.
• Assurez-vousquel’appareilestpositionnésurunesurfaceplane,situéaumoinsà75mmdurebord.
• Neplacezpaslecordonélectriqueau-dessusdesmeublesoudestablesoùilpeutêtreatteintpar
desenfantsouprovoqueruntrébuchementinvolontaireetrisquededommagescorporels.
• Netentezjamaisdechangerlescaractéristiquestechniquesdel’appareilnidemodierlessystèmes
dequelquefaçonquecesoit.Toutetentativeencesenspeutcauserunincendieoudesblessures.
• L’usaged’accessoiresnonrecommandésparlefabricantdel’appareilpeutentraînerunincendie,
unchocélectriqueoudesblessures.
• Netentezenaucuncasd’eectuerdesréparationssurcesystème.Risquedeblessuresoude
défaillancefonctionnelleAppelezleserviceclientèle.
• Defaçonàprotégercontreleschocsélectriques,toujoursdébrancherl’appareillorsqu’iln’estpas
utiliséetavantlenettoyage
• Pourdébrancherl’appareil,éteignezle(“0”surl’interrupteur)puisretirezlacheélectriquedela
prise de courant.
• Netouchezpaslessurfaceschaudes,laissezl’appareilrefroidiravantdereplaceroud’enleverles
partiesamoviblesetavantlenettoyage.Risquedebrûlures.
• Nenettoyezquelesendroitsspéciquementindiquésdanslesinstructionsd’entretiensdefaçonà
éviterd’endommagerl’appareil.
• Nemettezjamaistropd’eaudansl’appareil,carcelapourraitentraînerunchocélectrique.
1

2
• N’utilisezpasl’appareilavecdel’eauadoucieausodium.L’eauadouciepeutaecterlapression
danslesachetetledéchireravecrisquedebrulures.
• Nemettezpasdelait,d’alcoolniquoiquecesoitd’autrequedel’eaufroideetfraîchedansle
réservoird’eau.Celapourraitnuirealasécuritéetendommagerasérieusementl’appareil.
• Videzleréservoiràeaufroideetgardezl’appareilenpositionverticalepourletransportet
l’entreposage.Neledéplacezpasquandilestremplid’eau.L’eaurenverséepeutrendreles
surfaces dangereusement glissantes.
• N’utilisezjamaisdesachetsquiontétéentreposésauréfrigérateurouaucongélateurcarils
peuventsedéchirerdurantleurutilisation.
N’utilisezjamaisdesachetsquisemblentendommagésdequelquefaçonquecesoit.Carils
peuventsedéchirerdurantleurutilisation.
• N’utilisezjamaisl’appareilsansplacezungobeletsurleportegobeletendessousdel’arrivéed’eau.
• Assurez-vousquelegobeletoulatasseaunetailleadéquatepourlaboissonquevouspréparez.
Autrement,lecontenantpourraitdéborder,cequipeutcauserdesbrûlures.
• Neretirezjamaislegobeletpendantlecycledepréparation,carcelapourraitcauserdesbrûlures.
• N’ouvrezjamaislaporteducompartimentàsachetspendantlecycledepréparation,carcela
pourraitcauserdesbrûlures.
• Nepenchezjamaisetnesecouezjamaisl’appareil,etneletournezpasàl’envers,carcelapourrait
entraînerunrenversementouendommagersérieusementl’appareil,oulesdeux.
• Respectezlesrecommandationslocalesconcernantl’inspectionrégulièreetl’évaluationdecetappareil.
• Lesystèmeestsoumisàuntestashavantdequitterlelieudefabrication.Destestsashrépétés
peuvent endommager l’isolant de l’appareil.
ALIMENTATION EN ELECTRICITE ET FIL ELECTRIQUE
• Nefaitesjamaisrienquipuisseendommagerleloulacheélectriques(commelesmodier,placer
desobjetschaudsoulourdsdessus,lesplier,lesétireroulestordre).Sionsesertdel’appareilalors
qu’ilestendommagé,uncourt-circuitouunincendiepeutenrésulter.Sil’appareilabesoind’être
réparé,veuillezcontacterleresponsablelocalduserviceàlaclientèle.
• N’immergezpaslecordonélectrique,lapriseoul’appareildansl’eauoutoutautreliquide,pour
protégercontrelefeu,leschocsélectriquesetlesdommagescorporels.
• Nefaitesfonctionneraucunappareildontleloulacheélectriquesontendommagésouquia
connuunedéfaillance,ouquiaétéendommagédequelquefaçonquecesoit.Contactezleservice
clientèle ou le point de vente.
• Cetappareildoitêtremisàlaterre.Nepaslefairepeutentraînerunchocélectrique.
• Assurez-vousquelacheestcorrectementinséréedanslaprisedecourant.Unechemalbranchée
peutcauserunchocélectriqueouproduiredelachaleuretentraînerunincendie.Nevousservez
pasd’unecheendommagéenid’uneprisedecourantoùlachenetientpasbien.
• Nebranchezpasd’autresappareilssurunemêmeprisedecourant.Autrement,lachaleurproduite
peut causer un incendie.
• Nebranchezetnedébranchezjamaisl’appareilavecdesmainsmouillées.Celapourraitoccasionner
unchocélectrique.
• Retirezlachedelaprisedecourantalternatifseulementquandl’appareilestéteint(quandiln’est
pasenusage).Sil’isolantsedétériore,celapeutentraînerunchocélectriqueouunincendie,oules
deux.
• Quandvousdébranchezl’appareil,tireztoujourssurlache–PASSURLEFIL!
CONSEILS DE SECURITE
This manual suits for next models
1
Table of contents
Languages:


