BRAVILOR BONAMAT Bolero XL User manual

1
2
3
4
5
6
712
13
891011
14
15
17.7
17.6
17.5
17.4
17.1
17.2
17.3
22.1
22.2
22.322.7 22.6 22.5 22.4
16 17 18
19202122
23

316
67
W=40
E=40
455
110
142
574
780
WE
8050

GB
Bravilor Bonamat
Operating Instructions
BOLERO XL
700.403.290A
Bravilor Bonamat
01–2001
Bravilor Bonamat
Pascalstraat 20
1704 RD Heerhugowaard
The Netherlands

GB
All rights reserved.
No part of this document may be copied and/or published by means of printing, photocopying,
microfilming or by any other means whatsoever without the prior written consent of the manufacturer.
This applies equally to the included drawings and/or diagrams.
The information contained in this document is based on general data concerning the construction, materials
characteristics and working methods known to us at the time of publication and therefore we reserve the
right to make changes without notice. For this reason the instructions given should be regarded as a guide
to the installation, use and maintenance of the machine indicated on the front cover.
This document applies to the standard version of this machine. The manufacturer therefore accepts no
liability for any damage arising from specifications that deviate from the standard version of the
machine as delivered to you.
Every possible care has been taken in the production of this document, but the manufacturer accepts
no liability for any errors in this document or for any consequences arising therefrom.
TAKE THE TIME TO CAREFULLY READ THIS DOCUMENT BEFORE USING THE MACHINE.
DURING READING KEEP THE FOLD–OUT OPEN.
ALWAYS KEEP THIS DOCUMENT NEAR THE MACHINE.

GB
ECopyright Bravilor Bonamat B.V. I
version 1.0
PREFACE
Using this document
This document is intended to provide instructions for authorized users qualified technicians to safely
install, use and maintain and repair the machine.
The words ”left”, ”right”, ”front”and ”back”are used in this document to indicate a particular part of the
machine. The point of departure here is the position of the user standing at the operating side.
The position numbers 1.–23. used in this document refer to the figures in the fold–out. On this same
sheet the compositions 17. and 22. are specified in more detail. The further elaborated compositions 4.
and 18. are dealt with in fig.2 and 3 respectively.
Icons and symbols
To the machine the following safety icons and symbols are applied.
WARNING
nRisk of electric shock.
WARNING
nProcedures that can result in serious damage to the machine or in physical injury if they are not
carried out with due care.
In this document the following icons and symbols can be found:
TIP
–Hint, suggestion or advice to carry out certain tasks more easily or neatly.
CAUTION!
–Procedures that can result in damage to the machine, the surrounding area or the environment if
they are not carried out with due care.
WARNING
nProcedures that can result in serious damage to the machine or in physical injury if they are not
carried out with due care.
Related documents
The following related documents are available:
–Bolero XL maintenance manual : 700.703.Mxx
Document code
Document codes consist of two fields:
–Field 1: document number (if required followed by the revision number)
–Field 2: revision date

GB
version 1.0 ECopyright Bravilor Bonamat B.V.
II
Service and technical support
Please contact your dealer for information concerning the specific setting, maintenance or service
activities that fall outside the scope of this document. He will always be happy to help you. When doing
this, always ensure that you have the following details at hand:
–Model code
–Type number
–Serial number
These data can be found on the identification plate. Write down the data of the identification plate in
the intended fields (fig.1 ).
Guarantee conditions
The guarantee conditions applicable to this machine form part of the terms of delivery.
Identification of the machine
MODEL :
TYPE :
VLGNR :
230V
12
4
3
56
50/60HZ 2025W
VHH
PATENTED
Fig. 1 Identification plate
1. Model code
2. Type number
3. Serial number
4. Output capacity
5. Frequency
6. Supply voltage

Table of contents
GB
ECopyright Bravilor Bonamat B.V. III
version 1.0
Preface I. . . . . . . . . . . . . . . . . . . . . . . . . . . . . . . . . . . . . . . . . . . . . . . . . . . . . . . . . . . . .
Using this document I. . . . . . . . . . . . . . . . . . . . . . . . . . . . . . . . . . . . . . . . . . . . . . . . . . . .
Icons and symbols I. . . . . . . . . . . . . . . . . . . . . . . . . . . . . . . . . . . . . . . . . . . . . . . . . . . . . . . . . . .
Related documents I. . . . . . . . . . . . . . . . . . . . . . . . . . . . . . . . . . . . . . . . . . . . . . . . . . . . . . . . . . .
Document code I. . . . . . . . . . . . . . . . . . . . . . . . . . . . . . . . . . . . . . . . . . . . . . . . . . . . . . . . . . . . . .
Service and technical support II. . . . . . . . . . . . . . . . . . . . . . . . . . . . . . . . . . . . . . . . . . . . . . . . . .
Guarantee conditions II. . . . . . . . . . . . . . . . . . . . . . . . . . . . . . . . . . . . . . . . . . . . . . . . . . . . . . . . .
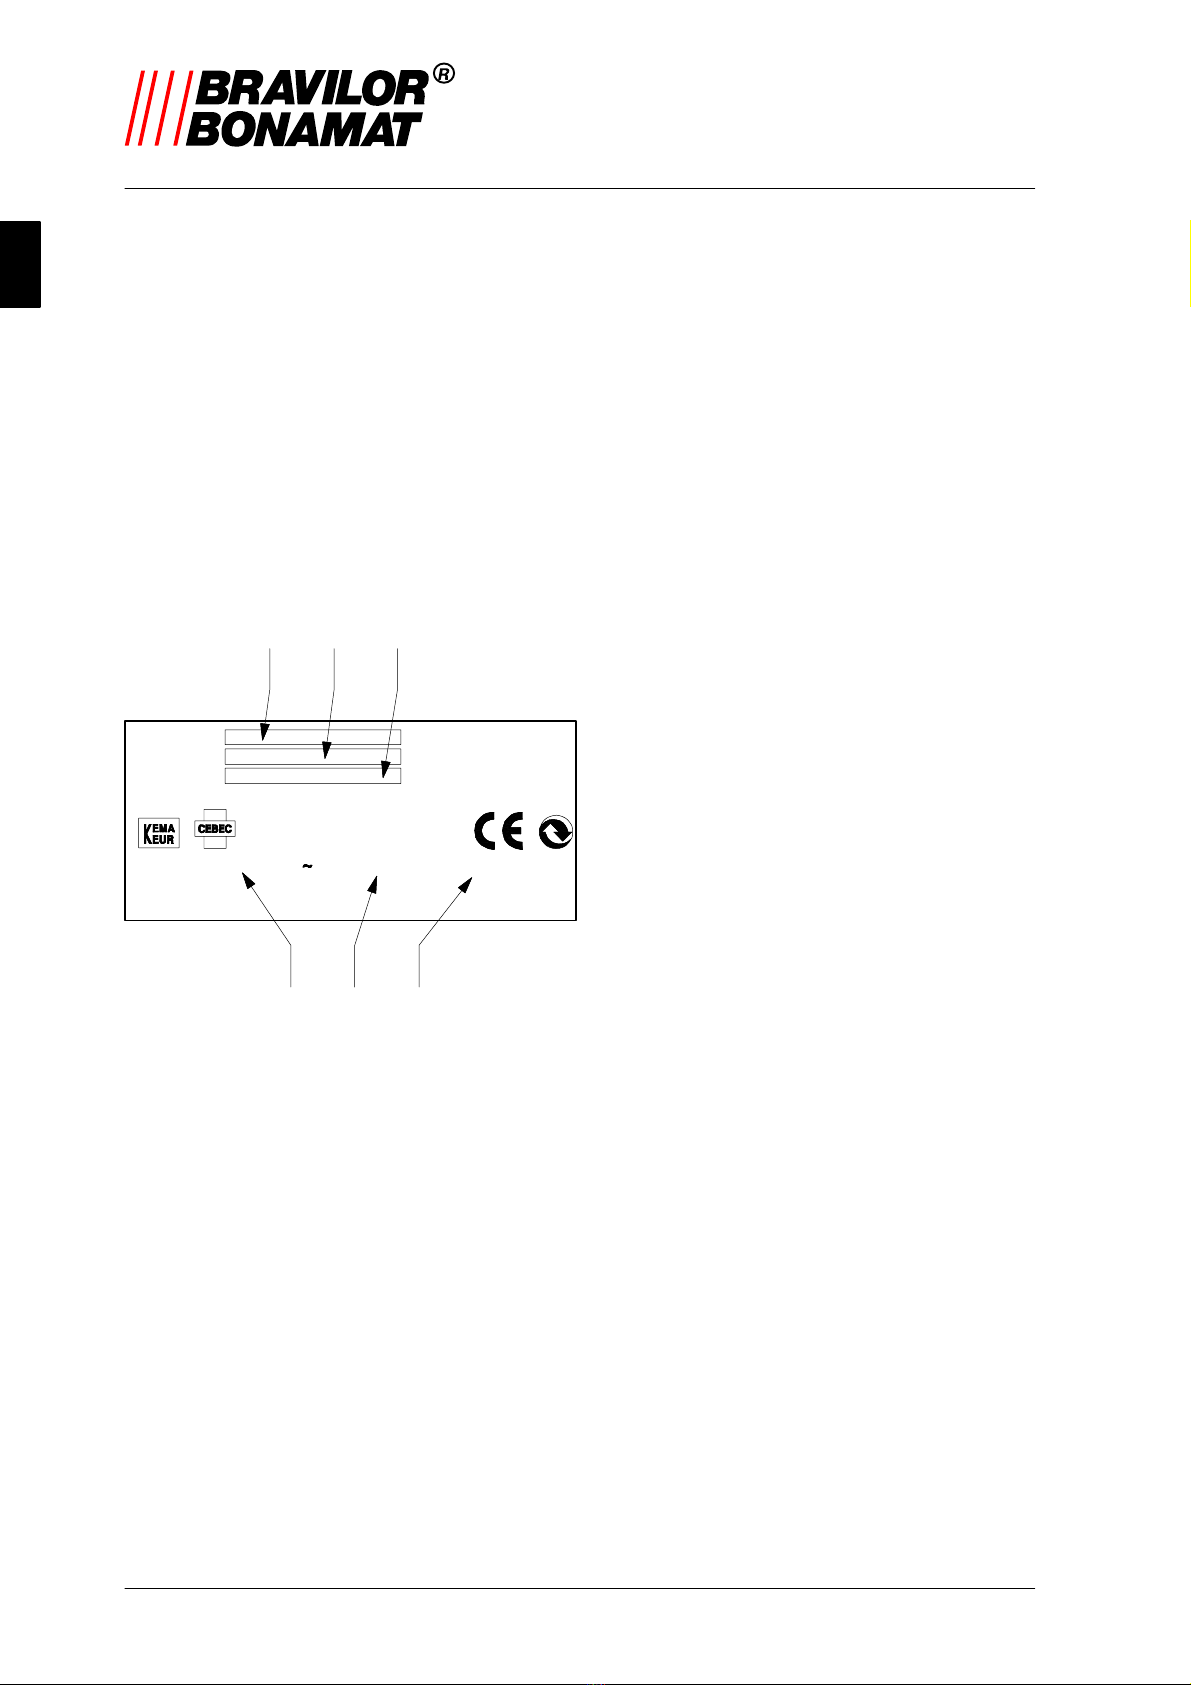
Identification of the machine II. . . . . . . . . . . . . . . . . . . . . . . . . . . . . . . . . . . . . . . . . . . .
Safety instructions and danger warnings VI. . . . . . . . . . . . . . . . . . . . . . . . . . . . . . . . .
General VI. . . . . . . . . . . . . . . . . . . . . . . . . . . . . . . . . . . . . . . . . . . . . . . . . . . . . . . . . . . . . . . . . . . . .
Instructions for use VI. . . . . . . . . . . . . . . . . . . . . . . . . . . . . . . . . . . . . . . . . . . . . . . . . . . . . . . . . . .
Icons and instructions on the machine (if present) VI. . . . . . . . . . . . . . . . . . . . . . . . . . . . . . . .
Users VI. . . . . . . . . . . . . . . . . . . . . . . . . . . . . . . . . . . . . . . . . . . . . . . . . . . . . . . . . . . . . . . . . . . . . . .
Proper use VI. . . . . . . . . . . . . . . . . . . . . . . . . . . . . . . . . . . . . . . . . . . . . . . . . . . . . . . . . . . . . . . . . .
Technical specifications VI. . . . . . . . . . . . . . . . . . . . . . . . . . . . . . . . . . . . . . . . . . . . . . . . . . . . . . .
Modifications VI. . . . . . . . . . . . . . . . . . . . . . . . . . . . . . . . . . . . . . . . . . . . . . . . . . . . . . . . . . . . . . . .
Installation VII. . . . . . . . . . . . . . . . . . . . . . . . . . . . . . . . . . . . . . . . . . . . . . . . . . . . . . . . . . . . . . . . . .
Use VII. . . . . . . . . . . . . . . . . . . . . . . . . . . . . . . . . . . . . . . . . . . . . . . . . . . . . . . . . . . . . . . . . . . . . . . .
Maintenance and repairing failures VII. . . . . . . . . . . . . . . . . . . . . . . . . . . . . . . . . . . . . . . . . . . . .
Safety devices present VIII. . . . . . . . . . . . . . . . . . . . . . . . . . . . . . . . . . . . . . . . . . . . . . . . . . . . . . . .
Machines and the environment VIII. . . . . . . . . . . . . . . . . . . . . . . . . . . . . . . . . . . . . . . . . .
Packaging material VIII. . . . . . . . . . . . . . . . . . . . . . . . . . . . . . . . . . . . . . . . . . . . . . . . . . . . . . . . . . .
Disposal of the machine VIII. . . . . . . . . . . . . . . . . . . . . . . . . . . . . . . . . . . . . . . . . . . . . . . . . . . . . . .
1. Introduction 1. . . . . . . . . . . . . . . . . . . . . . . . . . . . . . . . . . . . . . . . . . . . . . . . . . . . .
1.1 General description 1. . . . . . . . . . . . . . . . . . . . . . . . . . . . . . . . . . . . . . . . . . . . . . .
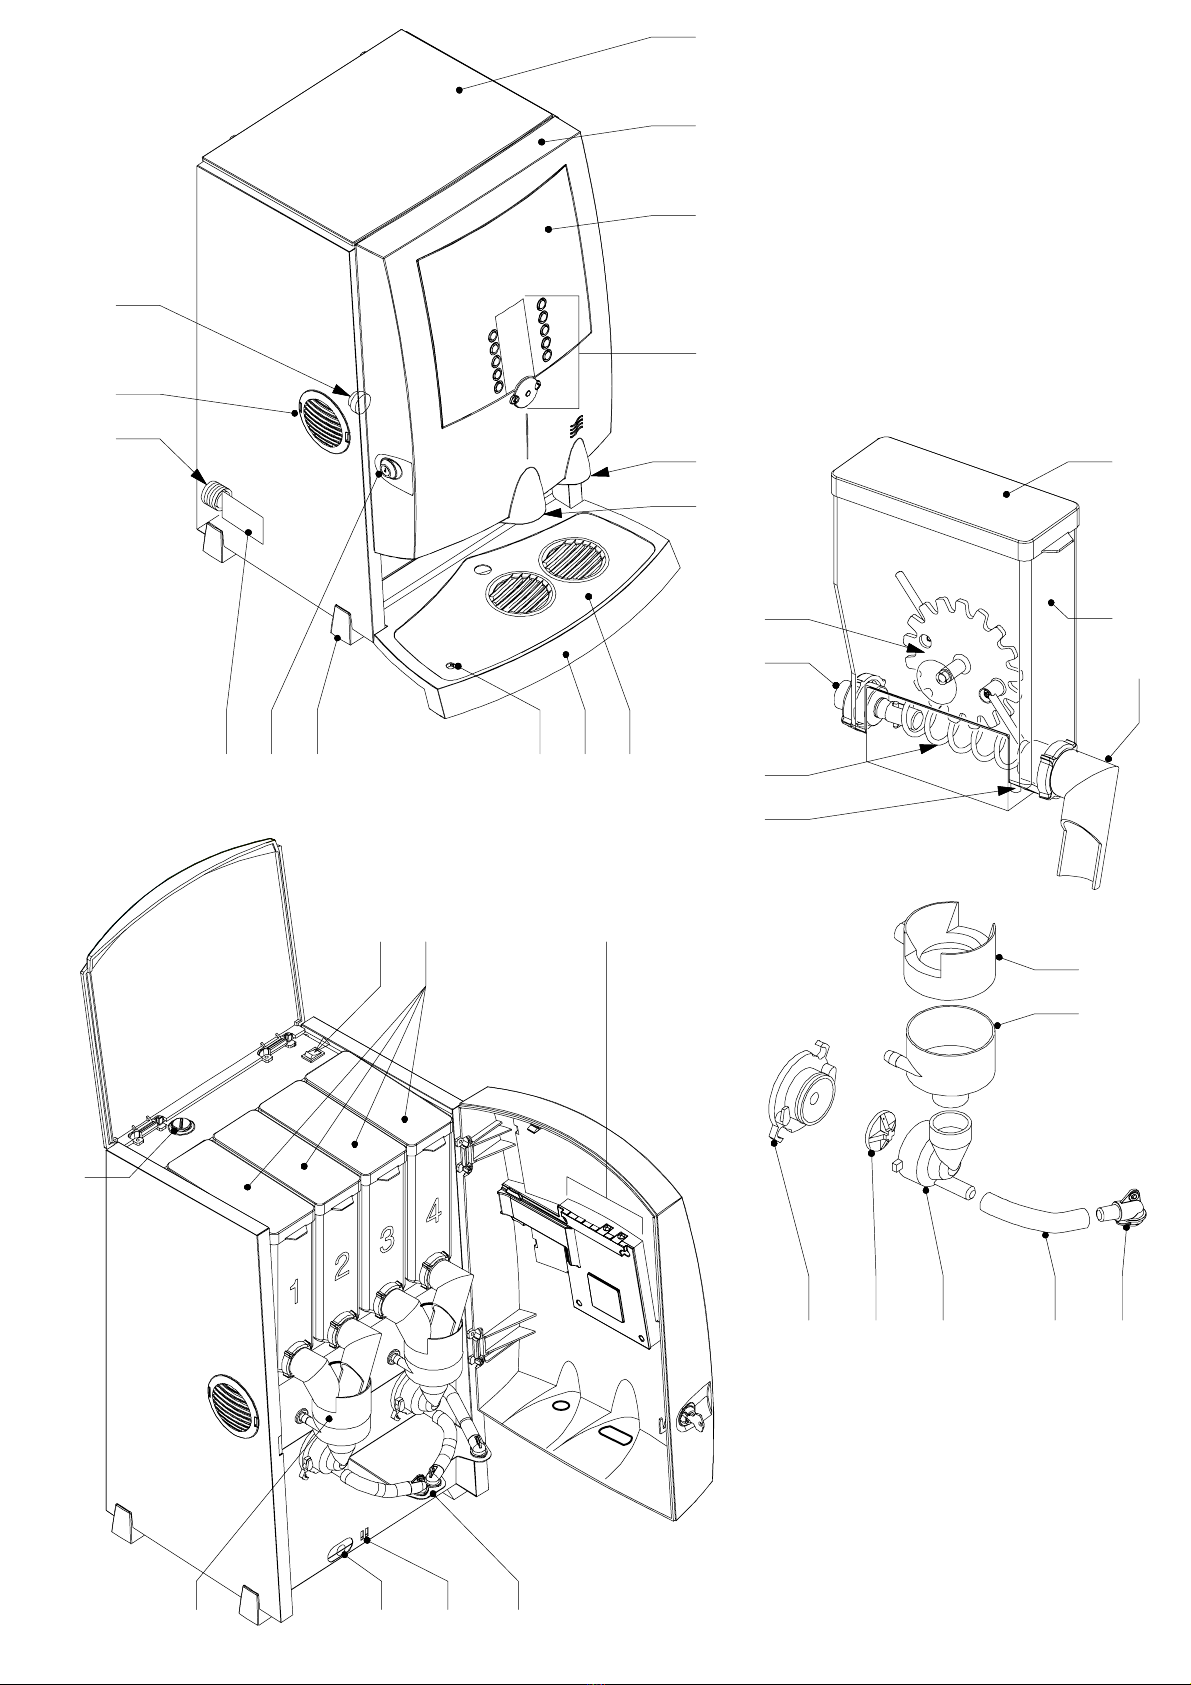
1.2 Main components 1. . . . . . . . . . . . . . . . . . . . . . . . . . . . . . . . . . . . . . . . . . . . . . . . .
1.2.1 Outside 1. . . . . . . . . . . . . . . . . . . . . . . . . . . . . . . . . . . . . . . . . . . . . . . . . . . . . . . . . . . .
1.2.2 Inside 1. . . . . . . . . . . . . . . . . . . . . . . . . . . . . . . . . . . . . . . . . . . . . . . . . . . . . . . . . . . . .
2. Technical data 2. . . . . . . . . . . . . . . . . . . . . . . . . . . . . . . . . . . . . . . . . . . . . . . . . . .
2.1 General 2. . . . . . . . . . . . . . . . . . . . . . . . . . . . . . . . . . . . . . . . . . . . . . . . . . . . . . . . . .
2.2 Dimensions 2. . . . . . . . . . . . . . . . . . . . . . . . . . . . . . . . . . . . . . . . . . . . . . . . . . . . . .
2.3 Electrical system 2. . . . . . . . . . . . . . . . . . . . . . . . . . . . . . . . . . . . . . . . . . . . . . . . .
2.4 Water system 2. . . . . . . . . . . . . . . . . . . . . . . . . . . . . . . . . . . . . . . . . . . . . . . . . . . . .
2.5 Capacity 2. . . . . . . . . . . . . . . . . . . . . . . . . . . . . . . . . . . . . . . . . . . . . . . . . . . . . . . . .
2.6 Environmental conditions 2. . . . . . . . . . . . . . . . . . . . . . . . . . . . . . . . . . . . . . . . .
2.7 Recommended descaling materials 2. . . . . . . . . . . . . . . . . . . . . . . . . . . . . . . .
3. Installation 3. . . . . . . . . . . . . . . . . . . . . . . . . . . . . . . . . . . . . . . . . . . . . . . . . . . . . .
3.1 Unpacking 3. . . . . . . . . . . . . . . . . . . . . . . . . . . . . . . . . . . . . . . . . . . . . . . . . . . . . . . .
3.2 Installation 3. . . . . . . . . . . . . . . . . . . . . . . . . . . . . . . . . . . . . . . . . . . . . . . . . . . . . . .
3.3 Initial use 4. . . . . . . . . . . . . . . . . . . . . . . . . . . . . . . . . . . . . . . . . . . . . . . . . . . . . . . .
3.3.1 Drink system 4. . . . . . . . . . . . . . . . . . . . . . . . . . . . . . . . . . . . . . . . . . . . . . . . . . . . . . .
3.3.2 Hot water system 4. . . . . . . . . . . . . . . . . . . . . . . . . . . . . . . . . . . . . . . . . . . . . . . . . . .
4. Operation 5. . . . . . . . . . . . . . . . . . . . . . . . . . . . . . . . . . . . . . . . . . . . . . . . . . . . . . .
4.1 Controls 5. . . . . . . . . . . . . . . . . . . . . . . . . . . . . . . . . . . . . . . . . . . . . . . . . . . . . . . . . .
4.1.1 Operating panel front 5. . . . . . . . . . . . . . . . . . . . . . . . . . . . . . . . . . . . . . . . . . . . . . . .
4.1.1.1 Display 5. . . . . . . . . . . . . . . . . . . . . . . . . . . . . . . . . . . . . . . . . . . . . . . . . . . . . . . . . . . .
4.1.1.2 Buttons and keys 5. . . . . . . . . . . . . . . . . . . . . . . . . . . . . . . . . . . . . . . . . . . . . . . . . . .
4.1.2 Operating panel inside 5. . . . . . . . . . . . . . . . . . . . . . . . . . . . . . . . . . . . . . . . . . . . . . .
4.1.2.1 Electronic control 5. . . . . . . . . . . . . . . . . . . . . . . . . . . . . . . . . . . . . . . . . . . . . . . . . . .
4.1.2.2 Keys on the electronic control 5. . . . . . . . . . . . . . . . . . . . . . . . . . . . . . . . . . . . . . . .

Table of contents
GB
version 1.0 ECopyright Bravilor Bonamat B.V.
IV
4.2 Daily use 6. . . . . . . . . . . . . . . . . . . . . . . . . . . . . . . . . . . . . . . . . . . . . . . . . . . . . . . . .
4.2.1 Tap cup 6. . . . . . . . . . . . . . . . . . . . . . . . . . . . . . . . . . . . . . . . . . . . . . . . . . . . . . . . . . . .
4.2.2 Tapping mug, half a jug or whole jug 6. . . . . . . . . . . . . . . . . . . . . . . . . . . . . . . . . . .
4.2.3 Indicator ‘drip–tray full’6. . . . . . . . . . . . . . . . . . . . . . . . . . . . . . . . . . . . . . . . . . . . . . .
4.2.4 Raising the machine 6. . . . . . . . . . . . . . . . . . . . . . . . . . . . . . . . . . . . . . . . . . . . . . . . .
5. Maintenance by users with limited authority 7. . . . . . . . . . . . . . . . . . . . . . .
5.1 Daily 7. . . . . . . . . . . . . . . . . . . . . . . . . . . . . . . . . . . . . . . . . . . . . . . . . . . . . . . . . . . . .
5.1.1 General 7. . . . . . . . . . . . . . . . . . . . . . . . . . . . . . . . . . . . . . . . . . . . . . . . . . . . . . . . . . .
5.1.2 Checking the supply in the ingredients container 7. . . . . . . . . . . . . . . . . . . . . . . .
5.1.3 Cleaning 7. . . . . . . . . . . . . . . . . . . . . . . . . . . . . . . . . . . . . . . . . . . . . . . . . . . . . . . . . . .
5.1.3.1 Rinsing programme 7. . . . . . . . . . . . . . . . . . . . . . . . . . . . . . . . . . . . . . . . . . . . . . . . .
5.1.3.2 Cleaning the mixing system 8. . . . . . . . . . . . . . . . . . . . . . . . . . . . . . . . . . . . . . . . . .
5.2 Weekly 8. . . . . . . . . . . . . . . . . . . . . . . . . . . . . . . . . . . . . . . . . . . . . . . . . . . . . . . . . . .
5.2.1 General 8. . . . . . . . . . . . . . . . . . . . . . . . . . . . . . . . . . . . . . . . . . . . . . . . . . . . . . . . . . .
5.2.2 Cleaning outside 8. . . . . . . . . . . . . . . . . . . . . . . . . . . . . . . . . . . . . . . . . . . . . . . . . . . .
5.2.3 Cleaning the mixer and the supporting plate 8. . . . . . . . . . . . . . . . . . . . . . . . . . . .
5.2.4 Cleaning ingredients container 9. . . . . . . . . . . . . . . . . . . . . . . . . . . . . . . . . . . . . . . .
6. Use of the programming unit 10. . . . . . . . . . . . . . . . . . . . . . . . . . . . . . . . . . . . .
6.1 Reading out the counter contents or re–setting the counter 10. . . . . . . . . .
6.1.1 Reading counter positions of tapped drinks 10. . . . . . . . . . . . . . . . . . . . . . . . . . . . .
6.1.2 Reading counter positions per drink 10. . . . . . . . . . . . . . . . . . . . . . . . . . . . . . . . . . .
6.1.3 Resetting the counter positions to zero 10. . . . . . . . . . . . . . . . . . . . . . . . . . . . . . . . .
6.2 Setting possibilities 10. . . . . . . . . . . . . . . . . . . . . . . . . . . . . . . . . . . . . . . . . . . . . . .
6.2.1 Setting the amount of water per drink 10. . . . . . . . . . . . . . . . . . . . . . . . . . . . . . . . . .
6.2.2 Switching on or off the tapping possibilities ‘mug, half a jug or whole jug’11. . .
6.2.2.1 Switching off 11. . . . . . . . . . . . . . . . . . . . . . . . . . . . . . . . . . . . . . . . . . . . . . . . . . . . . . .
6.2.2.2 Switching on 11. . . . . . . . . . . . . . . . . . . . . . . . . . . . . . . . . . . . . . . . . . . . . . . . . . . . . . .
6.2.3 Setting strongness of drink 12. . . . . . . . . . . . . . . . . . . . . . . . . . . . . . . . . . . . . . . . . . .
6.2.4 Setting the hot water temperature 12. . . . . . . . . . . . . . . . . . . . . . . . . . . . . . . . . . . . .
6.2.5 Setting descaling signal 13. . . . . . . . . . . . . . . . . . . . . . . . . . . . . . . . . . . . . . . . . . . . . .
7. Maintenance by authorized users 14. . . . . . . . . . . . . . . . . . . . . . . . . . . . . . . . .
7.1 Descaler 14. . . . . . . . . . . . . . . . . . . . . . . . . . . . . . . . . . . . . . . . . . . . . . . . . . . . . . . . .
7.2 Cleaning the exhaust fans 15. . . . . . . . . . . . . . . . . . . . . . . . . . . . . . . . . . . . . . . . .
8. Correcting malfunctions 16. . . . . . . . . . . . . . . . . . . . . . . . . . . . . . . . . . . . . . . . .
8.1 Malfunctioning analysis general 16. . . . . . . . . . . . . . . . . . . . . . . . . . . . . . . . . . .
8.2 Display messages and their meanings 17. . . . . . . . . . . . . . . . . . . . . . . . . . . . .
9. Consumable items and accessories 18. . . . . . . . . . . . . . . . . . . . . . . . . . . . . .
9.1 Recommended consumable items 18. . . . . . . . . . . . . . . . . . . . . . . . . . . . . . . . .
9.2 Accessories 18. . . . . . . . . . . . . . . . . . . . . . . . . . . . . . . . . . . . . . . . . . . . . . . . . . . . . .
9.2.1 Raising feet 18. . . . . . . . . . . . . . . . . . . . . . . . . . . . . . . . . . . . . . . . . . . . . . . . . . . . . . . .

Table of figures
GB
ECopyright Bravilor Bonamat B.V. V
version 1.0
Fig. 1 Identification plate II. . . . . . . . . . . . . . . . . . . . . . . . . . . . . . . . . . . . . . . . . . . . . . . . . . . . . . . . . . . . . .
Fig. 2 Operating panel front 5. . . . . . . . . . . . . . . . . . . . . . . . . . . . . . . . . . . . . . . . . . . . . . . . . . . . . . . . . . . .
Fig. 3 Operating panel inside 5. . . . . . . . . . . . . . . . . . . . . . . . . . . . . . . . . . . . . . . . . . . . . . . . . . . . . . . . . . .
Fig. 4 Flushing programme 7. . . . . . . . . . . . . . . . . . . . . . . . . . . . . . . . . . . . . . . . . . . . . . . . . . . . . . . . . . . .
Fig. 5 Positioning of the outlets 8. . . . . . . . . . . . . . . . . . . . . . . . . . . . . . . . . . . . . . . . . . . . . . . . . . . . . . . . .
Fig. 6 Mounting the mixer 8. . . . . . . . . . . . . . . . . . . . . . . . . . . . . . . . . . . . . . . . . . . . . . . . . . . . . . . . . . . . . .
Fig. 7 Counter positions 10. . . . . . . . . . . . . . . . . . . . . . . . . . . . . . . . . . . . . . . . . . . . . . . . . . . . . . . . . . . . . . .
Fig. 8 Initial situation programming 11. . . . . . . . . . . . . . . . . . . . . . . . . . . . . . . . . . . . . . . . . . . . . . . . . . . . . .
Fig. 9 Setting the amount of drink 11. . . . . . . . . . . . . . . . . . . . . . . . . . . . . . . . . . . . . . . . . . . . . . . . . . . . . . .
Fig. 10 Initial situation programming 12. . . . . . . . . . . . . . . . . . . . . . . . . . . . . . . . . . . . . . . . . . . . . . . . . . . . .
Fig. 11 Strongness drink 12. . . . . . . . . . . . . . . . . . . . . . . . . . . . . . . . . . . . . . . . . . . . . . . . . . . . . . . . . . . . . . .
Fig. 12 Temperature setting 12. . . . . . . . . . . . . . . . . . . . . . . . . . . . . . . . . . . . . . . . . . . . . . . . . . . . . . . . . . . .
Fig. 13 Descaling signal 13. . . . . . . . . . . . . . . . . . . . . . . . . . . . . . . . . . . . . . . . . . . . . . . . . . . . . . . . . . . . . . .
Fig. 14 Descaling signal 14. . . . . . . . . . . . . . . . . . . . . . . . . . . . . . . . . . . . . . . . . . . . . . . . . . . . . . . . . . . . . . .
Fig. 15 Descaling programme 14. . . . . . . . . . . . . . . . . . . . . . . . . . . . . . . . . . . . . . . . . . . . . . . . . . . . . . . . . .
Fig. 16 Removing the fan grille 15. . . . . . . . . . . . . . . . . . . . . . . . . . . . . . . . . . . . . . . . . . . . . . . . . . . . . . . . .
Fig. 17 Removing the fan blade 15. . . . . . . . . . . . . . . . . . . . . . . . . . . . . . . . . . . . . . . . . . . . . . . . . . . . . . . .
Fig. 18 Raising foot 18. . . . . . . . . . . . . . . . . . . . . . . . . . . . . . . . . . . . . . . . . . . . . . . . . . . . . . . . . . . . . . . . . . .

GB
version 1.0 ECopyright Bravilor Bonamat B.V.
VI
Safety instructions and danger warnings
General
The manufacturer accepts no liability whatsoever for damage or injury resulting from a failure to
(strictly) observe the safety instructions contained in this document or resulting from negligence during
the installation, use or maintenance of the machine specified on the front cover of this document or of
any related accessories.
Additional safety instructions may be required, depending on the specific working conditions required
for the accessories used. Please contact your dealer if you think there may be any potential danger in
using the machine.
The full responsibility for observing the local safety instructions and regulations always rests
with the user of the machine.
Instructions for use
DEach person working with the machine should know the contents of this document and carefully
follow the instructions contained. The management must instruct the personnel on the basis of this
document and take all the instructions and recommendations into account.
DNever change the order in which activities must be carried out.
DAlways keep this document near the machine.
Icons and instructions on the machine (if present)
DIcons, warnings and instructions attached to the machine form part of the safety provisions. They
must not be covered or removed and they must be present and remain legible throughout the life of
the machine. Any icon, warning or instruction that becomes illegible must be repaired or replaced
immediately.
Users
DThe machine may only be used by properly trained and authorized persons. Temporary staff and
persons undergoing training may only use the machine under the supervision and responsibility of
authorized users.
Proper use1
The machine is exclusively made for delivering various hot drinks and hot water. Any other or further
use is not in conformity with the purpose. The manufacturer does not accept any liability for damage or
injury resulting from this. The machine meets the current standards and guidelines. Use the machine
only if it is in perfect technical condition and only for the proper purpose as described above.
Technical specifications
The specifications given in this document may not be modified.
Modifications
Modification of (parts of) the machine is not allowed.
1. ”Proper use”as laid down in EN 292–1 is the use for which the technical product is suitable as stated by
the manufacturer –including any instructions in the sales brochure. In cases of doubt, it is the use that is
evident from the construction, version and function of the product. Proper use includes taking into account
the instructions included in the ”instructions for use”.

GB
ECopyright Bravilor Bonamat B.V. VII
version 1.0
Installation
DThe maximum acceptable ambient temperature with which a good operation can be guaranteed is 40°C.
DConsider damage caused by freezing. Never place the machine in rooms in which the temperature
can drop below 0°C. After all, with normal use there will always be water in the machine.
DDo not turn over the machine, move it upright.
DNever install the machine in places where water is sprayed or sprinkled.
DNever install the machine in front of entrances, exits or passageways intended for emergency
services.
DPlace the machine on a sufficiently solid, flat surface close to a water connection, water discharge
and an earthed electrical power outlet.
DConnect the machine to the electrical supply in such a way that the power can easily be
disconnected.
DLeave sufficient space at the back and front of the machine for maintenance and repair purposes.
DLeave a space of at least 5 cm at the left and right sides of the machine for ventilation.
DConnect the machine to a readily accessible, manually operated water tap, so that the water supply
can easily be turned off.
DAlways observe local rules and standards when installing this machine.
Use
DInspect the machine before use and check for damages.
DProtect the machine against water and moisture. Do not wet the machine by spraying and never
submerge the machine in water.
DKeep the operating controls free from dirt and grease.
DNote that during use some parts of the machine become very hot.
DDisconnect the electricity grid and the water supply when the machine will not be used for a longer
period. Clean the machine following the instructions in chapter 5. Make sure that no ingredients are left
in the ingredient containers. Discharge the water (chapter 7.).
DComponents that need lubrication and come into contact with the drink may only be lubricated with
silicone grease suitable for food products.
Maintenance and repairing failures
DRepair and maintenance activities not included in this document must always be carried out by
service mechanics.
DIf the mains lead is visibly damaged, it has to be replaced by a qualified service technician.
DObserve the given maintenance intervals. Overdue maintenance can lead to high repair costs and
may cause guarantee claims to become invalid.
DDo not carry out any maintenance activities concerning the machine before having it protected
against unintentional coming into operation. In such cases disconnect the electricity grid.
DAvoid contact with moving parts.
DNever leave the machine during maintenance activities.
DFor cleaning the machine only use descaler recommended by the manufacturer.
DAlways wear suitable facial protection and gloves while working with descaling materials. Wash your
hands after using these materials.
DPrevent damage of the machine caused by spilled descaler solution. Remove spilled solution as
quickly as possible and follow the previously mentioned safety instructions.

GB
version 1.0 ECopyright Bravilor Bonamat B.V.
VIII
Safety devices present
The machine is default provided with the following safety devices:
–Using the ON/OFF–switch the machine is switched on or off. After switching off there is still some
residual voltage in the electrical system. Remove the plug from the wall outlet in order to take away
this residual voltage.
–Electrical fuse of electronic components that is activated as soon as the power drop exceeds the
allowed maximum value due to a power failure.
–Thermal safety device that interrupts the power when the water temperature in the boiler becomes
too high.
–Boiling protection that interrupts the power when the boiler temperature becomes too high.
–Overflow protection that prevents the machine from taking in more water than allowed.
–Emergency stop to interrupt a selection of the amount of fluid (cup, half a can or whole can). The
cycle started last is finished.
–Drip–tray with float indication and discharge possibilities to prevent trouble caused by spilled drink.
Machines and the environment
Packaging material
The main components of the packaging material for transport and protection of the machine are the
following:
–Corrugated board
–Polystyrene elements
Generally, the packaging material can be returned through your dealer after installation of the machine.
If this is not be possible, ask your local authority refuse department how you can dispose of the
materials.
Disposal of the machine
Machines that you wish to dispose of can usually after consultation be returned to your dealer. If this is
not possible, inquire with your local authority about the possibilities for re–use or
environmentally–friendly processing of the materials. All plastic parts have been clearly coded for this
purpose. The printed–circuit board in the machine and the components connected to this should be
consigned to electrical or electronic refuse.

GB
version 1.0ECopyright Bravilor Bonamat B.V. 1
1. INTRODUCTION
1.1 General description
This is a hot drinks machine designed for serving various hot drinks and hot water. The functions of the
machine are fully computer–controlled. The personnel responsible for the operation can change the
factory settings in the programmable control. Once programmed and set conform the specific wishes
and requirements, the machine can be easily operated by the consumer through the operating panel
(with display) at the front.
1.2 Main components
The machine consists of the following main components (see the fold out):
1.2.1 Outside
1. Lid
2. Door
3. Window + text plate
4. Operating panel front
5. Hot water outlet
6. Drink outlet
7. Drip–tray plate
8. Drip–tray
9. Indicator ‘drip–tray full’
10. Foot (4x)
11. Lock
12. Identification plate
13. Water connection
14. Ventilation grille
15. Mains cable
1.2.2 Inside
16. ON/OFF switch
17. Ingredient containers 1 –4
17.1 Lid
17.2 Ingredients container
17.3 Outlet (discharge opening)
17.4 Fixing cam
17.5 Worm (plastic) or spiral (metal)
17.6 Drive clutch
17.7 Agitator
18. Operating panel inside
19. Drink outlet
20. Fixing hole for drip tray
21. Drain hose
22. Mixing unit (2x)
22.1 Exhaust hood
22.2 Mixing basin
22.3 Outlet piece
22.4 Drink outlet hose
22.5 Mixing room
22.6 Mixer
22.7 Supporting plate
23. Pouring opening descaler

GB
version ECopyright Bravilor Bonamat B.V.21.0
2. TECHNICAL DATA
2.1 General
Model : Blr42–001
Weight (empty) : 15,1 kg
2.2 Dimensions
DSee the fold out.
2.3 Electrical system
DSee the identification plate for the correct values.
2.4 Water system
Water hardness : min. 5 _dH
Min. water pressure (supply) : 100 kPa (1 bar)
Max. water pressure (supply) : 1000 kPa (10 bar)
Flow–rate : 2 l/min
Conductivity : q35 µSiemens/cm
Boiler capacity : 1 liter
Hour capacity (hot water) : 20 liters per hour
2.5 Capacity
Start–up time : 2 minutes
Delivery time per cup (120 ml) : 6 seconds
2.6 Environmental conditions
In view of danger of freezing the machine may never be placed in rooms where the temperature can
fall below 0_C.
2.7 Recommended descaling materials
Descaler : RENEGITE
CAUTION!
–Before use first read the instructions on the packing.
See chapter 9. for ordering descaler.

GB
version 1.0ECopyright Bravilor Bonamat B.V. 3
3. INSTALLATION
3.1 Unpacking
DCheck whether the machine is complete. The contents of the packaging consist of:
–1 hot drinks machine
–1 drip–tray (complete with drip–tray plate)
–1 water connection hose
–1 sachet of RENEGITE descaler
–1 funnel (for descaling)
–1 scrubbing brush for cleaning the ingredients container
–2 door keys
–1 glass jug
–supplementary sheet with factory settings
–This manual
DPlease contact your dealer if components are missing or damaged.
3.2 Installation
DPlace the machine on a flat (max. 5_off
plumb), sufficiently solid surface near a water
connection point (and if possible a water
discharge) and an electricity connection point
that is earthed.
DLeave sufficient space for maintenance and
repair purposes at the back and front of the
machine.
DLeave a space of at least 5 cm at the left and
right sides of the machine for ventilation.
DConnect the machine to a readily accessible
manually operated water tap, so that the water
supply can easily be turned off. Use the water
connection hose provided for this.
DOpen the tap.
DOpen the door (2.) on the left side with the key.
Follow the instructions below to install another
language with drink names:
DRemove the window (3.) with the name plate.
–Press the plastic lips of the window from the
inside of the machine to the outside.
–Remove the window and the name plate.
DPlace the multilingual, double–sided leaf with
drink names behind the name plate. Now you
can read the drink names in the required
language through the openings.
DRemount the window with the name plate.
DSwing up the cover (1.) of the machine.
DRemove the cover (17.1) of the 1st ingredients
container. Fill the ingredients container with the
ingredient especially meant for this machine,
according to table 2 on the supplementary
sheet.
DPut back the cover on the ingredients
container.
DAlso fill the other containers with the correct
ingredient, according to table 2 on the
supplementary sheet.
WARNING
nPower supply voltages vary from one country
to another. Ensure that the machine is
suitable for connecting to the local power
supply. Details on the required supply voltage
and frequency can be found on the
identification plate.
DConnect the plug to the power socket.
DSwitch the machine on by turning the ON/OFF
switch (16.) to ON. A little red square appears
on the switch. The machine starts filling up with
water. On the display all fields light up for a
moment).
DClose the cover (1.) and close the door (2.)
with the key. When the water is hot enough,
the flashing thermometer disappears.

GB
version ECopyright Bravilor Bonamat B.V.41.0
TIP
–It is possible to mount a discharge hose on
the drip–tray. At the back of the drip–tray
there is a spout. Bore a hole in this and slide
the hose on.
DHook the fixing cam of the drip tray into the
fixing hole (20.).
3.3 Initial use
CAUTION!
–Inspect the machine before use and check for
damages.
–Protect the machine against water and moist.
Do not wet the machine by spraying and
never submerge it in water.
–Keep the operating controls free from dirt and
grease.
–Note that during use some parts of the
machine become very hot.
At coming into operation the machine has the
default factory settings. If required, these settings
can be adjusted (chapter 6.).
3.3.1 Drink system
DPlace an empty cup under the drink outlet (6.).
DPress the Selection button of the drink to be
tested.
–The selection is confirmed by a beep. Only
the dot on the display at the selected drink
remains after which the drinks flows into the
cup. During the filling the cup on the display
flashes.
DThrow away the content of the first two cups.
DCheck for the 3rd cup whether the taste and
the amount are right. If not, correct the taste
and/or amount (§6.2).
DRepeat the above steps for the other drinks.
3.3.2 Hot water system
DPlace an empty cup under the hot water outlet
(5.).
DPress the Selection button (4.10) ‘hot water’.
–The selection made is confirmed by a beep.
Only the dot on the display at the selected
drink remains after which the water flows
into the cup. During the filling the cup on the
display flashes.
The system is now ready for use.

GB
version 1.0ECopyright Bravilor Bonamat B.V. 5
4. OPERATION
4.1 Controls
The machine is provided with two operating
panels, one at the front (fig.2 ) and one at the
inside (fig.3 ). During normal daily use of the
machine by the consumer, only the operating
panel at the front is used. For programming and
specific activities the operating panel at the inside
is important as well.
4.1.1 Operating panel front
4.1
4.2
4.3
4.4
4.5
4.6
4.7
4.8
4.9
4.10
4.11
4.12
4.13
<>
4
Fig. 2 Operating panel front
4.1.1.1 Display
DThe display (4.) shows during normal use while
programming, rinsing or descaling the machine
and in the case of failures various symbols,
values and messages that will be explained in
this manual. Fig.2 displays the basic position
(operational position).
4.1.1.2 Buttons and keys
4.1–4.9 Selection buttons for various hot
drinks
4.10 Selection button ‘hot water’
4.11 Setting key [>]
4.12 Enter key (blocked during normal
use of the machine)
4.13 Setting key [<]
The setting keys (4.11 and 4.13) have more than
one function. During normal use of the machine
these keys are only used to choose between cup,
mug, half a jug and whole jug respectively).
The [Enter] key (4.12) is blocked during normal
use of the machine.
4.1.2 Operating panel inside
18 18.1 18.2
Fig. 3 Operating panel inside
4.1.2.1 Electronic control
The housing of the electronic control with
operating panel (18.) of the machine is found at
the inside of the door (2.). The two keys are for
service and maintenance activities.
4.1.2.2 Keys on the electronic
control
18.1 Key ‘rinse’
18.2 Programming key
While the machine is in use, the factory default
settings may appear to be incorrect or insufficient
for the situation in which the machine is used.
These settings can be adjusted following the
instructions in §6.2.
The present chapter (4.) therefore only describes
the normal daily use of the machine.
Periodic maintenance by users with limited
authority is described in Section 5.

GB
version ECopyright Bravilor Bonamat B.V.61.0
4.2 Daily use
DSwitch the machine on with the ON/OFF
switch (16.) under the cover (1.). When the
machine is on there is a little red square visible
on the switch. During warming up a flashing
thermometer appears in the upper right corner
of the display. Tapping is only possible after the
thermometer has disappeared from the display.
4.2.1 Tap cup
You can only select those drinks that are
indicated on the display by a black dot.
DPlace an empty cup under the drink outlet (6.).
DSelect a drink with one of the selection buttons
(4.1 –4.9).
–The selection made is confirmed with a
beep. On the display only the dot with the
selected drink remains after which the drink
flows into the cup. During the filling the cup
flashes on the display.
4.2.2 Tapping mug, half a jug
or whole jug
TIP
–After 5seconds the setting automatically
returns to tapping a cup.
–Tapping a half or whole jug is not possible
for all drinks (this depends on the type of
the machine)
DSelect with the setting key (4.11 or 4.13) mug,
half a jug or whole jug.
TIP
–If a thermometer appears on the display the
temperature is (temporarily) too low caused
by tapping too much water. The machine is
blocked until the temperature is right again.
DPlace an empty mug or jug under the drink
outlet (6.).
DSelect a drink with one of the selection buttons
(4.1 –4.9).
–The selection made is confirmed with a
beep. On the display only the dot with the
selected drink remains after which the drink
flows into the mug or jug. During the filling
the cup flashes on the display.
TIP
–By pressing any selection button after having
selected a mug, half a jug or a whole jug you
prevent the machine from really executing
this task. The machine is now limited to
tapping just one cup.
4.2.3 Indicator ‘drip–tray full’
The float indication (9.) will come up at reaching
the maximum level of spilled drink. In this case,
empty the drip–tray as soon as possible!
4.2.4 Raising the machine
When you use a mug or jug that does not fit
under the drink outlet you can temporarily
remove the drip–tray.
If necessary, the machine can be raised 2 cm
with a set of raising feet to increase the distance
between the drink outlets and the drip–tray. Such
a set can be ordered as accessory with your
specialist (§9.2.1).

GB
version 1.0ECopyright Bravilor Bonamat B.V. 7
5. MAINTENANCE BY USERS WITH LIMITED
AUTHORITY
5.1 Daily
5.1.1 General
Obviously, the machine and the accessories must
be carefully kept clean. Besides, it should be
checked daily whether there are still sufficient
ingredients in the ingredient containers.
DRemove the drip tray (8.) complete and wash
all components in hot water with a normal
washing–up liquid.
WARNING
nTake action if the descaler signal appears in
the display (fig.13 ).
5.1.2 Checking the supply in
the ingredients container
DOpen the door (2.) with the supplied key.
DLift up the cover (1.).
DCheck the contents of the ingredient containers
(17.).
Filling up:
DLift the ingredients container (17.) a bit
slantingly backwards out of the machine.
DRemove the cover (17.1).
DCheck whether the ingredients have not
congealed. If this is the case, clean the
ingredients container (§5.2.4).
DFill up the corresponding ingredient, see
supplementary sheet table 2 .
DPress the cover on the container and place this
back into the machine. Make sure that the
drive clutch (17.6) at the back side of the
container is slid over the drive shaft in the back
wall and that the fixing cam (17.4) at the
bottom falls into the notch of the sheet–metal
work.
WARNING
nThe ingredient containers and their places in
the machine are numbered. Always stick to
the order of the numbers.
TIP
–The ingredients container can also be filled
without taking it out of the machine.
5.1.3 Cleaning
5.1.3.1 Rinsing programme
The machine has a rinsing programme to clean
the mixing units. It is recommended to run this
programme daily.
DPlace a jug under the drink outlet (6.).
DPress key (18.1) at the inside of the door.
Fig. 4 Flushing programme
A flashing cup appears on the display to indicate
that the rinsing programme is active.
DRepeat the rinsing by pressing the key (18.1)
again until the water coming out of the drink
outlet piece is clean.
DClose the door with the key and place the
drip–tray in front of the machine again.

GB
version ECopyright Bravilor Bonamat B.V.81.0
5.1.3.2 Cleaning the mixing system
DRemove the drip tray (8.).
DOpen the door (2.).
DTilt the ingredient containers a bit slantingly
backwards and lift them out of the machine.
DPull the mixing basin (22.2) towards you, so
that the exhaust opening of the exhaust hood
(22.1) is released and subsequently move it
back and forth to remove the exhaust hood.
DPull the mixing basin (22.2) carefully loose
from the water connection and remove it by
moving it back and forth.
DPull the outlet hose (22.4) carefully loose from
the mixing room (22.5).
DTurn the outlet piece (with hose) (22.3) a
quarter of a turn into the direction of the
machine and then move it upwards, so that it is
loosened from the drink outlet.
DRemove the mixing room (22.5) by turning it to
the right and after that pulling it towards you.
DRepeat this procedure for the other mixing unit.
DWash all components in hot water with a
normal washing–up liquid.
DRemount all parts in reversed order.
WARNING
–Turn the outlets apart; they should touch the
side of the mixing basin.
5.2 Weekly
5.2.1 General
The following activities must be carried out
weekly:
5.2.2 Cleaning outside
DRemove the drip–tray (8.).
DWash all part of the drip–tray in hot water.
DClean the outside of the machine with a moist
cloth. If necessary use a non–scratching or
non–corrosive cleaning product.
DAfter this dry the machine with a soft cloth.
DPlace the drip–tray (8.) in front of the machine
again.
5.2.3 Cleaning the mixer and
the supporting plate
DCarry out the first 8 steps of §5.1.3.2.
DRemove the mixer (22.6) from the mixer motor
shaft by pulling it perpendicularly from the
shaft.
DRemove the supporting plate (22.7) by turning
it to the right and after that pulling it towards
you.
DRepeat this procedure for the other mixing unit.
DWash all components in hot water with a
normal washing–up liquid.
DRemount all parts in reversed order.
TIP
–At mounting the mixer in the mixer motor
shaft the dot (fig.5 ) must be in line with the
flattened part of the mixer motor shaft.
!22.6
22.7
!
Fig. 5 Mounting the mixer
Other manuals for Bolero XL
1
Table of contents
Other BRAVILOR BONAMAT Dispenser manuals
Popular Dispenser manuals by other brands

Clean Cut
Clean Cut CC3100 installation manual

Glas Craft
Glas Craft GCP3RA user manual

SureShot
SureShot AC2-GP-30 Service manual

Georgia Pacific
Georgia Pacific Professional 54338A Installation and operating instructions

Idex
Idex X-Smart Pro manual

Miele professional
Miele professional DOS-Modul G 60 Fitting instructions

BEST SANITIZERS
BEST SANITIZERS VersaClenz Touchless user guide

Kohler
Kohler K-25419T-CP installation instructions

Vivreau
Vivreau V3-205-I owner's manual

ViscoTec
ViscoTec Preeflow eco-PEN600 Operation & maintenance manual

Graco
Graco PrecisionSwirl 243402 Instructions-parts list

DRESSER Wayne
DRESSER Wayne 3/V390/U Installation