FlexArm GH-18 User manual

Correct handling and maintenance is absolutely necessary.
Read the following instructions for installation and operation carefully.
GH-18 Operations Manual
Machine Power: 2Hp
Voltage: 110V
1-800-837-2503
705 Commerce Drive
Wapakoneta, Ohio 45895
www.flexmachinetools.com
FlexArm Inc
GH-18 Tapping Arm Manual
10/17/2019
REV. 001
1

Index
Page
2.) Index
3.) Installation
3.) Startup and Shutdown Procedures
4.) Improper Shutdown
4.) Guarantee
5.) Tap Lubricator System
6.) Multi-Position Head
7.) Machine Drawings
8.) Technical Details
9.) Electric Diagram
10.) Electrical Parts List
11.) Hydraulic Diagram
12.) Hydraulic Parts List
13.) Spare Parts Diagrams
FlexArm Inc
GH-18 Tapping Arm Manual
10/17/2019
REV. 001
2

Installation
1) Mount the arm in the pivot of the angle mount.
2) Adjust the counterbalance of the arm to eliminate the possibility of the arm striking the
operator when positioned at its lowest point.
3) Connect the machine to a grounded 110 volt, 1 phase electric supply.
CAUTION: When making repairs to this unit, always disconnect the main power supply.
4) Flip the forward switch on the hydraulic motor of the tapping head. The rotation of the
hydraulic motor is correct if the tapping head rotates clockwise. If it turns
counterclockwise or does not rotate, reserve the two phases at the supply connection,
not in the internal electric panel.
5) Always wear safety glasses and use proper safety precautions when operating this unit.
Gloves are not recommended when operating this machine.
ALWAYS SECURE THE WORK PIECE TO THE TABLE BEFORE OPERATING.
This machine is designed for tapping, chamfering and light reaming of holes up to M18 diameter.
FlexArm Inc is not responsible for accident or injury resulting from the misuse of this machine.
GH-18 Startup and Shutdown Procedures
Startup:
1. Plug in
2. Lockout breaker on
3. Green button press on (Hold for 2-3 seconds on initial startup)
Shutdown:
1. Red button off
2. Lockout breaker off
a. allow the motor in the power pack to spool down completely before turning lockout breaker
off (approximately 3 seconds)
b. this is only necessary if locking out the unit
3. Unplug (this is only necessary if moving locations)
a. allow the motor in the power pack to spool down completely before unplugging the unit
(approximately 3 seconds)
FlexArm Inc
GH-18 Tapping Arm Manual
10/17/2019
REV. 001
3

CMA recommend change of hydraulic oil every 5000 work hours.
Any ISO Viscosity Grade 46 Hydraulic Oil will work for this model.
Guarantee
The machines have a one year warranty against manufacturer defect from the date of
delivery. Cases of incorrect use or incorrect connection are not covered by the warranty.
(Due to constant product improvement, the manufacturer reserves the right to modify
machines without prior notice.).
Improper Shutdown:
• Turning the machine off with the lockout breaker before turning off the machine with the red
button.
• Turning the lockout breaker to off before the motor in the power pack has spooled down
completely. (approximately 3 seconds)
• Suddenly removing power from the machine i.e. pulling the plug out of the wall before turning
off the machine with the red button.
• Unplugging the unit before the motor in the power pack has spooled down completely.
(approximately 3 seconds)
• Pressing the green button while lockout breaker is off and residual power is still in the inverter
(approximately 45 seconds after shutdown)
If improper shutdown occurs:
Reset the power pack:
1. Lockout breaker off
2. Unplug the machine (wait 45 seconds to allow the inverter to reboot)
3. Plug the machine back in
4. Lockout breaker on
5. Green button press on (Hold for 2-3 seconds on initial startup)
FlexArm Inc
GH-18 Tapping Arm Manual
10/17/2019
REV. 001
4

Use of tap lubricator system
FlexArm mounts a standard tap lubricator system in its tapping units. [Refer to diagram]
•Connect air inlet and arm pneumatic tube to the regulator-manometer which is adjusted in our factory.
•Fill oil tank located in front lower arm: uncover the filler plug and fill with tapping oil to the maximum level.
•Press and hold the starting lever until you see atomized oil begin to leave for the lance tip. The first time, the
atomized oil will take time to reach the lance tip, but later uses will be much quicker.
•Adjust the quantity of oil mixture released by adjusting the oil regulator mounted behind lance.
•The tap lubricator system can be used before, during and after tapping pieces.
Oil regulator
Oil tank
Filler plug
Lance
Regulator, manometer
Starting lever
Caution! Don´t use corrosive oil, It can damage the system's plastic valves.
FlexArm Inc
GH-18 Tapping Arm Manual
10/17/2019
REV. 001
5
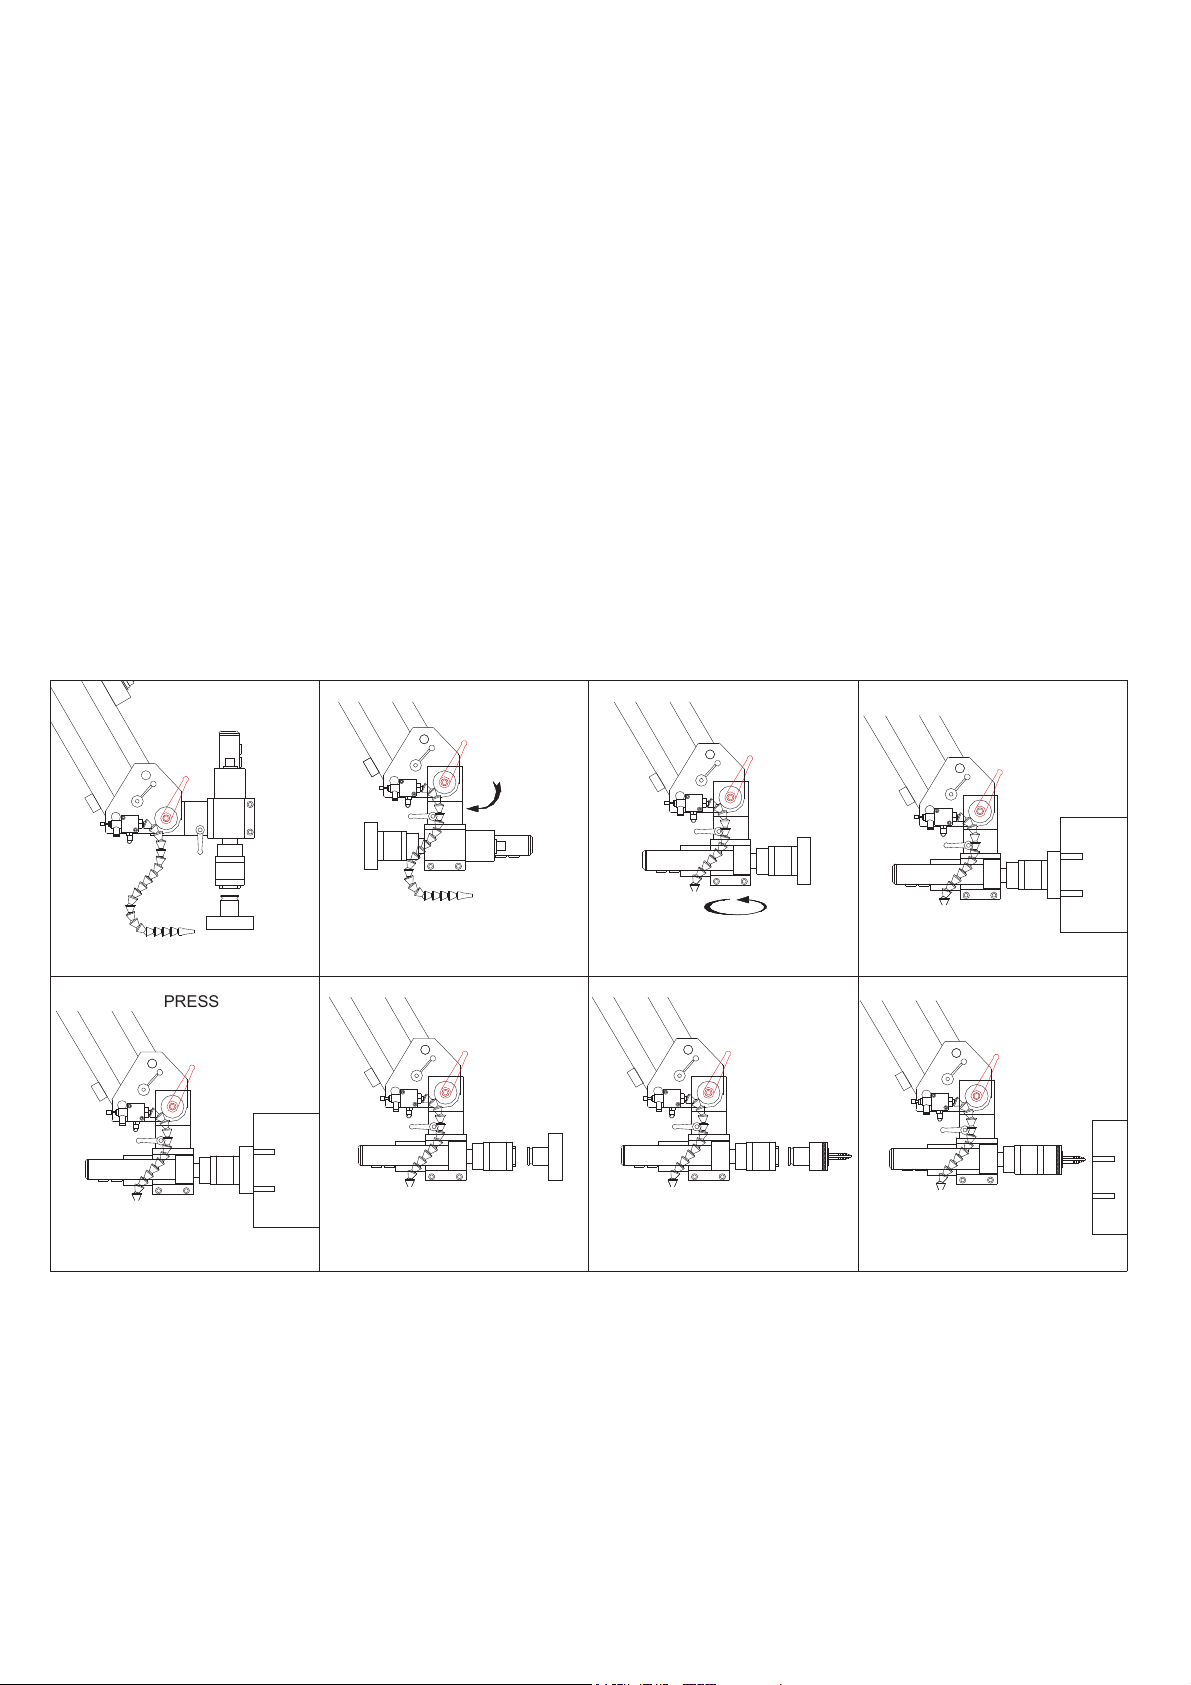
Use of the multi-position head
FlexArm models GH-18 that are equipped with a multi-position head.
The multi-positional head allows taping in additional positions. This kind of
tapping doesn't guarantee the perfect thread but will provide a good tapping
quality.
PRESS RED
LEVER
•Loosen the large lever to adjust the position of the tapping head
between vertical and horizontal tapping. Loosen the small lever to adjust
the head position from right to left.
•Before Tapping, check the small lever isn't fixed, since it must be loose for
tapping.
•When returning the head to the vertical tapping position, remember that
both levers must be secure to tap.
FlexArm Inc
GH-18 Tapping Arm Manual
10/17/2019
REV. 001
6
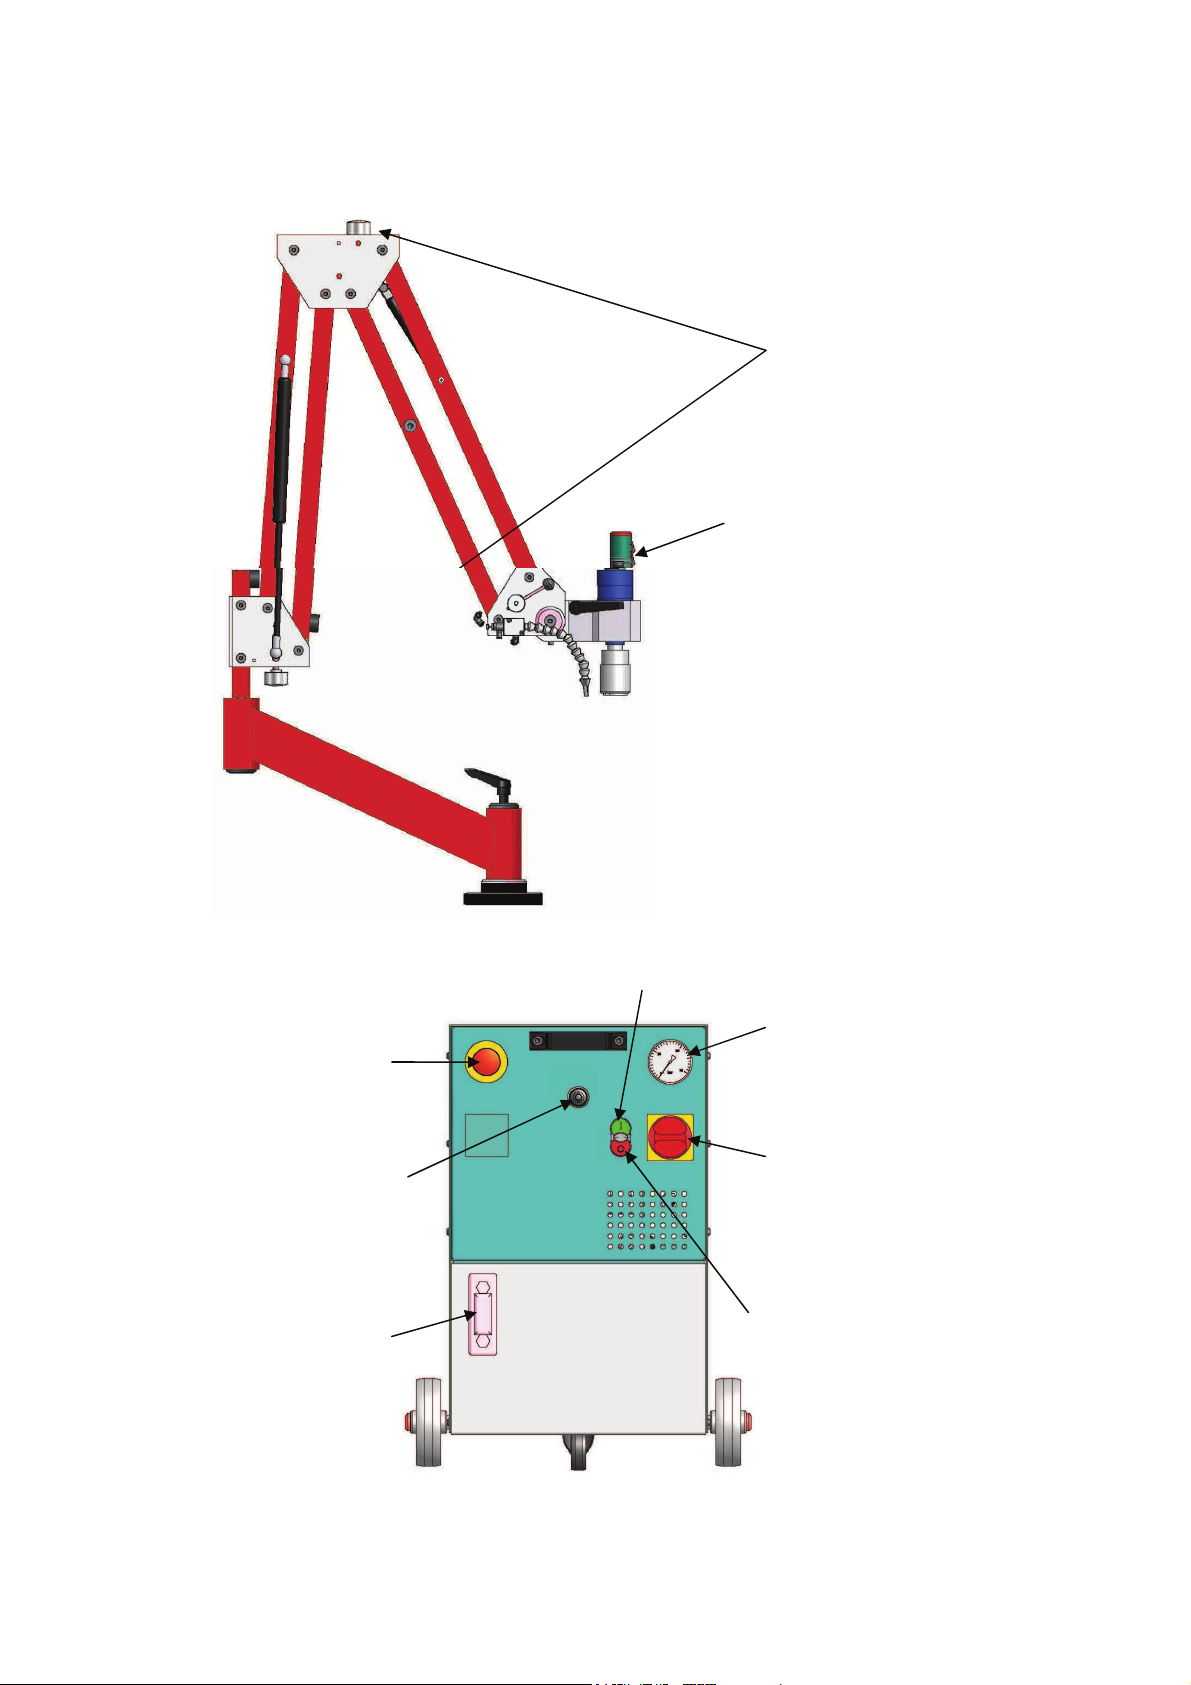
Machine drawing
Stop switch
Emergency stop
Manometer
Speed governor
Oil level
Master switch
Forward and reverse switches
Start switch
Cylinder governors
FlexArm Inc
GH-18 Tapping Arm Manual
10/17/2019
REV. 001
7

Technical details
GH-18, GHM-18
Electric motor 2Hp
The best maximum pressure 120
Security maximum pressure 140
Minimum threaded capacity #6
Maximum threaded capacity 5/8"
R.P.M. 420
Table dimensions
---
Oil tank capacity 9G
Voltage in knobs 24 V
Effective range
Full 360º degrees
FlexArm Inc
GH-18 Tapping Arm Manual
10/17/2019
REV. 001
8
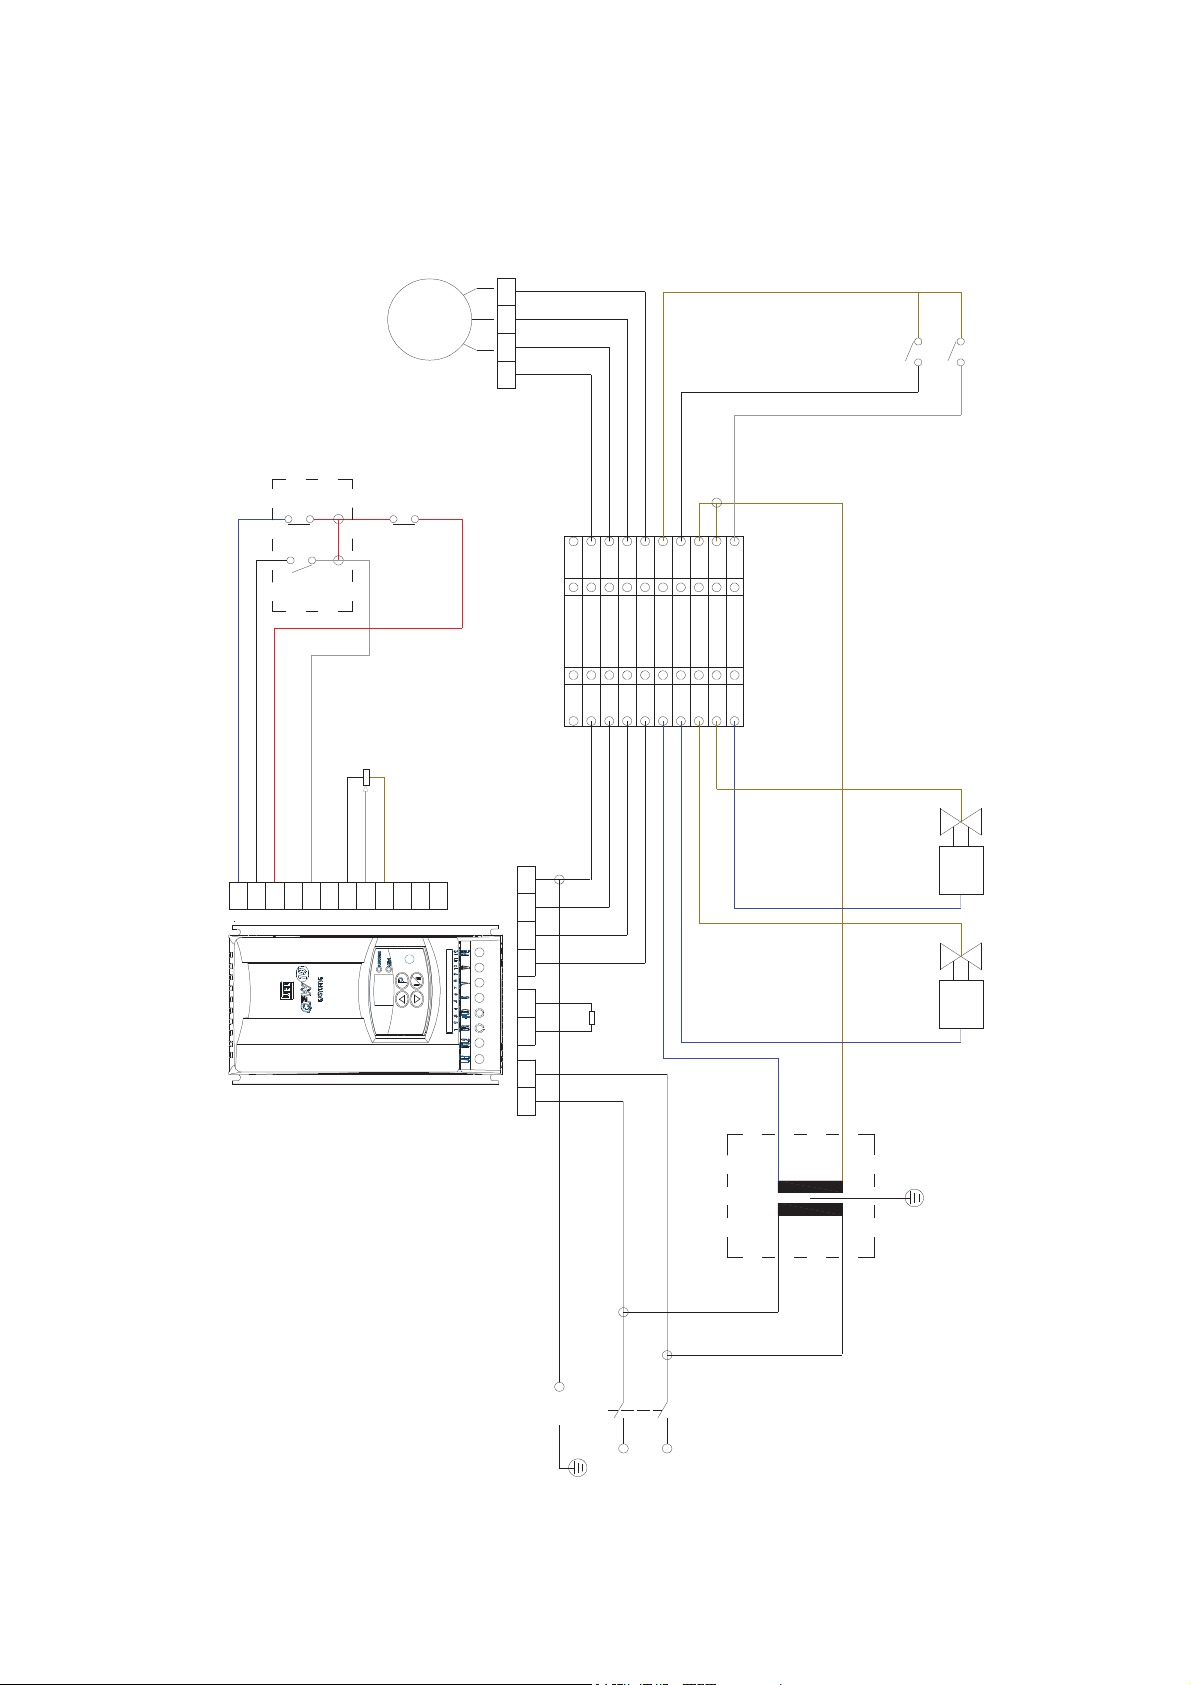
Electric diagram
PE
L1
L2
M
1.5 ~
L1 L2 BR
+UD
u v w PE
PE w v v
1
2
3
4
5
6
7
8
9
10
11
12
PT
= 5 K
IG
U
VV
U
WW
TTTT
220
N
24
N
T
S1 S2 P2
P1
PM
PE
IN
INVERTER
E
TTTT
FlexArm Inc
GH-18 Tapping Arm Manual
10/17/2019
REV. 001
9

Electrical parts list
Pos #
Type of component
1 --
Binding clamp 39061
2 T
Transformer Type M
3 IG
Main Switch
4 PE
Emergency Stop
5 PM
Start/stop switch
6 P1 – P2
Forward and reverse switches
7 --
Connector Han-Kit-3 AGM
8 IN
Inverter
9 PT
Speed governor
10 E
Electrovanne
11 M
Electric motor 2 Hp
FlexArm Inc
GH-18 Tapping Arm Manual
10/17/2019
REV. 001
10
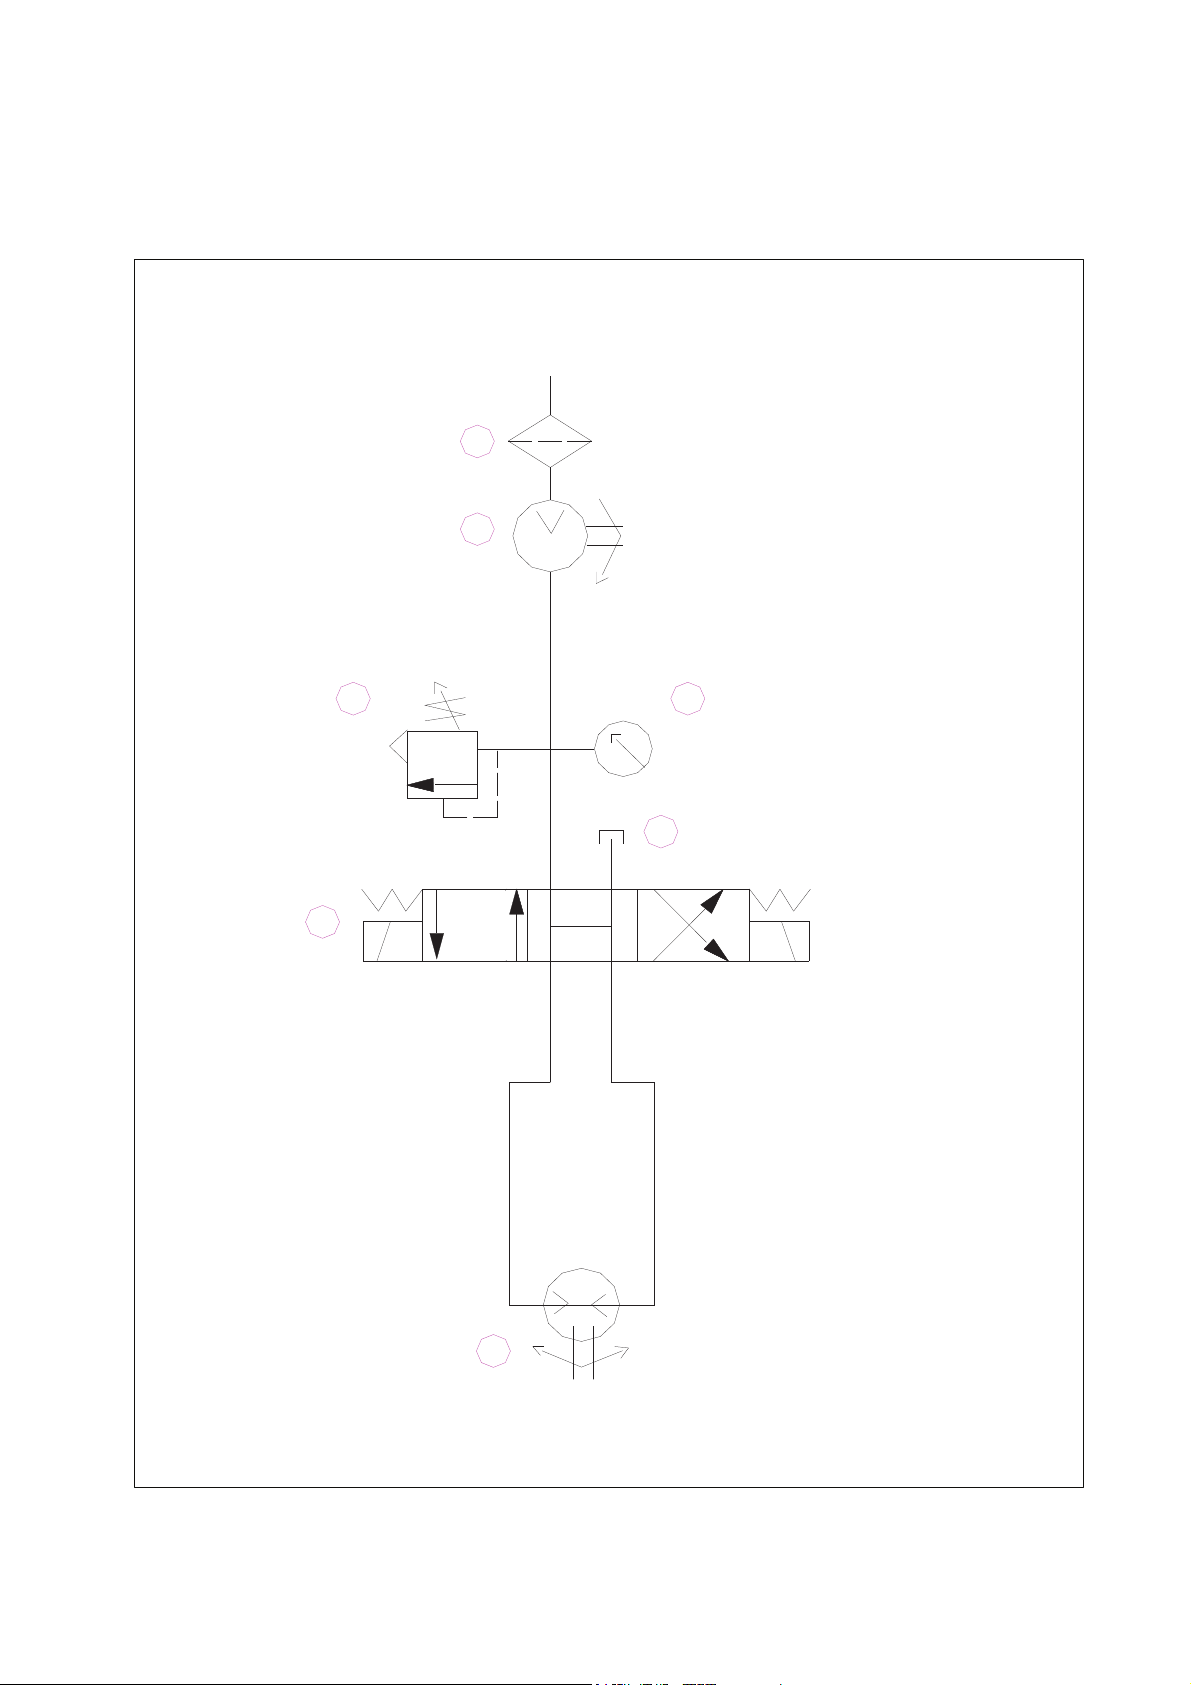
Hydraulic diagram
5
3
4
21
7
8
FlexArm Inc
GH-18 Tapping Arm Manual
10/17/2019
REV. 001
11

Hydraulic parts list
Type of component
1
Filter suction
2
Gear pump
3
Base plate with security limitator
4
Manometer
5
Electrovalve
6
7
Hydraulic motor 32 cc
8
Oil tank
FlexArm Inc
GH-18 Tapping Arm Manual
10/17/2019
REV. 001
12

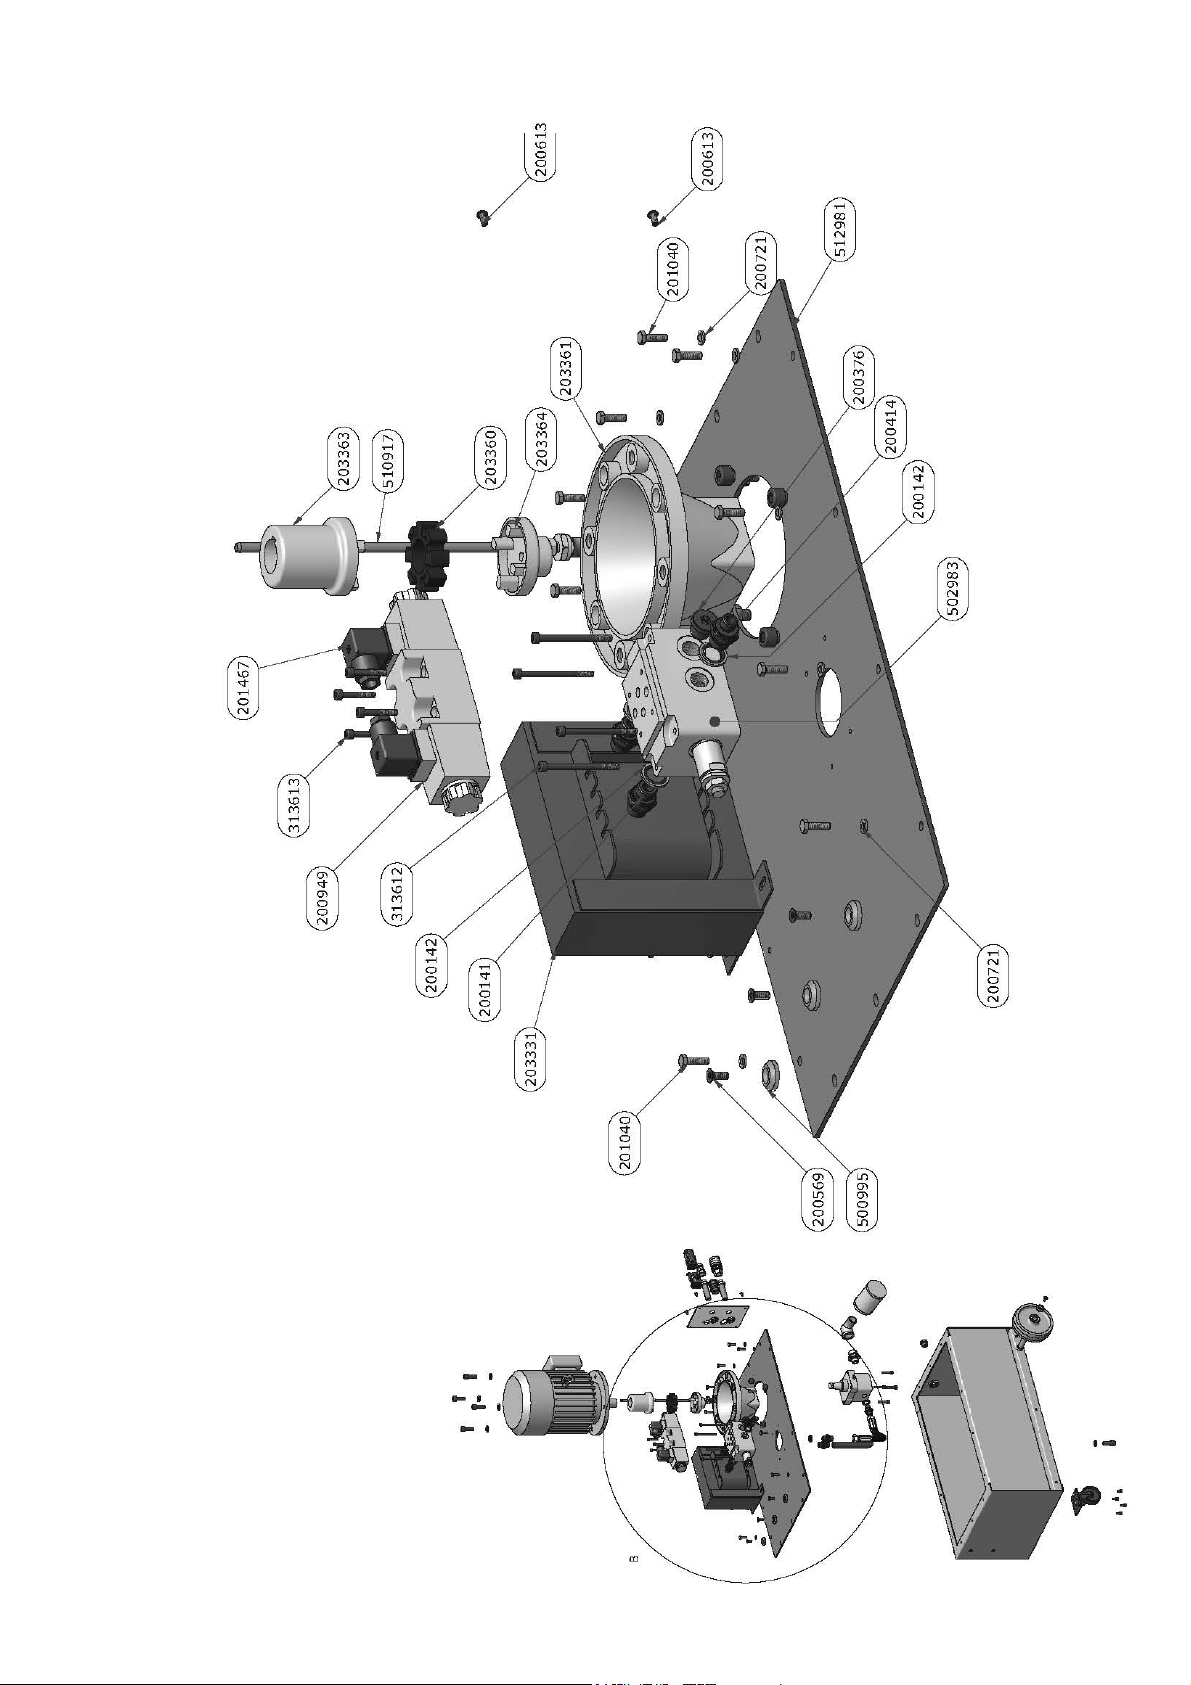
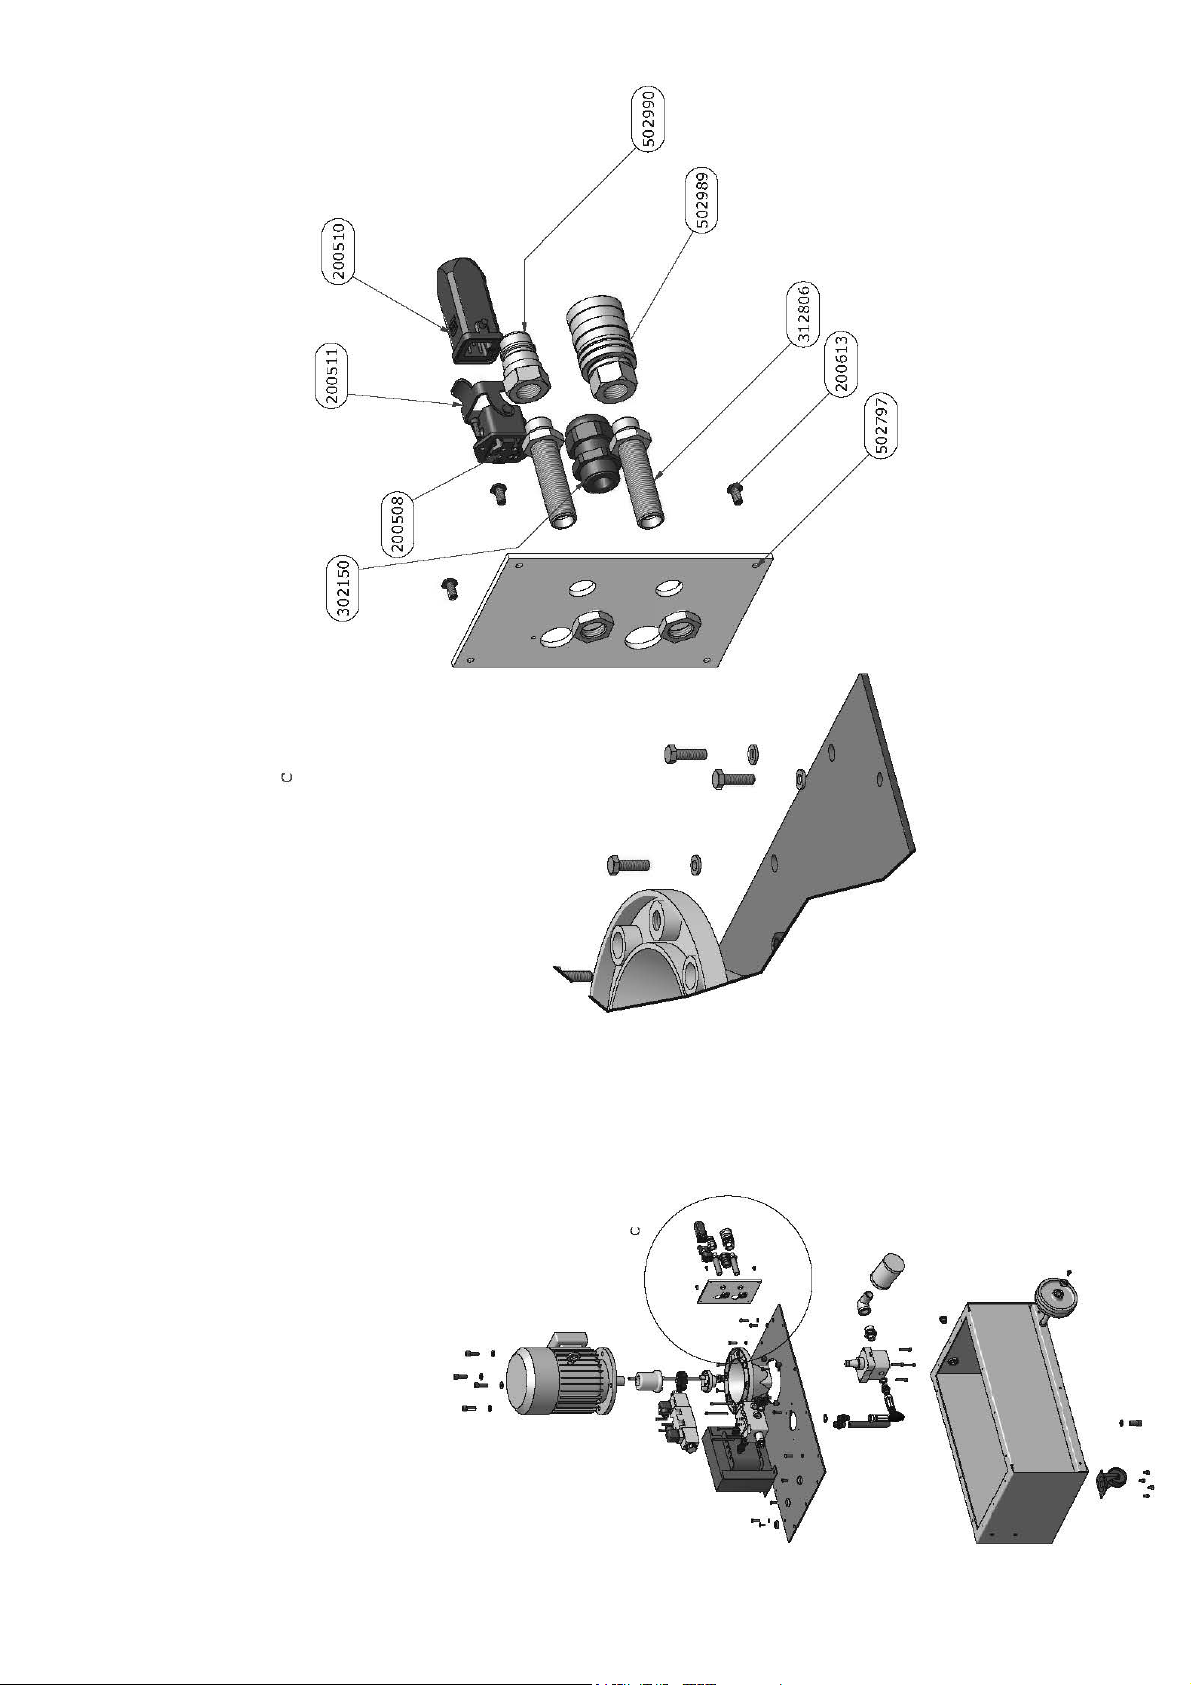
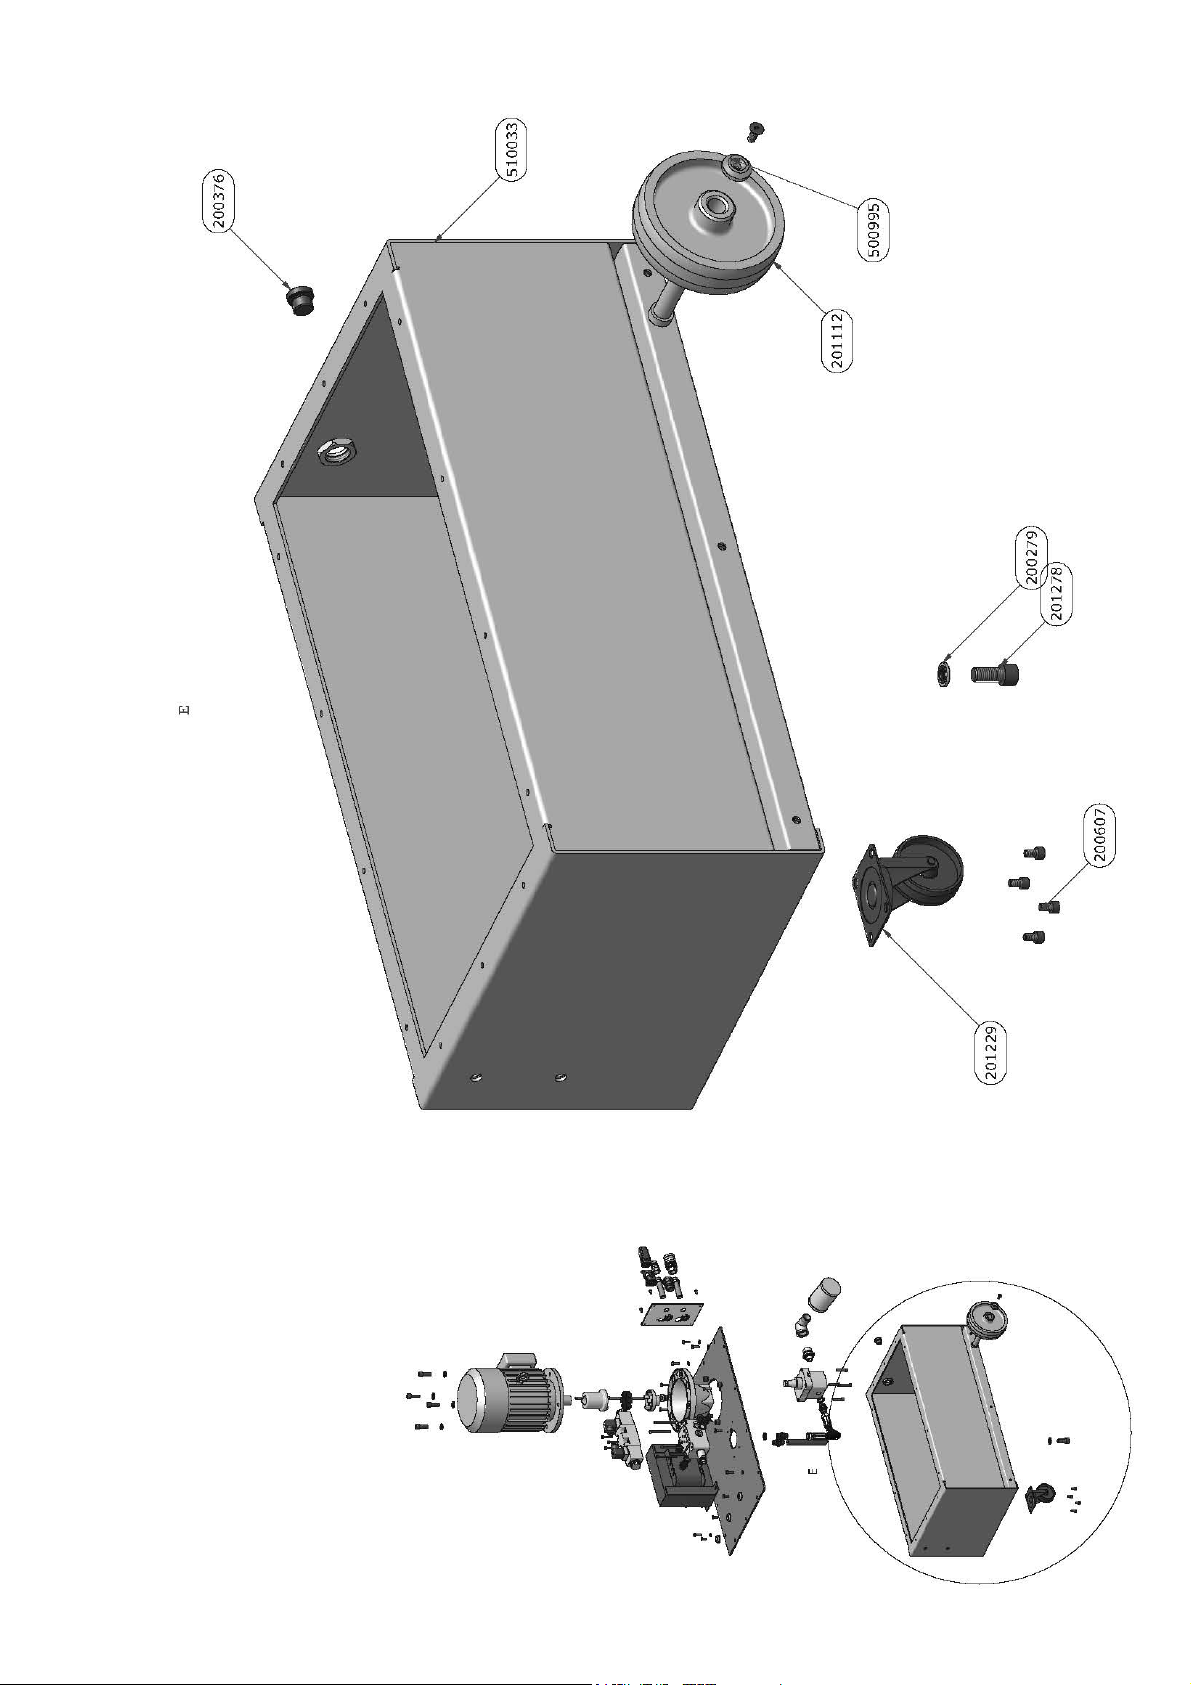
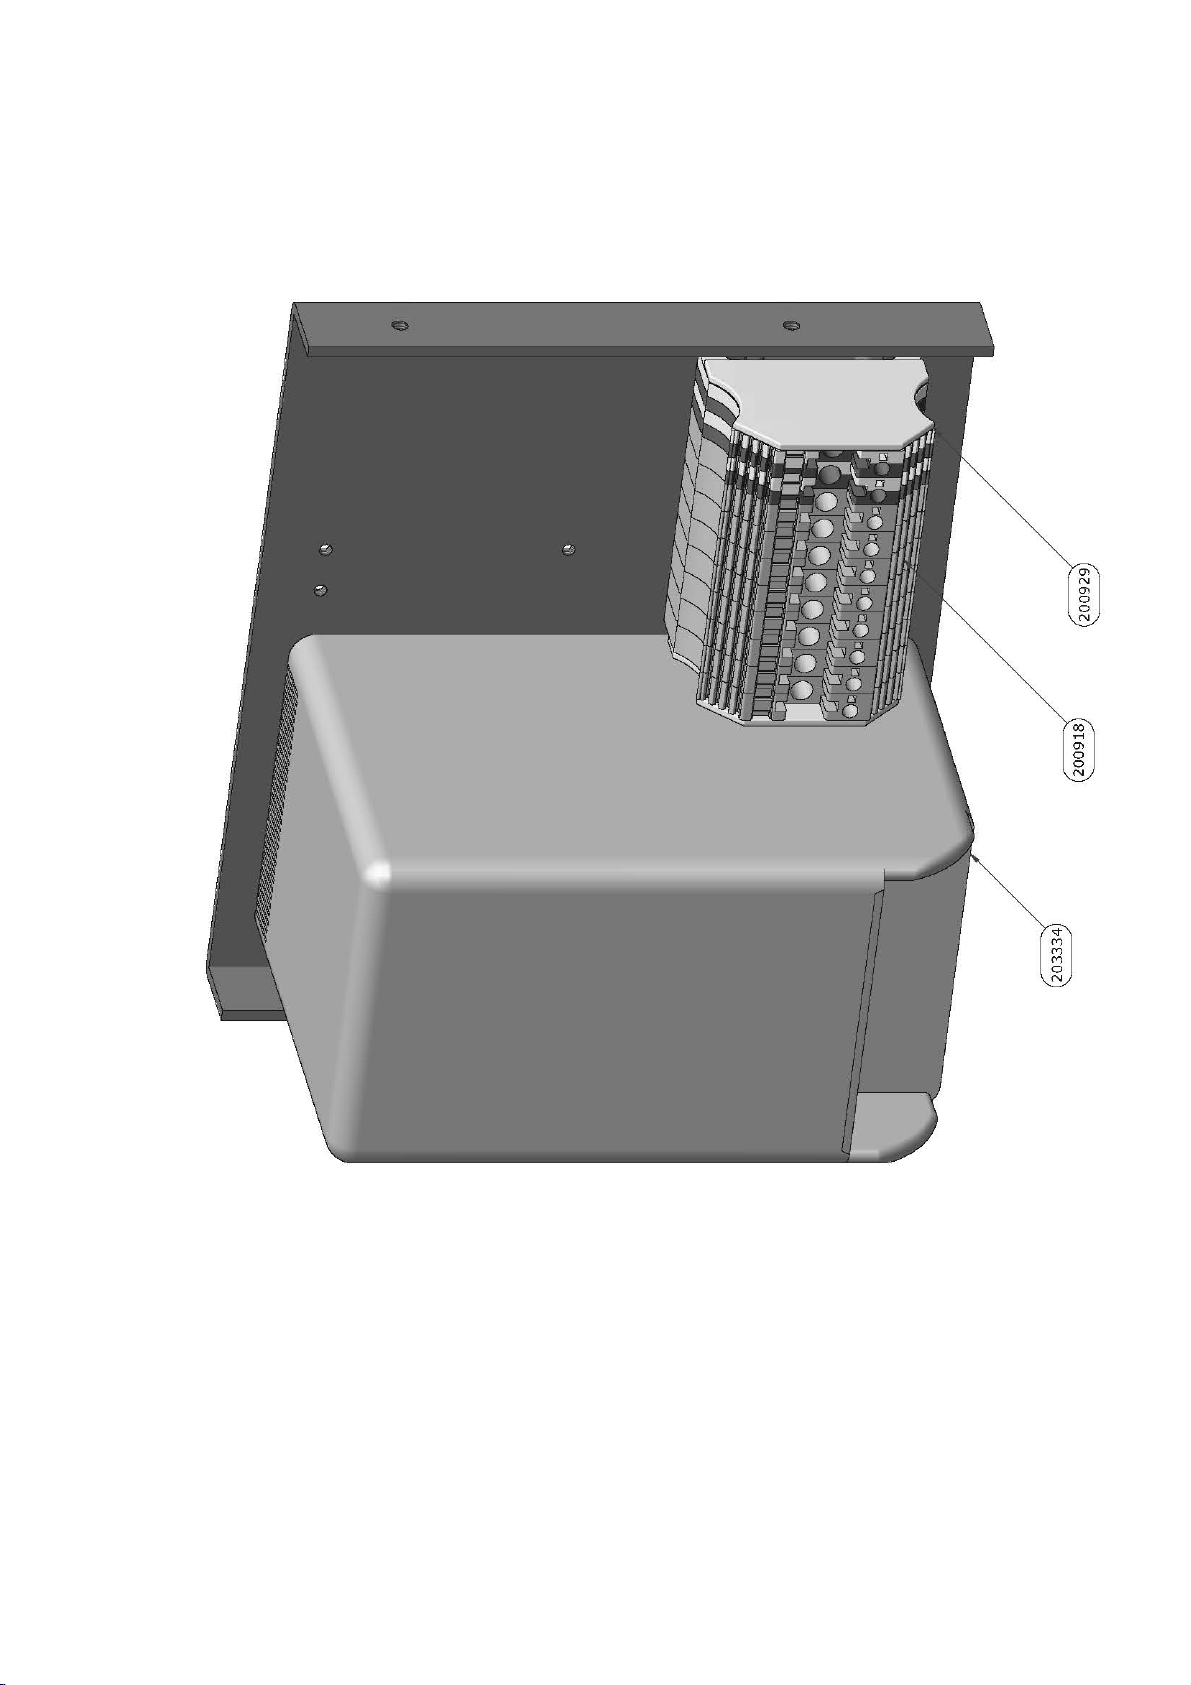
Spare Parts Diagram
FlexArm Inc
GH-18 Tapping Arm Manual
10/17/2019
REV. 001
13

$$
$
FlexArm Inc
GH-18 Tapping Arm Manual
10/17/2019
REV. 001
14
%
FlexArm Inc
GH-18 Tapping Arm Manual
10/17/2019
REV. 001
15
&&&&
&
FlexArm Inc
GH-18 Tapping Arm Manual
10/17/2019
REV. 001
16

''''
'
FlexArm Inc
GH-18 Tapping Arm Manual
10/17/2019
REV. 001
17
((((
(
FlexArm Inc
GH-18 Tapping Arm Manual
10/17/2019
REV. 001
18

FlexArm Inc
GH-18 Tapping Arm Manual
10/17/2019
REV. 001
19
FlexArm Inc
GH-18 Tapping Arm Manual
10/17/2019
REV. 001
20
Table of contents
Other FlexArm Industrial Equipment manuals


Popular Industrial Equipment manuals by other brands

CIAT
CIAT DynaCIAT LG instruction manual

4Protect
4Protect COLORADO User instruction manual

Emerson
Emerson Rosemount 2410 instructions

LOVATO ELECTRIC
LOVATO ELECTRIC EXM10 12 instruction manual

DEHN + SÖHNE
DEHN + SÖHNE HVI Series installation instructions

HEIDENHAIN
HEIDENHAIN MSE 1300 installation instructions


