Flexologic FAMM User manual

1
H. Kamerlingh Onnesweg 2
2408 AW Alphen aan den Rijn
The Netherlands
CONFIDENTIAL - THIS DOCUMENT MAY NOT BE DISCLOSED TO ANY THIRD PARTY OR USED FOR ANY
OTHER PURPOSE WITHOUT THE EXPRESS WRITTEN PERMISSION OF AV FLEXOLOGIC BV
CONFIDENTIAL
User manual
FAMM
Full-automatic mounting machine
Summary
This document is the user manual for the Full-Automatic flexo plate mounting machine FAMM
of AV Flexologic BV and explains the procedures required for general operation of the FAMM.
Revision history
Date
Change
Revision
Name
20-jun-2016
Creation of document
V01-01
DaBe
NOTE: Document may only be used if the revision history states a “RELEASED” status

2
H. Kamerlingh Onnesweg 2
2408 AW Alphen aan den Rijn
The Netherlands
CONFIDENTIAL - THIS DOCUMENT MAY NOT BE DISCLOSED TO ANY THIRD PARTY OR USED FOR ANY
OTHER PURPOSE WITHOUT THE EXPRESS WRITTEN PERMISSION OF AV FLEXOLOGIC BV
CONFIDENTIAL
Contents
1. Introduction .............................................................................................................................................2
2. Safety information ...................................................................................................................................2
3. Liability.....................................................................................................................................................3
4. Contact information.................................................................................................................................3
5. Tools list ...................................................................................................................................................3
6. Starting the machine................................................................................................................................3
7. Emergency shutdown procedure.............................................................................................................5
8. Light pillar.................................................................................................................................................6
9. Adding a new job .....................................................................................................................................7
10. Adding plates to the cylinder...................................................................................................................8
11. Preparation before mounting ..................................................................................................................9
12. Mounting plates.......................................................................................................................................9
13. Printing mounting information (reports)...............................................................................................10
14. Microdot not recognized at pickup position..........................................................................................10
15. Microdots not recognized at mount position........................................................................................11
16. Adobe AcrobatTM Plug in........................................................................................................................14
17. ESKO graphics® PlatepatcherTM..............................................................................................................14
18. Importing a MOM file ............................................................................................................................14
19. External job creation..............................................................................................................................16
20. Non-disclosure .......................................................................................................................................17
1. Introduction
This is the user manual for the Fully Automatic Mounting Machine (FAMM), a mounting machine which
eliminates the human factor in the mounting process. This manual describes the operation of the FAMM.
The intended audience is the client, or client’s service/operational personnel. All steps in this manual are
required to be followed in detail. If there are any deviations, a remark can be placed in the comments
sections in this document and please contact the service department at AV Flexologic BV.
2. Safety information
Sound emission of this machine does not exceed 70 dB (A).
While using the FAMM the following personal protective equipment (PPE) is required:
#
Description
Qty
1
Steel toe boots
pair
2
NOTE: Please check the user manuals of the above PPE on responsible use of these PPE.

3
H. Kamerlingh Onnesweg 2
2408 AW Alphen aan den Rijn
The Netherlands
CONFIDENTIAL - THIS DOCUMENT MAY NOT BE DISCLOSED TO ANY THIRD PARTY OR USED FOR ANY
OTHER PURPOSE WITHOUT THE EXPRESS WRITTEN PERMISSION OF AV FLEXOLOGIC BV
CONFIDENTIAL
3. Liability
AV Flexologic BV is not accountable for injuries sustained from using the FAMM, if personnel is not
properly schooled, if steps in this manual were not followed in detail, if incorrect tooling was used, or if
proper personal protective equipment was not used.
4. Contact information
If there are any questions or obscurities during the use of this manual and there is no
means of continuing, please contact the service department of AV Flexologic at Support@AVflexologic.com
5. Tools list
The following tools are required to operate the FAMM. Please make sure the tools are available before
starting. If these tools are not available, please do not use the FAMM.
#
Description
Qty
1
NONE
2
3
NOTE: Images are indicative, colours and/or shapes may vary.
6. Starting the machine
This section describes the power-up of the FAMM.
Step
Action
1
Make sure the machine has been powered down for at least 5 minutes.
2
Make sure the emergency stop button(s) are not activated (See section 7)
3
Turn the main power switch located on the front of the machine to the “ON” position:
4
Wait for the system to power up.
5
Enter username: Operator
Enter password: avmom
6
Wait for the software to completely boot up.
A
B
I: POWER ON POSITION (A)
O: POWER OFF POSITION (B)

4
H. Kamerlingh Onnesweg 2
2408 AW Alphen aan den Rijn
The Netherlands
CONFIDENTIAL - THIS DOCUMENT MAY NOT BE DISCLOSED TO ANY THIRD PARTY OR USED FOR ANY
OTHER PURPOSE WITHOUT THE EXPRESS WRITTEN PERMISSION OF AV FLEXOLOGIC BV
CONFIDENTIAL
7
Press the blue or white RESET button. (After reset the light of the button will go off)
8
The FAMM control software will automatically start-up and show the main screen.
Wait 30 seconds until the red bars disappear.
9
Click on Initialize (A) and wait for everything to turn green.
12
The machine is now fully powered up and ready to be used
13
DONE
Comments
A
5
H. Kamerlingh Onnesweg 2
2408 AW Alphen aan den Rijn
The Netherlands
CONFIDENTIAL - THIS DOCUMENT MAY NOT BE DISCLOSED TO ANY THIRD PARTY OR USED FOR ANY
OTHER PURPOSE WITHOUT THE EXPRESS WRITTEN PERMISSION OF AV FLEXOLOGIC BV
CONFIDENTIAL
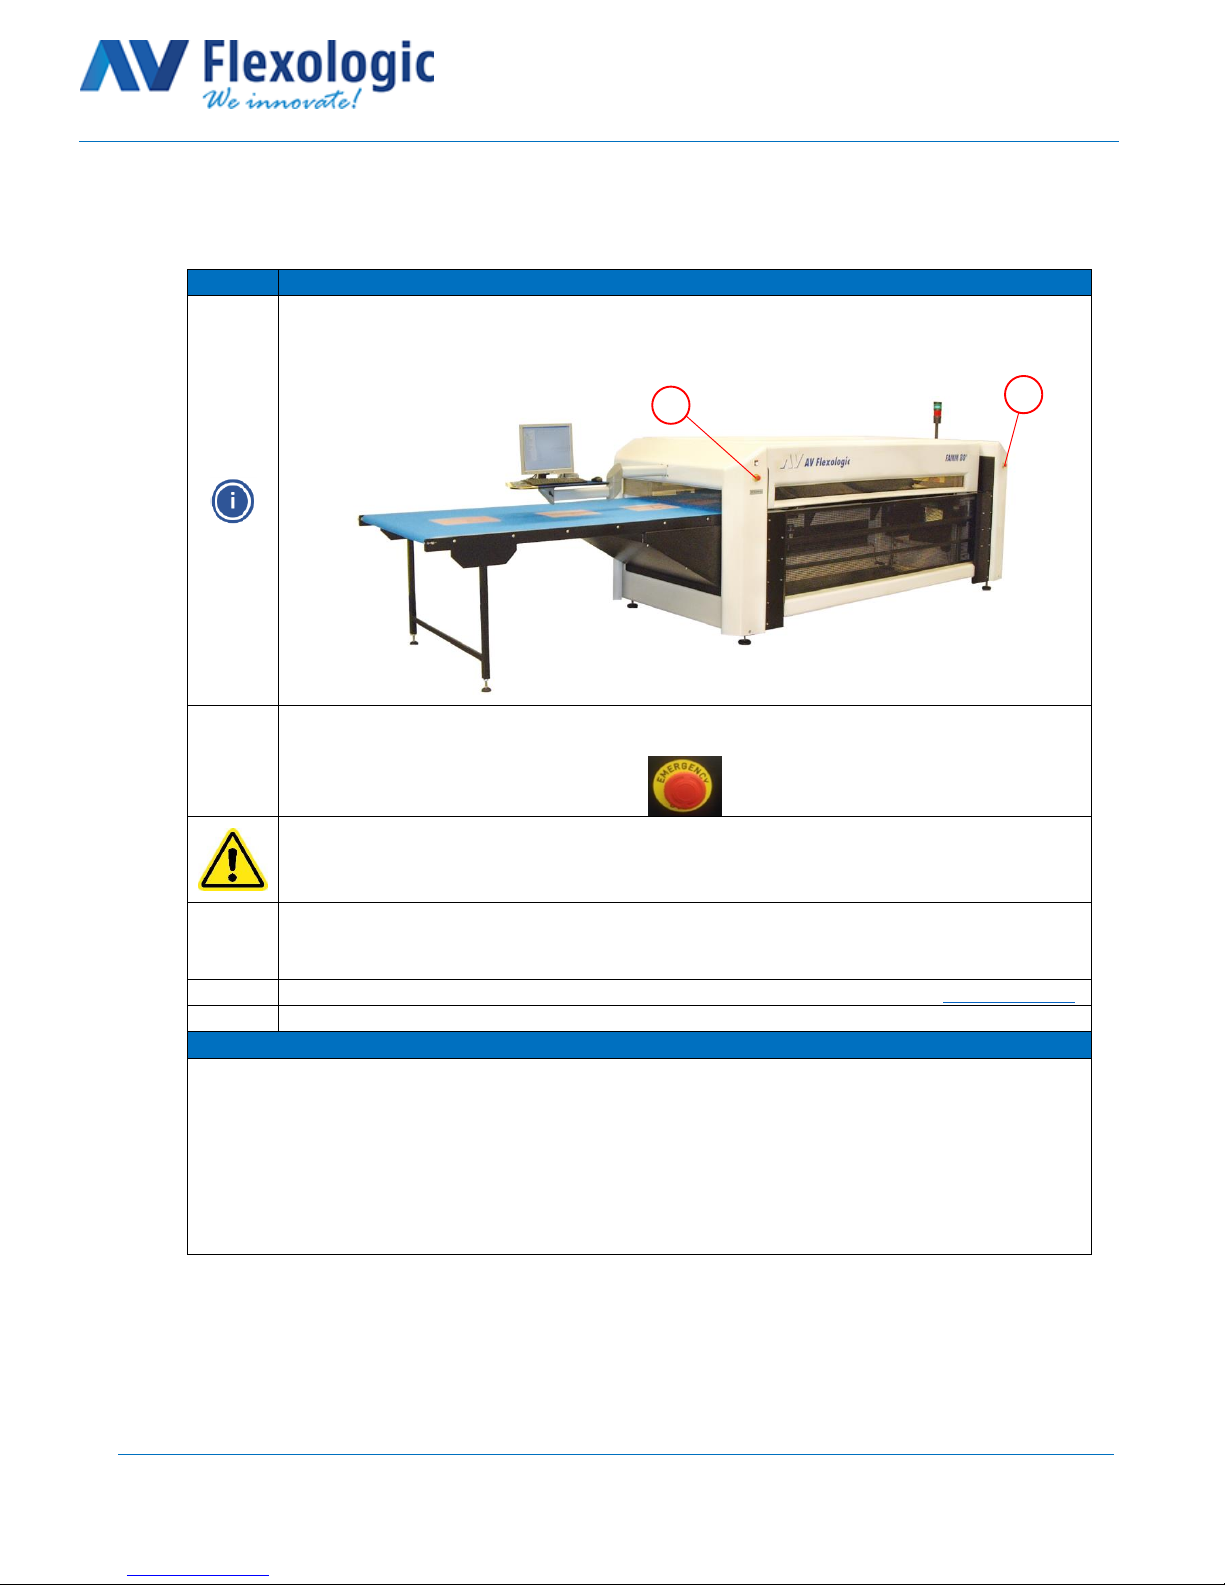
7. Emergency shutdown procedure
This section describes the procedure for an emergency shut down.
Step
Action
The FAMM is equipped with 2 emergency stop buttons (A). These buttons are situated at the
front of the machine, one on the left and one on the right side of the machine. These buttons
are for situations in which the FAMM needs to immediately stop all actions.
1
In case of an emergency, press an emergency stop button firmly. The FAMM will immediately
stop all actions.
Use of the emergency stop buttons is only allowed in an emergency situation and may not
be used under normal operational conditions to switch off the machine. Use of the
emergency stop button can potentially lead to the need to (re) calibrate the machine.
2
After the emergency situation is resolved, rotate the red part of the activated pushbutton, as
indicated on the button, until it “pops” out to release it.
3
After resetting the emergency stop button, reset the machine as described in section 6 step 7.
4
DONE
Comments
A
A
Table of contents


