FLINQ Xyro FQC8304 User manual

FlinQ Smart Indoor
Xyro Floorlamp
FQC8304 | Instruction Manual
EN NL DE FR

Manuel
EN
Thanks for purchasing one of our items! To ensure continuous operation and
accuracy, please read these operating instructions carefully before use and save this
manual for future use. Passing certain procedures may result in incorrect reading
and incorrect use of this product. We hope that you will enjoy using your new FlinQ-
product! If by any chance the item is damaged, defective or broken, you are covered
with warranty! Please do not hesitate to contact us for any questions, concerns or
suggestions at the email address as mentioned in this manual.
We can imagine you want to treat your FlinQ item carefully.
Register your product and you will be entitled to the following:
1 year extra warranty (2+1)
Personal support
Digital warranty certi cate
Digital manual
Welcome to the FlinQ family
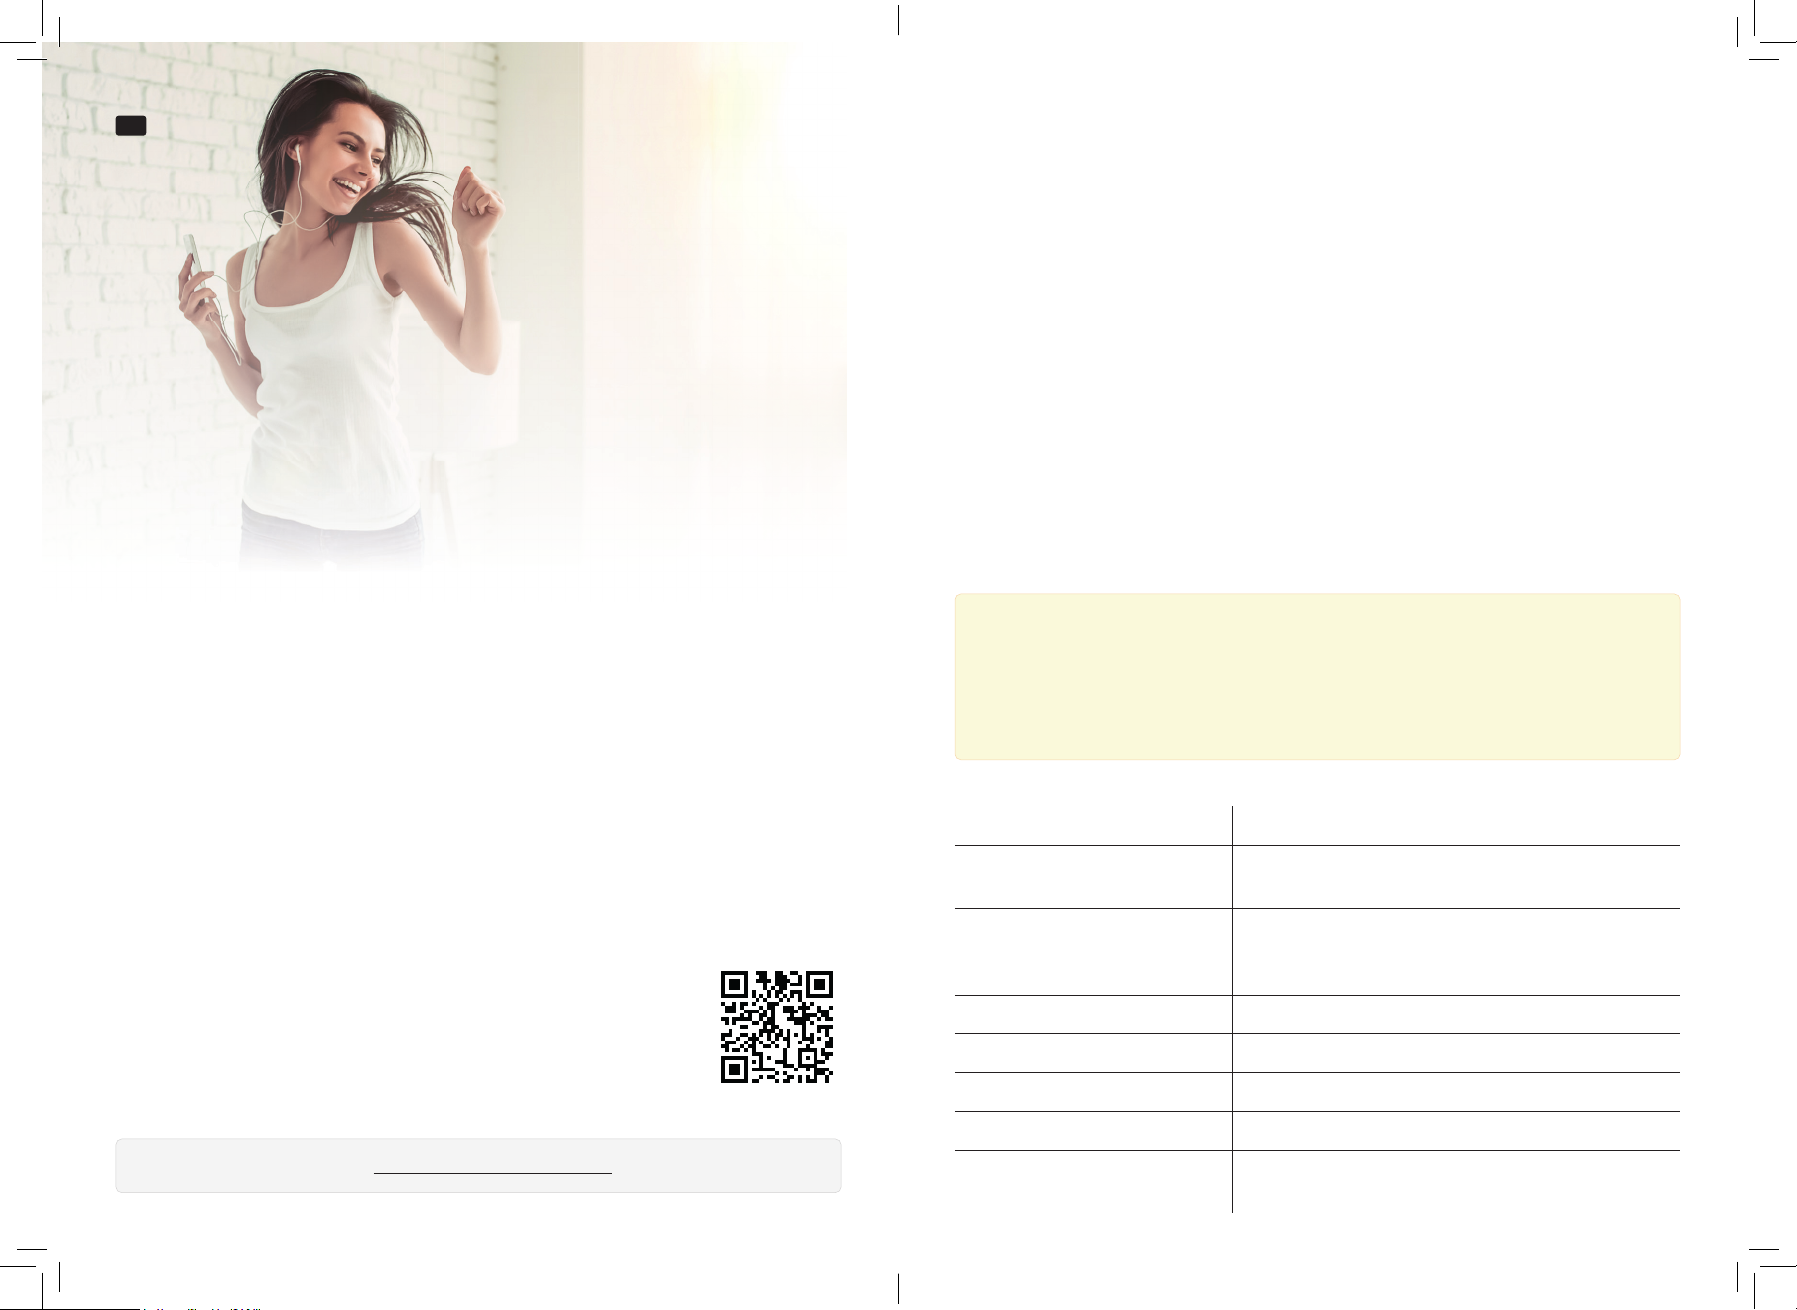
Register your FlinQ product
Scan the QR code or go to inqproducts.nl/registration
FlinQ Smart Indoor Xyro Floorlamp
Please read this manual thoroughly before using the product! Keep it in hand for
future reference. Warnings alert the user to potential serious outcomes, such as injury
or adverse events to the user. Cautions alert the user to exercise care necessary for
the safe and e ective use of the product. Notes contain important information that
may be overlooked or missed. This product can be used indoors only (see below for
more info). This appliance may be used by children aged 12 and over, and by persons
with reduced physical, sensory or mental capacities or a lack of su cient experience
and/or knowledge, provided they are supervised or have been trained in the safe use
of the appliance and understand the potential dangers. Cleaning and maintenance
must not be carried out by children without supervision. Children must not be allowed
to play with the appliance. Keep the packaging material away from children. There is a
risk of su ocation!
Safety information
Warning
- Do not allow unsupervised children to clean or maintain this device.
- WARNING! Do not leave packaging material lying around carelessly. This may
become dangerous playing material for children. Risk of su ocation!
- DANGER due to swallowing small parts. Keep these away from children. Risk of
su ocation!
Speci cations
Input voltage AC 100-240V / 50-60Hz
Rated output/input voltage
lamp
DC 12V- 2A (2000mA) max with 1.5MT cable
Control method FlinQ APP and/or RF433 soft touch wireless remo-
te control with color, speed and dimming function
and much more
Wireless Connection Mode FlinQ APP CB2S Wi + BT BLE
Wi control distance +-100 meters
Microphone pick up distance 36Db ≤10 meters
Product height size 115 cm x 120 mm x 120 mm base foot
Light color Smart RGB Symphony colors + Cool White + Warm
White chosen at any way possible
Manuel
EN FlinQ Smart Indoor Xyro Floorlamp
Display index CRI>80
Number of lamp LED beads 5050 RGB IC 60x + 2835 Warm white 60x + 2835
cool white 60x
Product color temperature warm white (2800-3200K) / white (6000-6500K) /
RGB Symphony Colors
LED life 40000 hours max.
Working temperature 0 degrees celcius ~ + 45 degrees celcius
IP Grade IP20 (indoor use only)
Shell material ABS + PC + metal iron spray paint
Lighting Symphony colors
mode +/-
232 lighting eects
Remote control
Buttons: 10x
Button function: ON/OFF, SYMPHONY START/PAUSE, SPEED +/-, BRIGHTNESS +/-,
LIGHT SWITCH, SYMPHONIC MODE +/-, RING COLOR
Remote control type: RF433 radio frequency remote control
Remote control distance: up to 30 meters (open area)
Remote control power supply: 3x AAA (LR03) batteries (not included, optional)
Control quantity: One remote control can control multiple lights (only for the single
colors) or 1 light selectable for your choice
Please note
- Choose a stable, solid and supportive surface and make sure the lamp is set
correctly.
- Make sure the cables cannot cause a trip hazard.
- Make sure there is enough ventilation around the device and so not cover it at all
times.
- This lamp is intended for inside use and the main power adapter and remote control
is not waterproof! Keep away from water and only use indoors.
WARNING: Keep the external adapter out of reach of children.
Never charge this product in moisture conditions or in the rain. Only charge it indoors,
in a dry place.
- This is not a TOY, keep away from small children below 12 years.
- Do not open or disassemble the lamp or adapter yourself, this will void the warranty
at all times.
- Do not disassemble, repair or modify the product by yourself as this may result into
an electric shock.
- Do not look directly into the lamp beads as it could hurt your eyes.
- The led source is not replaceable.
- If the cable or adapter is damaged or broken please contact your seller for correct
replacement by the manufacturer only.
- Do not stand, sit on, jump or throw with the lamp at all times.
- Do not throw this product in the air as it may cause damage by falling.
- Only use the lamp for its intended designed use as a light.
- Take good care of the product and clean it regularly.
- Never touch the plug contacts with sharp or metal objects.
- Use only the original power supply and original accessories.
- Do not use the device outdoors.
- Protect the device from special liquids and vapors.
This product is a lifestyle product
- Read and follow the instructions contained in this manual carefully. Keep these
instructions at a safe place for future reference.
- The operating life of the product will be less if the ambient temperature is higher
than 45°C or lower than -10°C.
European Regulatory Notice for wireless function in Europe
- Frequency Range: 433.92 Mhz + 500 Khz
- Antenna Gain: 1.8 dBi
- Max Radio Transmission power: <10dBm
Note
- Please note that the power port of the device should not be inltrated by water.
Otherwise, it will cause a product failure.
- Do not charge or store the product in a place below 0°C or above 40°C, otherwise
the product performance will be reduced.
- It is a normal phenomenon that temperature of the adapter rises during use.
Manuel
EN
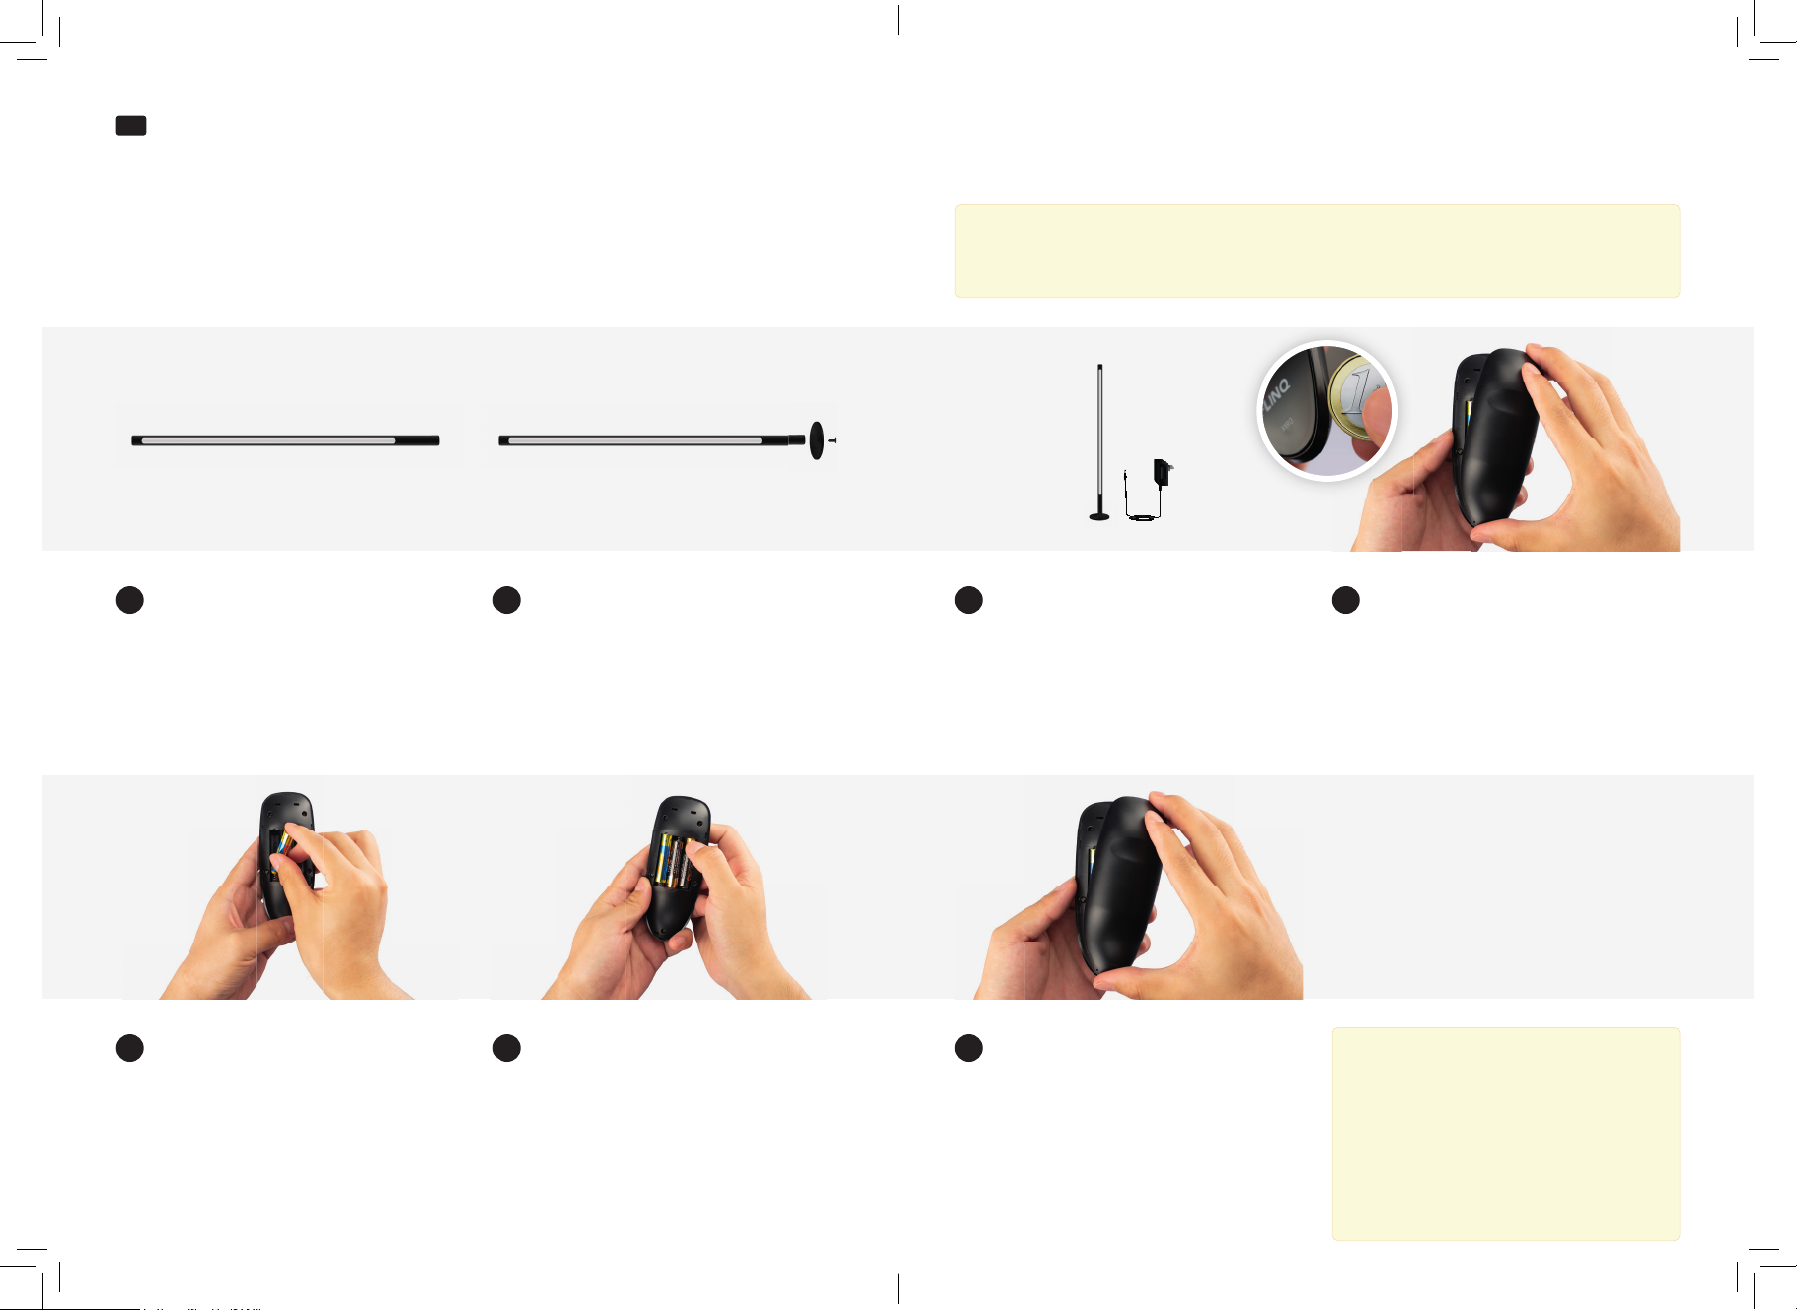
Do not connect the power cable nor adapter to the power mains outlet yet!
Please check if the lamp set is complete according the package contents as described.
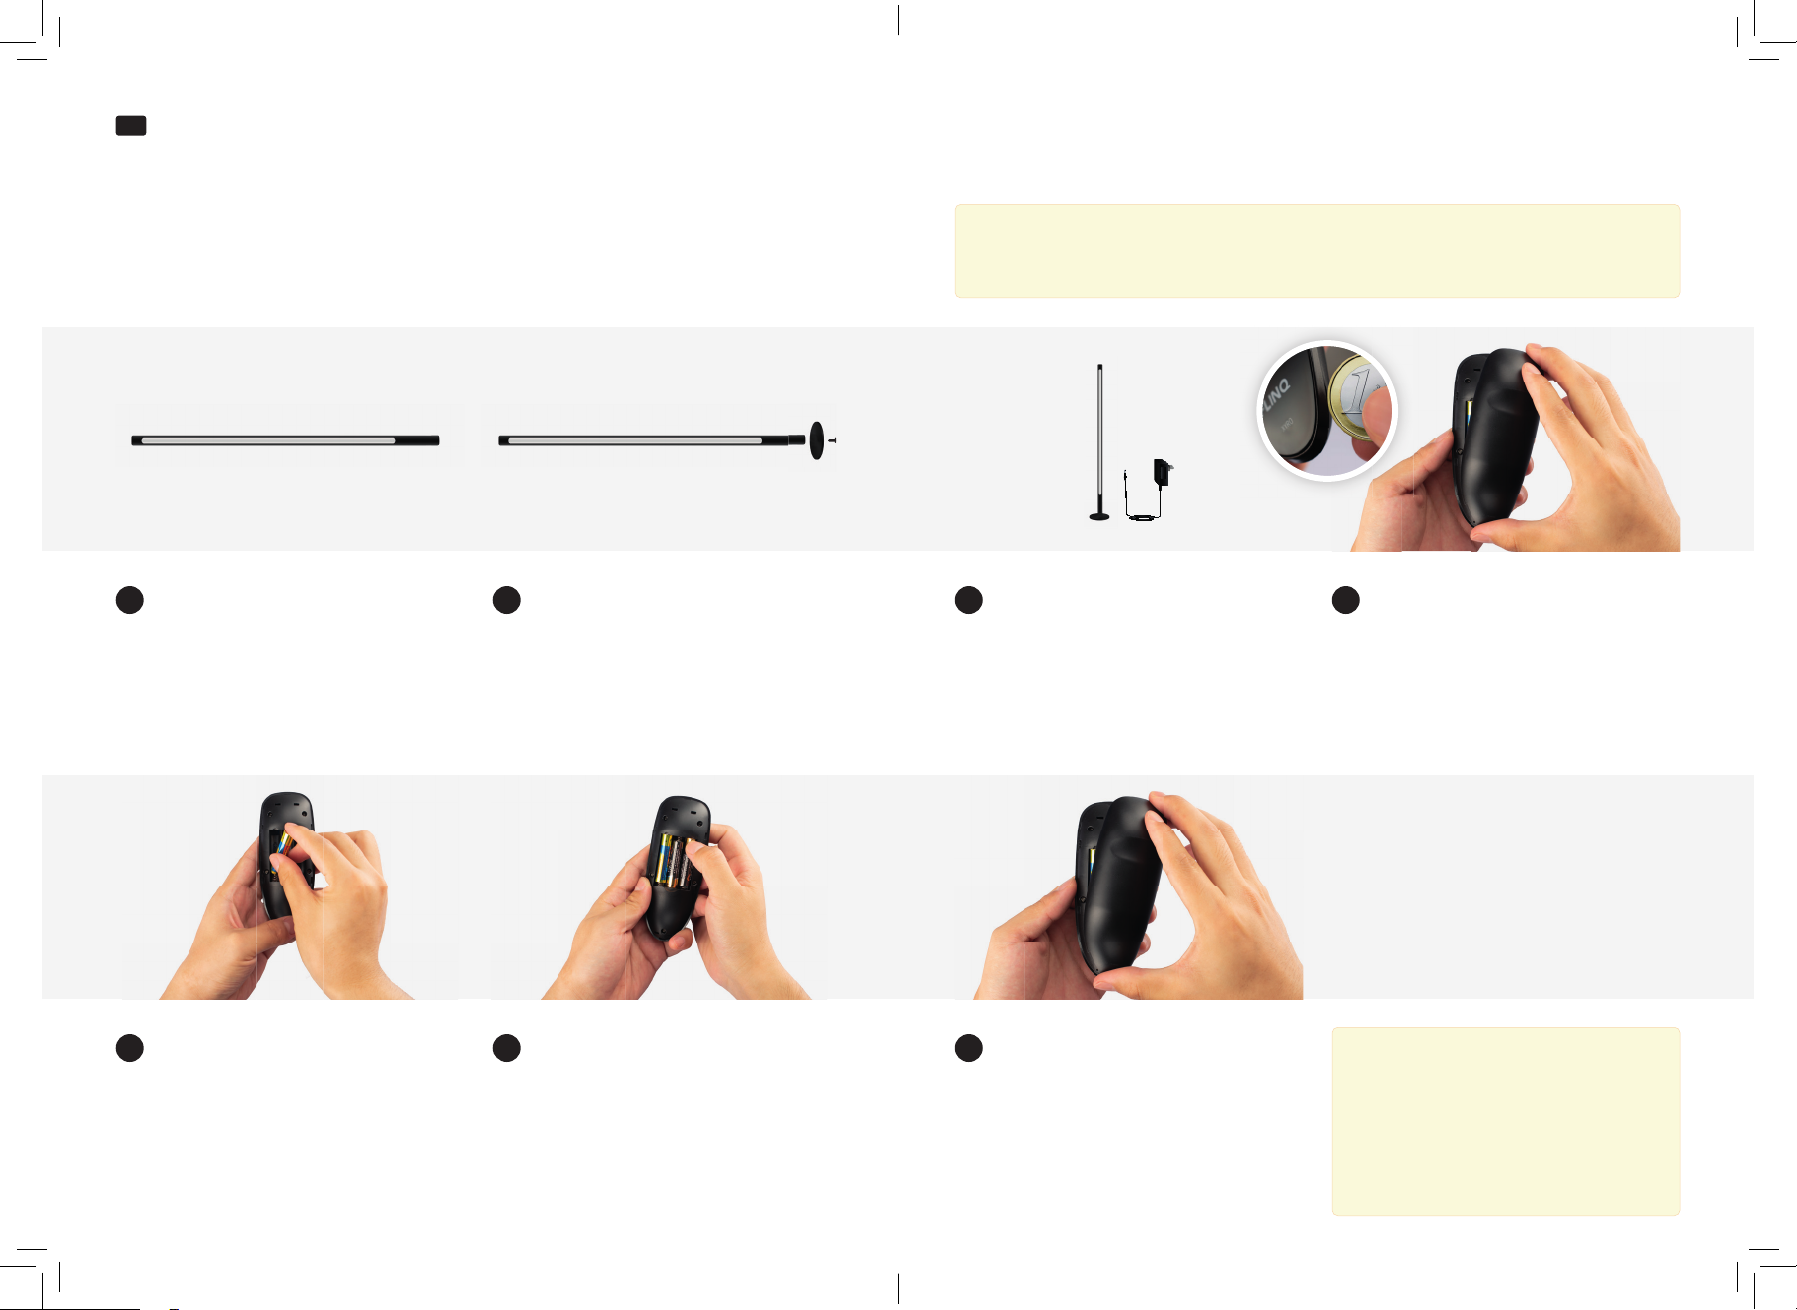
Installation of the lamp
Place the lamp pole carefully on a table
that is protected by a soft cloth or towel
etc.
To open the battery cover at the back
side use a small coin to twist and open it
at the side of the remote back cover.
Take the lamp pole bottom screw side in one
hand and bolt it with your other hand on the
lamp foot base hole with the supplied tool
and bolt. Fix it rmly but slow, carefully.
Clean the battery contact and remote
contacts before installing the batteries.
Insert the USB connector cable end
included into the approved adapter
power connection to connect and insert
it to the mains power outlet.
Install the three batteries 1 by 1 and
make sure to use the correct polarity +
and – inside the remote control housing.
Put the battery cover back into its place
and make sure that all sides are correctly
“clicked” and pushed inside the housing
of the remote top housing.
Place lamp on table Open remote controlAttach the base to the lamp pole
Clean batterie contacts
Insert cable
Place batteries Place cover back
1 42
5
3
6 7
FlinQ Smart Indoor Xyro Floorlamp
Note: The power adapter input is AC100-240V 50/60Hz, 0.7A with output from DC
12V-2A (2000mA) 24W max. Keep in mind this adapter is not waterproof and needs
to be used only indoors.
Note: The remote can be used for the
change of colors, to dim the light, to
speed up or down, start/pause function
controls and more. The remote control
is not waterproof! The maximum
control distance is <30 meters without
obstacles and in open space.

Manuel
EN FlinQ Smart Indoor Xyro Floorlamp
Button explanation
1. ON/OFF
Short press to turn on/o the light. Long press 5 seconds for code clearing/checking.
When the code is successfully matched, the blue light of the lamp ashes quickly 5
times, and the yellow light ashes slowly 5 times after the code is successfully cleared.
Note: Code clearing/code matching requires holding down the key within 20 seconds
after the lamp is powered on. If no operation is performed after 20 seconds, the
software will exit the code clearing/code matching mode. ( see below steps 1-3).
2. Play/pause
Short press function: When the light strip is turned on, short press to change the
monochrome color or illusion static color enters automatic playback mode. When the
light strip is in dynamic mode, short press the button to pause.
3. Color adjusting ring
Short press or slide the color ring to switch colors in color light mode, and switch color
temperature in white light mode.
4. Light mode
Short press function: Short press the white light switch button to get into the light
mode, the light color will switch among cool, warm and neutral light every click.
5. Timed shutdown
Short press function: Short press the button, the white light ashes one/two/three/four/
ve times that mean the light will turn o after one/two/three/four/ ve hours later.
6. Mode change speed+/-
Short press the button to change the 256 types illusory color modes and can adjust
the color sequence in setting mode.
7. Music rhythm mode
Short press function: Short press the button to get into the music rhythm mode, click
the button again to switch the mode; then click color adjusting ring, white light switch
and mode change speed+/- to exit. Long press Function: The controller will force the
Wi-Fi pairing state, Lamp with pairing state will appear red light ashing rapidly.
Note: When the power supply is connected, long press the “Music” button for 5-8
seconds in the power on/o state, the Internet data of the lamp will be cleared, and
the WIFI pairing mode will be re-entered. Note: The music rhythm mode has the
highest control power. Please exit music mode when it is not in use or it will switch to
APP built-in microphone mode when using a remote control.
8. Brightness +/-
Short press the button to adjust to 16 levels dierent brightness.
9. Mode change speed+/-
Short press the button to switch to 10 levels light color changing speeds. And it can
adjust LED set numbers in setting mode.
10. Microphone sensitivity+/-
Short press the button to adjust the microphone sensitivity.
11. Indicator
The light will turn on when the remote control is in normal operation, and if make the
long press, the light will turn of only after a moment.
Use one remote control to operate 1 or more lamps at the sae time
One remote control can be used with 1 lamp OR with multiple lamps at the same time.
You can “pair” it within a range of <5 meters from the lamp(s). To pair and use the
remote control with more than 1 lamp in the same/multiple rooms/spaces (optional to
purchase more lamp sets separately at www.inqproducts.nl)
Works as follows:
Note: In this process, be sure to turn o other purchased lamps FIRST before pairing.
You must do this by unplugging the adapter.
Below steps 1-3 needs to be done WITHIN 20 seconds time:
1. Plug the adapter into the power outlet of the lamp you want to pair and make sure
the lamp is ON.
2. Put the lamp into “color mode” by pressing the “light switch” button once if the lamp
is in normal white color mode.
3. Press and hold the LIGHT SWITCH button until the lamp slowly ashes the light 5x in
the color WHITE to conrm that the lamp is paired for use with more than 1 lamp.
4. Now remove the adapter OUT of the socket.
5. Repeat steps 1-3 above for any additional other lamp(s)

Manuel
EN FlinQ Smart Indoor Xyro Floorlamp
To reconnect and use the remote control with only 1 lamp in one room/area
works as follows:
Note: In this process, be sure to turn o other purchased lamps FIRST before pairing.
You must do this by unplugging the adapter.
1. Plug the adapter into the outlet of the lamp you want to pair and make sure the
lamp is ON.
2. Put the lamp into “color mode” by pressing the “light switch” button once if the lamp
is in normal white color mode.
3. Press and hold the LIGHT SWITCH button until the lamp ashes the light 5 times
rapidly in the color BLUE to conrm that 1 remote control is now paired.
4. Now remove the adapter OUT of the power outlet.
5. Repeat steps 1-3 above for any additional lamp(s) to be able to use them again with
1 remote control.
Register / login to the FlinQ app
1. Launch the “FLINQ” Application
2. Tap “agree” to conrm the privacy policy
3. To register, enter your mobile phone number or email address.
4. Press “verication code retrieval”
5. Enter the “verication code” that was send by phone number or email address
6. Create a password and login for the new app use or go to Login if you already have
an existing account.
When turned ON by the adapter the red LED will quickly ash to indicate it’s ready
to pair/connect by the Wi/BLE function. TIP: If it fails to ash quickly in red pairing
function, just check the remote functions described above to restore the pairing
factory setting.
Tip: For users that don’t want to use the lamp by the FLINQ app, they can wait for
the red led light ashing for more than 3 minutes so the lamp will be automatically
working with the remote control.
Read and follow all safety instructions
- This IP20 product is suitable for indoor use.
- Please use the rated input voltage power supply of the product as mentioned on the
back label.
- Do not install near a gas device or other sources with a similar heating process.
- Do not use the product outside its intended use.
- Read and follow all instructions that are indicated on the product or supplied with it.
- Keep this manual for future reference.
Important
Make sure that the lamp is set up, placed and powered ON during the 1st setup and
within a range of 10 meters max between your mobile device and the lamp itself.
Note: if you are using multiple lamps (2 or more) with 1 remote control then only the
normal white and static colors will work together and simultaneously to operate as well
as the dim setting etc. The symphonic (moving colors) can NOT be run simultaneously
as this is technically not possible and will continue to work independently.
Make sure your mobile device is running iOS 9 & higher or Android 5 & higher and
Bluetooth is turned ON!

Manuel
EN
Before plugging the unit into the mains, ensure by visual inspection that the unit is
intact and has not su ered any damage during transit.
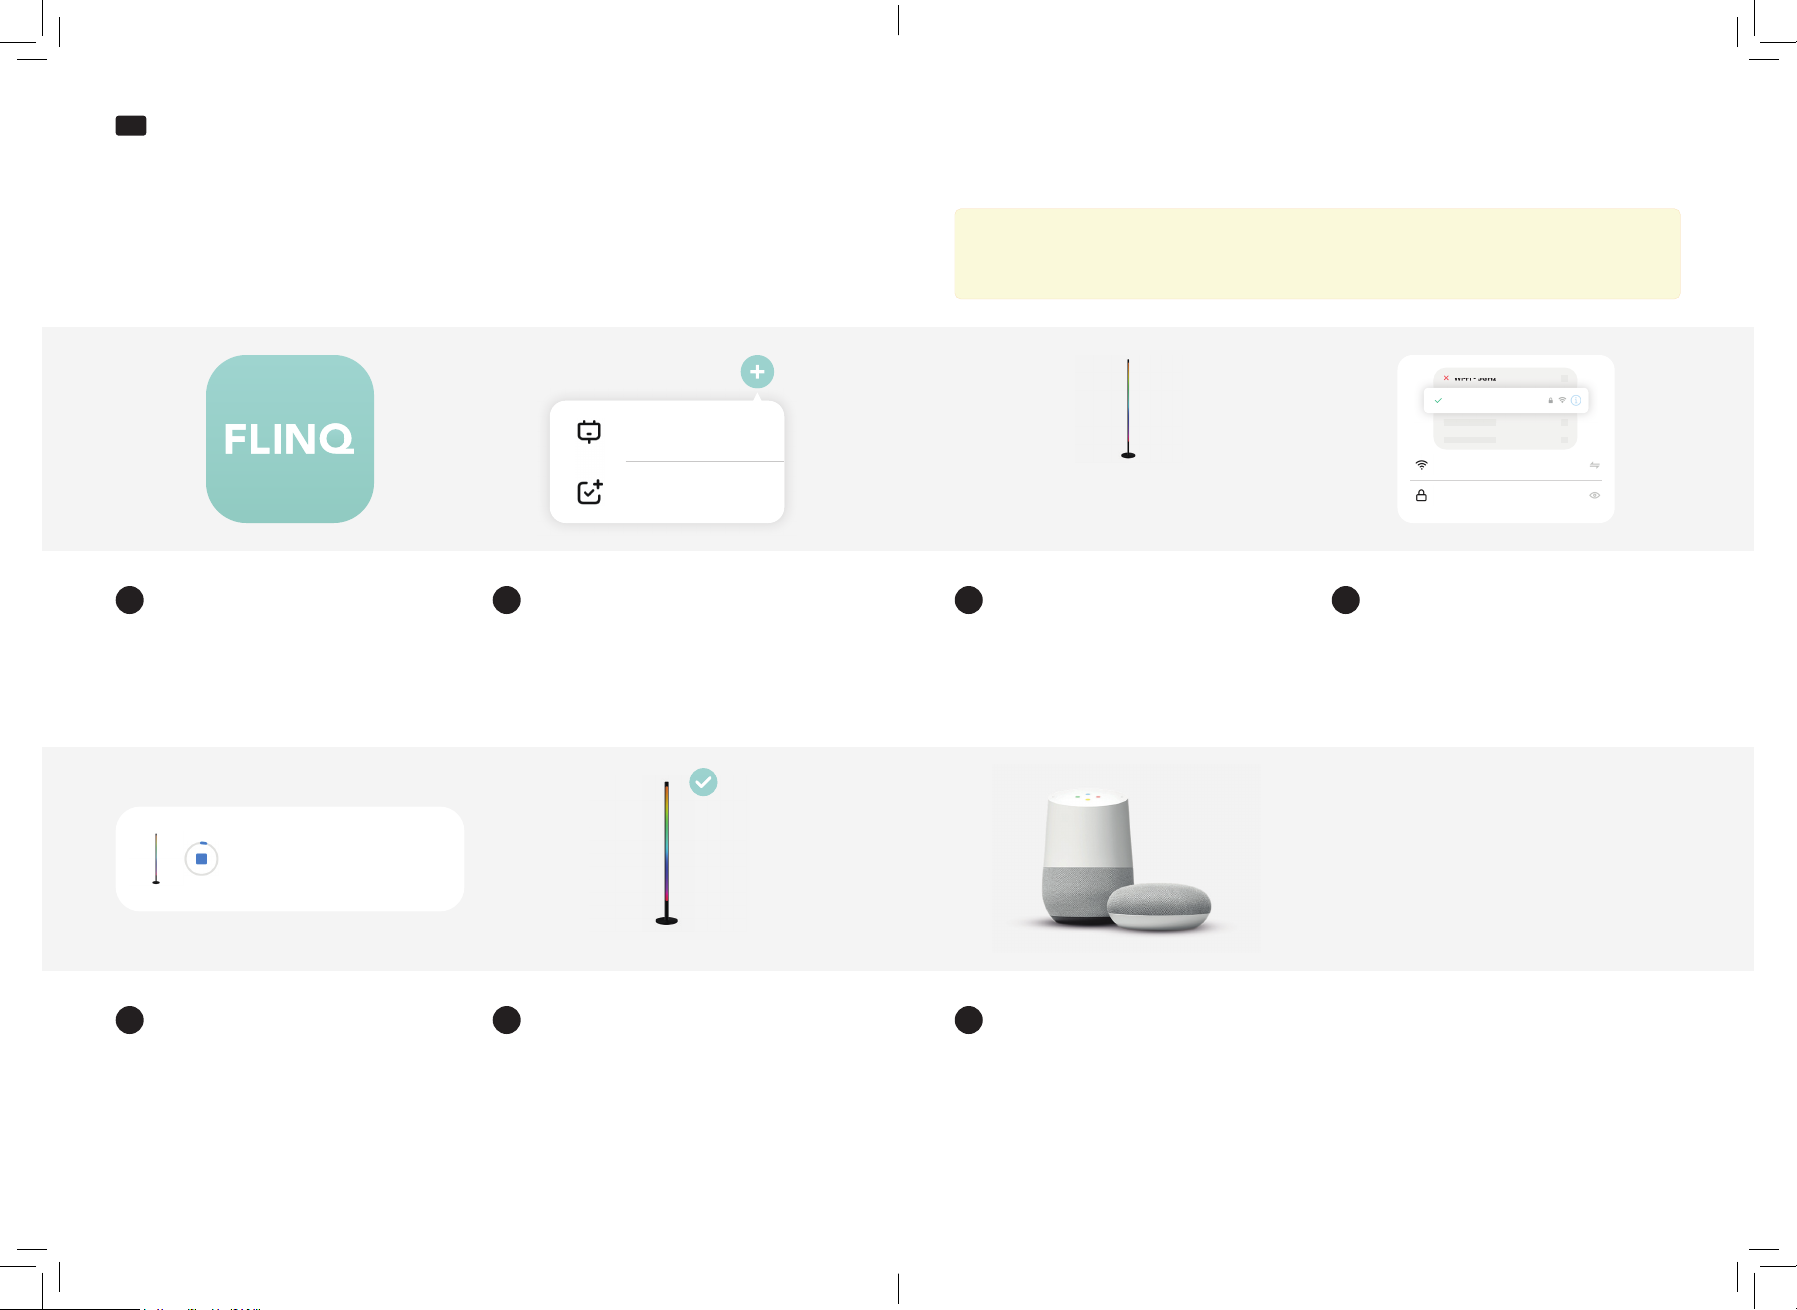
Connect your smart lamp to the FlinQ app
Open the FlinQ app on your mobile
device.
The device is installed. This can take up
to 2 minutes.
Select ‘Add Device’ or the ‘+’ sign and
make sure the red light on the lamp is
ashing rapidly.
The device is installed succesfully and
added to your list of products. You can
now control your device remotely.
To control your device by using your voice via a smart speaker, please refer to the
manufacturers instructions manual on how to enable a voice command through
your device.
Select your product type via the light
section tab. Please select the ‘FlinQ Smart
Indoor Xyro Floorlamp’.
Now ll in the WiFi name and password
to continue the installation
Open the FlinQ app
Device is being added
Add the device
Device added succesfully Google Home & Amazon Alexa
Select product type Fill in the WiFi details
1
5
2
6 7
34
FlinQ Smart Indoor Xyro Floorlamp
Add Device
Create Scene FlinQ Smart Indoor
Xyro Floorlamp
Wi-Fi name
************
Wi-Fi - 5GHz
Wi-Fi -
5GHz
Wi-Fi - 2.GHz
FlinQ Smart Indoor Xyro
Being added...
Notes: Please note that only 2,4 GHz networks are supported. 5 GHz networks will
not work. Ask your provider how to turn on both frequencies.

Manuel
EN FlinQ Smart Indoor Xyro Floorlamp
Notes
- If any problems, please restore the lamp to factory default and set it up again from
start!
- Never connect several Wi-Fi light in series!
- Make sure the Wi-Fi networks are 2.4Ghz only during setup.
- The Wi-Fi authorization method should be set as WPA2-PSK and Encryption type as
AES or set both at AUTO or newer.
- Do not exceed the total power capacity from the smart lights with the used
appliances/devices!
- Wireless router cannot be set as 802.11N.
- For Google assistant and Alexa; if these cannot be found, try to disable the FLINQ
function or the home skill app (for Alexa)
- If you need to fully RESET the Smart lamp follow the RESET instructions in the FLINQ
app or the FAQ.
- Do not open the Smart lamp yourself
- This Smart Lamp is not a TOY, Keep away from children!
- Only use this smart lamp with earthed power outlets and not with extension cables
(for charge)
- Do not use with appliances that could cause any re in unattended use (like irons etc)
- This Smart lamp does not have any safety disconnection
- Any other use as the intended way for this Smart lamp is not validated for any
warranty or liability.
- This Smart lamp is only used for private use
Instructions for use and maintenance
In case of non-use, store the product in a cool and dry place away from direct sunlight.
Troubleshooting
Light does not turn on?
- Button use: Try to power on/o by the button remote or re-connect the USB cable
connection or adapter from the main power outlet.
- Remote control not working: The RF signal maybe weak when there is a strong visible
light or barrier. Normal range should be eective within 30 meters.
Caution: NON-Replaceable LED lights!
Note: If the lamp does not work or respond at any possible way by the remote
please disconnect the power adapter from the mains power outlet and wait for at
least 15min and then re-connect it again.
Or remove the old batteries by opening the battery cover and remove of the cover
from the remote control. Take notice of the positive (+) and negative (-) side of the
batteries, make sure that the new batteries (AAA 1,5V) is inserted the right way. Click
the cover back on and dispose of the old battery responsibly.
- Not working: Is the battery full from the remote? Please replace and make sure the
adapter is connected to the mains power and retry.
- Poor distance: Use it inside a range of max. 30 meters without any obstacles.
The battery runs out too quick?
- Weak battery: We suggest only to use dry alkaline batteries from A-brands.
Cleaning the device itself
- Make sure the lamp is kept dust free and clean. Clean it regularly with a dry anti-
static cloth and with warm, soapy water but make sure that no water liquid can enter
the lamp luminaire. Dry the lamp before turning it ON again.
- Please do not immerse the main unit in water, it is not waterproof!
- Wipe gently with a clean soft cloth (microber) dampened with water or a mild
detergent.
- Do not use a strong irritant lotion such as gasoline, alcohol or rubber water.
This product is designed, produced and tested in accordance with the strictest
European safety directive’s and test standards.
Disposal Information
Separate collection.
This symbol means the product must not be discarded with the general household
waste. There is a separate collection system for these products.

Manuel
EN FlinQ Smart Indoor Xyro Floorlamp
Batteries and rechargeable batteries do not belong in the household waste! You
are required by law to dispose of used batteries and rechargeable batteries to a
collection point in your municipality or city administration or to a specialist battery
dealer so please return the battery/device to the collection point which will dispose of
the device and/or battery properly. If the battery is built-in inside the product , open
the product and remove the battery!
WEEE, the waste electrical and electronic equipment directive 2012/19/EU:
This marking shown on the product or its literature, indicates that it should not be
disposed with other household wastes at the end of its working life. To prevent
possible harm to the environment or human health from uncontrolled waste disposal,
please separate this from other types of wastes and recycle it responsibly to promote
the sustainable reuse of material resources. Household user should contact either the
retailer where they purchased this product or their local government oce for details
of where and how they can take this item for environmentally safe recycling. Business
users should contact their supplier and check the terms and conditions of the
purchase contract. This product should not be mixed with other commercial wastes
for disposal. Do not dispose of batteries in your household waste. Dispose of batteries
by taking them to your local recycling store or station, contact your local government
oce for more details. If possible please dispose the batteries separately as stated
by law and let it be recycled separately or give it to your local sales store/distributor/
dealer that dispose of it correctly and free of charge at all times. By recycling, reusing
the materials or other forms of utilizing old devices/batteries, you are making an
important contribution to protecting our environment and use.
Disclaimer
Information in this document is subject to change without notice. The manufacturer
does not make any representations or warranties (implied or otherwise) regarding
the accuracy and completeness of this document and shall in no event be liable for
any loss of prot or any commercial damage, including but not limited to special,
incidental, consequential or other damage. No part of this document may be
reproduced or transmitted in any form by any means, electronic or mechanical,
including photocopying, recording or information recording and retrieval systems
without the expressed written permission of the manufacturer. Our company owns
all right to this unpublished work and intends to maintain this work as condential.
Our company may also seek to maintain this work as an unpublished copyright. This
publication is to be used solely for the purpose of reference, operation, maintenance
or repair of our equipment. No part of this can be disseminated for other purposes.
In the event of inadvertent or deliberate publication, our company intends to enforce
its right to this work under copyright laws as a published work. Those having access
to this manual may not copy, disseminate or disclose the information in this work
unless expressly authorized by our company. All information contained in this manual
is believed to be correct. Our company shall not be liable for errors contained herein
nor for incidental or consequential damages in connection with the furnishing,
performance, or use of this material. This publication may refer to information and
protected by copyrights or patents and does not convey any license under the patent
rights of our company, nor the rights of others. Our company does not assume any
liability arising out of any infringements of patents or other rights of third parties
described at any time without notice or obligation. Also, content of the manual is
subject to change without prior notice.
Warranty
The warranty begins on the date of purchase and expires after 24 months. The
warranty period is considered to have started three months after the date of
manufacturing indicated on the product or as derived from the serial number of the
product. If any defect due to faulty materials and/or workmanship occurs within the
warranty period, we will make arrangements for service. Where a repair is not possible
or is deemed uneconomical we may agree to replace the product. Replacement will
be oered at our discretion and the warranty will continue from the date of original
purchase. The warranty applies provided the product has been handled properly for
its intended use and in accordance with the operating instructions. This warranty is
limited to the original buyer and not transferable. Support, warranty and questions
information: info@inqproducts.nl.
This product is designed, produced and tested in accordance with the strictest
European safety directive’s and test standards.
Handleiding
NL
Bedankt dat je voor een van onze artikelen heeft gekozen! Om een continue werking
en nauwkeurigheid te garanderen, dien je deze gebruiksaanwijzing voor gebruik
zorgvuldig te lezen en deze te bewaren voor toekomstig gebruik. Het overslaan van
bepaalde procedures kan leiden tot onjuiste lezing en onjuist gebruik van dit product.
Wij wensen je veel plezier met uw nieuwe FlinQ-product! Als het artikel per ongeluk
beschadigd, defect of kapot is, dan heb je recht op garantie! Aarzel niet om contact
met ons op te nemen bij vragen, opmerkingen of suggesties op het e-mailadres zoals
vermeld in deze handleiding.
Registreer je FlinQ product
Je FlinQ product, daar ben je extra zuinig op en dat begrijpen we.
Registreer gratis je product en pro teer onder meer van:
1 jaar extra garantie (2+1)
Persoonlijke ondersteuning
Digitaal garantie certi caat
Digitale handleiding
Welkom bij de FlinQ familie
Scan de QR code of ga naar inqproducts.nl/registreren/
FlinQ Smart Indoor Xyro Floorlamp
Lees deze handleiding aandachtig door voordat u het product gebruikt! Houd het bij
de hand voor toekomstig gebruik. Waarschuwingen waarschuwen de gebruiker voor
mogelijke ernstige gevolgen, zoals letsel of bijwerkingen voor de gebruiker. Waarschuwingen
waarschuwen de gebruiker om de nodige voorzichtigheid te betrachten voor een veilig
en e ectief gebruik van het product. Notities bevatten belangrijke informatie die over het
hoofd kan worden gezien of gemist. Dit product kan alleen binnenshuis worden gebruikt
(zie hieronder voor meer informatie). Dit apparaat mag worden gebruikt door kinderen
van 12 jaar en ouder, en door personen met verminderde fysieke, zintuiglijke of mentale
capaciteiten of een gebrek aan voldoende ervaring en/of kennis, op voorwaarde dat zij onder
toezicht staan of zijn opgeleid in het veilige gebruik van het apparaat en de potentiële gevaren
begrijpen. Reiniging en onderhoud mogen niet door kinderen zonder toezicht worden
uitgevoerd. Kinderen mogen niet met het apparaat spelen. Houd het verpakkingsmateriaal uit
de buurt van kinderen. Er bestaat gevaar voor verstikking!
Veiligheidsinformatie
Waarschuwing
- Laat kinderen zonder toezicht dit apparaat niet schoonmaken of onderhouden.
- WAARSCHUWING! Laat verpakkingsmateriaal niet achteloos rondslingeren. Voor
kinderen kan dit gevaarlijk speelmateriaal worden. Gevaar voor verstikking!
- GEVAAR door het inslikken van kleine onderdelen. Houd deze uit de buurt van
kinderen. Gevaar voor verstikking!
Speci caties
Ingangsspanning AC 100-240V / 50-60Hz
Nominale uitgangs-/ingangs-
spanning lamp
DC 12V- 2A (2000mA) max with 1.5MT cable
Control method FlinQ APP en/of RF433 soft touch draadloze
afstandsbediening met kleur-, snelheids- en dim-
functie en nog veel meer
Draadloze verbindingsmodus FlinQ APP CB2S Wi + BT BLE
Wi -bedieningsafstand +-100 meter
Opvangafstand microfoon 36Db ≤10 meter
Producthoogte maat 115 cm x 120 mm x 120 mm voet
Licht kleur Slimme RGB-symfoniekleuren + Koel Wit + Warm
Wit, op elke mogelijke manier gekozen
Handleiding
NL FlinQ Smart Indoor Xyro Floorlamp
Index weergeven CRI>80
Aantal lamp-LED-kralen 5050 RGB IC 60x + 2835 Warm white 60x + 2835
cool white 60x
Kleurtemperatuur van het
product
warm wit (2800-3200K) / wit (6000-6500K) / RGB
Symfonie kleuren
LED levensduur 40000 uren max.
Werktemperatuur 0 graden Celsius ~ + 45 graden Celsius
IP Graad IP20 (alleen binnen gebruiken)
Materiaal ABS + PC + metalen ijzeren spuitverf
Verlichting Symfoniekleuren-
modus +/-
232 lichteecten
Afstandsbediening
Knoppen: 10x
Knopfunctie: AAN/UIT, SYMFONIE START/PAUZE, SNELHEID +/-, HELDERHEID +/-,
LICHTSCHAKELAAR, SYMFONISCHE MODUS +/-, RINGKLEUR
Type afstandsbediening: RF433 radiofrequentieafstandsbediening
Afstand afstandsbediening: tot 30 meter (open ruimte)
Voeding afstandsbediening: 3x AAA (LR03) batterijen (niet inbegrepen, optioneel)
Controlehoeveelheid: Eén afstandsbediening kan meerdere lampen bedienen (alleen
voor de enkele kleuren) of 1 selecteerbaar licht naar keuze
Houd er rekening mee dat
- Kies een stabiele, stevige en ondersteunende ondergrond en zorg ervoor dat de lamp
correct is afgesteld.
- Zorg ervoor dat de kabels geen struikelgevaar kunnen veroorzaken.
- Zorg voor voldoende ventilatie rondom het apparaat en dek het apparaat dus niet te
allen tijde af.
- Deze lamp is bedoeld voor gebruik binnenshuis en de hoofdstroomadapter en
afstandsbediening zijn niet waterdicht! Uit de buurt van water houden en alleen
binnenshuis gebruiken.
WAARSCHUWING: Houd de externe adapter buiten het bereik van kinderen.
Laad dit product nooit op in vochtige omstandigheden of in de regen. Laad hem alleen
binnenshuis op, op een droge plaats.
- Dit is geen speelgoed, houd het buiten het bereik van kleine kinderen onder de 12 jaar.
- Open of demonteer de lamp of adapter niet zelf, hierdoor vervalt ten alle tijden de garantie.
- Demonteer, repareer of wijzig het product niet zelf, aangezien dit tot een elektrische
schok kan leiden.
- Kijk niet rechtstreeks in de lampkralen, aangezien dit pijn kan doen aan uw ogen.
- De ledbron is niet vervangbaar.
- Als de kabel of adapter beschadigd of kapot is, neem dan contact op met uw
verkoper voor een correcte vervanging door de fabrikant.
- Ga niet te allen tijde met de lamp staan, zitten, springen of gooien.
- Gooi dit product niet in de lucht, omdat het schade kan veroorzaken als het valt.
- Gebruik de lamp alleen voor het beoogde gebruik als verlichting.
- Zorg goed voor het product en maak het regelmatig schoon.
- Raak de stekkercontacten nooit aan met scherpe of metalen voorwerpen.
- Gebruik uitsluitend de originele voeding en originele accessoires.
- Gebruik het apparaat niet buitenshuis.
- Bescherm het apparaat tegen speciale vloeistoen en dampen.
Dit product is een lifestyleproduct
- Lees en volg de instructies in deze handleiding zorgvuldig. Bewaar deze instructies op
een veilige plaats voor toekomstig gebruik.
- De levensduur van het product zal korter zijn als de omgevingstemperatuur hoger is
dan 45°C of lager dan -10°C.
Europese regelgevingskennisgeving voor draadloze functie in Europa
- Frequentiebereik: 433,92 MHz + 500 Khz
- Antenneversterking: 1,8 dBi
- Maximaal radiozendvermogen: <10dBm
Opmerking
- Houd er rekening mee dat de voedingspoort van het apparaat niet door water
mag worden geïnltreerd. Anders zal dit een productfout veroorzaken.
- Laad het product niet op en bewaar het niet op een plaats onder 0°C of boven
40°C, anders zullen de prestaties van het product afnemen.
- Het is een normaal verschijnsel dat de temperatuur van de adapter stijgt tijdens
gebruik.
Handleiding
NL FlinQ Smart Indoor Xyro Floorlamp
Sluit de voedingskabel en adapter nog niet aan op het stopcontact! Controleer of de
lampenset compleet is volgens de verpakkingsinhoud zoals beschreven.
Installatie van de lamp
Plaats de lampmast voorzichtig op een
tafel die wordt beschermd door een
zachte doek of handdoek etc.
Om het batterijklepje aan de achterkant
te openen, gebruikt u een klein muntje
om het te openen aan de zijkant van het
achterklepje van de afstandsbediening.
Neem de onderste schroefzijde van de lamp
in één hand en schroef deze met uw andere
hand vast op het gat in de voet van de voet. =
Reinig het batterijcontact en de
afstandsbedieningscontacten voordat u
de batterijen installeert.
Steek het meegeleverde uiteinde van de
USB-connectorkabel in de stroomaansluiting
van de adapter om verbinding te maken en
steek deze in het stopcontact.
Plaats de drie batterijen 1 voor 1 en zorg
ervoor dat u de juiste polariteit + en – in
de behuizing van de afstandsbediening
gebruikt.
Plaats het batterijdeksel terug op zijn
plaats en zorg ervoor dat alle zijden
correct zijn “geklikt” en in de behuizing
van de bovenste behuizing van de
afstandsbediening zijn geduwd.
Lamp op tafel zetten Afstandsbediening openenBevestig de voet aan de lamp
Maak de batterijcontacten
schoon
Sluit kabel aan
Plaats batterijen Plaats de deksel terug
1 42
5
3
6 7
Opmerking: De invoer van de voedingsadapter is AC100-240V 50/60Hz, 0,7A met
uitvoer van DC 12V-2A (2000mA) en maximaal 24W. Houd er rekening mee dat deze
adapter niet waterdicht is en alleen binnenshuis mag worden gebruikt.
Opmerking: De afstandsbediening kan
worden gebruikt voor het veranderen
van kleuren, het dimmen van het licht,
het versnellen of vertragen, het starten/
pauzeren van functies en meer. De
afstandsbediening is niet waterdicht! De
maximale bedieningsafstand is <30 meter
zonder obstakels en in open ruimte.

Handleiding
NL FlinQ Smart Indoor Xyro Floorlamp
Knop uitleg
1. AAN/UIT
Kort indrukken om het licht aan/uit te zetten. Houd 5 seconden lang ingedrukt om de
code te wissen/controleren. Wanneer de code met succes is gekoppeld, knippert het
blauwe lampje van de lamp 5 keer snel en knippert het gele lampje 5 keer langzaam
nadat de code met succes is gewist. Opmerking: voor het wissen/matchen van codes
moet u de toets binnen 20 seconden ingedrukt houden nadat de lamp is ingeschakeld.
Als er na 20 seconden geen handeling wordt uitgevoerd, verlaat de software de modus
voor het wissen van codes/codematching. (zie onderstaande stappen 1-3).
2. Afspelen/pauzeren
Functie voor kort indrukken: wanneer de lichtstrip is ingeschakeld, drukt u kort in
om de monochrome kleur of de statische kleur van de illusie te wijzigen en wordt de
automatische afspeelmodus geactiveerd. Wanneer de lichtstrip in de dynamische
modus staat, drukt u kort op de knop om te pauzeren.
3. Kleurafstelring
Druk kort op de kleurenring of verschuif deze om van kleur te wisselen in de
kleurlichtmodus, en om van kleurtemperatuur te wisselen in de witlichtmodus.
4. Lichtmodus
Functie voor kort indrukken: druk kort op de knop voor de witte lichtschakelaar om
in de lichtmodus te komen, de lichtkleur verandert bij elke klik tussen koel, warm en
neutraal licht.
5. Getimede uitschakeling
Functie voor kort indrukken: Druk kort op de knop, het witte licht knippert één/twee/drie/
vier/vijf keer, wat betekent dat het licht na één/twee/drie/vier/vijf uur later uitgaat.
6. Modusveranderingssnelheid +/-
Druk kort op de knop om de 256 soorten illusoire kleurmodi te wijzigen en u kunt de
kleurvolgorde aanpassen in de instelmodus.
7. Muziekritmemodus
Functie voor kort indrukken: druk kort op de knop om naar de muziekritmemodus
te gaan, klik nogmaals op de knop om van modus te wisselen; klik vervolgens op de
kleurinstelring, de witlichtschakelaar en de modusveranderingssnelheid +/- om af te
sluiten. Functie lang indrukken: De controller forceert de Wi-Fi-koppelingsstatus. De
lamp met koppelingsstatus zal rood licht laten zien en snel knipperen. Opmerking:
Wanneer de voeding is aangesloten, drukt u in de aan/uit-status lang op de knop
“Muziek” gedurende 5-8 seconden. De internetgegevens van de lamp worden
gewist en de WIFI-koppelingsmodus wordt opnieuw geactiveerd. Opmerking: De
muziekritmemodus heeft de hoogste regelkracht. Verlaat de muziekmodus wanneer
deze niet in gebruik is, anders schakelt hij over naar de ingebouwde microfoonmodus
van de APP wanneer u een afstandsbediening gebruikt.
8. Helderheid +/-
Druk kort op de knop om de helderheid aan te passen op 16 niveaus.
9. Modusveranderingssnelheid +/-
Druk kort op de knop om over te schakelen naar 10 niveaus, waarbij de lichtkleur
verandert. En het kan LED-instelnummers aanpassen in de instelmodus.
10. Microfoongevoeligheid +/-
Druk kort op de knop om de microfoongevoeligheid aan te passen.
11. Indicator
Het licht gaat aan als de afstandsbediening normaal werkt, en als u lang drukt, gaat
het licht pas na een moment uit.
Met één afstandsbediening bedient u 1 of meerdere lampen tegelijk
Eén afstandsbediening kan gebruikt worden met 1 lamp OF met meerdere lampen
tegelijk. Je kunt hem ‘koppelen’ binnen een bereik van <5 meter van de lamp(en). Om
de afstandsbediening te koppelen en te gebruiken met meer dan 1 lamp in dezelfde/
meerdere kamers/ruimtes (optioneel om meer lampensets apart aan te schaen op
www.inqproducts.nl)
Werkt als volgt:
Opmerking: Zorg ervoor dat u tijdens dit proces EERST andere aangeschafte lampen
uitschakelt voordat u gaat koppelen. U moet dit doen door de adapter los te koppelen.
Onderstaande stappen 1-3 moeten BINNEN 20 seconden worden uitgevoerd:
1. Sluit de adapter aan op het stopcontact van de lamp die u wilt koppelen en zorg
ervoor dat de lamp AAN staat.

Handleiding
NL FlinQ Smart Indoor Xyro Floorlamp
2. Zet de lamp in de “kleurmodus” door één keer op de “lichtschakelaar”-knop te
drukken als de lamp in de normale witte kleurmodus staat.
3. Houd de LIGHT SWITCH-knop ingedrukt totdat de lamp het licht 5x langzaam laat
knipperen in de kleur WIT om te bevestigen dat de lamp is gekoppeld voor gebruik
met meer dan 1 lamp.
4. Verwijder nu de adapter UIT het stopcontact.
5. Herhaal stap 1-3 hierboven voor eventuele andere lampen
Het opnieuw aansluiten en gebruiken van de afstandsbediening met slechts 1
lamp in één kamer/ruimte werkt als volgt:
Opmerking: Zorg ervoor dat u tijdens dit proces EERST andere aangeschafte lampen
uitschakelt voordat u gaat koppelen. U moet dit doen door de adapter los te koppelen.
1. Steek de adapter in het stopcontact van de lamp die u wilt koppelen en zorg ervoor
dat de lamp AAN staat.
2. Zet de lamp in de “kleurmodus” door één keer op de “lichtschakelaar”-knop te
drukken als de lamp in de normale witte kleurmodus staat.
3. Houd de LIGHT SWITCH-knop ingedrukt totdat de lamp 5 keer snel knippert in de
kleur BLAUW om te bevestigen dat er nu 1 afstandsbediening is gekoppeld.
4. Verwijder nu de adapter UIT het stopcontact.
5. Herhaal stap 1-3 hierboven voor eventuele extra lamp(en) om deze weer met 1
afstandsbediening te kunnen gebruiken.
Registreer/log in op de FlinQ app
1. Start de “FLINQ”-applicatie
2. Tik op “akkoord” om het privacybeleid te bevestigen
3. Om u te registreren, voert u uw mobiele telefoonnummer of e-mailadres in.
4. Druk op “vericatiecode ophalen”
5. Voer de “vericatiecode” in die per telefoonnummer of e-mailadres is verzonden
6. Maak een wachtwoord aan en log in voor het nieuwe appgebruik of ga naar
Inloggen als je al een bestaand account hebt.
Zorg ervoor dat uw mobiele apparaat iOS 9 en hoger of Android 5 en hoger gebruikt
en Bluetooth is ingeschakeld!
Wanneer de adapter is ingeschakeld, knippert de rode LED snel om aan te geven
dat hij klaar is om te koppelen/verbinden via de Wi/BLE-functie. TIP: Als het niet
snel knippert in de rode koppelingsfunctie, controleer dan gewoon de hierboven
beschreven afstandsbedieningsfuncties om de fabrieksinstellingen voor het koppelen
te herstellen.
Tip: Gebruikers die de lamp niet via de FLINQ-app willen gebruiken, kunnen wachten
tot het rode led-lampje langer dan 3 minuten knippert, zodat de lamp automatisch
gaat werken met de afstandsbediening.
Lees en volg alle veiligheidsinstructies
- Dit IP20-product is geschikt voor gebruik binnenshuis.
- Gebruik de nominale ingangsspanning van het product zoals vermeld op het
achterlabel.
- Niet installeren in de buurt van een gasapparaat of andere bronnen met een
soortgelijk verwarmingsproces.
- Gebruik het product niet buiten het beoogde gebruik.
- Lees en volg alle instructies die op het product staan aangegeven of daarbij worden
meegeleverd.
- Bewaar deze handleiding voor toekomstig gebruik
Belangrijk
Zorg ervoor dat de lamp is opgesteld, geplaatst en ingeschakeld tijdens de eerste
installatie en binnen een bereik van maximaal 10 meter tussen uw mobiele apparaat
en de lamp zelf.
Let op: indien u gebruik maakt van meerdere lampen (2 of meer) met 1
afstandsbediening dan werken alleen de normale witte en statische kleuren samen
en tegelijkertijd te bedienen evenals de dimstand etc. De symfonische (bewegende
kleuren) kunnen NIET worden uitgevoerd tegelijkertijd omdat dit technisch niet
mogelijk is en zelfstandig zal blijven werken.
Handleiding
NL FlinQ Smart Indoor Xyro Floorlamp
Voordat u de stekker van het apparaat in het stopcontact steekt, moet u door visuele inspectie
controleren of het apparaat intact is en tijdens het transport geen schade heeft opgelopen.
Koppel je slimme lamp aan de FlinQ app
Open de FlinQ-app op uw mobiele
apparaat.
Het apparaat is geïnstalleerd. Dit kan
maximaal 2 minuten duren.
Selecteer ‘Apparaat toevoegen’ of het ‘+’
teken en zorg ervoor dat het rode lampje
op de lamp snel knippert.
Het apparaat is succesvol geïnstalleerd
en toegevoegd aan uw lijst met
producten. U kunt uw apparaat nu op
afstand bedienen.
Om uw apparaat te bedienen met uw stem via een slimme luidspreker, raadpleegt u
de handleiding van de fabrikant over hoe u een spraakopdracht kunt inschakelen via
Je toestel.
Selecteer uw producttype via het tabblad
Lichtsectie. Selecteer de ‘FlinQ Smart
Indoor Xyro Vloerlamp’.
Vul nu de WiFi-naam en het wachtwoord
in om door te gaan met de installatie
Open de FlinQ app
Apparaat wordt toegevoegd
Voeg het apparaat toe
Apparaat succesvol toegevoegd Google Home & Amazon Alexa
Selecteer product type Vul de WiFi-gegevens in
1
5
2
6 7
34
Add Device
Create Scene FlinQ Smart Indoor
Xyro Floorlamp
Wi-Fi name
************
Wi-Fi - 5GHz
Wi-Fi -
5GHz
Wi-Fi - 2.GHz
FlinQ Smart Indoor Xyro
Being added...
Opmerkingen: Houd er rekening mee dat alleen 2,4 GHz-netwerken worden
ondersteund. 5 GHz-netwerken zullen niet werken. Vraag uw provider hoe u beide
frequenties kunt inschakelen.

Handleiding
NL FlinQ Smart Indoor Xyro Floorlamp
Opmerkingen
- Als er problemen optreden, herstel dan de fabrieksinstellingen van de lamp en stel
hem opnieuw in vanaf het begin!
- Sluit nooit meerdere Wi-Fi-lampen in serie aan!
- Zorg ervoor dat de Wi-Fi-netwerken tijdens de installatie alleen 2,4 Ghz zijn.
- De Wi-Fi-autorisatiemethode moet worden ingesteld als WPA2-PSK en het
coderingstype als AES of beide op AUTO of nieuwer.
- Overschrijd het totale vermogen van de slimme lampen niet met de gebruikte
apparaten/apparaten!
- Draadloze router kan niet worden ingesteld als 802.11N.
- Voor Google-assistent en Alexa; als deze niet te vinden zijn, probeer dan de FLINQ-
functie of de home skill-app (voor Alexa) uit te schakelen
- Als u de Smart lamp volledig moet RESETTEN, volgt u de RESET-instructies in de
FLINQ-app of de FAQ.
- Open de Smart-lamp niet zelf
- Deze slimme lamp is geen speelgoed, houd hem uit de buurt van kinderen!
- Gebruik deze slimme lamp alleen met geaarde stopcontacten en niet met
verlengsnoeren (tegen betaling)
- Niet gebruiken met apparaten die bij onbeheerd gebruik brand kunnen veroorzaken
(zoals strijkijzers enz.)
- Deze slimme lamp heeft geen veiligheidsuitschakeling
- Elk ander gebruik zoals bedoeld voor deze Smart-lamp wordt niet gevalideerd voor
enige garantie of aansprakelijkheid.
- Deze Smart lamp wordt alleen gebruikt voor privégebruik
Instructies voor gebruik en onderhoud
Als u het product niet gebruikt, bewaar het dan op een koele en droge plaats, uit de
buurt van direct zonlicht.
Probleemoplossen
Licht gaat niet aan?
- Knopgebruik: Probeer het apparaat aan/uit te zetten met de afstandsbediening of
sluit de USB-kabel of adapter opnieuw aan op het stopcontact.
- Afstandsbediening werkt niet: Het RF-signaal kan zwak zijn als er een sterk zichtbaar
licht of een barrière is. Normaal bereik zou eectief moeten zijn binnen 30 meter.
Let op: NIET-vervangbare LED-lampen!
Opmerking: Als de lamp niet werkt of op geen enkele manier reageert via de
afstandsbediening, koppel dan de voedingsadapter los van het stopcontact, wacht
minimaal 15 minuten en sluit hem vervolgens opnieuw aan.
Of verwijder de oude batterijen door het batterijdeksel te openen en het deksel van de
afstandsbediening te verwijderen. Let op de positieve (+) en negatieve (-) kant van de
batterijen, zorg ervoor dat de nieuwe batterijen (AAA 1,5V) op de juiste manier worden
geplaatst. Klik het deksel er weer op en gooi de oude batterij op een verantwoorde
manier weg.
- Werkt niet: Is de batterij vol van de afstandsbediening? Vervang de adapter, zorg
ervoor dat deze op het elektriciteitsnet is aangesloten en probeer het opnieuw.
- Slechte afstand: gebruik hem binnen een bereik van max. 30 meter zonder obstakels.
Is de batterij te snel leeg?
- Zwakke batterij: Wij raden aan alleen droge alkalische batterijen van A-merken te
gebruiken.
Het apparaat zelf reinigen
- Zorg ervoor dat de lamp stofvrij en schoon wordt gehouden. Maak hem regelmatig
schoon met een droge antistatische doek en met warm zeepsop, maar zorg ervoor
dat er geen watervloeistof in de lamparmatuur kan komen. Droog de lamp voordat u
hem weer AAN zet.
- Dompel het hoofdapparaat niet onder in water, het is niet waterdicht!
- Veeg voorzichtig af met een schone, zachte doek (microvezel) die is bevochtigd met
water of een mild schoonmaakmiddel.
- Gebruik geen sterk irriterende lotion zoals benzine, alcohol of rubberwater.
Dit product is ontworpen, geproduceerd en getest in overeenstemming met de
strengste Europese veiligheidsrichtlijnen en testnormen.
Informatie over verwijdering
Aparte inzameling
Dit symbool betekent dat het product niet met het gewone huisvuil mag worden
weggegooid. Voor deze producten bestaat een apart inzamelsysteem.
Handleiding
NL FlinQ Smart Indoor Xyro Floorlamp
Batterijen en accu’s horen niet bij het huisvuil! U bent wettelijk verplicht gebruikte
batterijen en accu’s in te leveren bij een inzamelpunt in uw gemeente of stadsbestuur
of bij een gespecialiseerde batterijhandelaar. Breng de batterij/het apparaat dus terug
naar het inzamelpunt waar het apparaat en/of de batterij wordt afgevoerd. op de
juiste manier. Als de batterij in het product is ingebouwd, open dan het product en
verwijder de batterij!
WEEE, de richtlijn betreende afgedankte elektrische en elektronische apparatuur
2012/19/EU: Deze markering op het product of de bijbehorende documentatie geeft
aan dat het aan het einde van zijn levensduur niet met ander huishoudelijk afval
mag worden weggegooid. Om mogelijke schade aan het milieu of de menselijke
gezondheid door ongecontroleerde afvalverwerking te voorkomen, dient u dit afval
van andere soorten afval te scheiden en op verantwoorde wijze te recyclen om het
duurzame hergebruik van materiële hulpbronnen te bevorderen. Huishoudelijke
gebruikers moeten contact opnemen met de detailhandelaar waar ze dit product
hebben gekocht of met het plaatselijke overheidskantoor voor informatie over
waar en hoe ze dit artikel kunnen inleveren voor milieuveilige recycling. Zakelijke
gebruikers moeten contact opnemen met hun leverancier en de voorwaarden van
het koopcontract controleren. Dit product mag niet worden gemengd met ander
bedrijfsafval voor verwijdering. Gooi batterijen niet weg bij het huishoudelijk afval.
Gooi batterijen weg door ze naar uw plaatselijke recyclingwinkel of -station te brengen.
Neem voor meer informatie contact op met uw plaatselijke overheidskantoor. Gooi
de batterijen indien mogelijk apart weg, zoals voorgeschreven door de wet, en laat
ze apart recyclen, of geef ze af bij uw plaatselijke verkoopwinkel/distributeur/dealer,
die ze te allen tijde correct en gratis afvoert. Door te recyclen, de materialen te
hergebruiken of op een andere manier oude apparaten/batterijen te gebruiken, levert
u een belangrijke bijdrage aan de bescherming van ons milieu en ons gebruik.
Disclaimer
De informatie in dit document kan zonder voorafgaande kennisgeving worden
gewijzigd. De fabrikant geeft geen enkele verklaring of garantie (impliciet of
anderszins) met betrekking tot de juistheid en volledigheid van dit document en is
in geen geval aansprakelijk voor winstderving of commerciële schade, inclusief maar
niet beperkt tot speciale, incidentele schade, gevolgschade of andere schade. Geen
enkel deel van dit document mag in welke vorm dan ook, elektronisch of mechanisch,
worden gereproduceerd of overgedragen, inclusief fotokopieën, opnames of
systemen voor het opnemen en ophalen van informatie, zonder de uitdrukkelijke
schriftelijke toestemming van de fabrikant. Ons bedrijf bezit alle rechten op dit
ongepubliceerde werk en is van plan dit werk vertrouwelijk te houden. Ons bedrijf kan
ook proberen dit werk als ongepubliceerd auteursrecht te behouden. Deze publicatie
mag uitsluitend worden gebruikt voor referentie, bediening, onderhoud of reparatie
van onze apparatuur. Niets hiervan mag voor andere doeleinden worden verspreid. In
het geval van onbedoelde of opzettelijke publicatie is ons bedrijf van plan zijn recht op
dit werk onder de auteursrechtwetten af te dwingen als gepubliceerd werk. Degenen
die toegang hebben tot deze handleiding mogen de informatie in dit werk niet
kopiëren, verspreiden of openbaar maken, tenzij uitdrukkelijk toegestaan door ons
bedrijf. Er wordt aangenomen dat alle informatie in deze handleiding correct is. Ons
bedrijf is niet aansprakelijk voor fouten in dit document, noch voor incidentele schade
of gevolgschade in verband met de levering, prestatie of gebruik van dit materiaal.
Deze publicatie kan verwijzen naar informatie die beschermd is door auteursrechten
of patenten en verleent geen enkele licentie onder de patentrechten van ons bedrijf,
noch de rechten van anderen. Ons bedrijf aanvaardt geen enkele aansprakelijkheid
die voortvloeit uit inbreuken op patenten of andere rechten van derden die op enig
moment zonder voorafgaande kennisgeving of verplichting worden beschreven.
Bovendien kan de inhoud van de handleiding zonder voorafgaande kennisgeving
worden gewijzigd.
Garantie
De garantie begint op de datum van aankoop en vervalt na 24 maanden. De
garantieperiode wordt geacht te zijn ingegaan drie maanden na de productiedatum
aangegeven op het product of zoals afgeleid uit het serienummer van het product.
Als er binnen de garantieperiode een defect optreedt als gevolg van materiaal- en/
of fabricagefouten, zullen wij een afspraak maken voor service. Als reparatie niet
mogelijk is of als onrendabel wordt beschouwd, kunnen we overeenkomen om het
product te vervangen. Vervanging wordt naar eigen goeddunken aangeboden en
de garantie loopt door vanaf de datum van oorspronkelijke aankoop. De garantie
geldt op voorwaarde dat het product correct is behandeld voor het beoogde gebruik
en in overeenstemming met de gebruiksaanwijzing. Deze garantie is beperkt tot
de oorspronkelijke koper en is niet overdraagbaar. Support, garantie en vragen
informatie: info@inqproducts.nl.
Dit product is ontworpen, geproduceerd en getest in overeenstemming met de
strengste Europese veiligheidsrichtlijnen en testnormen.
Handbuch
DE
Vielen Dank, dass Sie sich für einen unserer Artikel entschieden haben! Um einen
kontinuierlichen Betrieb und Genauigkeit zu gewährleisten, lesen Sie bitte diese
Bedienungsanleitung vor der Verwendung sorgfältig durch und bewahren Sie sie
zum späteren Nachschlagen auf. Das Überspringen bestimmter Verfahren kann zu
falschem Lesen und falscher Verwendung dieses Produkts führen. Wir wünschen
Ihnen viel Freude mit Ihrem neuen FlinQ-Produkt! Wenn der Artikel versehentlich
beschädigt, defekt oder kaputt ist, haben Sie Anspruch auf Gewährleistung! Bitte
zögern Sie nicht, uns bei Fragen, Kommentaren oder Vorschlägen unter der in diesem
Handbuch angegebenen E-Mail-Adresse zu kontaktieren.
Registrieren Sie Ihr FlinQ Produkt
Sie sind besonders vorsichtig mit Ihrem neuem FlinQ Produkt
nd wir verstehen das. Registrieren Sie Ihr Produkt jetzt kostenlos
und pro tieren Sie von:
Ein Jahr Zusatzgarantie (2+1))
Persönlicher technischer Unterstutzung und Support
Digitales Garantiezerti kat
Digitales Handbuch
Willkommen in der inq-familie
Scannen Sie den QR-Code oder besuchen Sie inqproducts.nl/registration/
FlinQ Smart Indoor Xyro Floorlamp
Bitte lesen Sie diese Anleitung sorgfältig durch, bevor Sie das Produkt verwenden! Bewahren
Sie es zum späteren Nachschlagen auf. Warnungen warnen den Benutzer vor möglichen
schwerwiegenden Folgen wie Verletzungen oder unerwünschten Ereignissen für den Benutzer.
Vorsichtshinweise weisen den Benutzer darauf hin, die für die sichere und e ektive Verwendung
des Produkts erforderliche Vorsicht walten zu lassen. Notizen enthalten wichtige Informationen,
die möglicherweise übersehen oder übersehen werden. Dieses Produkt kann nur im Innenbereich
verwendet werden (weitere Informationen nden Sie unten). Dieses Gerät darf von Kindern ab
12 Jahren und von Personen mit eingeschränkten körperlichen, sensorischen oder geistigen
Fähigkeiten oder einem Mangel an ausreichender Erfahrung und/oder Wissen verwendet
werden, sofern sie beaufsichtigt werden oder in die sichere Verwendung des Geräts eingewiesen
wurden die möglichen Gefahren verstehen. Reinigung und Wartung dürfen nicht von Kindern
ohne Aufsicht durchgeführt werden. Kinder dürfen nicht mit dem Gerät spielen. Halten Sie das
Verpackungsmaterial von Kindern fern. Es besteht Erstickungsgefahr!
Sicherheitsinformation
Warnung
- Erlauben Sie Kindern nicht, dieses Gerät ohne Aufsicht zu reinigen oder zu warten.
- ACHTUNG! Lassen Sie Verpackungsmaterial nicht achtlos herumliegen. Dies kann
für Kinder zu gefährlichem Spielmaterial werden. Erstickungsgefahr!
- GEFAHR durch Verschlucken von Kleinteilen. Halten Sie diese von Kindern fern.
Erstickungsgefahr!
Spezi kationen
Eingangsspannung AC 100-240V / 50-60Hz
Nennausgangs-/Eingangsspan-
nungslampe
DC 12 V – 2 A (2000 mA) max. mit 1,5 m langem
Kabel
Kontroll-Methode FlinQ APP und/oder RF433 Soft-Touch-Funk-
fernbedienung mit Farb-, Geschwindigkeits- und
Dimmfunktion und vielem mehr
Drahtloser Verbindungsmodus FlinQ APP CB2S WLAN + BT BLE
WLAN-Kontrollentfernung +-100 Meter
Aufnahmeabstand des Mikrofons 36Db ≤10 meters
Produkthöhengröße 115 cm x 120 mm x 120 mm Grundfuß
Helle Farbe Intelligente RGB-Symphonie-Farben + Kaltweiß
+ Warmweiß werden auf jede erdenkliche Weise
ausgewählt

Handbuch
DE FlinQ Smart Indoor Xyro Floorlamp
Index anzeigen CRI>80
Anzahl der Lampen-LED-Perlen 5050 RGB IC 60x + 2835 Warmweiß 60x + 2835
Kaltweiß 60x
Farbtemperatur des Produkts Warmweiß (2800-3200K) / Weiß (6000-6500K) /
RGB Symphony Colors
LED-Leben 40000 Stunden max.
Arbeitstemperatur 0 Grad Celsius ~ + 45 Grad Celsius
IP-Klasse IP20 (nur Innenbereich)
Schalenmaterial ABS + PC + Metall-Eisen-Sprühfarbe
Beleuchtungssymphonie-Farb-
modus +/-
232 Lichteekte
Fernbedienung
Knöpfe: 10x
Tastenfunktion: EIN/AUS, SYMPHONIE START/PAUSE, GESCHWINDIGKEIT +/-,
HELLIGKEIT +/-, LICHTSCHALTER, SYMPHONIE-MODUS +/-, RINGFARBE
Fernbedienungstyp: RF433-Funkfernbedienung
Fernbedienungsentfernung: bis zu 30 Meter (oener Bereich)
Stromversorgung der Fernbedienung: 3x AAA (LR03) Batterien (nicht im Lieferumfang
enthalten, optional)
Steuerungsmenge: Eine Fernbedienung kann mehrere Lichter steuern (nur für die
einzelnen Farben) oder 1 Licht nach Ihrer Wahl auswählbar
bitte beachten Sie
- Wählen Sie einen stabilen, festen und stützenden Untergrund und stellen Sie sicher, dass
die Lampe richtig eingestellt ist.
- Stellen Sie sicher, dass die Kabel keine Stolpergefahr darstellen können.
- Sorgen Sie für ausreichende Belüftung rund um das Gerät und decken Sie es daher nicht
ständig ab.
- Diese Lampe ist für den Innenbereich bestimmt und das Netzteil und die Fernbedienung
sind nicht wasserdicht! Von Wasser fernhalten und nur im Innenbereich verwenden.
WARNUNG: Bewahren Sie den externen Adapter außerhalb der Reichweite von Kindern
auf. Laden Sie dieses Produkt niemals bei Feuchtigkeit oder Regen auf. Laden Sie es nur
drinnen und an einem trockenen Ort auf.
- Dies ist kein SPIELZEUG. Halten Sie es von kleinen Kindern unter 12 Jahren fern.
- Önen oder zerlegen Sie die Lampe oder den Adapter nicht selbst, da sonst die Garantie
erlischt.
- Zerlegen, reparieren oder modizieren Sie das Produkt nicht selbst, da dies zu einem
Stromschlag führen kann.
- Schauen Sie nicht direkt in die Lampenperlen, da dies Ihre Augen verletzen könnte.
- Die LED-Quelle ist nicht austauschbar.
- Wenn das Kabel oder der Adapter beschädigt oder kaputt ist, wenden Sie sich bitte an
Ihren Verkäufer, um einen korrekten Ersatz nur durch den Hersteller zu erhalten.
- Stehen, sitzen, springen oder werfen Sie nicht mit der Lampe.
- Werfen Sie dieses Produkt nicht in die Luft, da es durch Herunterfallen beschädigt
werden kann.
- Benutzen Sie die Lampe nur bestimmungsgemäß als Leuchte.
- Pegen Sie das Produkt gut und reinigen Sie es regelmäßig.
- Berühren Sie die Steckkontakte niemals mit scharfen oder metallischen Gegenständen.
- Verwenden Sie nur das Original-Netzteil und Original-Zubehör.
- Benutzen Sie das Gerät nicht im Freien.
- Schützen Sie das Gerät vor besonderen Flüssigkeiten und Dämpfen.
Bei diesem Produkt handelt es sich um ein Lifestyle-Produkt
- Lesen und befolgen Sie die Anweisungen in diesem Handbuch sorgfältig. Bewahren
Sie diese Anleitung zum späteren Nachschlagen an einem sicheren Ort auf.
- Die Lebensdauer des Produkts verkürzt sich, wenn die Umgebungstemperatur über
45 °C oder unter -10 °C liegt.
Europäischer Regulierungshinweis für drahtlose Funktionen in Europa
- Frequenzbereich: 433,92 MHz + 500 kHz
- Antennengewinn: 1,8 dBi
- Maximale Funkübertragungsleistung: <10 dBm
Notiz
- Bitte beachten Sie, dass kein Wasser in den Stromanschluss des Geräts gelangen
darf. Andernfalls kommt es zu einem Produktausfall.
- Laden oder lagern Sie das Produkt nicht an einem Ort unter 0 °C oder über 40 °C,
da sonst die Produktleistung beeinträchtigt wird.
- Es ist ein normales Phänomen, dass die Temperatur des Adapters während des
Gebrauchs ansteigt.

Handbuch
DE FlinQ Smart Indoor Xyro Floorlamp
Schließen Sie das Netzkabel und den Adapter noch nicht an die Steckdose an! Bitte überprüfen
Sie, ob das Lampenset anhand des Packungsinhalts wie beschrieben vollständig ist.
Installation der Lampe
Stellen Sie den Lampenmast vorsichtig
auf einen Tisch, der mit einem weichen
Tuch, Handtuch usw. geschützt ist.
Um die hintere Batterieabdeckung
zu ö nen, verwenden Sie eine kleine
Münze, um sie an der Seite der hinteren
Abdeckung der Fernbedienung zu ö nen.
Nehmen Sie die untere Schraubenseite der
Lampe mit einer Hand und schrauben Sie sie
mit der anderen Hand in das Loch im Sockel
des Sockels.
Reinigen Sie den Batteriekontakt und die
Fernbedienungskontakte, bevor Sie die
Batterien einlegen.
Zum Anschließen stecken Sie das
mitgelieferte Ende des USB-Anschlusskabels
in die Strombuchse des Adapters und
stecken Sie es in die Steckdose.å
Legen Sie die drei Batterien
nacheinander ein und achten Sie
auf die richtige Polarität + und – im
Fernbedienungsgehäuse.
Setzen Sie die Batterieabdeckung wieder
an ihren Platz und stellen Sie sicher, dass
alle Seiten richtig „einrasten“ und in das
Gehäuse des Remote-Obergehäuses
gedrückt werden.
Lampe auf den Tisch stellen Fernbedienung öff nenBefestigen Sie den Sockel am
Lampenmast
Batteriekontakte reinigen
Kabel einführen
Batterien einlegen Abdeckung wieder aufsetzen
1 42
5
3
6 7
Hinweis: Der Eingang des Netzteils ist AC100-240V 50/60Hz, 0,7A mit Ausgang von
DC 12V-2A (2000mA) 24W max. Beachten Sie, dass dieser Adapter nicht wasserdicht
ist und nur im Innenbereich verwendet werden darf.
Hinweis: Mit der Fernbedienung
können Sie Farben ändern, Lichter
dimmen, die Geschwindigkeit
erhöhen oder verringern, Funktionen
starten/pausieren und mehr. Die
Fernbedienung ist nicht wasserdicht!
Der maximale Lenkweg beträgt 30m.
Table of contents
Languages:
Other FLINQ Outdoor Light manuals


Popular Outdoor Light manuals by other brands


HYDRO-RAIN
HYDRO-RAIN HRL-BKP1-LED-3W manual

Quoizel
Quoizel SNNL8406K instruction sheet

kenall
kenall LUXTRAN LTSI Series installation instructions

SUN AMEX
SUN AMEX APP SQUARE Instructions for use

Ferguson Enterprises
Ferguson Enterprises PARK HARBOR FOXFIELD PHEL5105BLK quick start guide

Patriot Lighting
Patriot Lighting 29145 manual

Tracon Electric
Tracon Electric STLE2W user manual

Aquatec Equipment
Aquatec Equipment PondMAX ULTRA Series instruction manual

LIGMAN
LIGMAN OD-21079 installation manual

Soltech
Soltech STL-CLF150 Series installation instructions

XanLite
XanLite PR200D manual

planeo
planeo Nova 5 Manual and safety instructions