Floria garden products Classic Plus User manual
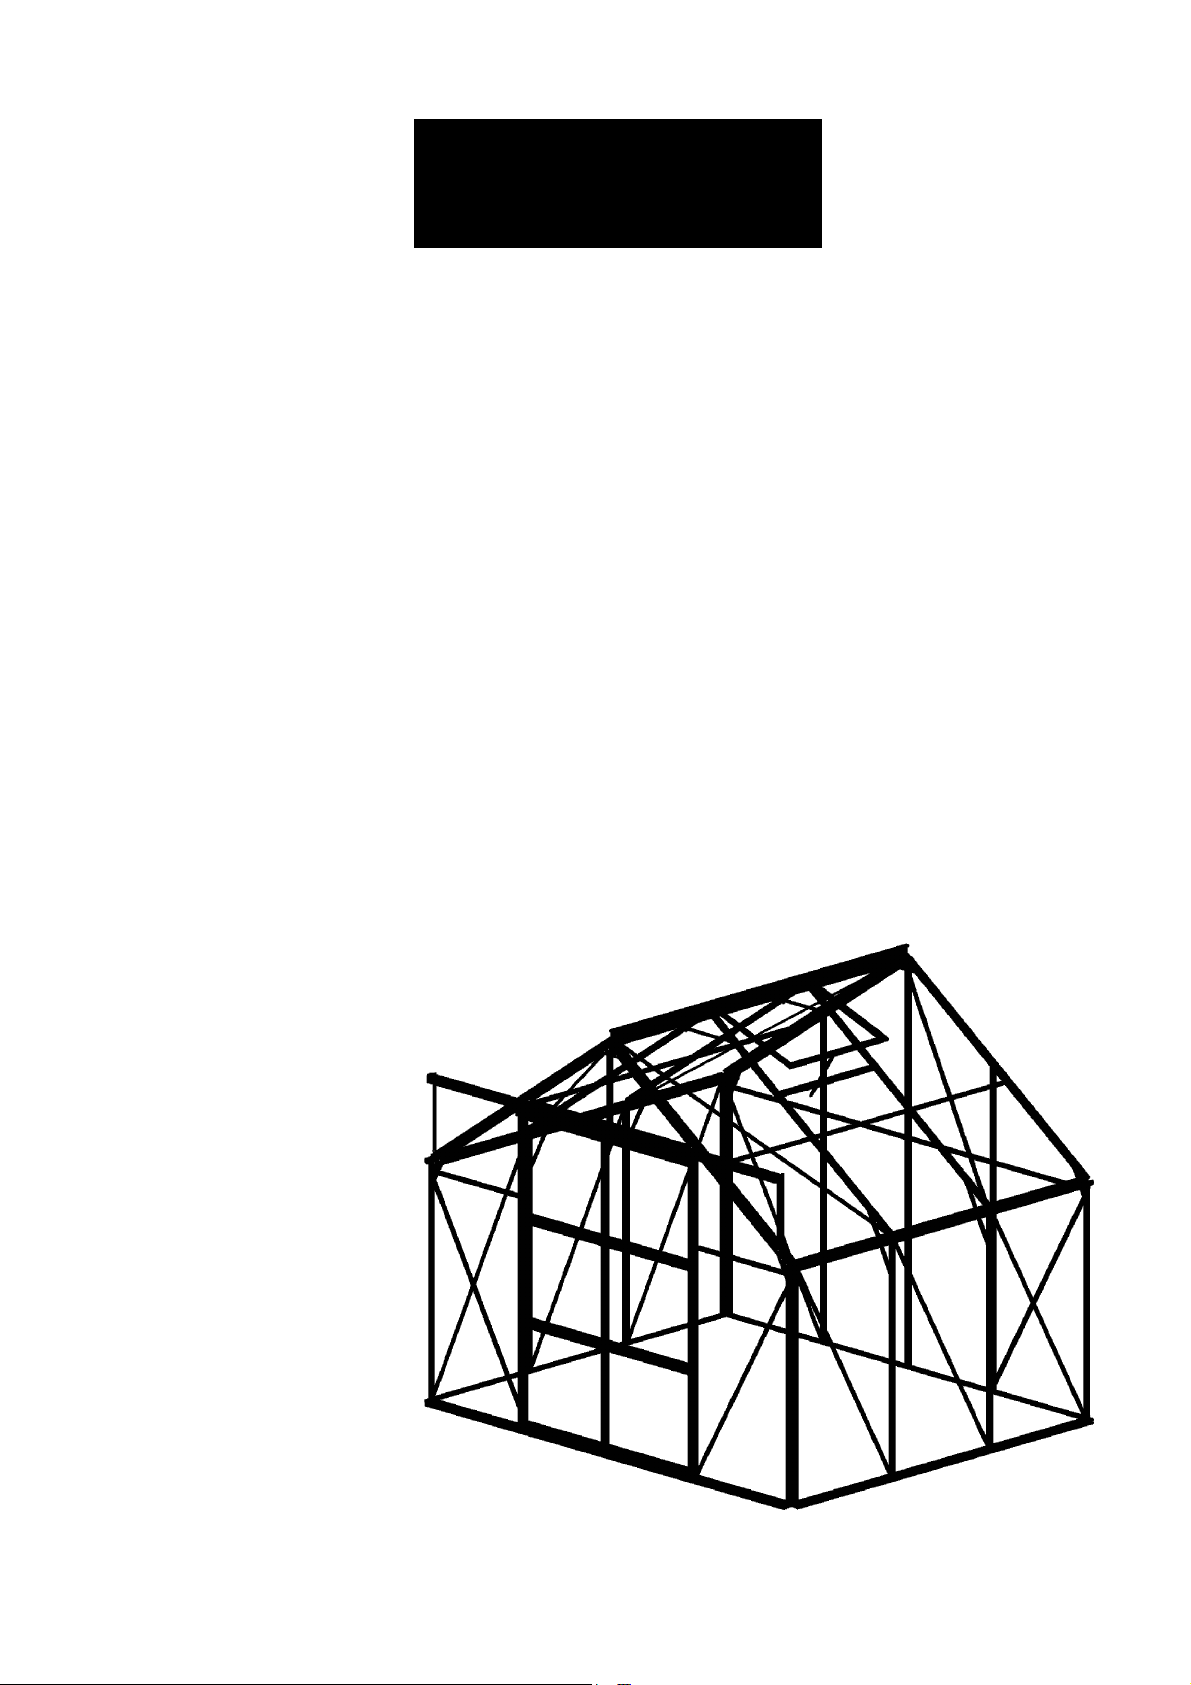
Classic Plus (B9)
Assembly instructions / Surinkimo instrukcija
2
Dear Customer!
May we congratulate you on your new Greenhouse.
We feel sure that by following the detailed assembly
instructions you will find as much pleasure in actually
building the greenhouse as the time you will spend in
your greenhouse in the future.
The assembly instructions mainly consist of detailed
illustrations and no specific technical knowledge is
required for the assembly of the greenhouse. However,
it is important that the assembly instructions are
followed strictly. The profiles in carton box are packed
in separate numbered packages corresponding to the
order in the assembly instruction. Erect one pack at a
time. Don’t mix the contents of different packs. All of
the aluminum profiles are marked with a part number
corresponding to the numbers given on the drawings
and in the parts list. Nuts, bolts and fittings will be
found in the relevant package.
All detailed illustrations are marked with a symbol:
Seen from inside
Seen from outside
Precautions
•Always try to select a sunny location, sheltered from
the wind as much as possible. Assembly must only be
carried out in dry and calm weather.
• Always use working gloves while handling aluminum
profiles and polycarbonate.
• Place the ladder on a level support.
• It is essential to have an assistant.
Tools
• Spirit level;
• Spanner or wrench 8 and 10 mm, screw driver normal
and crosshead PH2;
• Electric drill;
• Silicone pistol
• Acetone for degreasing the frames
Winter Protection
• Support the roof ridge at the centre of the greenhouse.
• Remove greater snow loads from the roof.
• Take precautions against snow falling down from
trees or a house roof.
• Dismount the cylinders for the automatic window
openers, if any (optional extras).
• Secure doors and windows preventing wind damage
to the greenhouse.
Insurance
Please note that not all insurance companies cover
greenhouses automatically. Please contact your
insurance company to ensure an insurance coverage.
Guarantee
Manufacturer gives frame guarantee which covers
replacement or repairs of defective parts due to material
or manufacturing fault. Moving and painted parts,
glazing and damage caused by wind or other extreme
weather conditions are excluded.
The guarantee does not cover, assembly, freight etc.
The guarantee is invalid if the greenhouse is not
assembled according to these instructions.
Complaints
We put severe demands on quality to secure that you
get a faultless product. However, should a problem
occur, we kindly ask you to contact the dealer from
whom you have bought the greenhouse. For a quick
service, you should specify the defect by means of the
parts list in the assembly instructions. Please also note
the model number which is stamped on the front page
of these instructions.
Tips
1. The base anchors has to be fastened/concreted into
the ground.
2. The base has to be 100% level and square. The
easiest way to ensure this is to make sure that the two
diagonal measurements are equal.
3. We recommend that you grease screws for doors and
windows for easier assembly.
4. If desired, it is possible to seal the greenhouse at the
edges and conners, also gap between polycarbonate and
gutter, using neutral silicon.
5. Polycarbonate—the UV-protected side (outside) of
the sheet is covered with opal white/text marked film
and must be faced towards the sun. Remove
approximately 2 inches of film from all sheet edges
before installing. Remove all film immediately after the
constructions is completed. Polycarbonate plates must
not come into contact with the ground. Always rest
them on cardboard or similar material during
construction.
Maintenance
• Grease doors (hinges and lock or door track).
• Clean the gutter for leaves, etc.
• Adjust windows and doors.
• Clean the greenhouse before and after the growing
season. Use only gentle detergents and soft cloth
(please check first if the detergent does not react
aggressively with the aluminum profiles, polycarbonate
and spring wire clips).
EN
3
LT
Gerbiamas pirkėjau,
Sveikiname Jus įsigijus naująšiltnamį.
Surinkimo instrukcijoje rasite išsamius brėžinius. Jokių
specialiųtechniniųžiniųnereikia. Visos šiltnamio
komplektuojančios dalys supakuotos pakuotėse, kuriose
rasite visus reikalingus polikarbonato lakštus, rėmo
profilius, tvirtinimo detales, pagrindą. Kiekvienas
aliuminio profilis yra pažymėtas tam tikru numeriu. Jis
atitinka šiltnamio surinkimo instrukcijos brėžiniuose
bei komplektuojančiųdaliųsąraše pažymėtąnumerį.
Visi profiliai yra supakuoti įatskiras sunumeruotas
pakuotes eilės tvarka pagal surinkimo instrukciją.
Ardykite po vienąpakuotę. Nesumaišykite skirtingų
pakuočiųturinio.
Visos schemos sužymėtos simboliais:
Vaizdas iš vidaus
Vaizdas iš išorės
Svarbu
• Šiltnamiui parinkite saulėtąir nuo vėjo apsaugotą
vietą. Šiltnamįstatykite tik nevėjuotąir nelietingą
dieną;
• Montuodami šiltnamįdėvėkite pirštines, apsauginius
akinius ir galvos apdangalą, avėkite batus - aliuminio
profiliųkampai, stiklo ar polikarbonato briaunos yra
labai aštrios;
• Kopėčias statykite tik ant lygaus pagrindo;
• Būtina turėti pagalbininką.
Įrankiai
Renkant šiltnamįreikalingi šie įrankiai:
• Gulsčiukas;
• Veržliaraktis 8 ir 10 mm, atsuktuvas;
• Elektrinis grąžtas;
• Silikonas;
• Acetono skiediklis, profiliųnuriebalinimui.
Priedai
Mes siūlome didelįšiltnamio priedųpasirinkimą, kas
leidžia sulaukti gausesnio derliaus ir palengvina darbą
šiltnamyje. Dėl išsamesnės informacijos kreipkitės į
šiltnamio pardavėją.
Apsauga žiemą
Regionuose, kur žiemągali iškristi daug sniego,
rekomenduojame laikytis šiųpatarimų:
• Paremkite stogo sijąšiltnamio viduryje;
• Nepamirškite nuvalyti didesnes sniego sankaupas;
• Imkitės priemonių, kad apsaugotumėt šiltnamįnuo
sniego, krintančio nuo medžiųar namo stogo;
• Išmontuokite langųdarinėjimo sklendžiųcilindrus
(jeigu tokie yra);
• Užremkite duris ir langus, kad apsaugotumėt šiltnamį
nuo stipraus vėjo.
Draudimas
Atkreipkite dėmesį, kad ne visos draudimo kompanijos
draudžia šiltnamius. Prašome susisiekti su savo
draudimo kompanija dėl šiltnamiųdraudimo.
Garantija
Gamintojas suteikia gamyklinęgarantijąšiltnamio
rėmui – defektų, atsiradusiųdėl gamybos klaidos,
pašalinimui ir brokuotųdetaliųpakeitimui. Garantija
nesuteikiama judančioms ir dažytoms detalėms (jei
tokios yra), surinkimui, pervežimui ir pan. Garantija
negalioja stipraus vėjo ar kitųekstremaliųoro sąlygų
padarytai žalai, ar jei šiltnamis buvo surinktas
nesilaikant instrukcijos.
Nusiskundimai
Visi šiltnamiai yra pagaminti pagal aukščiausius
kokybės standartus. Jei iškiltųkokiųproblemų,
prašome kreiptis įJums šiltnamįpardavusiąįmonę,
nurodydami defektąir brokuotos detalės numerįbei
šiltnamio modelį.
Geri patarimai
• Aliuminįšiltnamio pagrindąreikia įtvirtinti /
įbetonuoti įžemę;
• Pagrindas turi būti 100% horizontalus ir stačiakampis
– įsitikinkite, kad abi įstrižainės yra lygios;
• Rekomenduojame sutepti alyva durųir langų
varžtelius, kad būtųlengviau prisukti;
• Jeigu pageidaujate, kad šiltnamis būtųvisiškai
hermetiškas, sujungimo kampus ir siūles užglaistykite
silikonu. Užsandarinkite tarpątarp dangos ir vandens
latako.
• Polikarbonatas—UV spinduliams atspari (išorinė)
pusėyra apklijuota balta/tekstu markiruota plėvele. Ši
pusėturi būti šiltnamio išorėje. Nulupkite apie 5 cm
plėvelės nuo visųpolikarbonato kraštųprieš įstatant
juos įrėmą. Po to, kai surinksite visąšiltnamį,
pašalinkite likusiąapsauginęplėvelę. Polikarbonato
danga negali liestis su žeme – lai-kykite jąant
kartoninės pakuotės.
Priežiūra
• Reguliariai tepkite duris (lankstus ir spynąarba durų
bėgelius);
• Iš latakųvalykite lapus ir pan.;
• Reguliuokite langus ir duris;
• Valykite šiltnamįtam skirtomis dezinfekcinėmis
priemonėmis prieš ir po sezono. Polikarbonato dangą
plaukite šiltu vandeniu su minkštu audiniu. Naudokite
tik švelnias chemines priemones, kurios nekenkia
aliuminiui ir polikarbonatui.

4
Base/Pagrindas
X Y
B907 2723 2165
B909 2723 2859
B912 2723 3553
B914 2723 4247
X Y
B907 8’11” 7’1”
B909 8’11” 9’5”
B912 8’11” 11’8”
B914 8’11” 13’11”
# m7
B907 9
B909 11
B912 13
B914 15
# m5
B907 13
B909 15
B912 17
B914 19
a2
m7
Base/Pagrindas
m5
a2
Concrete/Betoninis
pamatas
5
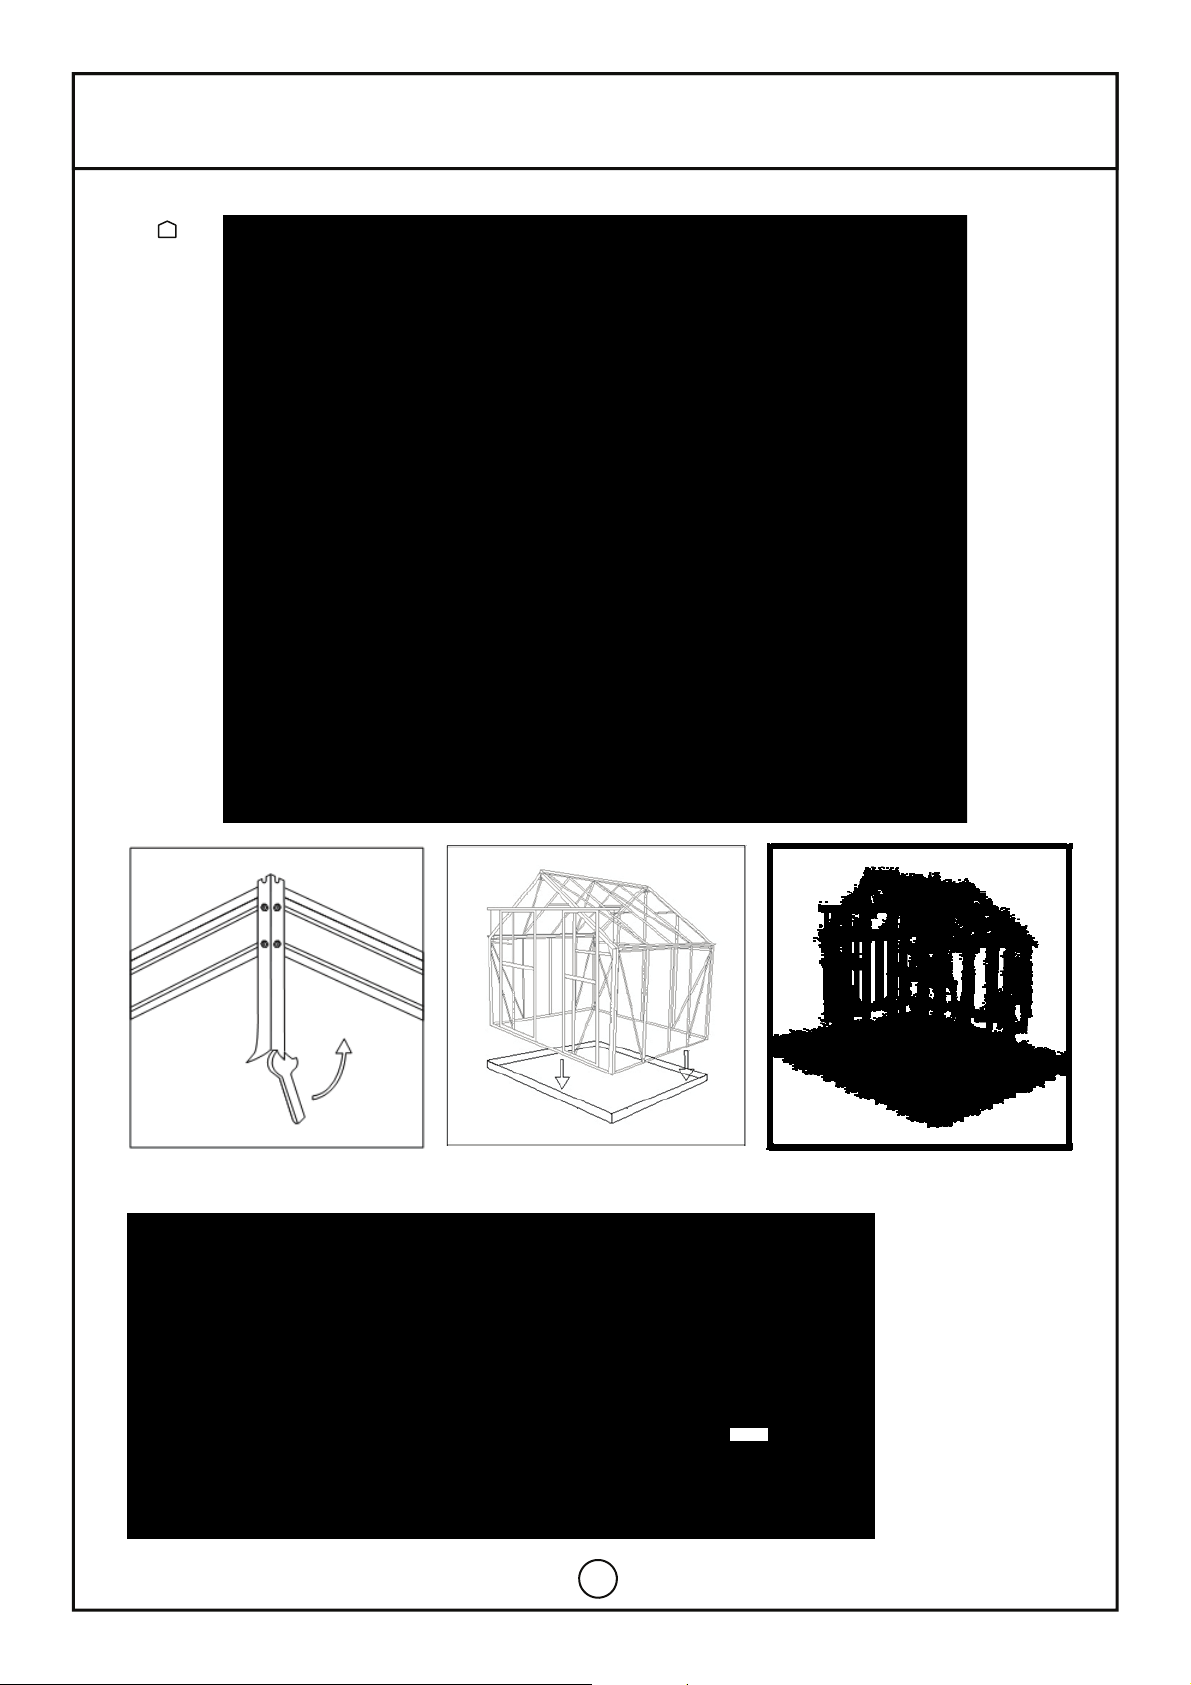
Base/Pagrindas
ENSecurethegreenhousetothefoundaon /LTPritvirnkitešiltnamįpriepagrindo
10 mm
6
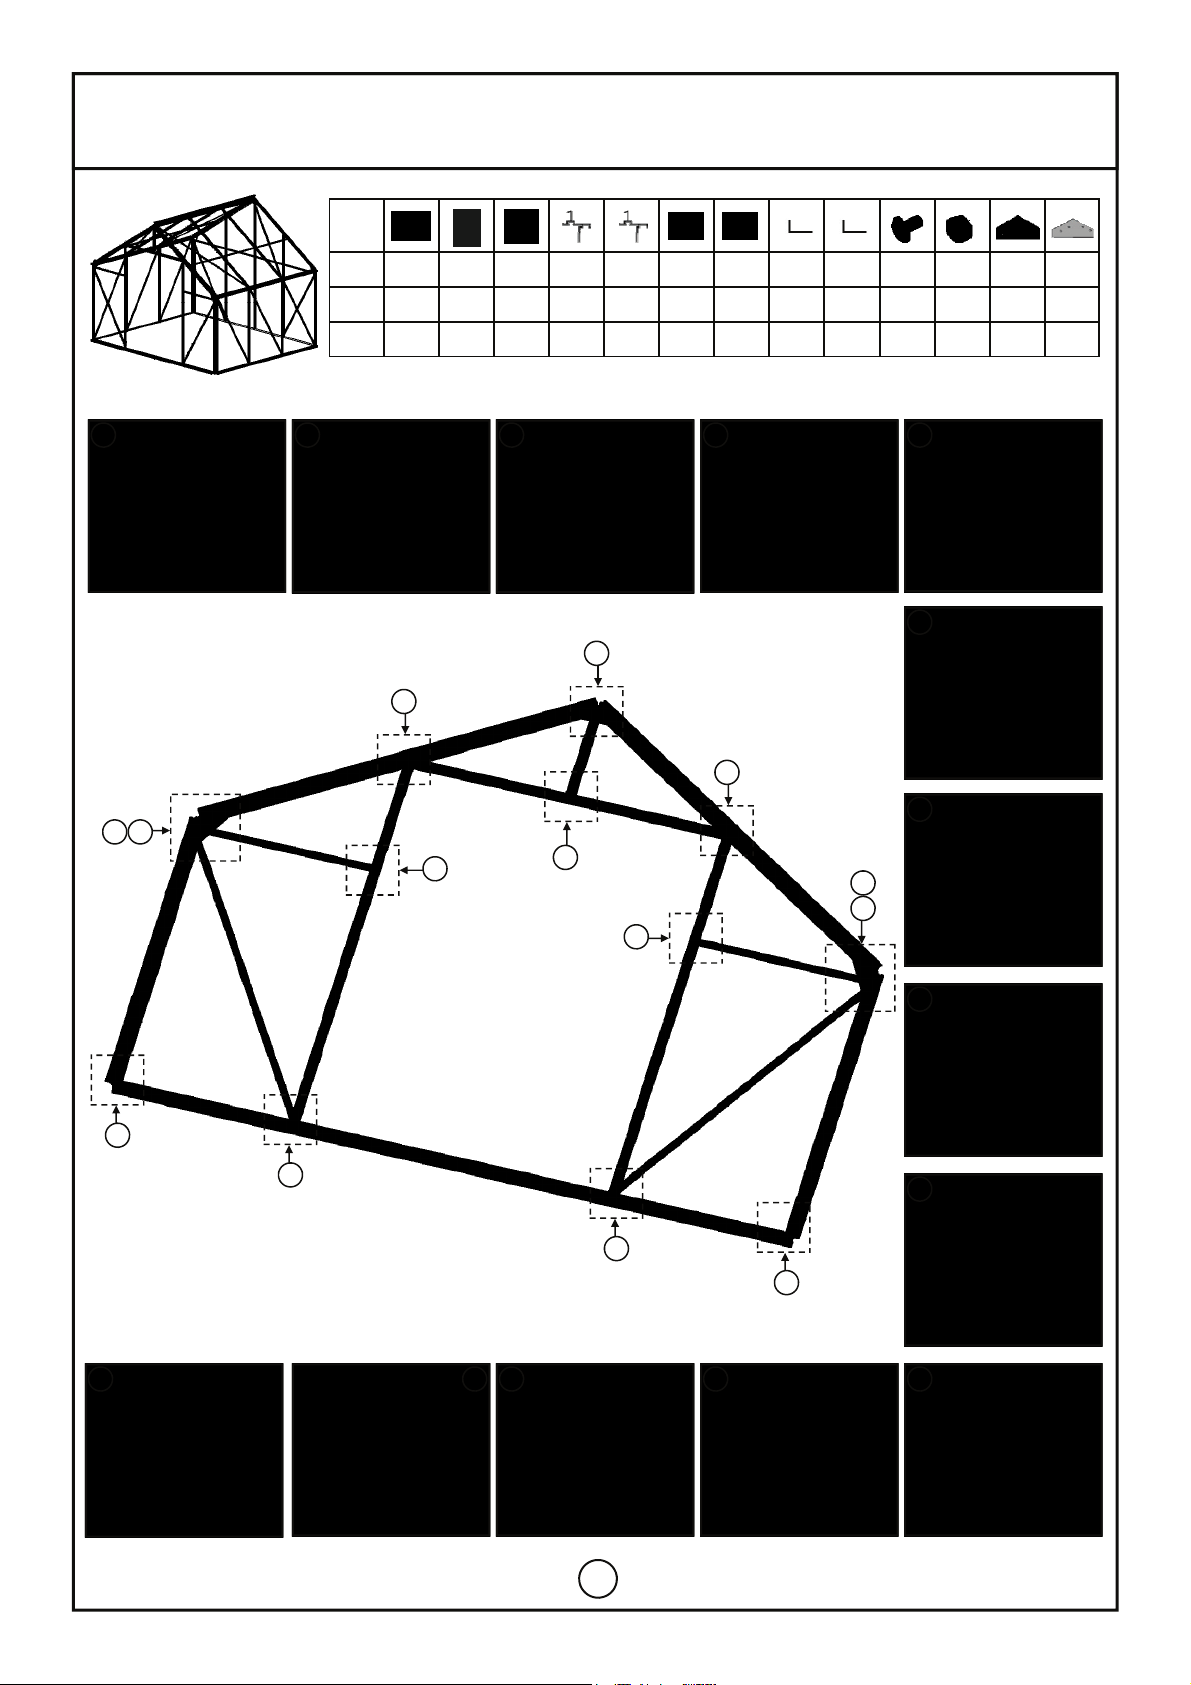
No.1
Frontgable/Priekinisfasadas
1
# 611 621 641 651 652 661 662 711 712 a1 a2
mm 2664 1282 1200 1571 1571 1660 378 1339 710 M6x10 M6
QTY 1 1 2 1 1 2 1 2 2 24 24
m1
1
m2
2
611
641
611
661
711
611
711
661
611
641
641
711
712
m2
712
661
661 712
712
711 641
m2
662
651 652
m1
641
651
712
711
m2
712
711 641
652
m2
651
661
621
652
621
661
662
621
1 2 3 4 5
6
7
8
9
10
11
12
13
14
1
2
3
4
5
10
6
7
8
11
9
12
13
14
611
621
641
641
661
661
711
711
712
712
651
652
662

7
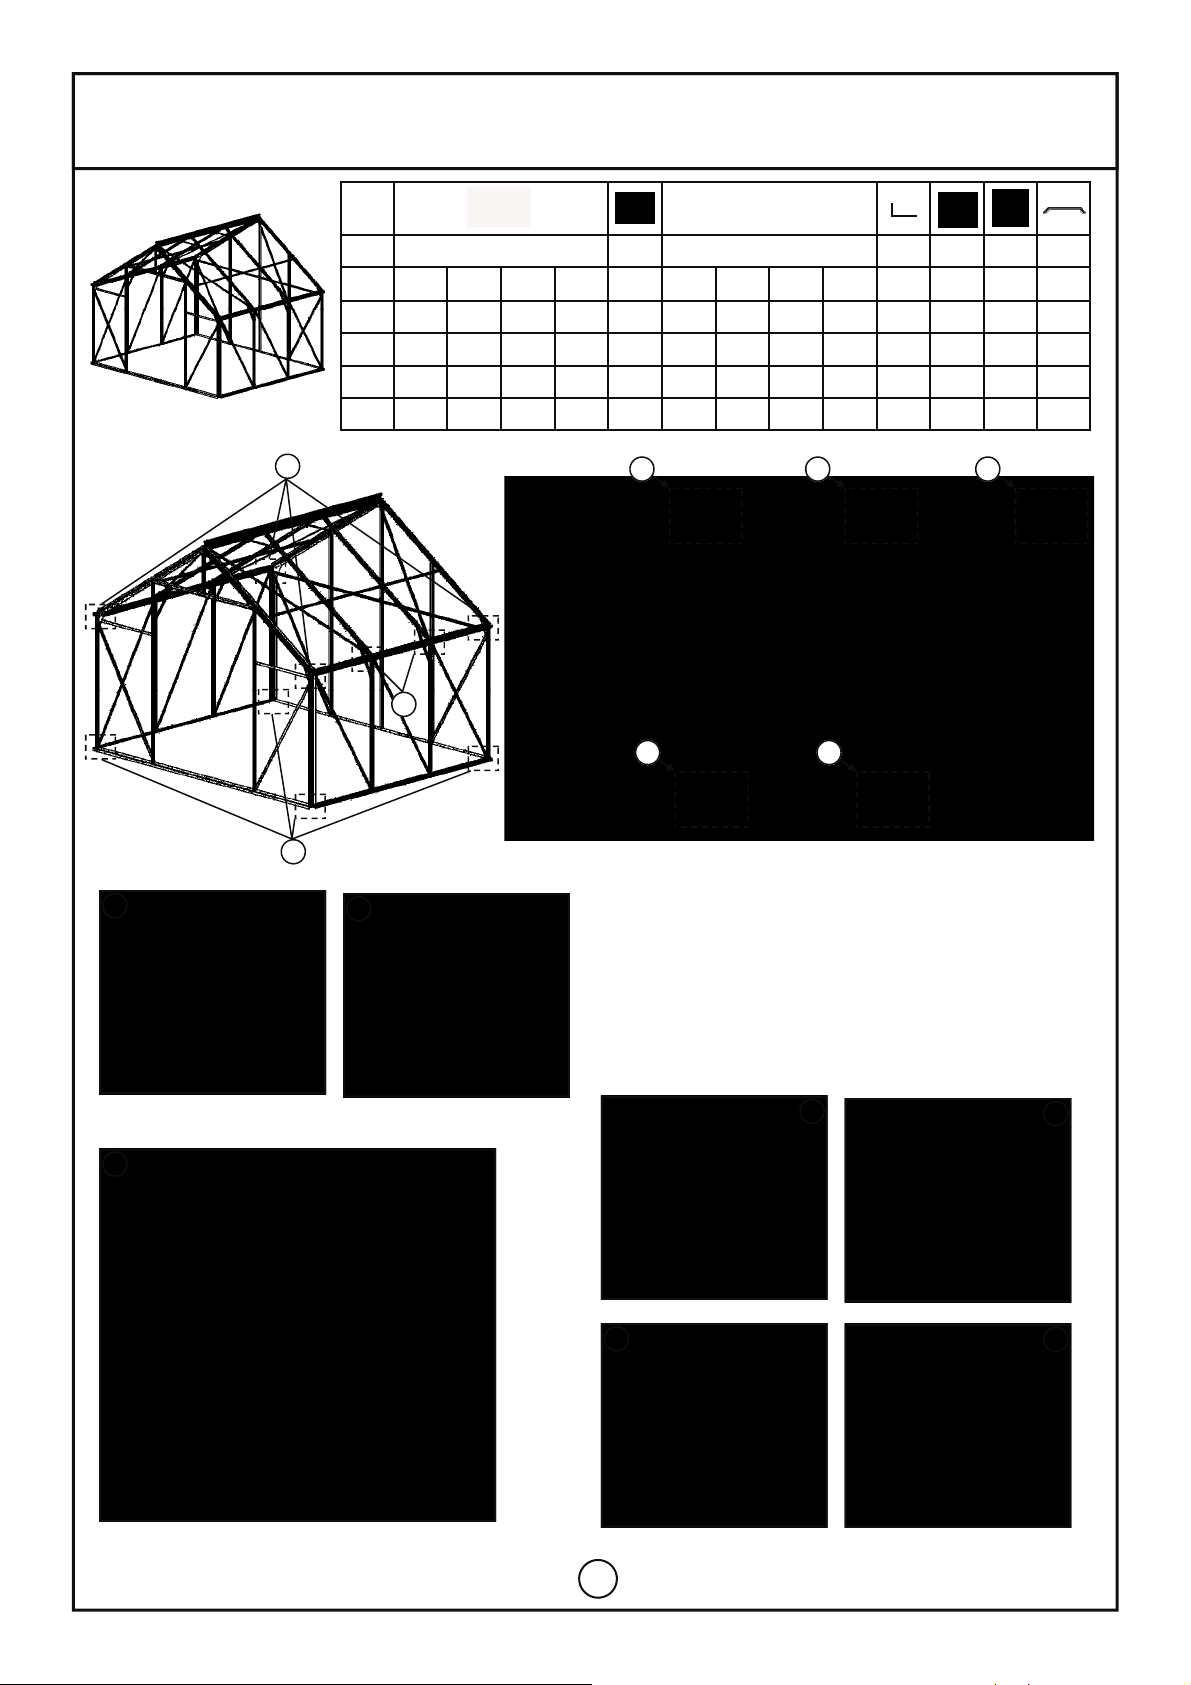
No.2
Reargable/Galinisfasadas
2
# 631 641 653 654 663 664 665 781 711 a1 a2
mm 2664 1200 1571 1571 1674 1674 2040 2662 1339 M6x10 M6
QTY 1 2 1 1 1 1 1 1 2 23 23
m1
1
m2
2
1
5
10
8
11
2
17
3
4
6A
15
16
9
1
631
641
641
663
664
665
781
711
711
654
653
641
631
631
711 663
2 3 4 5
6A
8
9
10
11
15
16
17
631
631
664
711
641 641
711
781
m2
781
781
711 641
m2
665
654 653
m1
781
711
641
654
m2
781
711 641
653
m2
654
663
664
653
665
631
8
No.3
Sidewall/Šoninėsiena
3
# 632 666 671 714 a1 a2
mm 2108 2802 3496 4190 1200 2108 2802 3496 4190 1374 M6x10 M6
B907 2
4 2
6 30 30
B909 2
6 2
8 40 40
B912
2 8
2 10 50 50
B914
2 10
2 12 60 60
753
400
4
6
8
10
632
671
666 666
714 714 714
632
666
714
671
714
671
714 666 641
781
711
671
632
641 714
ENNote:Pleaseaddextraboltinto#666channelfor
eavecanleveruseinadvance.
LTPastaba:įstatykitepapildomąvaržtąįprofilio#666
kanaląšoninėssienoskronšteinuipritvirn
1 2
3 4
5
6
7
671
666
714
753
681
1 1
2 3 3
5
6
7

9
No.4
Roof/Stogas
4
# 701 681 713 751 752 a1 a2
mm 2108 2802 3496 4190 1571 2099 2793 3487 4181 400 1709 M6x10 M6
B907 1
4 2
2 4 32 32
B909 1
6 2
3 4 40 40
B912
1 8
2 4 4 48 48
B914
1 10
2 5 4 56 56
681
752
666
714 671
681
713
1
2
3
4
5
6
7
8
1 2 6
6 2 1
4 3
5
8
701
m1
681
681
701
681 681
701
751
701
752
752
681
713
752
EN(3)(4)Note:Pleaseaddextraboltinto#681channelforridgeandeave
canlever,hangingbasketrailorwindowuseinad‐vance.
LT(3)(4)Pastaba:Įstatykitepapildomusvaržtusįprofilio#681kanaląsienos,
stogokronšteinui,skersiniui#713irpalangėspritvirnimui.
10
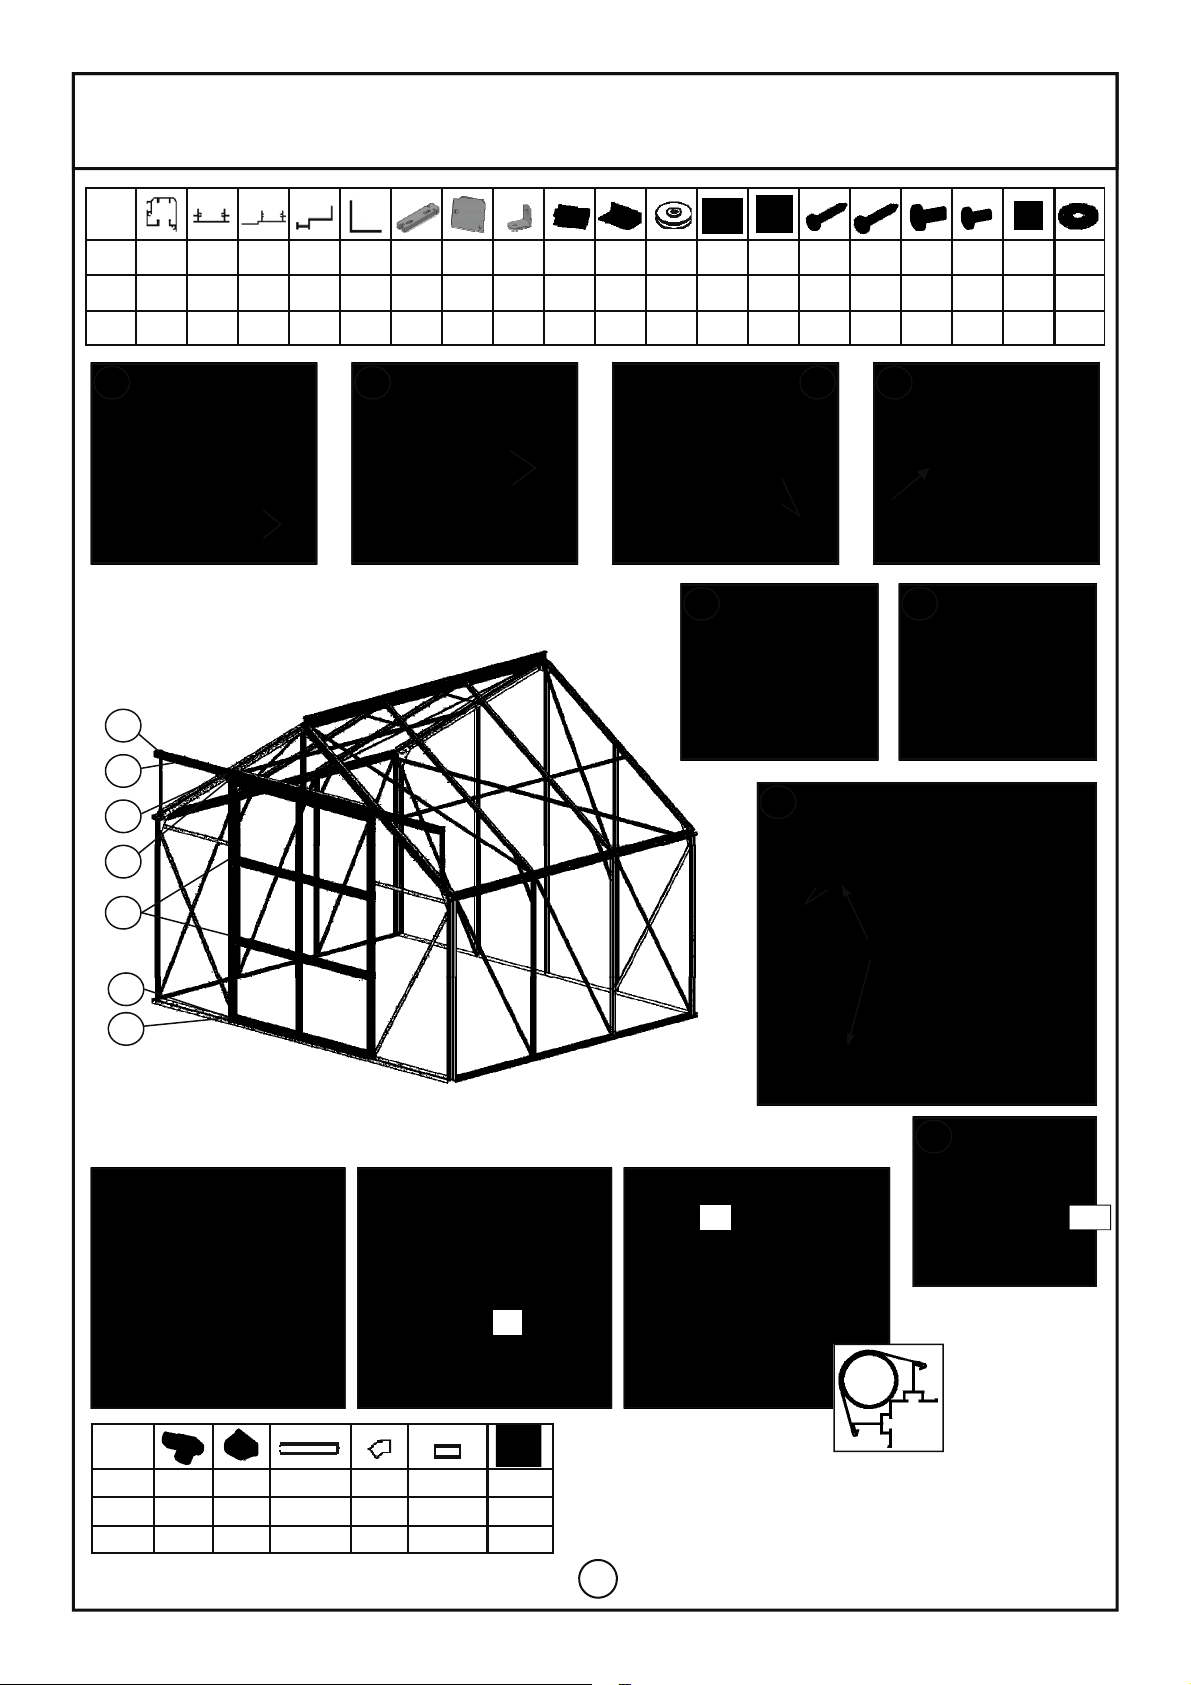
No.5
Door/Durys
# P8 P9 P0 m0
mm Φ36x800 Φ40 Φ36x200
2 2 2 2 2 2
P1 P2
5
# 572 581 582 591 791 p4 p5 m6 m9 m10 n1
mm 2590 623 623 1634 395
QTY 1 6 2 4 2 4 2 2 2 2 8
a1
M6x10
8
a2
M6
8
a5
Φ3.5x19
28
a6
Φ3.5x25
8
a7
Φ4x8
8
a8
Φ3x5
8
a10
M3
8
p11
1634
2
671
P8
P0
671
P9
P0
m0
1 2 3 4
5 6
7
581
591
p4
a6
581
591
a5 582
591
a7
n1
m9/m10
a8/a10
582
591
572
591
581
611
572
621
572
791
m6
a1/a2
p5
a5
8
581
591
p11
1
5
2
3
4
6
7
EN Downpipes (p0) and downpipe holder (m0) is an
optional extra and is not included in the price.
LT Lietvamzdžiai su laikikliais ir įstandartinę
komplektacijąneįeina.

11
No.6
Vent/Langas
6
# 051 201 521 531 541 551 a1 a2 a7 a9 a4 p3 p10
mm 200 300 749 584 701 701
M6x10
M6 M4x8 M4
Φ4.2x9.5
40
QTY 1 1 1 2 1 1 12 12 2 2 2 2 1
B907 B909 B912 B914
Vent No. 1 2 4 4
1 2 3 4
5
6
7 8 9
1
2
4
3
5
541
531
531 551
201
p10
541
531
a1/a2 541
531
a1/a2
531
551
a1/a2
531
551
a1/a2
551
201
a7
a9
701 541
7 8 9
701
681 521 681
681 681
521 521
681 681
521
051

12
b1 B2
b4
b5
B6
b7
B3
c-807
c-1200
s-660,f-2
c-726
c-380
s-585,f-2
B8
Polycarbonatesheet/Polikarbonatas
B2 b1
c-1659
c-1668
c-2045
c-2045
c-1668
c-1659
c-1200
s-592,f-2 s-592,f-2 s-660,f-2
c-726
c-807
c-726
b1
B3 B3
b4
b4
b4
b4
b4
b1 b5
b5
B6
c-807
c-1200
s-660,f-2 s-660,f-2
c-1200
c-807
c-1659
c-1659
c-1200
c-1200
c-1200
c-1200
c-1200
c-1200
s-660,f-2 s-660,f-2 s-660,f-2
s-660,f-2 s-660,f-2 s-660,f-2
c-1571
c-1571
c-980
c-1571
c-1571
c-980
s-660,f-2 s-660,f-2 s-660,f-2
s-660
s-660,f-2
s-660
13
Polycarbonatesheet/Polikarbonatas
# mm B907 B909 B912 B914
b1 677x1221/16614 4 4 4
B2 609x1672/20682 2 2 2
B3 616x400/02 2 2 2
b4 621x4856 6 6 6
b5 677x11946 8 10 12
B6 677x15755 6 6 8
b7 677x6121 2 4 4
B8 677x9801 2 4 4
DWG mm B907 B909 B912 B914 DWG mm B907 B909 B912 B914
Front
Gable
c
1200 2 2 2 2
Rear
Gable
c
1200 2 2 2 2
1659 2 2 2 2 1659 2 2 2 2
380 2 2 2 2 1668 2 2 2 2
726 2 2 2 2 2045 2 2 2 2
807 2 2 2 2 726 2 2 2 2
s 585 2 2 2 2 807 2 2 2 2
660 2 2 2 2 s 592 2 2 2 2
f 12 8 8 8 8 660 2 2 2 2
Roof
c 980 2 4 8 8 f 12 8 8 8 8
1571 10 12 12 16
Side
wall
c 1200 12 16 20 24
s 660 12 16 20 24 s 660 12 16 20 24
f 12 14 20 28 32 f 12 24 32 40 48
1
2
3
4
ENAssembleb5Panel
LTDangosmontavimasįb5segmentus
2 4
ENAssembleb1&B2Panel
LTDangosmontavimasįb1irB2segmentus
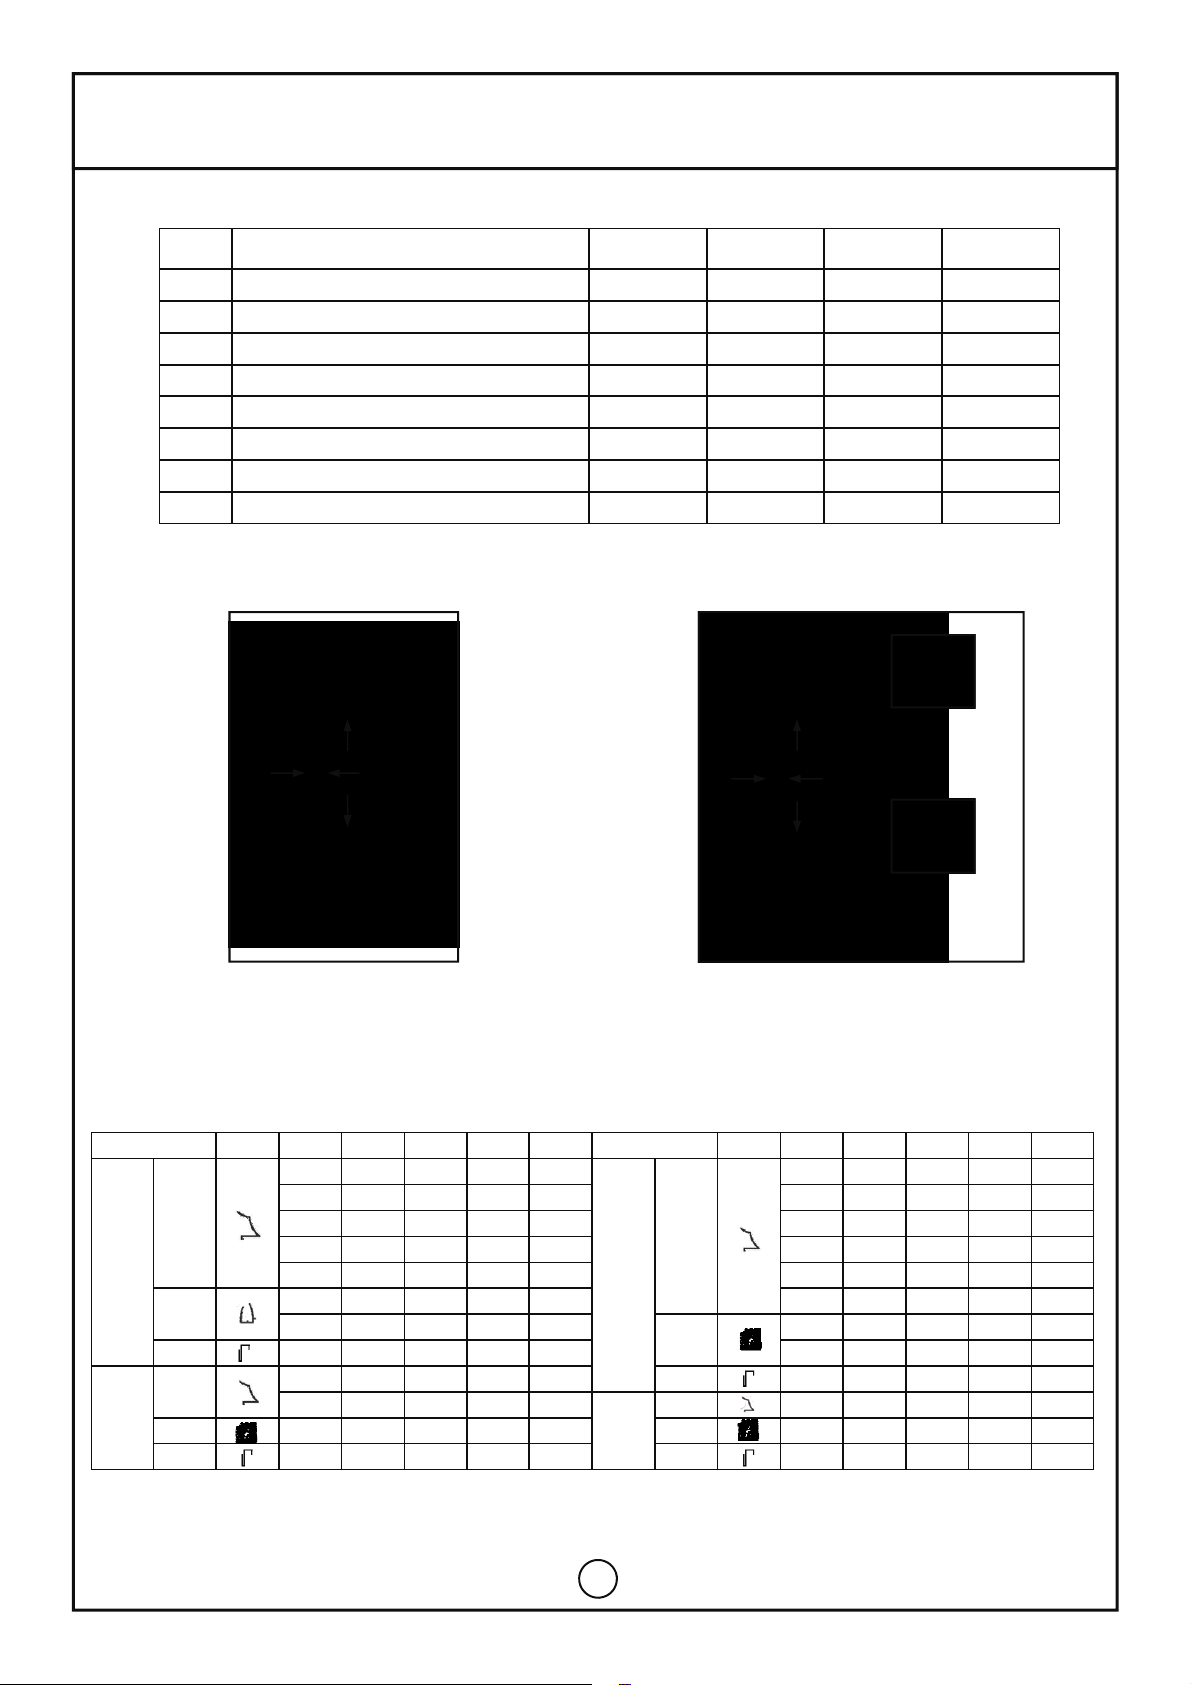
ENTable4e/LTLentelė4e
4a
3.Bottom / Apačia
1. Top / Viršus

14
Polycarbonatesheet/Polikarbonatas
A.Mounngofpolycarbonatewith“W”clips
PutplascUprofile“s”withthelongflapoutwardsontopandboomendof
polycarbonatesheets(posionsandlenghtinthetable4e)andfixings“f”(pic.
4a)2pieces.Degreasethealuminiumprofileswithacetoneandthenapplya
lineofneutralsiliconeofapprox.3mmindiametertothevercalprofiles.
Yougetthebestaachmentbygentlysandpaperingthesheetsabout1cm
alongtheedge.Thenpressthesheetsfirmlyintothesilicone.The
polycarbonateplatesshouldbesecuredwithspringclips.Polycarbonatesheets
indoorsandwindowsshoudbemountedintoframe.duringassembly.
B. Fixing polycarbonate using plastic gaskets.
PutplascUprofile“s”withthelongflapoutwardsontopandboomendofpolycarbonatesheets(posionsand
lenghtinthetable4e)andfixings“f”(pic.4a)2pieces.Theplascmoulding„c“ismountedbyplacingtheupperpart
ofthelistunderthewingofthealuminiumprofileandthenpressthe„c“profileinplaceattheboom‐thiswill
makethe„c“profileclickon(seeillustraon4b,4cand4d).Werecommendtoplacetheupperpartofthelistunder
thewingofthealuminiumprofileinthewholelengthofthesheetandthenclickonthelowerpartof„c“profile
starngfromabove.Polycarbonatesheetsindoorsandwindowsshoudbemountedintoframeduringassembly.
B. Polikarbonato tvirtinimas plastikinėmis tarpinėmis.
PolikarbonatogalusuždarykiteplaskiniaisUformosprofiliais“s”platesnebriaunaįišorę(montavimovietos,ilgiaiir
kiekiainurody lentelėje4e)iruždėkitealiuminiolaikiklius“f”(pav.4a)2vnt.Plaskinė juostelė “c”montuojama
viršunęjoskrašnęįstatantįaliuminioprofilio“stogelį”iratsargiaispaudžiantapačiojekolįsistatysįvietą–išgirsite
spragtelėjimą(žiūrėpav.4b,4cir4d).Patarimas:juostelėskrašnęįstatykiteįaliuminioprofilio“stogelį”pervisą
lapoilgįirktadaspauskite/užfiksuokiteapanęjuostelėskrašnę.
4b 4c 4d
A.Polikarbonatomontavimas“W”spyruokliniaisfiksatoriais
PolikarbonatogalusuždarykiteplaskiniaisUformosprofiliais“s”platesnebriaunaįišorę(montavimovietos,ilgiaiir
kiekiainurodylentelėje4e)iruždėkitealiuminiolaikiklius“f”(pav.4a)2vnt.Nuvalykiterėmąacetonu,antverkalių
profilių užtepkite3mmjuostelę neutralaussilikono.Geriauprisiklijuos,jeigupolikarbonatokraštusapie1cm
pašiaušiteabrazyviniupopieriumi.Lapusįstačiusįrėma,juospritvirnkite“W”spiruokliniaisfiksatoriais.
Polikarbonatolapaiduryseirlanguoseklijuojamįsilikonuįrėmąjųrinkimometu.
This manual suits for next models
1
Other Floria garden products Greenhouse Kit manuals


Popular Greenhouse Kit manuals by other brands


Strend Pro
Strend Pro SNGH-A2 instruction manual

Rion
Rion Hobby Gardener Assembly instructions

Redpath
Redpath Domestic Tunnel Series instructions

Vitavia
Vitavia HERA 9000 Assembly instructions

Palram
Palram Snap & Grow 6x8 + 4 Extension manual

EastSide Impex
EastSide Impex Homebox Modular Mounting instructions