manuals.online logo
Brands
  1. Home
  2. •
  3. Brands
  4. •
  5. EastSide Impex
  6. •
  7. Greenhouse Kit
  8. •
  9. EastSide Impex Homebox Modular User manual

EastSide Impex Homebox Modular User manual

Mounting instructions
HOMEBOX MODULAR is a patented product of
EASTSIDE impex Handelsgesellschaft mbH
Inventors of the portable grow room
Liselotte-Herrmann-Str.31 • 10407 Berlin - Germany
T: +49 30 470 042 83 • F: +49 30 260 793 35
info@hbmodular.net • www.hbmodular.net
3
2x1 HAMM Pg.12
3x1 MAINZ Pg.20
4x1 FRANKFURT pg.29
5x1 HAMBURG Pg.40
2x2 BREMEN Pg.50
3x2 KIEL Pg.60
4x2 LEIPZIG Pg.70
5x2 DRESDEN Pg.80
3x3 BERLIN Pg.90
L-2x2 ESSEN Pg.100
L-3x2 POTSDAM Pg.109
1x1 ULM Pg.6
1modular unit =
120cm x 120cm x 200cm
Choose your shape
100lbs
max
140°F
No tool required
Holds up maximum
weight of 100lbs.
Washable max 40°
Light proof / Leak proof
4
The inventors of the original portable grow room
are proud to present you a new revolutionary,
patent pending, modular grow box that enables
you to fully customize your garden space to the
shape that best suites you. It not only allows you
to determine the size and form of your desired
grow space, but also gives you the freedom to
place access doors and inlets/outlets wherever
you need them. It can be easily dismantled,
rearranged, changed in size and form as often
as you like. This instruction manual will show you
the basic steps needed to construct your
Modular HB allowing you to then create an infi-
nite amount of possible shapes.
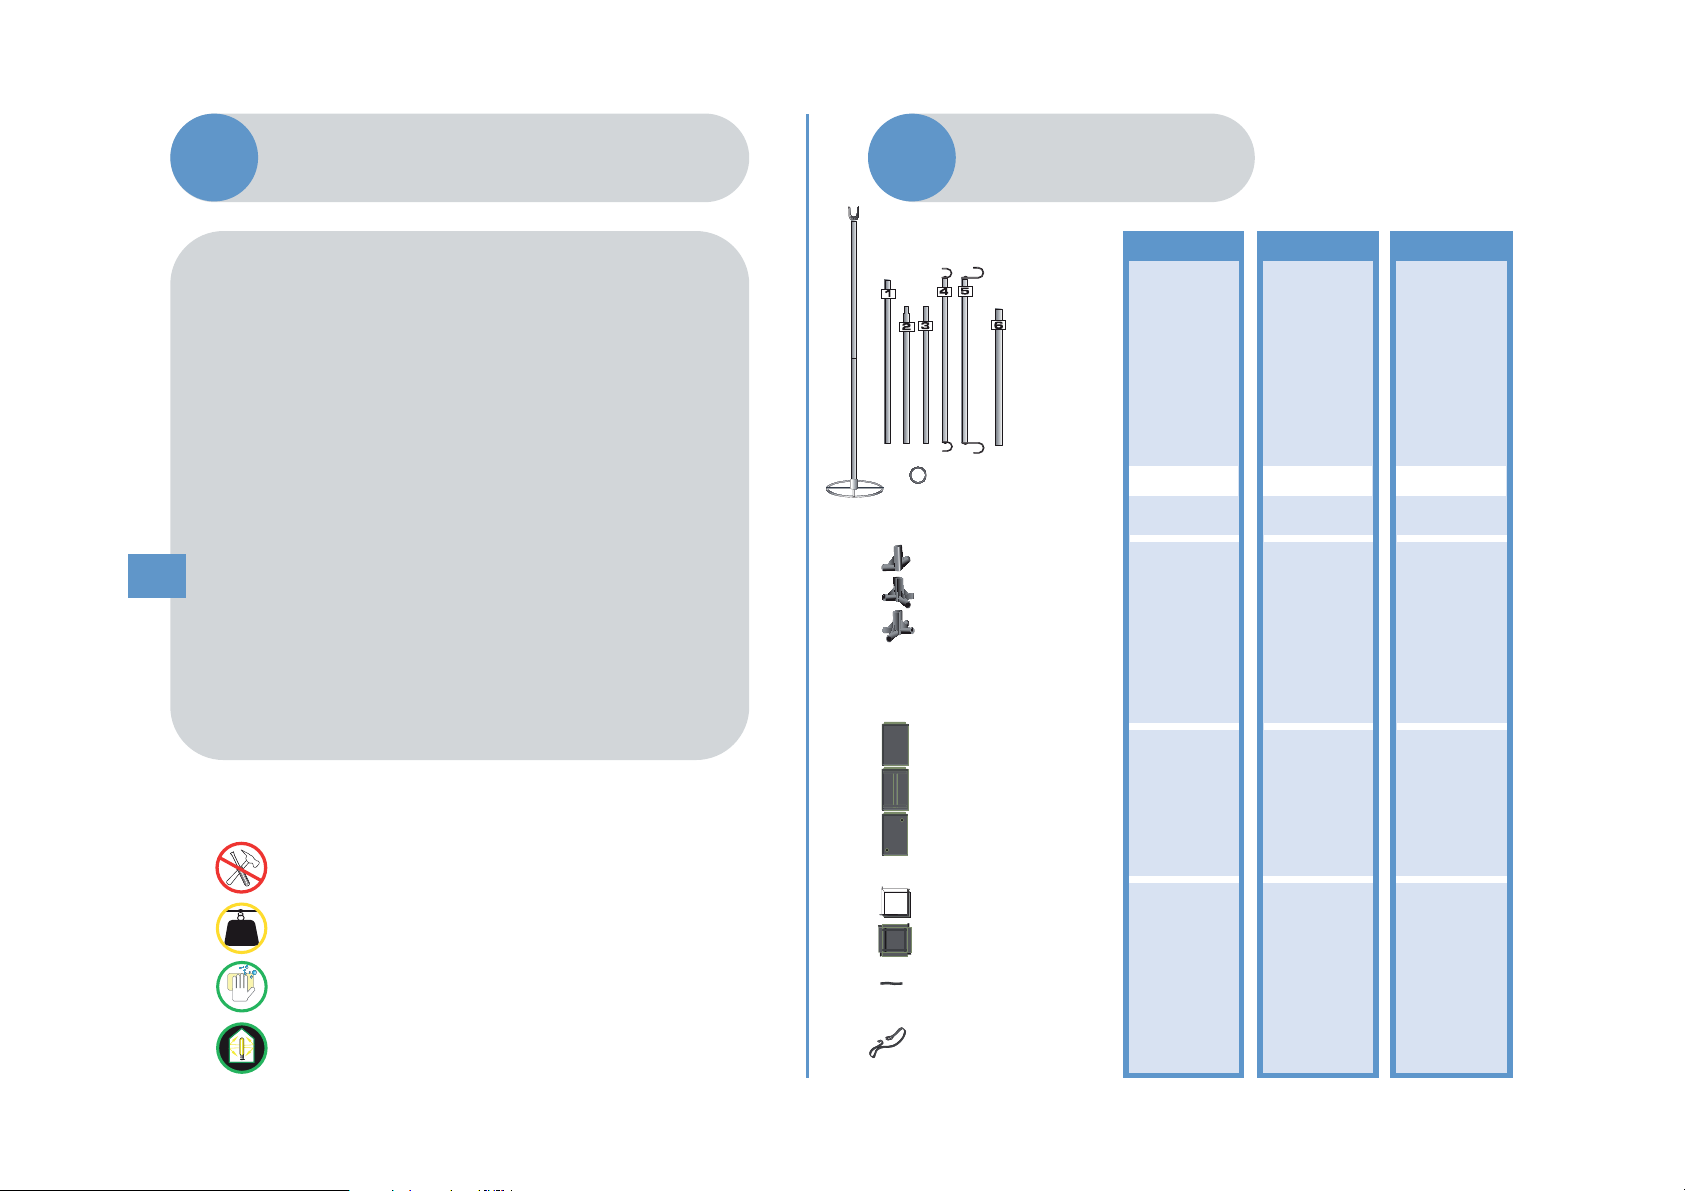
welcome Set contents
Poles
#1
#2
#3
#4
#5
#6
Roof ring
Roof support column
Connectors
3 way (corner)
4 way (side)
5 way inside corner
only for L-shape
Panels
Plain
Entrance
Ventilation
other
Floor basin
Roof top
Velcro basin
connector
Straps
Set 2
6
2
2
1
1
0
0
1
4
0
1
1
0
1
1
1
Set 3
1
0
0
1
1
2
1
1
0
0
0
0
0
0
1
1
2
Set 1
8
4
4
1
1
0
0
8
0
2
0
1
3
1
1
0
4
Poles
Connectors
Spare parts
bag
Roof ring
5
General parts index
Roof tops
120cm x 120cm
Floor basin
120cm x 120cm
Plain
panels
PVentilation
panels
V
Entrance
panels
E
Velcro basin
connector
3-way = corner
4-way = side
5-way = inside corner
(only L-shape)
Size of panels: 120cm x 200cm
Strap
Roof support
column
3x1 MAINZ
Actual size:
360cm x 120cm x 200cm
Composed of:
1x set 1
2x set 2
20
Roof tops Floor basin Poles
Connectors
PV
E
4-way = side3-way = corner
Velcro basin
connector
Spare parts
3x
2x 3x
3x 3x 2x
8x 8x
20x 8x 8x 3x 3x
Panels
1
3x1 Parts list
4x
Strap
3-way 5-way
2x 2x
Check items √
21
!
VV
P
EE
Example
2a
2a. Plan out your box by
deciding where ventilation, electri-
cal and water access is located.
2b. Designate Px2 (Panel), Ex3
(Entrance) or Vx3 (Ventilation) on
your modular box floor plan
according to your design.
2c. Calculate the amount of
panels with type of connectors
(corners = 3-way, sides= 4-way,
etc.)
Now you’re ready to assemble
your panels.
2a.Plan out your box
2b. Designate panels in chart
2c. Calculate panels
3 way = 1
4 way = 1
2xP
3 way = 1
4 way = 2
3xE
3 way =2
4 way = 1
3xV
Plan your box
22
V
E
P
Notice type of
connector
3 way =
4 way =
2xP
Designate panels 2b
3 way =
4 way =
3xE
3 way =
4 way =
3xV
3 way
3 way 4 way
3 way
4 way
Calculate panels 2c
23
3 way
4 way
4 way
f.
24
a. Create vertical poles by con-
necting pole nº2 to pole nº3.
b. Insert vertical pole in vertical slot.
c. Place appropriate connectors
according to calculations in step
2c.
d. Insert no.1 poles in horizontal
slots (top and bottom)
e. Push horizontal poles into con-
nectors of vertical pole.
f. Set panels aside. You are now
ready to assemble your box.
IMPORTANT: Assure poles are
fully pushed into connectors !
Assemble panels
3
a. b. c.
d.
f.
e.
1
2
3
1
a. Work from outside of the
box. Connect the first 2 pan-
els creating a corner by plac-
ing poles from the panel on
your left into the connectors
of the panel on your right.
b, c, d, Working in count-
er-clockwise direction con-
nect all walls.
e. Place no.1 poles into top
& bottom center connectors.
Assemble Box 4
b.
c.
d. e.
25
!Work in counter clockwise direction
a.
55
5
4
4
4
26
a. Place poles 4 & 5 were
needed for hanging equipment.
b. Fasten vertical velcro on all
panels.
5Equipment poles a.
b.
a. Extend Roof Tops on floor and
unite them by placing one over the
other aligning velcro strips. Connect
side flaps by tucking velcro under-
neath.
b. Flip the roof top so white side is
facing up, roll top for easy mounting.
c, d. Place roll on roof structure
white side down and unroll from
under working from the inside.
e. Close corners by overlapping
velcro strips.
27
Roof top 6
a.
b.
c.
d.e.
Floor basin
7
a. Place first Floor Basin inside
and open lower corners of the pan-
els. Take corner velcro strips of basin
and wrap them around the poles
from the inside out. Smoothly con-
nect velcro on sides of basin to
walls.
b. Place Velcro Basin Connector
on the corresponding side and repeat
step a placing second basin (b2).
c. Place last basins by connecting
them together and repeating step b.
d,e. Check floor basin connec-
tions and reseal panel walls.
a. b.
e.d.
28
b2.b
3.
c.

Popular Greenhouse Kit manuals by other brands

Palram Canopia Base Kit How to assemble

Palram

Palram Canopia Base Kit How to assemble

Richel J30309 Assembly instructions and user guide

Richel

Richel J30309 Assembly instructions and user guide

Juliana OASIS Assembly instruction

Juliana

Juliana OASIS Assembly instruction

Outsunny 845-059V01 Assembly & instruction manual

Outsunny

Outsunny 845-059V01 Assembly & instruction manual

Velcom CAMELLIA Technical manual

Velcom

Velcom CAMELLIA Technical manual

VOLYA Dachnaya Tryoshka Assembling manual

VOLYA

VOLYA Dachnaya Tryoshka Assembling manual

Mercia Garden Products 04MINIG-V1 General instructions

Mercia Garden Products

Mercia Garden Products 04MINIG-V1 General instructions

STC Clear View Assembly instructions

STC

STC Clear View Assembly instructions

Palram Glory 8'x8' instructions

Palram

Palram Glory 8'x8' instructions

Vitavia Calypso 3000 Assembly instructions

Vitavia

Vitavia Calypso 3000 Assembly instructions

FarmTek GrowSpan Gothic Pro 106314D Assembly instructions

FarmTek

FarmTek GrowSpan Gothic Pro 106314D Assembly instructions

Palram Canopia Sun Room Series How to assemble

Palram

Palram Canopia Sun Room Series How to assemble

Mercia Garden Products 04GREEN0806SD-V6 manual

Mercia Garden Products

Mercia Garden Products 04GREEN0806SD-V6 manual

Gardebruk 991468 instructions

Gardebruk

Gardebruk 991468 instructions

AeroGarden Salad Series Tending & Harvesting Guide

AeroGarden

AeroGarden Salad Series Tending & Harvesting Guide

St Helens GH350 user manual

St Helens

St Helens GH350 user manual

Juliana Veranda Assembly instruction

Juliana

Juliana Veranda Assembly instruction

Hanover HANGRNHSP8X6-GRN Assembly instruction

Hanover

Hanover HANGRNHSP8X6-GRN Assembly instruction

manuals.online logo
manuals.online logoBrands
  • About & Mission
  • Contact us
  • Privacy Policy
  • Terms and Conditions

Copyright 2025 Manuals.Online. All Rights Reserved.