Floria garden products SNGH-A1 User manual

Greenhouse 244x427
Assembly instructions / Surinkimo instrukcija

Dear Customer!
May we congratulate you on your new Greenhouse.
We feel sure that by following the detailed assembly
instructions you will find as much pleasure in actually
building the greenhouse as the time you will spend in your
greenhouse in the future.
The assembly instructions mainly consist of detailed
illustrations and no specific technical knowledge is required
for the assembly of the greenhouse.
Precautions
•Always try to select a sunny location, sheltered from the
wind as much as possible. Assembly must only be carried
out in dry and calm weather.
• Always use working gloves while handling aluminum
profiles and polycarbonate.
• Place the ladder on a level support.
• It is essential to have an assistant.
Tools
• Spirit level;
•Spanner or wrench 8 mm, screw driver normal and
crosshead PH2;
• Electric drill.
Winter Protection
• Support the roof ridge at the centre of the greenhouse.
• Remove greater snow loads from the roof.
• Take precautions against snow falling down from trees or
a house roof.
• Dismount the cylinders for the automatic window
openers, if any (optional extras).
• Secure doors and windows preventing wind damage to
the greenhouse.
Complaints
We put severe demands on quality to secure that you get a
faultless product. However, should a problem occur, we
kindly ask you to contact the dealer from whom you have
bought the greenhouse. For a quick service, you should
specify the defect by means of the parts list in the assembly
instructions. Please also note the model number which is
stamped on the front page of these instructions.
Guarantee
Manufacturer gives frame guarantee which covers
replacement or repairs of defective parts due to material or
manufacturing fault. Moving and painted parts, glazing and
damage caused by wind or other extreme weather
conditions are excluded.
The guarantee does not cover, assembly, freight etc. The
guarantee is invalid if the greenhouse is not assembled
according to these instructions.
Insurance
Please note that not all insurance companies cover
greenhouses automatically. Please contact your insurance
company to ensure an insurance coverage.
Tips
1. The base anchors has to be fastened/concreted into the
ground.
2. The base has to be 100% level and square. The easiest way
to ensure this is to make sure that the two diagonal
measurements are equal.
3. We recommend that you grease screws for doors and
windows for easier assembly.
4. If desired, it is possible to seal the greenhouse at the edges
and conners, also gap between polycarbonate and gutter,
using neutral silicon.
5. Polycarbonate—the UV-protected side (outside) of the
sheet is covered with transparent film and must be faced
towards the sun. Remove approximately 2 inches of film from
all sheet edges before installing. Remove all film immediately
after the constructions is completed. Polycar-bonate plates
must not come into contact with the ground. Always rest
them on cardboard or similar material during construction.
Maintenance
• Grease doors (hinges and lock or door track).
• Clean the gutter for leaves, etc.
• Adjust windows and doors.
• Clean the greenhouse before and after the growing season.
Use only gentle detergents and soft cloth (please check first if
the detergent does not react aggressively with the aluminum
profiles and polycarbonate).

Gerbiamas pirkėjau,
Sveikiname Jus įsigijus naują šiltnamį.
Surinkimo instrukcijoje rasite išsamius brėžinius. Jokių
specialių techninių žinių nereikia.
Svarbu
• Šiltnamiui parinkite saulėtą ir nuo vėjo apsaugotą vietą.
Šiltnamį statykite tik nevėjuotą ir nelietingą dieną;
• Montuodami šiltnamį dėvėkite pirštines, apsauginius
akinius ir galvos apdangalą, avėkite batus - aliuminio profilių
kampai, stiklo ar polikarbonato briaunos yra labai aštrios;
• Kopėčias statykite tik ant lygaus pagrindo;
• Būtina turėti pagalbininką.
Įrankiai
Renkant šiltnamį reikalingi šie įrankiai:
• Gulsčiukas;
• Veržliaraktis 8 mm ir atsuktuvas;
• Elektrinis grąžtas.
Priedai
Mes siūlome didelį šiltnamio priedų pasirinkimą, kas leidžia
sulaukti gausesnio derliaus ir palengvina darbą šiltnamyje.
Dėl išsamesnės informacijos kreipkitės į šiltnamio
pardavėją.
Apsauga žiemą
Regionuose, kur žiemą gali iškristi daug sniego,
rekomenduojame laikytis šių patarimų:
• Paremkite stogo siją šiltnamio viduryje;
• Nepamirškite nuvalyti didesnes sniego sankaupas;
• Imkitės priemonių, kad apsaugotumėt šiltnamį nuo
sniego, krintančio nuo medžių ar namo stogo;
• Išmontuokite langų darinėjimo sklendžių cilindrus (jeigu
tokie yra);
• Užremkite duris ir langus, kad apsaugotumėt šiltnamį nuo
stipraus vėjo.
Nusiskundimai
Visi šiltnamiai yra pagaminti pagal aukščiausius kokybės
standartus. Jei iškiltų kokių problemų, prašome kreiptis į
Jums šiltnamį pardavusią įmonę, nurodydami defektą ir
brokuotos detalės numerį bei šiltnamio modelį.
Garantija
Gamintojas suteikia gamyklinę garantiją šiltnamio rėmui –
defektų, atsiradusių dėl gamybos klaidos, pašalinimui ir
brokuotų detalių pakeitimui. Garantija nesuteikiama
judančioms ir dažytoms detalėms (jei tokios yra),
surinkimui, pervežimui ir pan. Garantija negalioja stipraus
vėjo ar kitų ekstremalių oro sąlygų padarytai žalai, ar jei
šiltnamis buvo surinktas nesilaikant instrukcijos.
Draudimas
Atkreipkite dėmesį, kad ne visos draudimo kompanijos
draudžia šiltnamius. Prašome susisiekti su savo draudimo
kompanija dėl šiltnamių draudimo.
Geri patarimai
• Šiltnamio pagrindą reikia įtvirtinti / įbetonuoti į žemę;
• Pagrindas turi būti 100% horizontalus ir stačiakampis –
įsitikinkite, kad abi įstrižainės yra lygios;
• Rekomenduojame sutepti alyva durų ir langų varžtelius, kad
būtų lengviau prisukti;
• Jeigu pageidaujate, kad šiltnamis būtų visiškai hermetiškas,
sujungimo kampus ir siūles užglaistykite silikonu.
Užsandarinkite tarpą tarp dangos ir vandens latako.
• Polikarbonatas—UV spinduliams atspari (išorinė) pusė yra
apklijuota skaidria plėvele. Ši pusė turi būti šiltnamio išorėje.
Nulupkite apie 5 cm plėvelės nuo visų polikarbonato kraštų
prieš įstatant juos į rėmą. Po to, kai surinksite visą šiltnamį,
pašalinkite likusią apsauginę plėvelę. Polikarbonato danga
negali liestis su žeme –laikykite ją ant kartoninės pakuotės.
Priežiūra
- Reguliariai tepkite duris (lankstus ir spyną arba durų
bėgelius);
-Iš latakų valykite lapus ir pan.;
-Reguliuokite langus ir duris;
- Valykite šiltnamį tam skirtomis dezinfekcinėmis
priemonėmis prieš ir po sezono. Polikarbonato dangą plaukite
šiltu vandeniu su minkštu audiniu. Naudokite tik švelnias
chemines priemones, kurios nekenkia aliuminiui ir
polikarbonatui.

EN The UV-protected side of the sheet is covered with with transparent film and must face towards the sun.
LT UV spinduliams atspari polikarbonato pusėpadengta skaidria apsaugine plėvele. Ši pusėturi būti šiltnamio išorėje!
Summary statement for polycarbonate panel / Polikarbonato lapųišdėstymo schema
Front/
Priekinėdalis
Back/
Galinėdalis
Šoninėdalis (dešinė)
Šoninėdalis (kairė)
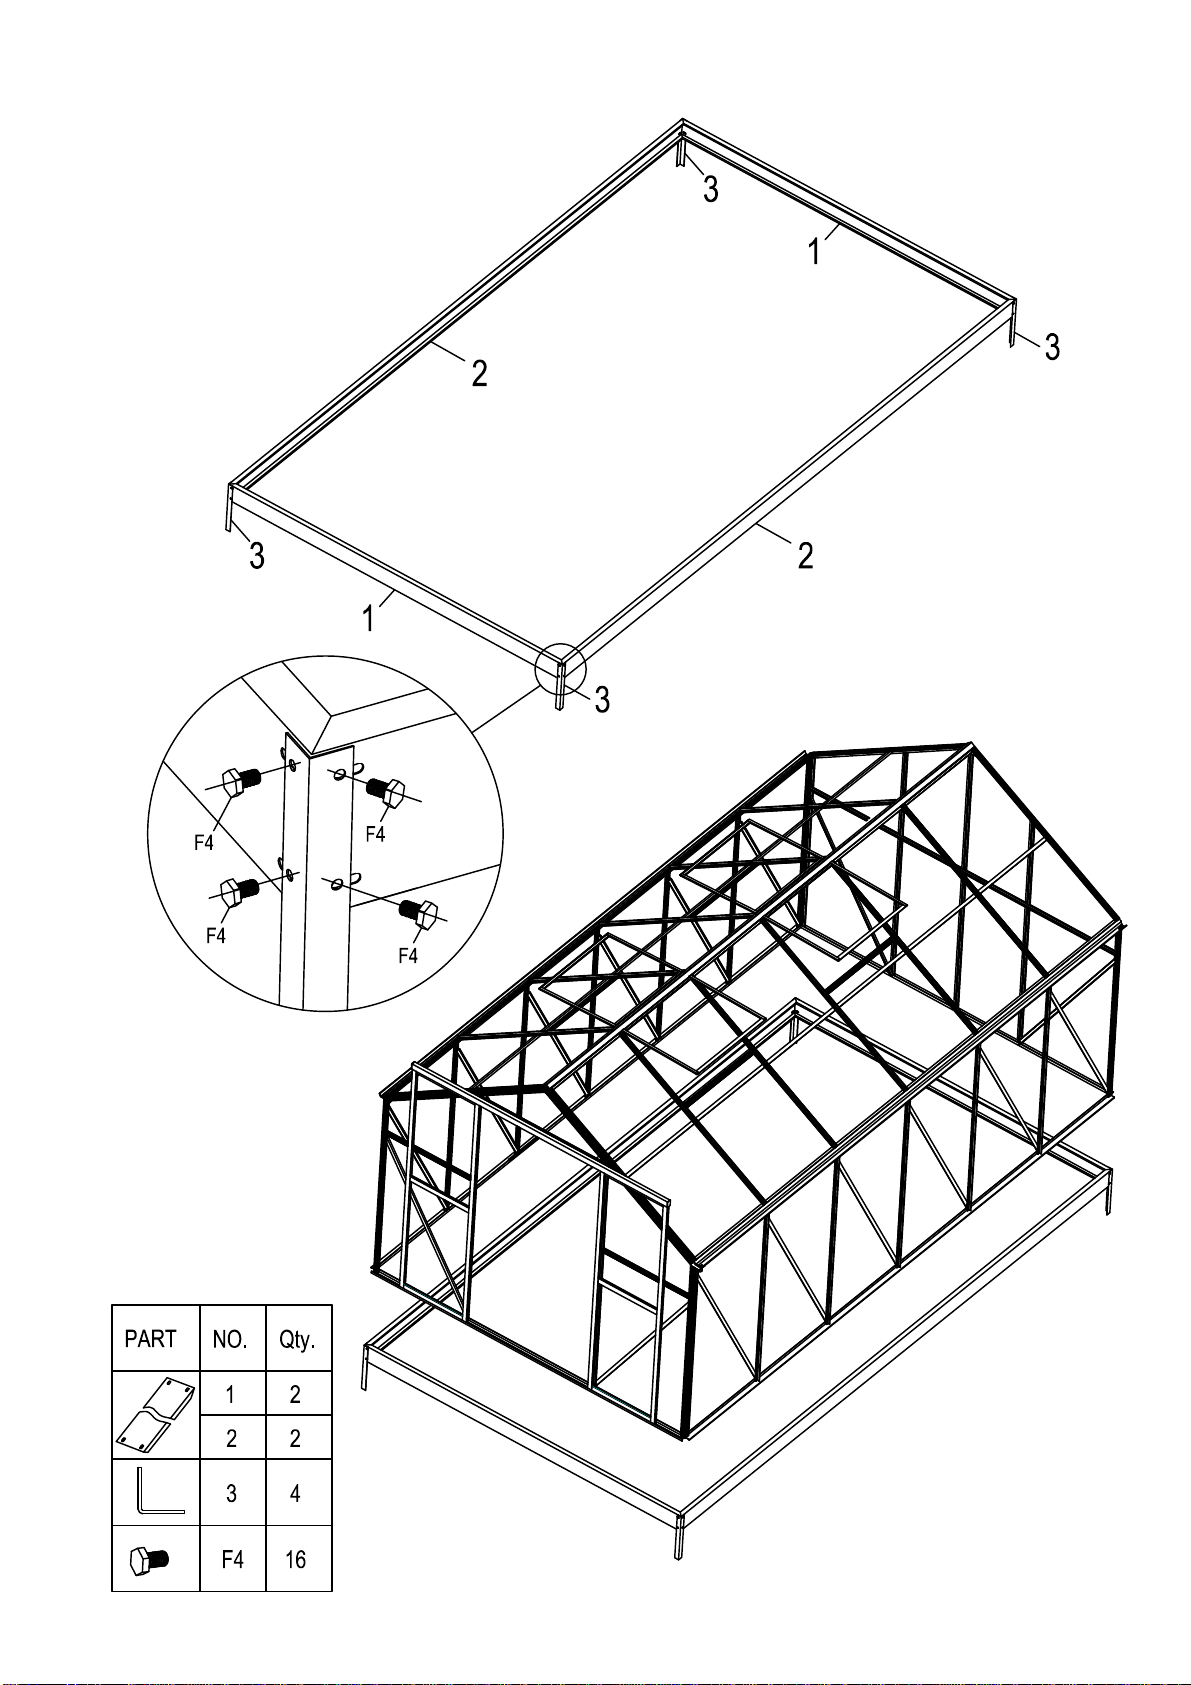
"Hexagonal screw" installation/ Šešiakampio varžto montavimas
3
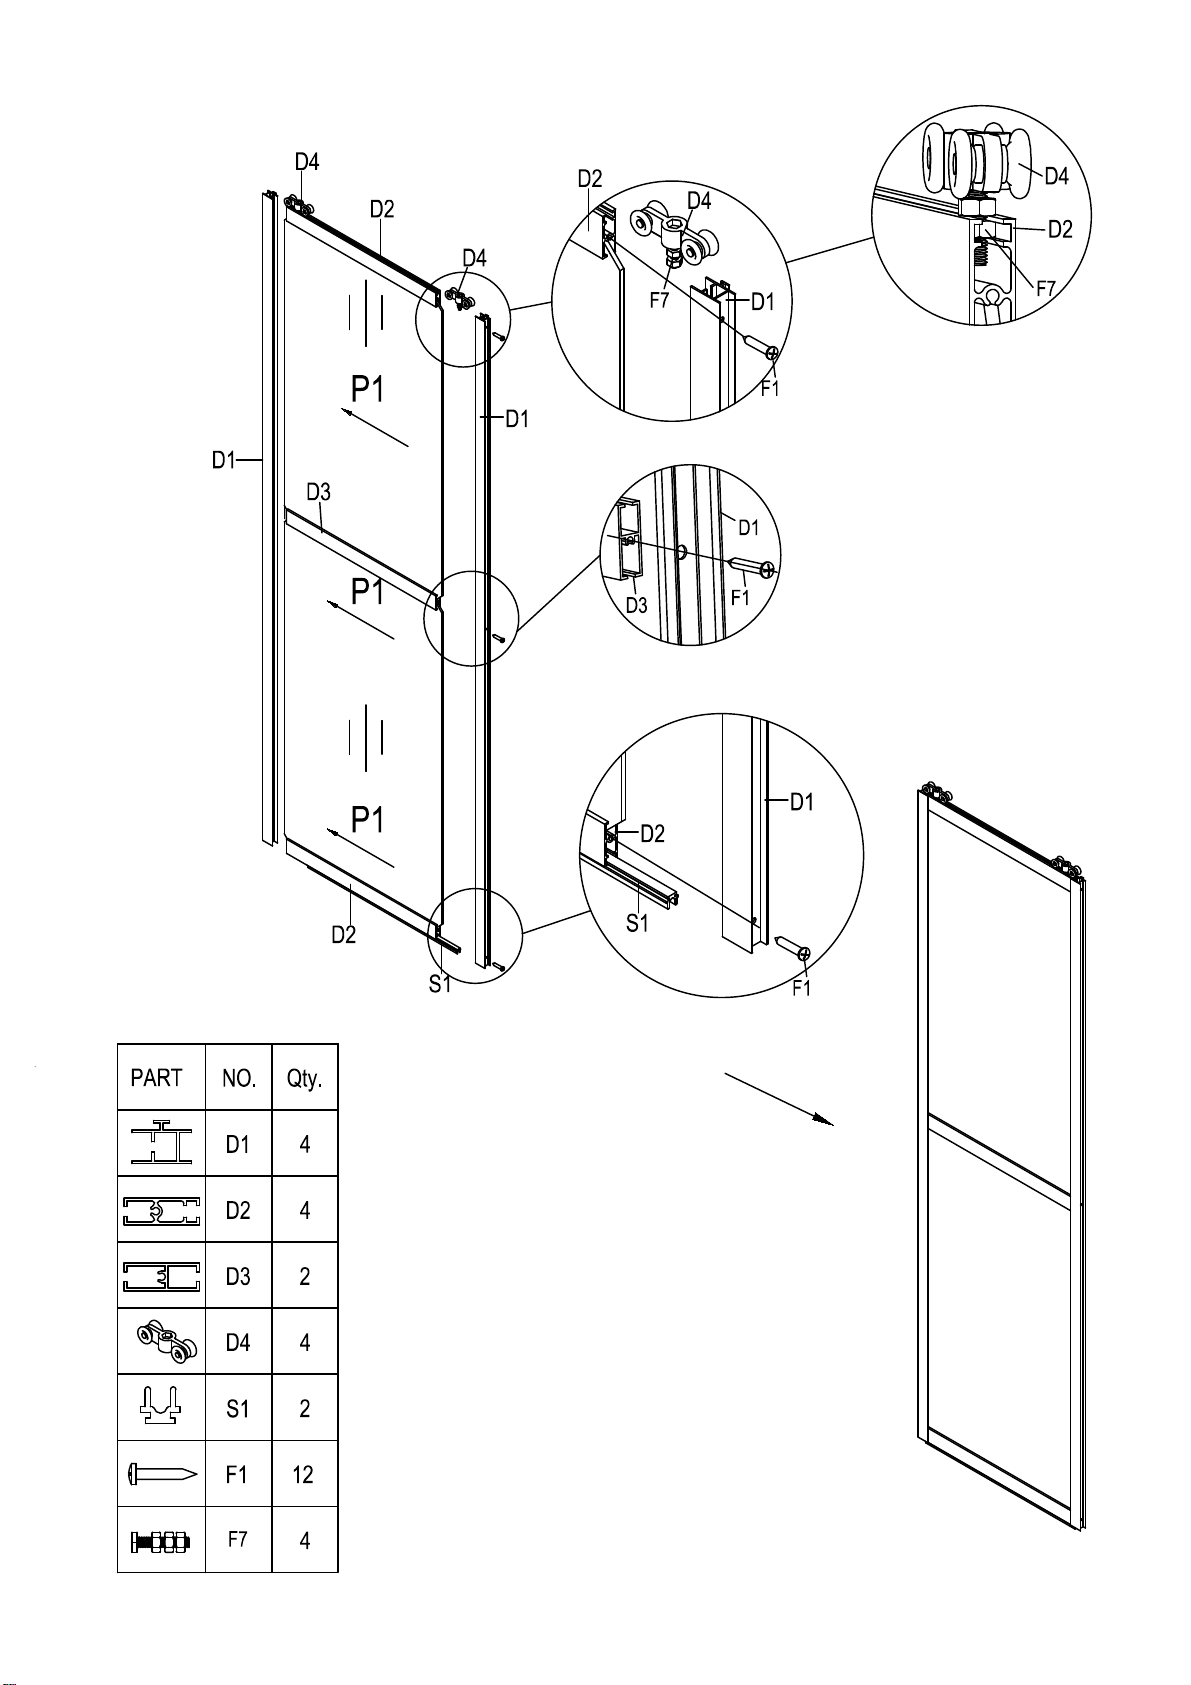
DOOR / DURYS
4

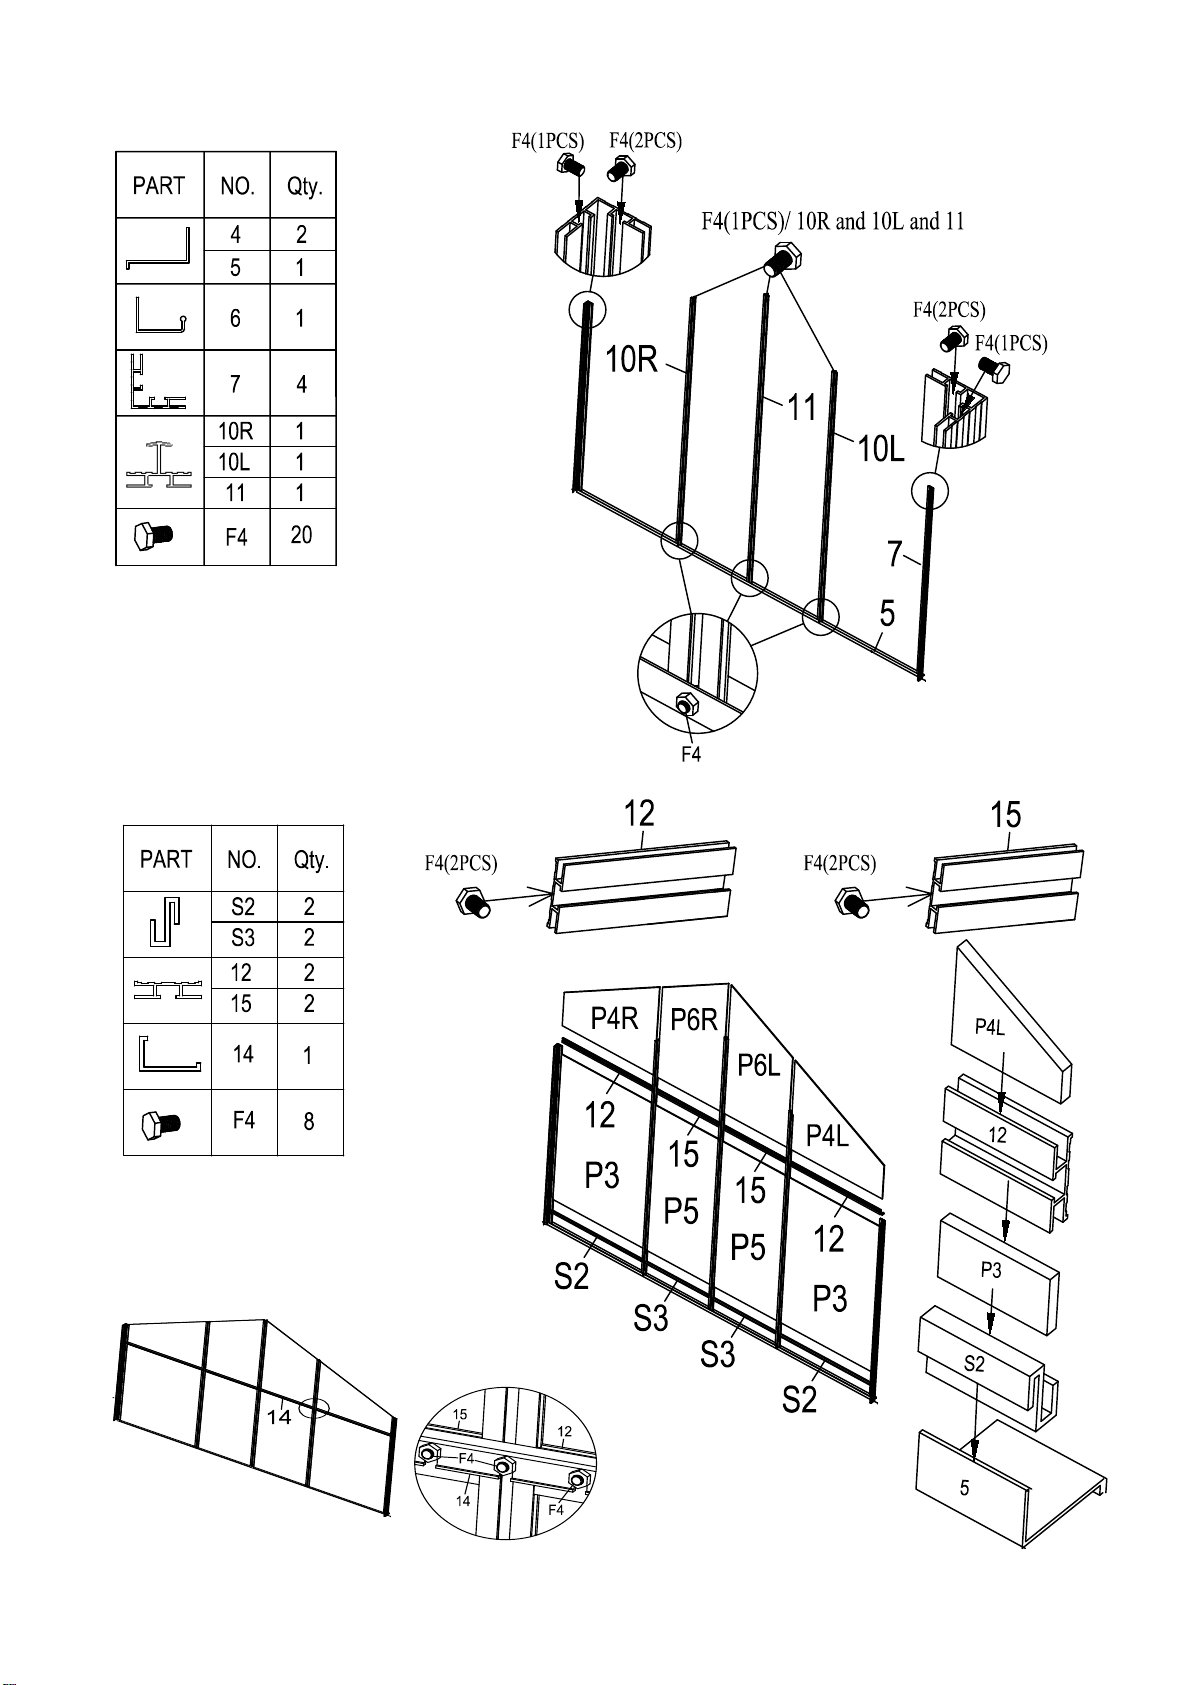
WINDOWS / LANGAI
5
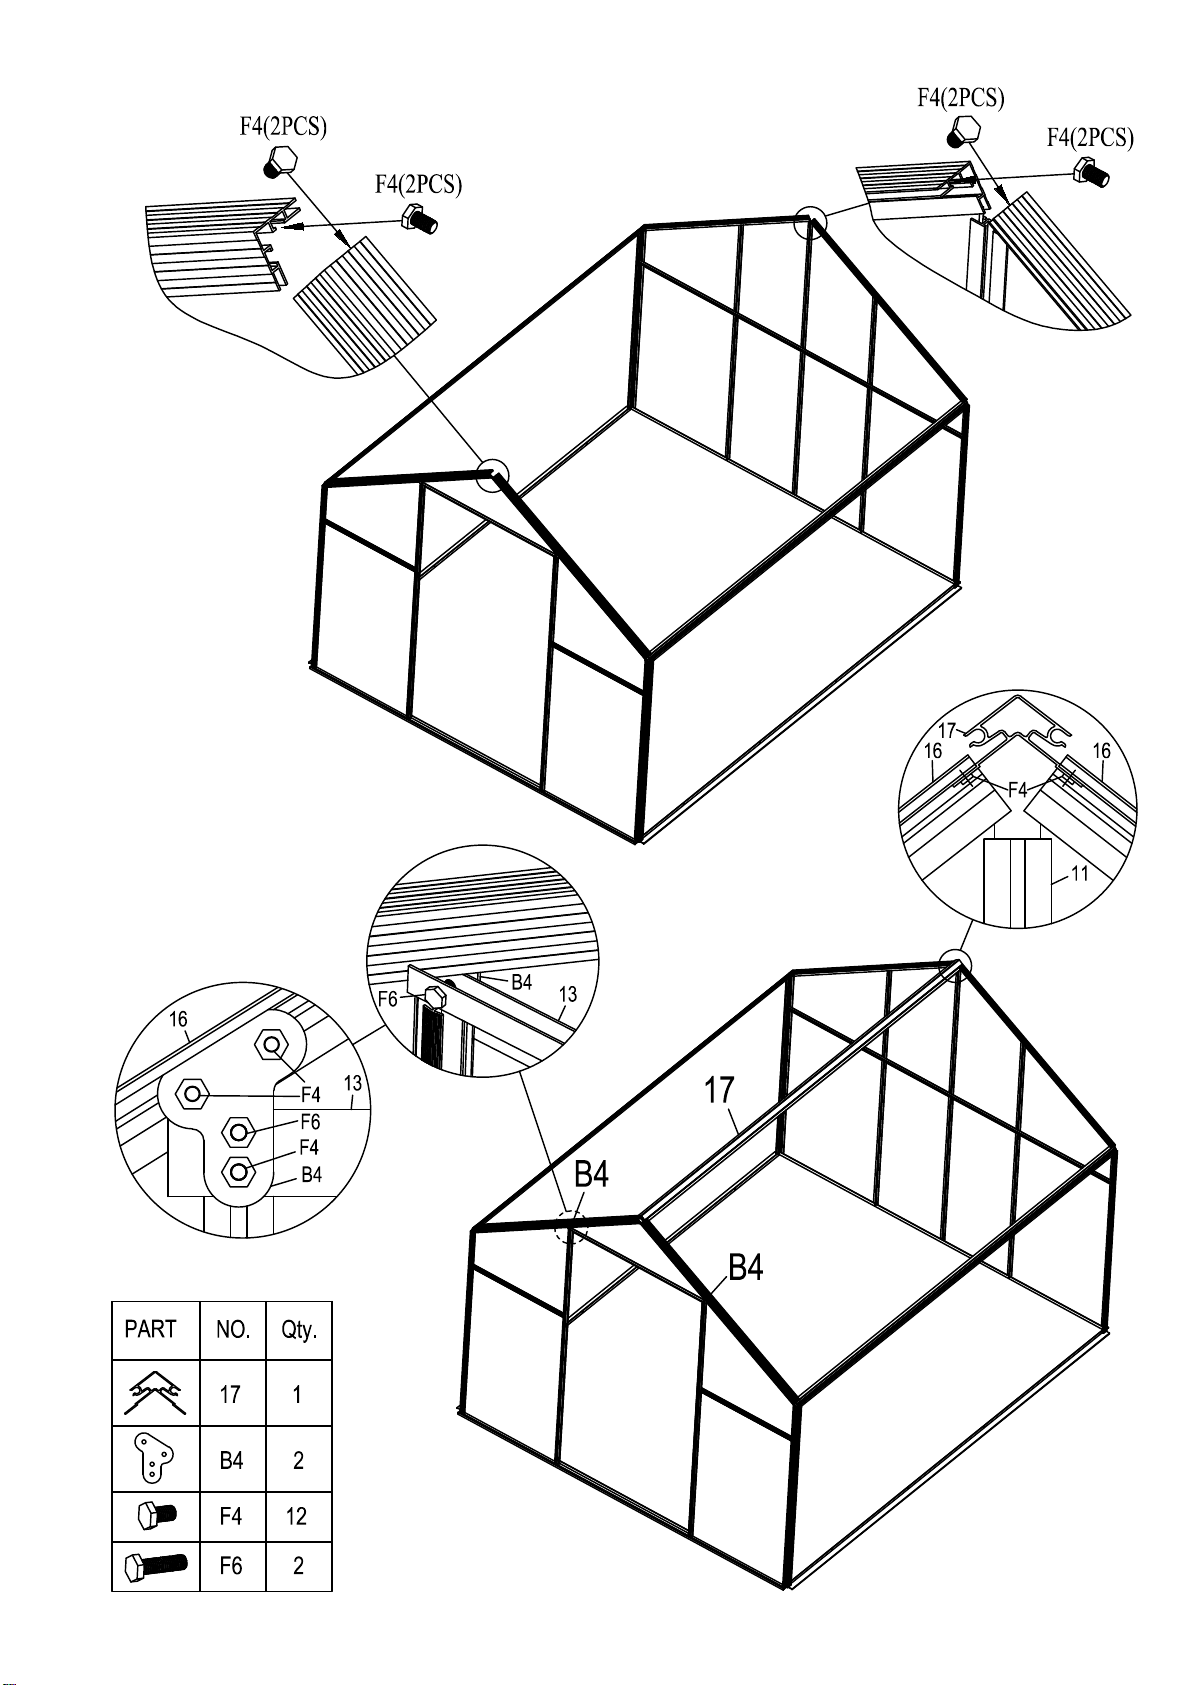
REAR GABLE/ GALINIS FASADAS
6

FRONT GABLE / PRIEKINIS FASADAS
6
7

4
4
8
9

28
10

98
11
EN Diagram of Door Guide Stopper to Top Rail
LT Durųfiksatoriaus montavimas viršutiniame bėgelyje
12

13

14

15

16
17

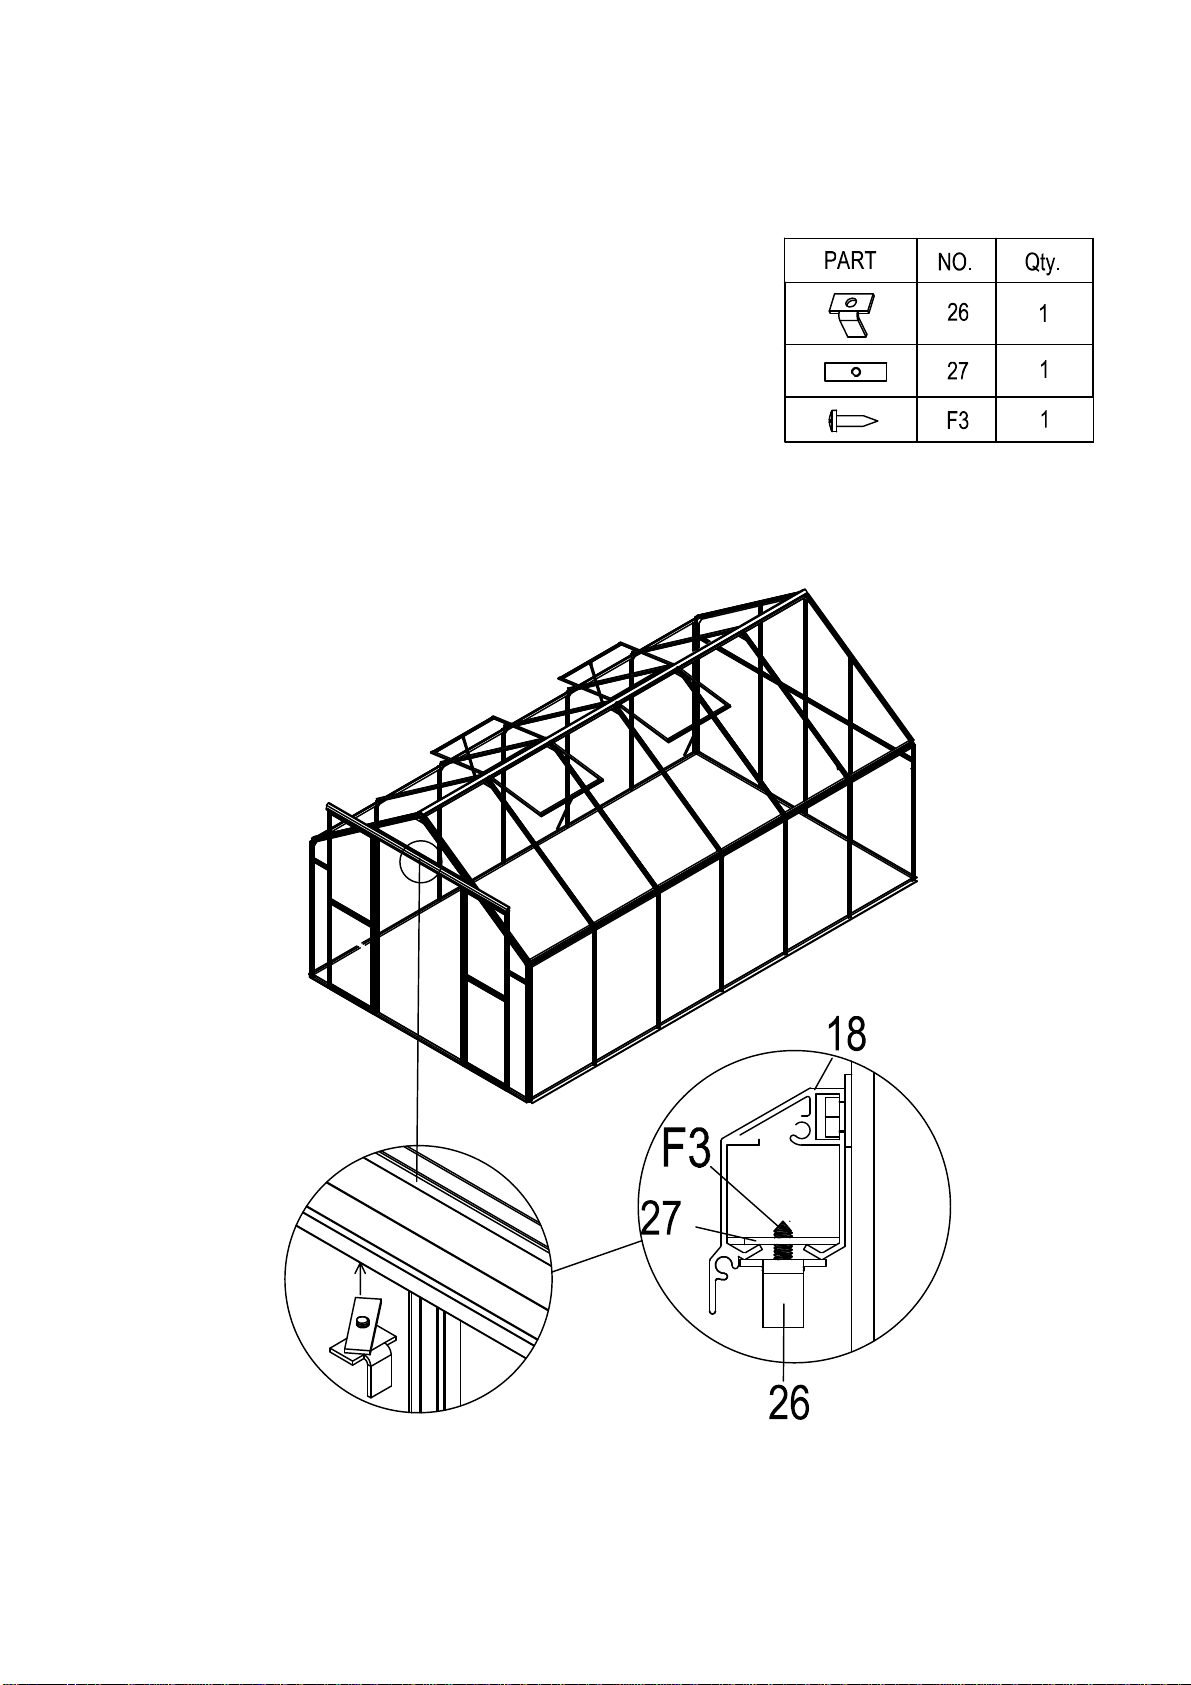
18

228
Parts list / Daliųsąrašas
19
Other Floria garden products Greenhouse Kit manuals


Popular Greenhouse Kit manuals by other brands

Riverstone Networks
Riverstone Networks Monticello 160701V Assembly instructions

Growing Spaces
Growing Spaces Doorway installation manual

Vitavia
Vitavia VM0038-C 8300 Assembly instructions

Walton
Walton 04LEAN0804-V1 manual

CLIMA POD
CLIMA POD Virtue Assembly instructions

VOLYA
VOLYA Dachnaya Tryoshka Assembling manual

ACF Greenhouses
ACF Greenhouses SOLAR HARVEST SH7 Assembly instructions

Juliana
Juliana Premium Wall 13 Assembly instructions

COVERTECH
COVERTECH Amber Assembly manual

Elite Greenhouses
Elite Greenhouses TITAN 1000 Instructions & Illustrations

LAMS
LAMS Melissa manual

Mercia Garden Products
Mercia Garden Products 04GREEN0806SD-V6 manual


