Floria RC Series User manual
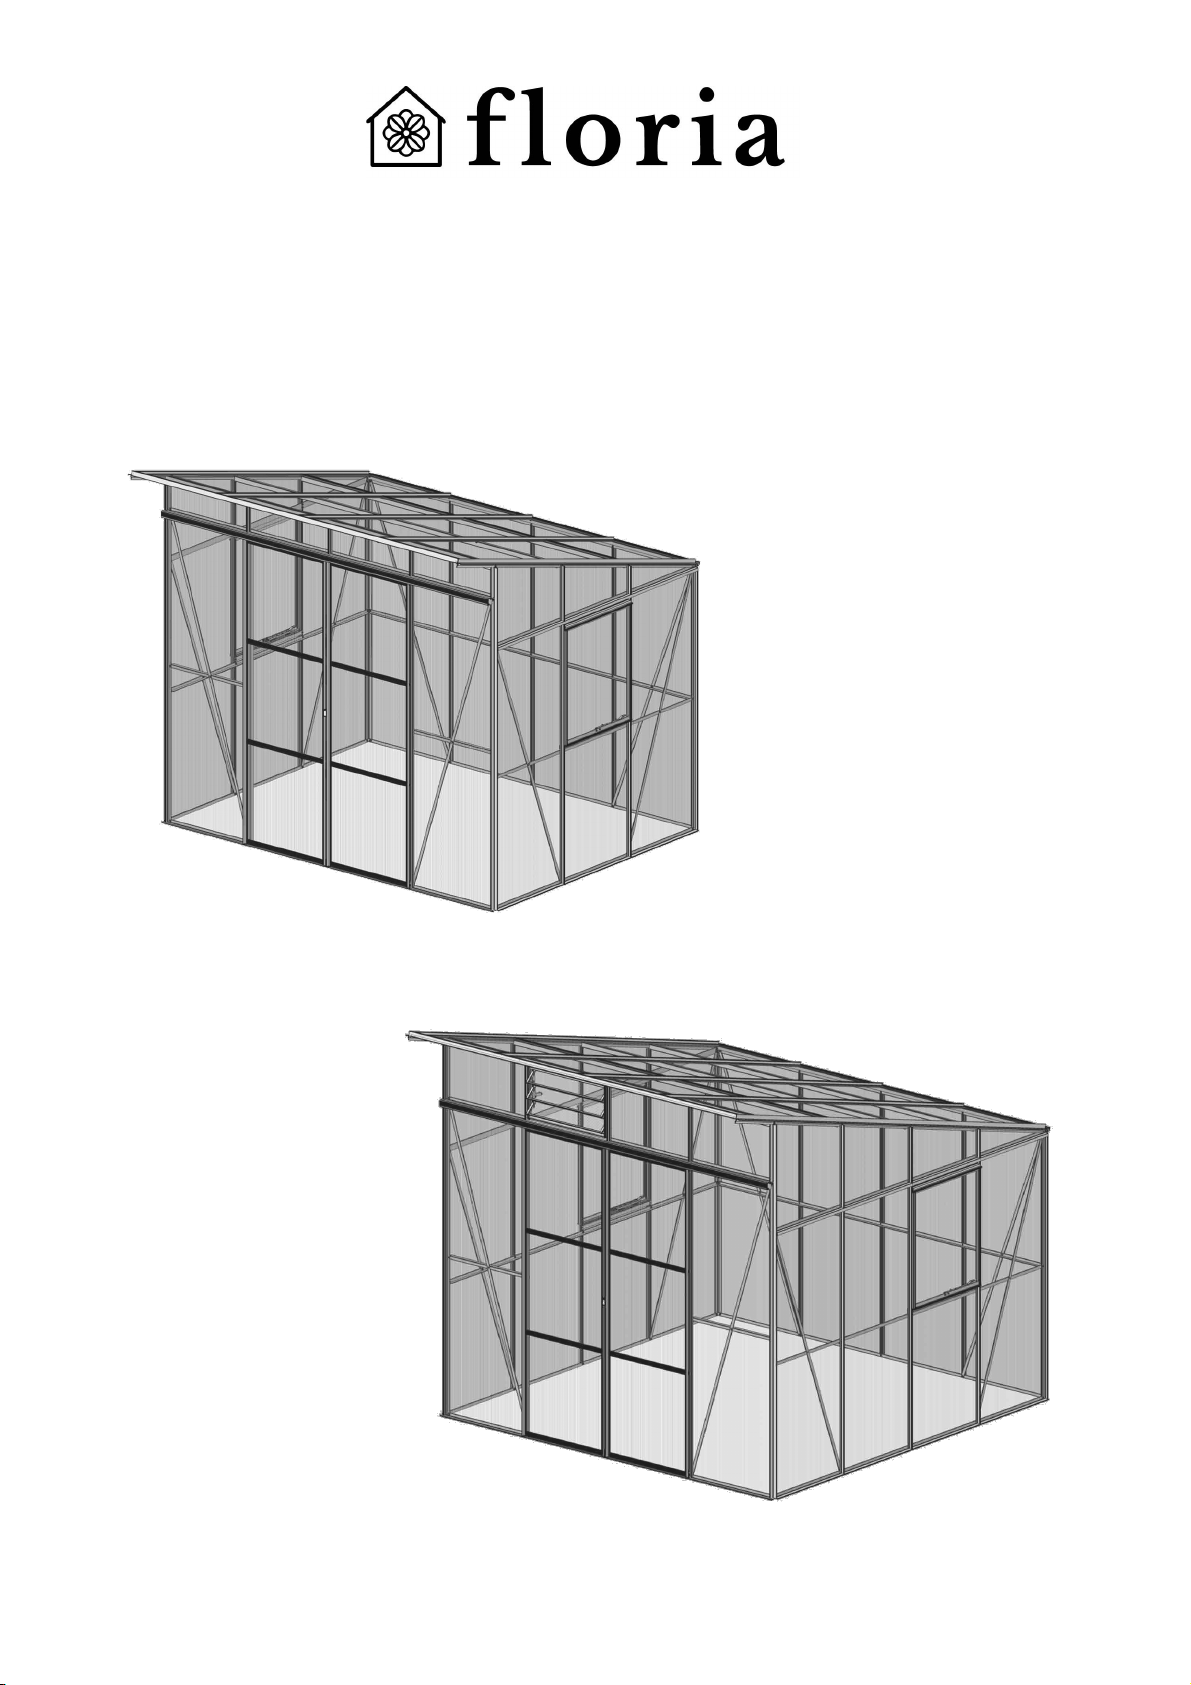
RC Series Greenhouse
Article No: GS010993 & GS010994

2
Thank you for purchasing your new greenhouse. We recommend you familiarize yourself with the instruc-
tions and read all safety information before you commence assembly.
The assembly instructions mainly consist of detailed illustrations and no specific technical knowledge is
required for the assembly of the greenhouse.
These instructions are divided into sections:Base, Side gable, Rear wall, Front wall, Roof, Vent, Door,
Louver, Polycarbonate or Glass, Fixing Spring clip or PVC capping bar, Down pipes, Anchoring green-
house to slab or base etc.
The house is packed in one carton and contains all of the parts and fittings. Package1(x2) mainly for side
gable parts, Package 2 for rear wall parts , Package 3 for front wall parts, Package 4 for roof parts, Pack-
age 5 for vent parts, Package 6 for door parts, Package 7 for Louver parts, Package 8 for down pipes
parts, fixing spring parts or PVC bars in other package. etc. All of the aluminum profiles are marked with a
part number corresponding to the numbers given on the drawings and in the separate parts list. Nuts, bolts
and fittings will be found in the relevant package.
The polycarbonate panel is packed in one carton, The sheets of Polycarbonate are not marked with a part
number, but the sizes appear in the overview. When fitting the Polycarbonate, the side with the opal film/
text must turn outward.
If include base, base is packed in another carton.
Safety Warning
1. Aluminum profiles, polycarbonate and glass can potentially cause injury. Please ensure you wear pro-
tective goggles, gloves, headgear and suitable footwear when assembling and glazing the building.
2. Please remember that glass is fragile and should be handled with extreme care. Always clear up and
dispose of any breakages immediately.
3. Do not assemble the greenhouse in high winds.
4. For safety reasons and ease of assembly, we recommend that this greenhouse is assembled by a
minimum of two people.
5. The product you have purchased is intended only for the growing of plants and should only be used for
this purpose. When used for other purposes we will take no responsibility.
6. When using a step ladder one person should steady it at all times whilst the other works.
7. Should you encounter difficulties constructing this house, or in positioning the glass or polycarbonate
sheets, please contact your retailer– do not use force!
8. The greenhouse must always be anchored.
9. In the event of high winds, close all doors and vents.
10. In the event of heavy snowfall, Please support the greenhouse roof and clear all lying
snow from the roof as it can cause the roof to buckle or collapse.
Site Preparation
1. When selecting a site for your greenhouse, Always try to select a sunny location, it is vital that you
choose as flat and level an area as possible.
2. Supplier's original base or a concrete or slab base will provide the most solid foundation for your
greenhouse.
3. Do not fix your building down until the building is fully assembled, including glazing.
4. Avoid placing your greenhouse under trees or in other vulnerable locations.
5. To minimize the risk of wind damage, try to select as sheltered a site as possible, e.g. beside a hedge-
row or garden fence.
Statement

3
Important
Before assembling your new greenhouse, please check that all parts in the provided list are included.
Please take each bundle out of the packaging in order to identify the parts better. Most parts are numbered
and can be identified by a stamped number or removable label. Alternatively, the components can be iden-
tified by lengths detailed in the packing list (see diagram below). Please also note that NOT all parts for a
specific area will be packed together, i.e. door related components are packed together and some are used
in main frame construction. and some side gable vent bars parts were packed in package No.5.
It is important that the opened bundles do not get mixed with one another. If something is missing please
contact your retailer.
The sheets of Polycarbonate are UV-protected on one side, When fitting the Polycarbonate, the side with
the opal film/text must turn outward. Remove approximately 2 inches of film from all sheet edges before
installing. Tear off all film immediately after the constructions is completed.
Additional Considerations
1. Please bear in mind that assembling your greenhouse can be time consuming. You may need to
spread the construction over two or more days. We recommend that you avoid leaving the building
partially glazed. If you ever have to leave your greenhouse half assembled and not anchored down,
weigh it down with slabs or bags of sand to stop the wind moving it.
2. You will find it helpful to prepare a large, clean and clear area in which to work in. A garage floor or flat
lawn area is ideal.
3. Anchoring down your greenhouse should be the final stage of construction just after glazing.
Necessary Tools
Screw drivers (Normal and Crosshead PH2),10 mm socket spanner or wrench, 10 mm combination span-
ner, knife, measuring stick, spirit level, Accu-drill with adjustable torque, Step ladder.
Maintenance
The greenhouse should be thoroughly washed with a gentle detergent occasionally. Please check that the
detergent used does not react aggressively with aluminium or plastic.
Ensure that the door tracks are cleaned regularly to avoid a buildup of debris , If hinged door, the hinge
should be lubricated usually.
Insurance
Not all insurance companies automatically cover greenhouses. We recommend you contact your insurance
company to ensure that you are covered.

4
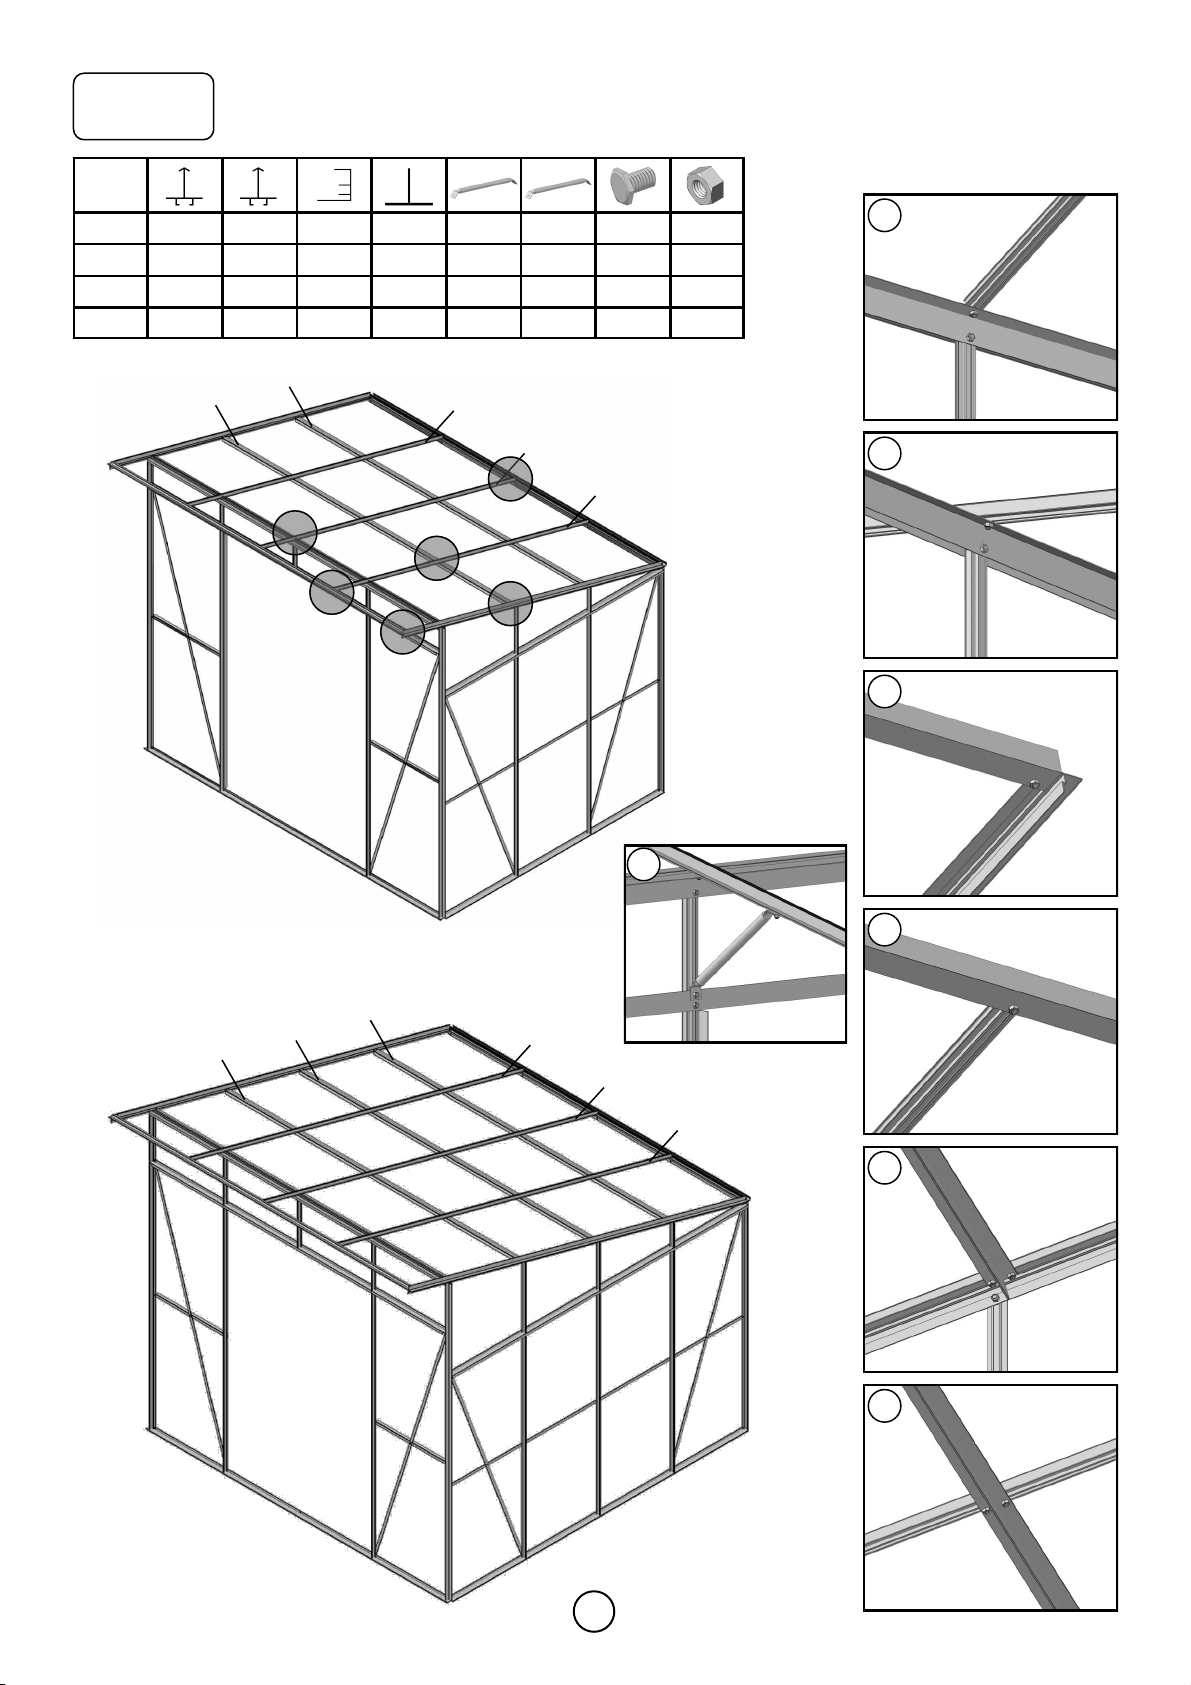
Base
We cannot emphasis how important it is to have a proper base for your Greenhouse to be erected upon.
It is essential that the BASE IS FLAT, LEVEL AND SUBSTANTIAL enough to take the weight of the
greenhouse including its polycarbonate panels or heavy glass.
Give yourself enough room around your base to allow for fitting the polycarbonate panel or glass and any
ongoing maintenance / cleaning. A slab base which is larger than the greenhouse is the ideal solution and
is our preferred foundation. If you use supplier's original base, also recommended.
A brick perimeter base is equally suitable providing there is a concrete foundation beneath it. We suggest
using a solid brick with no frogs or holes (quality stock bricks or semi-engineering bricks).
IMPORTANT: Do not anchor your greenhouse down until it is fully assembled including glazing unless
you are 100% sure your base is square and level. If not your polycarbonate panels or glass will not fit
properly.
A (mm) B (mm)
GS010994
2496 1886
2496
OPTION 1: base on grass
OPTION 2: base on slabs
OPTION 3: base on concrete
with drainage holes
OPTION 4: no base on brick
GS010993

5
#6901 6902 6903 6904 6905 6906 6907 6908 6909 6911 6912 6913 6914
mm 1600 2094 2094 2257 2257 2238 2238 2870 2870 175 175 338 338
GS..94 211111111
GS..93 211111111
#6915 6916 6611 6811 6917 6918 6320 6321 6319 6324 a1 a2 m21
mm 502 502 1826 2436 1826 2436 1808 2418 1600 1705 M6x10 M6 -
GS..94 2224446 46 2
GS..93 112226456 56 2
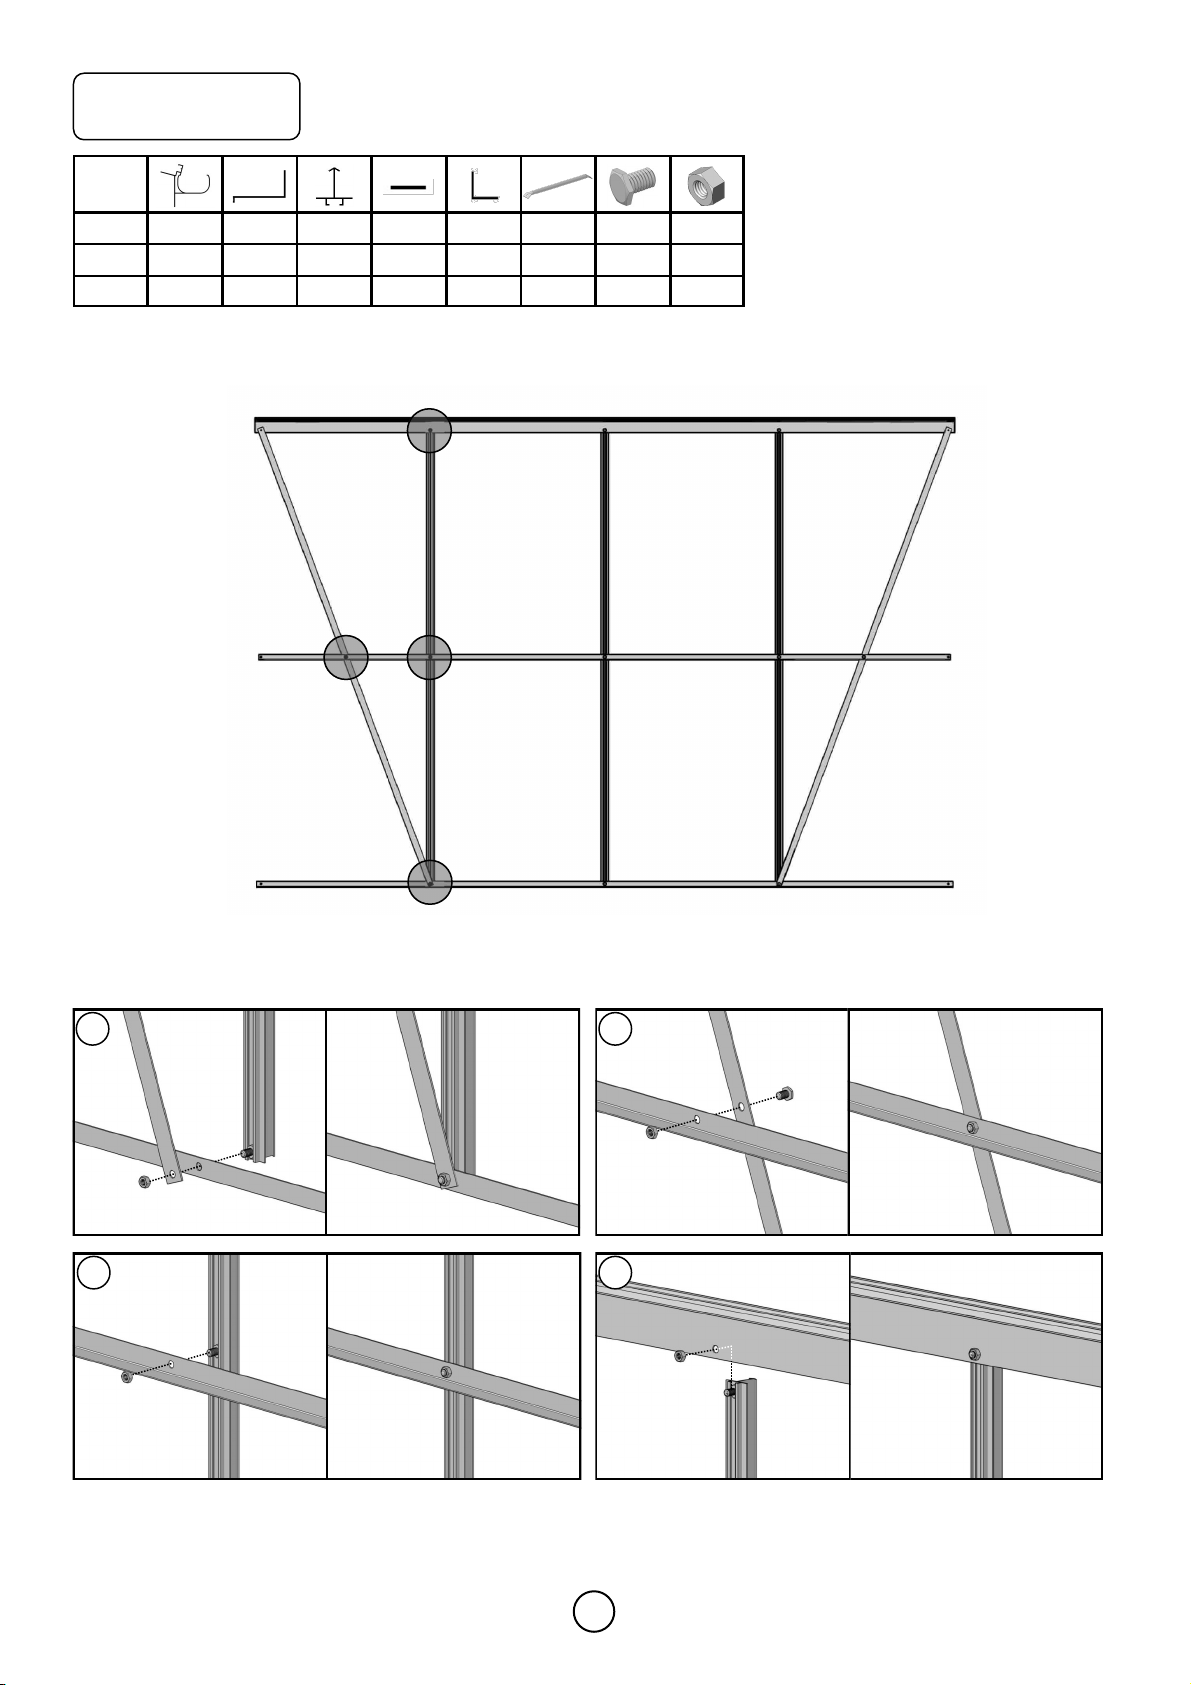
Side Gable
GS010994
GS010993
6901 69016902 6903
6901 69016904 6905
6907
6908 6909
6611 6611
6811 6811
12
345
67
8
9
11
6906
6911 6912
6913 6914
6917 6917
6320 6320
6319
6319
6319
6319
6324 6324 6324 6324
6911 6912
6913 6914
6915 6916
6918 6918
6321 6321
6324 6324 6324 6324
6319
6319
6319 6319
6319
6319
Package 1

6
1
6901
6611/6811
2
34
56
7
89
6611/6811
6319
6324
6901
6320/
6321
6320/
6321
6324
6320/
6321
6319
6324
6901
6906/
6908
6917/
6918
6917/
6918
6319
6906/
6908
6917/
6918
6324
6902/
6904
6906/
6908
6902/
6904
m21
6811
6319
Note:
At this stage, if you al-
ready decide where your
vent are positioned,
please insert two extra
bolts into each side bar
(#6319) either side of a
vent opening.
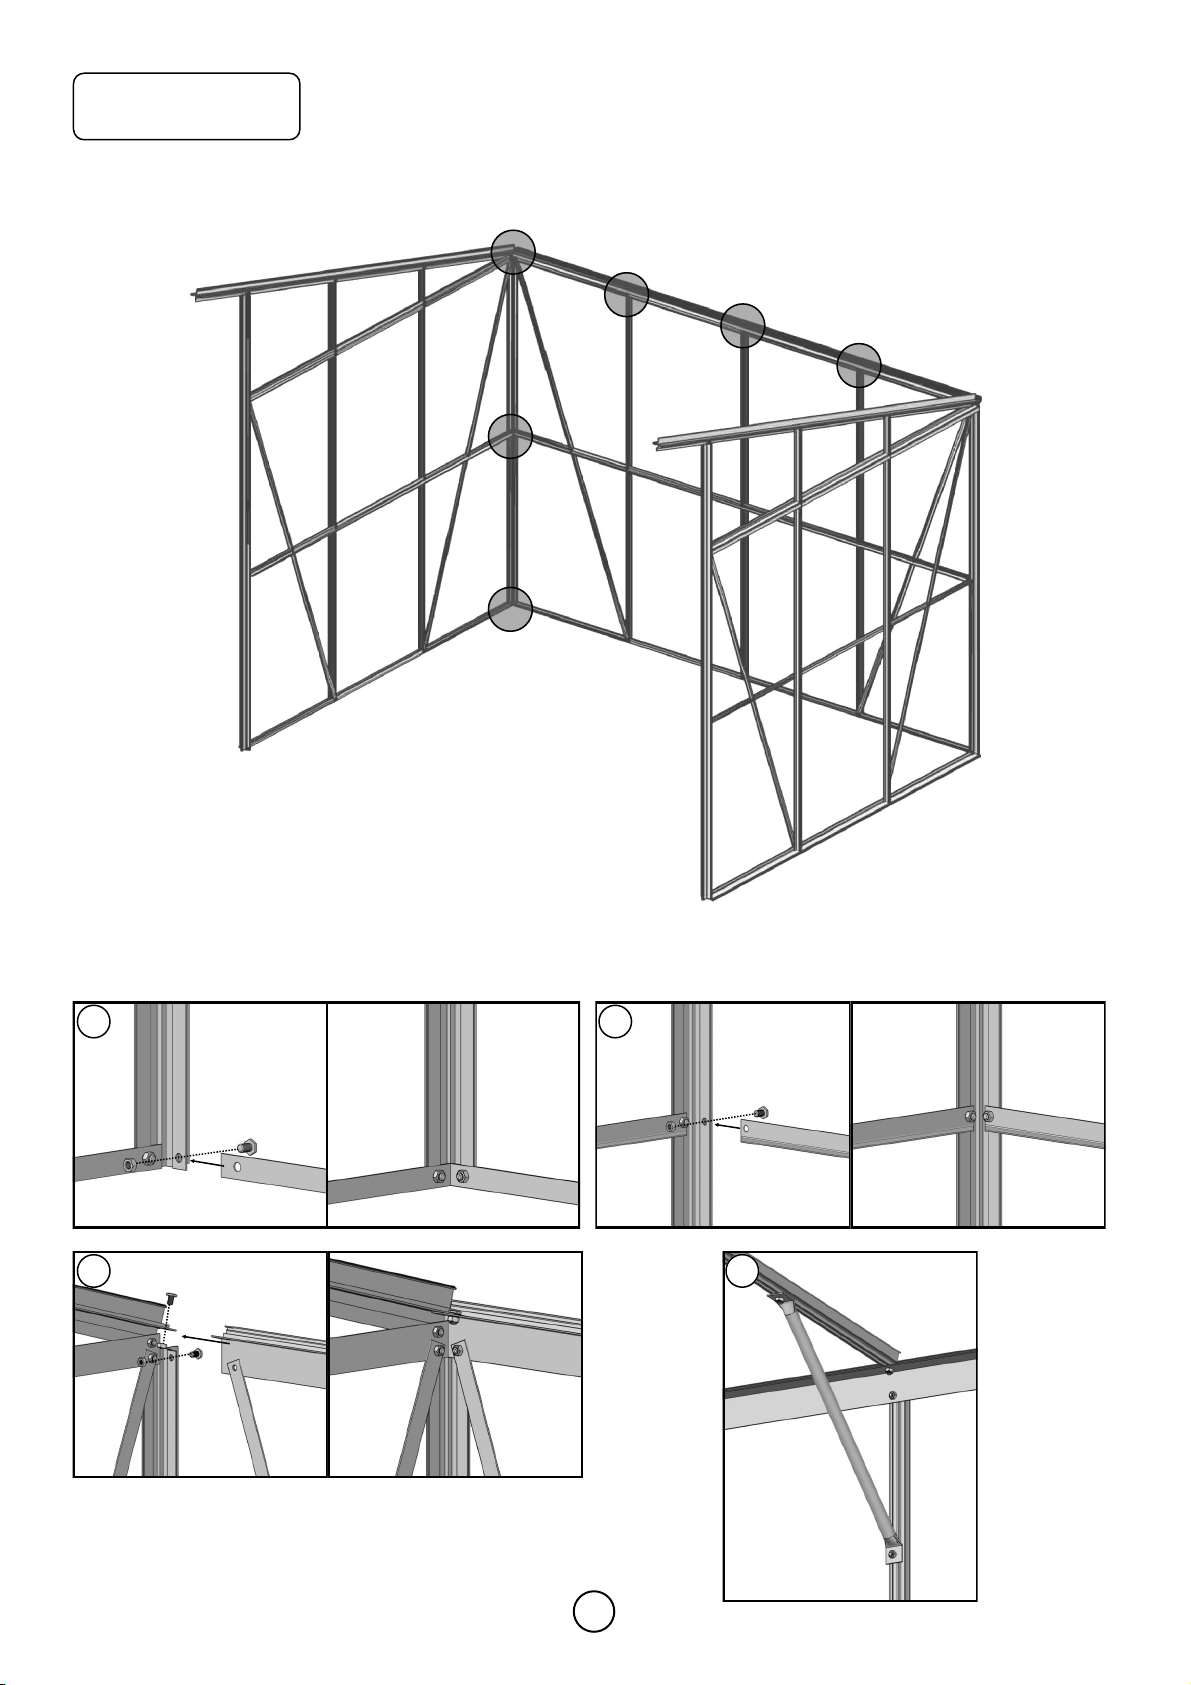
Side Gable
7
#6316 6811 6319 6324 6321 a1 a26960
mm 2446 2436 1600 1705 2418 M6x10 M6383
QTY 1132125 253
6811
1
23
4
6316
6319 6319 6319
6321
6324 6324
12
6811
6319
6324
6321
6324
3
6321
6319 4
6319
6316
Rear wall Package 2
8
5
6
7
5
6811
6
7
6901
6321
6901
Rear wall
8
8
8
8
6319
6960
6316
6928/
6929

9
#6801 6922 6923 6924 6925 6926 6927 6930 a1 a2 FLUFF
mm 2476 1903 2432 183 347 1991.5 606 2436 M6x10 M6 2.5M
GS..94 121322126 26 1
GS..93 121322126 26 1
GS010994
GS010993
6801
1
6922
6922
6926
6926
6923
6930
2
45
6
8
79
6924
6924
6927
6801
6922
6922
6926
6927
6927
6926
6923
6930
6925
6925
6925
6927
3
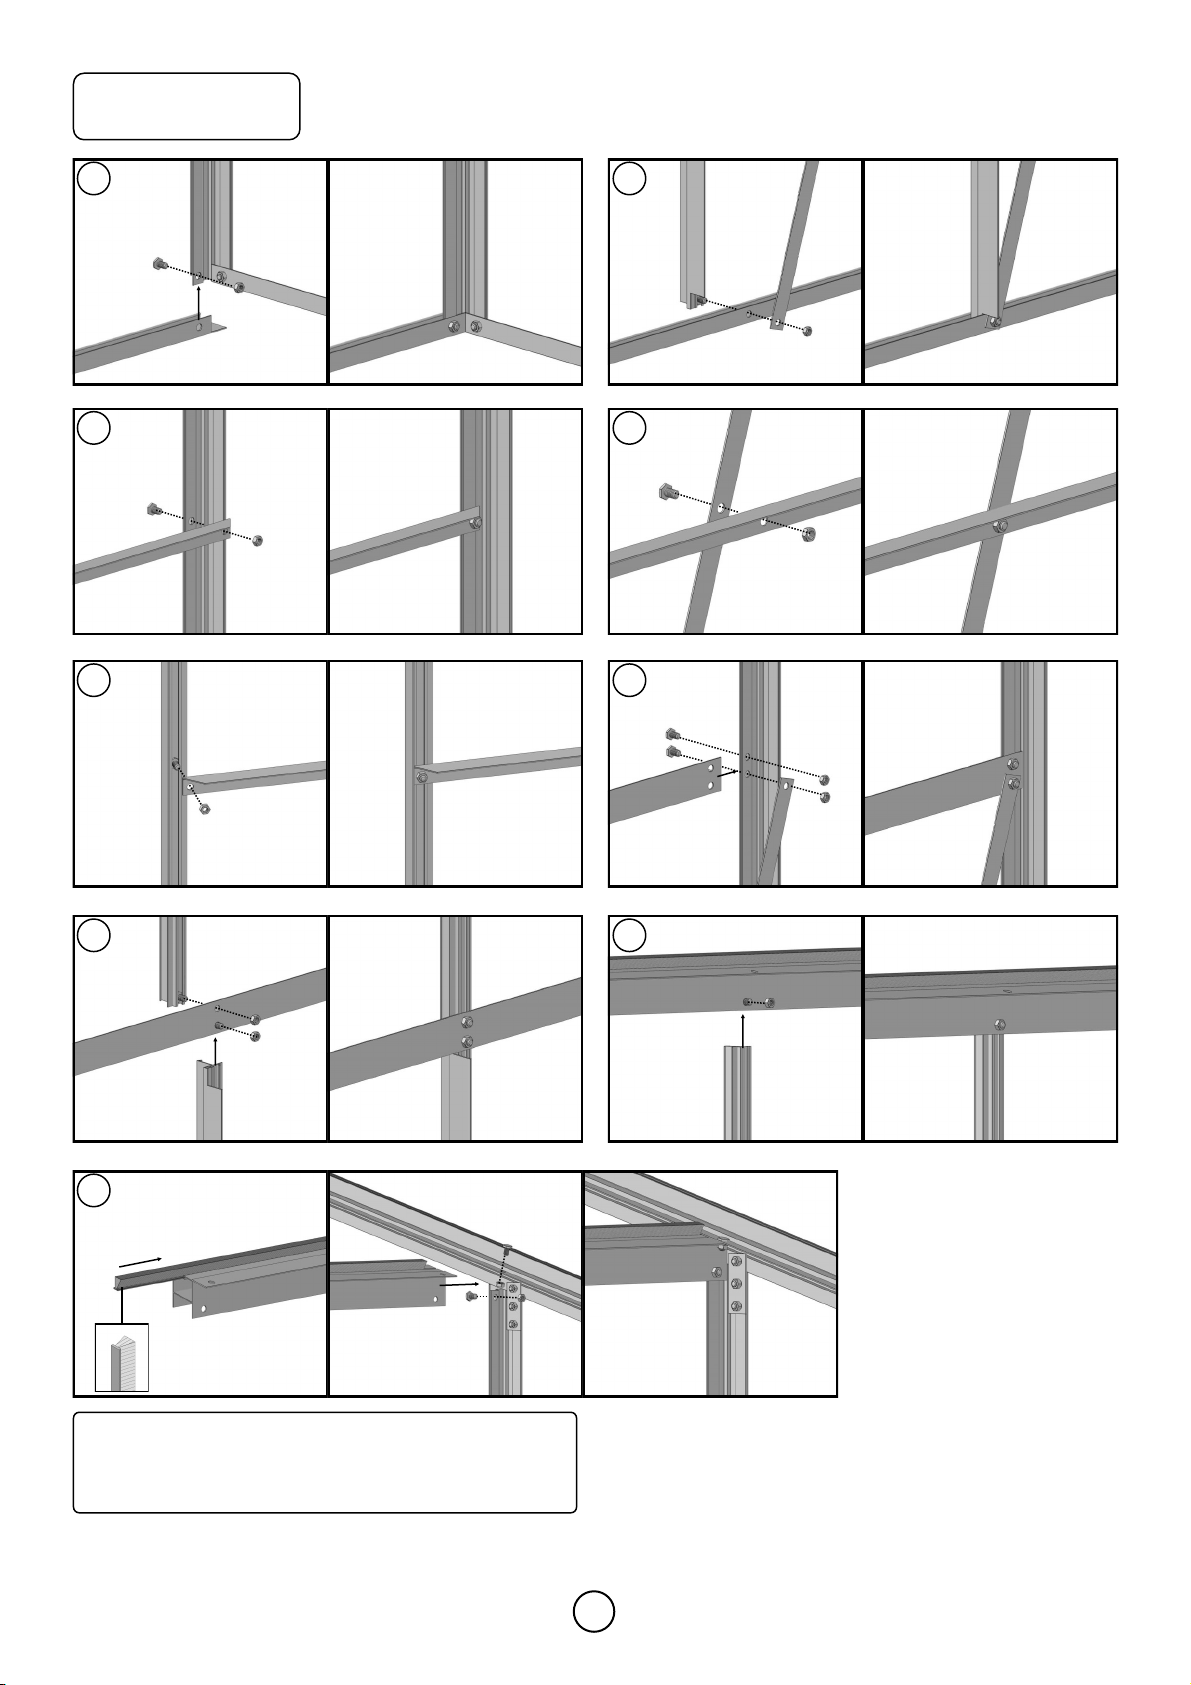
Front wall Package 3
10
12
34
56
79
8
6801
6903/
6905
6801
6922
6926
6903/
6905
6927 6927
6926
6927
6922 6923 6926
6923
6922
6924/
6925
6930
6924/
6925
6930 6930
6903/
6905
Front wall
Please insert fluff into the channel of ridge bar
(#6930) before it connect to side corner bar
(#6903/6905) and roof corner bar (#6906/6908).
6903/
6905
11
Roof
#6928 6929 6931 6331 a1 a269626961
mm 2228 2860 2440 2418 M6x10 M6478272
GS..94 31234 343
GS..93 31344 443
GS010994
GS010993
6928
6928
6928
6929
6929
6929
6931
6931
6331 6331
6331
6331
6331
1
2
3
45
6
1
2
3
4
5
6
6928/
6929
6319
6316
6928/
6929
6930
6931
6906/
6908
6928/
6929
6931
6906/
6908
6331
6331
6928/
6929
Package 4
7
6961/
6962

12
Vent
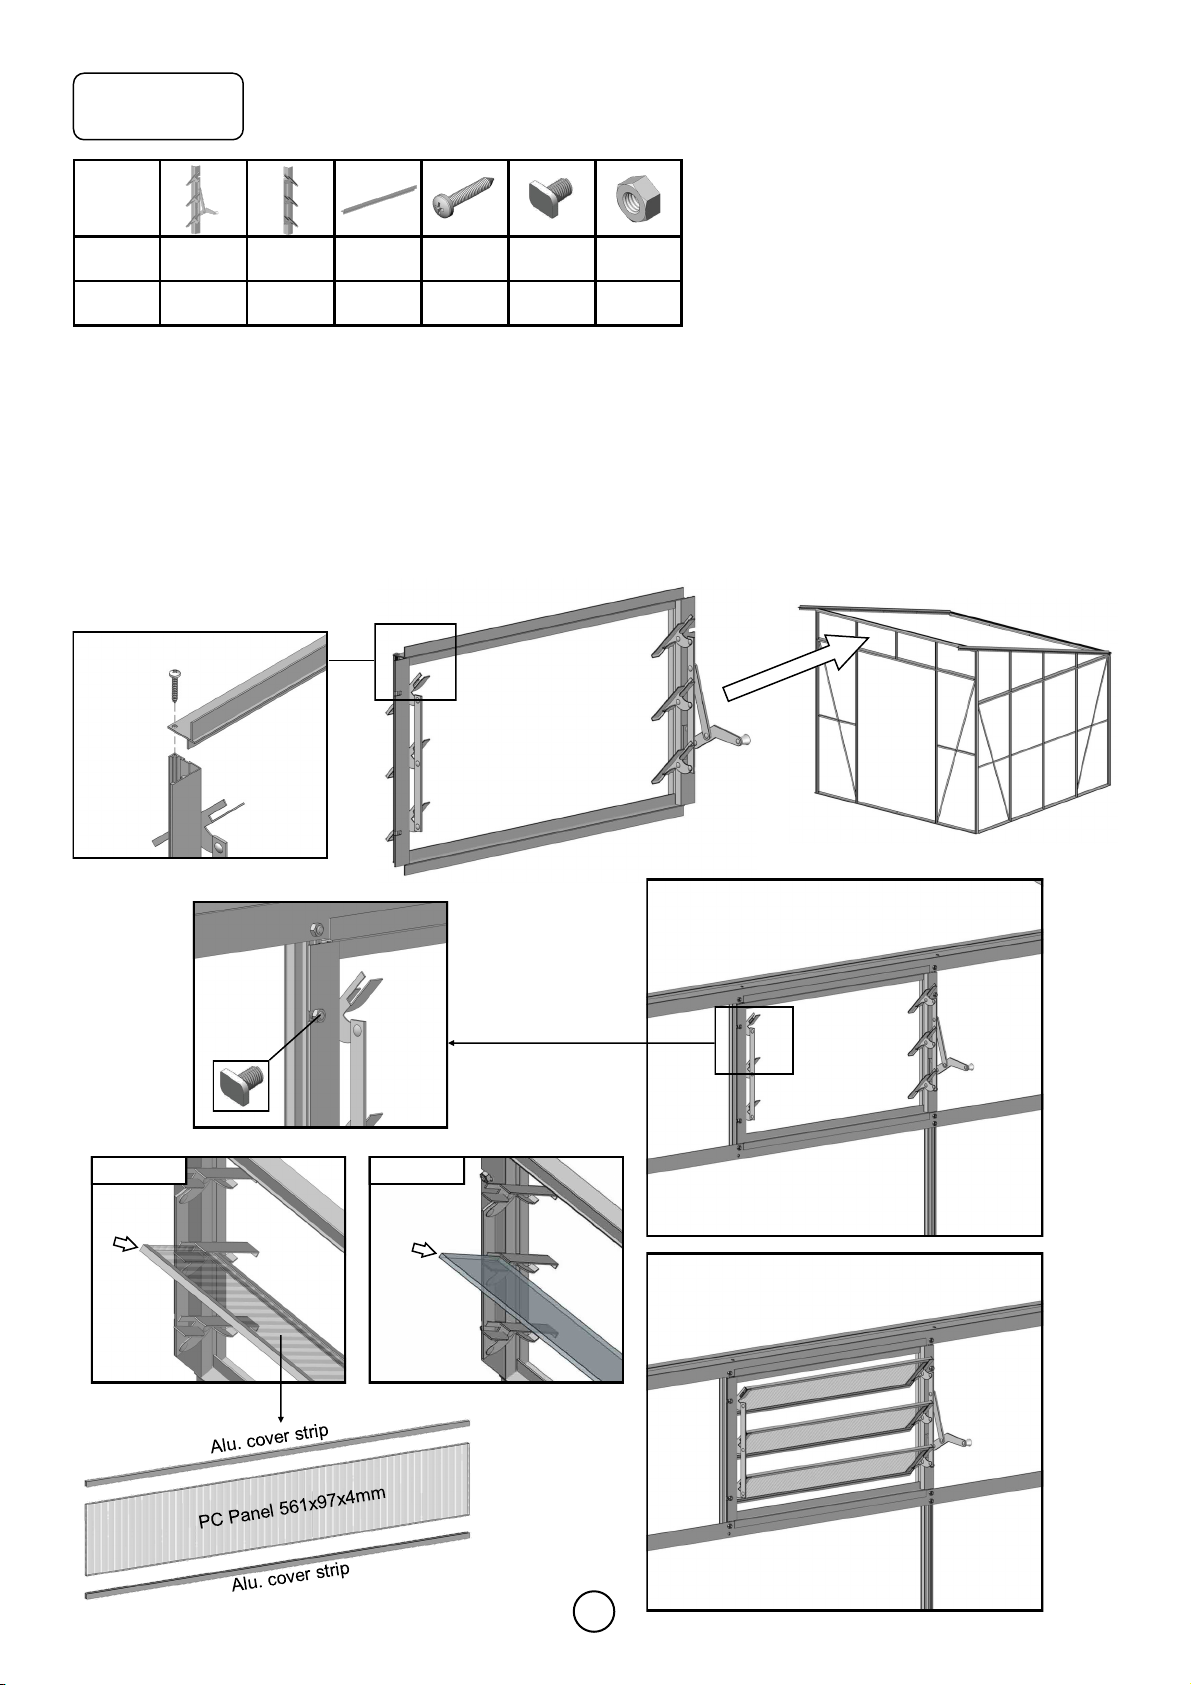
#6936 6336 6039 6337 6041 6055 a1 a2 a7 a10
mm 626 611 600 700 626 200 M6x10 M6 M4x8 M4
QTY 1112118822
GS..94 GS..93
Vent No. 22
6336
6337
6337
H
1
2
3
16337
6336
6039
6055
6039
6055
a10
a7
6039
3
6039
6337
Package 5

13
Vent
46936
Section View
6936
6336
5
6
5
6
6936
6041
6041
6319
6319
Please insert vent top bar (#6336) into vent ridge
bar (#6936) first before locating vent system in posi-
tion.
Maybe you should swing vent ridge bar (#6936) to match
the extra bolt in side bar (#6319) which inserted in ad-
vance. At the time, the vent should be opened, otherwise,
it will block vent ridge bar to swing to position.
14
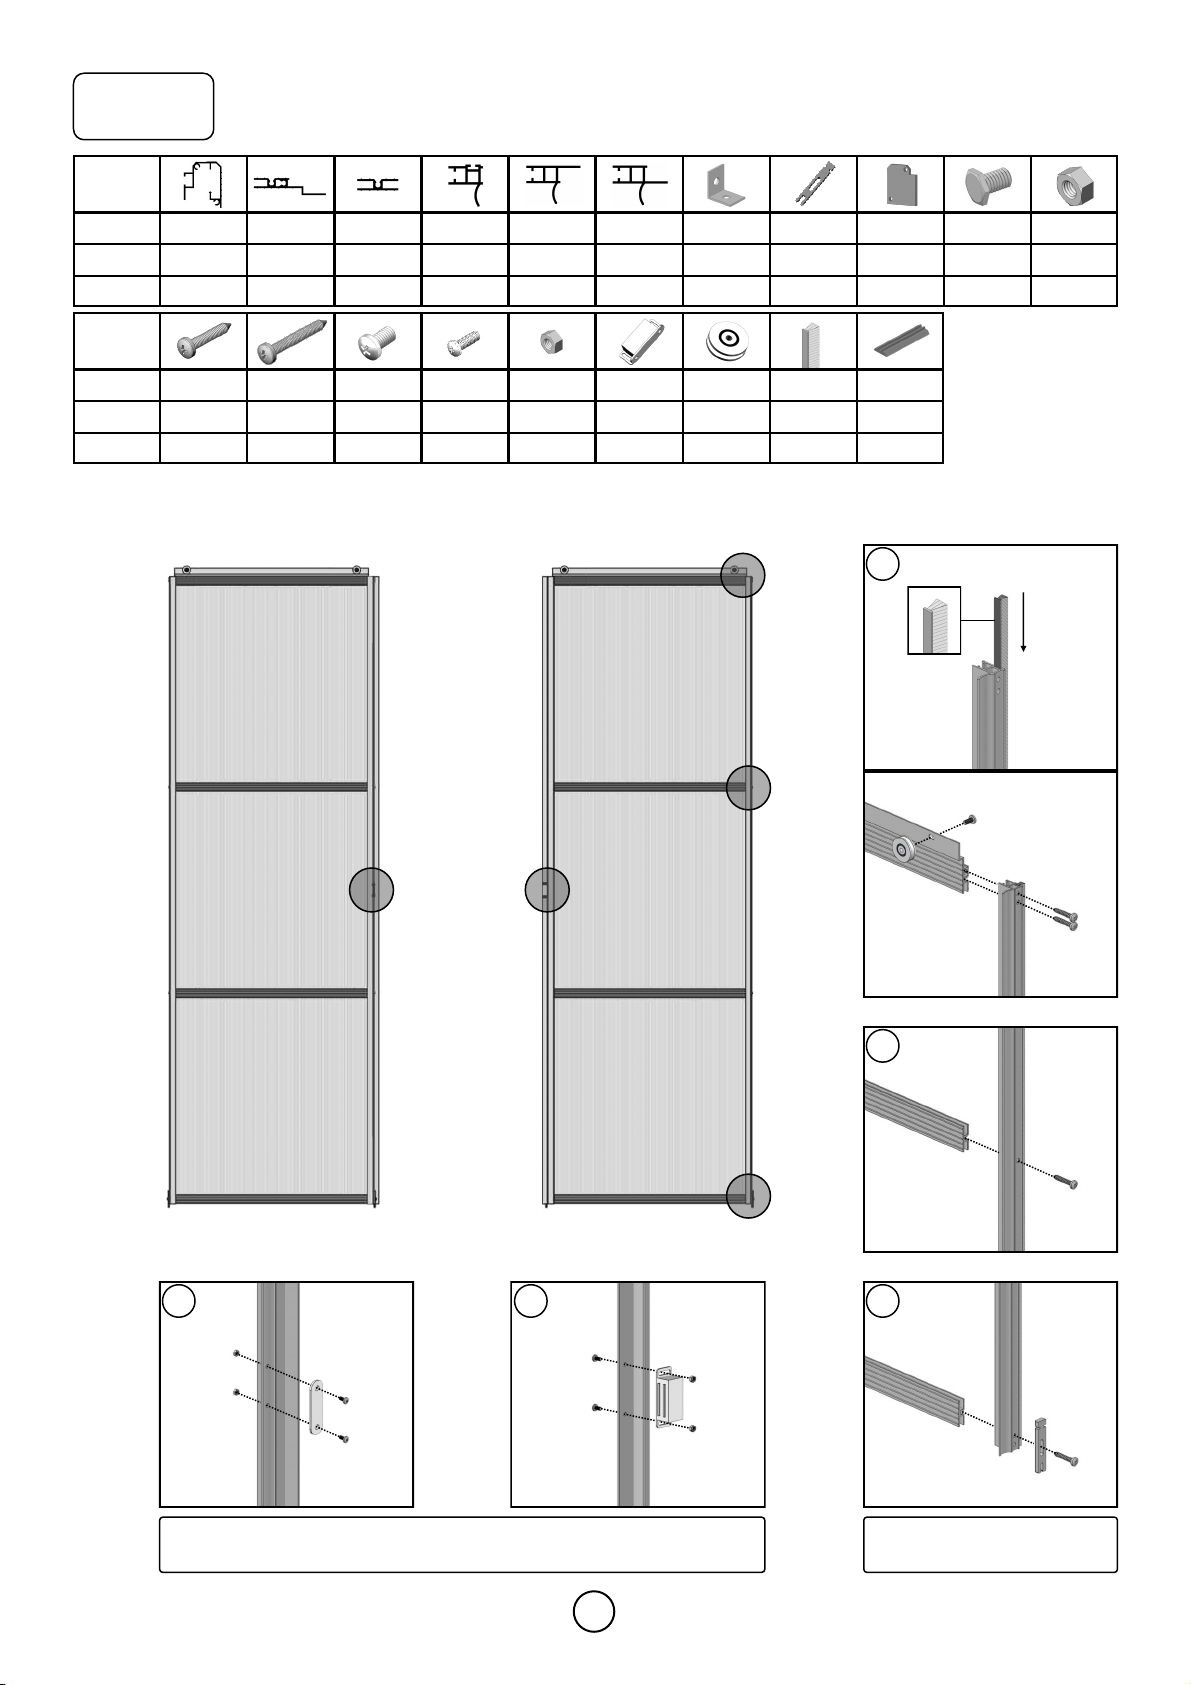
Door
#6937 6938 6939 6940 6941 6942 m22 p4 p5 a1 a2
mm 2444 576 576 1864 1864 1864 ---M6x10 M6
QTY 12621124266
#a5 a6 a7 n1 FLUFFa11 a12 m11 p10
mm Φ3.5x19 Φ3.5x35 M4x8 -3.8MM3x10 M3 -1000
QTY 420 4414411
69386938
69406940
6941 6942
6939 6939
6939 6939
6939 6939
1
2
3
45
1
2
345
6940
6940
6938
n1
a7
a6
6939
6940
6940
6939
a6
a6
p4
6941 6942
a12
a11
m11
a11
a12
m11
Package 6
m11 is magnetic door lock, every center door vertical bar
assemble half part. p4 is plastic door glider.

15
Door
6937
6
7
9
6
7
8
9
6937
m22
6937 6937
6937
6923
6923
6937
6937
a5p5
p4
6801
Bracket (m22) was used to connect door track bar (#6937) and corner bars.
Please assemble bracket (m22) on door track bar (#6937) first before connect-
ing door track bar to horizontal bar (#6923).
p5 is door track cover
and door stop.
16
Louver
mm 310 310 580 Φ3.5x19 M6x10
Crop M6
GS..93 112444
Top sill
Side
jamb GS010993
Package 7
Installation of Louver(Only for GS010993 Model)
*Place top sill into position on side jamb of louvre and secure with self tapping screws.
*Do same with bottom sill.
*Please note that the handle is on the right hand side. The diagrams are viewed from inside.
*Use cropped head both to attach the louvre to the frame during the glazing of the greenhouse.
*Glass pane could be slided into louver holders on both sides directly. Polycarbonate pane should be
slided into louver holders together with alu. Cover strips on both edges. Bend the aluminium ends to fix
the panes in place.
PC Panel Glass

17
H
I
I
H
Please cut 20mm long rubber
gib part #p10 to fill in the gap
between glass and aluminium
frame from greenhouse inside.
4 gibs every glass panel, at 4
corners. (One meter long
rubber gib in Door Package)
I
II
I
I

18
Glass Foam
On front and rear gable and side wall
Please put foam together with masking paper
on glazing bar first, then peel off masking pa-
per from foam before assembling glass panels.
GS010994 GS010993
FOAM 10M 5
roll
6
roll
19
Glass —— Use PVC Bar Capping
F
F
F
F
F
A
B
C
D
A
B
C
H
G
H
G
E
E
E
E
I
I
I
I
I
I
I
I
I
I
I
I
J
K
#Size GS..94 GS..93
A598x16/176 22
B598x180/340 22
C598x343/503 22
D598x506/666 2
E598x949 44
F598x798 16 20
G598x835 22
# Size GS..94 GS..93
H594x710 22
I589x605 66
J598x181 4
K598x345 3
Louver 561x100 3
58010 12
GS010994
GS010993
K
K
J
J
J
F
F
F
E
E
F
F
F
F
F
F
F
F
E
EF
F
F
F
F
F
F
F
F
F

20
EI
J
I
II
II
JJJ
E
EE
II
II
II
K
DWG Length GS..94 GS..93
Side c
168 22
175 22
332 22
338 22
485 2
495 2
502 2
627 22
631 46
649 2
830 44
1598 812
c-345
c-345
K
c-345
c-345
K
c-345
c-345
J
c-181
c-181
c-1901
c-1901
c-1901
c-1901
c-1901
c-1901
c-1901
c-1901
BA
c-332
c-175
c-168
Glass —— Use PVC Bar Capping
EE
EE
F
F
F
F
F
F
F
F
F
F
F
F
G
H
A
B
C
c-485
c-338
c-830
c-830
c-1598
c-1598
c-1598
c-1598
c-1598
c-1598
c-1598
c-1598
c-1598
c-1598
c-1598
c-1598
B
C
D
A
F
F
F
F
F
F
F
F
F
F
F
F
F
F
H
G
c-1598
c-1598
c-1598
c-1598
c-1598
c-1598
c-1598
c-1598
c-1598
c-1598
c-1598
c-1598
c-1598
c-1598
c-830
c-830
c-649
c-502
c-
c-338
DWG Length GS..94 GS..93
Front
Gable c
181 8
345 6
1901 44
Rear
Gable c 1598 88
Glass
Glass Glass
This manual suits for next models
2
Table of contents
Popular Greenhouse Kit manuals by other brands

Poly-Tex
Poly-Tex FieldPro Gothic High Tunnel 20 installation instructions

VOLYA
VOLYA Dachnaya Tryoshka Assembling manual

Robinsons
Robinsons Victorian RAMSBURY 14 Assembly instructions

Robinsons
Robinsons Redoubtable Assembly instructions

Juliana
Juliana Premium Wall 13 Assembly instructions

Palram
Palram CANOPIA AMERICANA 12x12 / 3.7x3.7 How to assemble


