FLUENCE RAZR Series User manual

US
E
R
MANUAL
RAZRx
RRXP106N5H
ZR
512.212.4544
www.fluence.science
SET UP
LET’S GET

RAZR
USER MANUAL
CONTENTS
S
S
S
S
S
S
S
S
TS
TS
TS
TS
TS
TS
TS
TS
TS
TS
NTS
NTS
NTS
NTS
NT
NT
NT
NT
NT
NT
ENT
ENT
EN
EN
EN
EN
EN
TEN
TEN
TEN
TEN
TEN
TE
TE
TE
TE
NTE
NTE
NTE
NTE
NT
NT
NT
NT
NT
NT
ONT
ONT
ON
ONT
ON
ON
ON
ON
ON
ON
ON
ON
CO
CO
CO
CO
CO
CO
CO
CO
CO
CO
CO
CO
C
C
C
C
C
C
C
C
C
C
USER MANUAL
ELEMENTS
Safety Precautions + Explanation of Symbols.......................
Warranty Info ......................................................................................
System Hardware + Accessories ................................................
Assembly ..............................................................................................
Best Practices .....................................................................................
General Care .......................................................................................
Technical Specifications .................................................................
RAZRx RR-X-P-1-06-N5-H
2
PAGE
3
4
5
6
7
8
9

RAZR
USER MANUAL
QPlease read this manual thoroughly before attempting to install
or operate any Fluence RAZR Series system.
QAfter successful installation and configuration of the system,
be sure to retain this manual in a safe place for future
reference. Safety is a key component to a long lasting and
trouble free installation.
QIt is important you read, fully understand, and observe the subse-
quent safety precautions. If you are not comfortable with the
installation of high-performance lighting systems, you should
seek the services of a qualified installation professional or call us
for help.
QNOTICE: RAZR is a high-performance lighting system. Do not
touch while in operation.
QConnect the system only to power sources of the correct voltage
(as shown in this manual). Protect power cables from being
pinched, walked on, or otherwise damaged. Be especially
careful where the power cable enters the power outlet and the
unit. Only connect the system to an electrical outlet or extension
cord of appropriate type and rating.
QDO NOT defeat the safety purpose of a grounding or polarized
plug by removing ground pins or using unsafe adapters.
A polarized plug has two blades—one wider than the other.
A grounding plug has a third ground prong in addition to the two
main conductors. The wide blade or third grounding prong is
provided for your safety. If the provided plug does not fit your
outlet, consult an electrician to replace your obsolete outlet. If
you replace the power cord, only use one of similar type and
equal or greater current rating.
QThe system should only be cleaned as directed in the manual.
You should seek service for your system by qualified service
personnel if any of the following occur:
1. The power-supply cord or the plug has been damaged.
2. The unit has been exposed to rain.
3. The unit exhibits a marked change in performance.
4. The unit has been dropped, or its enclosure or chassis
is damaged.
SAFETY & SYMBOLS
S
S
S
S
S
S
S
S
LS
LS
LS
LS
LS
LS
LS
LS
OLS
OLS
OLS
OLS
OLS
OLS
OL
OL
OL
OL
BOL
BOL
BO
BO
BO
BO
BO
BO
BO
BO
MBO
MBO
MBO
MBO
MB
MB
MB
MB
MB
MB
YMB
YMB
YM
YM
YM
YM
YM
YM
YM
YM
SYM
SYM
SYM
SYM
SY
SY
SY
SY
SY
SY
SY
SY
& SY
& SY
& S
& S
& S
& S
& S
& S
& S
& S
&
&
Y&
Y &
Y &
Y &
Y &
Y &
Y &
Y &
Y &
Y &
TY
TY &
TY
TY
TY
TY
TY
TY
ETY
ETY
ETY
ETY
ETY
ETY
ET
ET
FET
FET
FET
FET
FET
FET
FE
FE
AFE
AFE
AFE
AFE
AFE
AFE
AF
AF
AF
AF
SAF
SAF
SA
SAF
SA
SA
SA
SA
SA
SA
SA
SA
SA
SA
S
S
S
S
S
S
S
S
IMPORTANT SAFETY PRECAUTIONS
and EXPLANATION of SYMBOLS
3

RAZR
USER MANUAL
OUR PRODUCT GUARANTEE
Every RAZR system is engineered
and built by Fluence in Austin, TX
using state-of-the-art robotics and
hand craftsmanship. All RAZR sys-
tems are guaranteed against man-
ufacturing defects for three years
from date of purchase.
We stand behind our research,
we stand behind our technology
and we stand behind our clients.
www.fluence.science/warranty
WARRANTY
W
4

RAZR
USER MANUAL
PRODUCT
T
T
T
T
T
T
T
T
CT
CT
CT
CT
CT
CT
CT
CT
CT
CT
CT
CT
UCT
UCT
UC
UC
UC
UC
UC
UC
UC
UC
DUC
DUC
DU
DU
DU
DU
DU
DU
DU
DU
ODU
ODU
OD
OD
OD
OD
OD
OD
OD
OD
OD
ROD
RO
RO
RO
RO
RO
RO
RO
RO
PRO
PRO
PRO
PRO
PR
PR
PR
PR
PR
PR
PR
PR
P
P
P
P
P
P
P
P
A....... RAZR console pre-configured with:
B........Driver
C.......0-10V dimming cables
D....... ( 4) Mounting hooks
E........ ( 2 ) Cantilever brackets (option if upgraded at time of purchase)
F........ ( 1 ) 6’AC cable (15’cable option if upgraded at time of purchase)
G....... Vinyl-cut Fluence sticker
SYSTEM HARDWARE + ACCESSORIES
PRODUCT LEGEND
5
System Hardware
Accessories
G
F
ACCESSORIES
A
B
C
E
D

RAZR
USER MANUAL
ASSEMBLY &MOUNTING INSTRUCTIONS
6
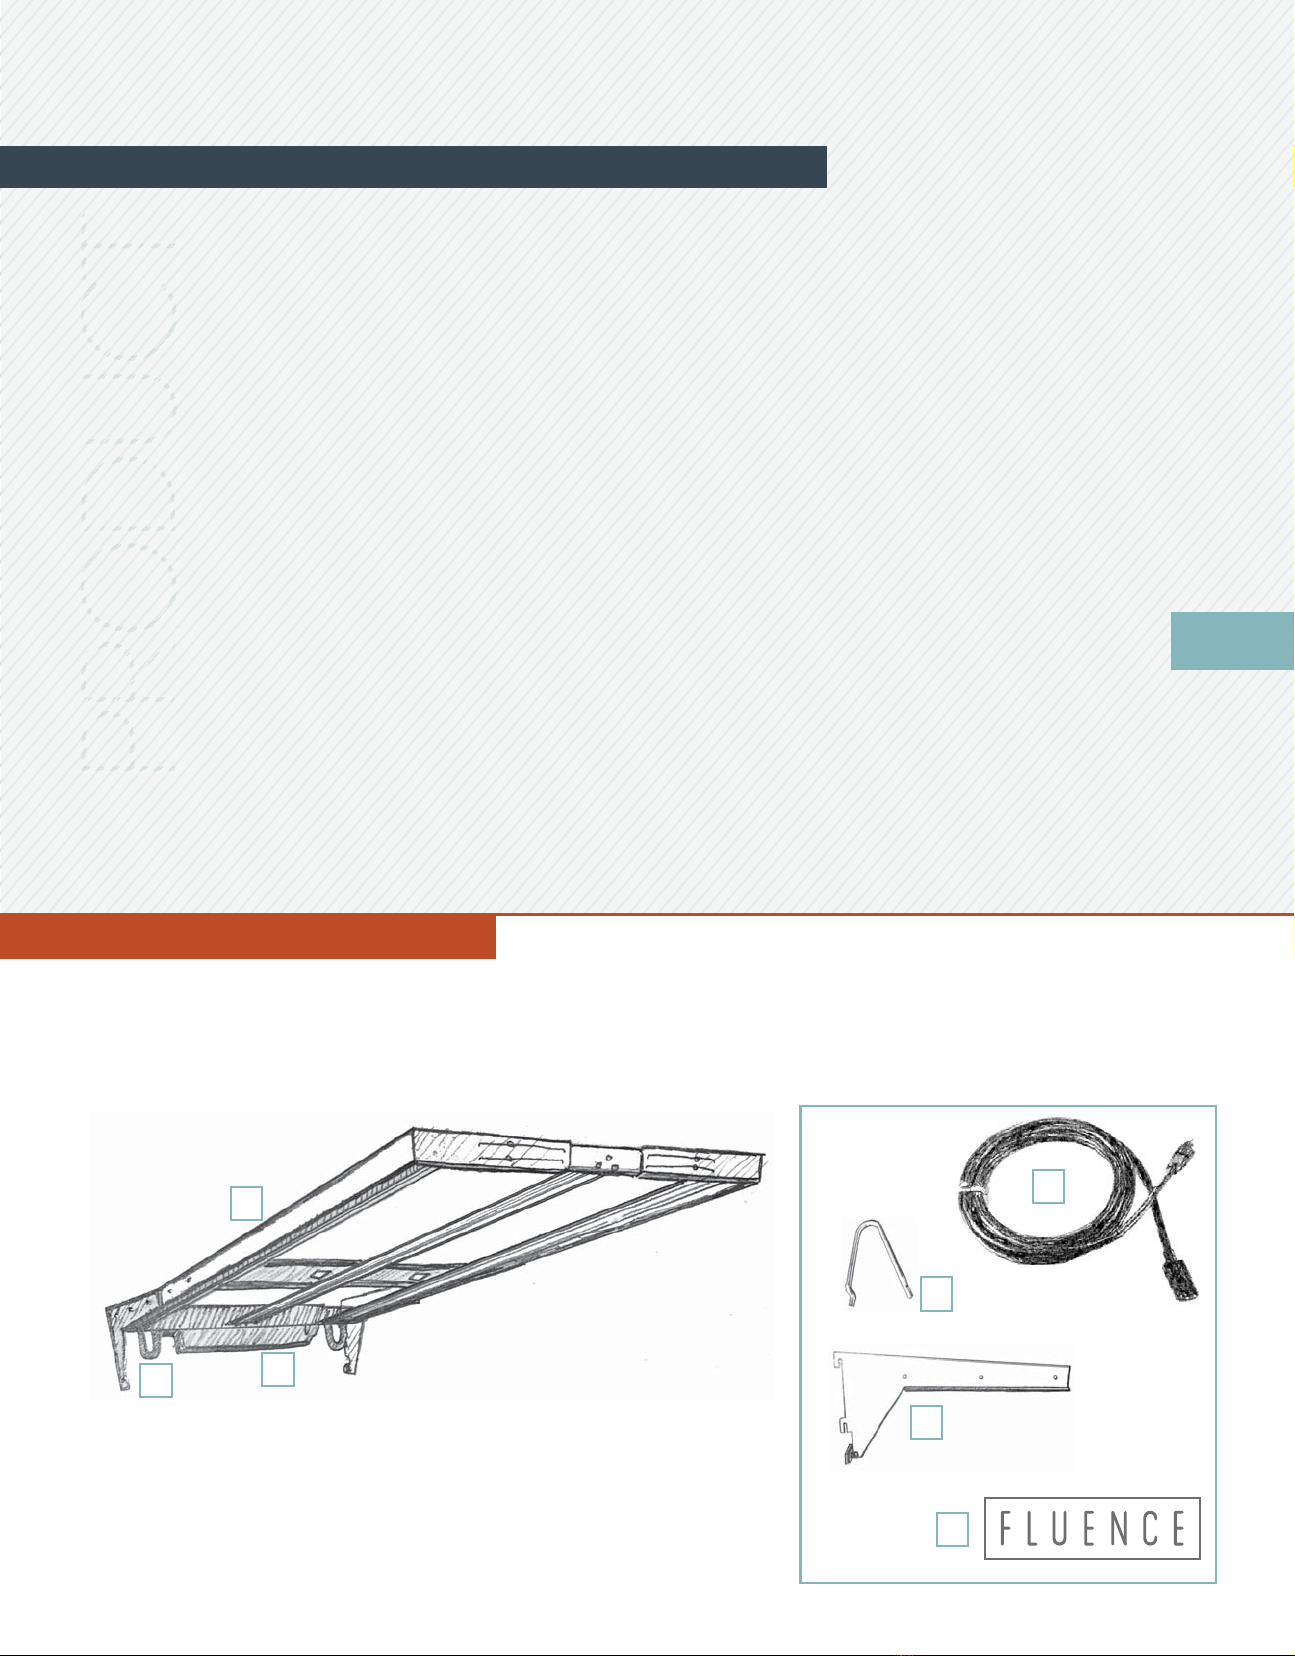
1Unbox hardware from packaging and place on flush, stable surface.
Take extra caution with RAZR—ensuring the LED array does not
come in contact with sharp objects or force that may damage the
diodes.
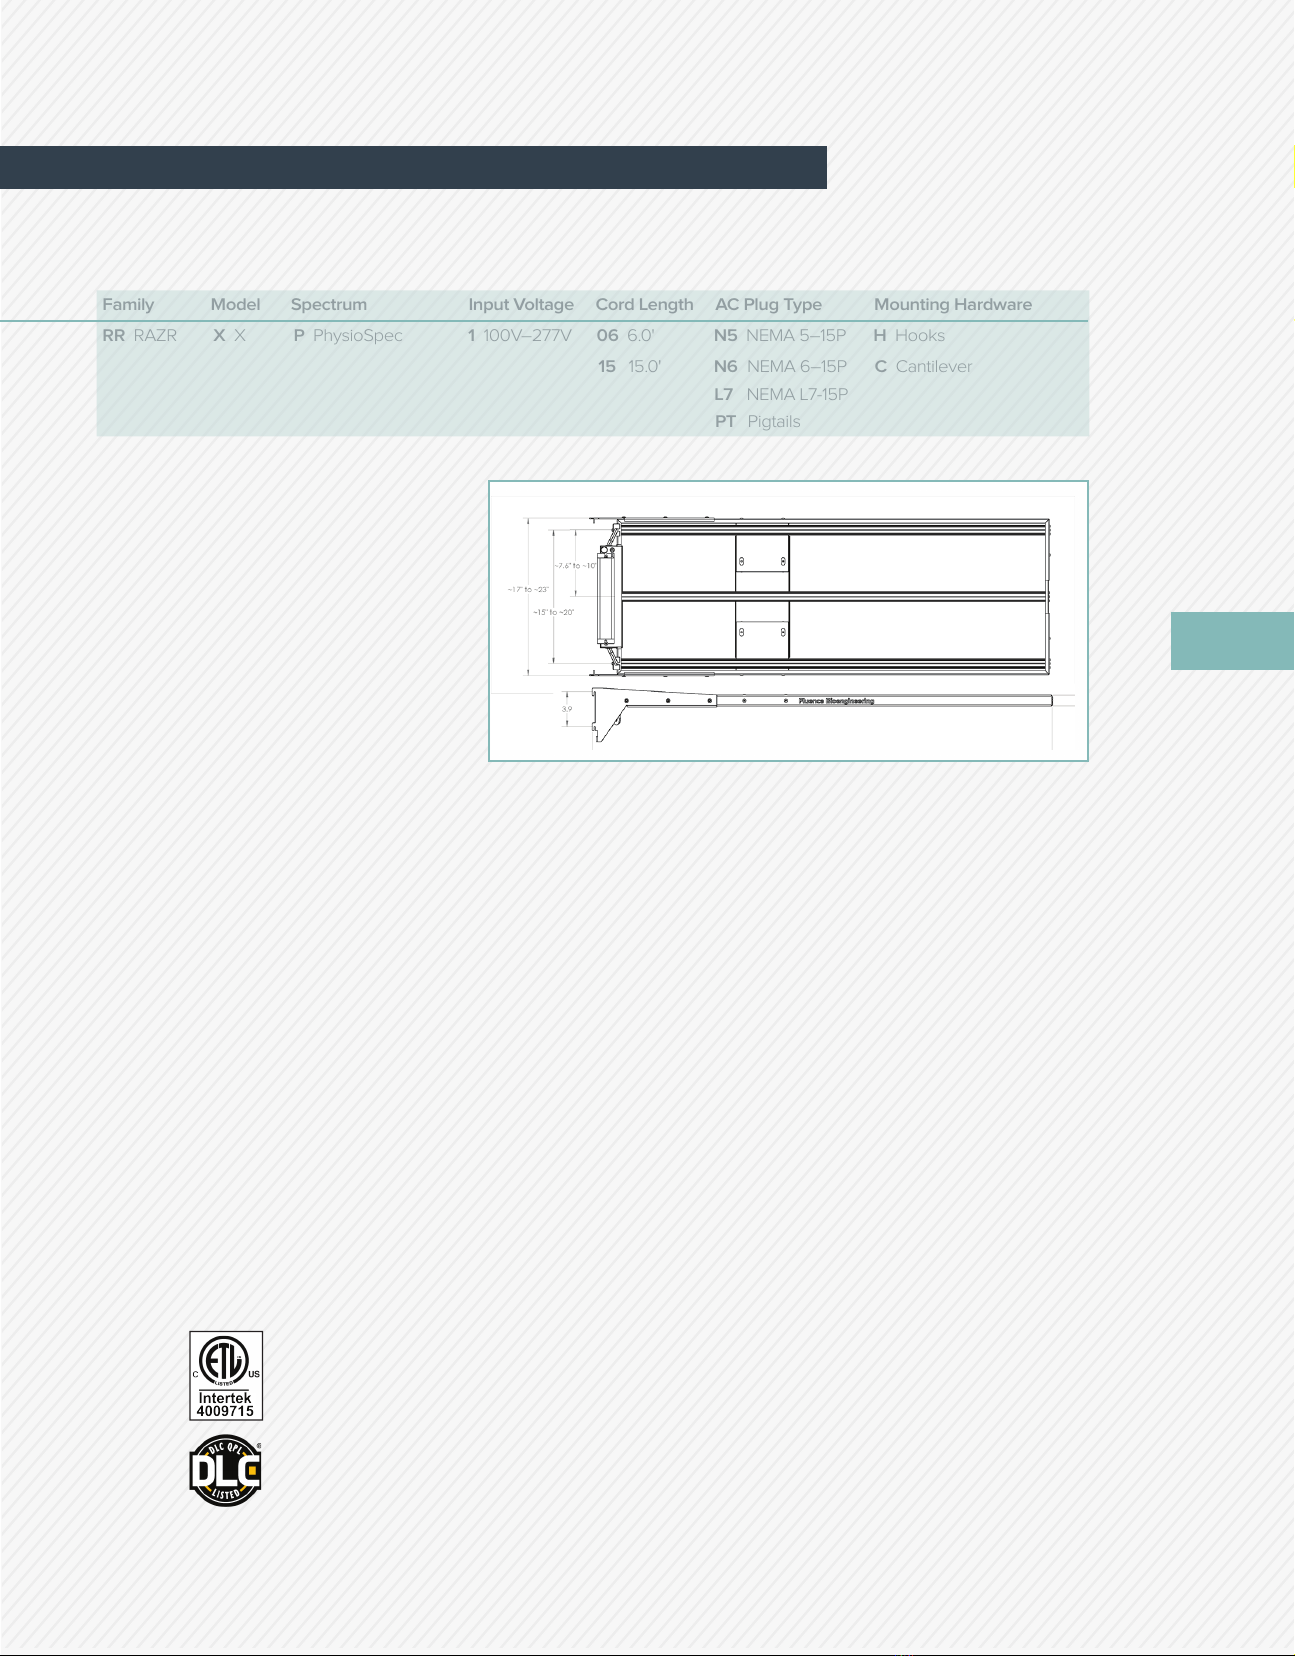
1.........To change fixture width, place RAZR on firm surface with
LEDs facing down. Use the supplied #20 torque wrench to
loosen 4 screws at the end of the fixture. Loosen 4 screws
near the power supply, and the 4 screws on the backplate.
With these screws loosened, you can now adjust the fixture’s
width from 15.75” up to 22.75”. When fixture has been appro-
priately adjusted, re-tighten the 16 screws.
2........ RAZR can be mounted using universal attachment brackets
(tips facing up) in holes at either end of fixture.
3........ Alternatively, cantilever brackets can be installed and used to
mount RAZR to a standard slot rack. To install cantilever
brackets, attach at back sides with #20 torque wrench and
three screws per bracket. When mounting RAZR to a Danish
trolley/slot rack, use fine-angle level adjustment device to
adjust the angle of the fixture.
4........To dim RAZR, attach the appropriate dimming cables to a
dimming system.
For detailed instructions for assembling and mounting RAZR, please
see video turtorials at www.fluence.science/support/.
How to apply your vinyl-cut Fluence sticker:
1......... Clean and dry the surface where the sticker will be applied.
Air and surface temperature should be between 40° to 90° F.
2........ Remove backing sheet to expose adhesive and apply sticker
to desired surface.
3........ Starting from the center and working outward, squeegee
pre-masked surface with a credit card to remove air bubbles.
4........ Allow adhesive to bond approximately 15 minutes.
5........ Remove pre-mask from sticker at a 45° angle, keeping it as
close to the sticker as possible. If lettering is coming up with
pre-mask, re-squeegee before attempting to remove.
Last, and most important, please recycle all packaging
material. Future generations will thank you.
3
2

RAZR
USER MANUAL
Fluence encourages everyone to experiment and
pursue their own techniques. Every crop is dierent
and everyone has dierent goals. However, our
internal research has given us insight into several
strategies we would like to share.
QRegularly check your plants’ growth and health.
Fluence lighting systems deliver high levels of
PAR, typically more than experienced in nature.
Adjustments to H₂O, CO₂, RH, nutrients, and
temperature are typically required.
QMount the light bars 5” from the top of your canopy
to ensure optimal uniformity and consistent PPFD.
RAZR was designed for maximum precision and
requires precise deployment. A 1” variation in either
direction will have a significant change in uniformity
and PPFD (which may or may not be desired).
QMany plants prefer higher temperatures when
exposed to high PPFD. Experiment with higher
temperatures to achieve higher yields. Canopy
temperature and room ambient temperature often
vary. For accurate results, test at the canopy level to
gauge leaf surface temperature.
BEST PRACTICES
CARE &
7

RAZR
USER MANUAL
RAZR Series systems are passively cooled with
zero moving components. They are designed for
harsh environments and years of maintenance-free
performance. Some basic care will keep your system
operating at peak performance cycle after cycle.
QNatural convection removes heat away from the
heatsink. In order for the system to properly cool
itself, at least one inch of space is required between
the console and the roof of your grow area.
Failure to do so may shorten the fixture’s lifespan.
QTo achieve the optimal lifespan and performance
of your fixtures, routinely check for and remove
excess dust, debris, and mineral build up
from heatsink and LED array.
QCleaning should always be done with the fixture
unplugged from its power source using low-pres-
sure compressed air or water to rinse away dirt from
light bars.
QNever use a cloth to clean the diode array. Doing
so can scratch or compromise the integrity of the
silicon seal, or dislodge diodes entirely.
QTo limit degradation, avoid touching the diodes
with your hands, even in a powered o state.
GENERAL CARE
CARE & PRACTICES
CARE &
8

RAZR
USER MANUAL
WARNING Risk of electrical shock. To reduce the possibility of serious injury, always take the proper
precautions and unplug the fixture before moving or cleaning.
WARNING Light bars and power supply are splash-proof but not waterproof. In the event that the light bar
becomes submersed, first disengage the circuit breaker, then unplug the fixture before
proceeding to remove from water.
CAUTION To prevent eye damage, avoid looking directly at the unshielded LEDs.
CAUTION LED and heat sink surfaces may be hot. Allow sucient cooling time before handling.
CAUTION To reduce the risk of overheating or fire, never place operating fixtures face down on a flush
surface. Always allow for adequate ventilation of fixtures and power supplies.
ETL Rating: Fluence Bioengineering fixtures are rated suitable for damp locations. A “damp
location” is defined as exterior or interior location that is normally or periodically subject to
condensation of moisture in, on, or adjacent to the electrical components of a lighting fixture or
ceiling fan. RAZRx is certified to meet UL standards (ETL) from the Intertek safety
consulting and certification company. Systems are cETL and DLC listed.
TECHNICAL SPECIFICATIONS
9
Product Model Input Voltage Input Power2 Amps @ 120V Amps @ 208V Amps @ 240V Amps @ 277V Frequency
RAZRx 100V - 277V 91W .8A .4A .4A .3A 50/60Hz
1 PPF calculations compiled using integrating sphere measurements and typical spectroradiometric data for each LED to determine typical fixture performance. Actual photometric results may vary within the LED
manufacturer’s bin tolerance.
2 Wattage values are typical expected values. Fluence maintains a tolerance of ±10% on flux and power specifications. Target light levels can vary from projected levels depending on ambient temperature, room
reflection values and dirt accumulation.
Family Model Spectrum Input Voltage Cord Length AC Plug Type Mounting Hardware
RR RAZR XX P PhysioSpec 1 100V–277V 06 6.0'N5 NEMA 5–15P HHooks
15 15.0'N6 NEMA 6–15P CCantilever
L7 NEMA L7-15P
PT Pigtails
STOCK KEEPING UNIT SKU CONFIGURATOR AND OPTIONS
RAZR
USER MANUAL
9
Photosynthetic Photon Flux (PPF)1 RAZRx 210 µmol/s
Energy Efficiency (PAR)/Watt) RAZRx 2.3µmol/J
Dimensions
RAZRx 14 lbs 0oz | 52.3”x 17-23”x 1.2”
Electrical
EXAMPLE SKU: RRXP106N5H

RAZRx
RRXP106N5H
512.212.4544
www.fluence.science
version 1.0
|
09.2016
USER MANUAL
This manual suits for next models
1
Table of contents
Other FLUENCE Farm Equipment manuals
Popular Farm Equipment manuals by other brands

Buhler
Buhler Round Bale Carrier 1500 Operator and parts manual

Kerbl
Kerbl EasyHeat 23A Instructions for use

Tufline
Tufline CP-48L Operator's manual

STEIN Automation
STEIN Automation 300 SoftMove operating instructions

Redexim
Redexim Verti-Knife 1800 User manual and parts book

MASSEY FERGUSON
MASSEY FERGUSON MF9005 Operator's manual

Versatile
Versatile AutoBoom SX275 installation manual

electricity noth west
electricity noth west I-430P1-M319-001 quick start guide

J&M
J&M GC31t-1 Operator's manual

Titan Implement
Titan Implement 7000 Series Operation and parts manual

Anderson
Anderson GB series Operation guide

enorossi
enorossi HAY TOP 300 Use and maintenance manual