Flushmate 504 Series User manual

Visit Our Website
Most questions can be quickly answered on the
Flushmate®website —download technical
documents, watch instructional videos, and order
replacement parts.
flushmate.com
Where to Buy
flushmate.com/distributors
Installation Videos
Find helpful instructional videos on the
Product Support section of our website:
flushmate.com/resources
Flushmate Part Finder
The part nder helps to nd replacement parts
for your Flushmate system.
flushmate.com/parts
Technical and Product Support
For information please email us at:
info@flushmate.com
Customer Support hours are Monday through Friday
9:00 AM - 5:00 PM EST
800.533.3460
30075 Research Drive
New Hudson, MI 48165
800.533.3460
flushmate.com
Pro Pocket
Guide
A resource for Flushmate equipped toilets,
replacement systems, parts, tools, and accessories.

Whether specifying new toilets
with Flushmate®Systems or
locating replacement vessels or
parts, this guide provides the
complete list of brands and models
that oer Flushmate pressure-
assisted technology.
IMPORTANT
Only the toilet models listed in this guide are compatible with Flushmate Systems.
See pages 6-13 for all current toilets manufactured to include Flushmate pressure-
assisted technology.
20% less water
Flushmate models
can consume 20% to
38% less water than
1.6 gpf gravity toilets
on average.
Fewer double flushes
70 gallon per minute
peak flow of Flushmate
pressure-assisted
technology clears the
bowl on the rst flush.
Water savings for life
The flush volume will
never decrease which
means water savings
are sustained for the
life of the xture.
Every drop counts
Leading toilet brands around the world are powered by
Flushmate pressure-assisted technology for single flush
performance and water-savings.
Contents
4 Flushmate®Systems
5 Flushmate Equipped Toilet Specications
6 504 Toilets
10 503H Toilets
12 503 Toilets
14 I-Flush™
16 Flushmate Replacement Systems
18 Replacement Parts
20 Tools
21 Upgrade Kits
22 Handle Replacement Kit
24 Handle Replacement Kit Instructions
29 Actuator Adjustments
30 Cartridge Adjustments
3

Flushmate®Systems
Flushmate pressure-assisted toilets eectively eliminate waste and
conserve water through an innovative flushing technology that
outperforms traditional gravity toilets. There are three options to choose
from, dened by flush volume (water consumption):
1.0 gpf
1 & 2 piece
Compatible toilet types
UHET
• Ultra-high-eciency
toilet
• Most water conserving
• WaterSense certied
1.28 gpf
2 piece
Compatible toilet type
HET
• High-eciency toilet
• Water conserving
• WaterSense certied
The 503H Series is a Flushmate
III 503 series systems that uses
1.28 gpf.
1.6 gpf
1 & 2 piece
Compatible toilet types
• Out performs older
models
• For environments with
limited water pressure
Flushmate IV
504 Series
Flushmate III
503H Series
Flushmate III
503 Series
Commercial A 10-story oce building with 1,000 occupants could save 1.2 million
gallons of water and up to $10,000 per year by switching to WaterSense toilets.
Residential The average family can reduce water used for toilets by 20 to 60 percent
by switching to WaterSense models.
Information courtesy of the EPA. For more information, visit: epa.gov/watersense
Flushmate®Equipped Toilet
Specications
If the new toilet will be replacing an existing one, several key
specications —mounting and outlet, rough-in dimension, and
bowl shape — are included in this guide to make selection easy.
E - Elongated Bowl R - Round Bowl RR - Raised Rim
Floor
Floor Mount
Floor Outlet
Floor/Rear
Floor Mount
Rear Outlet
Wall/Rear
Wall Mount
Rear Outlet
2 pc. - Two-piece 1 pc. - One-piece Rough-in
17-19”
10”, 12”, 14”
4For more information, visit: flushmate.com 5

Brand Model Name Model Tank # Bowl # Rough-in Type Bowl Mount/Outlet ADA
Contrac Chane 5721BOY 5721BOY 5722BMY Rear 2 pc. E, RR Floor/Rear
Contrac Cleo 5722BOY 5721BOY 5722BOY 12” 2 pc. E, RR Floor
Wineld PAT 155-100 PAK100 PAB155 12” 2 pc. E Floor
Wineld PAT 165-100 PAK100 PAB165 12” 2 pc. E, RR Floor
Corona Cyclone Ultra 2707 14763 12271 12” 2 pc. E, RR Floor
Corona Powermax 20801001 E21801005 E20801005 12” 1 pc. E Floor
Corona Prestigio 31636 12” 1 pc. E Floor
Exergis Acquamenos N2310RB N2310T N2310RB 2 pc. R Floor
Kohler Barrington
Pressure Lite K-3578 K-4484 K-4305 Rear 2 pc. E, RR Floor/Rear
Kohler Highline Pressure
Lite K-3519 K-4484 K-4304 12” 2 pc. E, RR Floor
Kohler
San Raphael
Comfort Height
Pressure Lite
K-3597 12” 1 pc. E, RR Floor
Kohler Wellworth
Pressure Lite K-3531 K-4484 K-4303 12” 2 pc. E Floor
Koohoo T-3051 2 pc. E Floor
Koohoo T-3052C 1 pc. E Floor
Manseld Prestigio 4 704 153 12” 2 pc. E Floor
Manseld QuantumOne 144-153 153 144 Wall 2 pc. E Wall/Rear
Manseld QuantumOne 146-153 153 146 12” 2 pc. R Floor
Manseld QuantumOne 147-153 153 147 12” 2 pc. E Floor
Manseld QuantumOne 149-153 153 149 Rear 2 pc. E Floor/Rear
Manseld Quantum
Smart Height 148-153 153 148 12” 2 pc. E, RR Floor
Peerless Pottery Predator 1-606 1606 12” 2 pc. E Floor
Peerless Pottery Predator 1-608 1608 12” 2 pc. E, RR Floor
Seasons Hawthorne 564854/564856 564854 564856 12” 2 pc. E, RR Floor
Seasons Hawthorne 564854/564814 564854 564814 Rear 2 pc. E, RR Floor/Rear
Sloan Sloan WETS-
8009.8016 2108016 2108009 12” 2 pc. E Floor
Sloan Sloan WETS-
8029.8016 2108016 2108029 12” 2 pc. E, RR Floor
Western Pottery Wrangler One B422PF-1 12” 2 pc. R Floor
Western Pottery Wrangler One B432PF-1 12” 2 pc. E Floor
Western Pottery Wrangler One B472PF-1 12” 2 pc. E, RR Floor
Flushmate®Equipped Toilets
Flushmate 504 Series / 1.0 gpf
504 Bowl Shape
EElongated Bowl
RRound Bowl
RR Raised Rim
Mounting/Outlet
Floor Floor Mount, Floor Outlet
Floor/Rear Floor Mount, Rear Outlet
Wall/Rear Wall Mount, Rear Outlet
IMPORTANT
Gravity-fed toilets cannot be retrotted with a Flushmate®System.
6For more information, visit: flushmate.com 7

Brand Model Name Model Tank # Bowl # Rough-in Type Bowl Mount/Outlet ADA
Gerber Ultra Flush HE-21-300 HE-28-385 HE-21-342 10” 2 pc. R Floor
Gerber Ultra Flush HE-21-302 HE-28-380 HE-21-342 12” 2 pc. R Floor
Gerber Ultra Flush HE-21-304 HE-28-384 HE-21-342 14" 2 pc. R Floor
Gerber Ultra Flush HE-21-310 HE-28-380 HE-21-374 Rear 2 pc. E Floor/Rear
Gerber Ultra Flush HE-21-311 HE-28-385 HE-21-372 10" 2 pc. E Floor
Gerber Ultra Flush HE-21-312 HE-28-380 HE-21-372 12" 2 pc. E Floor
Gerber Ultra Flush HE-21-314 HE-28-384 HE-21-372 14" 2 pc. E Floor
Gerber Ultra Flush HE-21-317 HE-28-385 HE-21-377 10" 2 pc. E, RR Floor
Gerber Ultra Flush HE-21-318 HE-28-380 HE-21-377 12" 2 pc. E, RR Floor
Gerber Ultra Flush HE-21-324 HE-28-384 HE-21-377 14" 2 pc. E, RR Floor
Gerber Ultra Flush HE-21-325 HE-28-380 HE-21-375 Rear 2 pc. E, RR Floor/Rear
Lamosa Tornado 3138-3471 3471-V 3138-V 12" 2 pc. E Floor
Lamosa Tornado ADA 3134-3471 3471-V 3134-V 12" 2 pc. E, RR Floor
Manseld Quantum 1.28 144-155 155 144 Wall 2 pc. E Wall/Rear
Manseld Quantum 1.28 146-155 155 146 12" 2 pc. R Floor
Manseld Quantum 1.28 147-155 155 147 12" 2 pc. E Floor
Manseld Quantum 1.28 149-155 155 149 Rear 2 pc. E Floor/Rear
Manseld Quantum 1.28
Smart Height 148-155 155 148 12" 2 pc. E, RR Floor
Sloan Sloan WETS-
8009.8010 2108010 2108009 12" 2 pc. E Floor
Sloan Sloan WETS-
8029.8010 2108010 2108029 12" 2 pc. E, RR Floor
Vortens Tornado 3134-3471 3471-V 3134-V 12" 2 pc. E, RR Floor
Vortens Tornado 3138-3471 3471-V 3138-V 12" 2 pc. E Floor
Western Pottery Wrangler B422PF-1.28 12" 2 pc. R Floor
Western Pottery Wrangler B432PF-1.28 12" 2 pc. E Floor
Western Pottery Wrangler B472PF-1.28 12" 2 pc. E, RR Floor
Wineld PAT 165-128 PAK128 PAB165 12” 2 pc. E, RR Floor
Flushmate®Equipped Toilets
Flushmate 503H Series / 1.28 gpf
503H Bowl Shape
EElongated Bowl
RRound Bowl
RR Raised Rim
Mounting/Outlet
Floor Floor Mount, Floor Outlet
Floor/Rear Floor Mount, Rear Outlet
Wall/Rear Wall Mount, Rear Outlet
IMPORTANT
Gravity-fed toilets cannot be retrotted with a Flushmate®System.
8For more information, visit: flushmate.com 9

Brand Model Name Model Tank # Bowl # Rough-in Type Bowl Mount/Outlet ADA
Gerber Ultra Flush 21-300 28-385 21-342 10" 2 pc. R Floor
Gerber Ultra Flush 21-302 28-380 21-342 12" 2 pc. R Floor
Gerber Ultra Flush 21-304 28-384 21-342 14" 2 pc. R Floor
Gerber Ultra Flush 21-310 28-380 21-374 Rear 2 pc. E Floor/Rear
Gerber Ultra Flush 21-311 28-385 21-372 10" 2 pc. E Floor
Gerber Ultra Flush 21-312 28-380 21-372 12" 2 pc. E Floor
Gerber Ultra Flush 21-314 28-384 21-372 14" 2 pc. E Floor
Gerber Ultra Flush 21-317 28-385 21-377 10" 2 pc. E, RR Floor
Gerber Ultra Flush 21-318 28-380 21-377 12" 2 pc. E, RR Floor
Gerber Ultra Flush 21-319 28-380 21-329 12" 2 pc. E, RR Floor
Gerber Ultra Flush 21-324 28-384 21-377 14" 2 pc. E, RR Floor
Gerber Ultra Flush 21-325 28-380 21-375 Rear 2 pc. E, RR Floor/Rear
Kohler Barrington
Pressure Lite K-3554 K-4645 K-4327 Rear 2 pc. E Floor/Rear
Kohler Highline Pressure
Lite K-3493 K-4645 K-4304 12" 2 pc. E, RR Floor
Kohler Wellworth
Pressure Lite K-3505 K-4645 K-4303 12" 2 pc. E Floor
Manseld Quantum 144-123 123 144 Rear 2 pc. E Floor/Rear
Manseld Quantum 146-123 123 146 12" 2 pc. R Floor
Manseld Quantum 147-123 123 147 12" 2 pc. E Floor
Manseld Quantum 149-123 123 149 Rear 2 pc. E Floor/Rear
Manseld Quantum Smart
Height 148-123 123 148 12" 2 pc. E, RR Floor
Orion Turborion II 12" 2 pc. E Floor
Sloan Sloan WETS-
8009.8013 2108013 2108009 12" 2 pc. E Floor
Sloan Sloan WETS-
8029.8013 2108013 2108029 12" 2 pc. E, RR Floor
Flushmate®Equipped Toilets
Flushmate 503 Series / 1.6 gpf
503 Bowl Shape
EElongated Bowl
RRound Bowl
RR Raised Rim
Mounting/Outlet
Floor Floor Mount, Floor Outlet
Floor/Rear Floor Mount, Rear Outlet
Wall/Rear Wall Mount, Rear Outlet
IMPORTANT
Gravity-fed toilets cannot be retrotted with a Flushmate®System.
10 For more information, visit: flushmate.com 11

I-Flush™
I-Flush enables touchless, electronic sensor operation of
existing Flushmate®units.
ON-WALL SENSOR
The wall sensor oers infrared object
detection, wave, and 24 hour automatic
flush activation providing hygienic,
hands-free flushing performance.
FLUSH MODULE
The flush module attaches to the
top of the Flushmate 503, 503H, or
504 Series systems with four screws.
OVERRIDE BUTTON
Immediate flushing is available
with a sleek override button
that easily replaces your
traditional flush handle.
I-Flush Automatic Flushing System
for 503, 503H, and 504 Series*
I-Flush on-wall sensor, with chrome trim K-200101
I-Flush on-wall sensor, with white trim K-200100
I-Flush, with override button with NO sensor K-100500
*Please contact sales@flushmate.com to conrm compatibility with OEM xture before
installation. Visit flushmate.com/resources for complete list.
Hands-free operations for
hygienic convenience.
Introducing I-Flush, a sleek and stylish solution for modern
restrooms and the latest innovation in the company’s
line of pressure-assisted restroom products. Packed with
enhancements, the I-Flush oers improved touchless
flushing operations to help reduce touch points and the
spread of bacteria, helps diminish recurring odors, and
highlights the convenience of automatic flushing.
Certications
ISO9001 Quality System Certied
Design features
• Superior flushing with proven Infrared
Object Lock Technology
• Easy to install on-wall sensor system
• Ideal for new 1.0, 1.28, or 1.6 gpf Flushmate
systems or retrotting to select Flushmate
models
• Automatic calibration, flush delay (3 or 7
second), and 24-hour flush cycle
• Optional “hand wave only” actuation
• LED indication on detection and when
battery is low
• Sealed battery compartment
• Sensor trim available in chrome or white
Features and benets
• Battery-activated
• ADA compliant
• Infrared sensor technology ensures a
complete flush after each use
• Adjustable sensor settings
• Ideal for applications where physical
flushing is a concern
• Helps reduce odors
• 3 year expected battery life
• 1 year limited warranty
12 For more information, visit: flushmate.com 13

Flushmate®Replacement Systems
Identify Toilet Type
One-piece or two-piece.
Identify Your Model and Serial Number
The model and serial number are located on the top portion of the label
adhered to the top of the Flushmate System. The middle characters (up
to 5) in the serial number determine the replacement part needed.
XXXXXX F3HG3 XXXX
Locate your Serial Number
Search the lists below for your serial number. The replacement part
number is listed in bold above your serial number.
In example on the right you would
replace your model (that has serial
number F3HG3) with replacement
part M-101526-F3H3
M-101526-F3H3
F3HGR
F3HG3
504 Series 1.0 gpf
Model: M-101526-F4
503H Series 1.28 gpf
Model: M-101526-F3
503 Series 1.6 gpf
Model: M-101526-F3
Two-piece Toilets
One-piece Toilets
504 Series 1.0 gpf
Model: M-102540-F4
Replacement Part:
M-102540-F4M
Manseld/Corona Only
F4M
Replacement Part:
M-102540-C
C01
503 Series 1.6 gpf
Model: M-102540-F3
Replacement Part:
M-102540-FC
FC
FC1
Replacement Part:
M-102540-F3
F03B
Replacement Part:
M-102540-F3A
American Standard
F3A
Replacement Part:
M-101526-F41
F4L
F4LR
F4N
F41
Replacement Part:
M-101526-F42
F4B
F4BR
F4C
F4F1
F4F2
F4J
F4M
F4MP
F4V
F4V1
F4V2
F4T1
F4P1
F42
Replacement Part:
M-101526-F43
F4K2
F4KR
F42
F43
Replacement Part:
M-101526-F4ET
F4ET
Replacement Part:
M-101526-F3H1
F3G6
F3H
F3H1
F3HC
F3HE
F3HG
F3HG2
F3HM
F3HS
Replacement Part:
M-101526-F3H3
F3HGR
F3HG3
F3H3
F3HL
Replacement Part:
M-101526-F31
F03
F3A
F31A
F3AR
F3C
F3CR
F3E
F3ER
F3G
F3G2
F3K1
F3K2
F3L
F3LR
F3R
F3M
F3MP
F3MR
F3U
F3UR
F3S
F31
F34
Replacement Part:
M-101526-F32
F3K
F3KR
F3Z
F32
Replacement Part:
M-101526-F33
F3GR
F3G3
Use the Flushmate®Part Finder for serial numbers not listed
or to nd compatible replacement parts: flushmate.com/parts
14 For more information, visit: flushmate.com 15
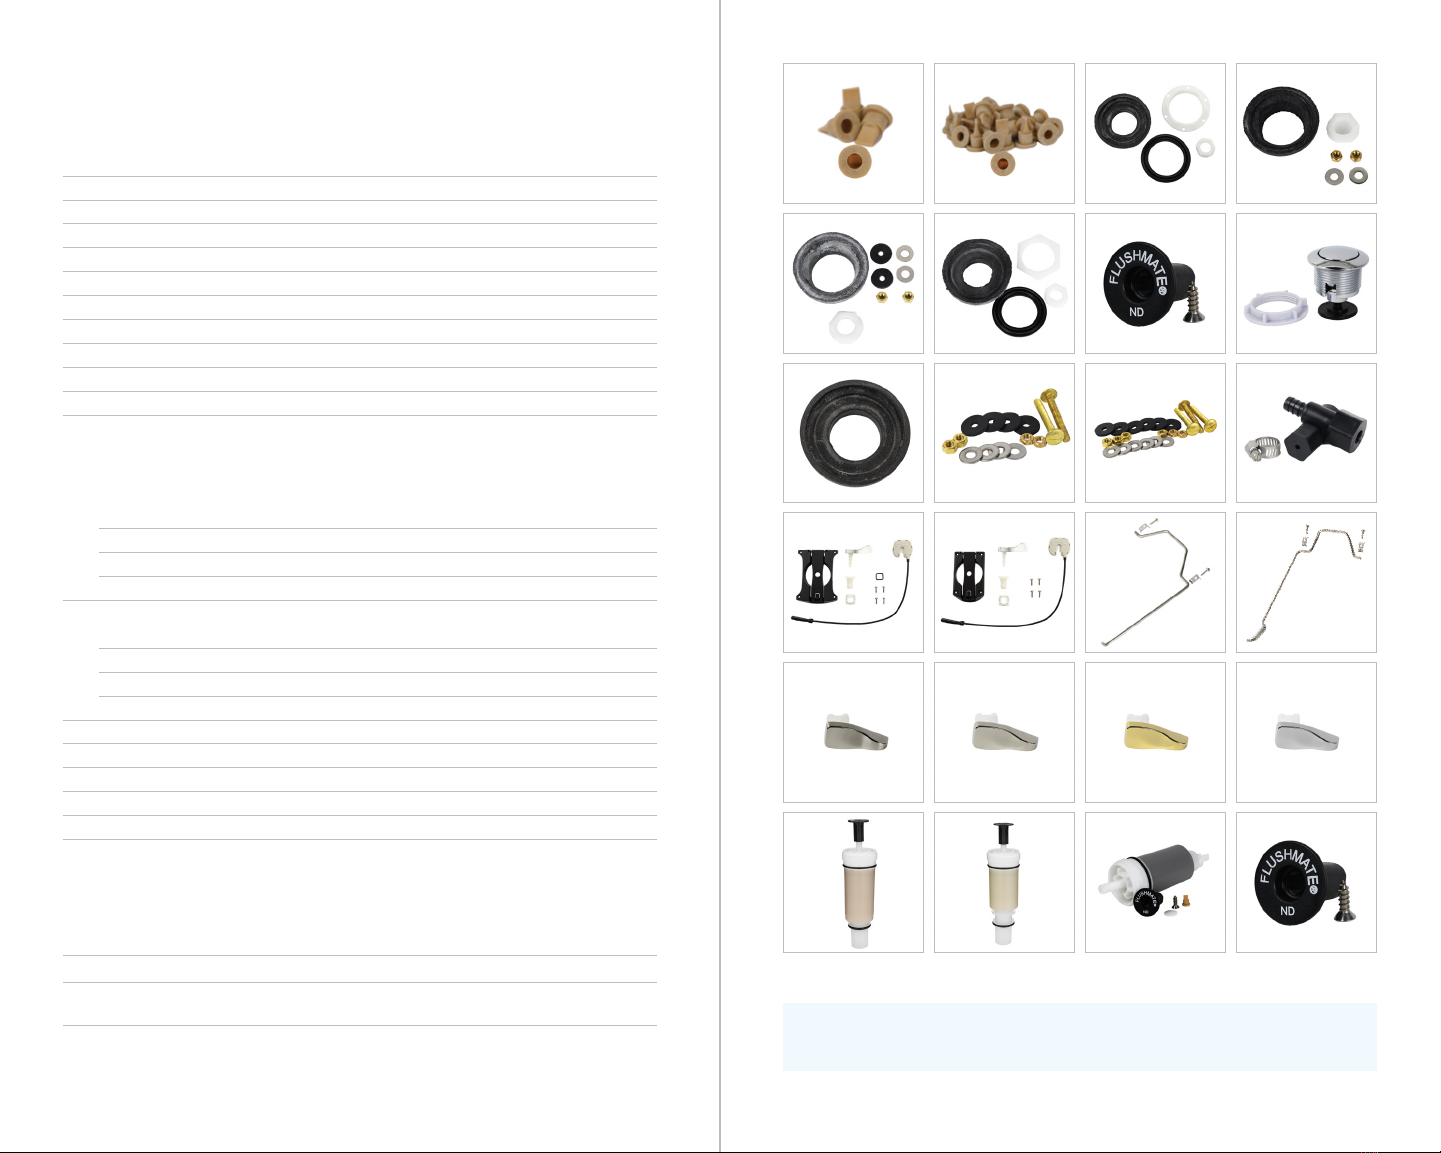
Installation Packs & Parts
1Duckbill Valve (air inducer), 4 Count Pack B-108288-4PK
2Duckbill Valve (air inducer), 24 Count Pack B-108288-BK
3Installation Pack, Large Discharge Extension BP200108-1
4Installation Pack, 1-Piece Toilet (excluding Kohler) BP200112-1
5Installation Pack, Kohler K-3597 only BP200112-2
6Installation Pack, Standard Discharge Extension BP200114-4
7Actuator with Set Screw C-218221-1
8Convex Push Button DP400999-1
9Tank to Bowl Gasket E-205288
10 Tank to Bowl Bolts (2 bolts per pack) E-300022
11 Tank to Bowl Bolts (3 bolts per pack) E-300023
12 Upper Supply Valve for all Flushmate Systems BU100505-KIT
Actuation Kits & Parts
13 Universal Handle Replacement Kit for Flushmate III - 503 Series
With Chrome Handle AP300503
With Satin Nickel Handle AP300503-SN
With Polished Brass Handle AP300503-PB
With Polished Nickel Handle AP300503-PN
14 Universal Handle Replacement Kit for Flushmate IV - 504 Series
With Chrome Handle AP400504
With Satin Nickel Handle AP400504SN
With Polished Brass Handle AP400504PB
With Polished Nickel Handle AP400504PN
15 Actuation Rod Kit for Gerber Tank 21-012, Left Hand AR300308-L3
16 Actuation Rod Kit for Kohler Tank K-3597, Left Hand AR300309-L4C
17 Satin Nickel Handle Kit (handle only) D-400602-2KIT
18 Polished Nickel Handle Kit (handle only) D-400602-3KIT
19 Polished Brass Handle Kit (handle only) D-400602-4KIT
20 Chrome Handle Kit (handle only) D-400602-KIT
Cartridge Assembly
21 Cartridge Kit for Flushmate III - 503 Series, 1.6 gpf
and Flushmate IV - 504 Series, 1.0 gpf
C-100500-KIT
22 Cartridge Kit for Flushmate III - 503H Series, 1.28 gpf C-100501-KIT
23 Cartridge Kit for Flushmate IV - 504 Series, 1.0 gpf,
Model M-102540-C
C-100502-KIT
24 Actuator with Set Screw C-218221-1
Flushmate®Replacement Parts 1 2 3 4
5 6 7 8
910 11 12
13 14 15 16
17 18 19 20
21 22 23 24
Use the Flushmate®Part Finder for serial numbers not listed or to nd compatible
replacement parts: flushmate.com/parts
16 For more information, visit: flushmate.com 17

Tools
Flushmate®3-in-1 Discharge
Nut Wrench
ST100100
Installation Tool Kit for Flushmate
System Maintenance
ST300500
Cartridge Wrench
ST100500
We have the right tools for the job.
Use the Flushmate Part Finder for
serial numbers not listed or to nd
compatible replacement parts:
flushmate.com/parts
Upgrade Kits
Switching to Flushmate®is simple. We’ve made it easy to replace other
pressure-assisted brands to the Flushmate 1.6 gpf or 1.28 gpf systems.
Visit flushmate.com/products/upgrade-kits for complete list of
replacement models.
Flushmate III 503 Series Kit
# M-101526-F31K (1.6 gpf)
Replaces
Gerber PF/2 Energizer 150-403 1.6 gpf
Fits these toilet models
BRAND MODELS
American Standard 4142016
Crane 3612
Eljer 141-7000
Zurn EcoVantage
Peerless Peerless 1
Flushmate III 503H Series
Kit # M-101526-F3H1K (1.28 gpf)
Replaces
WDI EcoFlush 1.1/1.6 gpf
Fits these toilet models
BRAND MODELS
Zurn EcoVantage
American Standard 4142100
Crane 31612
Gerber DF28-380
Manseld 119
Zurn 1.1 gpf pressure-assisted tank
1918 For more information, visit: flushmate.com
Prior to Installation
Before removing existing handle, note its orientation. The new handle
should be installed facing the same direction.
If you have a flush rod, clips, and screws, remove them before you start.
Be careful not to drop parts into the tank.
The existing and new nut provided are left-hand thread (clockwise to
loosen and counter-clockwise to tighten).
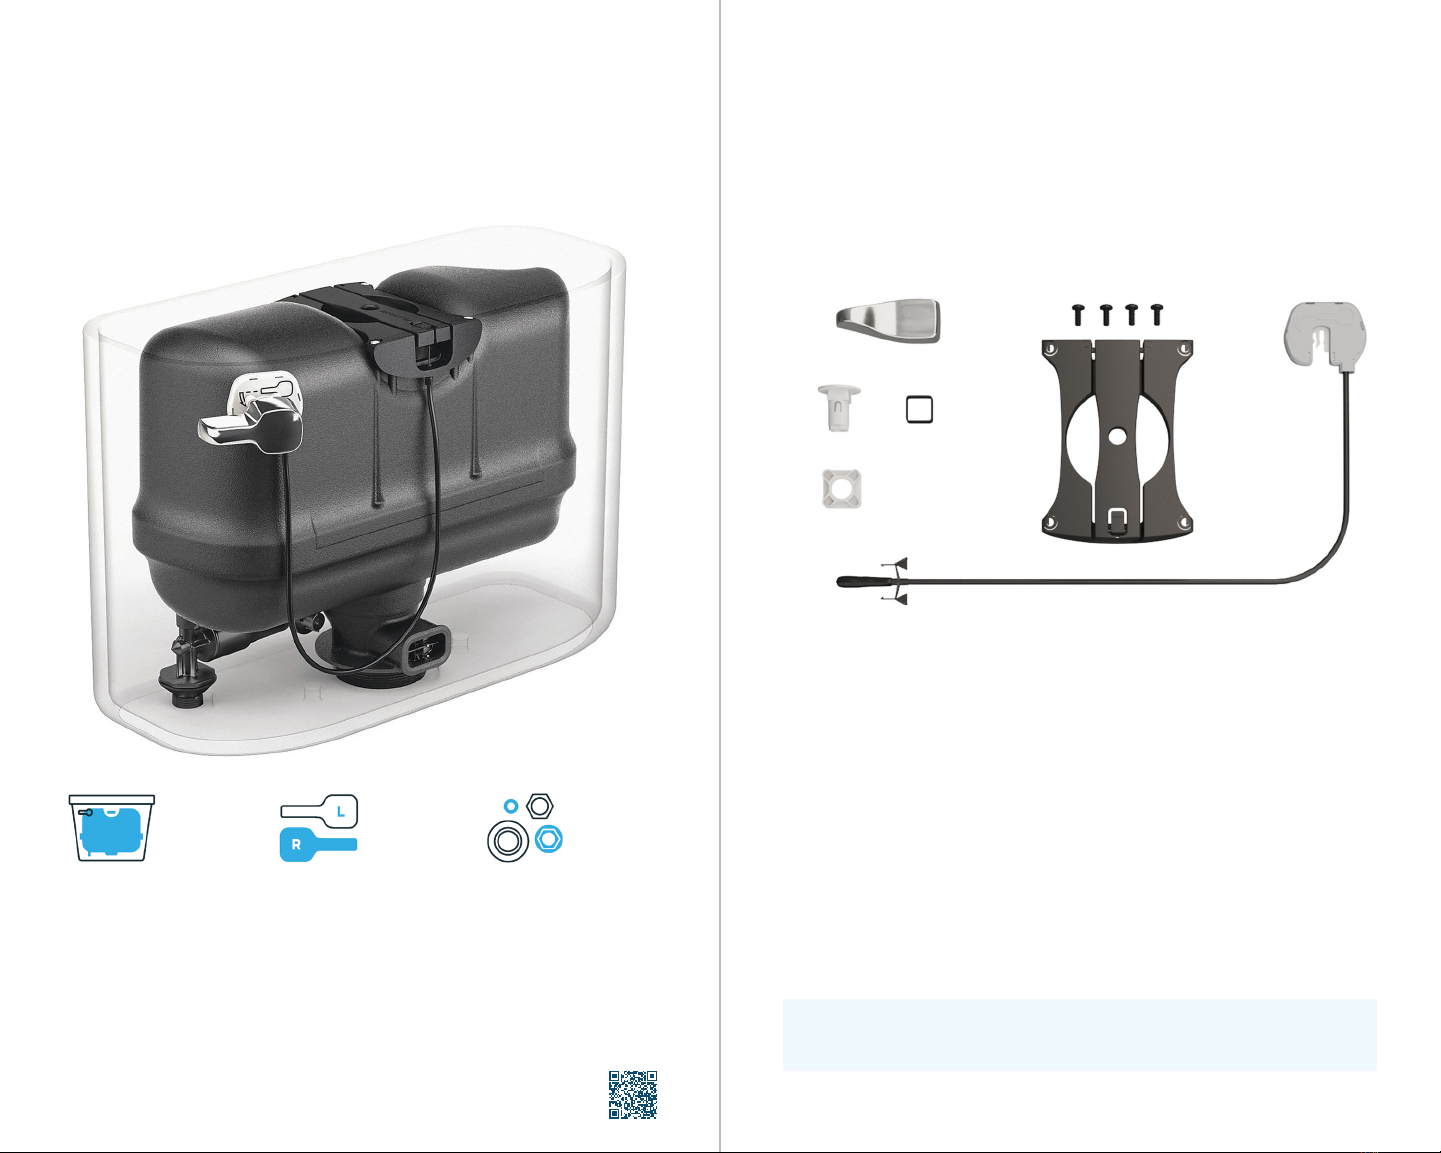
1. Frame and Lever 2. Handle 3. Bushing 4. Nut 5. Spacer
6. Screws (4) 7. Cassette 8. Cable with Barrel End and Disposable Cap
Kit Includes
Tools Needed
No. 2 Phillips screwdriver, pliers
Flushmate Upgrade Kit
One-kit Wonder
Replace your pressure-assisted system with Flushmate®.
Complete Flushmate
System
Includes the Flushmate
III, 1.6 gpf system
for two-piece toilets.
Universal handle
replacement
The new universal
handle is designed for
mounting on either
left-handle or right-
handle toilets.
Nuts and bolts
Kit includes locknuts,
gaskets, and necessary
tools.
20 For more information, visit: flushmate.com 21
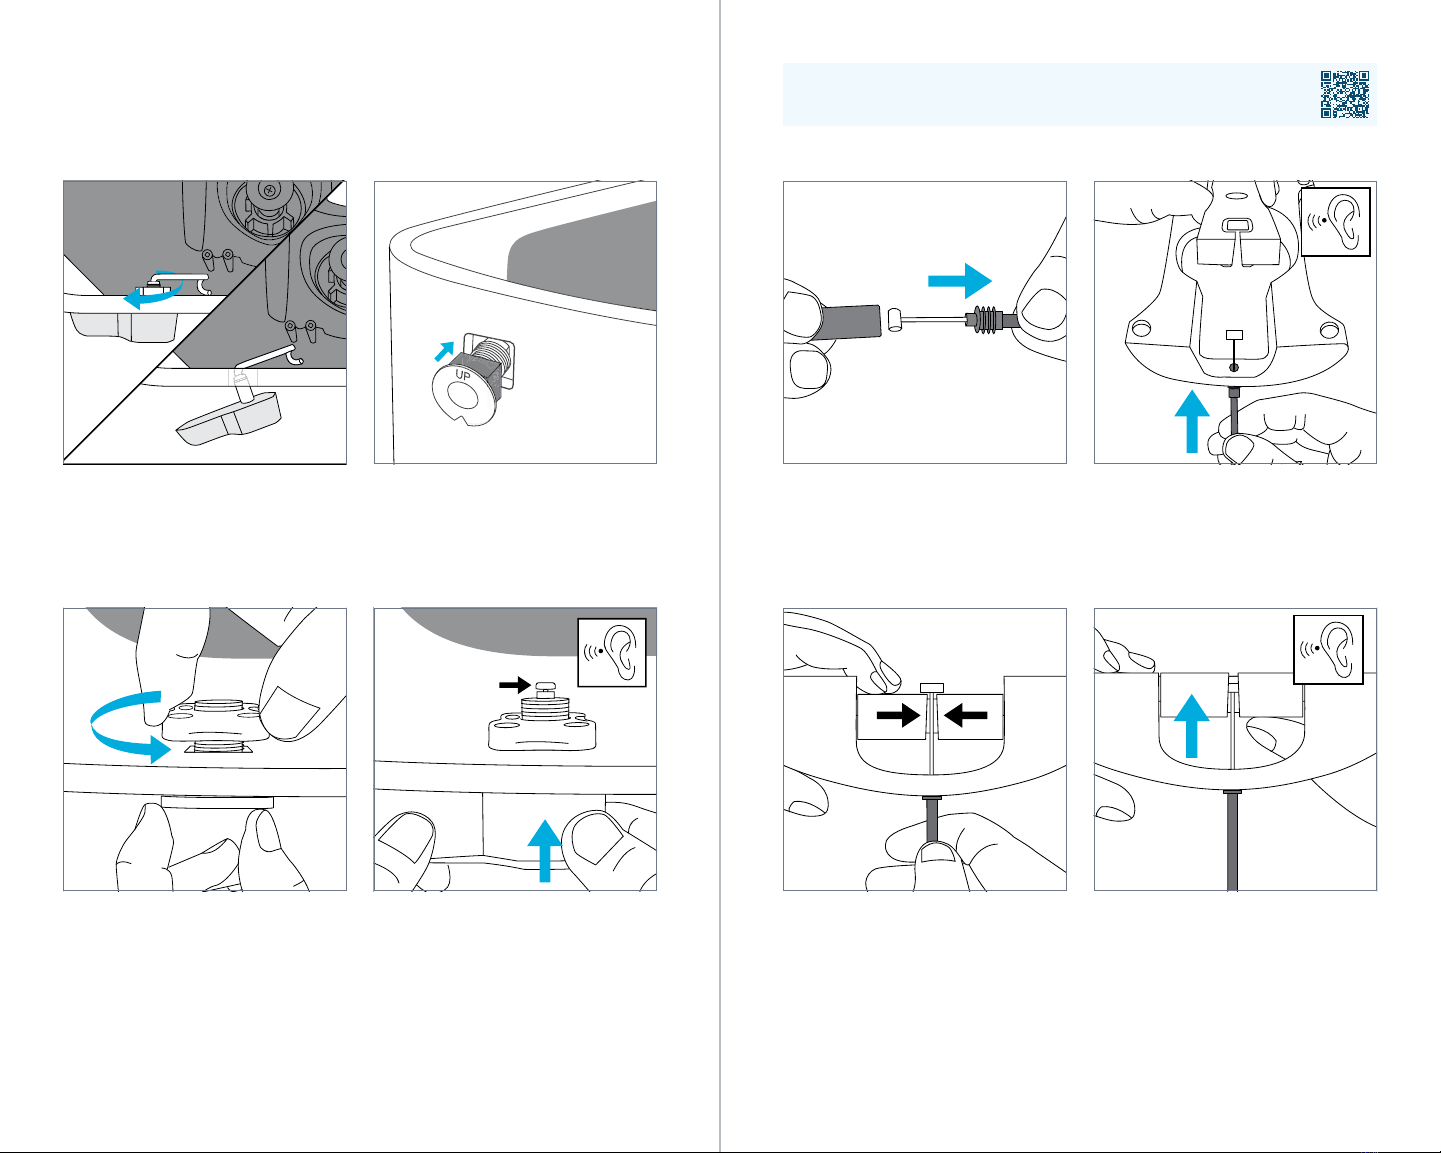
Handle Replacement Kit Instructions
Continue
1To remove handle, loosen nut
(inside tank). It is reverse
thread. Pliers may be needed.
Guide handle through opening
to completely remove.
2Place black spacer on bushing.
Orient and insert as shown. If
bushing does not t, remove the
black spacer and re-insert bushing.
5Gently remove disposable cap from
barrel end of cable and discard. 6Lift lever and push barrel end of
cable up through hole on underside
of frame until it clicks into place.
7Guide cable end into lever slot. 8Raise lever to seat white barrel into
catch (you will hear it click).
3Hand tighten nut snug around
bushing (counter-clockwise). 4Orient new handle in same direction
as original. Insert until stem extends
past bushing, as shown. You will hear/
feel it click into place.
Visit flushmate.com/resources for handle replacement video
22 For more information, visit: flushmate.com 23

Handle Replacement Kit Instructions
9Position the frame and lever with
cable facing the front of the toilet
tank (rest cassette on side of tank).
Secure with (4) screws.
10 Match handle icon (circled) on
cassette to direction of actual handle,
and lift handle to horizontal position.
13 To begin lever alignment, hold
actuator in place and loosen (but
do not remove) set screw.
14 Adjust actuator height. Turn UP
(counter-clockwise) or DOWN
(clockwise) to align lever and frame
(see step 15).
15 Proper alignment of lever and frame
is shown above. 16 Once properly aligned, hold actuator
in place and tighten set screw to
secure. Place toilet lid on toilet tank.
Installation complete
11 Maintain alignment of cassette,
and guide it down over protruding
stem until it clicks into place.
(Protruding stem is shown in step 4.)
12 Gently push handle to test
movement. If it doesn’t move
properly, parts may be installed
in the wrong orientation and you
should verify that steps 2, 4, and 10
were completed correctly.
24 For more information, visit: flushmate.com 25

Common Adjustments
Most troubleshooting issues can be resolved by common
system adjustments of either the cartridge or the actuator.
Please review the following pages for
step-by-step instructions.
Actuator Adjustments
1Hold actuator in place. Use 4-in-1
tool to loosen set screw by turning
counter-clockwise, approximately
4 rotations. Do not remove set screw.
2Adjust actuator UP (counter-
clockwise) if there is too much travel
in push button, or if toilet does not
flush completely. Adjust actuator
DOWN (clockwise) if there is not
enough travel in push button, or if
toilet runs for more than 1 minute.
Adjustment complete
26 For more information, visit: flushmate.com 27

Cartridge Adjustments Visit flushmate.com/resources for cartridge adjustment video
x2
1Make sure water supply stop is
completely OPEN. 2Hold actuator in place. Use 4-in-1
tool to loosen set screw by turning
counter-clockwise, approximately 4
rotations. Do not remove set screw.
Toilet may flush during this step.
5After you complete raising the flush
valve cartridge, conrm only 1 black
thread of the vessel is showing.
6Turn flush valve cartridge clockwise
¼ turn. Listen for the water to stop
running. If necessary, continue
making ¼ turns, waiting 30 seconds
between each turn, until water
stops running.
7Flush toilet twice, waiting 1 minute
between flushes to test. Does the
water stop running?
YES → Continue to step 8
NO → Repeat steps 4-7
8Reinstall actuator. After 2
unsuccessful attempts, contact
Flushmate at 800.533.3460.
Adjustment complete
3Unscrew and remove actuator.
Set aside to reinstall. Leave set screw
in place.
4Use end of 3-in-1 wrench to turn flush
valve cartridge counter-clockwise
until only 1 black thread of the vessel
is showing.
28 For more information, visit: flushmate.com 29
Other manuals for 504 Series
1
This manual suits for next models
2
Table of contents
Other Flushmate Plumbing Product manuals


Popular Plumbing Product manuals by other brands

Glacier bay
Glacier bay HD67818W-6101 Installation and care guide

ROGERSELLER
ROGERSELLER Tonic installation instructions

Svedbergs
Svedbergs Love Me 96809 manual

ProFlo
ProFlo PFWSC4850CP installation instructions

Moen
Moen BRANTFORD T933BN Illustrated parts list

Murdock
Murdock A152 8-BF4 Series Installation & maintenance instructions


