Fly Kan PCIEMD01 User manual

PCI Express V.92 56K Internal Data/Fax Modem
English
PCIEMD01
Version: PCIEMD01-V1.0190511
Instruction Manual
*actual product may vary from photos

Introduction
The PCIEMD01 PCI Express V.92 56K Data Fax Modem lets you add an internal modem for dial-up
Internet access and fax support to your computer, through an available PCI Express x1 (or higher)
slot. With support for transfer rates up to 56 Kbps (data) and 14.4 Kbps (fax), and compatibility
with the latest transmission standards (V.92, V.90, etc.), this versatile PCIe modem can be used as a
backup Internet connection, or in rural areas where broadband connections are not available.
Delivery content
• 1 x PCI Express Modem
• 1 x RJ11 Cable
• 1 x Low-Profile Bracket
• 1 x Driver CD
• 1 x
System requirements
• Available PCI Express slot
Hardware Installation
WARNING! PCI Express cards, like all computer equipment, can be severely damaged by static
electricity. Be sure that you are properly grounded before opening your computer case or touching
your PCI Express card. StarTech.com recommends that you wear an anti-static strap when installing
any computer component. If an anti-static strap is unavailable, discharge yourself of any static
electricity build-up by touching a large grounded metal surface (such as the computer case) for
several seconds. Also be careful to handle the card by its edges and not the gold connectors.
1. Turn your computer off and any peripherals connected to the computer (i.e. Printers, external
hard drives, etc.). Unplug the power cable from the rear of the power supply on the back of the
computer and disconnect all peripheral devices.
2. Remove the cover from the computer case. See documentation for your computer system for
details.
3. Locate an open PCI Express slot and remove the metal cover plate on the rear of the computer
case (Refer to documentation for your computer system for details.). Note that this card will work
in PCI Express slots of additional lanes (i.e. x4, x8 or x16 slots).
4. Insert the card into the open PCI Express slot and fasten the bracket to the rear of the case.
NOTE: If installing the card into a low profile desktop system, replacing theprein stalled standard
profile bracket with the included low profile (half height) installation bracket may be necessary.
5. Place the cover back onto the computer case.
6. Insert the power cable into the socket on the power supply and reconnect all other connectors
removed in Step 1.
7. Connect a standard telephone cable (included) from the “Line” port on the card to the telephone
outlet on the wall. If you wish to also have a telephone connected to this outlet, connect the
telephone to the “Phone” port on the card.
NOTE: Telephone pass through works even if computer is powered off.
Driver Installation
Note: The modem may auto-install using native drivers. Please use the CD included software in case
of driver installation requested by your computer. The included driver is .exe executive file, which
will lead you to finish the installation.
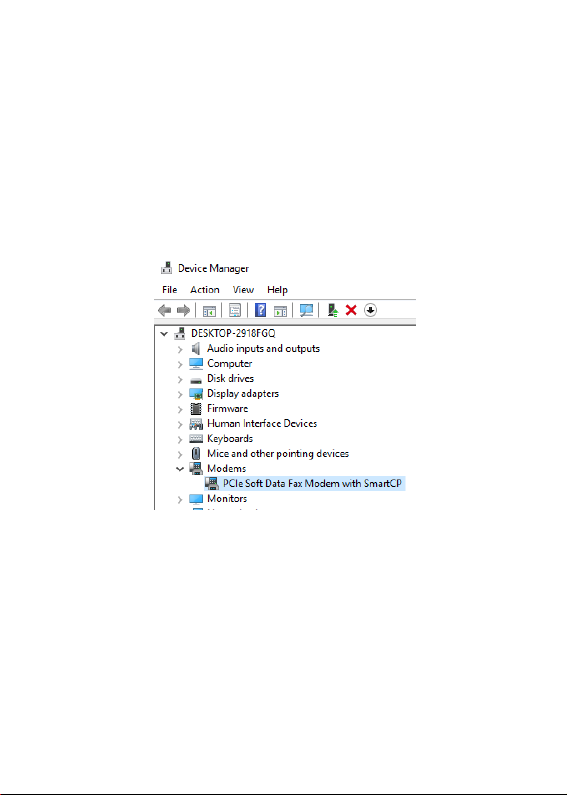
Verifying Installation (Windows 10 / 8 / 7)
1. Open the Device Manager by right-clicking on Computer, and then select Manage. In the new
Computer Management window, select Device Manager from the left window panel
(For Windows 10, open the Control Panel and select Device Manager).
2. Expand the “Modems” section. On a successful install, you should following devices in the list
with no exclamation points or question marks.

Specifications
Bus Type PCI Express
Card Type Standard Profile (LP bracket incl.)
Chipset ID Conexant -
CX95610
Port Style Integrated on Card
Ports 2
Connector Type(s) 1x PCI Express x1 Male
External Port(s) 2x RJ-11 Female
Maximum Data Transfer Rate 56 Kbps Down
48 Kbps Up
14.4 Kbps Fax
Modulation Modem Modulation: ITU-T V.92, V.90, V.34,
V.32bis, V.32, V.22bis,V.22, V.23, V.21
Fax Modulation: ITU-T V.17, V.29, V.27 Ter,
and V.21 channel 2
Data Compression: V.44
Dimensions (L x W x H)
Weight
Humidity 10-90% RH
Operating Temperature
0°C to 40°C (32°F to 104°F)
Storage Temperature -40°C to 70°C (-40°F to 158°F)
Compatible Operating Systems Windows® 8 (32/64bit), 7 (32/64),
Vista(32/64), XP(32/64)
Windows® Server 2008 R2, 2003(32/64)
Safety Measures
(1) If product has an exposed circuit board, do not touch the product under power. (2) If Class 1
Laser Product. Laser radiation is present when the system is open. (3) Wiring terminations should
not be made with the product and/or electric lines under power.(4) Product installation and/or
mounting should be completed by a certified professional as per the local safety and building code
guidelines.(5) Cables (including power and charging cables) should be placed and routed to avoid
creating electric, tripping or safety hazards.

FCC Statement
This equipment has been tested and found to comply with the limits for a Class B digital device,
pursuant to part 15 of the FCC Rules. These limits are designed to provide reasonable protection
against harmful interference in a residential installation. This equipment generates, uses and can
radiate radio frequency energy and, if not installed and used in accordance with the instructions,
may cause harmful interference to radio communications. However, there is no guarantee that
interference will not occur in a particular installation. If this equipment does cause harmful
interference to radio or television reception, which can be determined by turning the equipment
off and on, the user is encouraged to try to correct the interference by one or more of the following
measures:
(1) Reorient or relocate the receiving antenna. (2) Increase the separation between
the equipment and receiver. (3) Connect the equipment into an outlet on a circuit
different from that to which the receiver is connected. (4) Consult the dealer or an
experienced radio/ TV technician for help.
This device complies with part 15 of the FCC Rules. Operation is subject to the following two
conditions: (1) This device may not cause harmful interference. 2) This device must accept any
interference received, including interference that may cause undesired operation.
Any changes or modifications not Expressly approved by the party responsible for compliance could
void the user’s authority to operate the equipment.
Disposal of Old Electrical & Electronic Equipment (Applicable in the European Union and other
European countries with separate collection systems).
This symbol on the product or on its packaging indicates that this product shall not be
treated as household waste. Instead it shall be handed over to the applicable collection
point for the recycling of electrical and electronic equipment. By ensuring this product
is disposed of correctly, you will help prevent potential negative consequences for the
environment and human health, which could otherwise be caused by inappropriate waste handling
of this product. The recycling of materials will help to conserve natural resources. For more
detailed information about recycling of this product, please contact your local Civic Office, your
household waste disposal service or the shop where you purchased the product.
The product carries the CE Mark
This is a class B product. In a domestic environment, this product may cause radio
interference, in which case the user may be required to take adequate measures.
Table of contents


