Flyte MTI-1 User manual

3 4
Welcome to Flyte!
2
1
Clean Flyte Insert Flyte Turn Flyte on
Charge Flyte
Let’s get started!
First, please visually inspect Flyte
for anything unusual (cracks, tears,
exposed wires).
Please also register your Flyte (see
page 28 of the Instructions for Use).
Please review the Instructions for Use
for complete information.
Clean the wand before first use and
after each use. Unplug the wand from
the biofeedback controller prior to
cleaning.
To clean your Flyte wand wipe off any
obvious residue with a clean cloth,
simply clean using mild soap and
water for 20 seconds, rinse, and wipe
dry with a clean cloth.
Now you are ready to use Flyte!
Turn the controller on by firmly squeezing
and holding the ON/OFF button between
your thumb and index finger for 1 to 2
seconds.
When you see the “On” light turn green, let
go of the ON/OFF button. You will then see
one blue light blink.
Flyte will now guide you through your
5-minute session!
USING FLYTE (SIDE 2)
Find a comfortable and private place for your treatment session where you can
concentrate for 5 continuous minutes. We recommend lying on your back but
choose a position that is comfortable for you. As you gain strength and tone,
that position may change (feel free to contact our Ask a PT service for options).
Connect the wand to the biofeedback controller until you hear a click
Fully insert the wand like you would insert a tampon (If necessary for
comfort, apply a small amount of water-based vaginal lubricant to yourself
and to the wand, or cover the wand with a lubricated non-latex probe cover
or condom).
Make sure that the longer “wing” is facing the front of your body and that
both wings are resting comfortably on your skin. Do not insert the wings
into your vagina.
Plug the USB end of the cable into the charging block. Plug the black end of the charging cable into the biofeedback controller
(round unit) until you hear a click. Plug the charging block into the wall. Flyte takes about 2 ½ hours to fully charge.
You will know Flyte is charging when the charging light is yellow. When the yellow charging light turns off, Flyte is fully charged.
Unplug and store the charging cable and charging block. We recommend that you recharge the battery weekly or as needed.
If during charging the yellow light does not come on, it is likely Flyte does not need to be charged. Continue to use as directed.
WARNING: Do not submerge the biofeedback unit, the charging cable, the wall charger, or the wand in water.
#FLYTEISMYSUPERPOWER
Quick Start Guide
In-Home Pelvic Floor Treatment Model MTI-1
SIDE 1

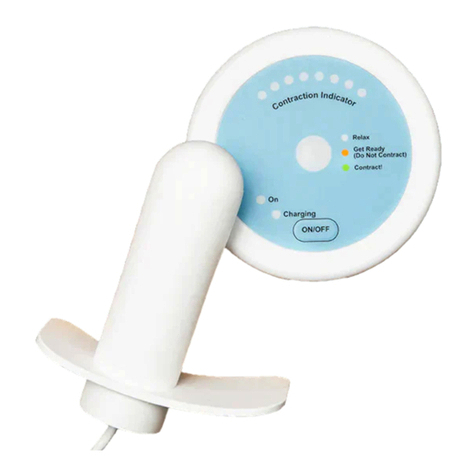
While you are repeating the relaxation and contraction, observe the Contraction
Indicator lights. These lights indicate the strength of your pelvic floor muscle
contractions. With each contraction, try to activate ass mmaannyy bblluuee llights aass yyoouu ccaann. Do
not be discouraged if you cannot activate all eight lights: Muscle tone and strength
should improve over time.
Part # LBL-0004-01
Quick Start Guide
In-Home Pelvic Floor Treatment Model MTI-1
Questions? Visit us at www.pelvital.com or contact
Pelvital Customer Care at 1-866-PELVITAL or
support@pelvital.com.
With the product on and the wand inserted, it’s time to use Flyte™. The “Contract” light in the middle of the device will
tell you when to relax your pelvic floor muscles and when to contract (squeeze or tighten).
• Hold the biofeedback unit and look at the Contract light in the middle of the device.
• Rest until the Contract light turns green. Squeeze and hold your pelvic floor muscles for 5 seconds while the light is
green. You should also feel a vibration from the wand. When the Contract light turns off, rest your muscles. The rest
period lasts 8 seconds, and the cycle begins again when the Contract light is orange. (Do not squeeze when the light is
orange.)
• The cycle occurs 20 times during the 5-minute session and you’ll continue the process of squeezing and resting by
following along.
Watch the center indicator light to guide you during the 5-minute therapy.
Observe the Contraction Indicator lights.
7
8
After 5 minutes of
training, your therapy
is complete for the day and
Flyte™ will power down
automatically. You’ll know
the device is turned o
because the green light will
stop lighting up, and no
other indicator lights will be
displayed.
To end the day’s session,
complete the following
steps:
•Disconnect the
wand cable from the
biofeedback unit.
•Remove the wand from
your vagina.
•Clean the wand by
following the instructions
•Store the Flyte™ system
in the box until the next
session.
•Charge the device once
a week and you’re good
to go!
End the day’s session.
9
Do not squeeze (2 seconds) Squeeze & hold! (5 seconds) Rest (8 seconds)
SIDE 2
FOLLOW ALONG
5 ? Need more help?
A. Rest (8 seconds) B. Do not squeeze (2 seconds) C. Squeeze & hold! (5 seconds) Need more info? Connect with our Ask A
PT service or refer to the Instructions for
Use manual.
Ask A PT
Have any questions about your pelvic
floor or Flyte? Reach to us at our free Ask
A PT service to connect with a certified
pelvic floor physical therapist.
Call us at 1-866-735-8482
(press 1 when prompted), email us at
support@flytetherapy.com, or schedule a
call with Ask A PT on
www.flytetherapy.com.
Be sure to join our private Facebook
group Flyte Community for extra support
along your journey!
General educational information provided does
not constitute medical advice. If you have further
concerns, please seek out your healthcare
provider.
A. NO CENTER LIGHT (8 seconds) = Your session will start with an 8 second rest period with no center light. Do not squeeze during
this time. Focus on relaxing and breathing normally.
B. ORANGE LIGHT (2 seconds) = You will start to feel the vibration of the wand. DO NOT SQUEEZE your pelvic floor muscles. Instead,
take a gentle belly breath IN through your nose to help relax your pelvic floor muscles. Focus on where you feel the vibration
internally, this will help you feel where to squeeze during the green light phase.
TIP: We do not want you to squeeze during the orange light because Flyte is measuring your baseline resting muscle tone.
This helps Flyte provide you with accurate biofeedback during the green light (squeeze) phase.
C. GREEN LIGHT (5 seconds) = You will continue to feel the vibration of the wand. Exhale slowly while you squeeze and lift your pelvic
floor muscles. Hold your squeeze for the full 5 seconds. Try to not hold your breath.
TIP: Focus on the timing and coordination of orange light relaxations and green light squeezes rather than the number of
blue lights. The blue lights reflect how well you are squeezing and lifting your pelvic floor in comparison to your muscles
at rest. That is why it is equally important to relax at each orange light! When the center light turns off and the wand stops
vibrating release and relax your pelvic floor.
This cycle will repeat 20 times in your 5-minute treatment. Note that it is very normal for the number of blue lights to decrease as
you continue through the 5-minute session. Flyte will turn off on its own after these 5 minutes (and the green “on” light will turn off).
All done! Remove the wand, clean it, let it dry, and put it away for your next session!
LBL-007-04
Questions?
Visit us at www.flytetherapy.com or contact
Flyte Customer Care at 1-866-735-8482
or support@flytetherapy.com
SIDE 2
#FLYTEISMYSUPERPOWER
Quick Start Guide
In-Home Pelvic Floor Treatment Model MTI-1
Other manuals for MTI-1
2
Other Flyte Medical Equipment manuals
Popular Medical Equipment manuals by other brands
ResMed
ResMed H5i User instructions

Hillrom
Hillrom CarePorter P3000 Service manual

Nasco
Nasco Life/form LF01060U instruction manual
B. Braun
B. Braun Aesculap 46886 Instructions for use/Technical description
Kodak
Kodak DirectView CR 825 Diagnostics guide
B. Braun
B. Braun Aesculap AdTec mini Assembly and disassembly instructions
