FM Calefaccion ST Compact Series User manual
Instruction manual
Electric ovens
Models:
STC 423/411/611/1011 E
STC 411/611/1011 E W
ATTENTION:Please, read these instructions before using the unit.


CONTENTS
1. CE CERTIFICATION 4
2. WARRANTY 5
3. GENERAL AND SAFETY STANDARDS 6
4. SAFETY INSTRUCTIONS, TRANSPORT AND MAINTENANCE 9
4.1 Unpackaging 9
4.2 Transport 9
4.3 Preliminary operations 10
4.4 Placing the unit 10
5. INSTALLATION 12
5.1 Electrical connection 12
5.2 Water inlet 14
5.3 Draining connection 14
6. USE INSTRUCTIONS 18
6.1 Using the unit for the first time 18
6.2 Cooking use 18
6.3 Control panel 19
6.4 Manual regulation of the chimney valve 20
6.5 Oven cleaning 20
7. FRECUENTLY ASKED QUESTIONS 22
3

1. CE Certification____________________________________________
DECLARATION OF CONFORMITY
Council Directive(s) to which conformity is declared:
DC 2014/35/EU + DC 2014/30/EU + DC 2011/65/EU
Application of the Standards:
EN 60335-1:2012 / EN 60335-2-42:2003 + Corr:2007 + A1:2008 + A11:2012 /
EN 55014-1:2006 + A1:2009 + A2:2011 / EN 55014-2:1997 + A1:2001 + A2:2008 / EN 61000-3-2 :2006 + A1:2009 +
A2:2009 / EN 61000-3-3 :2008
Manufacturer´s addres:
FM CALEFACCIÓN S.L.
CIF: B-14343594
Manufacturer´s address:
CTRA. de Rute km.2.700, C.P.:14900, Lucena
Cordoba, España
Type of equipment:
OVEN
Trade.:
FM CALEFACCIÓN
STC
423/411/611/1011 V5
Model:
STC
411/611/1011 V5 W
We, the undersigned, hereby declare under our sole responsibility that the specified equipment is in conformity
with the above Directive(s) and Standard(s)
Place:
Lucena
Signature: B-14785315
Date:
01/10/2019
4

2. Warranty
The warranty period is 12 months from the date of purchase of the unit.
The warranty does not cover damages to the glass, lamps, door seals, insulating material or damages caused by
improper installation, maintenance, or lack of maintenance, repair and misuse.
To process the repair of a unit under warranty or for any other query, please contact your distributor and
reference to the following description table.
Distributor:
Unit model:
Serial number:
Name:
Date of the request:
Fault description:
Address:
Contact telephone number:
Time frame:
Warning: improper adjustment, installation, service or maintenance of the unit may lead to damages to
the goods or persons. For this reason, read this manual thoroughly before starting the unit.
5

3. General and safety standards
Safety standards and responsibility for installing and maintaining
•Read this manual thoroughly before starting the unit and keep it for further consultation. If you need technical
support, contact an authorised technical service.
•Installation, starting and maintenance of the oven shall be carried out by qualified technicians in accordance with
the scale and technical characteristics specified by the manufacturer. Likewise, observe the current legislation on
safety and with regard to installations and occupational safety in force in the country of use.
•Check that the unit is unplugged from the power supply before installing or maintaining.
•Before installing the unit, check that installations are in accordance with the current legislation in the country of
use and refer to the indications on the data plate.
•Do not manipulate or disconnect the unit safety devices. This will invalidate the warranty.
•Damages, injuries or fatal accidents could be produced due to the non-observance of the manufacturer’s
indications.
•If the oven is installed on supports or overlaying parts, use the ones supplied by FM only and follow the assembly
instructions inside the packaging.
•Non-original spare parts do not ensure the correct operation of the unit and will imply the loss of the warranty.
•The over must be only used by duly-trained technicians.
•The oven data plate provides necessary technical information for repair or maintenance. Therefore, avoid
removing, damaging or modifying it.
•Failure to comply with these safety standards will release FM from any responsibility and the warranty will
become null and void.
Safety standards for use
•Read this manual thoroughly before starting the unit and keep it for further consultation. If you need technical
support, contact an authorised technical service.
•If the unit is not used for a long time, all connections must be interrupted (power supply and water).
•The oven must only and exclusively be used for the purpose it was designed, it is to say, for baking products such
as fresh or frozen bread or pastries. Any use other than that mentioned may damage the unit.
•Do not put products into the oven with a high alcohol concentration.
•The outside and inside of the oven should be cleaned frequently to ensure hygiene and proper performance. Do
not use abrasive or flammable products, which may damage the unit, to clean those surfaces
6

•Usage and cleaning different from what is recommended by the manufacturer and with non-authorised products
may damage the unit and the user.
•Do not use direct water jet on the unit in order to avoid damaging its components.
•If the unit has a humidifier, the use of an anti-lime filter at the water supply inlet is recommended. Otherwise,
some oven components may be damaged. Faults caused by lime or water sediment are not included in the
warranty.
•Failure to comply with these safety standards will release FM from any responsibility and the warranty will
become null and void.
Maximum loads
CAPACITY
MAXIMUM LOAD
MAX. LOAD PER RACK
4 x (Gn 2/3)
12kg
Max. 10 kg per rack
4 x (Gn 1/1)
20 kg
Max. 15 kg per rack
6 x (Gn 1/1)
30 kg
Max. 15 kg per rack
10 x (Gn 1/1)
45 kg
Max. 15 kg per rack
• Never exceed the maximum load capacity to prevent damage to your equipment. The breach of maximum load
exempts the manufacturer from any responsibility and makes the warranty void.
Risk of burns
•Read these warnings carefully and follow its indications when the oven is working or not completely cooled
down.
•Only touch the unit control elements and the door handle. Avoid touching any other external element of the
oven as it may reach temperatures over 60ºC.
•Wear thermal mittens or similar to move or handle containers or trays inside the baking chamber.
•Open the oven door slowly and be careful with high temperature vapours coming out from the baking chamber.
7

Risk of fire
•If you do not clean the unit properly or as often as needed, greases and food leftovers will be accumulated in the
baking chamber and then, become inflamed.
•Only use the products recommended by the manufacturer. Using other products may damage the unit and
invalidate the warranty.
•Only use home-use cleaning products and a soft damp cloth to clean the outside coating. Do not use corrosive or
irritating substances.
8
4. Safety instructions, transport and maintenance_________
4.1 Unpackaging
Visible damages: When receiving the material, enter a detailed description of the break in the PDA or in the
delivery note.
General comments such as “damaged packaging” or “damage can be seen”, etc. will not be accepted. Clear
photographs showing the damaged good and packaging must be provided.
Hidden damages: When receiving the material and within 24 hours after reception, once the hidden damage has
been checked, photographs showing the damaged good and its corresponding packaging must be provided. The transport
agency label must be clearly visible. Photographs showing the content only and exclusively will not be accepted.
In either case, transport incidences should be reported to FM Industrial to manage the replacement of the machine.
If visible damages are detected when receiving the packaged machine, indicate “hits to the oven” at the time of the
delivery, take photos of the damages and transport agency label on the packaging. Please, contact FM Industrial
immediately.
If package is apparently in good conditions, and damages are detected when unpacking, place the original packaging again
on the machine, take pictures of the packaging and transport agency label on the packaging. Next, unpack again and take
photos of damages to the machine. Please, contact FM Industrial immediately.
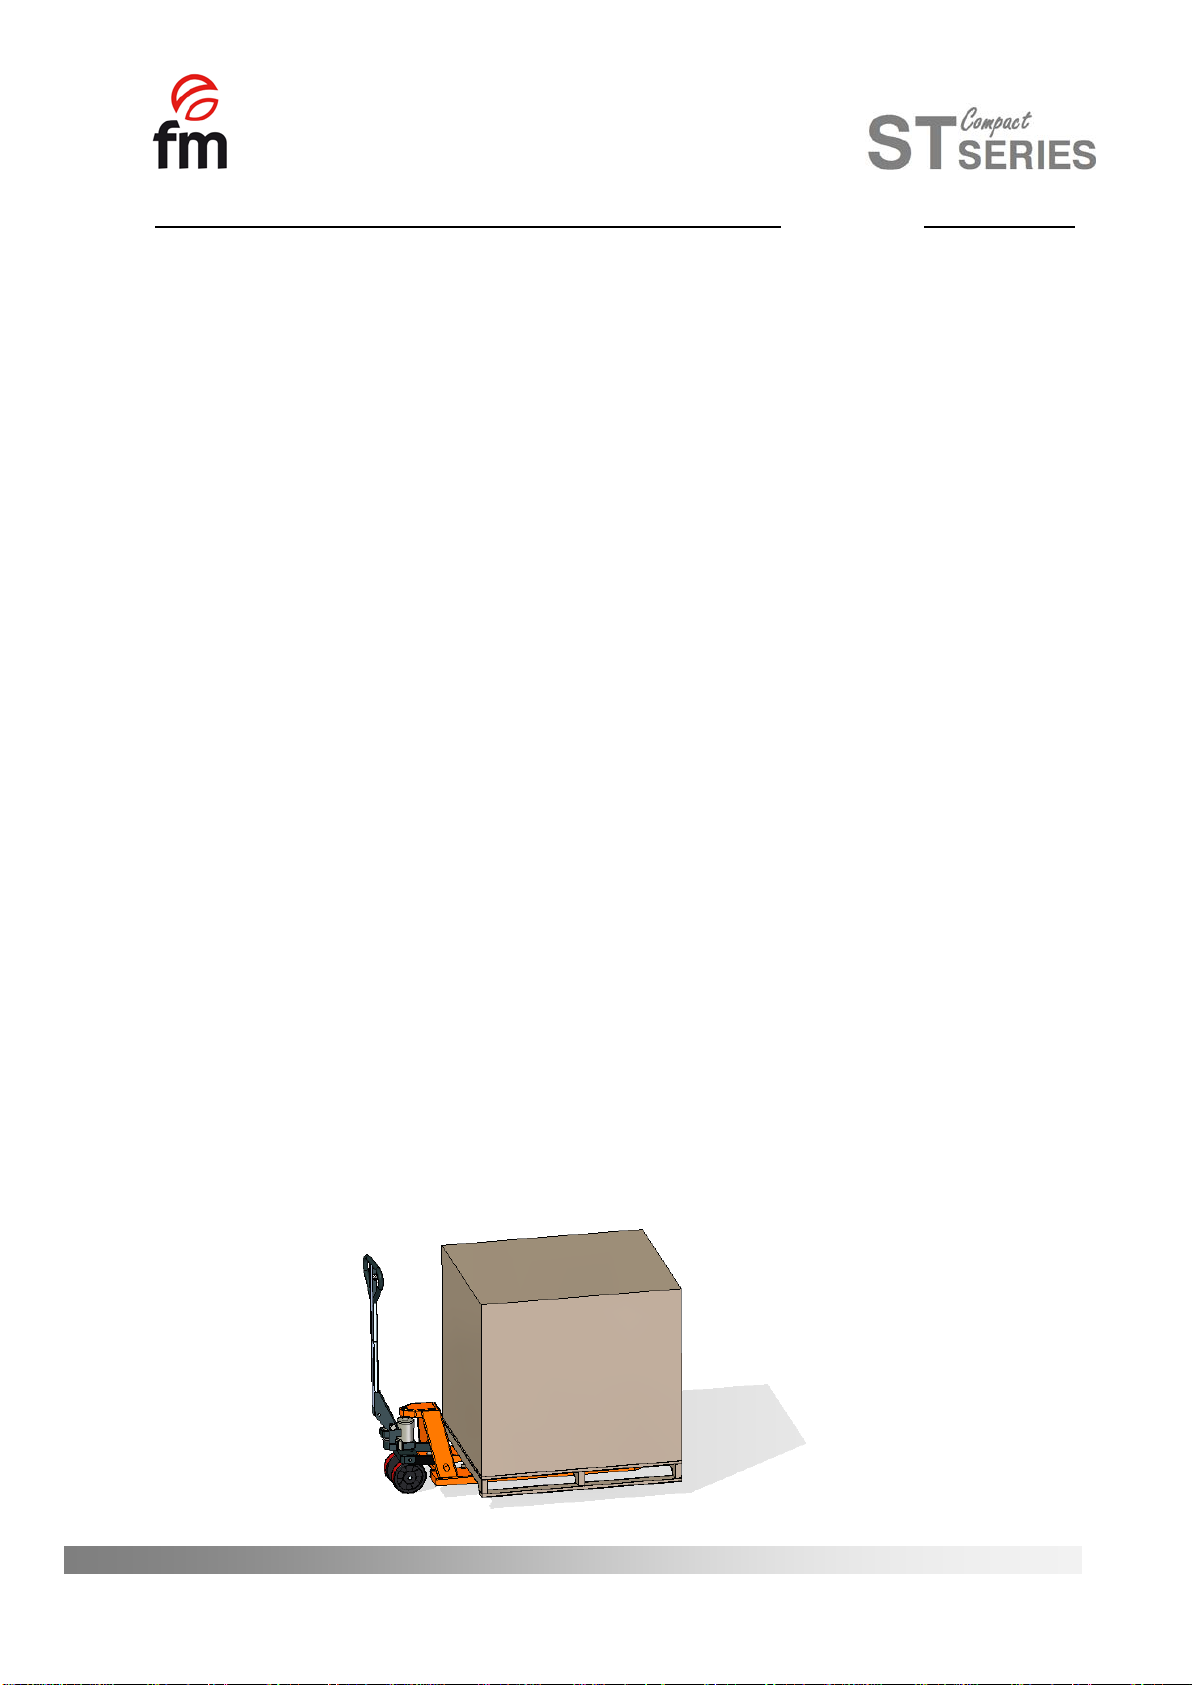
4.2 Transport
Before transporting the unit to its installation site, make sure that:
- Fits through the door
- The floor withstands its weight
Transport should only and exclusively be carried out by mechanical means, such as a pallet jack, and always on a pallet.
9
4.3 Preliminary operations
Remove the protection film from the unit. Clean the adhesive residues with an appropriate solvent. Never use
abrasive or acid products or tools that may damage the surface.
4.4 Placing the unit
Place the oven in the selected work place and keep a safe distance as indicated below. Check that the unit has
sufficient cold air inlets through the ventilation registers ensuring correct operation. Otherwise, the unit may overheat,
and some components may be destroyed.
- If the oven is installed on an auxiliary support, it must be fixed to it.
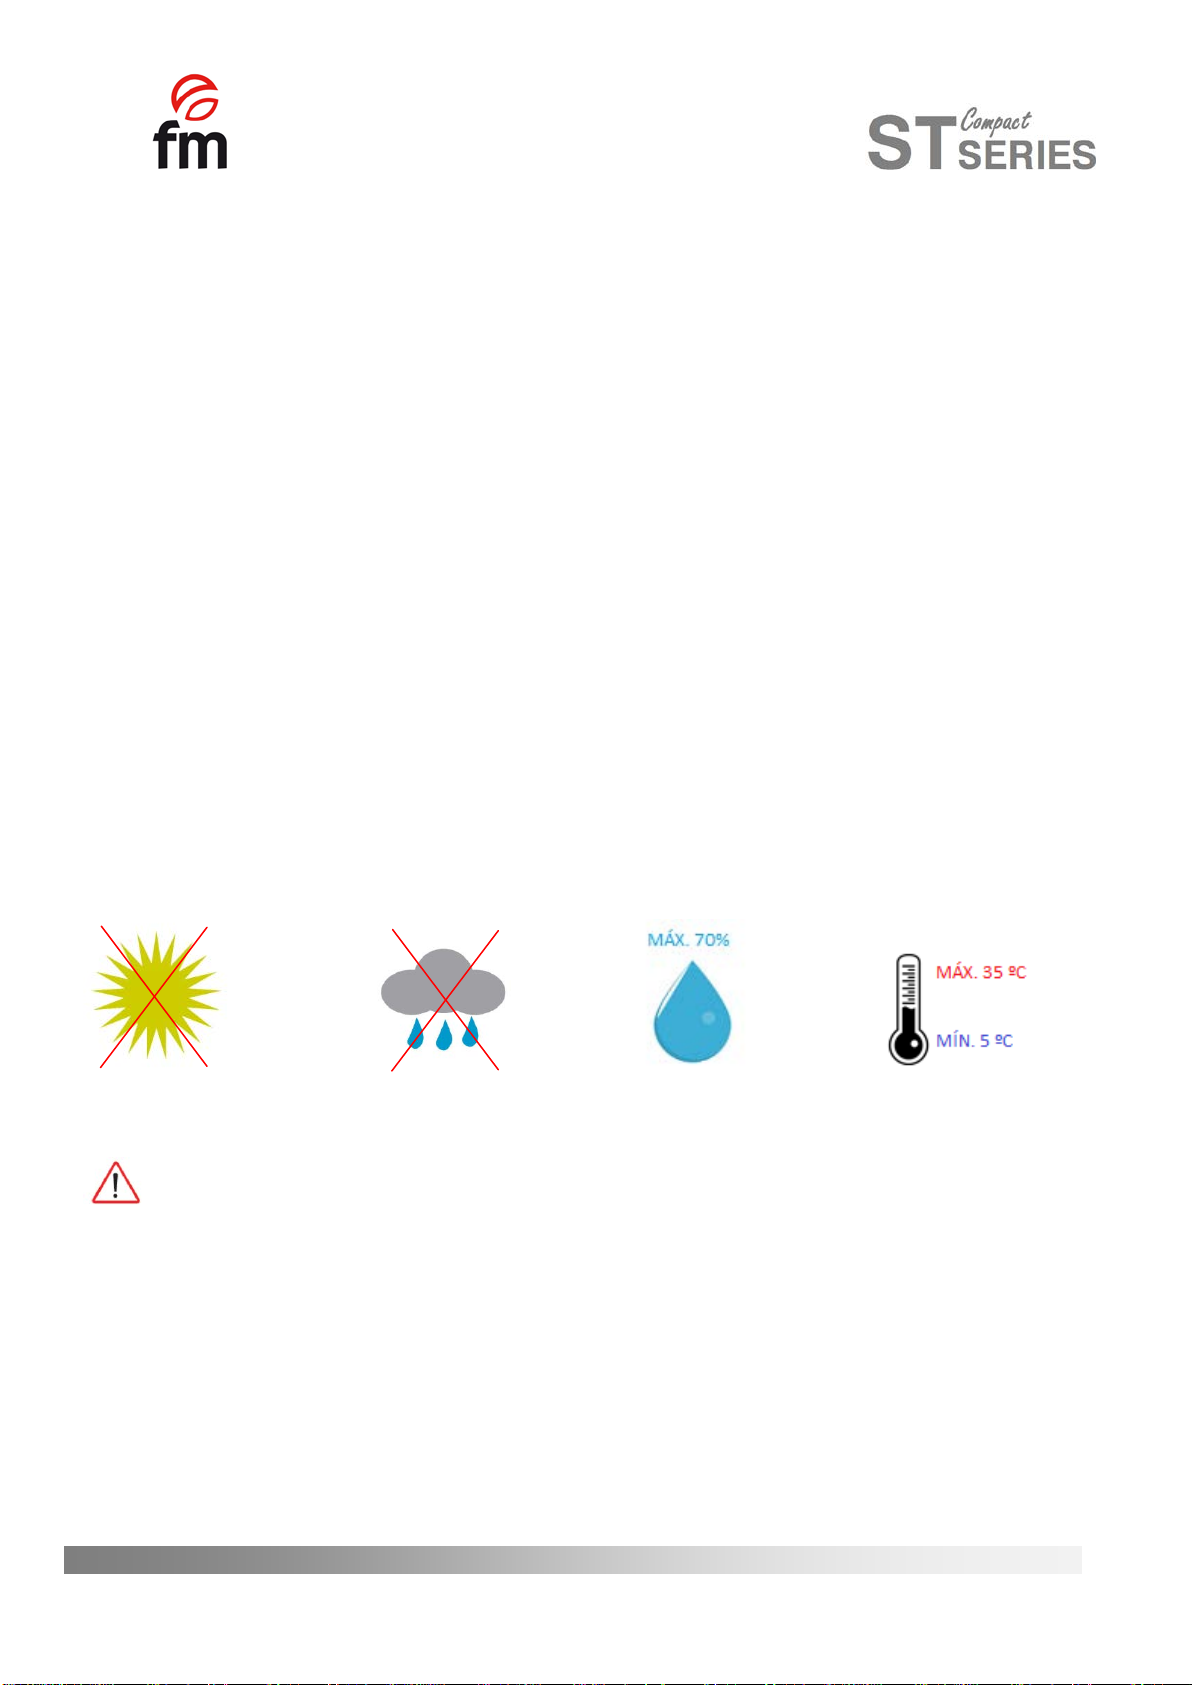
- The facilities must be conditioned and meet the regulations in force with regard to safety in installations.
- In addition, the unit must be protected from atmospheric agents
- The ambient temperature may range between 5ºC and 35ºC maximum for correct operation of the unit
- Humidity should not exceed 70%.
We recommend leaving a 120 mm gap for repair and if there are heat sources or combustible elements, that
safety distance must be 700 mm minimum. We also recommend ensuring good ventilation of the unit to prevent
overheating its components.
10
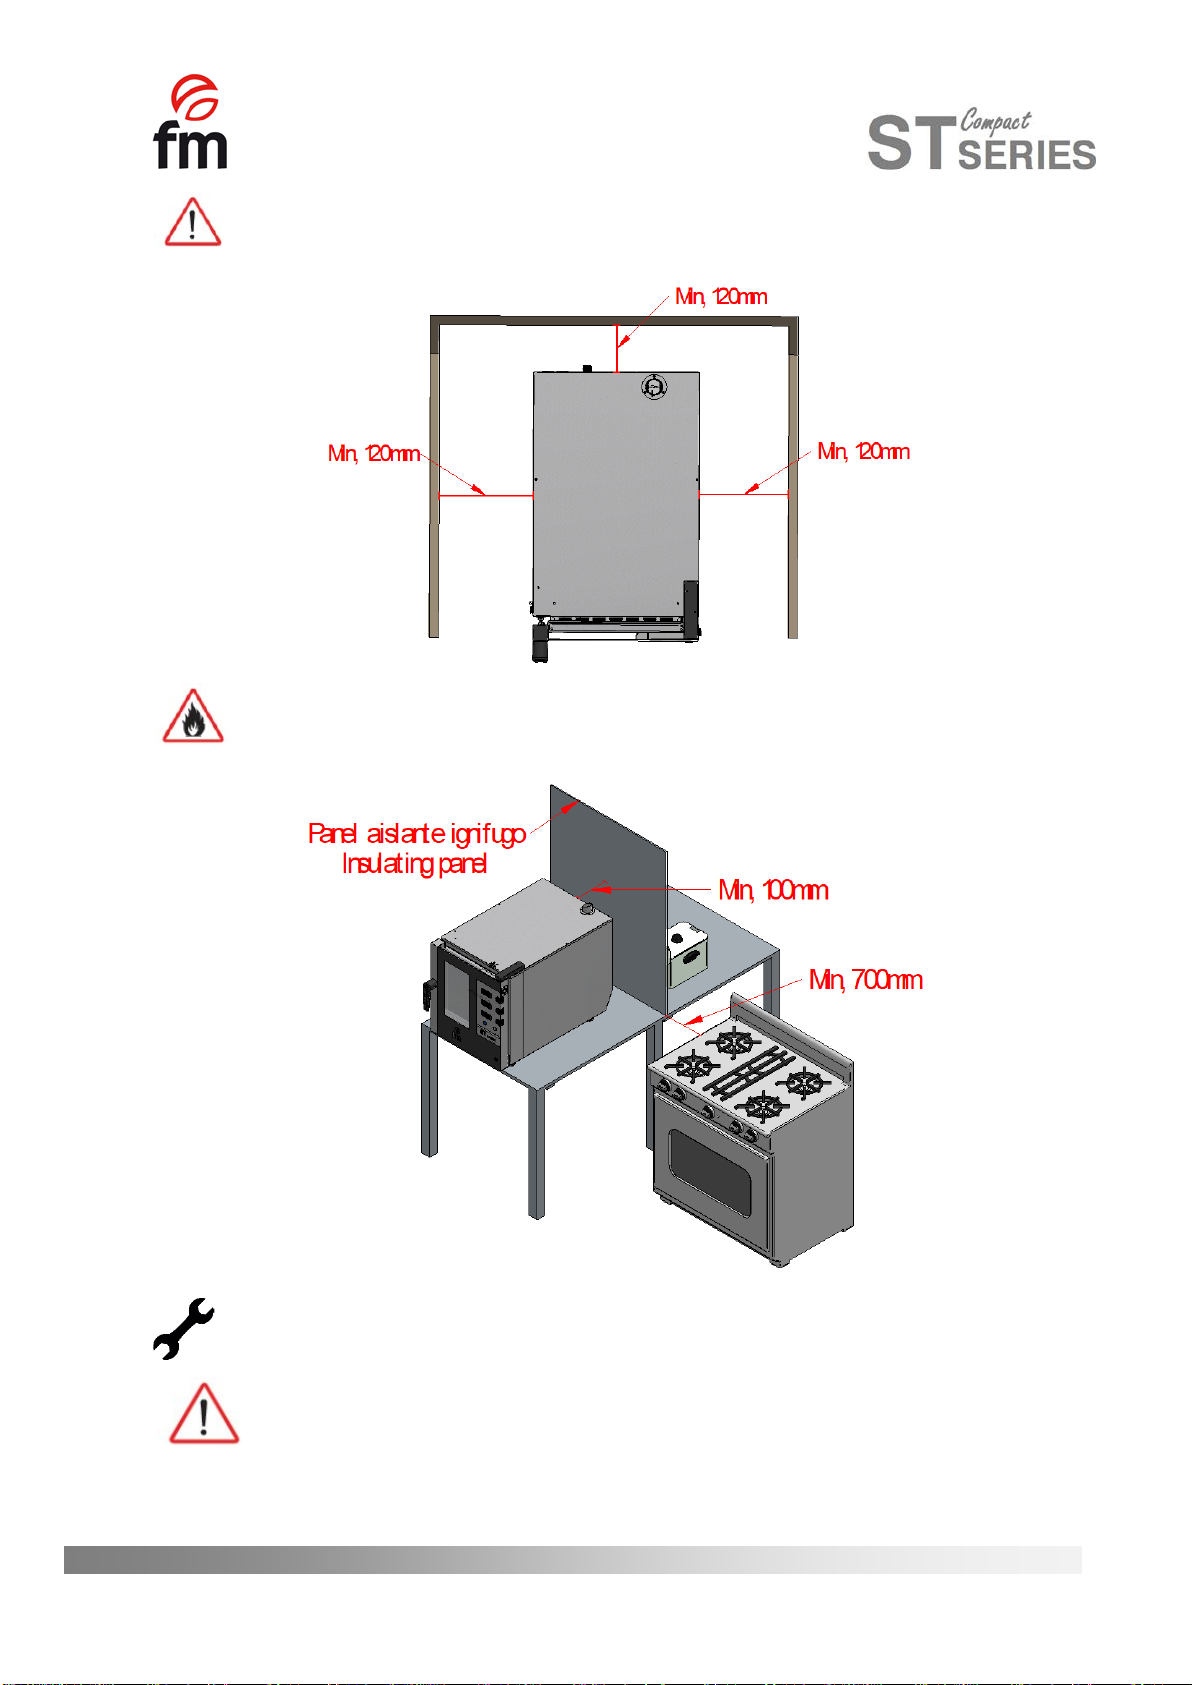
Example of equipment placement without nearby heat sources.
Placement of equipment next to heat sources.
For maintenance operations we recommend a free working space of 500 mm (approximately).
This unit is not suitable for built-in installations.
11

5. Installation________________
5.1 Electrical connection
Before connecting the unit to the power supply, check that the electrical grid characteristics match those
described in the technical characteristics of each unit. The electrical installation must be performed by authorised
technicians and meet the regulations in force.
Preferably, the electrical connection should be performed by mounting and electrical outlet of appropriate type
and capacity for the maximum current absorbed by the oven phases. If not possible, it could be directly connected to the
circuit breaker on the electrical control board.
We indicate the types of electrical connections recommended:
THREE PHASE 400V
•Three phase connection 400V directly connected to a circuit breaker.
CIRCUIT BREAKER
12
In order to avoid any danger due to accidental rearmament of the thermal cutting device, this device must not be
powered by an external control device, such as a timer, or connected to a circuit whose power is interrupted regularly.
We recommend an own power line protected by magneto-thermal switch of suitable caliber, as well as a fixed
network connection for the connection of the devices.
Observe the color code of the wires. An improper connection can irreparably damage the device.
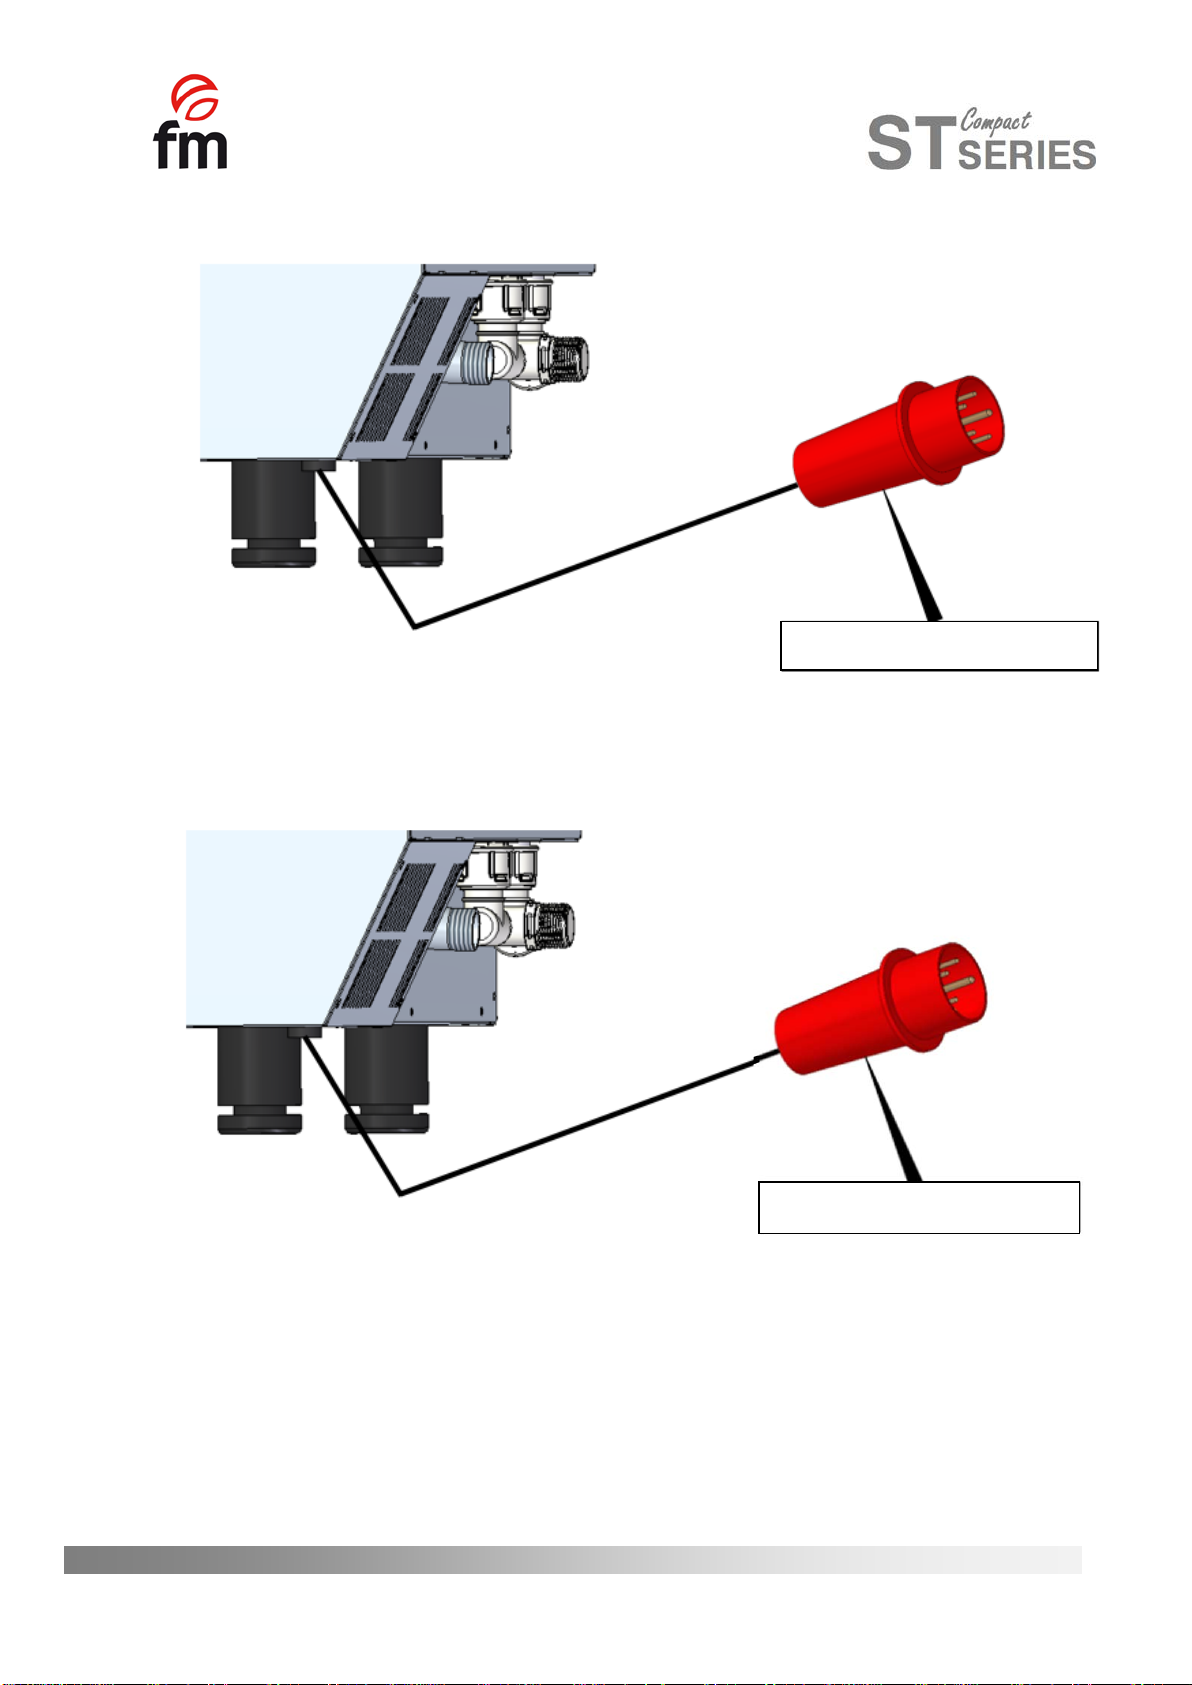
THREE PHASE 230V
•Three phase connection 230V connected to a three phase power socket type
MATERIAL NOT SUPPLIED
MATERIAL NOT SUPPLIED
•Three phase connection 400V connected to a three phase power socket type CETAC.
13
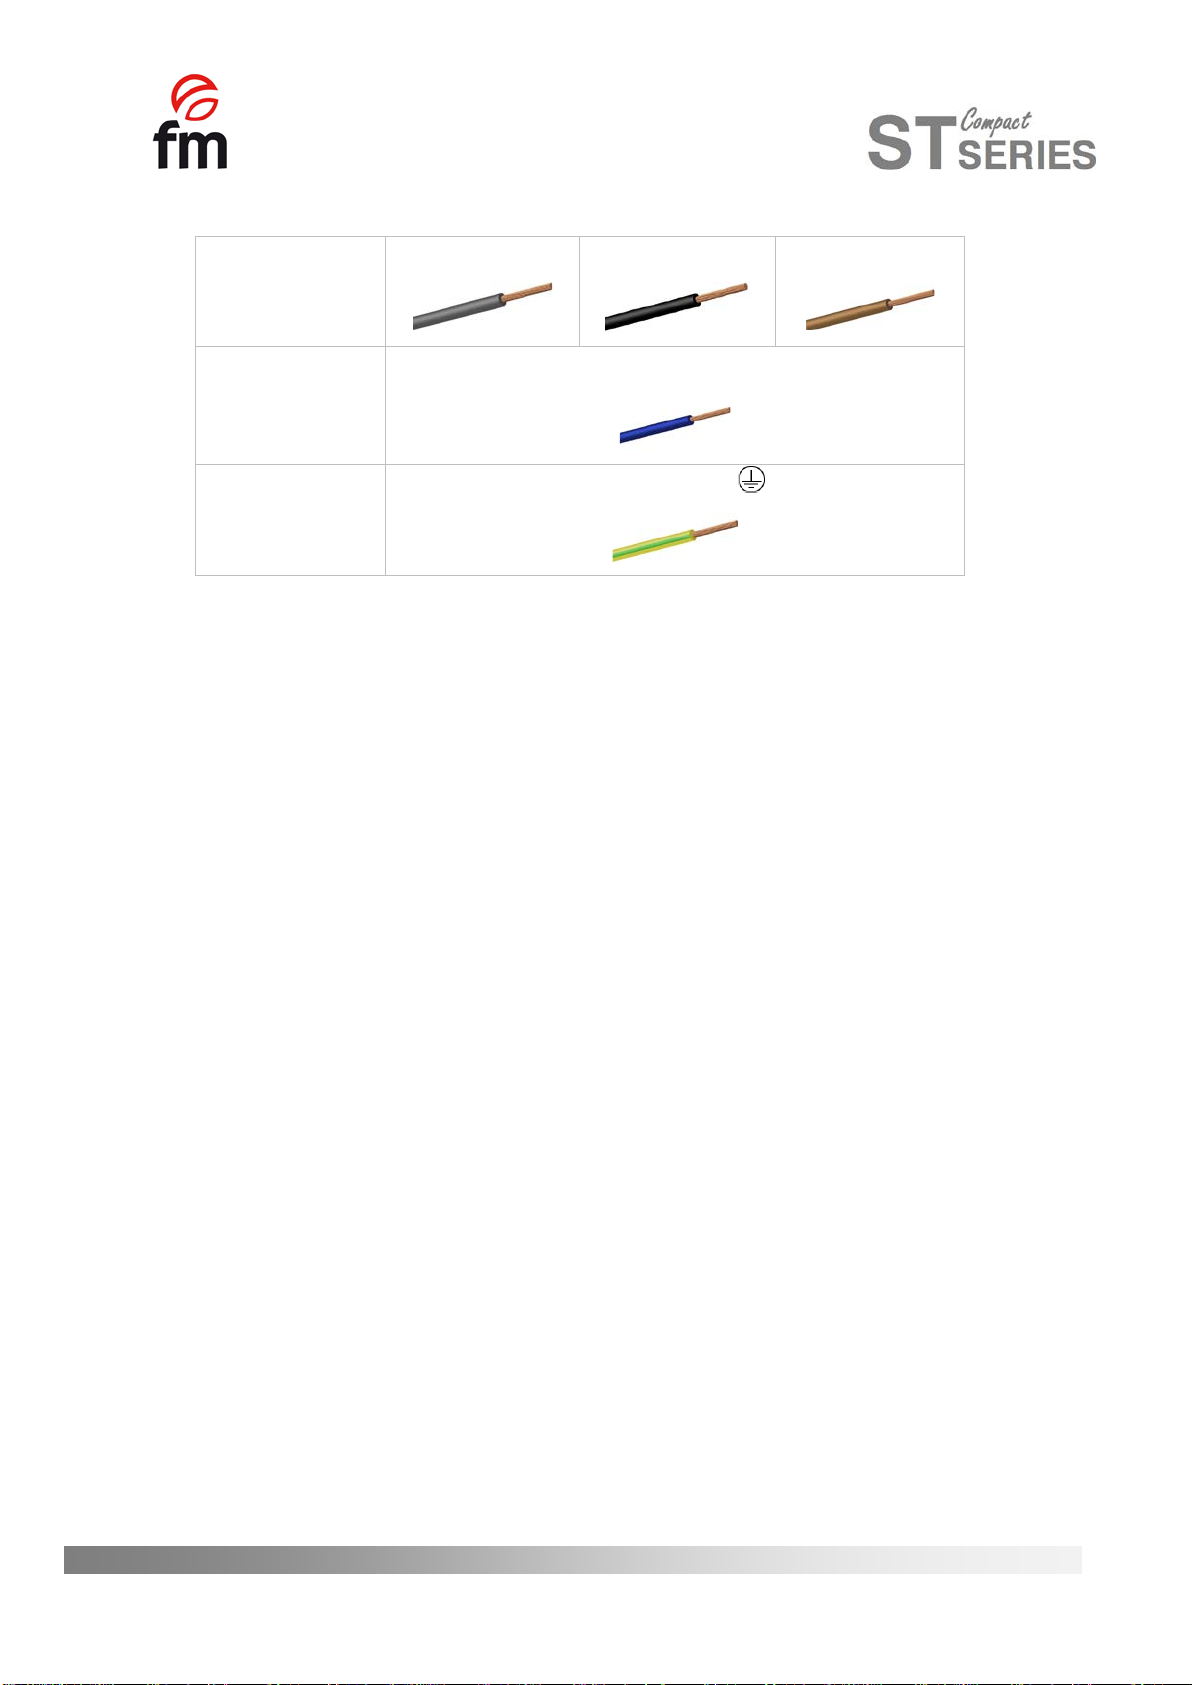
COLOUR CODE
PHASES
Grey (R)
Black (S)
Brown (T)
NEUTRAL
Blue (N)
GROUNDING
Yellow / Green
5.2 Water inlet
Use anti-lime system before to connect the water pipes to the device, is recommended. The water connection is
¾“.
In addition, it is advisable to install a "digimeter" for the liters of water consumed by the oven, and in this way, to
know when it is necessary to replace the filter.
Important: The incoming water must have a pressure between 1 and 3 bars with a temperature not exceeding
30 ° C. If the pressure is higher than these values must install a pressure reducer at the entrance.
5.3 Draining connection
- The connection of the oven drain must be made with discharge pipes that warranty thermal stability.
- It is advisable to connect the drain pipe of the oven through a corresponding siphon to contain the exit of the
vapors from the oven. This tube must have a minimum slope of 4% to ensure proper operation.
- The drain pipe must have a diameter greater than the drain connection.
- Be specific for each team. Otherwise, make sure that the main duct is dimensioned to warranty the correct flow
and without obstacles
- Be free of bottlenecks.
14
Types of drains:
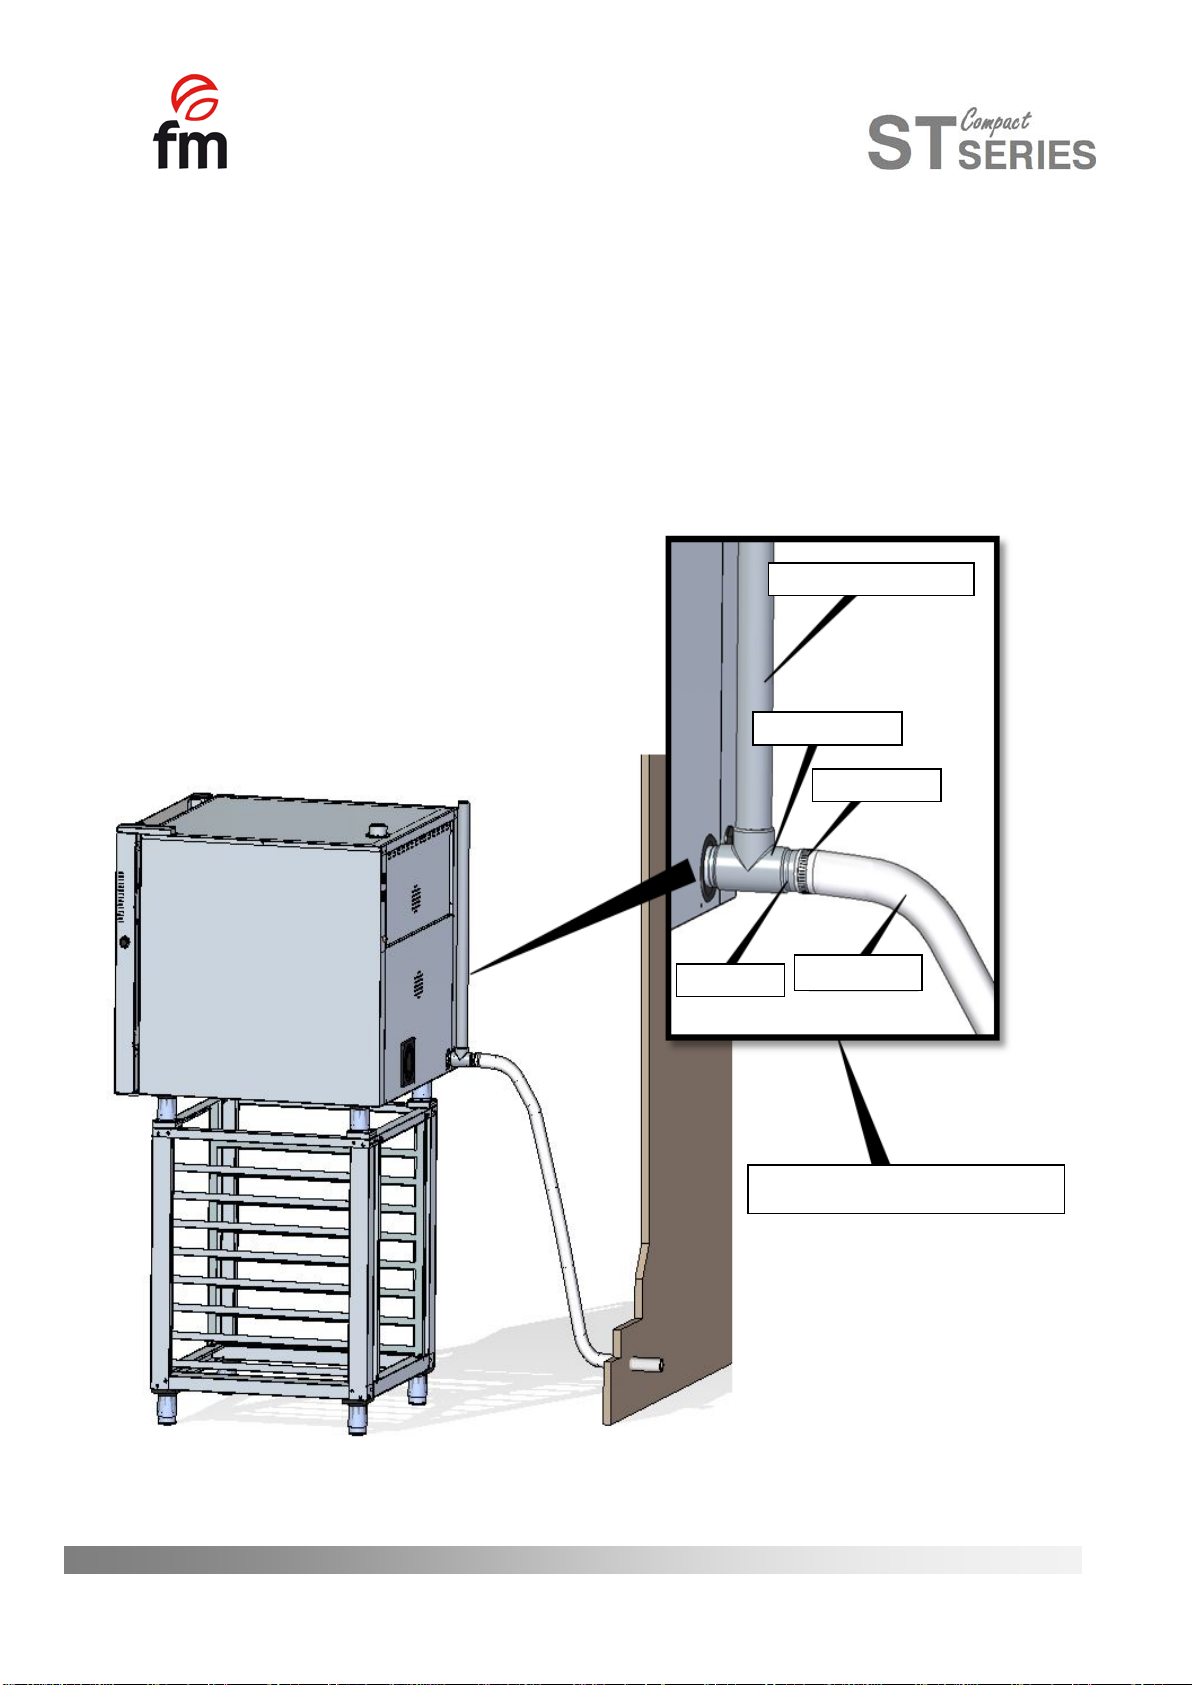
1. Wall drain:
It must have a vertical ventilation duct with a diameter not less than 25 mm, which must be above the top cover of
the oven, as shown in the picture.
In case of not installing the vertical ventilation duct, a correct drainage is not warrantyd, being able to cause
damages and the loss of the warranty.
Vertical ventilation duct
Connection 40mm
Clamp
Connection
Drain pipe
MATERIAL NOT SUPPLIED
15
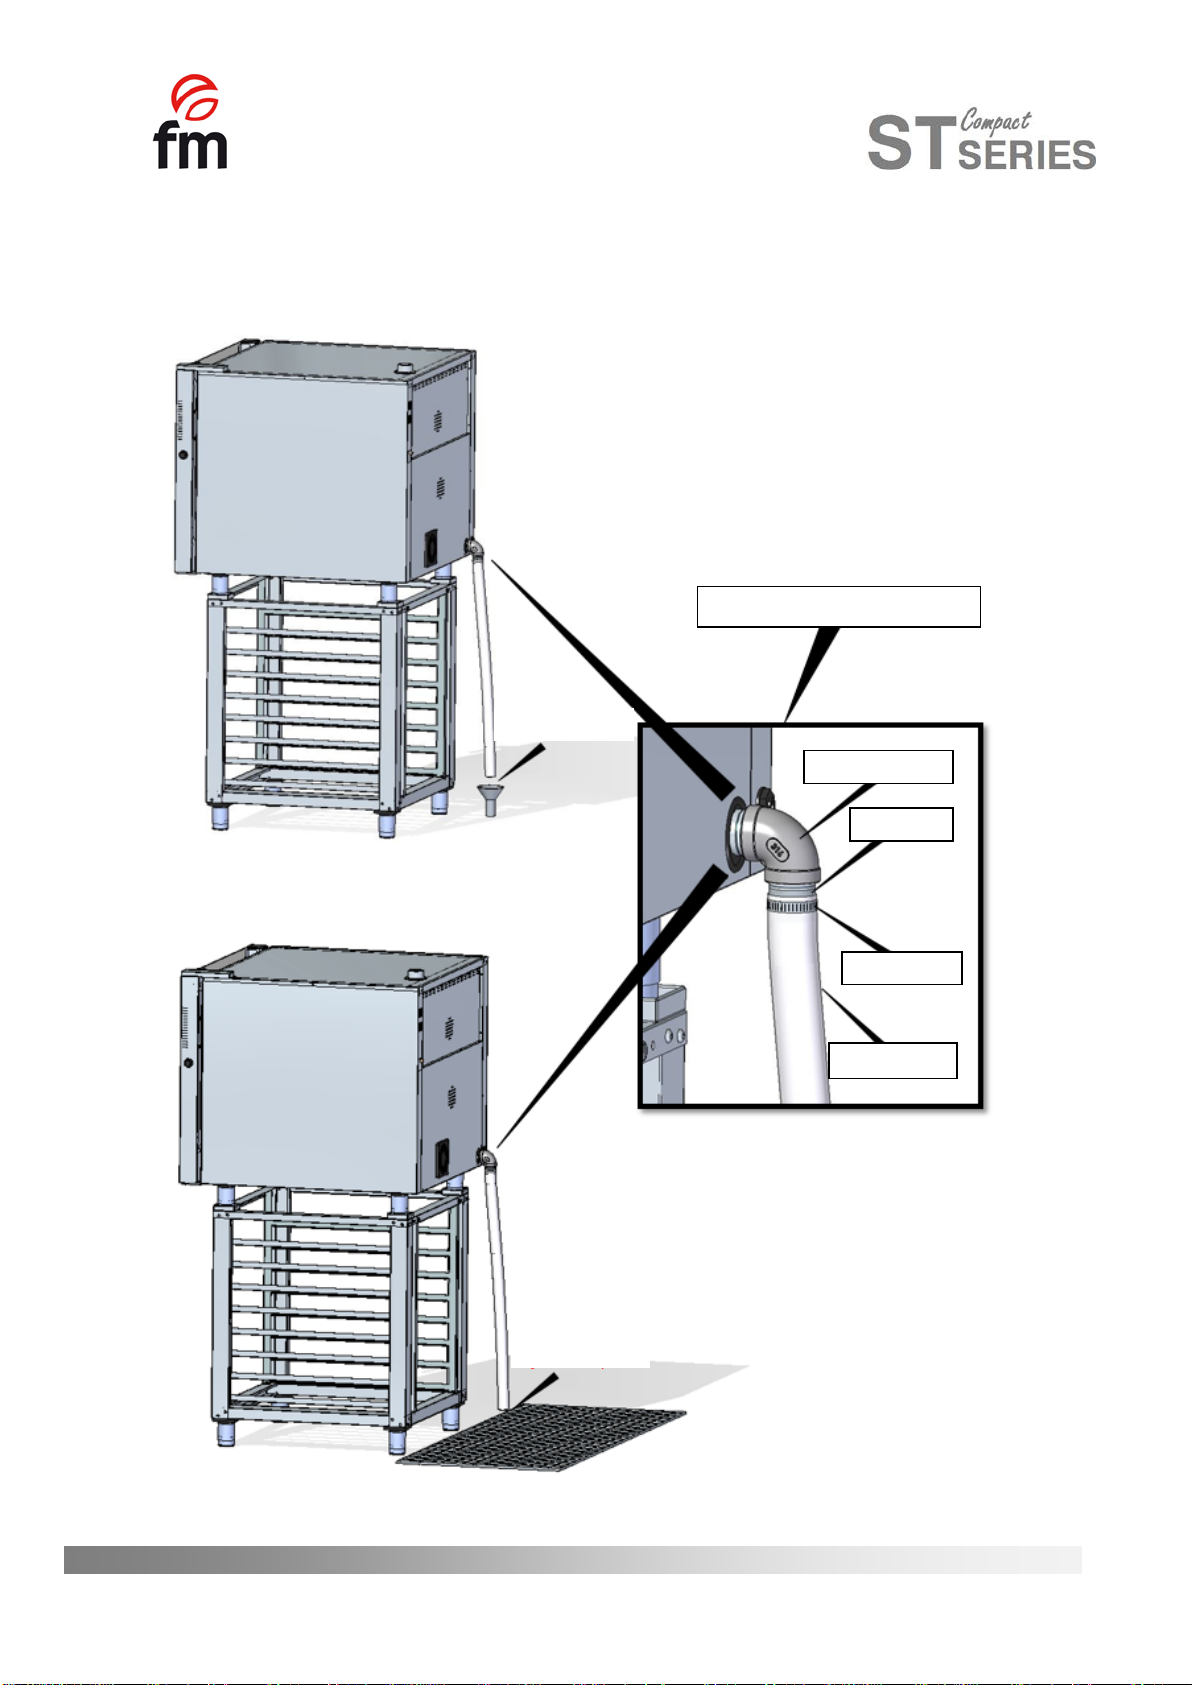
2. Drain with separated funnel:
3. Floor drain:
MATERIAL NOT SUPPLIED
Connection 40mm
Connection
Clamp
Drain pipe
Distance 2,5mm
Distance 2,5mm
16

5.4 Vapour exhaust from the baking chamber
Fumes can be wet and reach a high temperature, so do not use pipes to channel the gases, which materials do
not warranty absolute thermal stability up to 250ºC.
For the treaty of cooking vapours, may adapt a capacitor allow vapours condense and expel to a drain.
Important: Do not channel the vapour exhaust from the cooking chamber more than 50 centimeters due to risk of
condensation. This pipeline should be vertical and as straight as possible.
17
6. Use instructions______________ ____
Attention! Read these instructions carefully before operating the device.
6.1 Using the unit for the first time
Remove the external protection film. If there are adhesive residues, use an appropriate solvent and then, rinse
with a damp cloth.
The inner chamber and trays should be washed with water and soap and then, work at a 200ª cycle for 30 minutes.
Aviso: Never use aggressive or acid products because the unit may be damaged.
Aviso: When carrying out maintenance or cleaning operations, disconnect the power supply and wait for
the unit to cool down.
6.2 Cooking use
The oven has been designed to bake or regenerate fresh or frozen bakery and pastry products, being the ranges of
regulation:
SERIES
STC E
Temperature
0ºC – 250ºC
Time
0 min – INF.
Humidity
0 - 100%
The distance between trays is 80 mm in the RXB series, and 65 mm in the F series, and whenever possible, we
recommend leaving a space between pieces 40-60 mm in the same tray, for air to flow efficiently.
We recommend perforated aluminium trays for pastry and bakery, steel for gastronomy and grills for roast. Also
we recommend you, to preheat the appliance at a temperature 30 ° C above the temperature of the food cooking for
about 20 minutes; this warrantys a better finished product.
We also recommend that you preheat the appliance at a temperature 30 º C higher than the cooking temperature of
the food for about 20 minutes. This warrantys a better product finish.
18
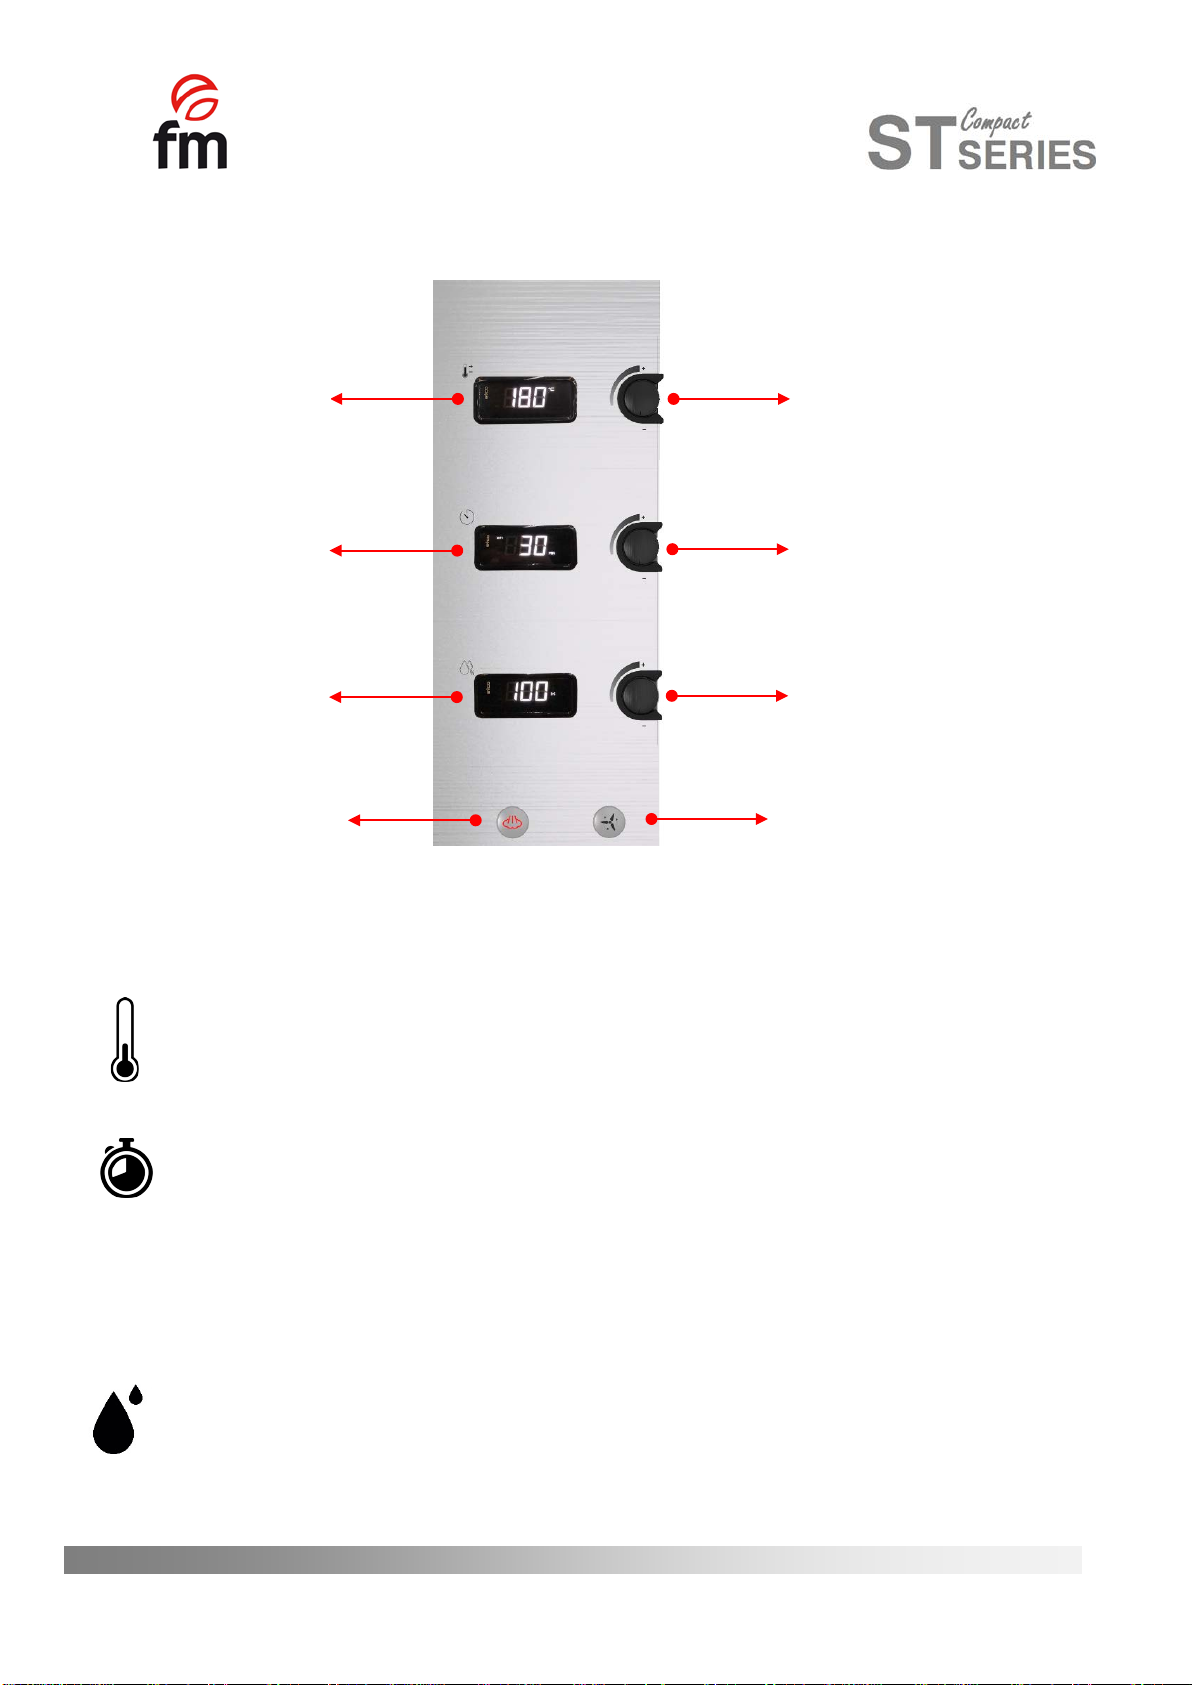
6.3 Control panel
There are four variables that can be adjusted by the user: time, temperature, humidity and speed of the turbines.
These variables depend on the type of food and the quantity in the oven.
Temperature:it is regulated using the knob, from 50 ° C to 250 ° C. If your appliance is heating by resistance,
the white LED will light next to the knob.
Time:it is regulated using the knob, from 0 to 120 minutes, although there is a non-stop mode. which makes
the device work whenever the door is closed (is represented by the symbol of an open hand). If your appliance is working,
amber led located next to this command will turn on.
At the end of the cycle and powering the device, the oven beeps.
You can also set infinite cooking time. To do this, turn the encoder and program “INF” on the display. Then press
to confirm.
Humidity: is controlled by injecting water into the turbines, and generating steam to avoid food drying. It’s
possible to regulate the value of the humidity between 0 to 100%. This regulation takes continuous moisture injection
cycles, depending on the programmed percentage. For continuous functioning turn the knob to the left to 100%.
Temperature display
Time display
Humidity display
Humidity button
Temperature control
Time control
Humidity control
Double speed switch
19

Double speed: With the double speed switch, you can choose between the maximum and minimum speed of
the turbines according to your need and the product you are going to cook. In this way, you can cook from large products
to the most delicate.
6.4 Manual regulation of the chimney valve
The chimney can keep it open or closed during cooking. To do this, you can adjust it manually, using the wheel
shown in the following image.
- If you turn in a clockwise direction, the valve will remain closed.
- If you rotate it counterclockwise, the shot will stay open.
Burn Hazard: Before changing the chimney draft, verify that the oven is cold. If not, you should use thermal
mittens or similar to avoid possible burns.
6.5 Oven cleaning
Warning: Never use products that may be aggressive or acid, could damage the oven.
Warning: Fats or food debris can cause the oven to catch fire.
•The interior and exterior surfaces of the oven should be cleaned frequently to ensure hygiene and proper
functioning. To clean these surfaces, do not use abrasive or flammable products that could damage the oven.
•Do not use direct water jet or steam under pressure to clean the oven.
20
This manual suits for next models
7
Table of contents
Other FM Calefaccion Oven manuals


Popular Oven manuals by other brands

Bosch
Bosch HBA234B 0 Series User manual and installation instructions

Siemens
Siemens HM876G2 6 Series User manual and installation instructions

GE
GE JTP35 installation instructions

Fisher & Paykel
Fisher & Paykel OB60C Series Diagnostic manual

Saturn
Saturn ST-EC1077 manual

Pelgrim
Pelgrim O500 Series Instructions for use


