FMN B122plus User manual

FMN B122plus
Instructions for use
FMN B122plus

2
3
Safety precautions
Safety precautions
l Do not open the device yourself, allow repairs by authorised specialists
only!
l Do not use or install your telephone in rooms with danger of explosion
and near electromagnetic fields (e.g. domestic appliances, TV or video
recorders)!
l The telephone is not splash-proof. For your own safety, do not operate
the phone in damp environments such as bathrooms, showers etc.!
l The last step before beginning operation is to plug the telephone
connecting cord into the wall socket!
l The first step when ending operation is to remove the telephone
connecting cord from the wall socket!
l The telephone connecting cord is only to be plugged into the designated
socket!
l The telephone connecting cord is immediately to be removed from the
socket if there is danger of touching conductive parts due to improper
use!
l Using the telephone during thunderstorms is on on'es own risk!
l The telephone should only be passed on to third parties if the complete
operating instructions are included!
l When the telephone has reached the end of it's service life, it should
be disposed of in an environmentally friendly manner!
Copyright
All rights reserved.
Duplication of these instructions for use or parts thereof by any reproduction method
whatsoever is not permitted without prior permission of the manufacturer.
Amendments may be published without prior notification.
Notwithstanding the above declaration, the manufacturer accepts no liability for errors in
these instructions or their consequences.

2
3
Table of contents
Safety precautions ............................................................................................ 2
Introduction ...................................................................................................... 4
Dialling method (pulse / DTMF dialling) ........................................................... 4
Setting up and putting into operation.....................................................................................4
Plugging in the handset cord .................................................................................................4
Connecting the telephone ......................................................................................................4
Labelling ............................................................................................................................4
Installation and maintenance ............................................................................ 5
Operating panel / key assignment .................................................................... 5
Redial key ............................................................................................................................5
Recall key ............................................................................................................................6
Mute key ............................................................................................................................6
Special keys: asterisk, hash, A, B, C and D (operation with ABCD keys) ...........................6
Fast dialling keys ...................................................................................................................6
Storing a call number on a fast dialling key ...........................................................................7
Deleting a stored call number ...............................................................................................7
Dialling a call number using the fast dialling key .................................................................7
Shortcode memory ........................................................................................... 7
Storing a call number on a digit key ......................................................................................7
Deleting a stored call number ..............................................................................................8
Dialling a call number using the shortcode memory ...........................................................8
Temporary switching from pulse dialling to DTMF dialling ............................ 8
The PIN and it's purpose .................................................................................. 9
Ringer ........................................................................................................... 9
Ringer volume .......................................................................................................................9
Ringer repetition frequency ..................................................................................................9
Locking the keypad (except during ABCD mode) ........................................ 10
Locking the keypad (except fast and shortcode dialling keys) ...........................................10
Unlocking the keypad .........................................................................................................10
Changing the dialling method (PD / DTMF) and the basic settings .............. 10
Operation in a telephone system (PBX) ........................................................ 11
Trunk codes ........................................................................................................................11
Programming a trunk code .................................................................................................11
Deleting trunk codes ...........................................................................................................11
Operating the ABCD keys ...................................................................................................11
General introduction ...........................................................................................................11
Programming an automatic flash on the ABCD keys .........................................................12
Programming an automatic flash .......................................................................................12
Deleting the automatic flash ...............................................................................................12
Handset standby position .............................................................................. 12
Malfunctions ................................................................................................... 12
Connection permit .......................................................................................... 12
Technical data .................................................................................................. 12

4
5
Setting up and putting into operation
Introduction
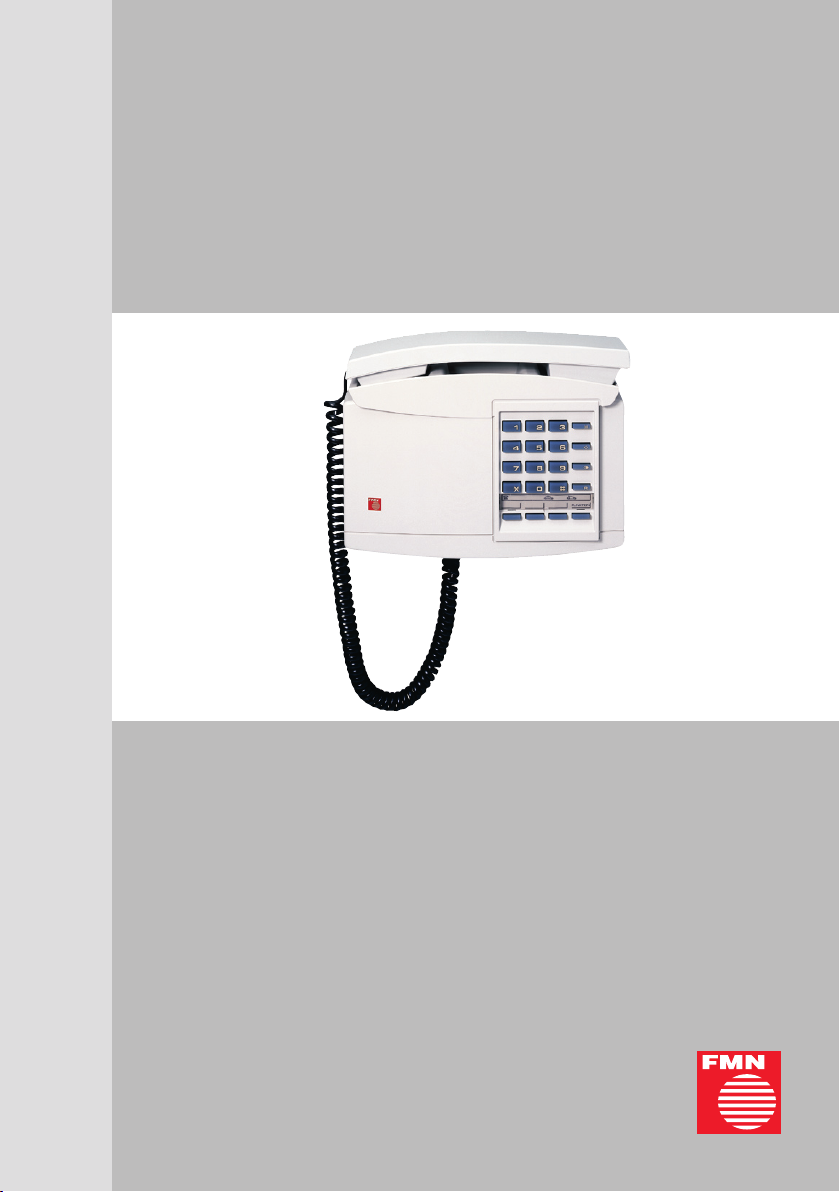
The wall-mounted telephone B122plus offers all important normal telephone features like
any other telephone. You can normally lift the handset and dial the required call number
using the digit keys 1 to 0. Additional features of your telephone are:
• 3 fast dialling keys
• 10 call number memories
• keypad lock
• programmable keys A, B, C, D for DTMF services
Please read the following instructions carefully in order to get fully acquainted with all the
functions of the telephone.
Dialling method (pulse / DTMF dialling)
The FMN B122plus has been designed for use on public telephone lines and telephone
systems with PD or DTMF dialling.
PD = Pulse dialling
DTMF = Dual Tone Multifrequency dialling
See chapter 11 “Changing the dialling method (PD / DTMF) and the basic settings”
Default settings
1. DTMF dialling is set.
2. Recall key is set to flash.
3. The PIN is set to “0 0 0”.
4. Ringer: volume is set to 4 (loud), repetition frequency is set to 1 (slow).
5. The flash time is set to 90 ms.
Setting up and putting into operation
Plugging in the handset cord
Plug the long straight end of the handset cord into the smaller socket located on the bot-
tom of the telephone, marked with the handset symbol, till it snaps safely into place. For
strain relief, press the cable into the two lower guide grooves inside the case and under
the lock catch. The cord will be led outside through the outer guide groove located on the
bottom side of the case. Attach the other end into the handset till it snaps into place.
Connecting the telephone
Put the small plug into the second (bigger) socket located on the back of the telephone
till it snaps into place. Press the cable into the upper and lower guide grooves inside the
case and lead it through the second guide groove on the bottom of the case outside. Plug
the end into the wall socket.
Labelling
Use the labelling cards (copy or clip from this manual, see page 14) to insert emergency
numbers, your own call number and for lettering the fast dialling keys.
Insert the emergency numbers above the fast dialling keys.
Gently lift off the plastic cover, take the protection foil off the cover and reinsert the cover.

4
5
Installation / Maintenance / Operating panel
Installation and maintenance
The wall-mounted telephone is rugged and maintenance-free. The telephone should be
installed close to a TAE jack (German standard) at a conventional height of about 145 cm.
The design of the case leaves the option (when the wall socket is installed by authorised
specialists) of covering both the TAE jack and the telephone connecting cord.
The telephone is screwed to the wall with 2 hexagon-head screws and 2 washers (use the
drilling template provided in this manual). Screw the top hexagon-head screw into the wall
until the telephone can be placed on it without clearance. Even out the telephone hori-
zontally and screw the bottom hexagon-head screw tight using a spanner. To cover the
TAE jack, you have to use the measures in brackets ( ) of the drilling template. Store the
telephone connecting cord inside the case.
Tools required:
power drill / twistdrill - diameter 6 mm / open-jawed spanner
Use only a moist soft cloth or an antistatic duster to clean the telephone. So you avoid that
dust increasingly collects on the telephone due to static charging of the plastic material.
Do not use substances that damage the plastic surface of the phone.
Operating panel / key assignment
Redial key w
In case that the line is busy or the party you called does not answer, replace the handset
or actuate the cradle switch. The telephone automatically stores the call number (max. 20
digits) dialled last.
Starting last number redial:
1. Lift the handset.
2. Press the redial key w.
The telephone automatically dials the call number entered last.
Note:
If you have to press the recall key to get access to the telephone line (only applicable for
extensions), this function is stored together with the call number.

6
7
Operating panel / Key assignment
Recall key e
You can transfer an incoming call within your telephone system or make a consultation
call via the recall key. You can also get access to the telephone line if this is required by
your telephone system. Getting access to the line is stored in the redial memory.
Making consultation calls to an extension or call transfer:
1. Press the recall key e.
2. Await the dial tone.
3. Dial the number of the extension line.
4. The other party answers.
5. Talk or announce the call.
6.1. Retrieve the call by pressing the recall key e again or
6.2. transfer the call (see instructions of your telephone systems).
7. Replace the handset.
Note:
Please bear in mind that the number of consultation calls is also stored in the redial me-
mory.
Mute key m
Via this function, you can switch off the microphone of the handset, e.g. if you do not want
the person you are talking with to hear a question asked in the room.
Switch of the handset:
1. Press the mute key m.
2. Talk into the room.
Switch on the handset:
1. Press the mute key m.
2. Continue the call (with the customer).
Note:
The mute function is as well switched off when you replace the handset or press any other
key.
Special keys asterisk s, hash r, A, B, C and D
(operation with ABCD keys)
These keys enable you to activate certain service features of your telephone system (du-
ring DTMF operation). For detailed information, please see the manual of your telephone
system.
During pulse dialling, you can transfer data traffic and use other services (e.g. paging
system and remote control of answering machine) by switching temporarily to DTMF via
the asterisk s or the hash key r.
Fast dialling keys
The threee fast dialling keys of the FMN B122plus (available except during ABCD opera-
tion) enable the user to store 3 frequently used call numbers. Each fast dialling key can
store up to 20 digits.

6
7
Operating panel / Key assignment / Shortcode memory
Storing a call number on a fast dialling key
In order to store a call number on a fast dialling key, follow the steps below:
1. Lift the handset and await the dial tone.
2. Press the programming key S.
3. Press the digit keys 8 and 5.
4. Enter the PIN.
5. Press the desired fast dialling key n.
6. Enter the call number.
7.1. If you want to store further call numbers:
Press another fast dialling key n and enter the desired call number.
7.2. If you do not want to store further call numbers:
Press the programming key S and the number is stored.
8. Replace the handset.
Note:
Additionally, the recall key function (to get access to the telephone line) can be stored
with the entered call number by pressing the recall key e. If you entered a wrong digit
during the procedure of storing a call number, you can delete the last digit any time by
pressing the mute key m. You can proceed storing the call number without interrup-
ting the storing procedure.
If your PIN is “0 0 0”, you can skip steps 3 and 4.
Deleting a stored call number
If you insert a new call number on a fast dialling key, the previously stored call number is
automatically deleted.
Dialling a call number using the fast dialling key
1. Lift the handset and await the dial tone.
2. Press the desired fast dialling key.
The stored call number is dialled automatically now.
Suffix dialling:
It is possible to store only parts of a call number (e.g. a number of a customer) and dial
the remaining digits of the number (e.g. extension number) via keypad.
Note:
Suffix-dialled numbers do neither appear in the fast dialling nor in the redial memory. Call
numbers dialled by the use of fast dialling keys are not stored in the redial memory.
Shortcode memory
The FMN B122plus (available except during ABCD operation) can store up to 10 numbers
on shortcode memories. Each digit key provides a memory for this and has a capacity of
16 digits.
Storing a call number on a digit key
In order to store a call number on a shortcode memory, follow the steps below:
1. Lift the handset and await the dial tone.
2. Press the programming key S.
3. Press the digit keys 8 and 5.

8
9
Shortcode memory / Temporary switching dialling
4. Enter the PIN.
5. Press the shortcode key k.
6. Press the desired digit key.
7. Enter the call number.
8.1. If you want to store another call number:
Press the shortcode key k and then another digit key and enter the call number.
8.2. If you do not want to store further call numbers:
Press the programming key S and the call number is stored automatically.
9. Replace the handset
Note:
Additionally, the recall key function (to get access to the telephone line) can be stored
with the entered call number by pressing the recall key e. If you entered a wrong digit
during the procedure of storing a call number, you can delete the last digit any time by
pressing the mute key m. You can proceed storing the call number without interrup-
ting the storing procedure. If your PIN is “0 0 0”, you can skip steps 3 and 4.
Deleting a stored call number
If you insert a new call number in one of the shortcode memories, the previously stored
call number is automatically deleted.
Dialling a call number using the shortcode memory
1. Lift the handset and await the dial tone.
2. Press the shortcode key k and afterwards the relevant digit key.
The stored call number is dialled automatically.
Suffix dialling:
There is an option to store only parts of a call number (e.g. a number of a customer) and
dial the remaining digits of the number (e.g. extension number) via the keypad.
Note:
Suffix-dialled numbers do neither appear in the shortcode nor in the redial memory. Call
numbers dialled using the shortcode keys are also not stored in the redial memory.
Temporary switching from pulse dialling to DTMF dialling
In case that your telephone is set to DTMF dialling, this section is of no significance for
you.
If your telephone works on pulse dialling, you can nevertheless transmit data or use other
services (paging systems and control your answering machine remotely) by switching
temporarily to DTMF dialling.
Temporary switching of the dialling mode:
during a call or after lifting the handset
1. Press the programming key S.
2. Press the special key asterisk s.
3. Press the programming key S.
Your telephone is switched to DTMF dialling now. You can insert the relevant numbers
or follow the instructions for the features you require. If you want to switch back to pulse
dialling, e.g. for further inquiries, press the recall key e. Press the recall key again to
return to DTMF dialling. The telephone automatically switches back to pulse dialling when
you replace the handset or repeat steps 1 to 3 mentioned above.

8
9
The PIN and it's purpose / Ringer
The PIN and it's purpose
PIN = Personal Identification Number
Unauthorised tampering with the telephone settings can be prevented by entering a PIN
that is known only to authorised persons.
The PIN is a number with three digits using the digits 0 to 9. As delivered ex works, the
telephone has the PIN “0 0 0”.
Programming the PIN
In order to program the PIN, follow the steps below:
1. Lift the handset and await the dial tone.
2. Press the programming key S.
3. Press the digit keys 8 and 9.
4. Enter the old PIN.
5. Enter the new PIN.
6. Verify the new PIN.
7. Press the programming key S.
8. Replace the handset.
The PIN can be cleared by entering the PIN “0 0 0”. PINs that are unknown or have been
forgotten can only be cleared by the manufacturer for an appropriate charge.
Ringer
Ringer volume
The ringer volume can be adjusted in two ways:
First method:
1. Lift the handset and await the dial tone.
2. Press the programming key S.
3. Press the digit key 5.
4. Choose the desired ringer volume by pressing one of the digits from 1 (soft) to 4
(loud).
5. Press the programming key S and the ringer volume is stored.
6. Replace the handset.
Second method:
Do not lift the handset when the telephone is ringing. Press one of the digit keys 1 to 4 for
the desired ringer volume which is automatically stored while the telephone is ringing.
Ringer repetition frequency
1. Lift the handset and await the dial tone.
2. Press the programming key S.
3. Press the digit key 6.
4. Choose the desired repetition frequency by pressing one of the digit keys from
1 (slow) to 4 (fast).
5. Press the programming key S and the desired ringer repetition frequency is
stored.
6. Replace the handset.

10
11
Locking the telephone / Changing the dialling method
Locking the telephone (except during ABCD mode)
Locking the keypad (except fast and shortcode dialling keys)
For locking the keypad, follow the instructions below:
1. Lift the handset and await the dial tone.
2. Press the programming key S.
3. Press the digit keys 8 and 11.
4. Enter the PIN.
5. Press the programming key S.
6. Replace the handset
After locking the keypad, fast and shortcode dialling memories can be operated only.
Unlocking the keypad
For unlocking the keypad, follow the instructions below:
1. Lift the handset and await the dial tone.
2. Press the programming key S.
3. Press the digit keys 8 and 0.
4. Enter the PIN.
5. Press the programming key S.
6. Replace the handset.
Changing the dialling method (PD / DTMF) and the basic settings
If the telephone system, where your telephone is to be connected to, needs other basic
settings than those provided in chapter 2 (default settings), you have to set the parame-
ters described below:
1. Lift the handset and await the dial tone.
2. Press the programming key S.
3. Press the digit key 1.
4. Enter the PIN.
5. Press the redial key w.
6. Enter the relevant code (see annex).
7. Press the programming key S.
8. Replace the handset.
Annex:
The codes have the following meaning:
Code 033 = PD, recall key set to “earth”
Code 034 = PD, recall key set to “flash”
Code 036= DTMF, recall key set to “earth”
Code 037= DTMF, recall key set to “flash”
Code 038= DTMF with ABCD, recall key set to “earth” (All memories are deleted!)
Code 039= DTMF with ABCD, recall key set to “flash” (All memories are deleted!)
Code 041= flash time: 90 ms Code 046= flash time: 360 ms
Code 042= flash time: 120 ms Code 047= flash time: 480 ms
Code 043= flash time: 180 ms Code 048= flash time: 600 ms
Code 044= flash time: 240 ms Code 049= flash time: 800 ms
Code 045= flash time: 300 ms Code 050= flash time: 1000 ms

10
11
Operation in a telephone system / Operating the ABCD keys
Operation in a telephone system (PBX)
Trunk codes
The FMN B122plus offers the possibility to program 2 trunk codes, each with up to two
digits. After dialling these codes, a pause of approx. 3 seconds is automatically produced.
Programming a trunk codes
1. Lift the handset and await the dial tone.
2. Press the programming key S.
3. Press the digit key 0.
4. Press the redial key w.
5. Enter the trunk code.
6.1. If you want to program another trunk code:
- Press the redial key w.
- Enter the trunk code.
- Press the programming key S and the trunk code is stored.
6.2. If you do not want to program another trunk code:
- Press the programming key S and the trunk code is stored.
7. Replace the handset.
Note:
Each time you change the trunk code, you have to delete all previously stored trunk codes
according to chapter “Deleting trunk codes”.
Deleting trunk codes
1. Lift the handset and await the dial tone.
2. Press the programming key S.
3. Press the digit key 0.
4. Press the redial key w.
5. Press the mute key m.
6. Press the programming key S and the trunk code is deleted.
7. Replace the handset.
Operating the ABCD keys
General introduction
During ABCD operation, neither fast dialling keys nor shortcode memories are available.
The keypad lock can also not be activated.
Programming an automatic flash on the ABCD keys (only possible in
DTMF dialling method with ABCD and flash function)
The FMN B122plus offers the possibility (only possible when the code 039 = DTMF with
ABCD, recall key set to flash, has been set) to program an automatic flash which is sent to
the telephone system before the ABCD function when one of the ABCD keys is pressed.
Programming an automatic flash
1. Lift the handset and await the dial tone.
2. Press the programming key S.
3. Press the digit key 4.
4. Press the redial key w.

12
13
Malfunction / Connection permit / Technical data
5. Press one of the ABCD keys.
6. Press the programming key S and the selected keys are programmed with an
automatic flash.
7. Replace the handset.
Note:
In case of programming a new automatic flash, all previously programmed automatic
flashes are deleted.
Deleting the automatic flash
1. Lift the handset and await the dial tone.
2. Press the programming key S.
3. Press the digit key 4.
4. Press the redial key w.
5. Press the programming key S and all automatic flashes are deleted.
6. Replace the handset.
Handset standby position
You can put the handset in a standby position during a call by placing it into the middle
hollow of the case without interrupting the connection.
Malfunctions
In case of any occurring malfunctions, please contact your specialist dealer / supplier.
Connection permit
This telephone is designed for connection to an access for analogue switched connec-
tions of the public telecommunications network (analogue access with standard require-
ments). It may be connected and operated by any person.
The telephone is compliant with the harmonized standards for connection to public tele-
communications networks.
This is no guarantee, however, for successful operation of the telephone unit on each
network termination point due to the differences in the public telecommunications network
in the different countries.
If you encounter problems when operating the telephone, please contact your specialist
dealer.
The FMN communications GmbH declares that FMN B122plus complies with the basic
requirements and the other relevant provisions of the directive 1999/5/EC (R&TTE directive).
The complete declaration of conformity can be found and downloaded on our website
http://www.fmncom.com.
The unit may be operated in the European Union (EU). If operated out of the EU, the natio-
nal regulation of the relevant country is binding.
Technical data
Enclosure: IP 20
Dimensions: W / H / D: 225 / 170 / 85 mm
Weight: 0.7 kg
Operating temperature range: -5 °C to +45 °C
Humidity: max. 95 %

12
13
Drilling template

14
15
Labelling card
Use for clipping or copying
- Clip and label labelling card
- Lift the plastic cover with a screwdriver or something similar, take the
protection foil off the cover at both sides
- Insert labelling card, insert plastic cover

14
15
Notes

Safety precautions
For protection of the environment!
Printed on paper bleached without chlorine, with a maximal waste paper content of 50 %.
FMN communications GmbH
Grimmelallee 4 99734 Nordhausen
P.O. box 10 04 65 99724 Nordhausen
Phone +49 (36 31) 56-50 00
Fax +49 (36 31) 56-32 24
Internet www.fmncom.com
HOTLINE +49 (36 31) 56-34 16
We are at your disposal to answer your questions.
Subject to change.
FMN B122plus: 1103.3.0500.01
Edition: 05/04 (1111-4858)
Table of contents
Other FMN Telephone manuals