Folio LINE WALL User manual

.LINE
WALL
USER MANUAL
Remote power supply
EN

Index
05 Components
06 Installation of fixing system
07 Electrical connection
08 FOLIO® LINE installation
09 Power supplies
10 WARNING
11 Handling
12 Cleaning
13 Damaged appliances
14 Dismantlement
.LINE

.COMPONENTS
Inside the crate you can find:
•FOLIO®LIGHTING PANEL(S) LINE
•FIXING SYSTEM
Unscrew the fixing
screw to open the
crate
FIXING SYSTEM
LINE
05

06
.INSTALLATION OF FIXING SYSYEM
Positioning the wall FIXING SYSTEM by passing the 24V cable (by you
previously installed) through the central hole. Install the FIXING SYSTEM to the
wall by usign appropriate screws.
Hole for electric
cable (24V)

07
.ELECTRICAL CONNECTION
Connect the power supply cable to the LINE’s cable in a suitable and consonant
manner.
Make sure to disconnect the power supply, connect the cable of the LED
panel to the driver as shown in step b. Connecting the red cable of the
panel with the red cable of the driver and the black cable of the panel
to the black cable of the driver. Subsequently connect the driver to the
electrical system with the 220 V cable and power the system.
Use class II transformers with adequate absorption with regards to the
consumption of the FOLIO®panel, with an exit current of 24V and with SELV
exits EN 61347-2-13 compliant. It is recommended to connect maximum
4/5 Folio panels to one driver.
Dimmable:
PWM - DALI - DMX
DIMMING
ba
OFF 220 V
DIMMER PWM - DALI - DMX
red
black
24 V
ON
c
_
08
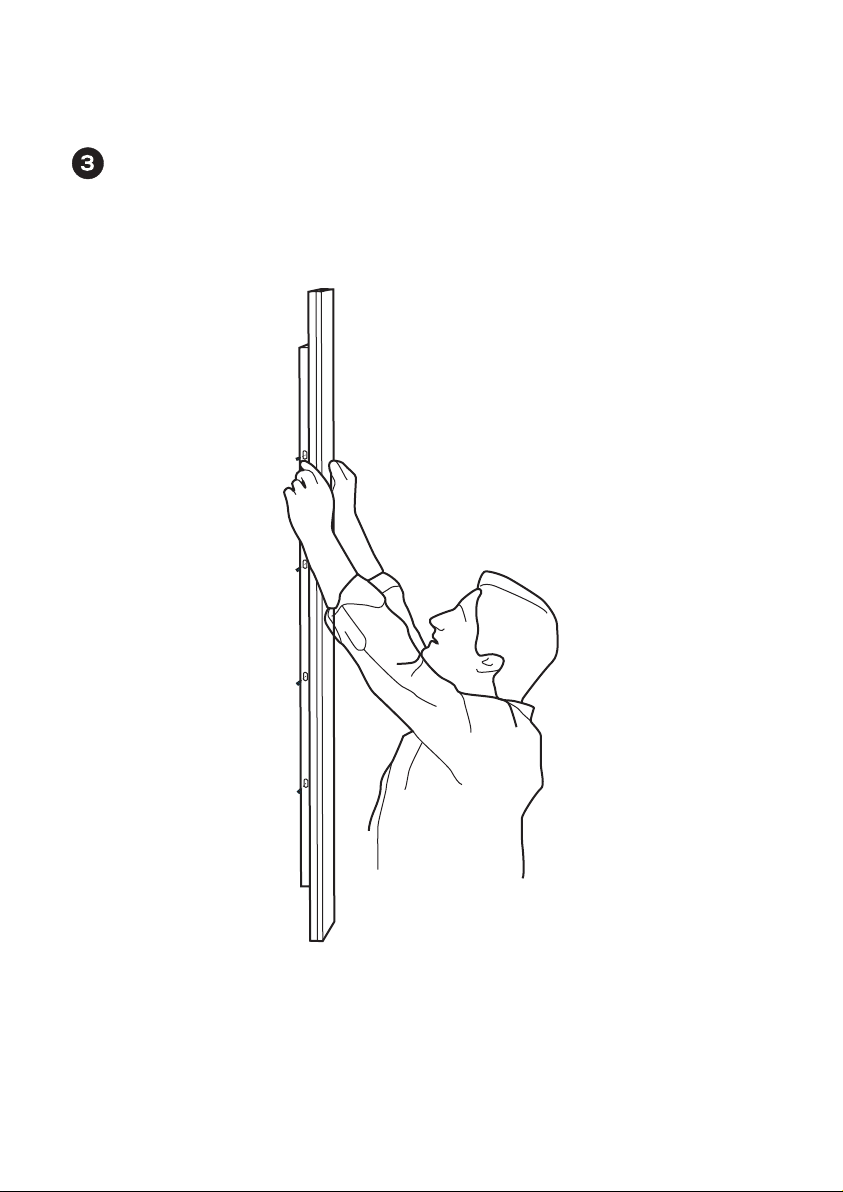
.FOLIO®LINE INSTALLATION
After the cables connection, fix the LINE WALL to the FIXING SYSTEM with the
safety screws (from both sides).

.POWER SUPPLIES
Use 24V power supplies
Use power supplies with the correct Wattage with regards to what indicated on the
label positioned on the back of each FOLIO®LED panel.
Pay particular attention to the data on the label before connection the appliance to the
mains.
IN CASE OF MALFUNCTION, DISCONNECT THE APPLIANCE.
Use class II drivers with adequate absorption with regards to the consumption of the
FOLIO®panel, with an exit current of 24V and with SELV exits EN 61347-2-13 compliant.
It is recommended to connect maximum 4/5 FOLIO®panels to one driver.
FOLIO® panel
SINGLE PANEL FOLIO®
TWO OR MORE PANELS FOLIO®
FOLIO® panel
FOLIO® panel
24V
power
supply
24V
power
supply 220V
220V
09

.WARNING
Consult the company Cifralluminio s.r.l. before intervening in any way on the
FOLIO® panels. For any doubts on the functioning of the device or on its mainte-
nance consult Cifralluminio s.r.l..
•Do not open or tamper with the FOLIO®panel.
•Do no flex/bend the panel.
•Do not unscrew/tamper with any screw on the panel.
•Do not spray/pour directly on the panel any kind of liquid/detergent.
•Keep in a dry place.
•Do not store at temperatures above 25°C.
•Keep away from heat sources.
•Do not expose to direct sunlight.
•Keep away from combustible substances.
•Avoid contact with vapors, fumes, dust, gas and liquids.
•Avoid accumulation of electrostatic charges.
•Avoid hitting or friction.
•For cleaning use the notes/instructions/products indicated in the manual.
•Before cleaning, the lighting fixture must be switched off.
•The FOLIO®panel must be installed in a place accessible for maintenance.
•Do not connect the FOLIO®panel directly to the mains. The FOLIO® panel must
always be connected to a driver, which will be successively connected to the
mains.
• Do not hit, pull or damage the electrical and panel’s cables.
10

.HANDLING
Remove the FOLIO®folio panel from the wooden case, not from the edges but from
the middle, prevent bending and curving and carry it vertically.
Carry the FOLIO®panel vertically to prevent every possibility of bending and
curving. Pay attention not to pull the power cables.
Do not use suction cups for the handing or installation of the
FOLIO® panel.
In addition to the images pay attention to:
•avoid hitting, pulling or damaging the electrical cables
•avoid contact of the FOLIO®panel with liquid.
11

.CLEANING
General indications for proper care of FOLIO® products:
•To enable an efficent performance of FOLIO® panel we recommended regular
cleaning.
•The parts influencing the performance of the light (such as white acrylic sheets,
marbles or glass) should be cleaned following the instructions below.
•The cleaning of EXTERNAL parts and SURFACES which are part of the FOLIO®
panel can be executed in according to the following table:
COMPONENTS TOOLS CLEANING SPECIFICATIONS
Aluminium or iron
parts
Glass, marble, onyx
spotlight
Transparent plastic
spotlight
Opal plastic spotlight
Damp, soft, non-abra-
sive cloth and dry, soft
non-abrasive cloth
Slightly damp, soft,
non-abrasive cloth
Dry, soft non-abrasive
cloth
Slightly damp, soft,
non-abrasive cloth
Dampen a soft cloth using warm water with
little chlorine-free liquid soap and clean the
product a second time using a clean dry soft
cloth
Avoid possible static before cleaning. While
cleaning apply light pressure to the parts.
NOTICE : use cleaning agents suitable for glas,
marble or onyx
Avoid possible static before cleaning. While
cleaning apply light pressure to the parts.
NOTICE : do not use any type of cleaning
agents, neither liquid nor solid
Avoid possible static before cleaning. While
cleaning apply light pressure to the parts.
NOTICE : use only diluted alcohol-free clean-
ing agents suitable for plastic
NOTICE: DO NOT SPRAY OR POUR DIRECTLY ON THE PANEL ANY TYPE OF
CLEANING AGENT BUT DISTRIBUTE THE CLEANING AGENTS (LIQUID OR SOLID)
ON A SOFT AND NON-ABRASIVE CLOTH. IT IS POSSIBLE TO CLEAN THE PANEL
BY USING JUST A DRY, SOFT AND NON-ABRASIVE CLOTH.
SAFETY NOTICE
Should any doubt concerning the cleaning of the FOLIO®panel arise, please
•Before cleaning, the lighting fixture must be switched off.
•All the electrical connections must be disconnected.
12

.DAMAGED APPLIANCES
Do not install or connect these appliances if one or more parts appear damaged.
Non-compliance with these instructions may cause injuries or damage the appliances
and other goods.
Installation of this appliance must be entrusted exclusively to qualified personnel that is
fully aware of all relevant instructions.
Before working on the appliance, disconnect the power supply from the mains.
Before proceeding with visual inspections, trials or maintenance operations on this
appliance, disconnect all current and voltage sources.
Proper functioning of this appliance depends on the correct operations of handling,
installation and use.
Non-compliance with the fundamental installation requirements can cause injuries to
people and damage electrical appliances and other goods.
Verify that the supply voltage is compatible with the voltage and current necessary for
the regular functioning of the appliance you are about to install: the primary factor to
consider is the data on the FOLIO®LED panels’ label.
13

.DISMANTLEMENT
Dismantlement of the appliance must be commissioned to qualified internal or external
personnel.
Dismantlement operations must be carried out in accordance with current regulations,
considering that some of the materials used are not recyclable and some others may
be harmful.
In accordance with Italian LEGISLATIVE DECREE 14 March 2014, no. 49 (in the field of
electric and electronic appliances) we inform you that the appliance this instruction
manual refers to cannot be disposed of as urban waste but must be destined to waste
sorting facilities.
The symbol:
pon the data label indicates the product must be recycled once dismantled.
Non-compliance with the law will be heavily sanctioned with fines.
14

Via R.Gessi, 10 - 25135 Brescia (BS) - Italy
Phone: +39 030 3363047 - +39 030 3363819
Fax: +39 030 3363048
www.foliopanel.it
Cod.Fiscale e P.IVA 03212940179
Cap. Soc. € 61.200,00 i.v.
Registro Imprese di Bs Num. 03212940179
R.E.A. 342944
Num. Iscriz. Registro AEE IT 08020000001025
Table of contents
Other Folio Power Supply manuals


