Fomei Digitalis Pro S600 DC User manual
Digitalis Pro S600 DC
Cordless Strobo Flash

Thank you for purchasing the Fomei Digitalis Pro S600 DC cordless flash. Before using the flash, read
carefully the user's manual.
We recommend the cordless flash mainly to photographers who travel frequently and photograph various
outdoor and indoor locations. The flash contains a rechangeable Li-Ion battery, which can be charged
separately.
3
For your safety
In order to prevent a fire or injury by electrical shock, always hold this product away from rain and moisture.
This product contains electronic components working under high voltage. Contact with the high voltage
circuit inside the product may cause an injury by electrical shock. Do not disassemble. In the event of repairs
being necessary, this product must be sent to an authorised service centre.
Stop using this product if it is damaged because of penetration, fall or strong impact and so remains
open. Otherwise there is a danger of coming into contact with the electronic parts inside and an injury by
electrical shock may result.
Do not point the flash directly into eyes at short distances (particularly with children). Otherwise this may result in eye
damage. When photographing children, keep the flash away from them at a distance of at least 1m (3.3 feet).
Do not use the flash when flammable gases, chemicals and other similar materials are present. Under
certain conditions these materials may be sensitive to the strong radiation created by the flash and this could
lead to a fire or electromagnetic interference.
Do not leave or store the flash in places where the ambient temperature exceeds 50°C (e.g. inside
a vehicle). Otherwise this may result in damage to its electronic parts.
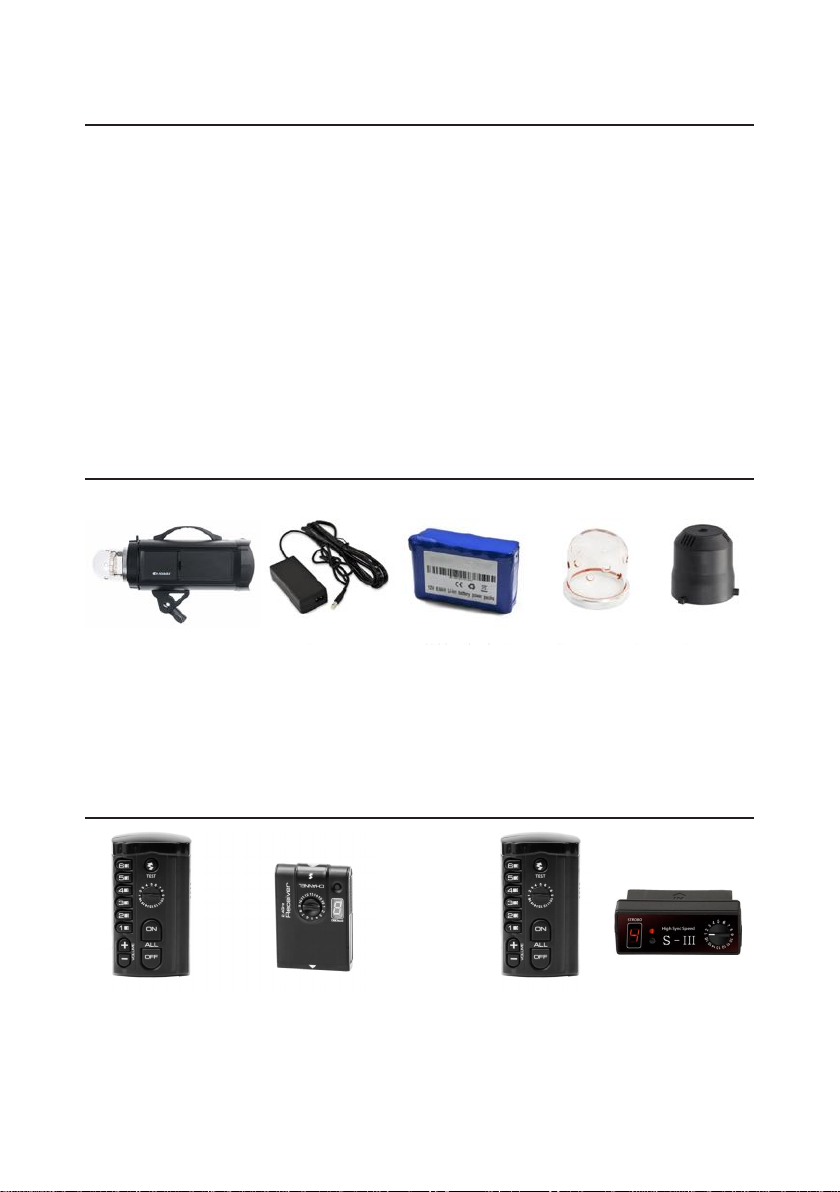
The basic cordless Strobo flash kit includes:
Body of the flash
(without an RF
receiver)
Battery charger Battery
Li-Ion 11.1 V
Glass discharge
lamp cover with
a thread
Plastic
discharge
lamp cover
Note: Do not leave the battery in a discharged state for an extended period of time.
Optional accessories:
RF transmitter TR-22
16 channels
6 groups
RF receiver TR-22
16 channels
6 groups
HSS transmitter
1/8000s
HSS receiver
1/8000s
Launcher for cordless flash triggering comes in two models. TR-22 and HSS. Both models work at the radio
frequency of 2.4 GHz. The TR-22 model has the additional feature of a remotely controlled flash intensity
output directly from the transmitter and the option of remotely turning the device on/off.
4
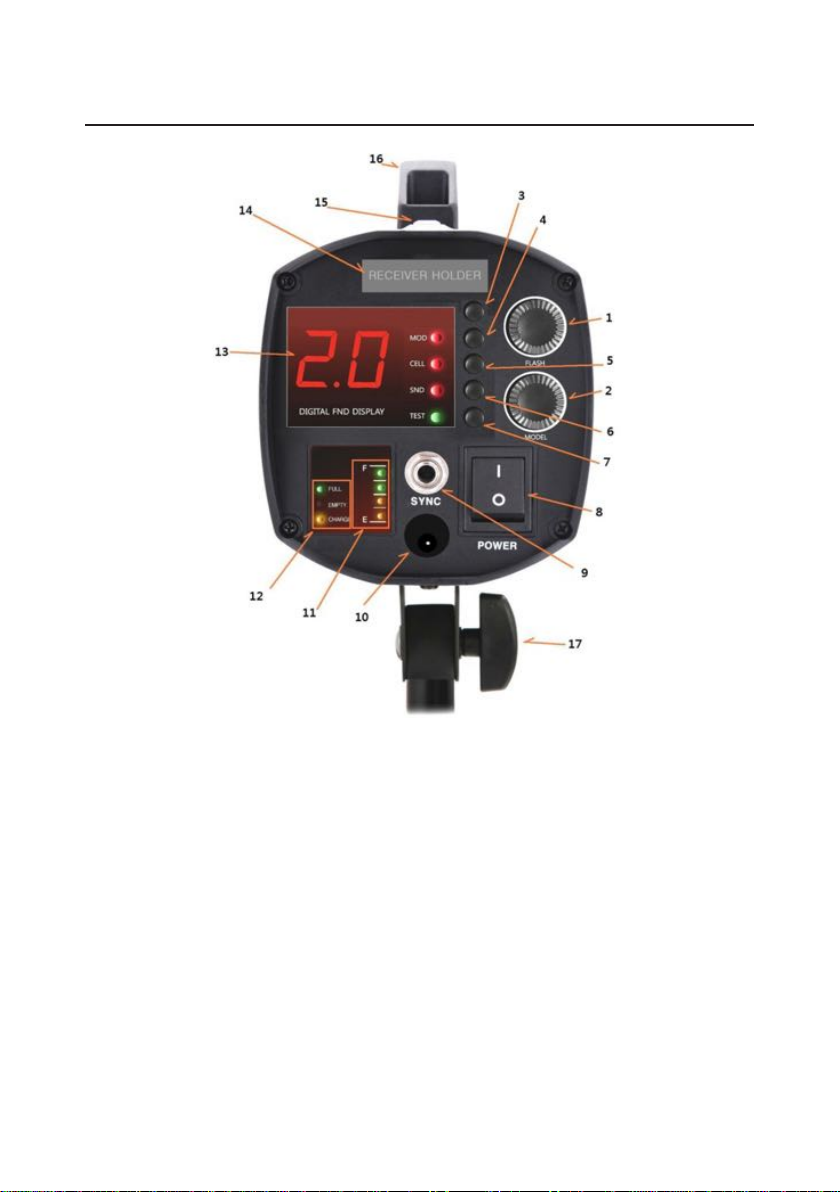
3. Product Description
1. Flash power level control 8.0 – 1.0
2. Pilot LED light power level control
3. RPT Strobo functions/use button to switch to position "C"
4. MODE Flash speed control/switch to position "T"
5. CELL – turn the light sensitive sensor on/off
6. SOUND – turn the sound sensor of flash charging on/off
7. TEST – test button for triggering the flash
8. POWER ON/OFF – main power switch of the device
9. SYNC – jack for connecting a triggering synchro-cable (6.35mm)
10. Jack for connecting the battery charger
11. Battery power level indicator (90%, 70%, 50%, 15%)
12. Battery power level
13. FND display – show flash power level
14. SLOT for inserting the RF receiver
15. CELL – light sensitive sensor
16. Handle for carrying the device
17. Lock screw/tilting joint
5
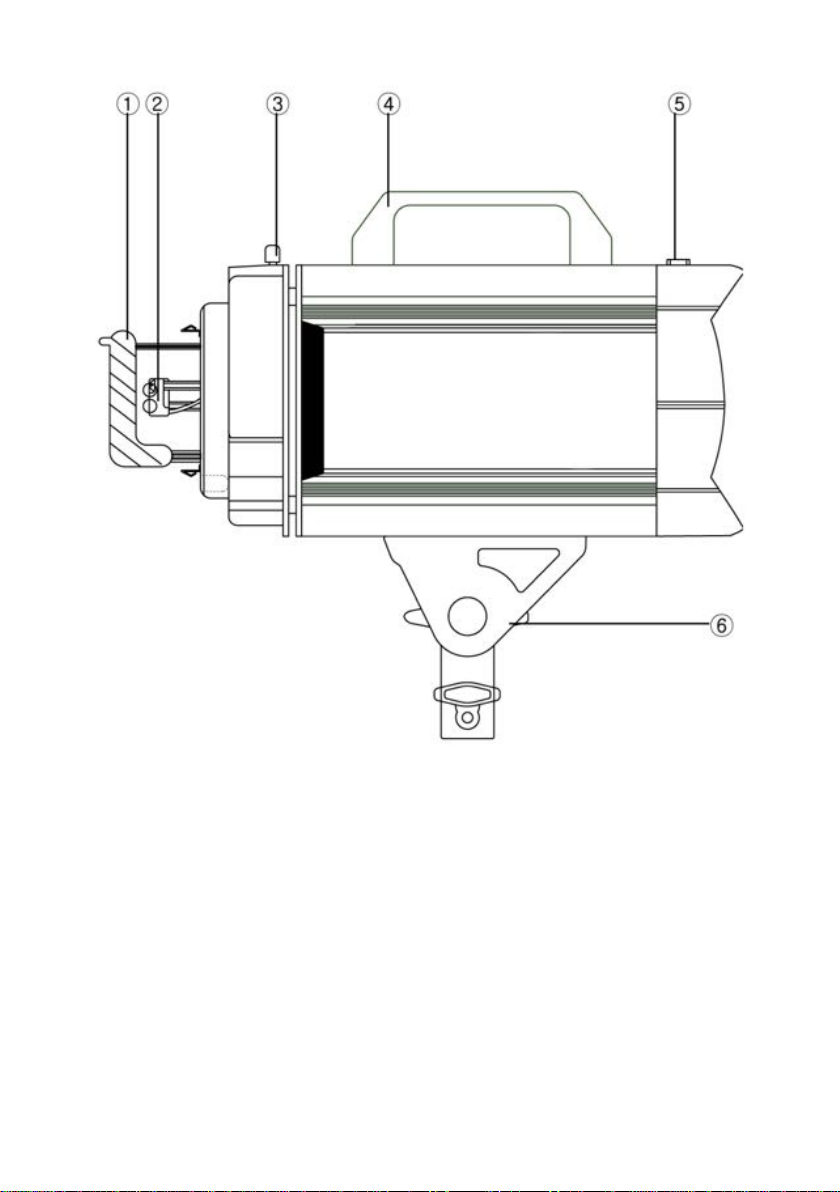
1. Flash discharge lamp of the device
2. Pilot LED light
3. Lock for bayonet/bayonets for attaching accessories
4. Handle for carrying the device
5. Light sensitive sensor
6. Lock screw/tilting joint

6
4. Putting the device into operation
1. The flash is equipped with protective features for transport. The pilot LED light and discharge lamp
are protected by a Pyrene glass cover with a thread. The glass cover is protected by a plastic
protective cover.
2. After unpacking the flash from the transport packaging, mount the flash on to a stand or ceiling
system using the flash mount with lock screw (17).
3. The battery is not fully charged when sold. Connect the battery charger into the jack (10) located on the rear
panel of the flash. Connect the battery charger to a 220V power socket. On first use, charge the battery for
8 hours, this will extend its lifetime. For subsequent charging, a time of 3 – 5 hours will be sufficient.
Charging takes place with the flash turned off (8/OFF).
4. The charging status is indicated by an indicator light on the charger. It is lit red during the charging
process. It is lit green when the battery is fully charged.
5. Disconnect the charger after charging is finished.
6. When the charging of the battery is finished, you can start working with the flash.
5. Connecting the flash to a camera
a) Connecting to the TR-22 launcher
• Pull the cover labelled "receiver holder" from the rear panel of the flash and insert the RF receiver
into the hole.
• Set the channel on the receiver that is inserted in the flash (using a control dial)
• Set the flash group number using the button on the receiver (will be shown on the display).
• Slide the TR-22 receiver into the flash rails on the camera.
• Use the control dial on the transmitter to set the same number as on the receiver.
• On the transmitter, hold down the button with the number for 3 seconds (same number as on the receiver).
• The number on the transmitter will start flashing and the receiver is connected with the transmitter.
• Now you can remotely control the power level and turn the device on/off directly from the transmitter.
• If you do not use the transmitter to change the power level, then it will turn off after 5 seconds.
• To reconnect the transmitter with the receiver, you must again hold down the button with the number
on the transmitter for 3 seconds (the same number as is lit on the receiver).
• If you have multiple cordless flashes, you can arrange them into various flash groups, which you can
then separately control remotely.
b) Connecting to the HSS transmitter
• Pull the cover labelled "receiver holder" from the rear panel of the flash and insert the RF receiver
into the hole.
• Use the switching lever to set a channel 1 – 16 on the receiver that is inserted in the flash.
• Set the same channel using the switching lever on the HSS transmitter
c) Connecting the flash using a synchronisation cable
• Connect the synchronisation cable into the jack on the rear panel of the flash (9).
• Connect the other end of the cable to the camera into the built-in "sync" jack.
• If your camera does not have a built-in "sync" jack, then in order to connect using the synchronisation
cable you need to purchase a so-called synchro cube, which is placed into the flash rails.
d) Setting up the camera
• Set the camera to manual mode "M".
• Set the synchronisation time on the camera. 1/60, 1/125, 1/160 or a maximum time of 1/250 s
(TR-22), Maximum time of 1/8000 with HSS transmitter.
• Set the f-number and ISO as required.
7
6. Flash modes
The Fomei cordless Strobo flash works with three flash settings modes.
1. Normal mode
• This is the standard mode normally used on all studio flashes.
• Use the control dial (1) to control the flash intensity level from 1.0 f-stop (4.7 Ws) up to 8.0 f-stop
(600 Ws).
• You can adjust the power level in 0.1 f-stop increments (1.0 - 1.0 - 1.2 up to 8.0).
F 8.0 F 7.0 F 6.0 F 5.0 F 4.0 F 3.0 F 2.0 F 1.0
Digitalis Pro S600 DC 600 Ws 300 Ws 150 Ws 75 Ws 37.5 Ws 18.8 Ws 9.4 Ws 4.7 Ws
Colour temperature 5400 K 5450 K 5500 K 5500 K 5600 K 5500 K 5450 K 5400 K
2. High Flash Duration Mode ("T")
• In this mode you only set the flash speed or the discharge lamp duration.
• This mode is used for moving sports photographs and for advertising and creative photography,
where it is necessary to "freeze" movement.
• If you want to use this mode, switch from the Normal mode to the "T" mode using the Mode button
(4). On the FND display values will change to the mode where the first letter is "T".
• After switching back to normal mode you will find the previously set power level.
• You can change the speed power level of the flash from T1 (lowest power level) to T7 (highest power
level) using the control dial (1).
• You can adjust the flash speed in 1 steps.
ATTENTION: If you go from "T" mode to Normal mode, launch the TEST
button several times so that the capacitors achieve the correct flash power and flash
speed.
t 7 t 6 t 5 t 4 t 3 t 2 t 1
Digitalis Pro S600 DC 1/12800 s 1/6400 s 1/4000 s 1/2500 s 1/1250 s 1/640 s 1/500 s
Colour temperature 5400 K 5400 K 5500 K 5600 K 5820 K 6300 K 7500 K
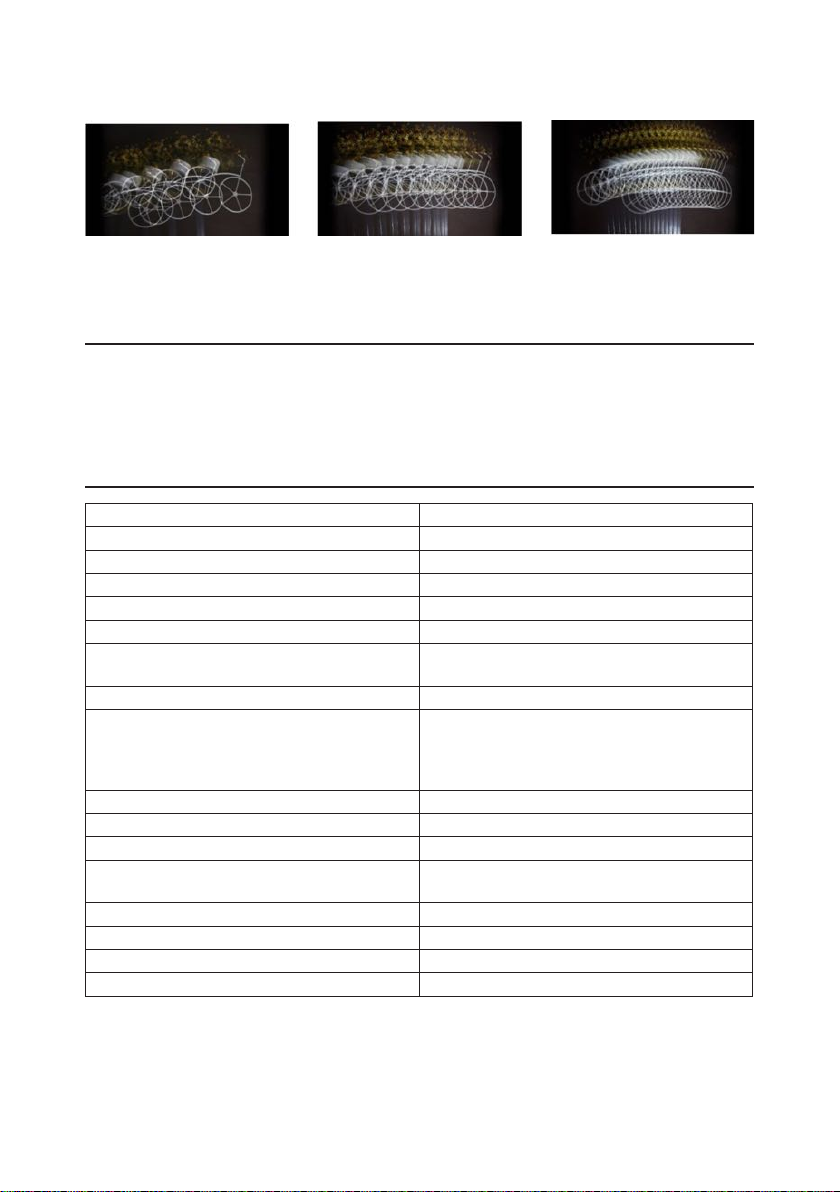
3. Stroboscopic mode "C"
• This function is able to launch 5, 10 and 15 flashes within 1 second.
• The function can be used when the button is switched when Normal mode 1.0 – 1.5 – 2.0 – 2.5 is set.
• Press the RFP button and you will enter mode C1 or C2.
• Now you are in Stroboscopic mode and have the setting of 5 flashes per second.
• Press the RFP button again and you are in the Stroboscopic mode with 10 flashes per second.
• Press the RFP button again and you are in the Stroboscopic mode with 15 flashes per second.
• In this photography mode, use "B" time or you can also experiment with longer times 1/4, 1/8, 1/16s.
• The C2 mode has a higher power level than C1.
• We recommend the use of the stroboscopic mode for photographing moving photographs.
• The colour temperature and the flash speed are similar to mode t 1 and t 2.
8
Example of photography with "B" time.
5 flashes per second 10 flashes per second 15 flashes per second
7. Pilot LED light
• The pilot light uses a 5W LED diode.
• The pilot LED light is variably controllable using the controller MODEL (2) and serves to make
focusing the camera easier during poor light conditions.
8. Technical information
Model Digitalis Pro S600 DC
Flash power level: 4.5 – 600 Ws
F – stop (ISO 100, 1m) 32
Flash power level control 7 F-stops (adjustable in 0.1 F-stop increments)
Flash charging time 0.02 – 4s
Discharge lamp burn time/flash speed "T" mode 1/12800 – 1/500s
Discharge lamp burn time/flash speed "Normal"
mode
1/2750 – 1/500s
Flash colour temperature (Normal mode) 5500 K (+/- 100 K)
Flash capacity with a fully charged battery Min. power level 4500x – Max. power level 550x
The capacity of the battery and the number of
flashes per single charge may decline as a result of
the way it is used.
Synchro-cable (V) 10V
Pilot light 5W LED
Battery (Li-ion) 11.1V / 8.8A
Battery charger AC 100V – AC 230V input
12.6V – 2A output
Battery charging time 3 – 5h
Weight 3.3kg
Dimensions 12 x 11.8 x 38.5 cm
Fuse 30 A

9
WASTE DISPOSAL AT END OF THE PRODUCT'S LIFETIME:
The product contains electronic components.
Do not throw this product in with communal waste, take it to a processor of waste materials or
to a recycling centre or to a collection location for this type of waste.

10
Notes


Table of contents
Other Fomei Camera Flash manuals


