fomex HD150 User manual

HD SERIES
HD150 / 200 / 400 / 600 / 900 / 1000 / 1200
User Manual

Before using
1.Be sure to use the lighting only after understanding manual.
2.Check the power input voltage
3. Do not move it nor give impact while the power is on
(Lamp filament can become disconnected)
4.Be sure to use the grounded socket as a power.
5.When using accessories like reflector or snoot,install or separate it after turning off halogen
lamp and cooling the heat enough.
6.There could be risk of fie if you use softbox made from combustible material, so use softbox
has over certain grade or is made out of incombustible material like glass fiber.
7.Be careful against electric shock when using in a damp place.
8.Keep out of children’s reach.
Warning
•The lamp must be changed if it has become damaged or thermally deformed.
• Shields, lenses, or screens must be changed if they have become visibly damaged
(cracks or deep scratches) to such extent that their effectiveness is impaired,
Symbol for minimum distance from lighted objects e.g.
Symbol for indoor use
Symbol required according toWEEE
HD SERIES 2
HD SERIES
Procedure
3
Before using
Name of each part
Name and function of control panel
Operating way
Specifications
Method of managing and keeping
Countermeasure on breakdown
page
2
4
5
6
7
8
9
HD SERIES
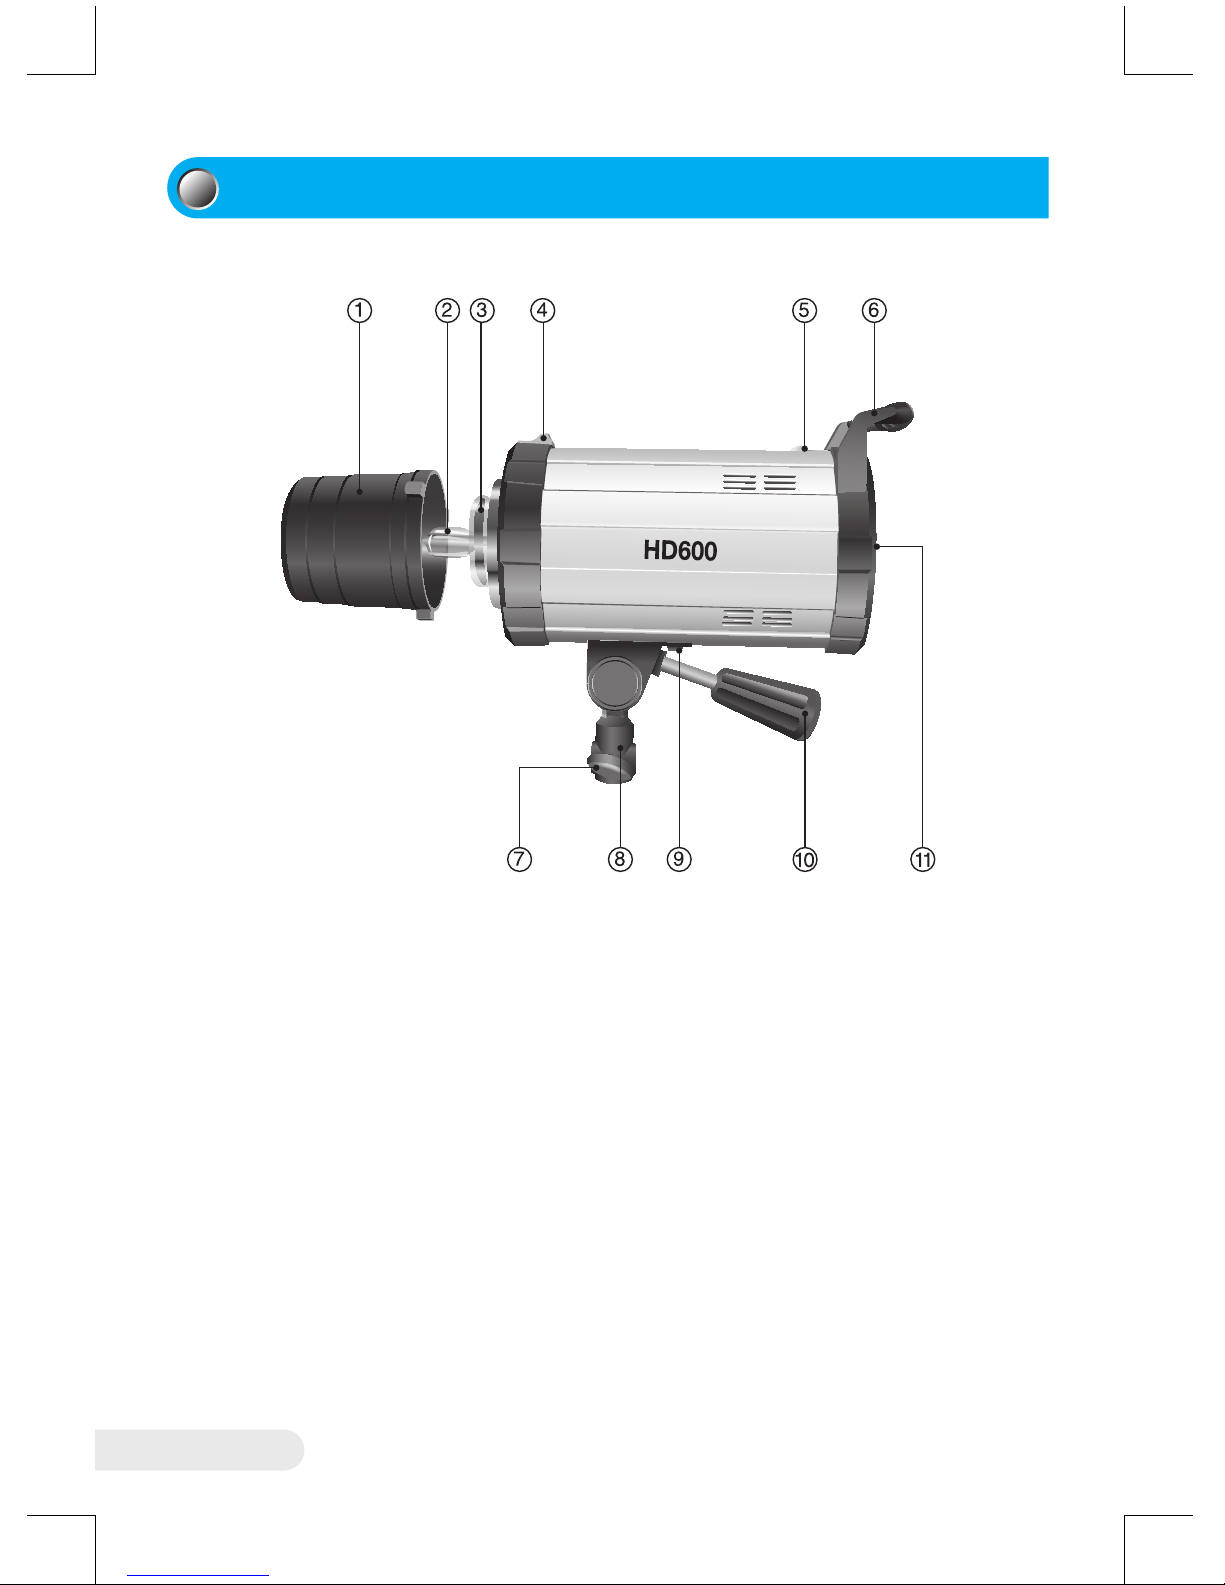
Name of each part
4
①① Protection cap
②Modeling(Halogen) lamp
③Flash tube(Xenon tube)
④Accessory disassembling and
assembling locking knob
⑤ Slave sensor
⑥Lighting knob
⑦ Stand stud joint fastening bolt
⑧ Stand stud joint part
⑨ Prop fastening bolt
⑩Knob for fastening.
⑪Control panel
HD SERIES
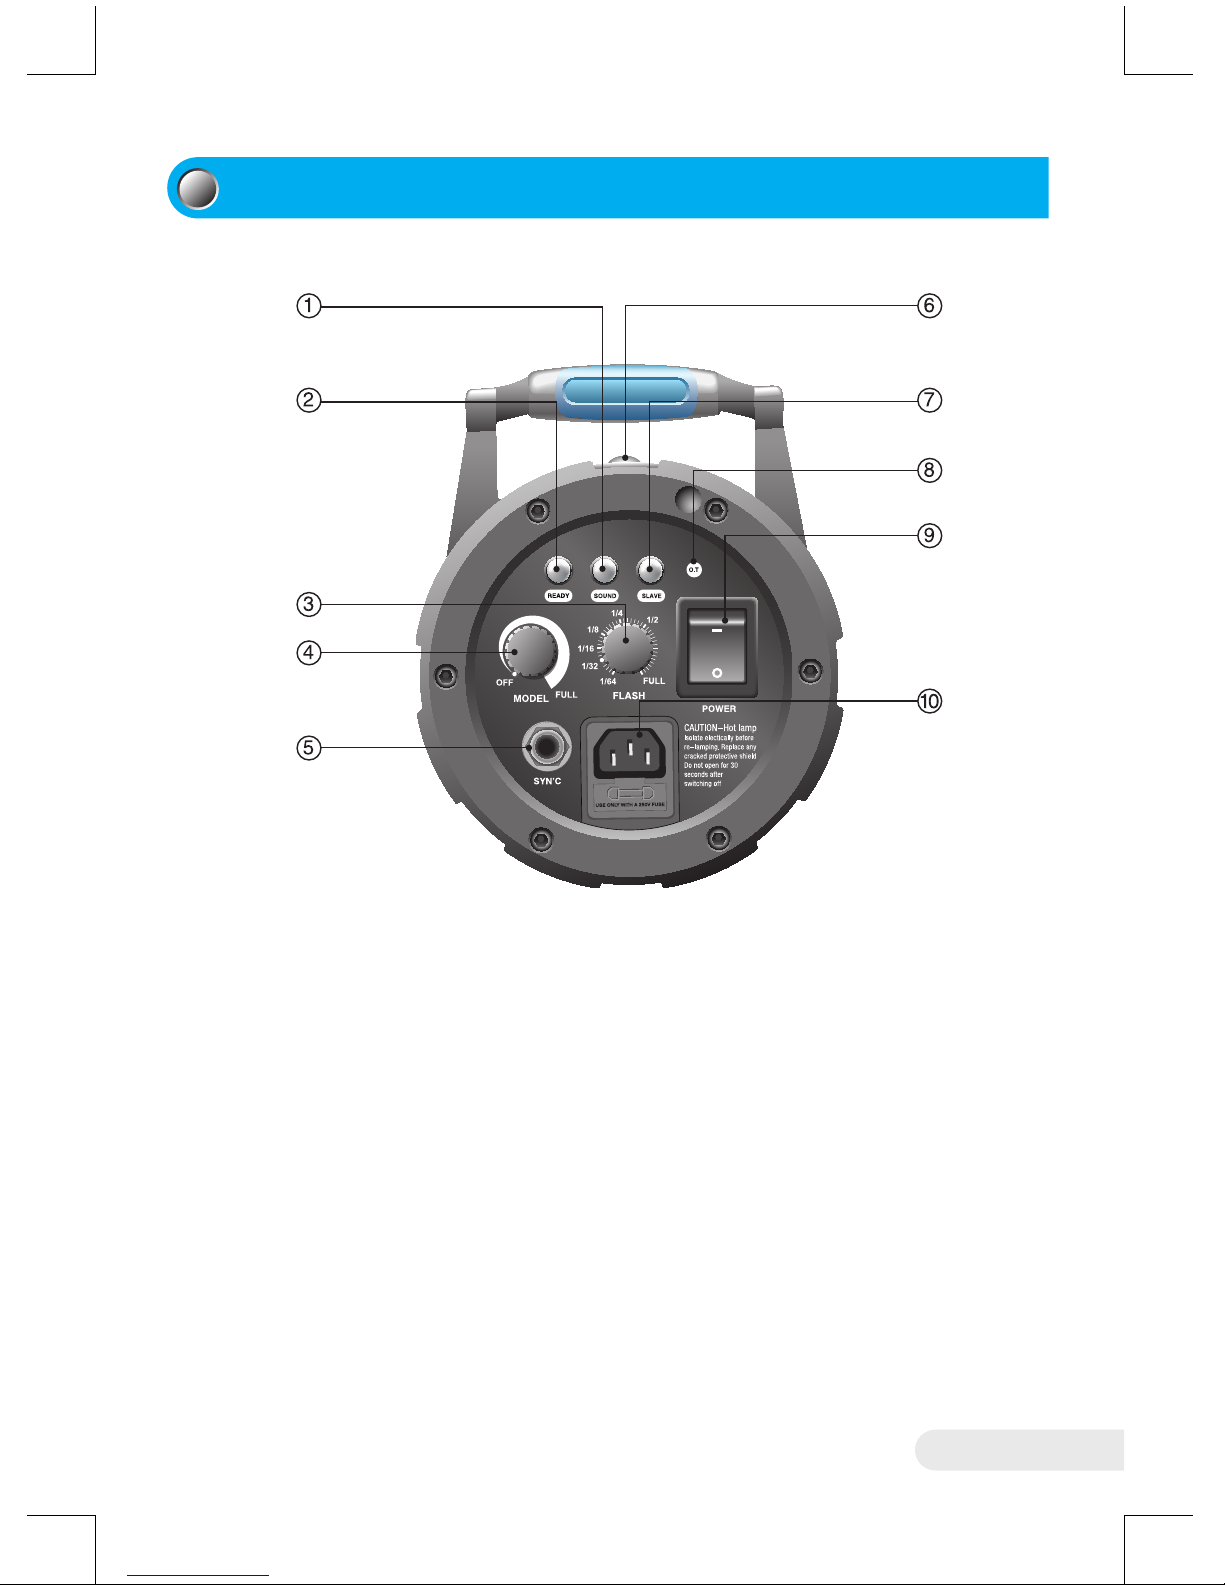
Name and function of panel
5
①Sound ON/OFF button : It makes signal sound on flash electrification or electric
discharge.
② Test PUSH button : It’s pressed on flash electric discharge or flash test.
③Flash power control volume : It controls power of flash(strobe).
④Modeling lamp control volume : It controls the brightness of modeling(halogen) lamp.
⑤Synchro ‘X’ : It’s a terminal that connects synchro cord.
⑥Slave sensor : It has function to slave the light of other lighting.
⑦Slave ON/OFF button : It’s a function to select whether to slave with other lighting.
(ON : Slave, OFF : Unslave)
⑧① Overheat signaling lamp : It turns on when inside circuit of lighting is overheated, and
on this case, turn off the power and cool the lighting before using.
⑨Power switch : It has function of turning off and on the lighting.
⑩AC input : Connecting part of power cord.

Operation
6
1.When released from the factory, halogen control volume is in off position.
2.Fit the modeling lamp into the lighting.
3.After checking if modeling lamp control volume(MODEL) of control panel and output
control volume are at minimum position and if power switch is OFF,connect the power
cord to input socket.
4.Connect synchro cord to synchro socket.
5.Turn on the power button and power indicator lamp should come on
6.Control the brightness of modeling lamp with modeling lamp control volume.
7.Control the power with power control volume.
8.If you want to tune this with other lighting, turn on the slave button.
9.If you change the power from high to low, ready lamp might flicker. If so, discharge by
pressing ready button before using.
10.Sound lamp turns on when you press the sound button. Sound is generated according
to the change of power. If power is changed to lower power, it will start beeping. If you
press the ready button at this time, the sound stops.
Way of checking whether flash is charged when not using sound function.
During charging :Modeling lamp is OFF
Completion of charging :Modeling lamp is ON
HD SERIES

HD SERIES
Specifications
7
Model
Item HD150 HD200 HD400 HD600 HD900 HD1000 HD1200
Maximum Output(W/s)
150 200 400 600 900 1000 1200
Input Voltage
AC 110/220V 50/60Hz
Charging Time(sec)
0.1~1.0 0.1~1.2 0.2~1.5 0.2~1.5 0.3~1.8 0.3~2.0 0.3~2.5
Power Control Range F2.8~F22
(6f-stops)
F2.83~F223
(6f-stops)
F45~F325
(6f-stops)
F5.6~F45
(6f-stops)
F5.68~F458
(6f-stops)
F8~F64
(6f-stops)
F82~F642
(6f-stops)
Color Temperature
5500
˚
K(±150
˚
K)
Ready Charge
LED Light/Buzzer(ALARM ON), Modeling Lamp Blinking(ALARM OFF)
Modeling Lamp
GX6.35 Base
Modeling Control Analog Dial Volume
Triggering Methode Synchro Sensor, Ready Button, Svnchro Cord
Triggering Voltage
DC 8V
Over Temp’ Warning
O.T(Red LED)Blinking, Buzzer Warning Sound
Size(W×L×H)mm 235×140×170 280×140×170 350×140×170
Weight
2.3kg/5.1lbs 2.5kg/5.5lbs 2.7kg/5.9lbs 3.7kg/8.1lbs 3.9kg/8.6lbs
Cooling Form
DC Cooling Fan(Ball Bearing Type)
Slave(Infrared Sensor)
ON/OFF
Sound
ON/OFF

HD SERIES
Directions for replacing parts
8
1. Replacing the modeling lamp (BASE: GX-6.35)
- After cooling the lamp enough, maneuver it left and right to separate it from the socket.
- Maneuver the new lamp left and right to install it onto the socket.
- Be careful not to let any finger print or dust stain the lamp, and clean the lamp with
soft cloth or tissue lightly dampened with alcohol after replacing the lamp.
2. Replacing the fuse
- Separate the power cord from the AC socket
- Eject the fuse holder using a straight (-) screwdriver
- Remove the existing fuse and install the spare fuse, which is also inside the fuse
holder.
- Be sure not to let dust stain the discharge tube and modeling lamp with replacing
the fuse.
- If dust or other materials get stuck to the discharge tube or lamp, it can shorten
the life of the lamp and deteriorate the color temperature, thus clean any impurities
with a soft cloth.
※ Reference :
When input voltage is lower than rated voltage, there can be cases where it’s not
charged fully for maximum output. So in this case, check the input voltage.
HD SERIES
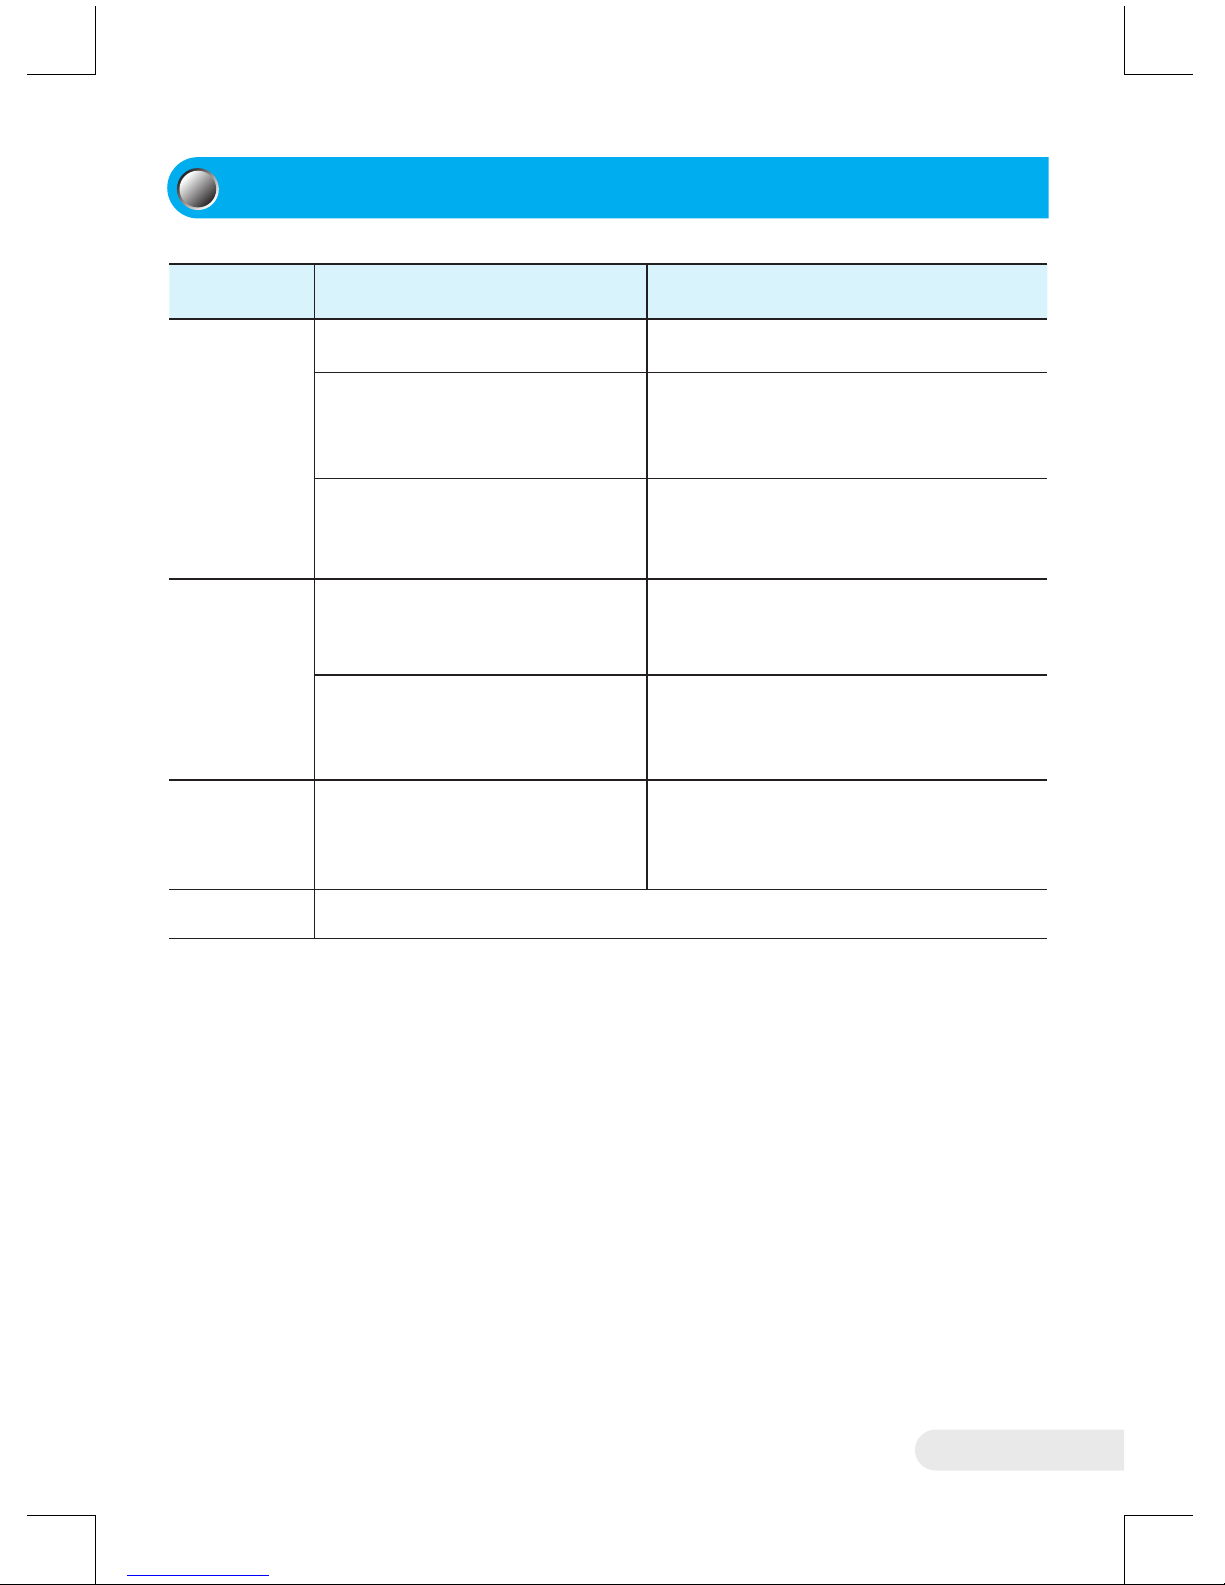
Countermeasure on breakdown
9
Status Expected cause Point of checking and action
Slave is
impossible.
Slave button is turned OFF. Check if slave button is turned ON.
Slave sensor is out of the light
of flash.
After turning the lighting by 180° so as
for turning sensor to be shown, and than
operate it again.
Too strong light is on slave sensor.
Block direct ray of light or bright light
from slave sensor.
Synchro Cord
doesn’t
become
tuned.
Due to dust or other material on
synchro jack, it causes contact’s
defective.
After checking synchro jack, remove
other material.
Synchro cord has defective contacts
and is disconnected.
Replace synchro cord.
(Check if it can radiate by pressing
ready button.)
There’s no
reaction at all.
Power supply is blocked.
• Check if power cord is well connected.
• Check if the contact of socket is loose.
• Check if fuse is disconnected.
Others Contact our company or its seller.

HD SERIES
MEMO
10

HD SERIES
MEMO
11

This manual suits for next models
6
Table of contents
Other fomex Lighting Equipment manuals


Popular Lighting Equipment manuals by other brands

Cineroid
Cineroid SATURN120 user manual

ONFORU
ONFORU BDB55G-3 quick start guide

Hapton Bay
Hapton Bay 19273-002 Use and care guide

Clevertronics
Clevertronics L10 LWPLIFE PRO Series Installation & maintenance instructions

Optic arts
Optic arts FLEX ACV2 installation guide

Equinox Systems
Equinox Systems PEGASUS II user manual

nordlux
nordlux UNE 1-SPOT Mounting instruction

Lightmybricks
Lightmybricks LEGO Winter Village Station manual

Delta Light
Delta Light MONO X DOWN-UP T50 INOX installation instructions

HQ Power
HQ Power HQLE10022 user manual

North Light
North Light WX-31VLED44-200WW-10-1 manual

Qlight
Qlight QT50L-USB-BZ manual


