fomex flexible LED FL1200 User manual

flexibleLED FL1200

This product is a portable and flexible LED light.
Please read this operation instruction before using the product.
Stop using this product when abnormal operation is detected and contact the store or A/S center.
Contents
In the box
Accessories (Optional)
How to connect
How to install X-Mount
How to use Controller
How to install Accessory (Softbox or Barn Door)
How to install Clamp Shoe
Specification
Notice
Warranty
2
2
3
3
4~5
5
5
6
7
7
..................................................................................
...................................................................
.........................................................................
...............................................................
.................................................................
..............................
...........................................................
.............................................................................
......................................................................................
...................................................................................
1
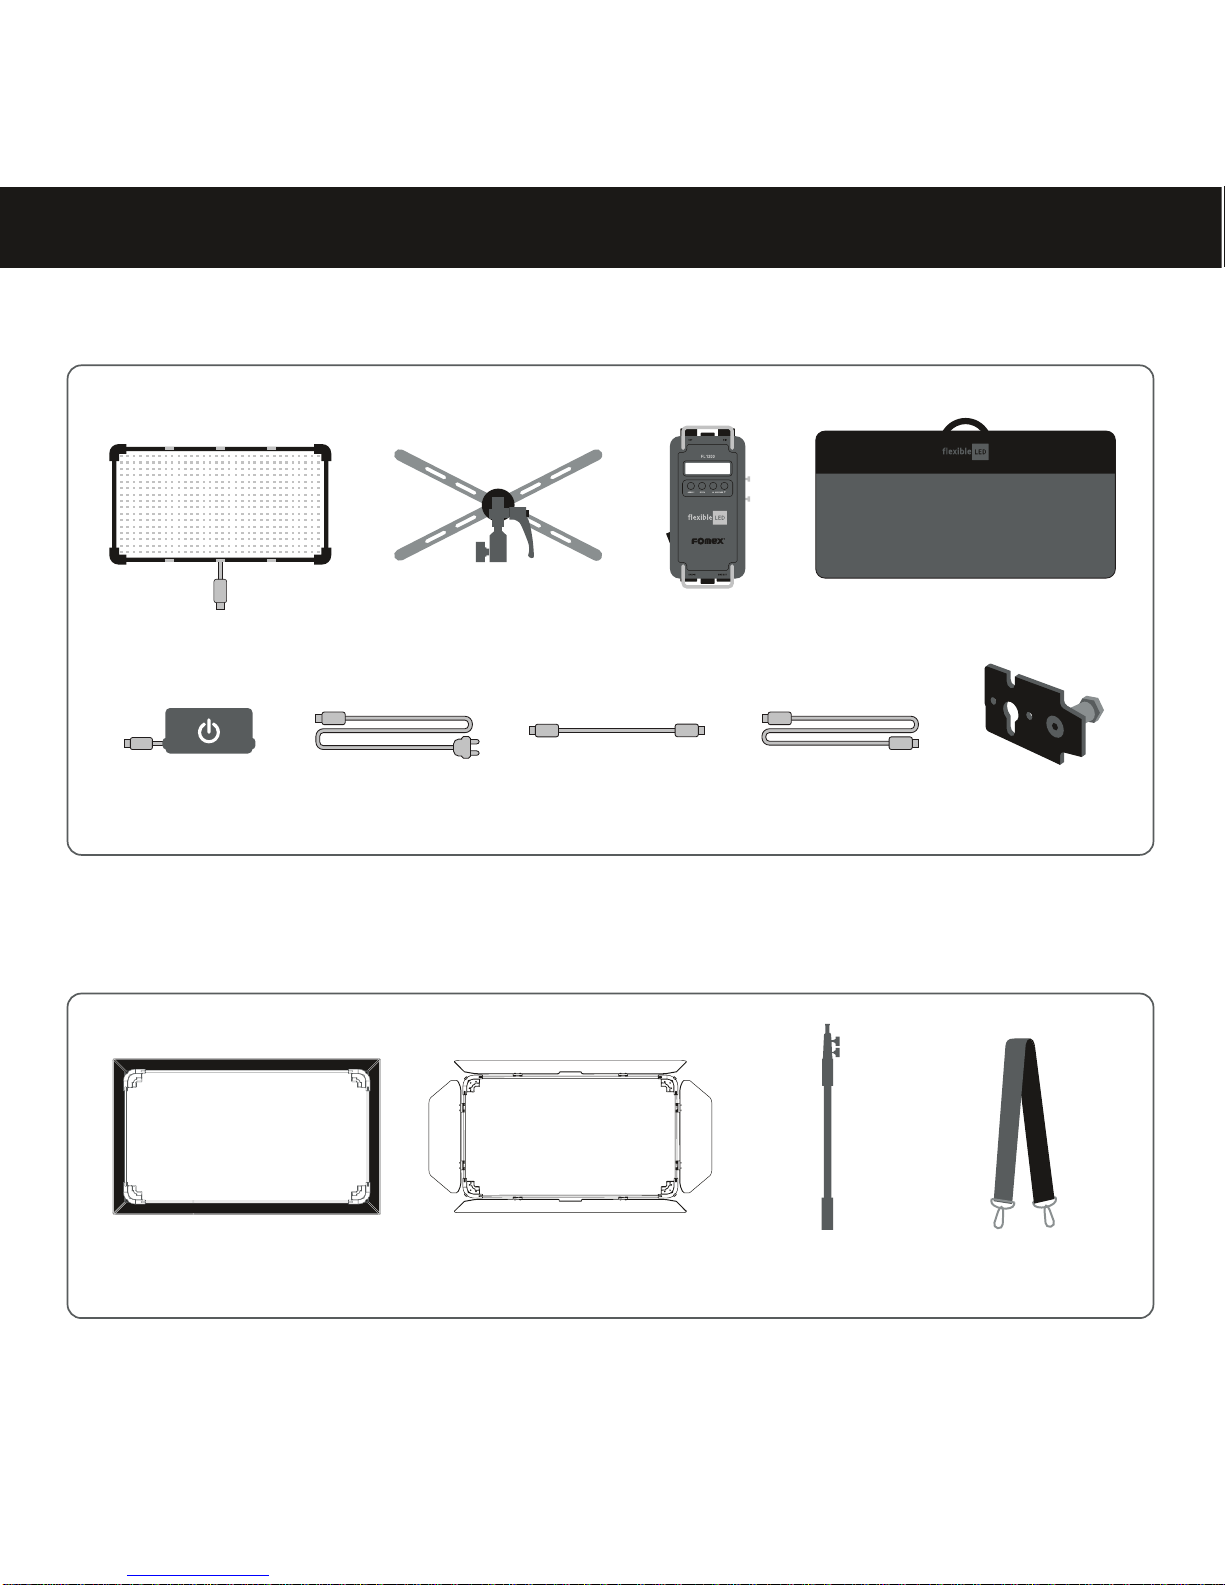
Inthe box
FL1200Kit
KitBagController
LEDMat1’x2’(30x58cm)
X-MountBracket
PowerSupply PowerCord(5m)
OutputCable(2m) ExtensionCable(5m)
2
Accessories (Optional)
SoftboxwithQuickFrame BarnDoor with QuickFrame Boom Pole 3 Sections ShoulderStrap
ClampShoe

HowtoinstallX-Mount
3
Howtoconnect
Please connect to Power Supply in the following order.
OutputCable(2m)
LEDMat Controller PowerSupply
PowerCord(5m)
※ExtensionCable(5m)
※Please use only the supplied extension cable from us when using the extension cable.
InsertX-Mountin therearcornerof LEDMatClips.
InstallX-Mountin astandortripodafterfirmlyfittedwith LEDMat.
1
2

4
Howto useController
9
1
Howtouse buttons
*SequenceofModeConversion (Normalmode→QUICKmode→DMXaddresssetting mode→Normalmode )
DETAIL
1
2
4
35
7
68
ToSetLOCKMode : 2~3secondspress‘MODE’ button once,ontheLCD displaywindow'LOCK' displaysand
isset. (Note:when‘LOCK’modeisset,CCTand DIMcan’tbe changed)
ToUnlock
:
In‘LOCK’mode,when2~3 secondspress‘ADJUST ’ buttononce,‘LOCK’disappearsfromtheLCD
displaywindowand isreleased.
ToSetQUICKMode : Short-press‘MODE’buttononce,on the LCD display window‘QUICK’displays.
PressQ1▲buttonto 3200K or Q2▼ buttonto5600K (Defaultvalue).Atthistime,DIMandCCTcan be adjusted.
How to adjust/set desired CCT value :In‘QUICK’mode,press‘ADJUST’button and CCT value is blinking.Please turn
CCT dial to selectCCT valueandpress‘ADJUST’buttontoset.
Returntodefaultcondition:PressandholdQ1▲ buttonand press Q2 button.
To Turn QUICK Mode Off : In‘QUICK’ mode, when press‘MODE’ button once,‘QUICK’disappears from the LCD
display window.And‘QUICK’is released and transfer to DMX Address setting mode.(At this time,CCT is automati-
callygoingbacktothe previous valueusedinnormalmode.)
To Set DMX Address :
Press‘MODE’ button twice, on the LCD display window‘DMX’ appears and address is
blinking.Atthistime,setDMX address using Q1▲/Q2▼button.Please press‘ADJUST’button to savetheaddress,
then it switches to normal mode. (Note :when it is connected with DMX console,DMX mode is automatically set
andthe followingis how to set DMX address.– Press‘MODE’button once.Whenaddress isblinking,pleasesetthe
addressusingQ1▲/Q2▼buttonandpress‘ADJUST’buttontosavethe address.)
5
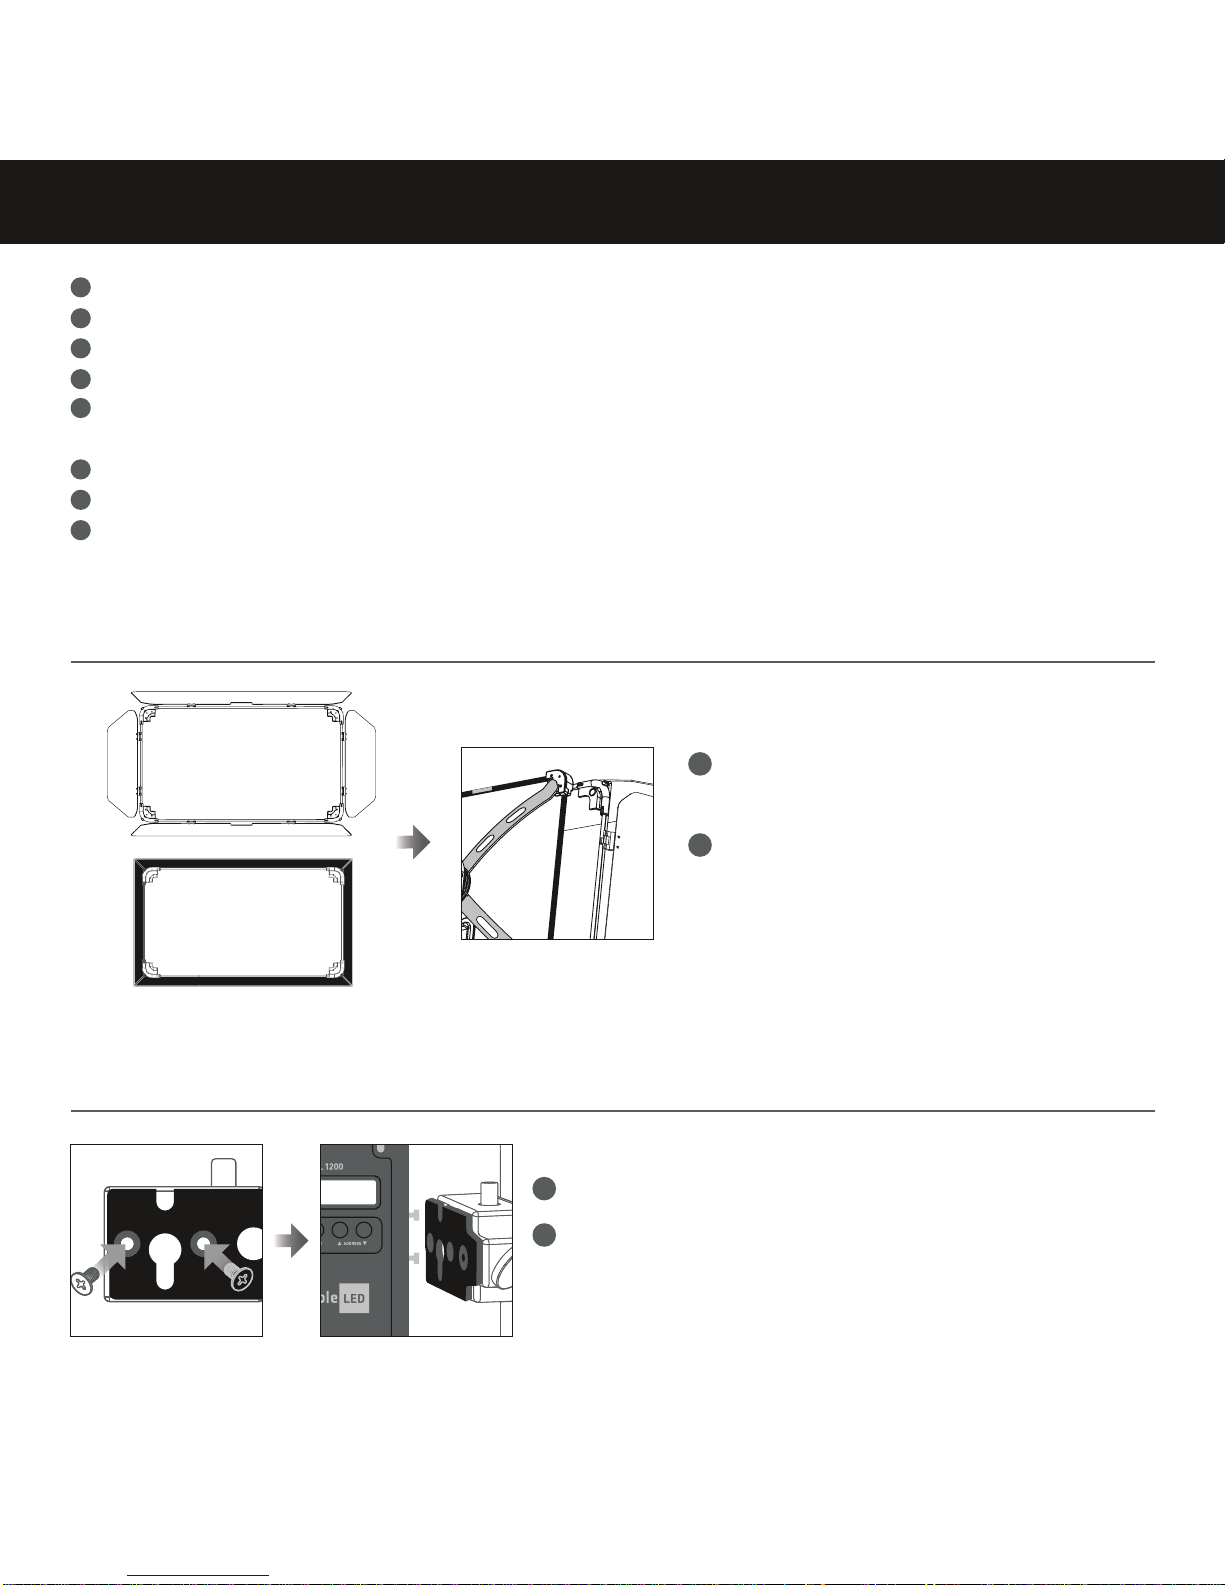
Howto install ClampShoe
TightenClampShoetoa Clamp(Optional)with screws.
MountControllertoClamp Shoe.
(Whenusingalightstand,pleaseuseControlleraftermounting
toClampShoeforsafety.)
1
2
How to install Accessory (Softbox or Barn Door)
AssembleQuickFrame andinstall
Accessory(Softboxor BarnDoor) onit.
FaceclosetothecornersofLEDMat
tosimply attachbymagnets.
1
2
Turnon/offwithON/OFFswitchontheleft.
AdjustcolortemperaturewiththeleftCCTdial. Thevaluefrom2700kto6500kwillbedisplayedontheLCDdisplaywindow.
ConnecttheLightoutputcable(2m)tolightoutputport,thenconnectthe cable toLEDMat.
AdjustbrightnesswiththerightDIMdial. Thevaluefrom0%to100%willbe displayedon theLCDdisplaywindow.
WhenusingDMXplease,connectthecordofDMXConsole.IfDMXconnectionisnormal,greenLEDlampis onunder
theDMXInputconnector.
ConnectDCpowerinputconnectortothe controllerwhenusingthe powersupply.
ConnectDMXcontrolcordtootherLEDlights.
Availabletouse battery pack with attachedV-Mountor Gold-Mount(Optional)insteadof powersupply.
2
3
4
5
6
7
8
9

6
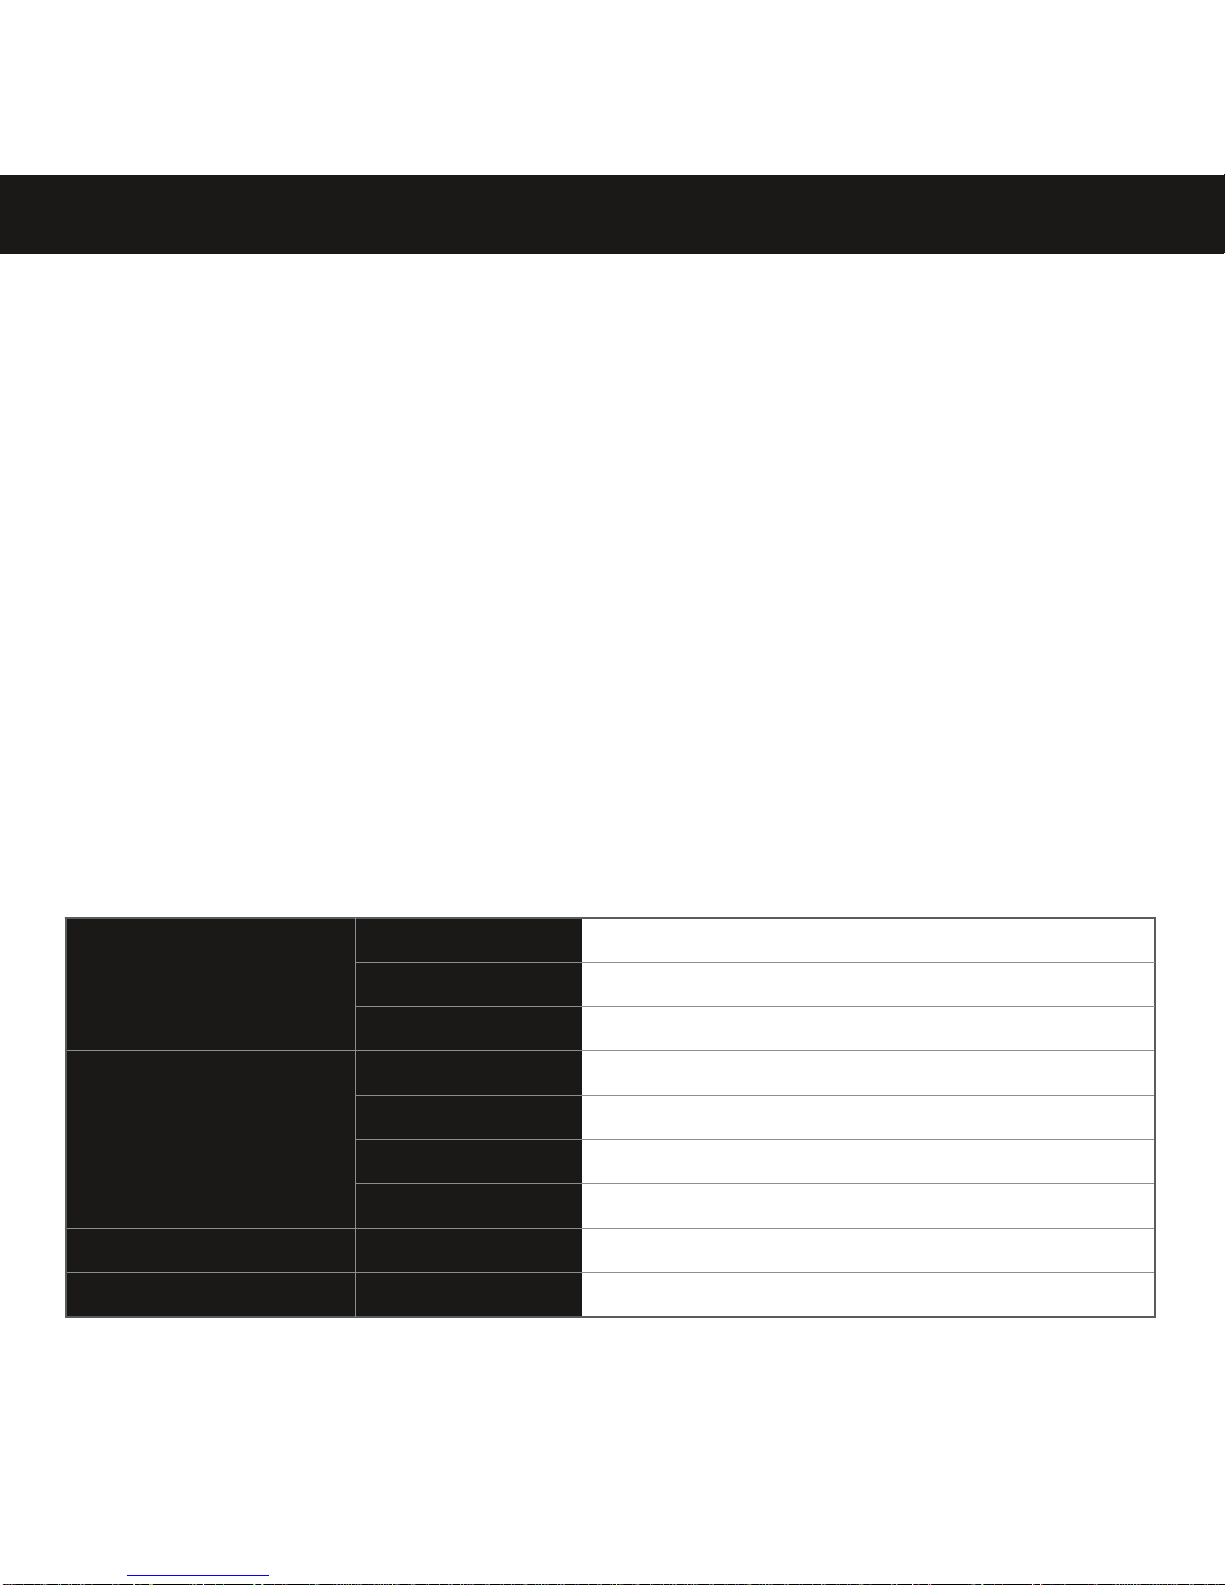
Specification
Model
LightOutput
PowerConsumption
CRI/TLCI
ColorTemperature
Dimmer
ColorTemperature
LightOutput Connector
IPRating
DCInput
DMXIn /Out
BeamAngle
LEDs
Battery Mounts
Dimensions(mm)
Weight
Controller
PowerSupply
FL1200
3800lux @1m;2700K / 4000lux @1m;6500K
120W
CRI 96~98 /TLCI 98
2700K- 6500K
0~100% DIM / DMX 512 / Manual
100K Steps
4PinWaterproof
IP64 except FLCR-Controller
DC 12~24V (4Pin)
5Pin XLR
120°
1152
V-Mount / Gold Mount
300 X 580
760g
Input :DC12 ~ 24V
Display : Mono LCD
CCT :2700K ~ 6500K
DIM :0 ~ 100%
Dimension : 234mm X 108mm X 79.7mm
Weight :705g
Input :AC100 ~ 240V 50/60Hz
Output :DC 19V,7.9A,150W

Notice
1.Must use supplied Power Supply only.Otherwise,it may cause a problem.
2.Do not use in rain or in a humid place.
3.Do not close to flammable objects.
4.Operating temperature range is 0°C ~ 40°C.
5.Handle with care when you use for a long time because the heat may occur.
6.Handle the cable attached to LED Mat with caution.
7.Do not fold LED Mat or bend it more than 60 internal degrees.
8.Keep LED Mat completely flat after disconnecting Power Supply and Controller.
9.Keep away from children.
10.Do not handle with a wet hand.
11.Do not drop or shock on the product.
12.Turn off the power after use and keep in provided Kit Bag after cooling enough.
13.Cannot receive A/S warranty with self-repair,and we’re not responsible for product damage.
Warranty provisions for this product are listed below:
1.Guaranteethis productforONEYearagainstdefectsinproduct and components(exceptconsumable
spareparts).Thepurchasedateisconsideredasthedateregisteredon the warranty cardwhenbuying
theproduct.
2.During the warranty period,repair the defects using new or renovated parts without any charge,
or exchangethedefectiveproductwith a newproductoraproductwhichhasbeenmanufactured
bynew orrefurbished components and is functionally equivalent to the normal product.
3.Apply only to the original product that can be identified by the trademark,trade name,or logo
affixed to the product.
Warranty
7
1.Expired warranty period.
2.Breakage or damage caused by inappropriate usage,repair,maintenance and accident.
1) Installation and removal with improper external equipment or improper usage.
2) Fall and external shock.
3) Exposure to the extreme environment of abnormal temperature,a solvent,an acid,a base,
a flood and a humid.
4) External damage such as scratch,dent and breakage.
3.Disrepair and damage caused by installation,repair,improvement,addition,disassembly
by unauthorized institution or person.
4.Modified,replaced,removed information identifying the original product.
5.Absence of the valid warranty card.
6.Disrepair and damage caused by usage of illegal nonstandard and unofficial software.
InapplicableWarranty
Please keep this warranty card after writing information at the purchase as it is necessary
for applying for services.
Customer Information
Seller Information
Product Information
Note
Name
Contact Number
Address
Name
Contact Number
Address
Date of Sale
Name
8

Unit701,31-18Gil,Seongsui-ro,Seongdong-gu,Seoul 04787 Korea
www.fomex.com
Table of contents
Other fomex Lighting Equipment manuals


Popular Lighting Equipment manuals by other brands


EuroLite
EuroLite LED PIX-6 HCL user manual

Larson Electronics
Larson Electronics GAU-HB-160LED instruction manual

Tronix
Tronix 136-024 quick start guide

LIGMAN
LIGMAN LH-10823 installation manual

PT
PT W2250 owner's manual

Whelen Engineering Company
Whelen Engineering Company WAT GSE Advisory FLAVA installation guide


