Fonexion fX1000 User manual

fX1000
BLUETOOTH HANDS FREE CAR KIT
KIT MANOS LIBRES BLUETOOTH
INSTRUCTION MANUAL
MANUAL DE INSTRUCCIONES
English
Instruction Manual
Thank you for choosing the “Lingua FX1000” Handsfree Car Kit equipped with
Bluetooth ® Technology.
Model: FX1000 (Bluetooth Handsfree Car Kit-PRO)
FX1000 is a Bluetooth® Handsfree Car Kit which can perform the basic call operations
through the handy 3 keys remote control. It is fully duplex with high sound quality.
Contents
1. Equipment
2. Installation
3. Major Features
4. Specification
5. Trouble shooting
6. Operations
1. EQUIPMENT
1.1. Main Unit Kit
1.1.1. Main Unit
1.1.2. Mounting Bracket
1.1.3. Bag of screws
1.2. Remote control Kit
1.2.1. Remote control
1.2.2. Magic Tape
1.3. T cable with ISO connectors
1.4. External microphone kit
1.4.1. External microphone
1.4.2. Magic Tape
2. INSTALLATION
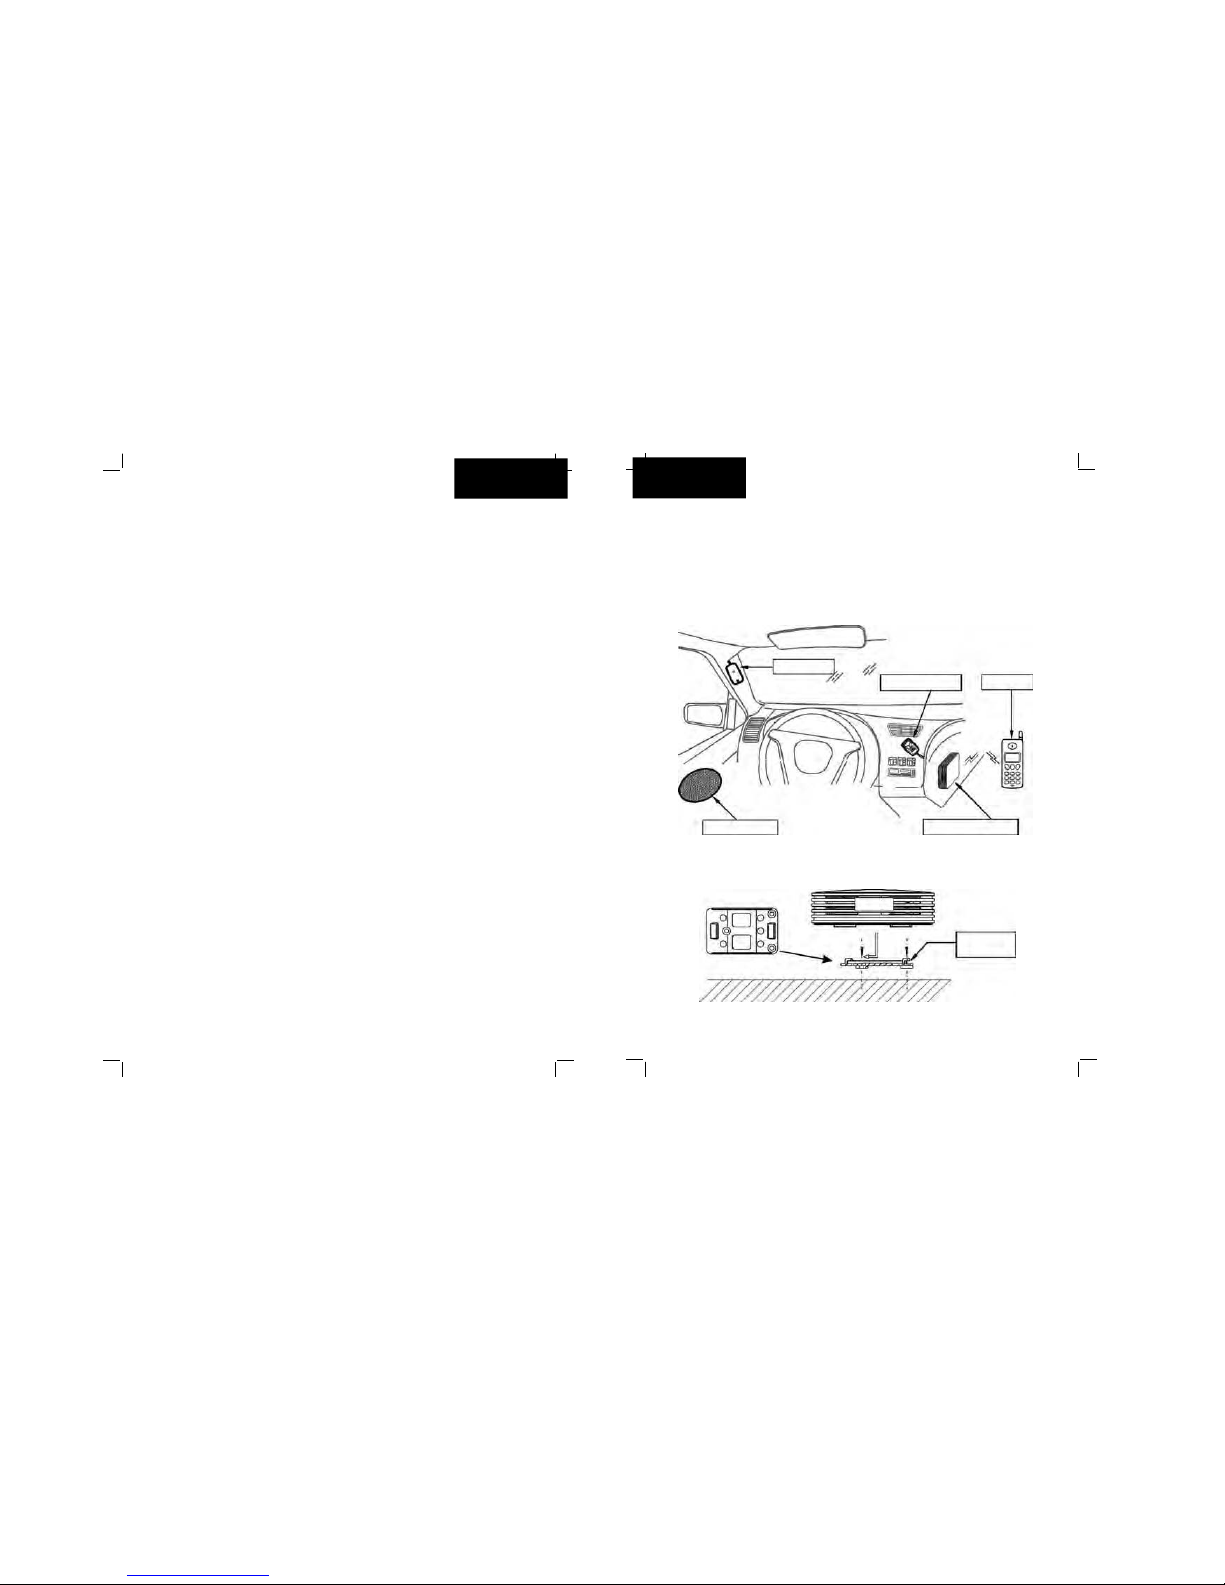
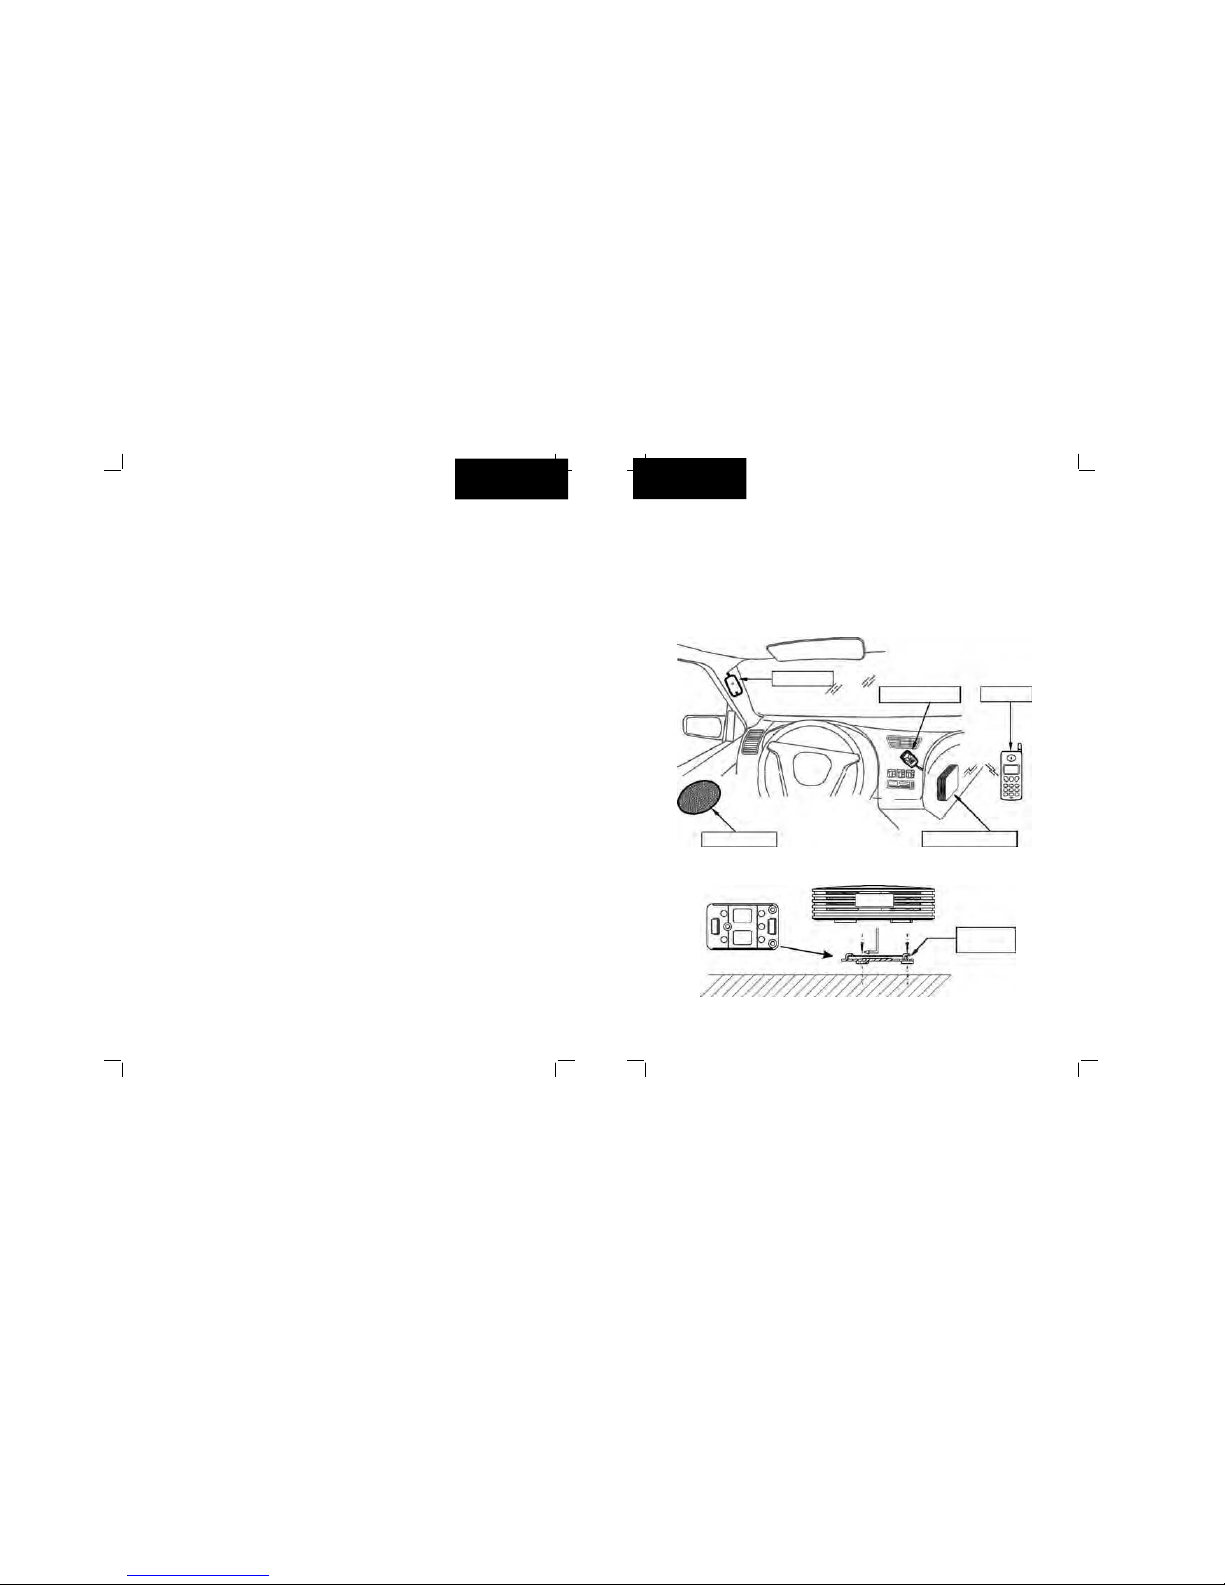
The system installation is shown in figure 1.
2.1. Main unit mounting method is shown in Figure 2; mounting bracket is included
in the box.
NOTE: Do not install the main unit near the heating/air conditioning system.
Protect the main unit from direct exposure to sunlight.
1
Do not enclose the main unit in a metal container, as this would affect the
quality of the Bluetooth ® connection.
2.2. Remote control can be stucked in order to be easily reached.
2.3. External microphone installation: we suggest to fix it near to the user’s mouth
with a maximum distance of 60 cm. For best reception. One of the installation
positions for external microphone is shown in Figure1.
Figure 1 System installation
Figure 2 Main Unit Mounting
English
2
Microphone
Car Speaker
Remote BT Mobile
Main Unit
Main Unit
Mounting
Bracket
English
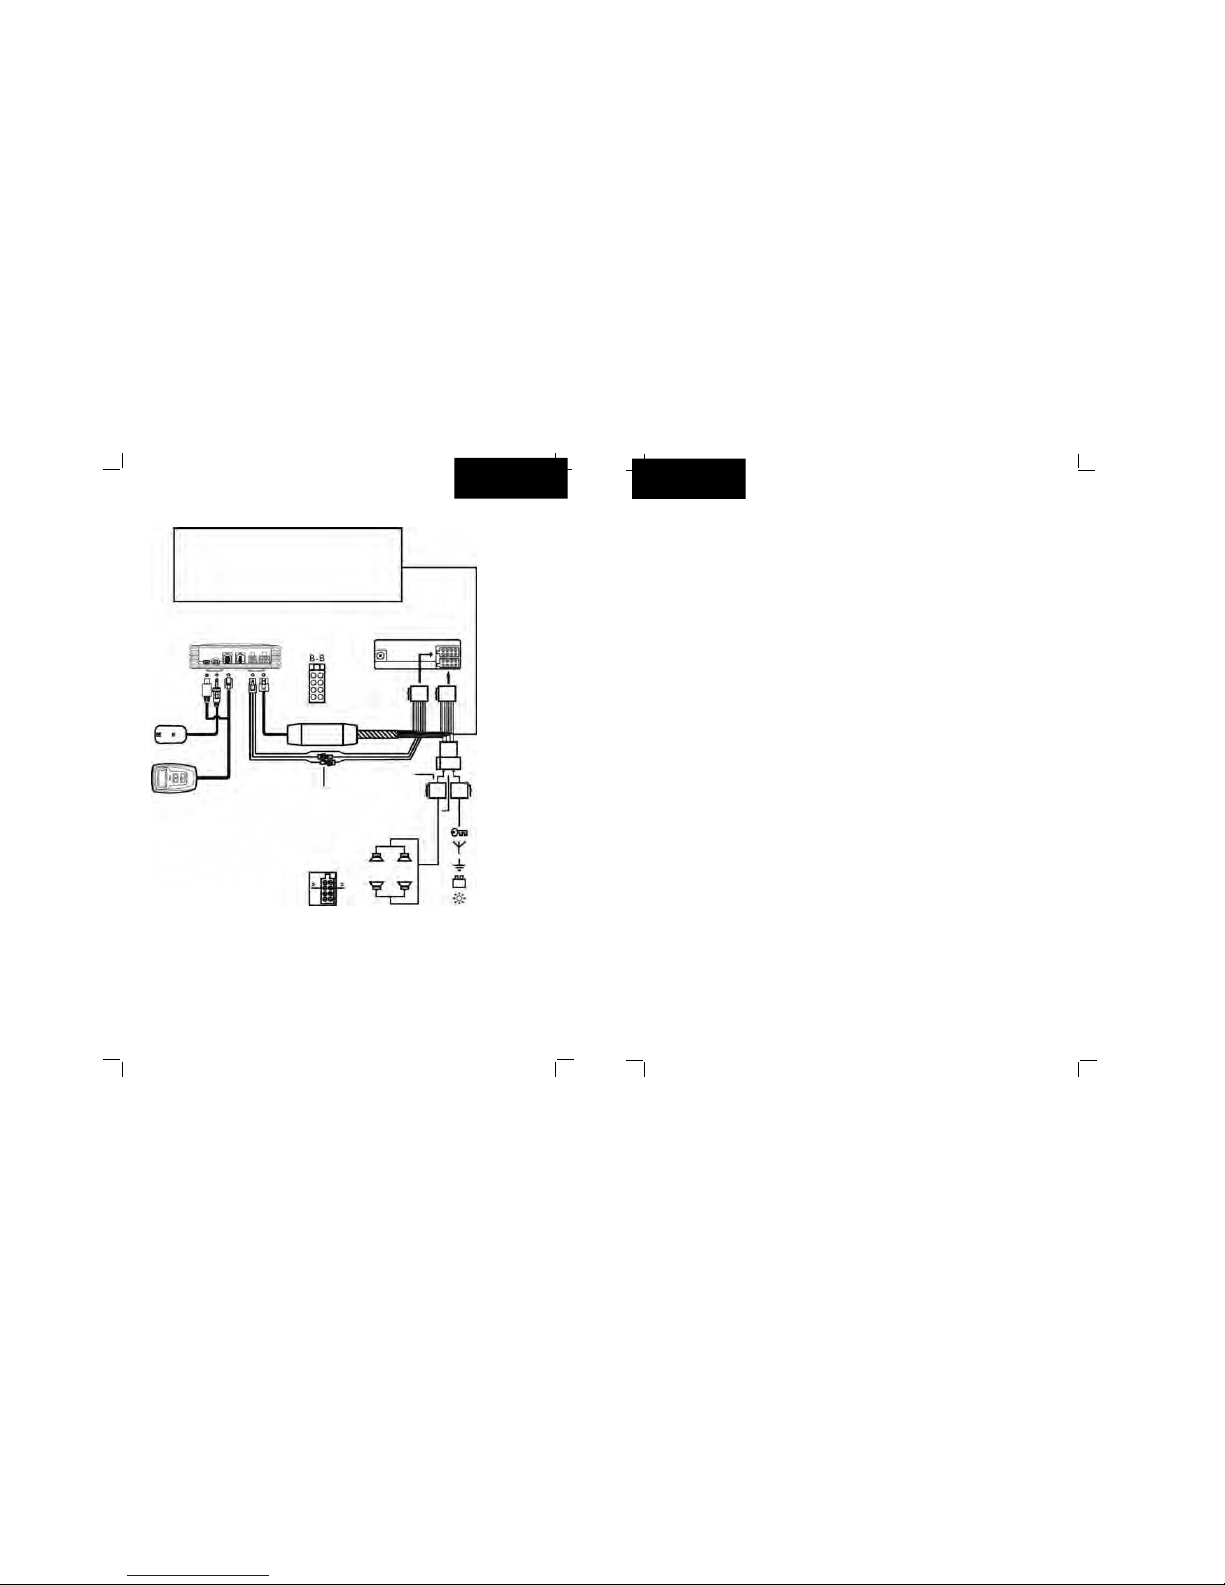
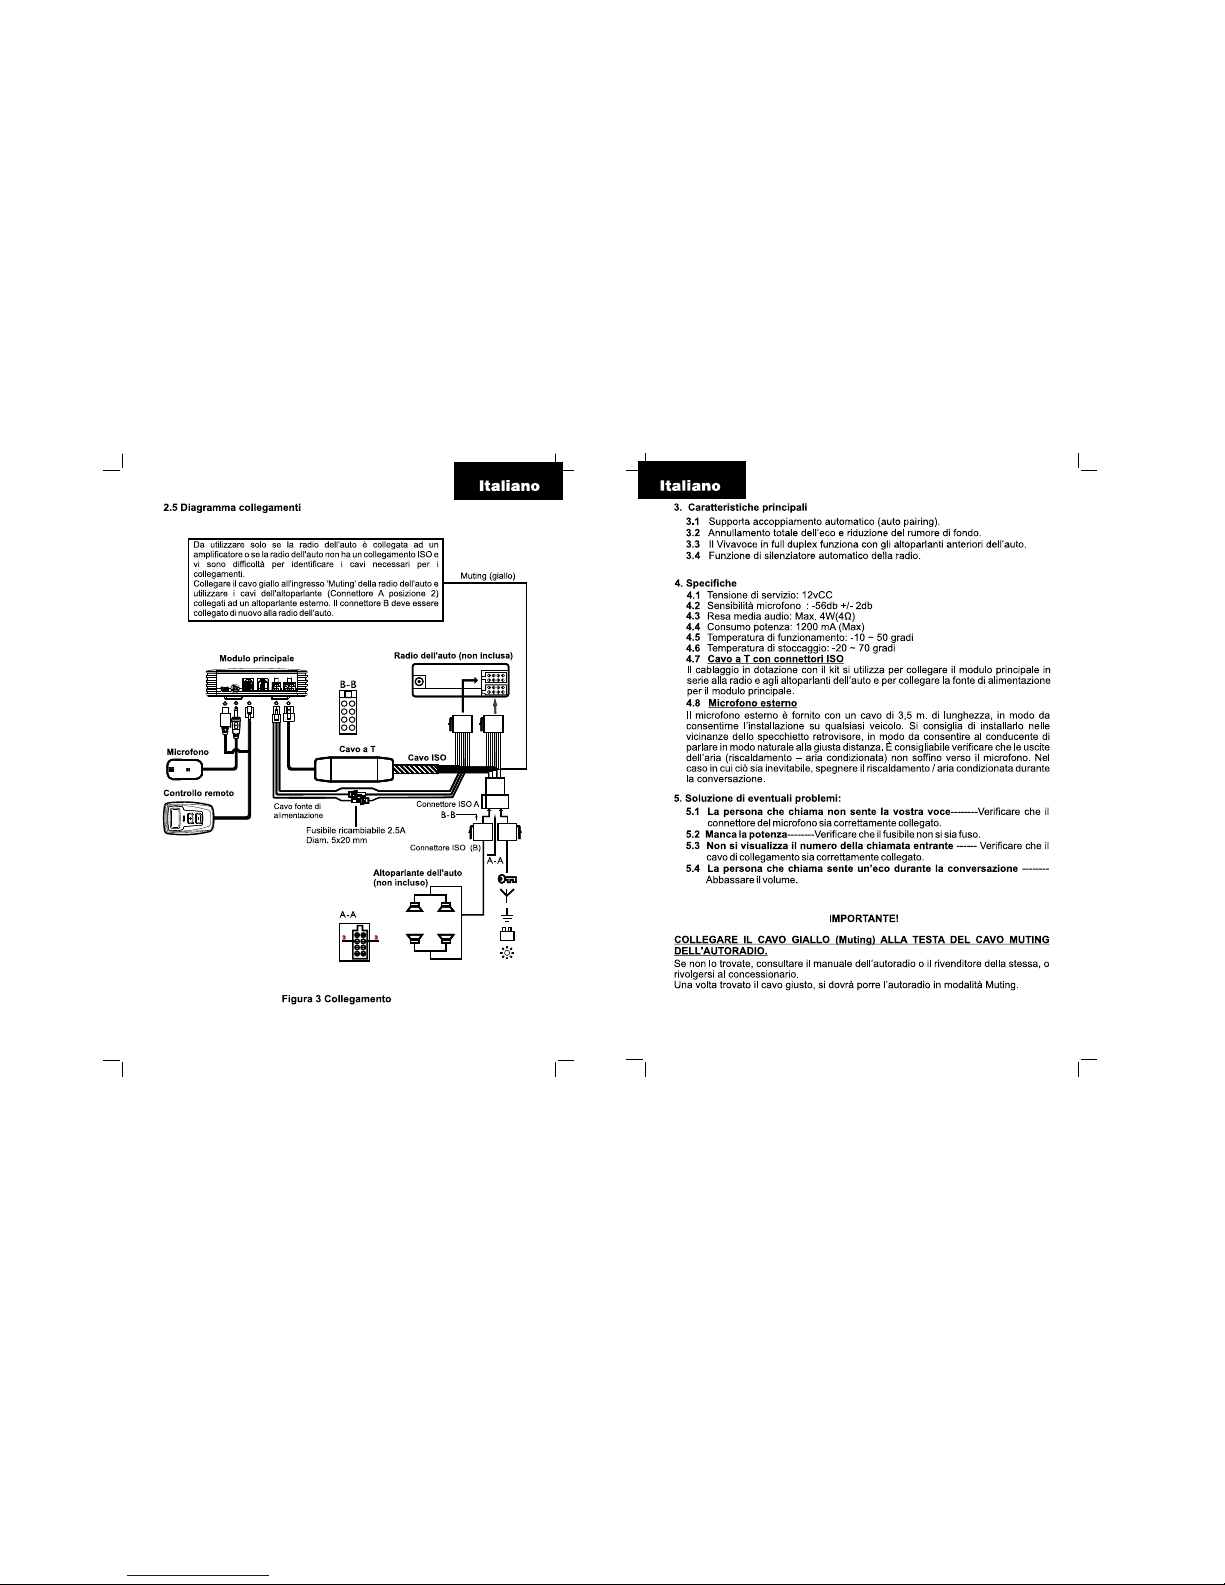
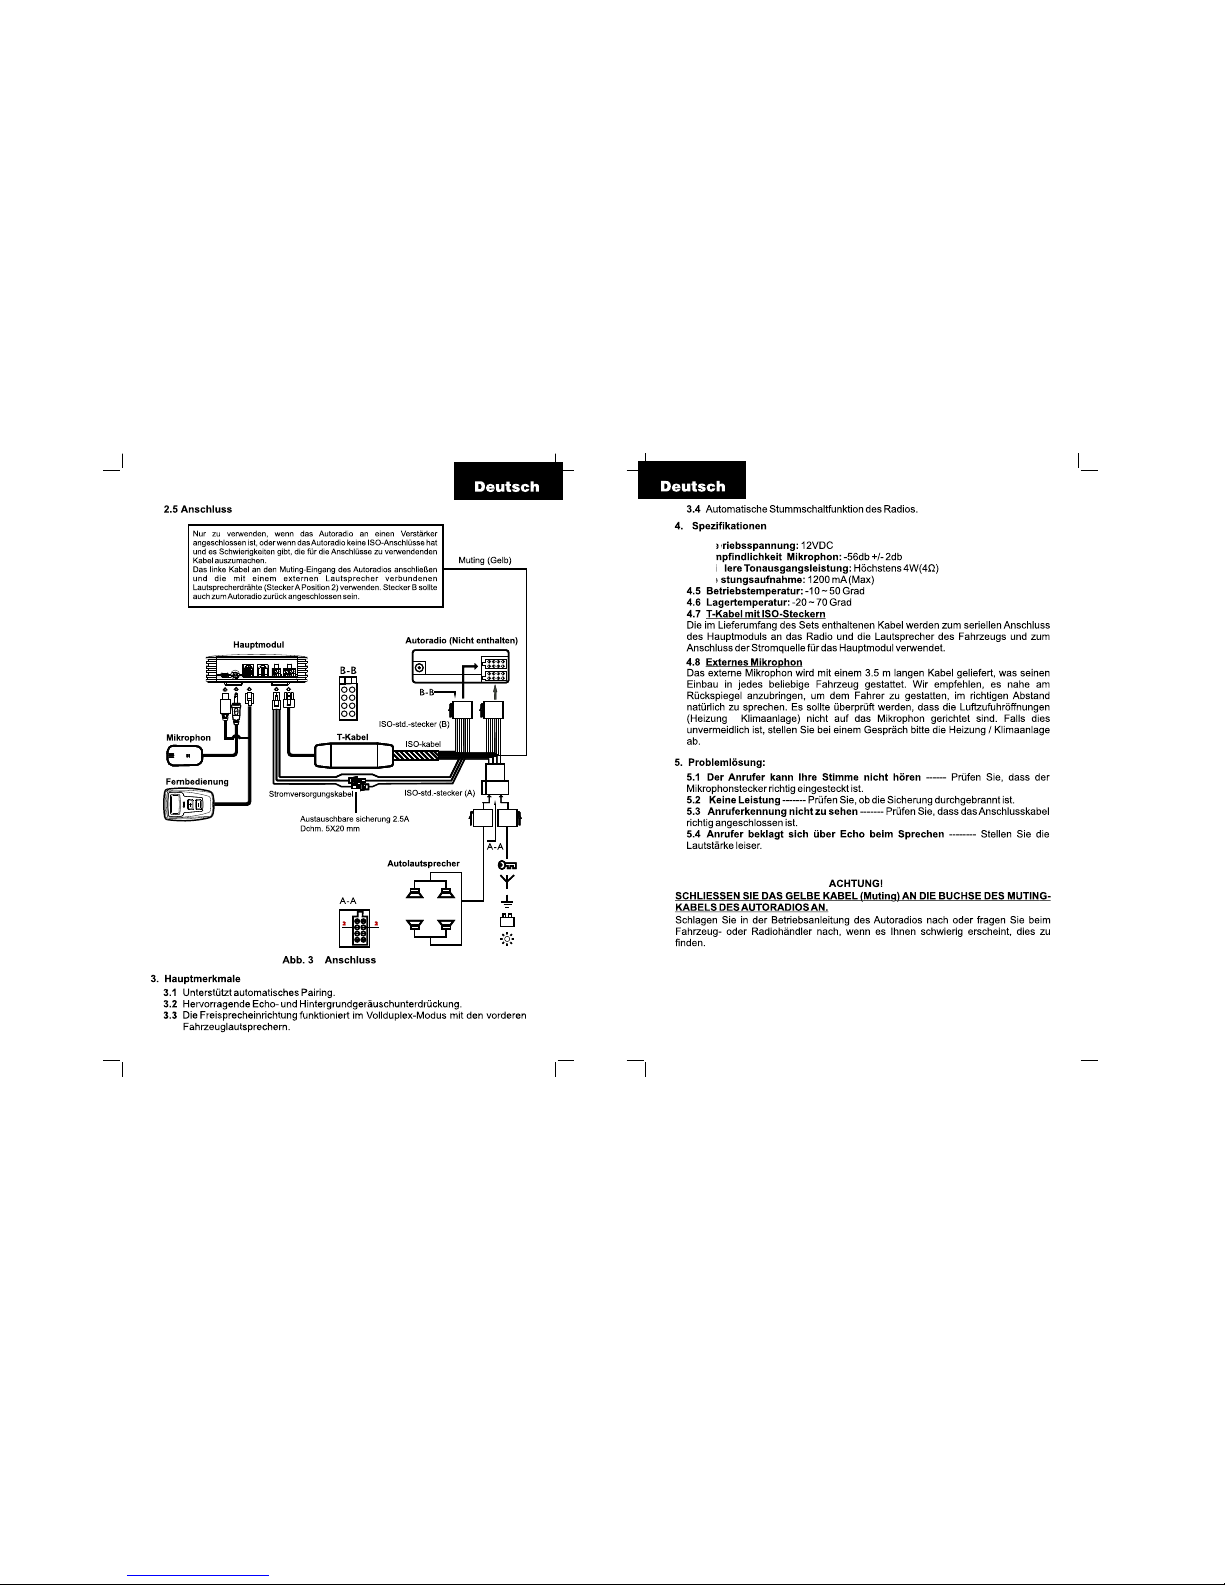
2.5. Connection Diagram
Figure 3 Connection
3. MAJOR FEATURES
3.1. Supports autopairing.
3.2. Super echo cancellation and background noise reduction.
3.3. The handsfree in full duplex works with the front speakers of the car.
3.4. Auto Radio muting function.
Only to be used if the car radio is connected to an amplifier
or if the car radio does not have an ISO connection and
there are difficulties identifying the cables to be used for
the connections.
Connect the yellow cable to the car radio muting input and
use the speaker wires (position 2 connector A) linked to an
external speaker. Also connector B should be connected
back to the car radio.
3
Main Unit
Muting (Yellow)
Car Radio (not included)
Microphone
Remote control
Power supply cable
Replaceable Fuse2. 5A
Dia. 5x20mm.
T-Cable ISO Cable
ISO Connector (A)
B-B
A-A
ISO Connector (B)
Car Spekar
(not included)
A-A
English
4. SPECIFICATIONS
4.1. Operating Voltage: 12 vDC.
4.2. Microphone sensibility: -56db+/-2db
4.3. Average audio output: Max. 4W (4 )
4.4. Power consumption: 1200 mA (Max)
4.5. Operating temperature: -10 /50 degrees
4.6. Storage temperature: -20 /70 degrees
4.7. T cable with ISO connectors
The wiring supplied with the kit is used to connect the main unit is series between
the car radio and the car’s speaker, and to get the power supply for main unit.
4.8. External microphone
The external microphone is supplied with a 3.5 mts. long cable, enabling it to be
installed in any vehicle. We recommend to install it near the rear-view mirror,
allowing the driver to speak naturally at the right distance. Please ensure that the
air inlets (heating. air conditioning) do not blow in the direction of the microphone.
If unavoidable, please turn down the heating/ air conditioning during the
conversation.
5. TROUBLESHOOTING
5.1. The caller cannot hear your voice – Ensure that the microphone connector
is properly connected.
5.2. No power – Check whether the fuse is broken down.
5.3. Caller ID no display – Ensure that the connection cable is properly connected.
5.4. The caller complains of an echo during the conversation – Turn down the
volume.
IMPORTANT!
CONNECT THE YELLOW (MUTING) WIRE LEAD TO THE CAR RADIO’S
MUTING SOCKET.
If you find it difficult to find this, please refer to the manual of car radio, or ask
you car supplier or radio supplier.
When you find the correct cable, the car radio will switch to Muting Mode.
4

English
6. OPERATIONS
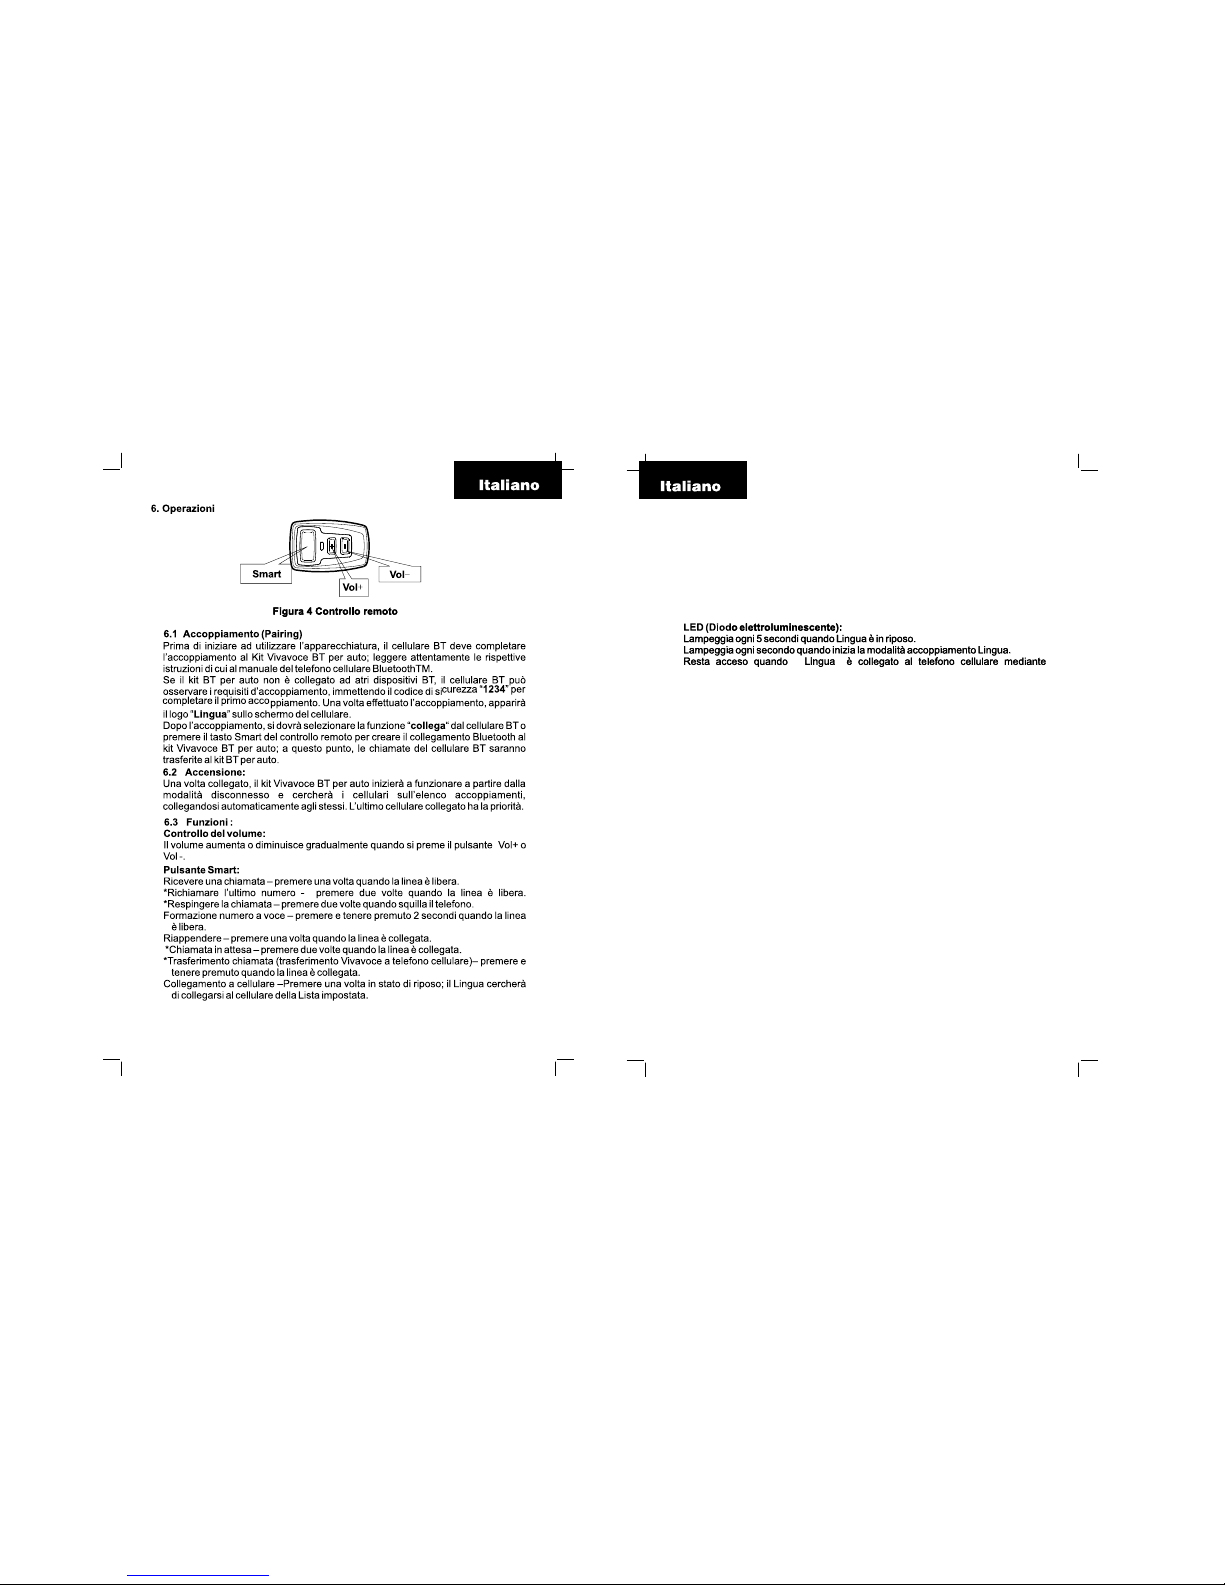
Figure 4 Remote control
6.1. Pairing
Before operations start, the BT mobile should finish the pairing with the BT
Handsfree Car Kit, please read carefully the relevant instructions in the user’s
manual of you Bluetooth ® mobile phone.
When BT car kit is not connected with other BT device, BT mobile can submit
the paring requirements, and entering the security keys “1234” to complete the
first time pairing. Once pairing is successful, “Lingua” logo will appear in the
mobile’s screen.
After pairing user should select “connect” function from the BT mobile or press
the Smart Key of the Remote Control to build Bluetooth ® connection with BT
Handsfree Car Kit, then the calls of BT mobile will be transferred to Car Kit.
6.2. Power Up
When powering up, the BT Handsfree Car Kit will start from disconnected mode
and search the mobiles in the pairing list and auto-connects with it. The last
connected mobile has the highest priority.
6.3. Functions
Volume control:
Volume increase or decrease by pressing the button Vol+ or VOL-.
Smart Button:
Receive call – Press once when the line is idle.
Last Number redial – press twice when the line is idle.
Reject call – press twice when the phone rings.
Voice dial – press and hold for two seconds when the line is idle.
Hang up – press once when the line is connected.
Call waiting – Press twice when the line is connected.
Call transfer (handsfree transfer to mobile phone) – Press and hold when the line
is connected.
5
Smart
Vol+
Vol-
English
Link to mobile – Press once in the idle mode, the lingua will try to connect to the
mobile in the paired list.
Microphone Control:
Long Press Vol+ and Vol- together will mute or un-mute the microphone for the
current calls only, reminding tones: Long lower frequency tone for mute, long high
frequency tone for un-mute.
Long press Vol+ will set the Microphone gain to High with reminding tones: Double
continuous high frequency tones.
Long press Vol- will set the microphone gain to Low, with reminding tones: Double
continuous low frequency tones.
*Long press: timing >2 seconds.
LED:
Flashing every 5 seconds when Lingua is idle.
Flashing every 1 second when the Lingua pairing mode is initiated.
Light on when Lingua is linked to the mobile.
*The function available subject to the specific model of mobile phone. It will be
only available when car kit was paired to the phone with handsfree profile.
6
Español
Manual de Instrucciones
Gracias por elegir nuestro Kit manos libres para coche “Lingua FX Series”
equipado con tecnología Bluetooth TM.
Modelo: FX1000 (Kit-PRO manos libres Bluetooth para coche)
FX1000 es un sistema en kit manos libres BluetoothTM para coche que puede
realizar las operaciones de llamada básicas a través de un práctico control remoto
con 3 teclas. Es totalmente duplex con elevada calidad de sonido.
Indice
1. EQUIPAMIENTO
2. INSTALACIÓN
3. CARACTERÍSTICAS PRINCIPALES
4. ESPECIFICACIONES
5. SOLUCIÓN DE PROBLEMAS
6. OPERACIONES
1. EQUIPAMIENTO
1.1. Módulo principal
1.1.1. Módulo principal
1.1.2. Soporte de montaje
1.1.3. Bolsa de tornillos
1.2. Kit Control Remoto
1.2.1. Control remoto
1.2.2. Cinta mágica
1.3. Cable en T con conectores ISO
1.4. Kit micrófono externo
1.4.1. Micrófono externo
1.4.2. Cinta mágica
2. INSTALACIÓN
La instalación del sistema está indicada en la Figura 1.
2.1. El método de montaje del módulo principal está representado en el Figura
2; el soporte de montaje está incluido en el caja.
Nota: No instalar el módulo principal cerca del sistema de calefacción/aire
7
acondicionado.
Proteger el módulo principal de la exposición directa a los rayos del sol. No meter
el módulo principal en un recipiente de metal ya que la calidad de la conexión
BluetoothTM podría verse afectada.
2.2. El control remoto puede clavarse para poder acceder a él con facilidad.
2.3.Instalación del micrófono externo: recomendamos colocarlo cerca de la boca
del usuario a una distancia máxima de 60cm. para obtener la mejor recepción. Una
de las posiciones de instalación del micrófono externo está indicada en la Figura 1.
Figura 1 Instalación del sistema
Figura 2 montaje unidad principal
Español
Micrófono
Altavoz coche
Control remoto Móvil BT
Módulo Principal
Módulo Principal
Soporte de
montaje
8

Español
2.5. Diagrama de conexión
Figura 3 conexión
3. CARACTERÍSTICAS PRINCIPALES
3.1. Soporta apareado automático (auto pairing).
3.2. Super cancelación de eco y reducción del ruido de fondo.
3.3. El manos libres en full duplex funciona con los altavoces delanteros del
coche.
3.4. Función de silenciamiento automático de la radio.
A utilizar únicamente si la radio del coche está conectada
a un amplificador o si la radio del coche no tiene una
conexión ISO y se tienen dificultades para identificar los
cables que hay que utilizar para las conexiones. Conectar
el cable amarillo a la entrada “Muting” de la radio del coche
y utilizar los cables del altavoz (Conector A posición 2)
conectados a un altavoz externo. El conector B tiene que
ser conectado de nuevo a la radio del coche.
9
Módulo Principal
Muting (Amarillo)
Radio del coche (no incluida)
Micrófono
Control remoto
Cable fuente de
alimentación
Fusible recambiable 2.5
Diam. 5x20mm.
Cable en T ISO Cable
Conector ISO
estándar A B-B
A-A
Conector ISO
estándar B
Altavoz del coche
(no incluido)
A-A
Español
4. ESPECIFICACIONES
4.1. Tensión de servicio: 12vCC.
4.2. Sensibilidad micrófono incorporada: -56db +/- 2db.
4.3. Rendimiento de audio medio: Max. 4W(4•'5f).
4.4. Consumo de potencia: 1200 mA (Max).
4.5. Temperatura de funcionamiento: -10 ~ 50 grados.
4.6. Temperatura de almacenamiento: -20 ~ 70 grados.
4.7. Cable en T con conectores ISO
El cableado que se suministra con el kit se utiliza para conectar el módulo
principal en serie con la radio y los altavoces del coche y para conectar la fuente
de alimentación para el módulo principal.
4.8. Micrófono externo
El micrófono externo se suministra con un cable de 3,5 mts. de largo, lo que
permite instalarlo en cualquier vehículo. Recomendamos instalarlo cerca del
espejo retrovisor, para permitir al conductor hablar de manera natural a la distancia
correcta. Conviene comprobar que las entradas de aire (calefacción – aire
acondicionado) no soplen en dirección del micrófono. Si fuera inevitable, apague
la calefacción / aire acondicionado durante la conversación.
5. SOLUCIÓN DE PROBLEMAS
5.1. La persona que llama no puede escuchar su voz - Compruebe que el conector
del micrófono esté correctamente conectado.
5.2. No hay potencia -Compruebe si el fusible está fundido.
5.3. No se puede ver la identificación de la llamada entrante - Compruebe si el
cable de conexión está correctamente conectado.
5.4. La persona que llama se queja de un eco durante la conversación - Baje el
volumen.
¡IMPORTANTE!
CONECTE EL CABLE AMARILLO (Muting) AL CABEZAL DE CABLE MUTING
DE LA RADIO DEL COCHE.
Si le resulta difícil encontrarlo, consulte el manual de la radio del coche o consulte
con el proveedor del coche o de la radio.
Cuando encuentre el cable correcto, la radio del coche se pondrá en modo
Muting.
10

Español
6. OPERACIONES
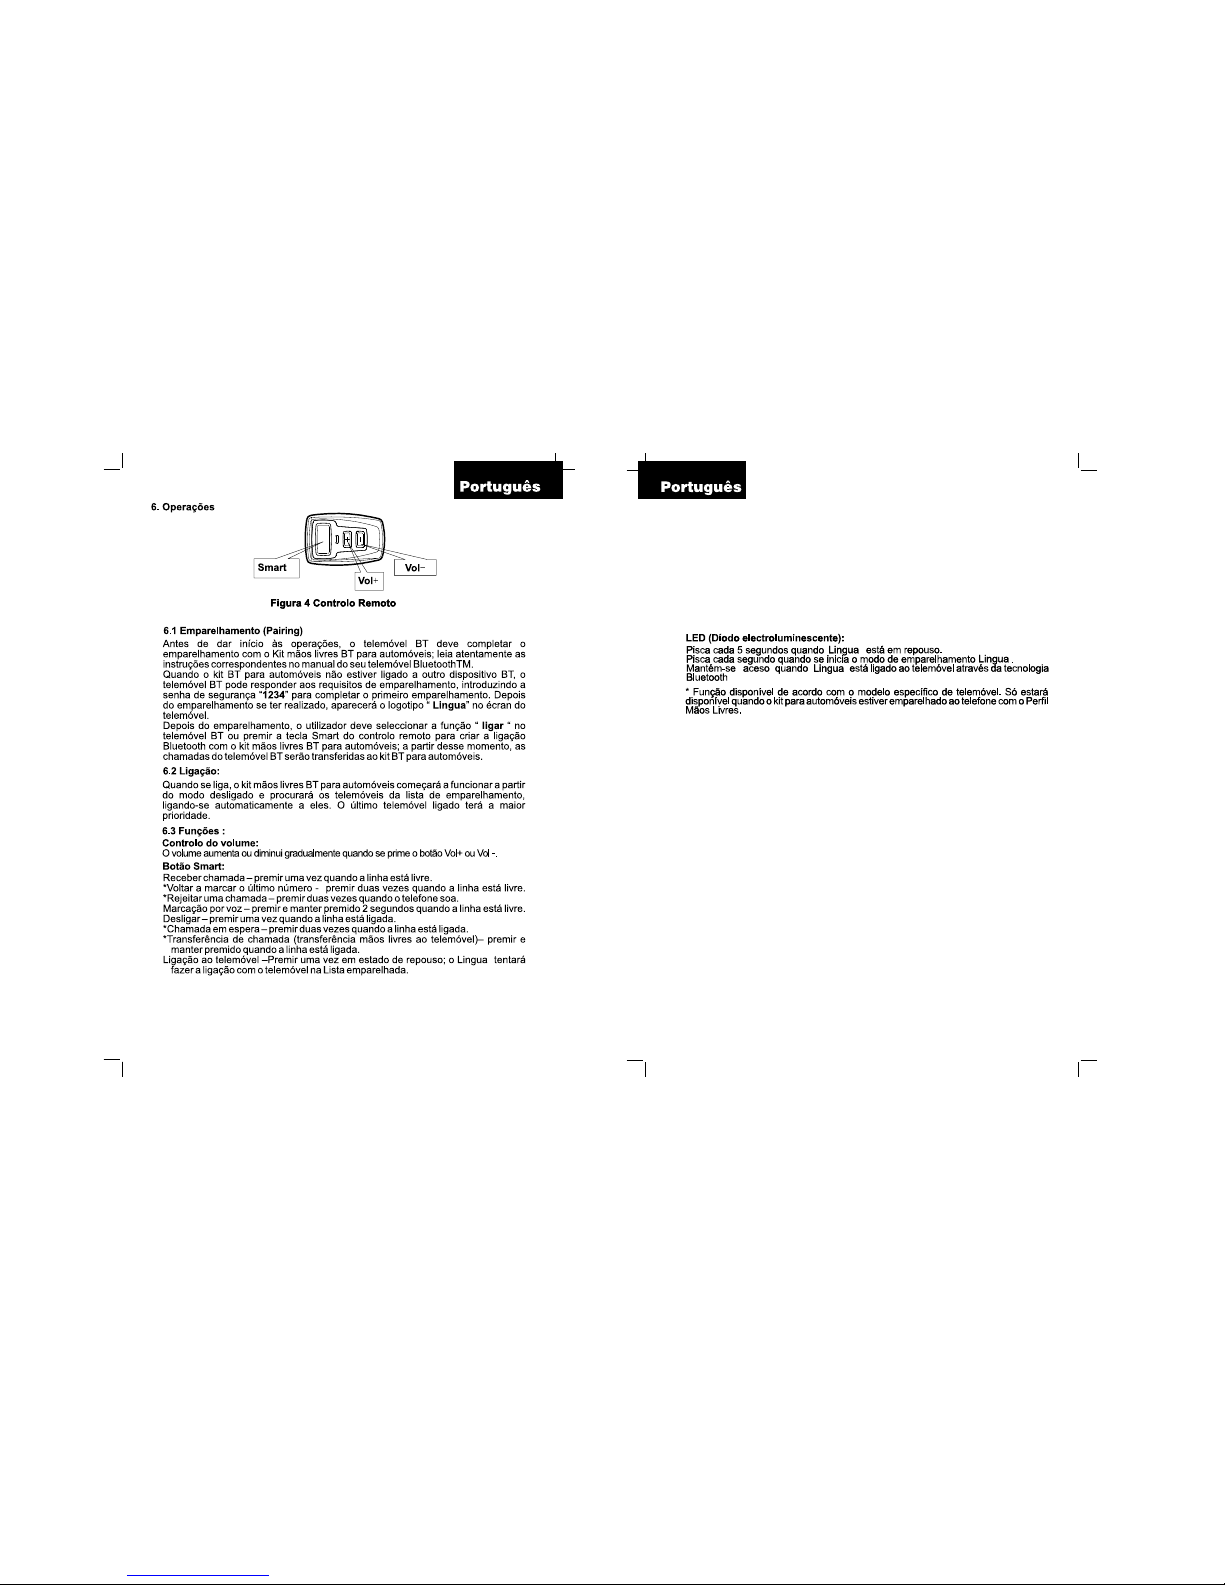
Figura 4 Control Remoto
6.1. Apareado (Pairing)
Antes de comenzar las operaciones, el móvil BT debe completar el vinculado con
el Kit manos libres BT para coche; lea atentamente las instrucciones
correspondientes en el manual de su teléfono móvil BluetoothTM.
Cuando el kit BT para coche no está conectado a otro dispositivo BT, el móvil BT
puede responder a los requisitos de vinculado, introduciendo la clave de seguridad
“1234” para completar el primer vínculo. Una vez realizado el vínculo, aparecerá
el logo “ BlueRadio” en la pantalla del móvil.
Después del vinculado, el usuario debe seleccionar la función “ conectar “ desde
el móvil BT o pulsar la tecla Smart del control remoto para crear la conexión
Bluetooth con el kit manos libres BT para coche; a partir de ese momento, las
llamadas del móvil BT serán transferidas al kit BT para coche.
6.2 Encendido:
Cuando se conecta, el kit manos libres BT para coche comenzará a funcionar a
partir del modo desconectado y buscará los móviles de la lista de vinculado y se
conectará automáticamente con ellos. El último móvil conectado tiene la mayor
prioridad.
6.3 Funciones :
Control de volumen:
El volumen aumenta o disminuye gradualmente cuando se pulsa el botón Vol+
o Vol -.
Botón Smart:
Recibir llamada – pulsar una vez cuando la línea está libre.
*Volver a marcar último número - pulsar dos veces cuando la línea está libre..
*Rechazar llamada – pulsar dos veces cuando suena el teléfono.
Marcación por voz – pulsar y mantener pulsado 2 segundos cuando la línea está
libre.
Colgar – pulsar una vez cuando la línea está conectada.
11
Smart
Vol+
Vol-
Español
*Llamada en espera – pulsar dos veces cuando la línea está conectada.
*Transferencia de llamada (transferencia manos libres a teléfono móvil)– pulsar
y mantener pulsado cuando la línea está conectada.
Conexión a móvil –Pulsar una vez en estado de reposo; el BlueRadio tratará de
conectar con el móvil en la Lista vinculada.
Control del micrófono:
Presionando unos segundos Vol+ y Vol- al mismo tiempo, el micrófono quedará
silenciado para la llamada en curso. Tonos: Un tono largo de baja frecuencia
cuando se silencia (mute), un tono largo de alta frecuencia para la reactivación
del micrófono.
Presionando unos segundos Vol+, subirá el volumen del micrófono. Tonos: Pitido
doble de alta frecuencia.
Presionando unos segundos Vol-, disminuirá el volumen del micrófono. Tonos:
Pitido doble de baja frecuencia.
LED (Diodo electroluminiscente):
Parpadea cada 5 segundos cuando BlueRadio está en reposo.
Parpadea cada segundo cuando se inicia el modo de vínculo BlueRadio.
Permanece encendido cuando BlueRadio está conectado al teléfono móvil mediante
Tecnología Bluetooth
* Función disponible según el modelo específico de teléfono móvil. Sólo estará
disponible cuando el kit para coche esté apareado al teléfono con Perfil Manos
Libres.
12

13 14

15 16
Controlo do micrófone :
Premindo durante uns segundos Vol+ e Vol- ao mesmo tempo, o micrófone ficará
silenciado para a chamada em curso.
Tons: Un tom comprido de baixa frequência quando se silencia(mute), um tom
comprido de alta frequência para podermos reactivar o micrófone.
Premindo uns segundos Vol+, o volume do micrófone aumentará .Tons: Som duplo
de alta frequência.
Premindo unos segundos Vol-, diminuirá o volume do micrófone. Tons : Som duplo
de baixa frequência.
17 18

19 20
21 22
Controllo del micrófono:
Premere per alcuni secondi contemporáneamente i tasti Vol+ e Vol-, per rendere
inattivo il micrófono durante la chiamata in corso. Un suono lungo di bassa frequenza
indicherá che il microfono é inattivo (mute); un suono lungo di alta frequenza
indicherá la riattivazione del micrófono.
Premere per alcuni secondi Vol+, per aumentare il volume del micrófono. Avviso
acustico: doppio suono di alta frequenza.
Premere per alcuni secondi Vol-, per diminuire il volume del micrófono. Avviso
acustico: doppio suono di bassa frequenza.
23 24

25 26

27 28
Contrôle du microphone :
En pressant quelques secondes sur Vol + et Vol - en même temps, le microphone
en mode « Muet » pour l’appel en cours.
Tonalité : Une longue tonalité de basse fréquence quand il passera en mode
« Muet », une longue tonalité de haute fréquence pour la réactivation du microphone.
En pressant quelques secondes Vol +, le volume du microphone montera.
Tonalité: Son double de haute fréquence.
En pressant quelques secondes Vol -, le volume du microphone diminuera.
Tonalité: Timbre double de basse fréquence.
29 30

31 32
33 34

35 36
Steuerung des Mikrofons:
Werden ein paar Sekunden lang gleichzeitig Vol+ und Vol- gedrückt, wird das
Mikrofon für den eingehenden Anruf stummgeschaltet. Referenzton: Ein langer
niedrigfrequenter Ton bei Stummschaltung (Mute), ein langer hochfrequenter Ton
bei Neuaktivierung des Mikrofons.
Drückt man ein paar Sekunden lang Vol+, nimmt die Lautstärke des Mikrofons zu.
Referenzton: Doppelter hochfrequenter Piepton.
Drückt man ein paar Sekunden lang Vol-, nimmt die Lautstärke des Mikrofons ab.
Referenzton: Doppelter niedrigfrequenter Piepton.

This device complies with Part 15 of the FCC Rules. Operation
is subject to the following two conditions: (1) this device may not
cause harmful interference, and (2) this device must accept any
interference received, including interference that may cause
undesired operation. Changes of modifications not expressly
approved by the party responsible for compliance could void the
user’s authority to operate the equipment.
873-063X00A-01
ELECTRONIC MODULE
The location of the electronic module MUST NOT
interfere with deployment of the vehicles airbags.
DO NOT locate the electronic module in the vehicle trunk
(boot).
MICROPHONE
The location of the microphone MUST NOT interfere
with the vehicle airbag deployment.
USER INTERFACE MODULE
The location of the electronic module UIM MUST NOT
create a visual distraction.
The mounted UIM MUST NOT create a visual distraction.
DO NOT mount the UIM on the steering wheel.
Caution
37
Warranty
FONEXION LIMITED 1 YEAR WARRANTY FOR HANDS FREE
BLUETOOTH CAR KITS
Coverage: FONEXION warrants this product againts defects in materials and workmanship
under normal consumer use for year from the date of purchase. FONEXION, at its options,
will at no charge repair, replace or refund the purchase price of this product should it not
conform to this warranty. This limited warranty is a consumer’s exclusive remedy, extends
only to the first consumer purchaser, is not transferable and is valid only on products
purchased by consumers in the United States or Canada.
Exclusions:
Miscellaneious: This warranty does NOT cover defects or damage that result from: (a)
improper operation, storage, misuse or abuse, accident or neglect, such as physical
damage (cracks, scratches, etc.) to the surface of the product resulting from misuse; (b)
contact with liquied, water, rain, extreme humidy or heavy perspiration, sand, dirt or the
like, extreme heat, or food; (c) use of the product for commercial purposes or subjecting
the product to abnormal usage or conditions; (d) service, installation, alteration or modification,
in any way by someone other than FONEXION, or its authorized service centers and, (e)
other acts which are not the fault of FONEXION.
Obtaining Service: To obtain service or information, please contact your distributor or
salespoint. You will receive instructions on how to ship the product, at our expense, to a
FONEXION service center. To obtain service, you must include a copy of your receipt or
other comparable dated proof of purchase, a written description of the problem and your
address or telephone number.
What other limitations are there?
Any implied warranties, including without limitation the implied warranties of merchantability
and fitness for a particular purpose, shall be limited to the duration of this limited warranty,
otherwise the repair, replacement, or refund as provided under this express limited warranty
is the exclusive remedy of the consumer, and is provide in lieu of all other warranties,
express of implied. In no event shall FONEXION be liabe, whether in contract or tort
(including negligence) for the damages in excess of the purchase price of the product. Or
for any indirect, incidental, special of consequential damages of any kind, or loss of revenue
or profits, loss of business, loss of information or data, software or applications or other
financial loss arising out of or in connection with the ability or inability to use the product
or any other product used with the product to the full extent these damages may be
disclaimed by law. Some States and jurisdictions do not allow the limitation or exclusion
of incidental or consequential damages, or limitation on the length of an implied warranty,
so the above limitations or exclusions may not apply to you. This warranty gives you
specific legal rights, and you may also hae other rights that vary from state to state or from
one jurisdiction to another.
This device complies with Part 15 of the FCC Rules. Operation is subject to the following
two conditions: (1) this device may not cause harmful inteference, and (2) this device must
accept any interference that may cause undesired operation. Changes of modifications
not expressly approved by the party responsible for compliance could void the user’s
authority to operate the equipment.
872-014X00A-01
38
Table of contents
Popular Automobile Accessories manuals by other brands


ULTIMATE SPEED
ULTIMATE SPEED 279746 Assembly and Safety Advice

SSV Works
SSV Works DF-F65 manual

ULTIMATE SPEED
ULTIMATE SPEED CARBON Assembly and Safety Advice

Witter
Witter F174 Fitting instructions

WeatherTech
WeatherTech No-Drill installation instructions

TAUBENREUTHER
TAUBENREUTHER 1-336050 Installation instruction