Forbidden DRUID User manual

READ
BUILD
RIDE.

WE ARE MOUNTAIN BIKERS.
WE MAKE MOUNTAIN BIKES.
Congratulations and thank you for choosing to purchase a bike from Forbidden. Like you, we love mountain
biking and want you to have the best experience possible. We therefore recommend that you take the time
to read through the guidelines set out in this manual before embarking upon the assembly of your new
Forbidden. But don’t worry, it’s not rocket science and we sweated the details so you won’t have to.
As a technical piece of sports equipment, your new bike requires a degree of technical knowledge as well
as the mechanical skills to properly and safely assemble ready for the trails. These instructions are in no way
here to replace the abilities of a professional bicycle mechanic - if you do not feel condent that you have the
abilities required to perform the necessary assembly of your new bike we strongly advise that you take your
new Forbidden to a professional bike shop for assistance.
Please be aware that if you choose to assemble your new bike on your own without the necessary skills to do so,
you run the risk of voiding the warranty. We will not accept any liability for damage or accidents that may arise
from improper assembly.
If you are struggling, and that’s okay, please reach out and let us know what the problem is as there’s
a high probability that we can help you out and have you closer to the trails in an email or two.
DRUID ASSEMBLY MANUAL \ WELCOME
02

DRUID ASSEMBLY MANUAL \ PARTS + TOOLS
03
1
2
3
4
5
6
7
8
9
10
11
12
SADDLE
SEATPOST
SEAT CLAMP
MAIN PIVOT
IDLER PULLEY
REAR DROPOUT
HANGER
CABLE PORT
CRANK ARMS
FRONT BRAKE CALIPER
FORK DROPOUTS
FRONT BRAKE ROTOR
DRUID XT
13
14
15
16
17
18
BRAKE LEVER
HANDLEBAR
FACEPLATE BOLTS
STEER CLAMP BOLTS
STEM
DROPPER POST REMOTE
1
2
3
4
5
6
7
8
9
TORQUE WRENCH: 2NM 9NM
SIDE CUTTERS
3MM, 4MM, 5MM AND 6MM ALLEN KEYS SUPPLIED
44MM 16 NOTCH INSTALLATION TOOL SUPPLIED
ASSEMBLY GREASE
PEDALS
SHOCK PUMP SUPPLIED
TIRE PUMP
BICYCLE WORKSTAND*
TOOLS REQUIRED
*If you don’t have one, keep the bike box handy as it can assist for the early steps.
1
2
3
4
5
6
7
8
910 11 12
13
14
15
16
17
18
234
5 6 7 8 9
1

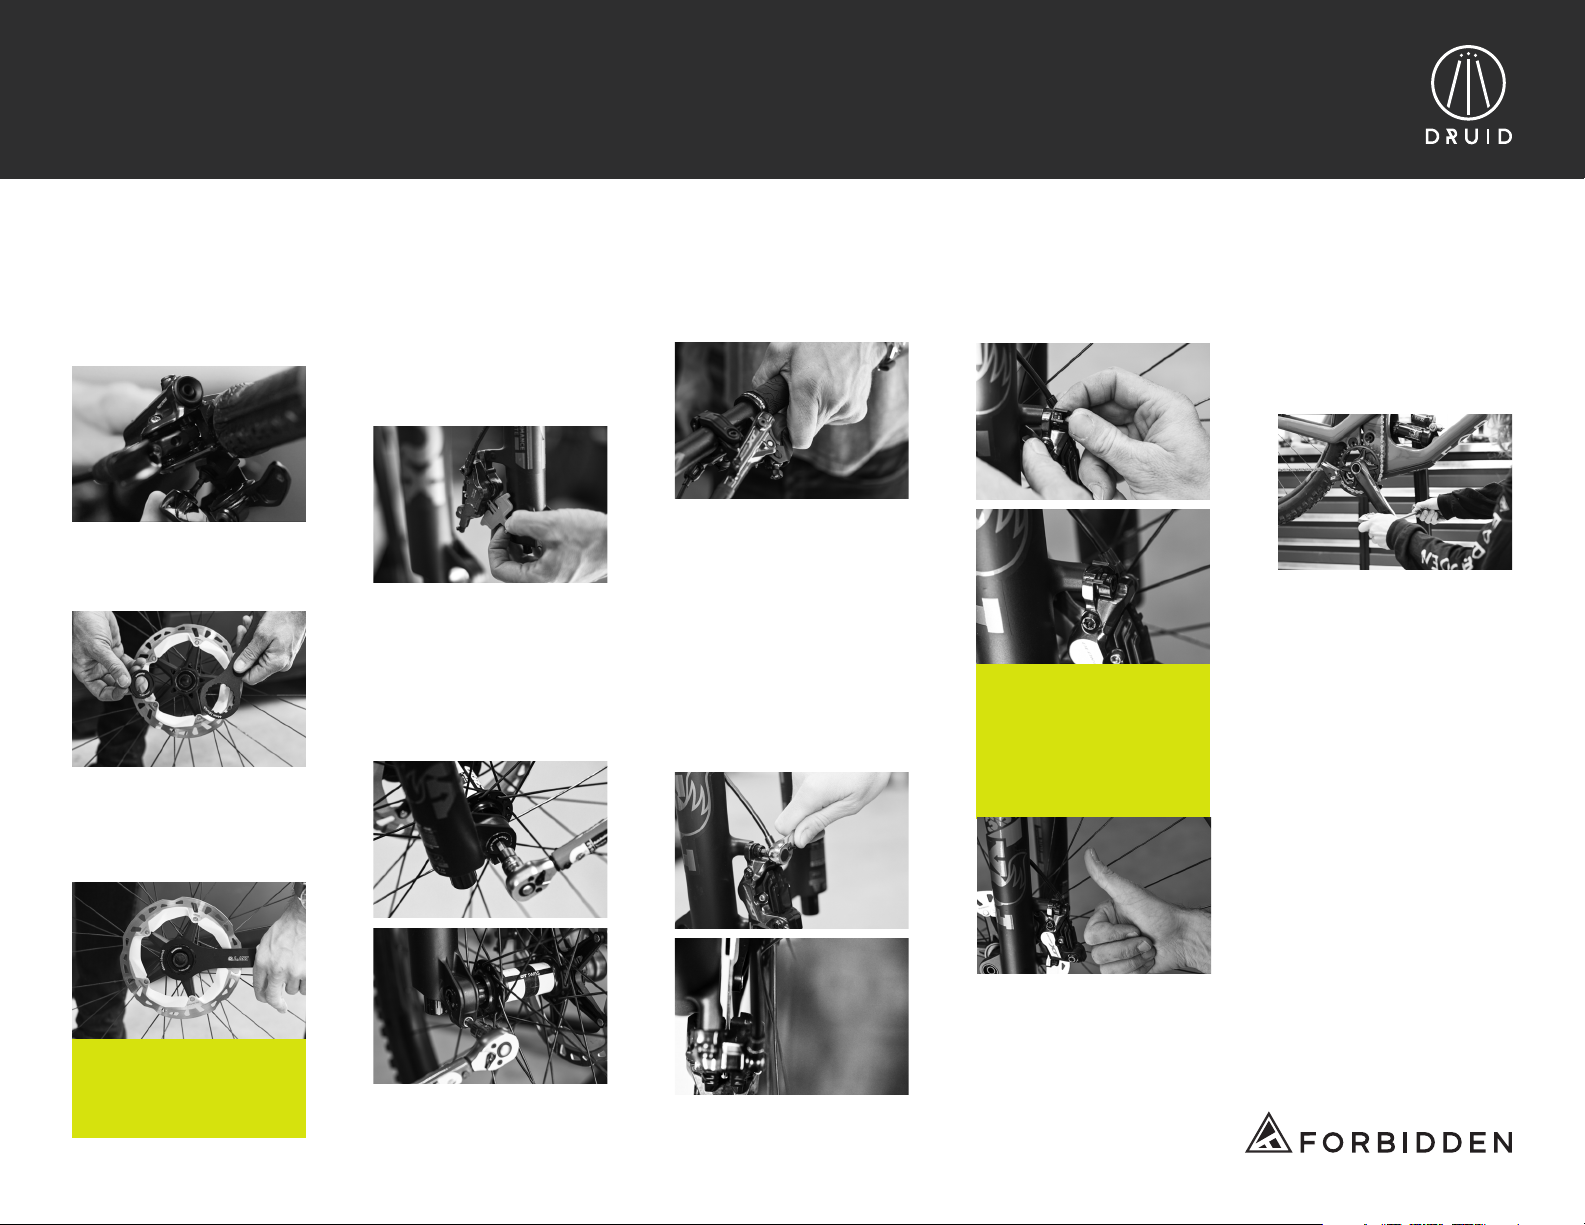
DRUID ASSEMBLY MANUAL \ ASSEMBLY
04
CAUTION: READ THIS MANUAL IN ITS ENTIRETY BEFORE ASSEMBLING YOUR NEW BIKE.
02. CONNECT DROPPER
POST CABLE
a. Fit cable end nut into
the cradle at the bottom
of the seatpost.
b. Pull the housing away
from the cable end nut and
align the housing into the
housing stop at the bottom
of the seatpost.
01. GETTING READY
a.Open the box top and
remove the small parts box,
set this aside.
b. Take your bike out of the
box and remove packaging,
being careful not to scratch
your new ride. Set the front
wheel safely aside.
c. Put the rear end of the
bike back in the box with the
fork overhanging outside of
the box. This will help make
the next few steps easier.
03. INSTALL DROPPER POST
c. While gently pulling on
the seatpost remote cable
housing, continue to insert
the seat post to your desired
height.
b. Apply a thin layer of
grease and insert the seat
post into the seat tube about
one inch.
e. Using a 4mm Allen key,
pull gently on remote cable
housing and re-tighten cable
port to 1-2Nm.
d. Tighten the seatpost
clamp to 6Nm.
b. Ensure cables are properly
routed and mount the
handlebar on the stem.
04. INSTALL HANDLEBAR
a. Using a 4mm Allen
key, remove all four
stem faceplate bolts.
d. Using a 4mm Allen key,
re-install faceplate and
faceplate bolts adhering
to the manufacture’s
specications.
RaceFace Aeect: tighten
the top two bolts so the
faceplate is flush with the
stem and then tighten the
bottom two bolts equally to
6Nm. Check all four bolts
once more to ensure 6Nm.
c. Double check the
orientation of the stem face-
plate by conrming which is
the top on the reverse side.
d. Remove the card
containing the bike’s
serial number and store
in a safe place.
a. Using a 4mm Allen key,
loosen the dropper post
cable port (drive side, near
the head tube) one full turn.
DRUID ASSEMBLY MANUAL \ ASSEMBLY
05
05. INSTALL FRONT BRAKE CALIPER
a.Using a 3mm, install the
dropper post remote via the
iSpec mount to the left brake
lever clamp.
c. Insert rotor onto the hub
and using a 44mm 16 notch
installation tool, torque lock
ring to 40Nm.
e. Insert front wheel into the
dropouts. Using a 6mm Allen
key for the Fox 36 fork,
tighten the axle to 9Nm.
Then tighten the pinch bolt
under the axle head to 5Nm
to lock the axle in place.
b. Grab the front rotor and
lock-ring out of the small
parts box.
06. PEDALS
a. Grab your own pedals
and install the pedals to
the crank arms following
the manufacturer’s
specications.
d. Remove the bike out
of box, remove brake pad
spacer from the caliper and
keep the spacer for any
future transportation where
the wheel needs to
be removed.
IMPORTANT:
FINAL TIGHTENING
AND TORQUE WILL
HAPPEN ON STEP 5.g
f. Pull the front brake lever a
few times and then hold the
brake lever in.
g. With the brake lever still
applied, tighten the two
caliper bolts. Once tight,
release the brake lever and
spin the front wheel to test
any drag between the rotor
and caliper. If the wheel
is spinning freely without
sound, using a 5mm Allen
key, tighten the two caliper
bolts to 8Nm.
CAUTION:
BRAKE CALIPER BOLTS
MUST BE PROPERLY
TORQUED AND ANTI-
ROTATION DEVICES
INSTALLED PRIOR
TO RIDING.
h. Install the nylon anti-ro-
tation devices (in small parts
box) on the brake bolt heads.

V
DRUID ASSEMBLY MANUAL \ ASSEMBLY
06
08. DIAL IN THE COCKPIT
a. Stand over the bike and
straddle the top tube.
c. Using a 3mm Allen key,
dial in the shifter and dropper
remote position. They can
be moved up and down/in
and out to get the perfect
placement.
b. Using a 4mm Alley key,
loosen the brake lever clamp
bolts and adjust the location
for your brake levers.
NICE
WORK.
You have now successfully built your new Forbidden,
but before you get it dirty, let’s do a few more steps to dial it in, just for you.
07. TIRES
b. We recommend that
for o-road riding, the
air pressure in your tires
needs to be within those
recommended by the
manufacturer (visible on the
sidewall) before ne-tuning
can commence.
Air pressure is just as
important as suspension
when it comes to
maximizing performance,
boosting both traction
and your bike’s dynamic
handling.

DRUID ASSEMBLY MANUAL \ ADJUSTMENTS
07
SUSPENSION SETUP
Your weight, riding style and the trails you ride the most, all factor into how you will
want to set up your suspension. Personal preferences will determine the exact settings
that will work best for you, but as a starting point, please refer to the suspension
manufacturers ‘base settings’ - these can be found in the manuals that accompanied
this bike or online via the manufacturer’s website.
CAUTION: YOUR BIKE’S HANDLING IS HIGHLY INFLUENCED BY EACH AND EVERY
ADJUSTMENT MADE TO EITHER YOUR FORK AND SHOCK’S ADJUSTMENT DIALS.
PLEASE TAKE IT EASY ON YOUR FIRST TEST RIDE AND TO REDUCE THE LIKELIHOOD
OF CRASHING, MAKE SMALL AND INCREMENTAL CHANGES TO YOUR FORK AND
SHOCK SETTINGS MAKING MENTAL OR PHYSICAL NOTES AS TO WHERE YOU ARE
WITH YOUR SETTINGS.
When dialing in your new bike, please note the detailed instructions of the suspension
manufacturer. You can nd up-to-date information on their websites, respectively:
RIDEFOX - 36 >>
RIDEFOX - DPX2 >>
If you have any questions regarding suspension setup, please don’t hesitate to
LEGAL STUFF
Wear a helmet whenever and wherever you ride.
FORK LENGTH
Forbidden bikes are designed to be used with specic suspension fork lengths and
travel. Installing forks that exceed our recommended lengths will void your warranty
and could result in catastrophic frame failure.
CAUTION: DO NOT INSTALL A FORK EXCEEDING THE MAXIMUM MANUFACTURER’S
SPECIFICATION; THE MAXIMUM FORK LENGTH COMPATIBLE WITH THIS PRODUCT
FORBIDDEN DRUID XT AND DRUID SLX MEASURES AT 571 MM AXLE TO CROWN
AND HAS 150MM TRAVEL.
BRAKES & SHIFTERS
Forbidden bikes have hydraulic disc brake systems that deliver exceptional braking
performance that will increase after a short break-in period and will be aected by
dierent terrain surfaces.
Forbidden bikes are shipped with a North American brake setup with the left brake lever
operating the front brake and the right brake lever operating the rear brake. To switch
these to a ‘moto’ style please contact your local bike shop as doing so will require
specialist hydraulic bleeding tools.
Applying too much pressure [via the brake lever] to either the front or rear brake may
result in a crash. We advise that you familiarize yourself with your bike’s braking system
in a safe and controlled environment before hitting the ‘full send’ mode on your favorite
double black trail.
Your Forbidden bike has a single gear shifter (situated on the right-hand side of your
handlebars) which operates the rear derailleur. It is best to ease o the amount of power
you are exerting through the drivetrain when shifting through the gears and instead make
small and incremental changes. This will make your shifts smoother and protect your
drivetrain from premature wear.
RIDING: PUBLIC ROADS/NIGHT/WET
Forbidden bikes are engineered to rip o-road trails and not epic road rides or your daily
commute to work through the city. If you are going to be riding on public roads, please
check with local government guidelines and laws to ensure your bike is compliant and
what steps need to be taken, ie, tting a bell and reflectors.
If you are going to be venturing out at night, be sure to follow local laws which will likely
require the use of front and rear lights, but check with your local government to make
sure you are compliant.
When riding in the wet, braking distances are increased and traction is decreased.
While riding o-road in the wet is fun, please be careful out there and give yourself
more time to slow down and be cautious of slippery surfaces.

DRUID ASSEMBLY MANUAL \ MAINTENANCE
08
BEFORE EVERY RIDE
Front and rear wheels are securely and properly mounted in the fork
and frame dropouts.
Axles should be tightened as per the torque chart.
Wheels should spin freely without any resistance or rubbing from
brake pads/ rotors.
Wheels should be steadfast and straight without any side-to-side or
up-and-down play in the hub or buckles (and cracks) in the rim.
All cockpit parts should be torqued to manufacturer’s specications.
Check brake functionality and where possible/ practical, pad wear.
Worn brake pads must be replaced before use.
The headset system moves freely and without play.
Handlebar, stem and seat post are all properly secured and have no
visible signs of wear or damage.
General check to ensure that all components (including the frame)
are free of any signs of damage, material fatigue or early signs of failure
(deformations, fractures, cracks, stress lines in nish, etc.).
Check both tire sidewalls and tread for damage and that pressures
are not outside those advised by the tire manufacturer.
Ensure that your chain and drivetrain are properly and regularly
lubricated and cleaned between service intervals.
Do not ride even if only one of the possible defects is present.
WEEKLY OR MONTHLY CHECKLIST*
All bolts and ttings are tightened to the proper torque value
Your wheels are true and spoke tension is proper and consistent
Brake pads have sucient pad material and brake system is free
of any leaking fluids
Derailleur hanger is straight and the rear derailleur is properly adjusted
Too much or too little chain lube can wear your drivetrain prematurely
so give it a clean and a light lube while you are at it.
Front and rear suspension are properly adjusted and are not leaking fluids
Tires are free of damage or excessive wear
SIX TO TWELVEMONTH CHECKLIST*
Bike overhaul/tune-up completed by a compentent mechanic.
Clean and re-grease headset races, bottom bracket shell, and freehub
assembly, checking for wear and tear
Remove and rebuild frame linkage, checking bearings and replacing
as necessary.
Remove and re-grease axles and tighten all ttings to proper torque values
Front and rear suspension service.
Dropper seatpost service
Detailed inspection of all components for signs of damage, wear, or failure
Here at Forbidden we take pride in the level of craftsmanship we apply to each and every bike we sell. Tested beyond the safety standards adopted by many in the industry, we stand by our
product 100%. But mountain biking by its very nature puts a lot of stress on equipment, all of which will wear dierently and fatigue at diering rates, and may even fail without warning. We,
therefore, recommend that you regularly inspect your bike for any signs of damage and wear, replacing any worn and damaged components. If you don’t have the necessary skills, please refer
to your local bike shop or Forbidden dealer. Loose bolts can lead to frame damage (and potential failure) that is not covered under warranty. Please use the torque wrench and attachments
supplied with your DRUID and refer to the torque settings outlined on page 10. If you are not condent in conducting these checks, please contact your local bike shop.
*Frequency depends on how much or how hard you ride.
CAUTION: Mountain biking and cycling o-road causes vibrations that can
(and will over time) loosen the bolts on your bike. Please check all frame ttings
regularly, including all linkage and rear shock assembly junctions.

DRUID ASSEMBLY MANUAL \ MAINTENANCE
9
CRASHES
Crashes do happen and sometimes things break and become damaged as a result.
If you’ve had a crash, please make sure to thoroughly check your bike for any signs of
damage before you continue on your ride - do not continue on your ride if you see any
signs of damage! If you are unsure that your bike is safe to use, we strongly recommend
that it is taken to a reputable local bike shop and have them inspect it for any damage.
Due to the nature of carbon ber, crashes can cause damage without showing any
visible signs. If you are unsure, seek professional advice and where possible, replace
the component in question. Forbidden has a crash replacement program that will help
get you and your bike on the trails.
TAKING CARE OF CARBON
Never clamp your carbon frame directly in a bike stand as it can
severely damage your frame and instead, clamp it to the seat post
Be careful with bike racks and transporting in cars. Do not overload the frame
with bike rack clamps and be careful not to overload the frame when
transporting inside cars
Never tighten your rear axle without the wheel installed in the frame as the
lateral forces can damage the stays
Never tighten your seat clamp without a seat post installed as it can
damage your frame
Do not leave aluminum components in direct contact with carbon without
rst applying a lm of high-quality grease or carbon paste - components can
corrode and bind to your frame over time
Never tighten ttings over the specied torque values, ever
Clean with warm water and where possible, proper bicycle detergent and avoid
all solvent based cleaners
Cover high wear areas with protective adhesive lms (eg: areas exposed to rub
from cables, heels, knees, etc.). We recommend Ride Wrap and Invisiframe
frame protection for our bikes.
Any damage that results from incorrect handling of your carbon frame will
not be covered under warranty.
TORQUE CHART
POSITION TORQUE
Main Pivot
Rate Control Link / Front Triangle Pivot
Rate Control Link / Rear Triangle Pivot
Rate Control Link
Main Pivot Cover
Shock Bolts
Upper Slider Screws
Idler Pulley Screw
Lower Chainguide ISCG Screws
Seat Clamp
Hanger
Rear Axle
Cable Ports
Fender
Water Bottle Bolts
Down Tube Protector
RaceFace Aeect Stem Faceplate
RaceFace Aeect Stem Steer Clamp
Shimano Brake Caliper Bolts
Shimano Centerlock Rotor Lock-Rings
Shimano Brake Levers
FOX 36 KaboltX Axle
FOX 36 KaboltX Pinch-Bolt
22Nm
14Nm
14Nm
14Nm
8Nm
10Nm
5Nm
10Nm
6Nm
6Nm
16Nm
10Nm
1-2Nm
0.5Nm
1Nm
0.5Nm
6Nm
8Nm
8Nm
40Nm
4-6Nm
9Nm
5Nm

DRUID ASSEMBLY MANUAL \ WARRANTY & LIABILITY
10
FORBIDDEN INDUSTRIES LTD
PRODUCT WARRANTY NOTICE
Forbidden Bike Co. warrants each new Forbidden bicycle frame against
defects in workmanship and materials for Five years from the purchase date,
for the original owner. All components featured on our complete bikes are
covered by the respective manufacturer’s warranty.
THIS WARRANTY DOES NOT COVER:
• Normal wear-and-tear
• Improper assembly
• Improper maintenance
• Installation of parts or accessories not originally intended for,
or compatible with, the frames as sold
• Damage or failure due to accident, misuse, abuse, or neglect
• Labour charges, shipping or other transportation charges for part
replacement or changeover
• This warranty is expressly limited to the repair or replacement of
a defective item and is the sole remedy of the warranty
THIS WARRANTY DOES NOT APPLY TO DAMAGE CAUSED BY:
• Collision
• Crashing
• Trick riding
• Riding with heavy loads
• Commercial activities
• Any similar activities or misuse;
Such uses may damage your bike and can cause serious injury
to the rider, and in all cases will void this warranty.
This warranty is void in its entirety by any modication of the frame,
or its components.
This warranty extends from the date of purchase, applies only to the original
owner, and is not transferable.
Claims under this warranty must be made through the point of sale.
Proof of purchase is required.
This limited warranty is the only warranty applicable to Forbidden Industries Ltd.
PRODUCT LIABILITY WARNING
Please read carefully the product service instructions before use. Improper use and/or
assembly, care and maintenance of this product can result in failure and/or personal
injury. We are not liable for any personal injury or property damage that results from
crashes, poor maintenance, incorrect assembly or failure of any component.
We advise that you seek professional assistance when assembling this product prior
to use. Mountain Biking involves risk and can be extremely dangerous. By choosing to
participate in Mountain Biking, you assume responsibility for this risk. Please ensure you
follow proper use and maintenance instructions and wear appropriate safety equipment.
Please wear a helmet whenever and wherever you ride.

V
RIDE
AND
REPEAT.
FORBIDDEN BIKE CO.
forbiddenbike.com
Unit #1 - 4640 Cumberland Rd.
Cumberland, BC Canada V0R 1S0
Table of contents


