Urban Arrow Family User manual

Quick-Start Guide
Urban Arrow Family
EN

Quick-Start Guide
2
About this Quick-Start Guide
First o, thanks for choosing Urban Arrow! This Quick-
Start Guide will help you learn your way around your
Urban Arrow. It is strongly recommended to read this
Quick-Start Guide before taking o on your rst ride.
A complete manual for your Urban Arrow Family is
available online via this link.
www.urbanarrow.com/en/manual
Safety and maintenance tips will appear throughout
this guide to help maximize your joy of riding. Safety
tips will appear as follows:
Driving suggestions and general information will ap-
pear as follows:
Maintenance instructions are not included in the
Quick-Start Guide (basic instructions are included in
the Urban Arrow Manual). Should you require imme-
diate maintenance information it is advised to check
online documentation or to contact your Urban Ar-
row dealer.
An updated Urban Arrow dealer overview can be
found on the urban arrow website via this link.
www.urbanarrow.com/en/dealerlocator
Check our website for up to date Urban Arrow docu-
mentation:
www.urbanarrow.com
Or check our YouTube channel:
www.youtube.com/channel/UCWr8tQlY4f-
GuynOA3Q-84Tg
Safety plane sample
!
Information plane sample
i

3
Table Of Contents
1 About Urban Arrow 4
1.1. Contact information 5
2 Getting started / First ride 6
2.1. Step 1, Charge your battery 6
2.2. Step 2, Safety checks 7
2.3. Step 3, Bike t 8
2.4. Step 4, Turn on the Bosch e-bike system 9
2.5. Step 5, Select the correct gear 11
2.6. Step 6, Ride away 12
2.7. Step 7, After a ride 13
3 Before every ride 15
4 Tips and tricks 16
4.1. Riding tips 16
4.2. Maintenance tips 17
4.3. E-Bike system tips 17
5 Technical Specications 18
6 Warranty 21
6.1. General Terms and Conditions 22
7 EC DECLARATION OF CONFORMITY 23
8 Service plan 24
9 Notes 34

Quick-Start Guide
4
1 About Urban Arrow
The Dutch bike brand Urban Arrow reinvented the
transport bicycle: a fresh new design, lightweight,
safe and comfortable materials together with the
powerful and reliable German Bosch electric pedal
assist and A-brand components (eg. Shimano, SKS,
NuVinci, Schwalbe). That’s why Urban Arrow was the
winner of an Eurobike Award 2010 and of the ISPO
Brand New Award in 2013.
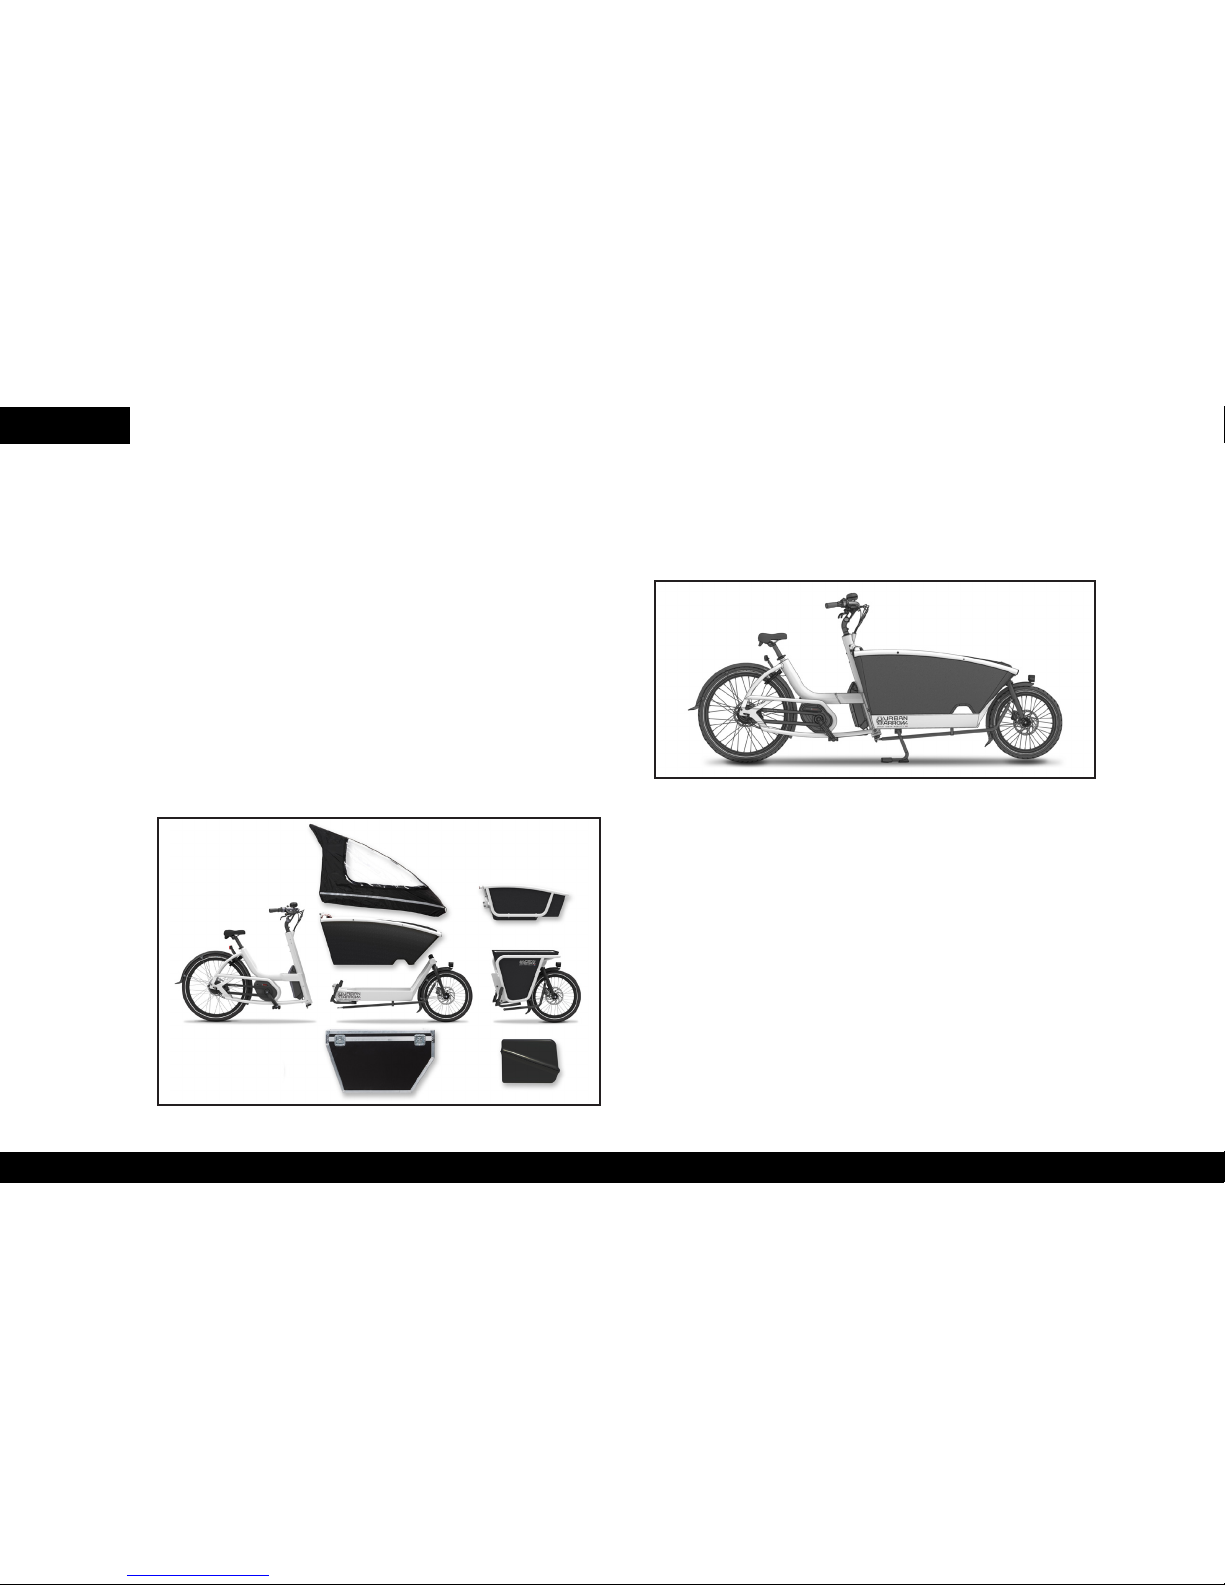
The modular frame design allows for dierent front
frames to attach to a rm and sturdy rear frame. This
makes it possible for Urban Arrow to congure mul-
tiple models, with shared technology. The image be-
low shows most options of the modular system.
The most famous type of Urban Arrow so far is the
Family model. This model is designed for families
with young children who want a green, aordable
and also time saving alternative to owning a (second)
car.
In addition to the Family model, Urban Arrow has also
developed a transport bike (Cargo), which comes in
several lengths and a shorter electric two-wheeled
transport bike (Shorty).
If you need a custom conguration or want your cur-
rent one changed please contact your Urban Arrow
dealer.
Urban Arrow stands for Smart Urban Mobility!
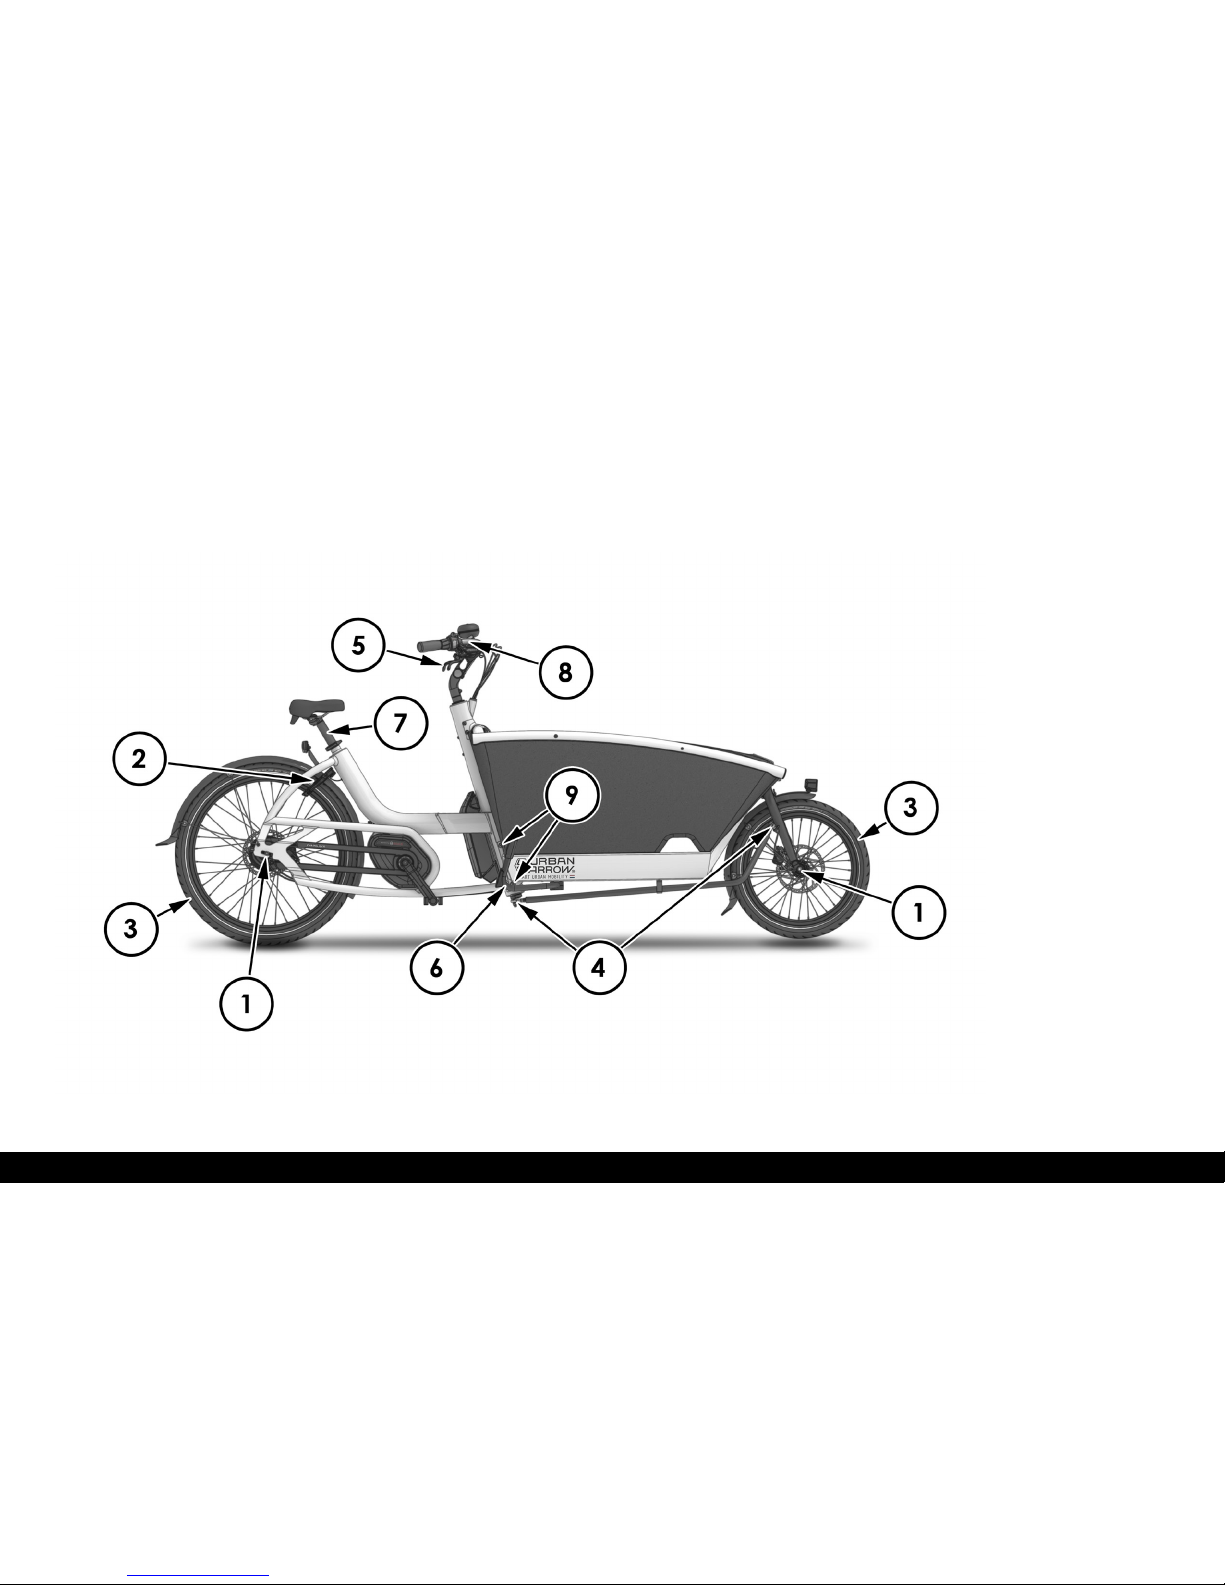
The Urban Arrow Family model
The Urban Arrow modular system

5
1.1. Contact information
If you need information or if you have any questions
regarding your Urban Arrow please contact your
local Urban Arrow dealer. A list of Urban Dealers can
be found online:
Dealer list
www.UrbanArrow.com/en/dealerlocator
For more Urban Arrow information, technical infor-
mation and news items please check our website
and our social media channels:
Our website
www.UrbanArrow.com
Our YouTube channel
www.youtube.com/channel/UCWr8tQlY4f-
GuynOA3Q-84Tg
Our Facebook page
www.facebook.com/urbanarrowcom
Our Instagram account
www.instagram.com/urbanarrow/
Our Twitter account
www.twitter.com/urbanarrowcom
Or contact us by:
Phone
+31 (0)20 6722968
e-mail
service@urbanarrow.com
Post
Urban Arrow
Frederiksstraat 24bv
1054 LD, Amsterdam
The Netherlands

Quick-Start Guide
6
2 Getting started / First ride
If you want to set out on your rst Urban Arrow ride
reading this chapter will suce. It will serve as a
quick guide for the rst ride.
Please follow all of the following steps, they will tell
you what to check before your rst ride and how to
operate the E-bike system in short.
2.1. Step 1, Charge your battery
On delivery of the Urban Arrow the battery is not fully
charged. Before setting out on your rst ride it is ad-
vised to fully charge the battery.
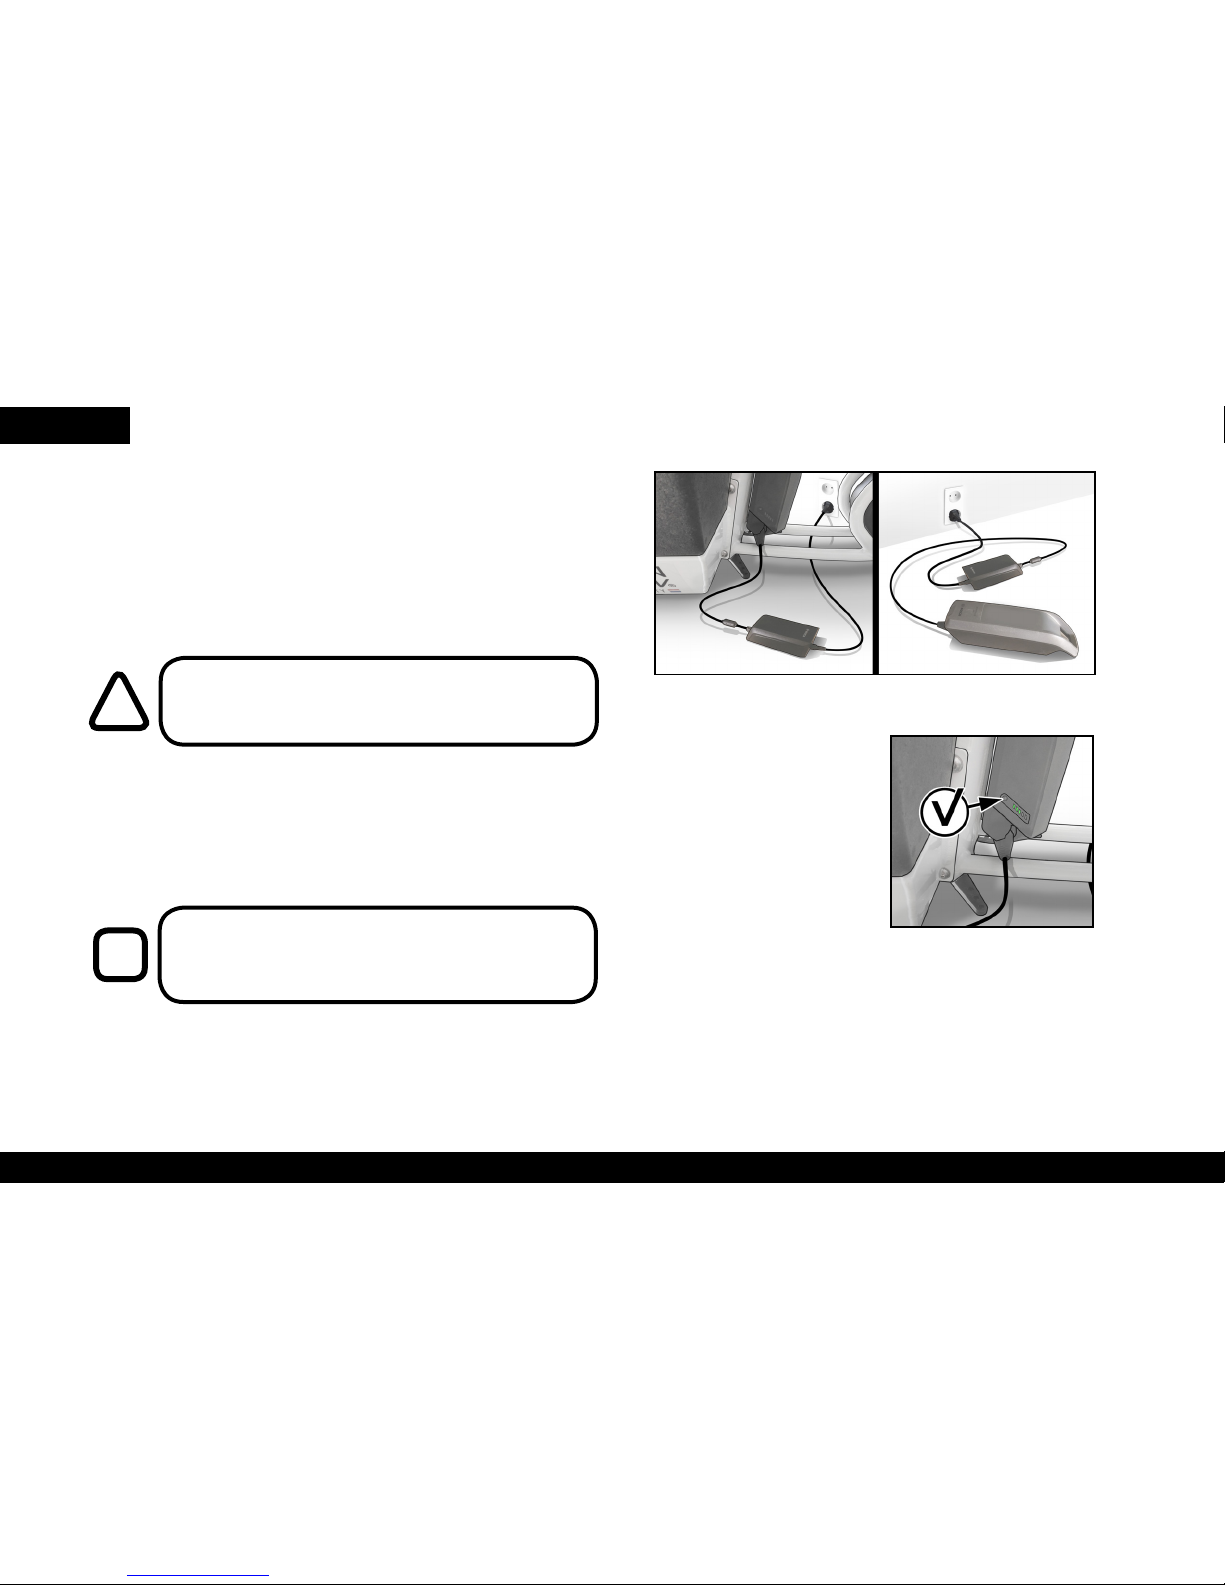
When the Battery is being charged, LEDs on the
battery will indicate how far the battery has been
charged. The LEDs will blink until the battery is fully
charged. At this point all the LEDs will be lit.
You can check how far the
battery, which is discon-
nected from a charger, is
charged by pushing the
button on the battery
once. The LEDs next to the
button will light up, the
more light up the more the
battery is charged. If no
LEDs light up there is no
charge left in the battery
It is strongly recommended to read this Getting
started / First ride chapter in full without skipping
any of the steps
Note that the battery can be charged while
mounted in the cradle or when it has been taken
out of the cradle.
!
i
Charging the battery
Battery charge

7
2.2. Step 2, Safety checks
To ensure your new Urban Arrow is safe to ride
please check the following safety points. These are
quick checks to avoid mechanical malfunctions.
1Check if the axle nuts aren’t loose.
2Check if the tyres aren’t running against the fenders, the frame
or the lock
3Check if the tyres are well inated (between 3 and 4 bar)
4Check if the steering rod / rod ends are tight
5Check if the brakes are working
6Make sure the kickstand folds upwards and keeps its position
7Check if the seatpost doesn’t slip in the frame, make sure the
seatpost clamp is tightened
8Check if the stem, handlebars and grips aren’t slipping or loose
9Check if the main frame connection bolts aren’t loose
If your bike fails on any of these points don’t use
the bike and check with your Urban Arrow dealer to
discuss any problem.
Quick safety checks

Quick-Start Guide
8
2.3. Step 3, Bike t
To ride a bike safely you will need to have a comfort-
able seating position. This is achieved by adjusting
the saddle height and handlebar position. These
are dependent on rider preference and the physical
properties of the rider.
If you follow these bike t tips you will have a good
base for nding a comfortable seating position. Note
that these are just quick tips. Please consult your
Urban Arrow dealer for a professional bike t.
• Make sure your back is not angled forward too
much (handlebars too low or too far away). This
will put stress on your lower back and wrists
leading to discomfort.
• The Urban Arrow is designed to provide a ‘re-
laxed’seating position. This means that the rider
will be able to have both their feet (not just the
toes) on the ground while seated on the saddle,
creating a stable position.
• A correct saddle height can be checked by
positioning your foot on the pedal at its point
farthest away. The knee should be slightly ben-
tat this point.
How to adjust the saddle height and handlebar
position is explained in the Urban Arrow Manual,
which is available online
i
Bike t tips

9
2.4. Step 4, Turn on the Bosch e-bike system
The battery and display need to be mounted before
you can turn on the Bosch e-bike system. The battery
is mounted into a cradle located on the rear frame.
Slide the bottom of the battery through hole in the
frame into the cradle. Make sure the cradle is clean
of dirt and debris.
Check if the battery is mounted correctly (also if
you’ve just mounted the battery). You should have
heard a ‘click’.
Never extend the seatpost beyond the minimum inser-
tion mark. It could result in the seatpost breaking or cause
damage to the frame.
Reversely don’t insert the seatpost too far. The maximum
insertion length is not marked on the side of the seatpost
but the clamp should always clamp on the cylindrical part
of the seatpost.
!
!
Placing the battery in an Urban Arrow

Quick-Start Guide
10
These images show how to recognize an incor-
rectly tted battery.
A mounted display is also required to turn the sys-
tem on. Slide the display onto the cradle mounted
on the handlebars.
Turn on the Bosch system
with the On/O button on
the display mounted on
the handlebars
Placing the display
Turn on the system
i
iThere is no specic order in mounting the display
and the battery

11
Turn on the lights with
the Light button on the
Bosch display. It is advised
to have your lights turned
on at all times, also during
the daytime. The in-
creased visibility to other
trac will increase your
safety.
Should you wonder about
the control pod located
next to the left handlebar
grip. This lets you adjust
the amount of support of
the Bosch e bike system.
There is no need to use it
to turn on the system.
More information on the controls and the Bosch
system can be found the Urban Arrow Manual.
2.5. Step 5, Select the correct gear
Your rst ride is only moments away but take some
time to understand the NuVinci gearhub. Before
riding away (also from a stop) always select a lower
gear.
This will put less stress on the drivetrain and you will
gain speed more quickly. Shifting while standing still
is possible but only within a limited range.
Turn the shifter clockwise for a lower gear (before
riding away, or riding uphill). Turn the shifter coun-
terclockwise (towards you) for a higher gear (riding
fast, or riding downhill).
Turn on the lights
Control pod
Shifting while the bike is not moving is possible
but within a limited range only. With a static bike
while rotating the shifter lever, resistance will in-
crease until it isn’t possible to rotate the lever any
further. Don’t apply unreasonable force to rotate
the lever beyond this point. Once the bike starts
rolling you can shift through the whole range of the
gearhub again.
!
Shifting the NuVinci gearhub into a lighter (lower) gear

Quick-Start Guide
12
Note that the image with the bicycle and the hill
changes when you turn the shifter. The NuVinci
gearhub has continuously variable gearing, meaning
there are no set gears with steps inbetween them.
2.6. Step 6, Ride away
To ride away, take the bike o its kickstand. This is
done by taking position on one side of the parked
bike. With one hand hold the handlebar grip closest
to you 1, with the other hand pull upwards on the
handle located underneath the saddle 2. Then push
the bike forwards 3, the spring loaded kickstand will
rotate upwards and out of the way 4. These steps are
shown in the image to the right.
Look over your shoulder, indicate direction and ride
away. Enjoy!
Selecting a lower gear riding away from a stop
will reduce strain on the drive train components
and increases the operating life of your bicycle. Se-
lecting the correct gear will also aect the range of
your battery positively.
i
Taking the bike of its kickstand
Make sure your bike is unlocked before taking it
o the kickstand. Otherwise there is a chance the
lock will bend or snap the spokes of your rear wheel.
!

13
2.7. Step 7, After a ride
Before coming to a stop don’t forget to shift the Nu-
vinci gearhub to a lower gear, anticipating for when
you would ride away again.
When you want to park the bike, put it on its kick-
stand. This is done by dismounting the bike and
taking position on one side of the bike. While hold-
ing the handlebars, one hand on each grip 1, push
down on the end of the kickstand with your foot 2.
Simultaneously pull the bike backward with your
hands on the handlebar 3. These steps are shown in
the image to the right.
Lock the bike, using the wheel lock and preferably
an extra lock. It is advised to use the extra lock to
secure the Urban Arrow to a static object. This will
reduce the chance of theft.
Take out the battery (if you plan to park your bike
for a longer period) and take o the display. These
are expensive parts to repair or replace, please take
good care of them. Store them in a dry and safe
place.
Putting the bike on its kickstand
Take care parking your Urban Arrow in a socially
acceptable manner. Don’t block the road or side-
walk. Don’t lock your Urban Arrow to bikes that
aren’t yours.
i

Quick-Start Guide
14
To take o the display, press the plastic ap at the
front of the display and simultaneously slide the
display towards the front. This way the display slides
of the display cradle.
If your lights are turned on they will automatically
switch o if you remove the battery or the display.
Alternatively you can switch them o using the
Light button on the display., or by turing o the
Bosch system with the On/O button.
Take your luggage and or kids out of the cargo box.
If you are parking your Urban Arrow outside over-
night or for a few days, covering the bike with an
Urban Arrow bike parka will reduce wear and litter-
ing problems and keeps the bike clean. Check the
Urban Arrow website for more information on the
Urban Arrow bike parka and other Urban Arrow ac-
cessoiries.
www.urbanarrow.com
Lastly, don’t forget to charge your battery after a
ride!
Charging the battery
Removing the display

15
3 Before every ride
To ensure a safe ride please regard these tips. Try and keep these in mind before every ride.
• Check if the battery is charged before taking it to the bike (in case was charged o the bike)
• (Charge the battery)
• Mount the battery and check if it is mounted correctly. Did you hear the ‘click’?
• While mounting the battery check if the battery cradle is clean (no dirt or debris)
• Place the display onto the handle bar
• Unlock the bike before taking it o the kickstand
• Take the bike o the kickstand and makes sure the kickstand holds its position
• Check the tyre pressures. Inate them if they feel too soft and in case of a puncture x this before your ride
• Turn on the lights with the ‘Light’ button on the display
• Check the indicated support level of the Bosch system. Select one of the levers before riding away
• Check the brakes. Pull on the brake levers and try and push the bike forward
• Check if your passengers are secured by their safety belts
• Check if your luggage is secured, so it cannot move around during the ride
• Look over your shoulder before riding away and indicate direction

Quick-Start Guide
16
4 Tips and tricks
This chapter will list Maintenance tips for specic
parts and general advice regarding riding your bike.
It is by no means complete but reading and applying
these tips and tricks will help maximize your Urban
Arrow experience.
4.1. Riding tips
• Make sure you are comfortably seated on the
Urban Arrow. With a good bike t you can have
both feet on the ground while seated on the
saddle. See chapter 2.3
• Unlock your bike before taking it o the kick
stand. Reversely, lock your bike when you have
it on the kick stand. This will prevent bending or
snapping of spokes.
• Select the correct gear before riding away
from a stop, selecting a lower gear will be both
quicker and will put less strain on the drivetrain
(motor and gear hub) see chapter 2.5
• Shifting can be done while standing still but
only within a limited range. If you feel resistance
increase while rotating the shifter don’t forcibly
rotate the lever beyond this point.
• Shifting over the full range can be done while
riding.
• Try and avoid shifting under load (while pushing
hard on the pedals). For instance at the start of a
hill or after a corner. Try and anticipate situa-
tions and shift before the hill or shift before the
corner.
• Try and shift towards a lower gear when you
anticipate you are going to make a stop.
• If you notice unusual noises while riding, try and
nd their source. If you cannot nd the source
or are unable to x it, please refer to your Urban
Arrow dealer.
• The gearing can be tuned very precisely with
the NuVinci gearhub, there is always a perfect
gear
• Going around a corner, make sure to have the
crankarm that is on the inside of the corner
rotated upwards (12 o’clock position) this will
avoid hitting the pavement with your pedal

17
4.2. Maintenance tips
• An Urban Arrow can be left parked outside for
long periods without any problems. Weather
inuences will increase wear however, both
technically as cosmetically. Protection from
weather inuences can be done by covering the
Urban Arrow with a bike parka or by parking it
indoors.
• Check your tire pressure regularly. At least once
every month. Low tire pressure will increase tire
wear, it will lower puncture resistance, it could
lead to damaging your wheels as will it decrease
the range of the Bosch e bike system. More roll-
ing resistance will require more battery power.
• If you are running disc brakes and are able to
pull your brake lever so it touches your han-
dlebar it’s time to adjust the brakes for brake
wear or it may be a indication of a mechanical
problem (air in the hydraulic lines)
• If you are running rollerbrakes it could be possi-
ble to pull your brake levers all the way towards
the handlebar. However this does not aect
maximum braking power.
• Insert some Shimano Rollerbrake grease into
the rollerbrakes every 3 to 6 months. This is part
of regular maintenance by your dealer but is
something to watch yourself too.
• Clean your Urban Arrow regularly. Especially in
wintery conditions, dirt and salt will increase
wear on parts and materials. Cleaning regularly
will prevent (costly) damage repairs. It is advised
to use bicycle cleaning products
• Don’t forget to clean the lenses of the lights for
optimal performance
4.3. E-Bike system tips
• Low temperatures have a negative eect on the
performance of your Battery. If the temperature
where your Urban Arrow is parked is below 5
degrees centigrade or 41 Fahrenheit make sure
to take the battery inside.

Quick-Start Guide
18
5 Technical Specications
Complete Bike (Urban Arrow Family)
Total length 258cm
Height 115cm*
Width Box / Handlebars 69cm / 64cm
Wheelbase 197cm
Weight 48kg
Max combined weight disc (incl bicycle) 275kg
Max combined weight Rollerbrake (incl bicycle) 200kg
Max Rider Weight 125kg
Max Pay Load front frame 125kg
Max weight rear carrier (optional) 25kg
"Max Saddle Height.
BB-Saddle / Ground - Saddle"
87cm / 103cm **
"Minimal Saddle Height.
BB-Saddle / Ground - Saddle"
64cm / 83cm
Frame material Aluminium (6061-T6)
Fork material Steel Hi-Ten
E-Bike System
Type Bosch Active Performance Performance
Line CX
Power 250W 250W 250W
Torque 45Nm 60Nm 75Nm
Battery 400Wh 400Wh 500Wh
Battery Lock, one key solution Abus Abus Abus
Range Max (in eco) 80km 80km 100km
Range Daily (in turbo, tested average with load) 40km 35km 45km
Front Wheel
Brake type Roller Brake Disc Brake
Wheel size 20 Inch (Ertro 406) 20 Inch (Ertro 406)
Tyre size 20 x 2.15” (55-406) 20 x 2.15” (55-406)
Tyre type Schwalbe Big Apple Plus Schwalbe Big Apple Plus
Hub Shimano HB-IM40 Shimano HB-M525
Hub spacing 100mm x 9mm 100mm x 9mm
Spokes Sapim 2.0 (14g) x 168mm Sapim 2.0 (14g) x 165mm
Brake "Shimano BR-C6000-F
Tektro Brakelever"
"Shimano BR-T615
RT-M66 disc 180mm
Metal Pads "
Brake hose dimensions, outer cable front 5.0mm x 2500mm 5.0mm x 2550mm
Brake hose dimensions, inner cable front 1.5mm x 2700mm
Rear Wheel
Brake type Roller Brake Disc Brake
Wheel size 26 Inch (Ertro 559) 26 Inch (Ertro 559)
Tyre size 26 x 2.15” (55-559) 26 x 2.15” (55-559)
Tyre type Schwalbe Big Apple Plus Schwalbe Big Apple Plus
Hub Nuvinci N380 RB Nuvinci N380 Disc
Hub spacing 135mm x 10mm 135mm x 10mm
Spokes Sapim 2.34 (13g) x 224 Sapim 2.34 (13g) x 224
Brake "Shimano BR-C6000-R
Tektro Brakelever"
"Shimano BR-T615
RT-M66 disc 180mm
Metal Pads "
Brake hose dimensions, outer cable front 5.0mm x 1940mm 5.0mm x 1950mm
Brake hose dimensions, inner cable front 1.5mm x 2140mm
*approximate, depending on handlebar height.
**with 350mm seatpost, longer seatpost available

19
Components
Front light / rear Light Spanninga Kendo / Spanninga Plateo
Chain KMC X1 100 links
Chainwheel front 18 teeth
Sprocket rear 20 teeth (min 19t max 21t)
Crank Length 170mm
Seatpost Satori 31.6mm x 350mm
Saddle Selle Royale with Handle
Stem Tranz X adjustable -10 to +60 degrees, 90mm long
Handlebars Humpert Steel 600mm wide
Pedals Flat pedals, rubber surface, Aluminium Cage
Wheel lock Abus, Extra wide 78mm, Shield 5650, same key as battery
Headsets First, sealed cartridge bearings
Fenders Front / Rear SKS 20" 65mm x 635mm / SKA 26" 65mm x 1185mm
Shifter cables: outer cable Nuvinci 5.0mm x 2070mm
Shifter cables: inner cable Nuvinci 1.1mm x 2250mm
Steering rod ends M8 Stainless steel
Family Box Material Expanded Poly Propylene (EPP)
Family Box inside Volume, approximately 180 Liters

Quick-Start Guide
20
Other manuals for Family
1
Table of contents
Other Urban Arrow Bicycle manuals