Ice Sprint User manual

2011
OWNER’S MANUAL
SPRINT
ADVENTURE
VORTEX

2
1.0 Introduction. .............................................................................................................................. 3
1.1 Overview................................................................................................................................ 3
1.2 Adjusting and Closing Quick-releases .................................................................................. 4
2.0 Adjusting your ICE trike ............................................................................................................. 4
2.1 Tyre pressure......................................................................................................................... 4
2.2 Folding and Unfolding........................................................................................................... 4
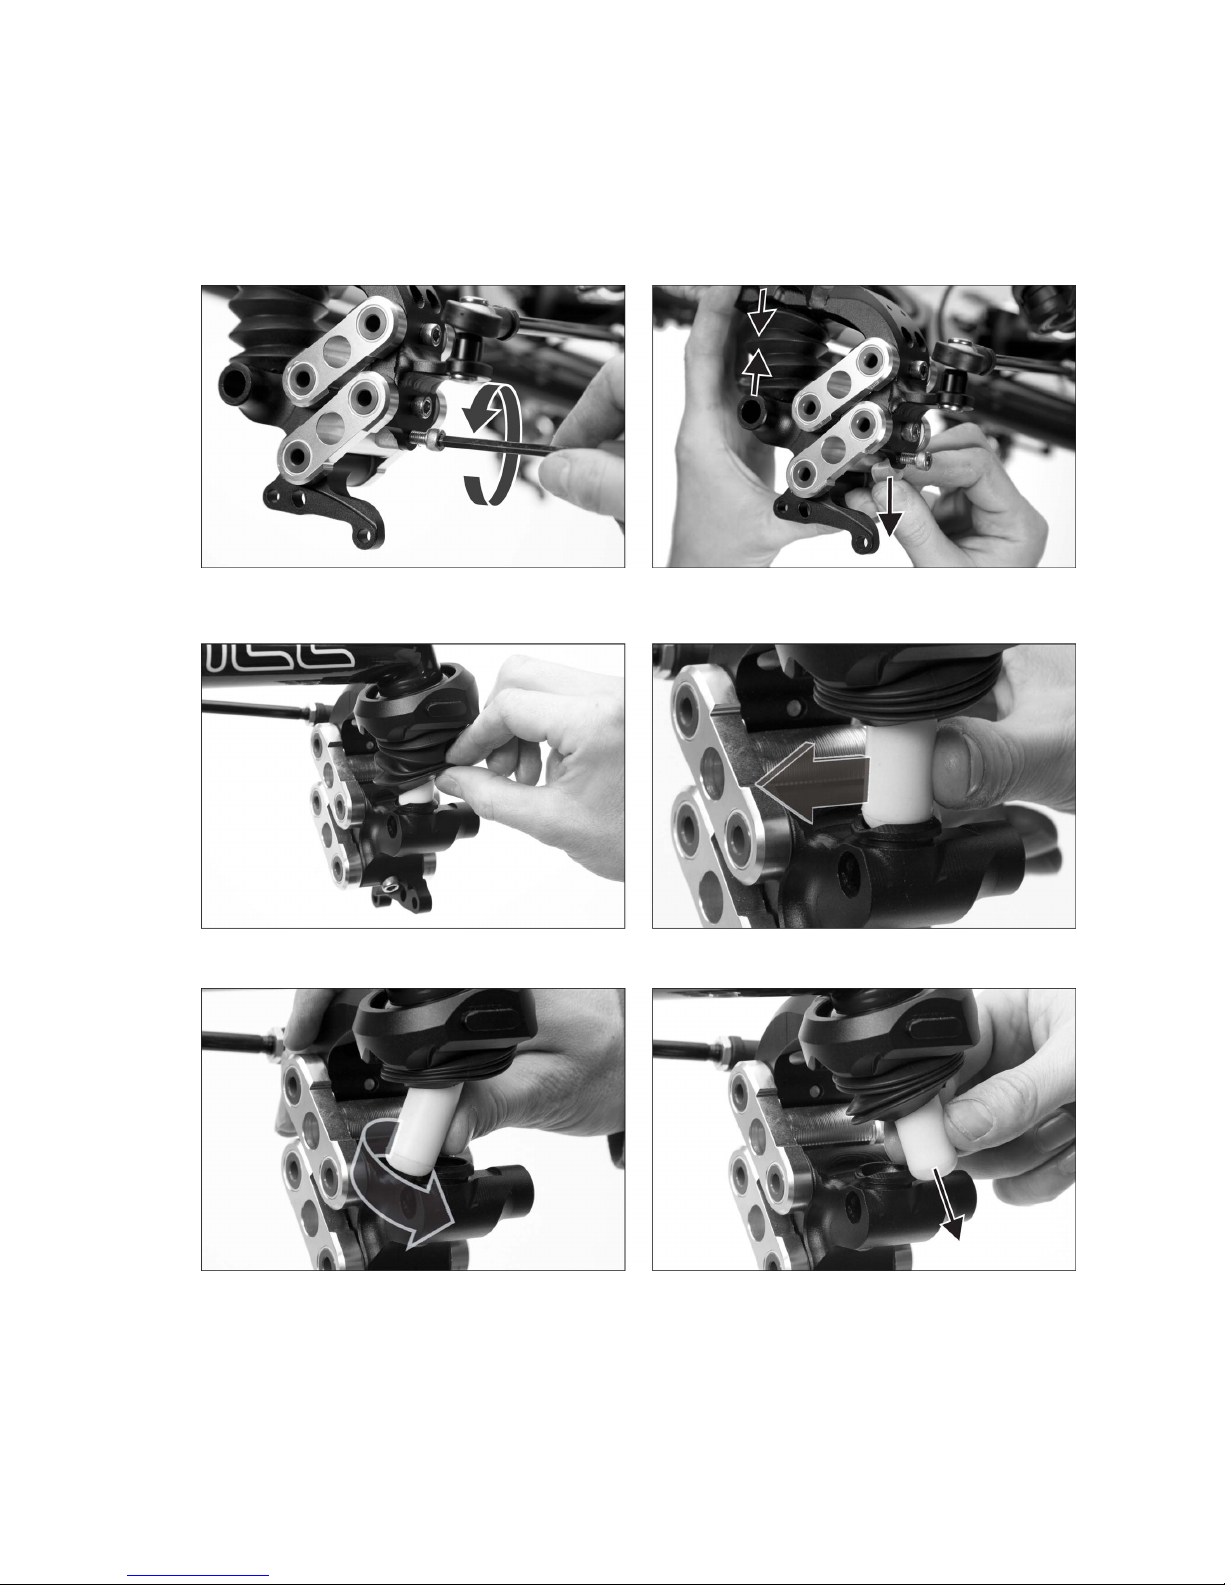
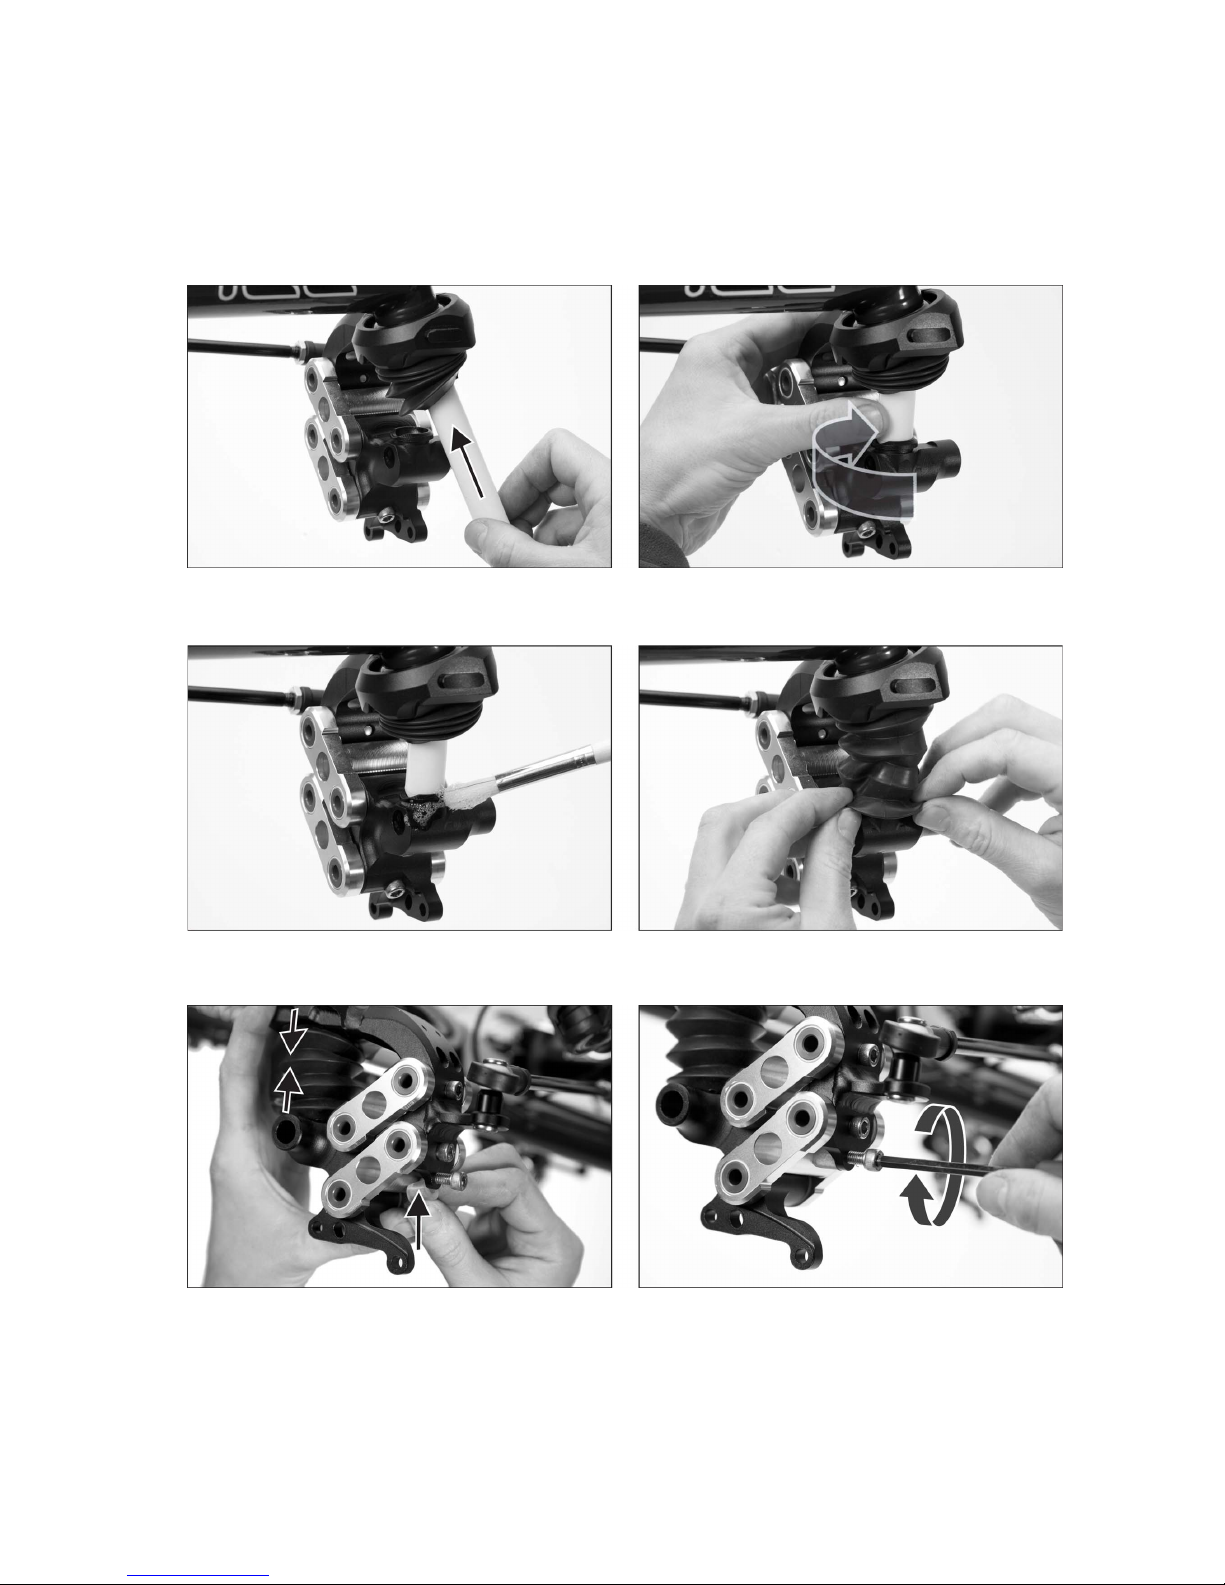
2.2a Suspension adjustment....................................................................................................... 7
2.2b Front suspension adjustment ............................................................................................. 7
2.3a Mesh seat cover ................................................................................................................ 11
2.3b Fitting the hard-shell seat to you ...................................................................................... 11
2.3c Seat angle adjustment....................................................................................................... 11
2.4 Leg length............................................................................................................................ 11
2.5 Seat brackets ...................................................................................................................... 11
3.0 ICE Optional Accessories........................................................................................................ 13
4.0 Riding your ICE trike................................................................................................................ 13
4.1 Getting on and off the trike. ................................................................................................ 13
4.2 Initial test ride ...................................................................................................................... 13
4.3 Stopping in a low gear ........................................................................................................ 14
4.4 Relax.................................................................................................................................... 14
4.5 Cornering............................................................................................................................. 14
4.6 Handling .............................................................................................................................. 15
4.7 Brakes ................................................................................................................................. 15
4.8 Hill climbing ......................................................................................................................... 15
4.9 Descending a hill ................................................................................................................. 15
4.10 Ground clearance.............................................................................................................. 16
4.11 Muscles ............................................................................................................................. 16
5.0 Maintenance ............................................................................................................................ 16
5.1 Lubrication........................................................................................................................... 16
5.2 Adjusting cables.................................................................................................................. 16
5.3 Drum Brakes........................................................................................................................ 17
5.4 Disc brakes.......................................................................................................................... 17
5.5 Rear brake ........................................................................................................................... 18
5.6 Drivetrain ............................................................................................................................. 18
5.7 The frame ............................................................................................................................ 19
5.8 Tyres, tubes, & wheels ........................................................................................................ 19
5.9 Suspension.......................................................................................................................... 20
5.10 Adjusting the tracking ....................................................................................................... 20
5.11 Storage.............................................................................................................................. 21
5.12 Serial Number.................................................................................................................... 21
5.13 Recommended minimum tools and spares ...................................................................... 22
5.14 First service ....................................................................................................................... 22
6.0 Safety....................................................................................................................................... 22
7.0 Other Important Information.................................................................................................... 23
7.1 Recumbent/Trike forums on the Internet ............................................................................ 23
7.2 Warranty Information........................................................................................................... 24
7.3 Liability Information ............................................................................................................. 25
7.4 Legal requirements.............................................................................................................. 25
7.5 Contacting us ...................................................................................................................... 25
Appendix A: Tightening torques .................................................................................................... 26
Appendix B: Suspension Elastomer limits .................................................................................... 26
Appendix C: Tyre Pressures.......................................................................................................... 27

3
1.0 Introduction.
Congratulations on being a new ICE trike owner. You have purchased the finest, most refined
recumbent tricycle available today; we hope it brings you many years of enjoyment.
This manual has been written to help you set up and use your trike. Recumbent trikes may be a
little different from the cycles you are familiar with, so please take a moment to read through this
document. You will find the latest version of this manual in a download-able PDF format on our
website.
Throughout the manual, we have included some Tips, which have been learned from over 20 years
of experience building trikes. They are well worth taking special note of.
If you have never worked on a bike before, you should consider purchasing a good book on bicycle
maintenance. The ICE trikes use as many standard bicycle components as possible, and their
adjustment and maintenance is no different from an upright bicycle. We can recommend Lennard
Zinn’s “Zinn and the Art of Mountain Bike Maintenance” as a thorough and easy-to-read reference.
If you are assembling your trike for the first time, please refer to the ICE Trikes Assembly Manual.
We hope you enjoy owning and riding your ICE trike as much as we like making these great
machines.
The ICE team
1.1 Overview

4
1.2 Adjusting and Closing Quick-releases
Open Closed
Quick-releases are used in a number of places on your trike; it is important that they are tightened correctly.
A quick-release that isn’t fully and properly closed can result in parts coming loose or moving while riding.
This could cause a serious accident.
A quick-release system consists of two basic parts: a lever that provides the clamping force and an adjusting
nut that alters the clamping tension.
With the part you are clamping located properly, adjust the quick-release by opening it, holding both ends and
turning one clockwise until, when you close the lever, you feel some resistance. At this point, try to close the
lever fully. The adjustment is correct when you can fully close the lever,but with some effort (the lever should
leave its impression in the palm of your hand). If you can only close the lever part way, open it, unscrew the
adjusting nut slightly and try again. If it closes too easily, tighten it up a tiny bit and try again. Do not try to
tighten the quick-release by winding the lever around; it will not tighten enough to be safe.
TIP - When assembling your trike, please refer to the table in the
appendix for the proper tightening torques for all fasteners. Do not over-
tighten.
2.0 Adjusting your ICE trike
Fine-tuning for leg length, seat angle, handle bar width / angle, brake lever reach, tyre pressure etc are all well
worth taking time to set to your personal preference.
TIP - Experiment but always go for a reasonable (a mile or two) test ride
to decide if an adjustment is right for you.
2.1 Tyre pressure
Typical tyre pressure for the standard tyres is about 70psi (4.6 bar). Do not inflate the tyres more than the
maximum pressure recommended on the tyre sidewalls. You will need to experiment a bit to find the tyre
pressure that suits you best. Higher pressures will allow the trike roll more easily, but will transmit more road
shock to the rider. Lower pressures will feel much more comfortable, but there can be more rolling resistance.
Also try experimenting with tyres; there are now large cruiser tyres available which can provide a comfortable
ride and reasonably low rolling resistance, as well as small high-pressure racing tyres that offer very-low
rolling resistance and sport-car type handling
2.2 Folding and Unfolding.
Folding and unfolding your trike is very simple. After you have practiced it a few times, you will be able to do
it easily in under a minute.
To fold your trike:

5
Unscrew the knobs
under the front of the
seat and slide the clips
off the frame cup in
which the seat sits.
The nuts should not
have to be screwed
down they should be
left at the end of the
screws as seen here. .
They are there to
prevent the knob from
being unwound too far
and falling out.
Release the quick
release QR (Quick
Release) on the seat
angle adjustment.
Remove the seat
Release the QR on
each handlebar and
swing it backwards
until each is horizontal.
Re-fasten each QR.
Undo the QR on the
hinge

6
Swing the QR and its
connecting pin
backwards 90
degrees.
Lift the QR and its pin
to release the safety
catch.
Swing the rear section
of the frame up and to
the left.
Be sure to lift the
chaintubes as shown
in the photo. This will
allow the chain to fold
over properly
Put the cushion mat
between any parts that
touch after the fold.
Unfolding your trike is the same sequence in reverse order. To unfold your trike:
Swing the rear section of the frame up and to the left and then down to the unfolded position.
Put the cushion mat in a safe place for next time you fold the trike.
Lift the QR (Quick Release) latch to retract the safety pin, and close the hinge. Make sure the safety
pin is properly engaged.
Swing the QR and its connecting pin forwards 90 degrees (into the slot on the front part of the hinge).
Tighten the QR on the hinge. If the QR is loose, the adjusting nut may be tightened slightly.
Release the QR on each handlebar and swing them forward until each is vertical. Re-fasten each QR.
Put the seat in place and slide the clips on the bottom seat rail over the frame cup in which the seat
sits.
Tighten the knobs under the front of the seat.
Secure the seat angle adjustment onto the QR and tighten the QR.
Make sure everything is secure before riding your trike.

7
2.2a Suspension adjustment
The front and rear suspension can both be fine-tuned to work well for you.
The rear suspension can be adjusted by a combination of selecting one of three different hardness and five
different fitting positions for the elastomer.
The front suspension can be adjusted by selecting one of three different hardness elastomers.
Rear suspension
The adjustment is accomplished by the selection of elastomers and mounting positions. The elastomers are
available in three hardnesses: Yellow/ soft, Red/medium, Green/ hard. There are five mounting positions; the
lowest/ closest to the main pivot (numbered 1 here) will make the suspension feel softer. The highest / furthest
from the main pivot position (5) will make the suspension feel harder.
To setup the suspension you will need to select an elastomer and position it by using the table
below.
Elastomer positions
Unclip the rear suspension by pulling the stainless steel clip on the left hand side over it’s pin. The purpose of
this clip is to keep the rear swing arm from dangling when the trike is picked up; it is only unclipped when
changing the elastomer.
The elastomer is removed by pulling and twisting it off of the shock pin.
With the back end hinged open, screw the shock pin into the required hole in the shock plate.
Firmly push the elastomer back onto the pin and close the swing arm back onto the stainless steel clip.
This will give you a good starting point. Your trike should perform properly like this; however, it is worthwhile
spending a little time experimenting with settings to find one that suits you best.

8
The elastomers have different compression characteristics, and you may find other combinations of elastomer
hardness and pin position which suit the roads you ride on and your riding style better; it is just a matter of
trying different combinations. The elastomer system is simple and small enough that you can carry a couple of
elastomers in your pocket and change them when you are out on a ride if you like.
If you carry a significant amount of luggage (perhaps you are going on a long tour), re-tune the suspension
with the trike loaded; you will definitely notice the difference. With a full load on the rack (25kg / 55lb)
you are likely to need to move the elastomer one or two positions up to compensate for the extra weight. If
you already have the elastomer in the top position or next to top you will need to change the elastomer for the
next harder grade; yellow for red, or red for green.
If you ride on rough terrain or ride aggressively, you may benefit from a harder elastomer. If you are a leisurely
rider, who rides predominantly on smooth tarmac, you may be able to use a softer elastomer.
If the setup is too soft the trike may feel like it will roll over..
If it is too hard comfort will be compromised.
You should generally get a better result with the hardest elastomer recommended for your weight, for example
if your weight is 90kg use the green elastomer in position 2 rather than red in position 4.
If you are a light rider and have your suspension setup soft it is advisable to adjust it to a firmer setting;
change for a harder elastomer if necessary before allowing a significantly heavier rider to sit on your trike,
otherwise permanent damage to the elastomer may occur.
With rear or full suspension tires can be run at higher pressure while maintaining good comfort.
Elastomers do not significantly change stiffness with lower or higher temperatures.
2.2b Front suspension adjustment
Note: This operation is shown here with the wheel removed but it is possible to do it with the wheel in place.
The elastomers are available in soft, medium and hard. All of them are coloured yellow, and can be identified
by the letters: S, M & H printed on the end.

9
To remove the elastomer:
To remove the suspension elastomer, first loosen the
stop screw. Compress the suspension unit and remove the rubber
bumper.
Slide the rubber gaiter off at the bottom. Push the bottom of the elastomer out of the locating
hole.
Slide the bottom of the elastomer around to the front of
the king post.
It should now be easy to remove the elastomer fully.

10
To replace the elastomer:
To replace the elastomer, first grease the elastomer all
over then slide it into the kingpost.
Push the bottom of the elastomer around to the side
and into the locating hole.
Apply soapy water to the gaiter groove to aid fitting. Slide on the rubber gaiter at the bottom, checking to
make sure that it is properly seated.
Compress the suspension unit and insert the rubber
bumper.
Tighten the stop screw.

11
2.3a Mesh seat cover
When new, both the seat cover and the straps stretch a little, and in the first few weeks of use you may need
to re-tension the seat by tightening up the straps. In time it will settle down. For maximum comfort you may
need to tighten the cover more in some places than in others. In general, the base of the seat should be tight,
and the back looser.
2.3b Fitting the hard-shell seat to you
The hard-shell seat is supplied with adhesive-backed foam. Try experimenting with cutting out pads and
sticking them on. You should be trying to pad any spaces where you do not touch the seat. Don't pad the
pressure points; pad around them. You can temporarily hold the pads in place with a bit of adhesive tape.
Don't peel off backing of the foam sheet until you are certain of their position. The adhesive is very strong.
2.3c Seat angle adjustment
The seat has 4 positions of adjustment, and adjustment is simple and quick.
Loosen the seat angle adjustment quick-release lever.
If you want to make the seat more reclined set it to the slots closest to the seat cup. If you want
to make the seat less reclined, then set it to the slots furthest from the seat cup.
Re-tighten the seat angle adjustment quick-release.
2.4 Leg length
A small adjustment can be quite noticeable, just like adjusting the saddle on a conventional bike.
Change gear to the smallest chain ring.
Undo the two clamp bolts under the front boom. They must be loose.
Slide the front boom in or out by twisting and pulling or pushing
TIP – It is easier to move the boom if you get a helper to sit on the trike with
both front brakes on.
Check the boom is vertical by eye. It's not necessary to measure anything, if it looks upright,
then it will be fine.
Check that boom is not extended past the MIN INSERT mark on the boom.
Tighten the two front boom clamp bolts (or quick releases)
If you have moved the boom by more than approximately 10mm you will need to check that you
have the correct chain length (see Fitting the Chain - section 2).
2.5 Seat brackets
If you cannot adjust the boom to fit you (either it needs to be further than the minimum insertion mark or your
heels are coming very close to the cross axle of the frame), then ICE offers accessory seat mounting brackets
for your trike. The FF and FB brackets are used to move the position of the seat forward or back when
installed between the trike’s sat mount and the seat. Contact ICE for more information or download the Seat
Bracket Instructions from our website.

12
2.6 Brake lever adjustment
The position of the brake lever relative to the handlebars (the ‘reach’) can be adjusted. It can be useful for
move the lever closer to the handlebar for riders with smaller hands.
For disc brakes levers, there is a reach adjustment screw on the underside of the lever body, between the
cable entry and the handlebar clamp. Use a 2 mm hex key to adjust the screw. The red knob other knob,
located on the outside of the lever, controls the leverage ratio of the brake lever. The correct position for Avid
BB7 brakes is with the knob turned fully counter-clockwise, so that the maximum amount of cable is pulled.
For Tektro Hydraulic brakes, there is an red adjustment knob on the outside of the lever near the pivot. Adjust
the position of the lever using the adjuster screw to the desired lever reach.
For drum brakes, the lever has a reach adjustment screw on the underside of the lever body, between the
cable entry and the handlebar clamp. Use a 2 mm hex key to adjust the screw. The other knob, located on
the inside of the lever, controls the leverage ratio of the brake lever. Changing this setting changes the
amount of cable the lever pulls, and affects the feel of the brakes. The usual position is with the knob turned
fully clockwise, so that the minimum amount of cable is pulled (but with the maximum power).

13
3.0 ICE Optional Accessories
Instructions for our accessories are now packed with the accessory itself. These include:
Front mudguards
Neck rest
Full wrap rear mudguard
Chainring guard
Easy adjust chain management system
Quick release kit
Rear disc brake
If you require an additional copy of these instructions, they may be downloaded from our website at
http://www.icetrikes.co.uk in the Download Centre of ICE World
Trailers
If you plan to attach a trailer to your trike we strongly recommend using a two wheeled trailer. One wheeled
trailers have no lateral stability unlike the trike itself, so when cornering are able to transmit large twisting loads
into the trike, possibly enough to cause serious damage to it. Two wheeled trailers are naturally stable and so
do not cause this problem.
4.0 Riding your ICE trike
CAUTION: If your feet fall from the pedals when you are riding then
they could be dragged under the crossaxle of the trike. Therefore
the trike should only be ridden with your feet securely attached to
the pedals; either with special shoes and pedals which you clip into
or toe clips and straps.
We recommend the use of ‘clipless’ pedals. There is more information in section 6 of this manual. They are a
safe way of attaching your feet to the pedals, Remember, because you are now riding a tricycle, there is no
need to put your feet down until you want to get off the trike.
4.1 Getting on and off the trike.
Getting on
Begin by standing in front of the cross axle
with one foot on either side of the front boom.
Now bend down and reach back to hold the
side of the seat to help lower yourself as you
sit. Try not to push or pull on the handle
bars as you get on and off.
Getting Off
This is much like getting on, but in reverse
order. Sit forward on the seat and put your
feet firmly on the ground. Reach behind you
and hold the side of the seat while you push
yourself up into a squatting position before
standing up.
N
ote: It is possible to damage the hard-
s
hell seat if these instructions are not followed. Not all parts of
it are capable of handling the weight of a full grown person trying to get out of a trike. Seats damaged
in this way are not covered under warranty.
4.2 Initial test ride
Start on a flat piece of road or drive preferably away from traffic. The front brakes are independent so the left
brake operates the left front wheel and the right brake operates the right wheel. Sit on, clip in and make sure
you know where the brakes are and that they stop you moving. Before you have ridden more than a few yards,

14
check the front brakes. MAKE SURE YOU CAN STOP! You should do this before each ride, as well as
checking your brakes for damage and wear.
Steering is very easy and natural and you will soon become unaware of the movements required.
Gear changing - As with any derailleur system you can only change gear when you are pedalling and moving
forward. It is easier to change if you are not putting a lot of force on the pedals, particularly when changing
from a high to a low gear. The rear derailleur is operated by the right shifter, and the front using the left shifter.
You should not try to change into the lowest gear (largest rear sprocket) unless you are on the middle or
lowest (smallest) chain wheel, because the chain will put strain on the rear derailleur.
TIP - Try to get into the habit of not crossing over the gears at
the extremes – don’t run on the biggest chain ring and the
biggest rear sprocket or the smallest chain ring and the smallest
rear sprocket. This will help prolong the life of the transmission.
Also try to anticipate hills and change to a lower (easier) gear
before you get onto the steep part of the hill hence avoiding
changing gear under pressure.
Do not change gear when the trike is rolling backwards, as the chain will jam in the rear derailleur and likely
damage it. When you are riding, you can make minor adjustments to the indexing of the gears using the
adjusters located where the cables exit the shifters.
4.3 Stopping in a low gear
As with an ordinary bicycle it is best to get into the habit of finishing your journey in an easy gear so that you
can pull away easily when you start again.
4.4 Relax
Whilst riding sit back and relax. DO NOT PULL ON THE HANDLEBARS; just hold them lightly. The trike will
tend to steer itself in a straight line depending on the road surface and camber.
TIP – The steering of the trike runs on ball bearings so it is very
smooth and requires minimal effort to steer. The gear cables run
forward and backwards and the spring effect in these cables
tend to make the trike slowly turn to the left if you let go of the
handlebars completely. This is normal and we do not recommend
riding without holding at least one of the handle bars or you will
not have proper control of the trike.
4.5 Cornering
Your trike is inherently very stable under normal riding conditions. Cornering at high speed can cause your
trike to lift a wheel, or in worse cases, roll over. Leaning into the corner can help this, and is a fun technique
that all trike riders learn.
Take care on corners which have a ‘reverse camber.’ Reverse camber is where the outside of the corner is
lower than the inside. On a corner with reverse camber, the trike will try to move to the outside of the curve,
which could take you off the edge of the road, or into the oncoming lane.
We recommend that you find a quiet smooth surfaced area (such as a car park or firm grassy field), and get a
feel for handling your trike. Try turning at various speeds to find the point where your trike starts to lift a
wheel. It is better to learn this in a quiet park than a busy street.
When you are negotiating a corner at speed, remember that your weight shifts away from the inside wheel.
You must remember that it is very easy to skid or lock the lightly loaded inside wheel, and that wheel is
contributing less to your ability to brake and steer.

15
4.6 Handling
You should avoid riding the trike on two wheels. It is possible to do, with considerable practice, but it places
unfair stresses on the wheels and you will not be able to control the trike properly.
If you lock the back wheel (using the rear parking or disk brake), it is possible to make the back end of the
trike skid around; this is the so-called ‘handbrake turn’. While fun to do in a quiet car park, this maneuver can
cause a loss of control, and should not be attempted around other vehicles. It can also scrub the tread off an
expensive tyre in a very short time.
Heavy loads should be carried as low as possible, and as much in the middle of the trike as you can. Heavy
loads mounted high on the back of the trike will affect its handling, especially at higher speeds and when
cornering. Do not carry a child in a child seat over the rear wheel. Besides affecting the trike’s stability, the
trike is not heavy enough to sufficiently support a child without someone sitting on it (it can fall over when you
get out of the seat).
For carrying children or heavy loads, we recommend towing a trailer. There are plenty of 2 wheeled trailers on
the market, and they can be very heavily loaded without affecting the handling of the trike. Crash tests done
in Germany show a child is much safer in a trailer than in a child seat.
4.7 Brakes
The front brakes are operated independently by each main brake lever. The left lever operates the left brake,
and the right lever operates the right brake. Normal braking should be done with both levers together and
evenly for excellent stopping power; you will find your trike to be very stable under braking. Unlike other
trikes, stopping using only one brake will not result in the trike veering from its intended course. This ‘No-
Brake-Steer’ geometry is a safety feature that is an ICE innovation and is designed into every trike we make.
Because your weight is being supported on 3 wheels rather than 2, you will find it easier to lock up the brakes
on the front wheels. The trike will not roll over, but it will slide. Locked wheels are hard on tyres, and are not
as efficient for braking as a wheel which is still turning. When you are braking into corner, you will find the
unloaded inside wheel will lock up quite easily. It is not a problem, but remember that the lightly loaded wheel
is not contributing much to steering or braking the trike.
If you brake violently, at low speeds and with both brakes, you may find the trike wants to lift its back wheel.
In extreme cases, you can brake hard enough for the chainring to hit the ground.
Brake drums, calipers and rotors will heat up when they are used. They can get very hot, especially after a
long descent, and it is possible to burn yourself if you are not careful. Do not touch them while riding or
immediately after dismounting from the bicycle. Check that the brake components have been cooled down
before attempting to adjust the brakes.
4.8 Hill climbing
A recumbent trike or bike tends not to climb a hill as quickly as an upright bike whose rider can get off the
saddle to use his/her weight to get extra effort. It will climb in comfort at a lower speed and in a lower gear.
Try to keep your cadence up by shifting down early. You should never need to get off and push, even when
carrying a heavy load. Just gear down and keep spinning until you reach to the top of the hill.
4.9 Descending a hill
CAUTION, take care on your first downhill rides until you gain experience. It is not unusual to reach
speeds of over 40 mph on steep descents. You will find you can go faster and with much more confidence
once you are used to the way the machine handles. Because there is less air drag in the recumbent position
you will go faster than a bike. You have powerful brakes with good stopping power.
CAUTION, the brakes are powerful and if they are applied sharply on some of our models with higher seats,
you can cause the rear wheel to rise up. This can result in some loss of directional control.

16
4.10 Ground clearance
When going over very rough ground, it is possible, but unlikely, that the underside of the frame could make
contact. If you think there is a chance that the underside of the frame may hit an obstacle, get off first and
look under the trike to see how close things are getting. You will quickly learn to recognize terrain that your
trike can easily handle. If you do contact the underside of the frame then, it's unlikely any serious damage will
be done (other than scratching the paint) but check to make sure everything is OK. A good way of riding over
obstacles is to aim your trike so that the object goes directly under one of your feet. This way it misses the
front wheel, the central frame, and the rear wheel.
4.11 Muscles
The first few times you ride your new trike, you will feel the muscles on your legs working harder than you may
be used to. This is because pedaling from the recumbent position uses different muscle groups than riding in
an upright position. You will find a noticeable improvement in this in a few days, and with a couple of months,
you won’t notice anything different at all.
When you are riding a recumbent, the best approach is to keep your cadence a little high, even if it means
gearing down a little early. One good reason for this is that the recumbent seat allows you to brace yourself
when you push on the pedals, and this makes it possible to put large loads into your knees. On an upright
bike, if you pushed that hard, you’d lift yourself out of the saddle. Also, try to remember to shift down before
you come to a stop; you will find starting off again to be much easier.
5.0 Maintenance
Your ICE trike has been built from quality materials and parts, and will last for many years with just a bit of
simple maintenance. Although there is nothing on the trike that a bike shop can’t maintain for you, doing your
own basic maintenance gives you a good feel of how your trike is working.
5.1 Lubrication
TIP - as with any cycle, a small amount of regular care will prolong the life of your
trike and its components. The simplest thing you can do is to regularly give a
quick drop of oil to all of the moving parts especially after riding in heavy rain.
Always keep the chain and chain tubes oiled.
Lubricating the Chain
At regular intervals, and always after riding in wet weather, you should lubricate the chain. The chain tubes
supplied with your ICE trike will help keep the oil on the chain by protecting it from rain and dirt, prolonging
chain life. Check with your local bike shop to see which chain lube works best in your area. It is not
necessary to use a lot of lube on the chain; better to use a little every week than a lot once a month. Wiping
the chain down occasionally with a dry cloth will help keep it clean and prolong its life.
Other lubrication
Rear hub, head set and pedal bearings on your trike will need greasing from time to time depending on riding
conditions, the same as any conventional cycle. The plain bearings in the suspension pivot need no
lubrication. If they show any significant wear (unlikely), they are simply pushed out and replaced with new
ones.
The steering ball joints don’t require lubrication.
The front hub bearings, handlebar (stem) bearings, and pulley bearings are pre-lubricated and sealed. If they
feel rough or sloppy, they should be replaced.
5.2 Adjusting cables
Cables don’t normally need a lot of adjustment. When they are new, they will stretch slightly, and that stretch
needs to be adjusted out of the system. Check all cables regularly for signs of damage.

17
Brake Cables
To adjust the brake cables, loosen the locking nut on the barrel adjuster (this is the part that hooks into the
brake backing plate on the inside of the hub). Screw the barrel adjuster out a little and check the brakes.
When squeezing the lever, it shouldn’t come too close to touching the handlebar grips. When the lever is
released, the wheel should turn freely and not drag on the brakes. When the cable is adjusted, tighten the
locking nut. If you are out riding and feel the cable could be a bit tighter, you can turn the adjuster on the
brake levers to fine-tune the cable tension.
Derailleur Cables
These are adjusted in the same way as brake cables. There is an adjuster on the rear derailleur, but none on
the front. For the front derailleur, it is only necessary to have the cable tensioned slightly when the chain is on
the inside chainring; fine tuning can be done using the adjuster on the left-hand shifter.
5.3 Drum Brakes
The drum brakes on your trike have a very long life, and shouldn’t ever need replacing under normal use. We
have yet to see a worn out set of pads. If you find that the brakes are not gripping as well as they used to,
they can be disassembled and de-glazed. Remove the wheel from the bike, and then the backing plate from
the wheel. Note how the spacer between the hub and the backing plate is located. If the pads are glazed,
they will look somewhat shiny and smooth. Using some fine sandpaper, lightly sand the surface of the brake
pads until they look dull again. Be careful about not breathing in the dust from the surface of the pads. Clean
the inside of the hubs out with a clean, dry cloth (use no oil, grease, or wax on the inside of the hubs), then
reassemble the brake plates on the hubs. You should notice a difference in braking performance, and you
should initially test them away from traffic until you are used to the improvement in braking. If you notice a
gradual reduction in braking power over a period of time, check the condition of the brake cables and
housing. Friction from dirty cables can considerably increase the effort required to stop the trike.
TIP – periodic removal and lubrication of the brake cables helps
increase their life and gives smoother operating brakes. Disconnect
them at the wheel, and then a small amount of light oil can be
dribbled down the housing without removing the inner cable.
5.4 Disc brakes
Disc brakes (mechanical or hydraulic) require regular attention and maintenance. The most common task is
replacing the disc pads. These will wear under normal use and will require periodic replacement to keep the
brakes working properly.
Your disc brakes may squeal under braking. This is normal, and will change depending on how worn the pads
are and how damp or cold the rotor is. A brake which is hot and dry will rarely squeal.
The braking performance will be severely reduced if the system is contaminated. Clean the calipers, lever,
and rotors with water and a clean cloth. If the disc rotor becomes contaminated with oil or grease, it can be
cleaned by wiping with a cloth with isopropyl alcohol or disc brake cleaning products designed specifically for
disc brakes. It is almost impossible to properly clean contaminated pads; they should be replaced.
Check the caliper and lever for any signs of fluid leaks and the hose for any damage such as chaffing or being
roughly handled. A damaged hose could cause a system leak, which will severely impair braking performance
or cause the brakes to fail.
Brake pads need replacing when the friction material is worn, contaminated or damaged. Don’t wait until the
friction material is worn through to the backing plate to replace the pads. To maintain safe and efficient
braking, the pads need to be replaced if the material is worn down to 0.5mm.
Replacing Brake Pads – follow the instructions that are supplied with your brakes. Parts and spares are
available from ICE.

18
Bleeding Hydraulic Brake Systems - Bleeding the brake system is a procedure where new hydraulic fluid is
used to replace leaked oil or to flush out any trapped air. Air in the system will reduce the braking
performance and the feel of the brake. To bleed your brakes, follow the instructions that were supplied with
your brakes. Parts and spares are available from ICE. Your brake takes mineral oil, which is not the same as
hydraulic fluid used for automotive brakes and clutches. Using automotive fluid will ruin the seals in your
brakes and they WILL fail! Always use mineral oil; a good source is LHM mineral oil used in many Citroen and
Jaguar motor vehicles. One litre is inexpensive and will last you a lifetime.
Troubleshooting
Symptoms Possible Cause Corrective Action
Lever goes to the handlebar System leak
Air in the System
Brake pads worn out
Re-bleed the system
Re-bleed the system
Replace pads
Spongy Lever
A
ir in the system Re-bleed the system
Disc Rotor rubbing on the Pads Calliper not centred over disc
Inadequate clearance
Bent rotor
Re-centre the calliper
Push piston back
Replace new rotor
No braking power Contaminated pads
Worn out pads
Contaminated disc
Replace new pads
Replace new pads
Clean disc with alcohol
Pads fall out Missing pin Replace pin
Fluid loss Hose leaking
Banjo leaking
Calliper bleeding
Tighten hose nut
Replace new hose
Replace banjo O-ring
Tighten or replace bleeder
Warning: If you are not confident of servicing your
brakes correctly, we strongly recommended that you
have a competent cycle mechanic service your disc
brake system. Always wear protective clothing,
safety glasses and gloves when servicing this
system.
5.5 Rear brake
The parking brake is operated from a small lever mounted on the left-hand handlebar. Because the brake
functions as a parking brake, it is necessary to make sure that it holds securely. Check the brake's function,
and if it appears to be slipping, tighten up the central bolt on the brake lever using a large flat screwdriver.
5.6 Drivetrain
The chain pulley on the tension side of the chain will wear over time. Initially it may make a small amount of
noise, but within a few weeks it will bed in and run much quieter. A pulley should normally last about 10,000-
12,000 miles, but if it shows significant wear, replace it.

19
Check that your cranks are tight after the first 50 miles of riding. These should be fastened firmly to the
bottom bracket, with no play. Even a small amount of movement will cause the joint between the spindle and
the hole in the crank to wear, resulting eventually in damage to the chainset.
The rear derailleur idlers tend to collect oil and dirt. Clean them with a dry rag. If they squeak, they can be
disassembled and greased. When you lubricate your chain, put a drop of light oil on the moving pivots of the
derailleur; they will last much longer.
The more you ride your trike, the more used you become to the sounds it makes. If you notice any change in
the sound your trike makes, check it carefully; it may be a sign of something needing attention.
5.7 The frame
The main cruciform and rear section of your ICE trike is powder-coated, a baked-on finish that is both tough
and beautiful. It is possible to damage the coating, particularly if you scrape the trike over road obstacles. If
this happens, touch-up paint is available from ICE to repair the damage. Lightly abrade the scrape with fine
sandpaper, cover the exposed metal with regular metal primer, and then apply the coloured touch-up paint.
The front boom of your ICE trikes are anodized and powder-coated. They require little maintenance except
for regular cleaning.
Mud, rain, road salt, salt air, and sweat can all affect the finish of your trike. Fitting mudguards will help to
keep road dirt off your trike.
Regular cleaning and corrosion protection should be a part of your maintenance routine. We recommend
hand washing your trike with warm soapy water and a rag or soft brush. Never use abrasive cleaners or
solvents on the powder-coated finish. Rinse well and dry after, and then lubricate the chain.
Do not clean your trike using a pressure washer, as the water will force its way into bearings, removing the
grease and causing corrosion.
Keeping the frame dry and clean will keep the coating looking its best for years to come.
If you need to clean the seat mesh, it should be hand-washed in warm soapy water, rinsed well, and hung up
to dry. Do not tumble dry!
After the first 50 or 100 miles, check the steering components for signs of looseness. The headset bearings
may need to be gently tightened after they have bedded in, and the axles should be checked for tightness as
well.
After the first ride or two, the clamp bolts should be checked to ensure they are tight.
5.8 Tyres, tubes, & wheels
Tyres
Quality tyres are vital for good traction and control while accelerating, turning and braking. Each brand of tyre
has its own individual mix of puncture protection, rolling resistance, pressure rating, and durability. Finding
the one that suits your riding style best is the challenge. Tyres should always be inflated according to the
range marked on the sidewall, never above the maximum recommended, and they should be checked
regularly. Worn tyres should be replaced. Trikes often run with slightly reduced pressure, as the load is
distributed across three tyres, not two. Lower pressure results in a more comfortable ride, but at the expense
of higher rolling resistance. Balloon tyres are now available that combine relatively low rolling resistance,
puncture protection, and a smooth ride; they are well worth considering. Your ICE trike has been designed to
allow these larger tyres to be fitted.
Appendix C has a conversion table for pressure in PSI and Bar.
Tubes & Punctures
Always use good quality inner tubes on your trike. It is easiest to carry a spare inner tube with you, and
change it if you should be unlucky enough to have a puncture. Front punctures are fairly easy to mend, as the
tyre can be removed without taking the wheel off the bike. You may find it easier to work on the front wheel if
you put the trike on its side first. Repairing a rear wheel puncture is no different from any other cycle.

20
Spokes
Occasionally check for loose spokes. Broken spokes are caused by spokes loosening up, and then
undergoing stress every time they take a load. If you notice loose (or broken) spokes, or an untrue wheel, take
your bike to your local bike shop to have the wheels re-trued. One loose spoke puts an unfair load on the
spokes next to it, and one broken spoke is usually followed by another.
5.9 Suspension
The suspension on ICE trikes runs on plain bearings. These bearings are made from a special low-friction,
chemical resistant plastic. They do not normally require lubrication. If you should notice any significant
amount of play in the suspension joint, the bearings can be easily adjusted. There are 2 bolts under the
swingarm bearings which adjust the tension on the bearings. Tighten these with a 4mm hex hey only until the
play is removed. Do not overtighten; it will make the suspension pivot stiff and wear the bearings prematurely.
When the bearings can no longer be adjusted, they will need to be replaced. To do this:
Undo the 2 pivot pin clamp bolts under the suspension mount. Loosen the bearing adjustment
screws.
Slide the pivot pin out of the bearings. If it is reluctant to slide, tap gently using a hammer and a
small block of wood to move the pin. Remove the swingarm.
Push the plastic bearings from the swingarm. This can usually be done with your fingers, although a
small bit of wood and a hammer will remove a stuck bearing without damaging the swingarm.
Gently push or tap the new bearings into place. Make sure they are pshed all the way in.
Press the pivot pin back into place, and tighten the 2 pivot pin clamp bolts. Re-tighten the bearing
adjustment screws to remove any play.
5.10 Adjusting the tracking
To avoid excessive tyre wear the front wheels must be kept parallel. Tracking only needs to be checked if you
suspect damage through an accident, if unusual wear starts on one or both front wheels, or the feel of the
steering changes. Before adjusting the tracking, check to make sure the track rods are not bent and the ball
joints are in good condition.
Use a long ruler or a piece of rod to measure between the inside of the tyres at the front of the tyres, and then
at the rear, all measured at axle height. The distance (between the arrows) should be the same, or up to 2mm
less at the front (toed-in).
If the tracking is out of adjustment, loosen the two lock nuts on one trackrod, and rotate the rod (a small
rotation gives a fairly large change in track). Tighten up the lock nuts when the distance is correct.
TIP - note that the lock nuts at each end of the track rods have left and
right handed threads (the left hand threaded nuts have a small notch to
identify them). This allows the track to be adjusted very precisely
This manual suits for next models
5
Table of contents
Other Ice Bicycle manuals