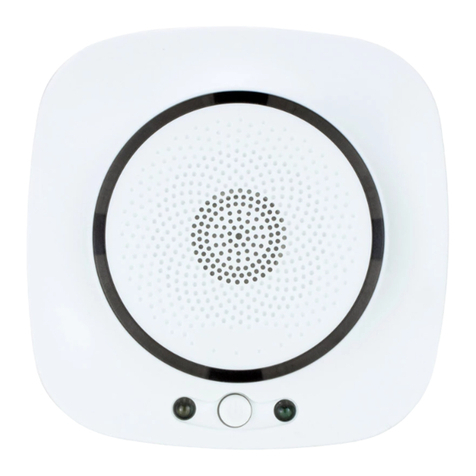
FORENSICS DETECTORS FD-VAPE-WALL User manual

!
FORENSICS DETECTORSTM
www.forensicsdetectors.com
SCHOOLS, HOTELS, BUSINESS
Model: FD-VAPE-WALL
User Manual Version: v1.0

!
FORENSICS DETECTORSTM
www.forensicsdetectors.com
INCLUDED PARTS
ü Vape Detector with (x2) mini bolts
ü Mount Plate and Screw Kit (x2 screws)
ü USB Charging cable
ü USB Charger
ü User Manual (this document)
1. INTRODUCTION
You have purchased the Forensics Detectors Vape Detector. This is a sleek Vape
Detector with advanced features such as smartphone connection and app alerts.
The detector can detect smoke from vapes, e-cigarettes, weed, and many other
illicit smoking sources. The Vape Detector employs laser scattering sensor
technology to detect the slightest airborne particles. The Vape Detector connects
to your network and phone via Wi-Fi and Bluetooth connectivity. This unit was
designed for easy use and setup for schools, K-12, restrooms, businesses,
hospitality toilets, bathrooms, and confined spaces to detect the slightest vapor,
smoke, or aerosol particles suspended from smoking.
It is paramount to consider the following items when installing the Vape Detector
for best operation:
1. Ventilation. If there is too much ventilation in the indoor space, the vapor
and or smoke will dilute, not allowing the Vape Detector an opportunity to
detect the presence of vaping.
2. Location. Placing the Vape Detector and locating it at the most appropriate
place is paramount. Do not locate the unit next to ventilation grills, windows,
dead space (vaults), behind drapes or furniture.
3. Behavior. Many students and individuals are catching onto methods to
reduce vape smoke, such as exhaling the vapor in a toilet when flushing,
vaping in a backpack, or employing personal smoke filters, such as the
Smoke Buddy.

!
FORENSICS DETECTORSTM
www.forensicsdetectors.com
2. SENSOR – PM2.5
LASER TECHNOLOGY
The Vape Detector employs a laser
scattering particulate sensor known
as a PM2.5 sensor. These sensors
employ very sensitive electronics and
optical components to provide high
fidelity and high sensitivity. These are
100x more sensitive than a typical
home smoke detector.
3. QUICK SETUP
1. Unpack the Vape Detector & make sure all parts are included.
2. Connect Power using the micro USB Cable and USB charger.
3. Download and install the TUYA SMART app.
4. Connect and Install the Vape Detector within the TUYA SMART app.
5. Setup your alarm and notifications with the TUYA SMART app.
6. Undertake “mock” alarming to confirm operation then mount Vape Detector.

!
FORENSICS DETECTORSTM
www.forensicsdetectors.com
4. Operation (see YouTube Tutorial)
1. Turn ON the Vape Detector by plugging the USB power to it.
2. When ON, the blue LED will flash, indicating the unit is ready for Smart
Phone Setup. To force it in pairing mode, press the button to trigger the
LED to flash fast, indicating pairing mode.
3. Connect to the TUYA app. See Section 7 to connect to the TUYA App.
4. The blue LED will remain constantly ON when it is properly connected to
your smartphone via the TUYA app and operating normally.
5. Confirm the Vape Detector works by blowing smoke or vape on the unit.
Ensure your alarms are triggering as setup within the app. This is the best
way to ensure the unit is working. Once the Vape Detector is operating
and alarming on your smartphone then mount it on the wall or ceiling.
6. When the unit is turned off (power cable disconnected), and then turned
back ON, the Vape Detector will automatically re-stablish connection and
begin operating as normal.
5. Select the Mount Location
• Avoid installation in areas where the temperature is colder than 40°F
(4.4°C) or hotter than 100°F (37.8°C).
• Do not install 4 ft near vents, flues, or any forced/unforced air ventilation
openings. Do not install where showers are located. (humidity and steam
will trigger false alarms)
• Do not install near ceiling fans, doors, windows or areas directly exposed
external air (avoid dilution effects).
• Do not install in dead air spaces, such as peaks of vaulted ceilings or
gabled roofs (not efficient smoke passage way).
• Do not obstruct the vents located on the Vape Detector. Do not place the
alarm where drapes, furniture or other objects block the flow of air.
• Install as close as possible where suspected vaping is taking place (i.e.
above restroom cubicles and stalls).

!
FORENSICS DETECTORSTM
www.forensicsdetectors.com
6.Mounting
1. The Vape Detector is mounted to the wall or ceiling via the mount plate.
First screw the two small bolts to the Vape Detector tightly. The bolts
are used as guide pins when mounting the detector to the plate.
2. Establish a mount location considering items mentioned in Section 5.
3. Having established the mounting location, ensure that there is no
electrical wiring or pipe work behind the mounting surface.
4. Mark the two mount hole locations on a wall using the backplate holes
as a guide and drill holes in the positions marked using a 5mm drill bit.
5. Insert the plastic drywall expansion anchors.
6. Install the mount plate, align the holes, and screw the screws into the
anchors. The mount plate is now firmly installed on the wall/ceiling.
7. Then mount your PVC conduit. This is recommended for tamper
prevention. The plate “guide arrow” is for power input alignment.
8. Twist the detector onto the mount plate, guided by its two bolts.
9. The detector is ready for continuous operation.

!
FORENSICS DETECTORSTM
www.forensicsdetectors.com
7. Smart Phone Installation (TUYA APP)
1. The Vape Detector operates using the TUYA Smart App. The TUYA
SMART app is a popular 3rd party app used by many products.
2. The TUYA App is a generic IoT smartphone platform and there is a
plethora of YouTube videos on how to use the software.
3. The TUYA App is FREE on Google Play (Android 4.3 or above) and the
iPhone Store (iOS 9.0 or above).
4. To operate the Vape Detector and Smartphone both Bluetooth (setup)
and Wi-Fi (on-going communication) is required.
5. During the Setup Phase, please make sure the Vape Detector and
smartphone are nearby to communicate via Bluetooth AND the Wi-Fi
network signal strength is reasonable.
6. The Vape Detector is a real-time detection system. It detects vape PM2.5
every 5 seconds. If the preset
“scenes”
alarm thresholds (in the TUYA
app) are met, the Vape Detector will send an alarm notification.
7. Data is stored on an average hourly basis. Averaging allows better
management of data and provides the user with a more accurate baseline
for
“fresh air”
– helps better program alarms to avoid false positives.
8. Turn ON the Vape Detector. Make sure the blue light is flashing fast. If you
are not sure, press the middle button for 2 seconds and the blue light will
flash fast. This indicates the unit is in pairing mode.
9. Make sure your smartphone is connected to the Wi-Fi network that you
want the Vape Detector to use. In addition, make sure your smartphone
Bluetooth function is enabled ON to allow pairing.
See App Tutorial Installation:
www.vapedetector.com

!
FORENSICS DETECTORSTM
www.forensicsdetectors.com
Step 1. Install TUYA App
Step 2. Open the App.
Step 3. Sign Up & Get Code
Step 4. Press “Add Device”
Step 5. Enable “Bluetooth”
Step 6. Check TUYA
Permissions and..

!
FORENSICS DETECTORSTM
www.forensicsdetectors.com
Step 7. ..Allow Nearby
Devices Permission
Step 8. Press “Add Device”
Step 9. Auto Search will find
the Vape Detector PM2.5.
Then press “Add”
Step 10. Successful
connection - main screen.
Step 11. Setup Scenes to
enable Alarms. Press “+”
Step 12. Example Scene – see
www.vapedetector.com
for
more video examples.

!
FORENSICS DETECTORSTM
www.forensicsdetectors.com
VAPE ALARM EXAMPLE
ü Setting up the TUYA alarms and baseline
threshold triggering is an important part
of the process. The baseline Trigger
Threshold will be different for different
locations, based on the background noise,
dust, smoke, and general air quality. We
recommend at least letting it run after
installation for 24 hours to establish the
baseline Trigger Threshold. This level is
important to determine if an actual vape
scenario did occur.
ü Let us take the right graph as an example.
After one day of datalogging, we will see
the ”Noise Range” existing between 0 - 3
ug/m3. We also performed a “mock” vape
test (recommended) and observed a peak
at 5 ug/m3 (hourly average). Based on
this 24-hour test example, we can be
confident that anything above 4 will
indicate a vape event.
ü That being the case, one would program a
scene as
PM2.5>4 send notification.
ü If False Alarms occur, then it indicates
the Baseline Trigger Threshold should be
increased.
ü Note that the TUYA app, allows for SMS texting and calling but some costs
are associated with these advanced features and NOT supported by
Forensics Detectors.
ü See our videos on the VAPE DETECTOR installation and setup. This will help
tremendously with more detail than this user manual.
ü When installing the Vape Detector, think about vandalism and any methods to
reduce damage (i.e. protecting the power cord by employing PVC or conduit).
ü The units operate via 5V power supply charger and cable. A handyman would
be a good choice to install this detector.

!
FORENSICS DETECTORSTM
www.forensicsdetectors.com
SPECIFICATIONS
Sensors: PM2.5 Laser Scattering, Temperature & Humidity
PM2.5 Detection Range: 0-999 µg/m3
PM2.5 Response Time: 5 seconds
Temperature Detection Range: 32 - 140F
Temperature Response Time: 5 seconds
Humidity Detection Range: 0 - 100% RH
Humidity Response Time: 5 seconds
Working Environment: 32 - 140F <99% RH
Power Supply: DC 5V DC USB Power (micro USB)
Working Humidity: 0 - 100% RH
Detector Dimensions: 5.5 x 5.5 x 1.5 inches
Detector Weight: 0.7 lb
Box Dimensions: 11 x 6 x 3 inches
Box Weight: 1lb

!
FORENSICS DETECTORSTM
www.forensicsdetectors.com
WARRANTY DISCLAIMERS
• This product is covered by a one-year limited warranty.
• This warranty does not cover damage resulting from accident, misuse,
disassembly, abuse, or lack of reasonable care of the product, or
applications not in accordance with the user manual.
• It does not cover events and conditions outside of our control, such as
Acts of God (fire, severe weather etc.). It does not apply to retail stores,
service centers or any distributors or agents.
• We will not recognize any changes to this warranty by third parties.
• We shall not be liable for any incidental or consequential damages caused
by the breach of any express or implied warranty. Except to the extent
prohibited by applicable law, any implied warranty of merchantability or
fitness for a particular purpose is limited in duration for 1 year.
THIS PRODUCT CANNOT BE REPAIRED IF THE UNIT IS TAMPERED WITH IT
WILL INVALIDATE THE GUARANTEE. IF THE UNIT IS FAULTY PLEASE RETURN
IT TO YOUR ORIGINAL SUPPLIER WITH YOUR PROOF OF PURCHASE.
Product Designed in California, USA
Product Made in China
Copyright © 2023, FORENSICS LLC, all rights reserved.
VAPE DETECTOR, FORENSICS, FORENSICS DETECTORS are registered
trademarks of FORENSICS LLC. All other trademarks, trade names, service
marks and logos referenced herein belong to their respective companies.

!
FORENSICS DETECTORSTM
www.forensicsdetectors.com
Support & Sales
WEB: www.vapedetector.com
WEB: www.forensicsdetectors.com
Email: [email protected]
Other FORENSICS DETECTORS Gas Detector manuals
Popular Gas Detector manuals by other brands
EsiWelma
EsiWelma Sensigas URD20SS quick start guide
Crowcon
Crowcon Gas-Pro quick start guide

Elektrotechnik Schabus
Elektrotechnik Schabus GAS ALARM GX-B1 operating instructions
mPower Electronics
mPower Electronics POLI MP400 user guide
Prosense
Prosense PQ Series Quick installation guide

Duomo
Duomo BX116 manual
