Foresight Sports ForeCaddy User manual

USER MANUAL
Version 1.2
™

Thank you.
For choosing the ForeCaddy by Foresight Sports.
Like everything we make, this product is designed
to provide you with years of game-changing
performance on the course.
Should you have any questions or concerns,
please contact our service team.
Instead of driving a golf cart, your ForeCaddy will
help you to enjoy the incredible health benefits of
walking your favorite course. Health benefits that
include lower blood pressure and cholesterol,
improving cardiovascular and cognitive function,
and reducing stress.
This product is Health Smart!
H
E
A
L
T
H
S
M
A
R
T

Features & Components
12
13
11
10
14
9
8
16
7
6
5
1
2
20
21
15
ForeCaddy Components1
17
18
19
4
3
1
2
3
4
5
6
7
8
9
10
11
12
13
14
15
16
17
18
19
20
21
22
Handle
Power Assist/Stop Button
Cart Power Indicator
Acceleration & Deceleration Button
Umbrella Holder
Score Card and Ball Holder
Hook
Arm Adjustment Latch
Golf Bag (Upper) Holder
Cart Power Button
Cart Battery
Cart LED Indicator Light
Golf Bag Straps
Wheels
Range Finder Magnet
Sand Bottle Holder
Column Folding Pedal
Charging Port
External Cart Battery Charging Base
Drink Holder
Power Charger Adapter
Remote Control
ForeCaddy Components 2
22
1
8
7
6
4
5
2 3
Control Stick
Power Assist/Remote Mode
Follow Mode BETA
Power On/Off
Remote Control Battery Indicator
Golf Cart Battery Indicator
Belt Clip
USB TYPE-C Charging Port
1
2
3
4
5
6
7
8
DF

Getting Started
Securing a golf bag (with provided straps)
Cleaning and storing
To clean your ForeCaddy, please use water ONLY.
It is recommended that you clean your ForeCaddy after every use by using
compressed air or gently rinsing with cold or warm (not hot) water. Towel or air
dry thoroughly before storing in a cool, dry place.
Folding and unfolding
The ForeCaddy can be collapsed and unfolded for storage and transportation.
Top Straps
Clasp the left side hook onto the
right side peg, then pull the elastic
loop to adjust the tightness and set
cord into grooves to secure.
Bottom Straps
Clasp the left side hook around the
right side peg.
Charging the ForeCaddy battery
Connect the power
adapter charger cable to
the charging port on the
back of the ForeCaddy.
You can also charge the
battery on the external
charger. (page 24)
Press and hold down the red lever
and pull up on the handle. The lower
column will lock in place when
fully extended (vertical). Adjust the
steering column to the desired angle
and lock in place with the arm lock.
Arm lock
3ForeCaddy Getting StartedForeCaddy Getting Started 4

Power Features
Powering the ForeCaddy ON and OFF
Quickly press the power button to turn the ForeCaddy ON or OFF
Powering the Remote ON and OFF
Press and hold to turn the remote control ON or OFF
Quickly press on the ForeCaddy handle or any button on the remote to
brake and stop the ForeCaddy while in Remote Control or Follow modes.
ForeCaddy Remote5 ForeCaddy Power Features 6
The cart power indicator
lights will confirm that the
ForeCaddy is ON or OFF,
and will indicate the
amount of battery charge
remaining.
DF
F
D
DF
DF
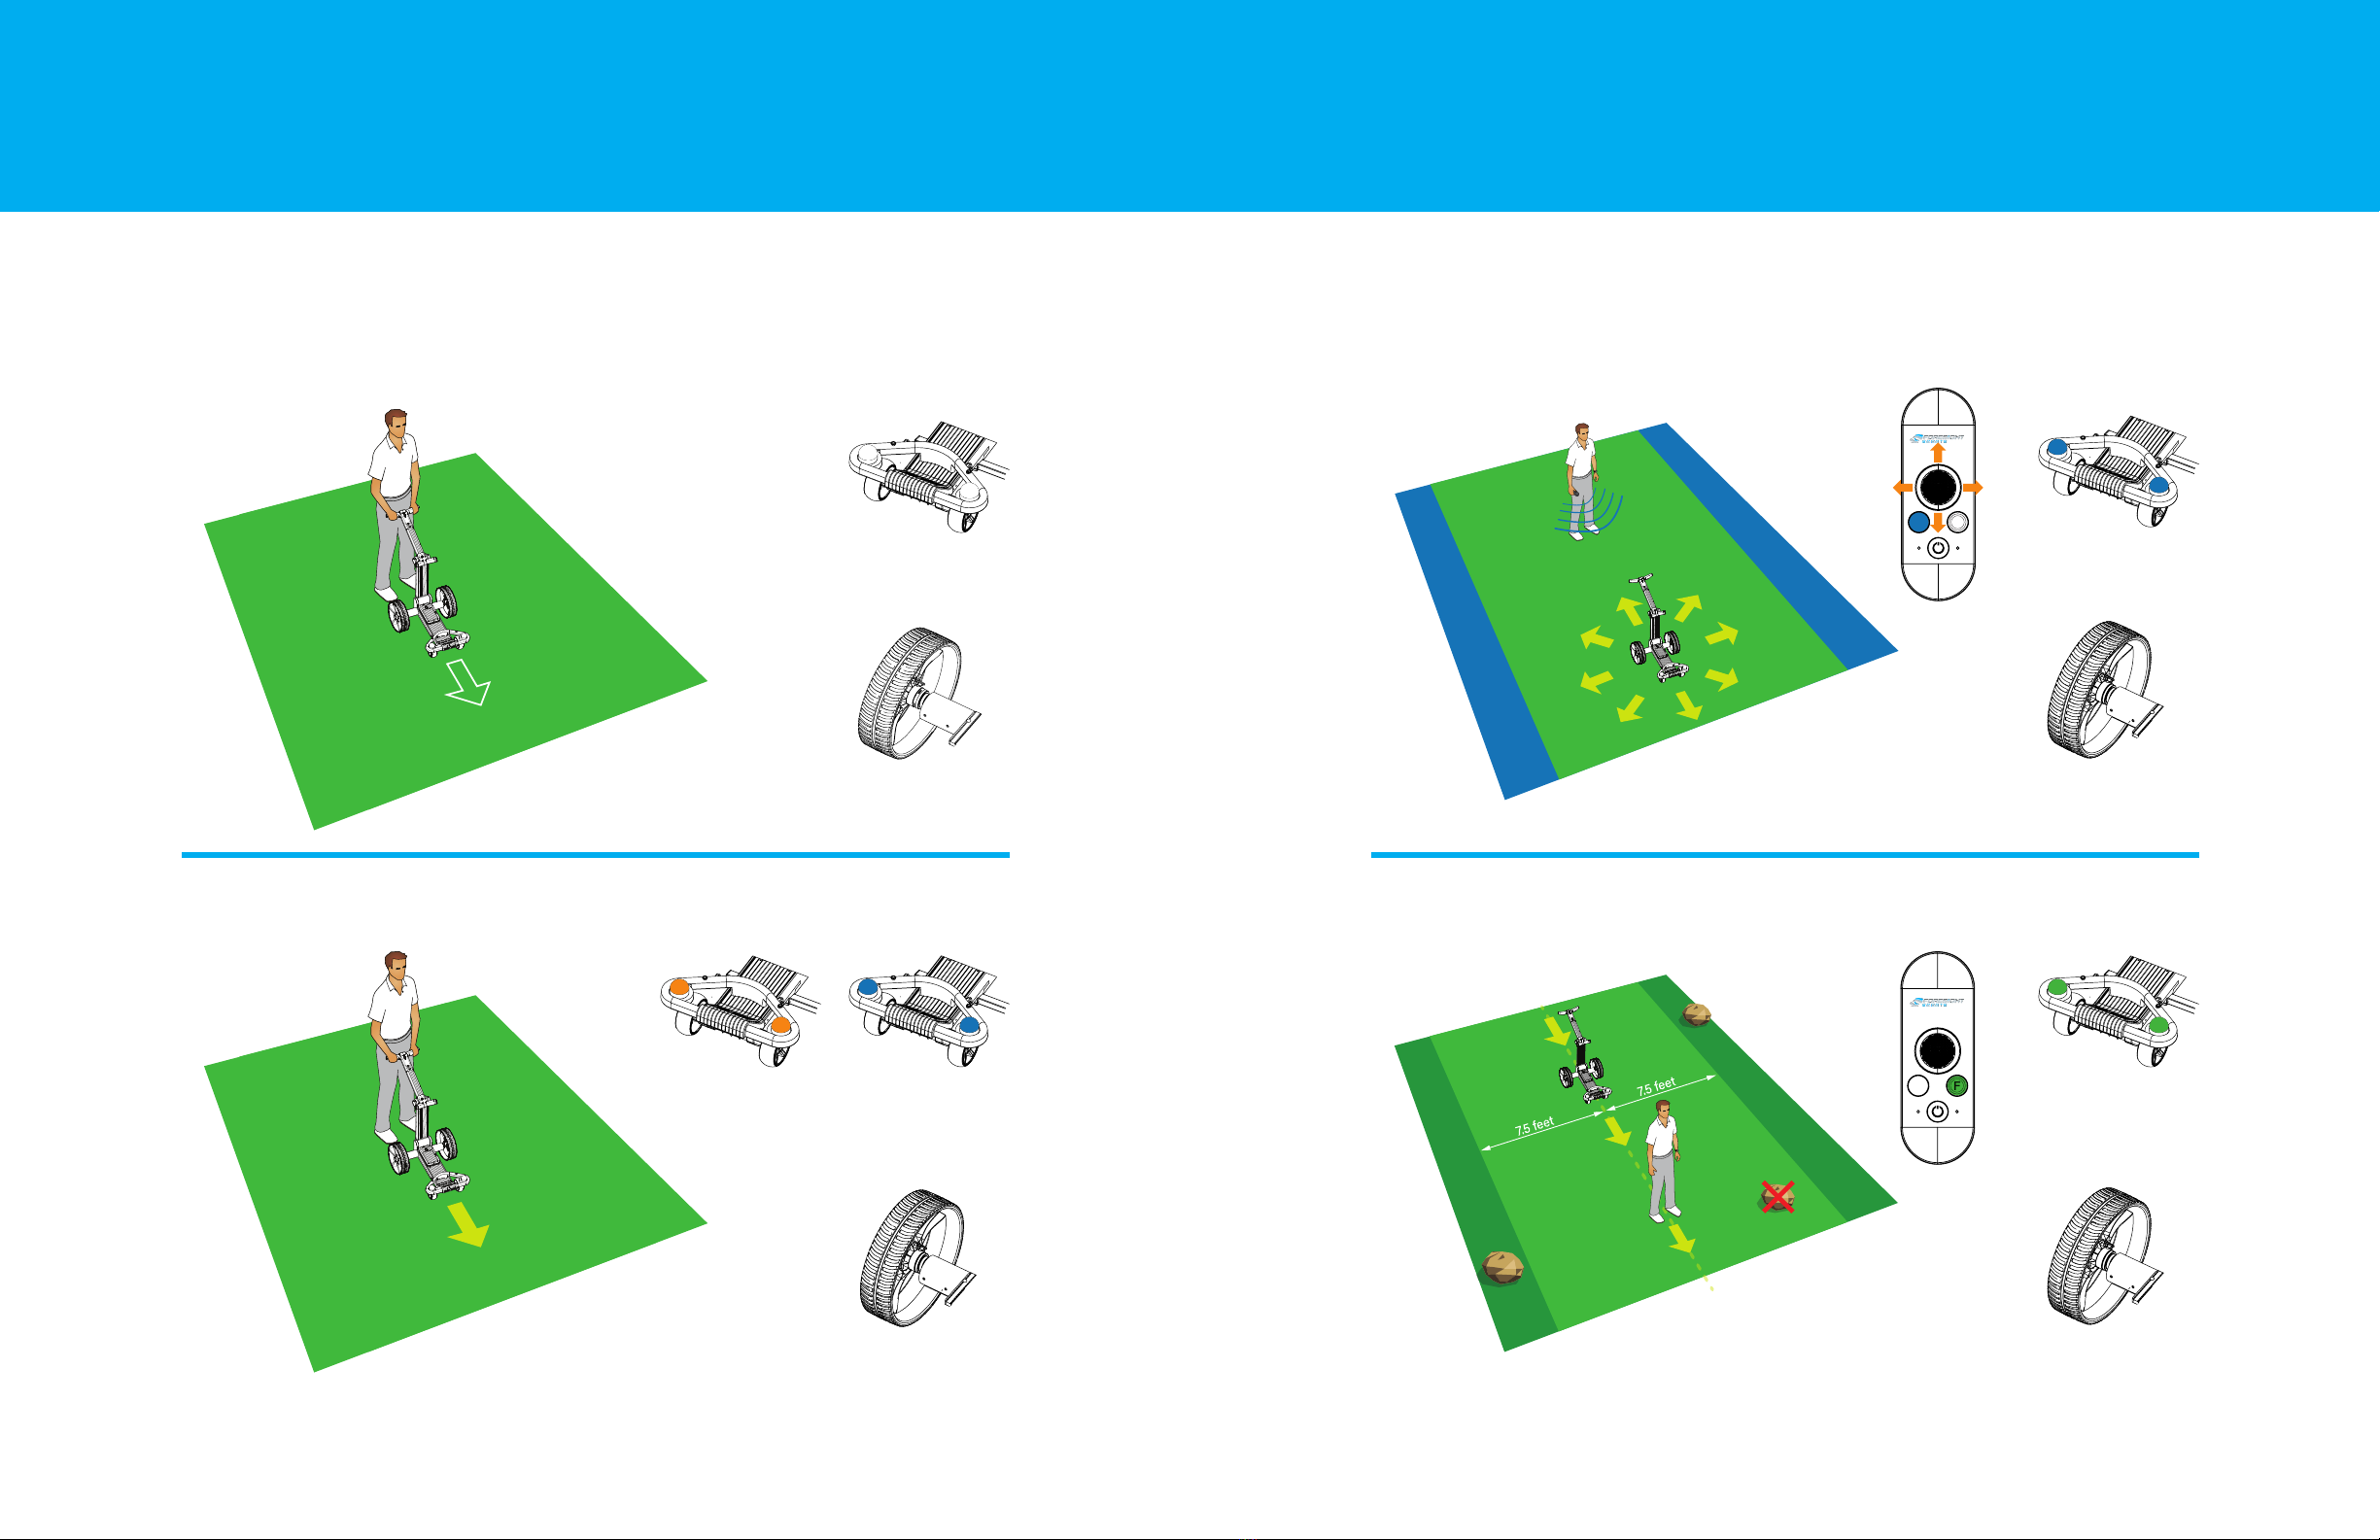
ForeCaddy Operating Modes ForeCaddy Operating Modes
Operating Modes (At-A-Glance)
Your ForeCaddy can be operated in four (4) dierent modes:
(No Indicator Lights)
Rear Wheel Setting:
Rear Wheel Setting:
Rear Wheel Setting:
Rear Wheel Setting:
Inner Groove
Outer Groove Inner Groove
Inner Groove
Blue Indicator Lights
Flashing Green Indicator LightsOrange OR Blue Indicator Lights
MODE 1: MANUAL (UNASSISTED) MODE 3: REMOTE OPERATION
MODE 2: POWER ASSIST MODE 4: FOLLOW (BETA)
7 8

MODE 2: POWER ASSIST
To move the ForeCaddy forward, press the button.
Press to increase or decrease the ForeCaddy’s speed.
Press to stop.
Alternatively, you can exclusively use the button by pressing and
holding it down to move the ForeCaddy forward and releasing it to stop. The ForeCaddy will
(by default) restart at the same speed as its last session. In Power-Assist mode there are 5
speeds that can be selected to match your desired walking rate (see chart below). When the
ForeCaddy is stopped and in Power Assist mode, press the button to release the brake
to use the ForeCaddy in “free wheel” mode.
Acceleration & Deceleration ButtonHandle
Power Assist/ Stop Button
While in Power Assist mode, the following safety
precautions should be followed:
1 The ForeCaddy should always be steered manually when
making a turn. When making a sharp turn, push the
handle down to lift the front of the ForeCaddy upward to
assist turning.
2 On complex turns or road sections, when the ForeCaddy
is stopped, press the deceleration button to switch into
neutral mode. This makes it easier to maneuver if you
need to stop the ForeCaddy (without sliding). To resume
Power Assist mode, press the Power Assist button again
after pushing or pulling the ForeCaddy.
3 When the ForeCaddy is connected to the remote control
in a stopped state, press the acceleration button to move
the ForeCaddy forward automatically. Press the Power
Assist button or the stop button on the remote control to
stop the ForeCaddy. The ForeCaddy will automatically
switch to standby mode if its distance from the remote
exceeds 10 feet.
Safety recommendations for Power Assist mode
Operating Your ForeCaddy
ForeCaddy Operating your ForeCaddy ForeCaddy Operating your ForeCaddy9 10
decreases speed
increases speed
Speed Chart
1st – 3.3 k/m per hour
(2.05 mph)
2nd – 4.2 k/m per hour
(2.61 mph)
3rd – 5.0 k/m per hour
(3.1 mph)
4th – 5.9 k/m per hour
(3.6 mph)
5th – 6.7 k/m per hour
(4.2 mph)
MODE 2: REMOTE CONTROL
To enter the Remote Control mode, quickly press the button
(the button will illuminate blue).
In Remote Control mode, use the control stick to control the speed and
direction of the ForeCaddy. Move the control stick back to the middle
or press to stop the ForeCaddy.
Note: You can use the Remote Control mode on open fields or fairway.
Operating Your ForeCaddy
While in Remote Control mode, the following safety
precautions should be followed:
1 Practice operating the ForeCaddy in a field or large,
obstacle-free area prior to using on the golf course.
2. Always inspect your environment for potential obstacles
or dangers prior to operating in remote mode.
3. Never operate the ForeCaddy remotely near vehicular
traffic (roadways) or in areas with dense pedestrian traffic.
4. Never operate the ForeCaddy remotely on steep hills,
near water features, or other natural or man-made
obstacles that may result in damage or injury.
5. Immediately disengage the ForeCaddy from Remote
Control mode in the event of a potential accident, or if an
accident has occurred.
Safety recommendations for Remote Control mode
ForeCaddy Operating your ForeCaddy ForeCaddy Operating your ForeCaddy11 12
DF
D
DF
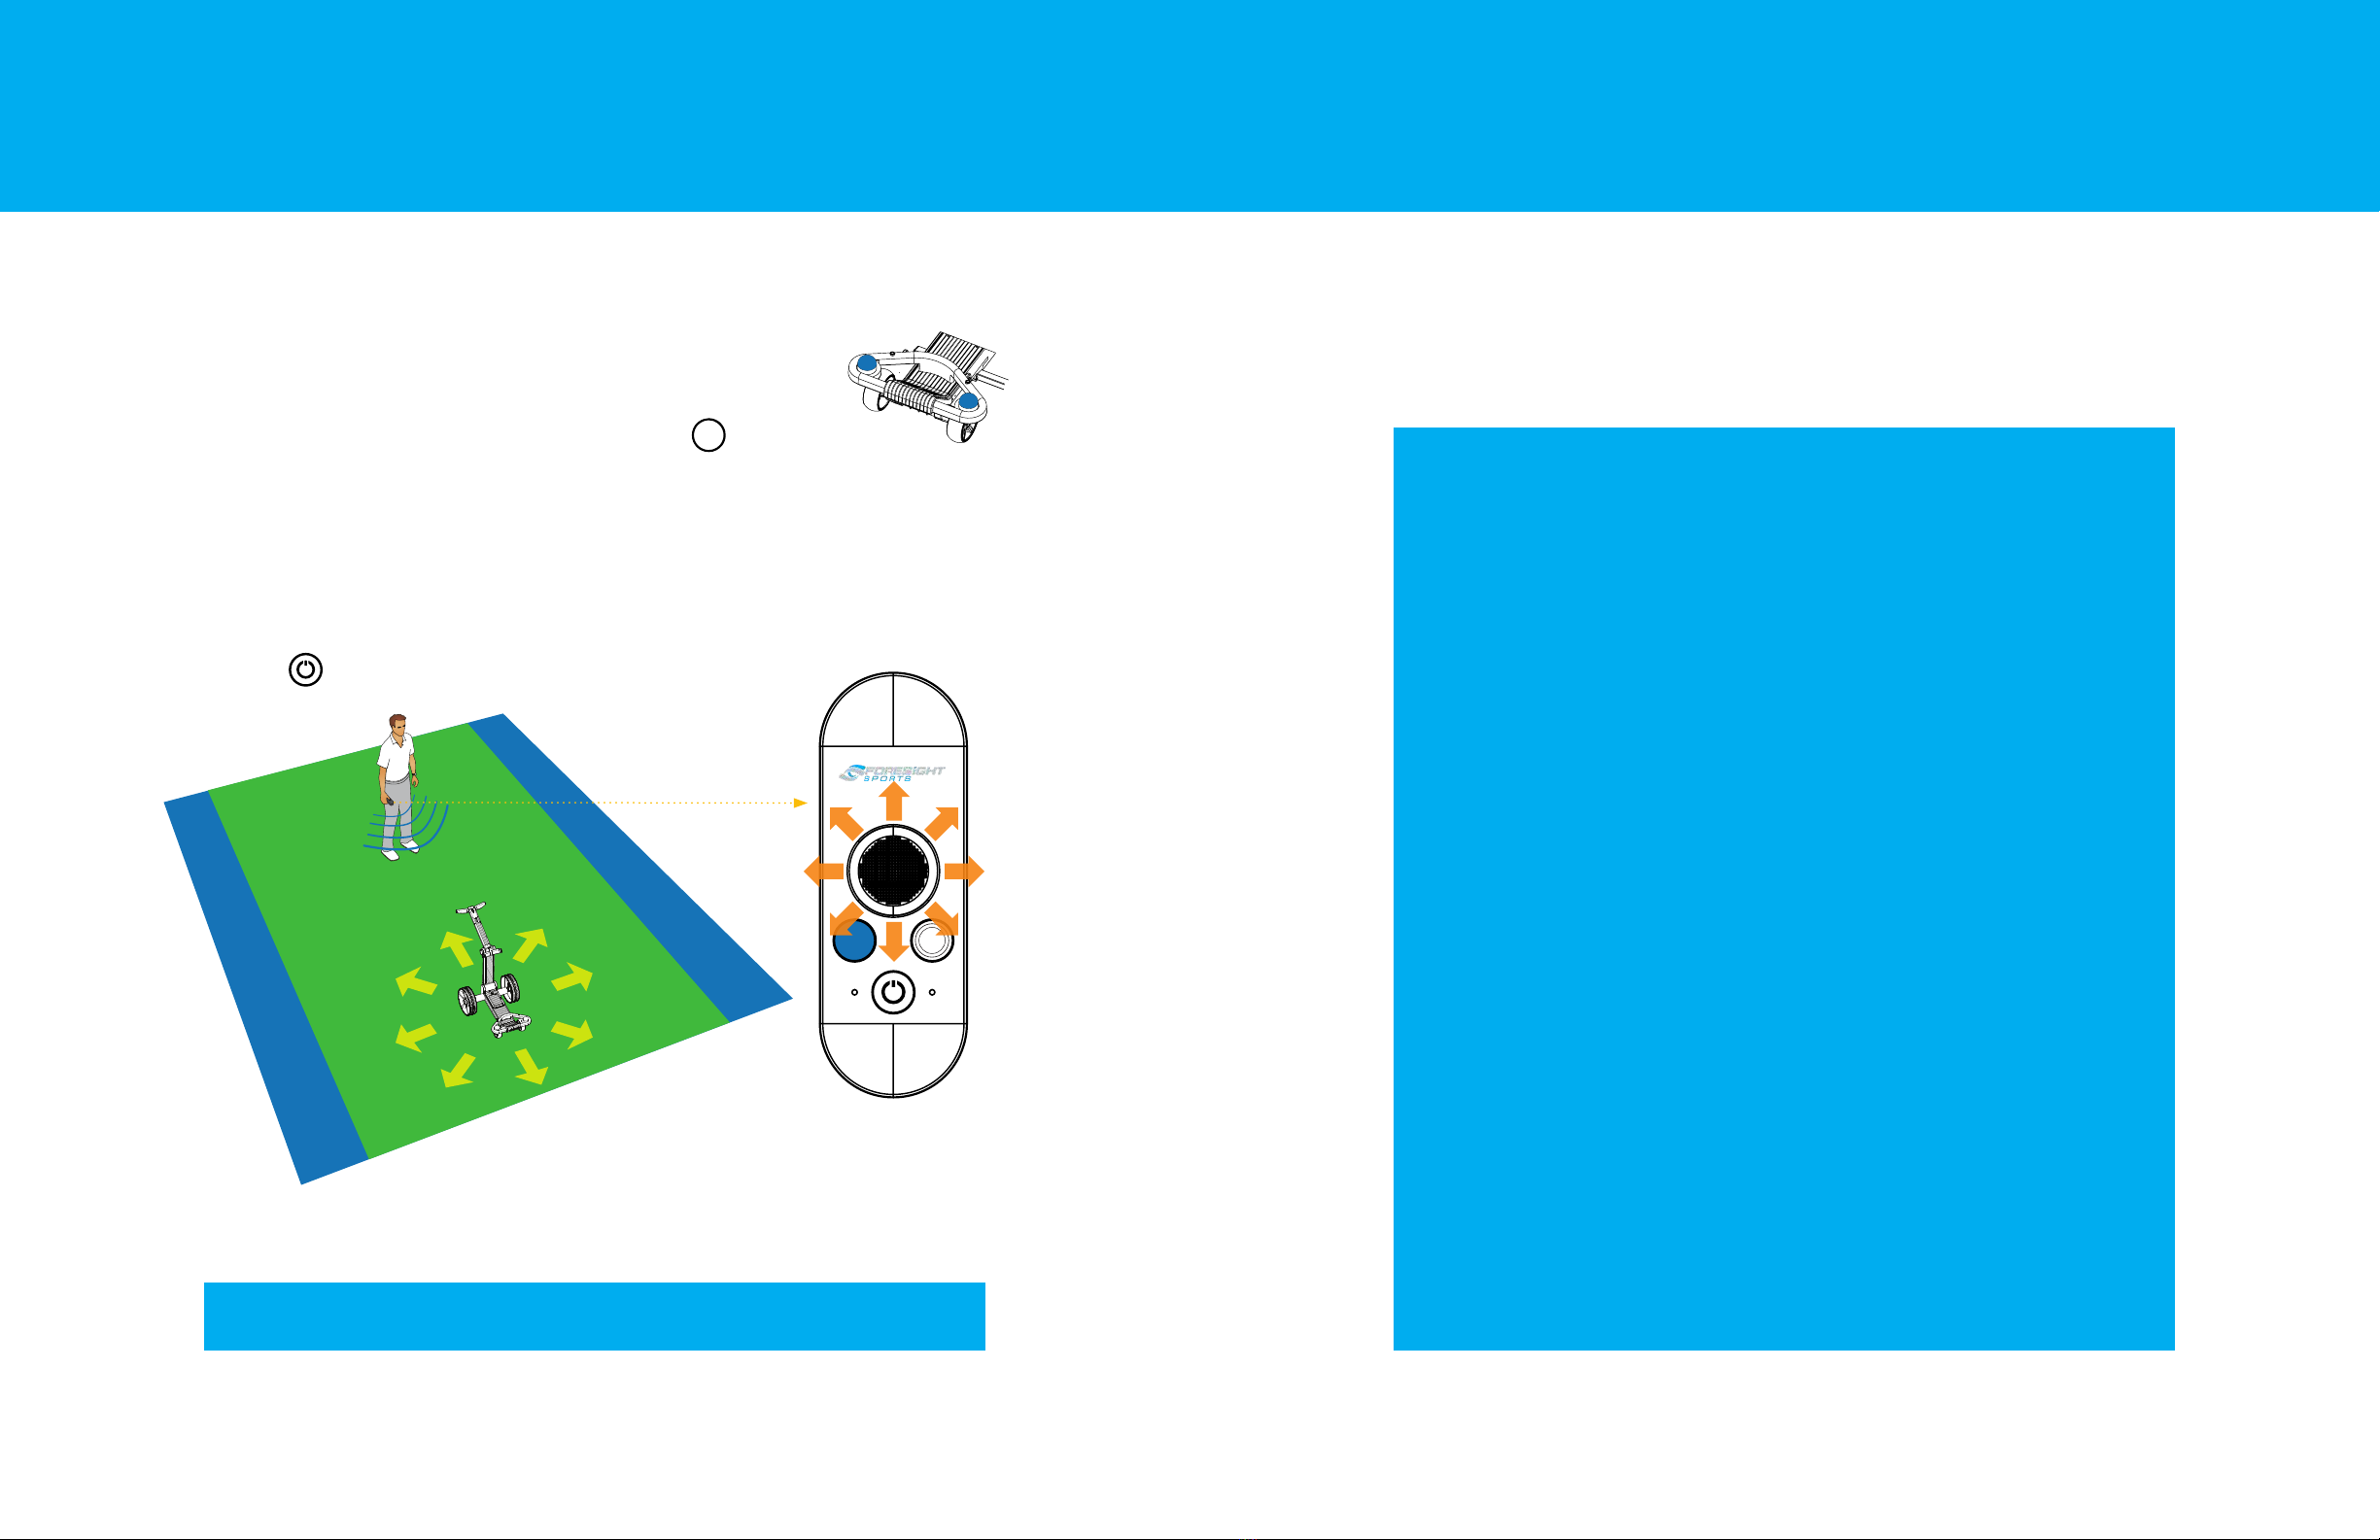
MODE 3: FOLLOW (BETA)
ForeCaddy Operating your ForeCaddy13
WARNING: Follow mode must only be used on an open field or fairway.
To activate Follow mode, stand IN FRONT of the ForeCaddy.
Press the button and then begin walking (the button will illuminate green).
The ForeCaddy will begin to follow, and will maintain the speed you are walking.
ForeCaddy Operating your ForeCaddy 14
Operating Your ForeCaddy
To exit Follow mode, come to a stop and allow the ForeCaddy to come to a rest,
then simply press the button on the remote to instantly switch to Power Assist
mode (Blue).
To resume Follow mode, simply press and the ForeCaddy will resume following.
Safety recommendations for Follow mode
PLEASE NOTE: Follow mode is still in BETA.
The Follow mode is undergoing testing and development and therefore
requires skilled use and thoughtful execution. Please use caution when
using the ForeCaddy in Follow mode (BETA).
While in Follow mode, the following safety
precautions should be followed:
1 NEVER use Follow mode when the golfer is behind the
ForeCaddy. Always make sure there are no obstacles
between the ForeCaddy and remote control prior to use.
2. NEVER use Follow mode around tee boxes, greens, or steep
terrain. Use Follow mode ONLY when past the teeing area and
before the green. (For more information, see mode usage on
page 16.)
2. For best results, be sure to wear the remote control on a belt on
the backside of the hip to insure it has close, unobstructed
access to the cart. You don’t need to see the buttons to operate
them; simply practice switching from green to blue and back
again by pressing each button on the remote.
D
F
F

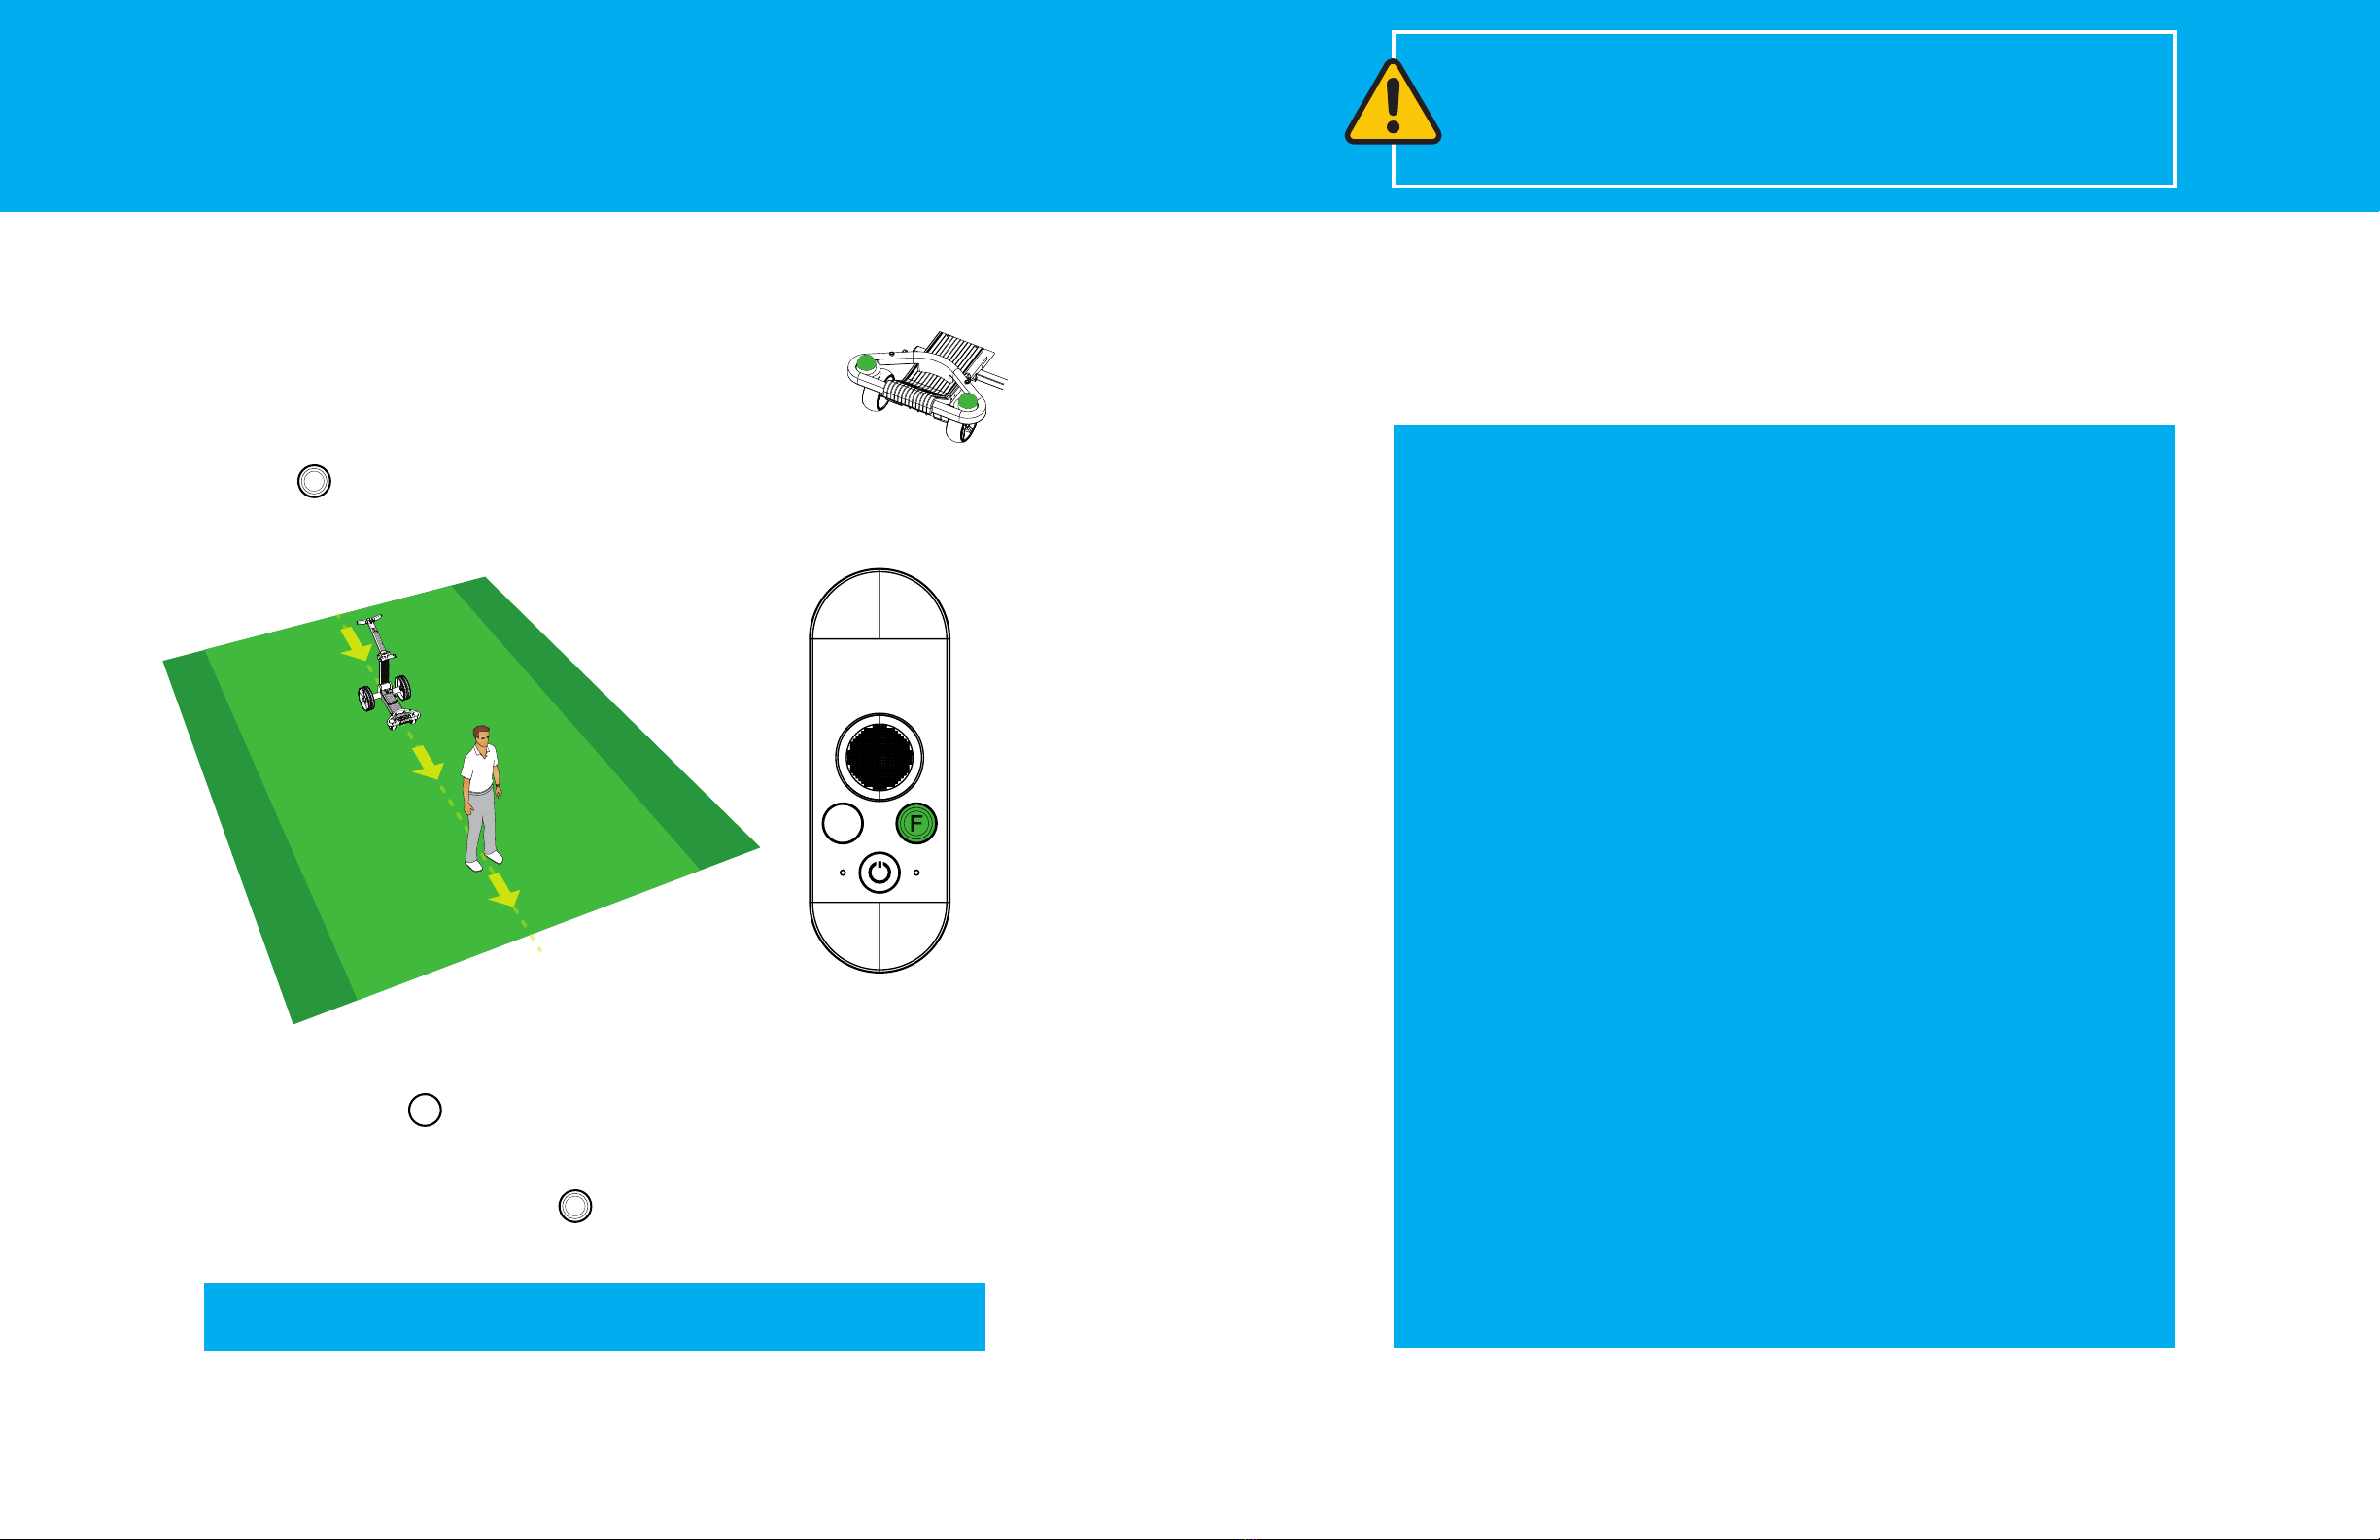
Safety clearance in Follow mode (BETA)
While using Follow mode BETA, always allow for 7.5 feet of obstruction-free space on both
sides of the ForeCaddy for safe operation.
Operating ranges in Follow mode (BETA)
Please observe the following range limits when operating the ForeCaddy in Follow mode.
ForeCaddy Operating your ForeCaddy15 ForeCaddy Operating your ForeCaddy 16
Operating Your ForeCaddy
Note: It is normal for the ForeCaddy to “weave” slightly while in Follow
Mode (BETA). When encountering obstructions that may be close to this 15
foot-wide safety zone, reduce your walking speed. The cart will also slow
down and will weave less.

Operating Your ForeCaddy
Proper mode usage on the course
Please follow proper mode usage while using the ForeCaddy on the golf course.
Follow
Zone
Fairway GreenTee
Power Assist
Zone
Power Assist
Zone
Only use the Follow mode on the fairway. Be sure to check your
surroundings for any hazards. It is safe to use the manual push mode
or Power Assist mode while using the ForeCaddy in the Tee area
or around the Green.
Operating Your ForeCaddy
ForeCaddy Operating your ForeCaddy17 ForeCaddy Operating your ForeCaddy 18

Rear wheel - mode settings
1. To install or remove the rear wheel, press on part A and rotate the wheel.
2. When the ForeCaddy is in ANY powered mode (Power Assist, Remote,
Follow BETA), the rear wheels need to be installed in the INNER groove.
3. When the ForeCaddy is in manual mode, the rear wheels need to be
installed in the OUTER groove.
Note: When the ForeCaddy is out of battery or powered off, you can use
manual mode for long distance walks.
A
Operating Your ForeCaddy
ForeCaddy Operating your ForeCaddy
Installing the (accessory) umbrella holder
1. Pull knob A to install or remove the umbrella holder.
2. When the umbrella holder is installed, place the handle into the holder,
then rotate knob C to keep the umbrella fixed.
3. Press on knob B to adjust the angle of the umbrella and release it
after the desired angle has been reached.
C
B
A
ForeCaddy Installing Accessories
Installing Accessories
19 20
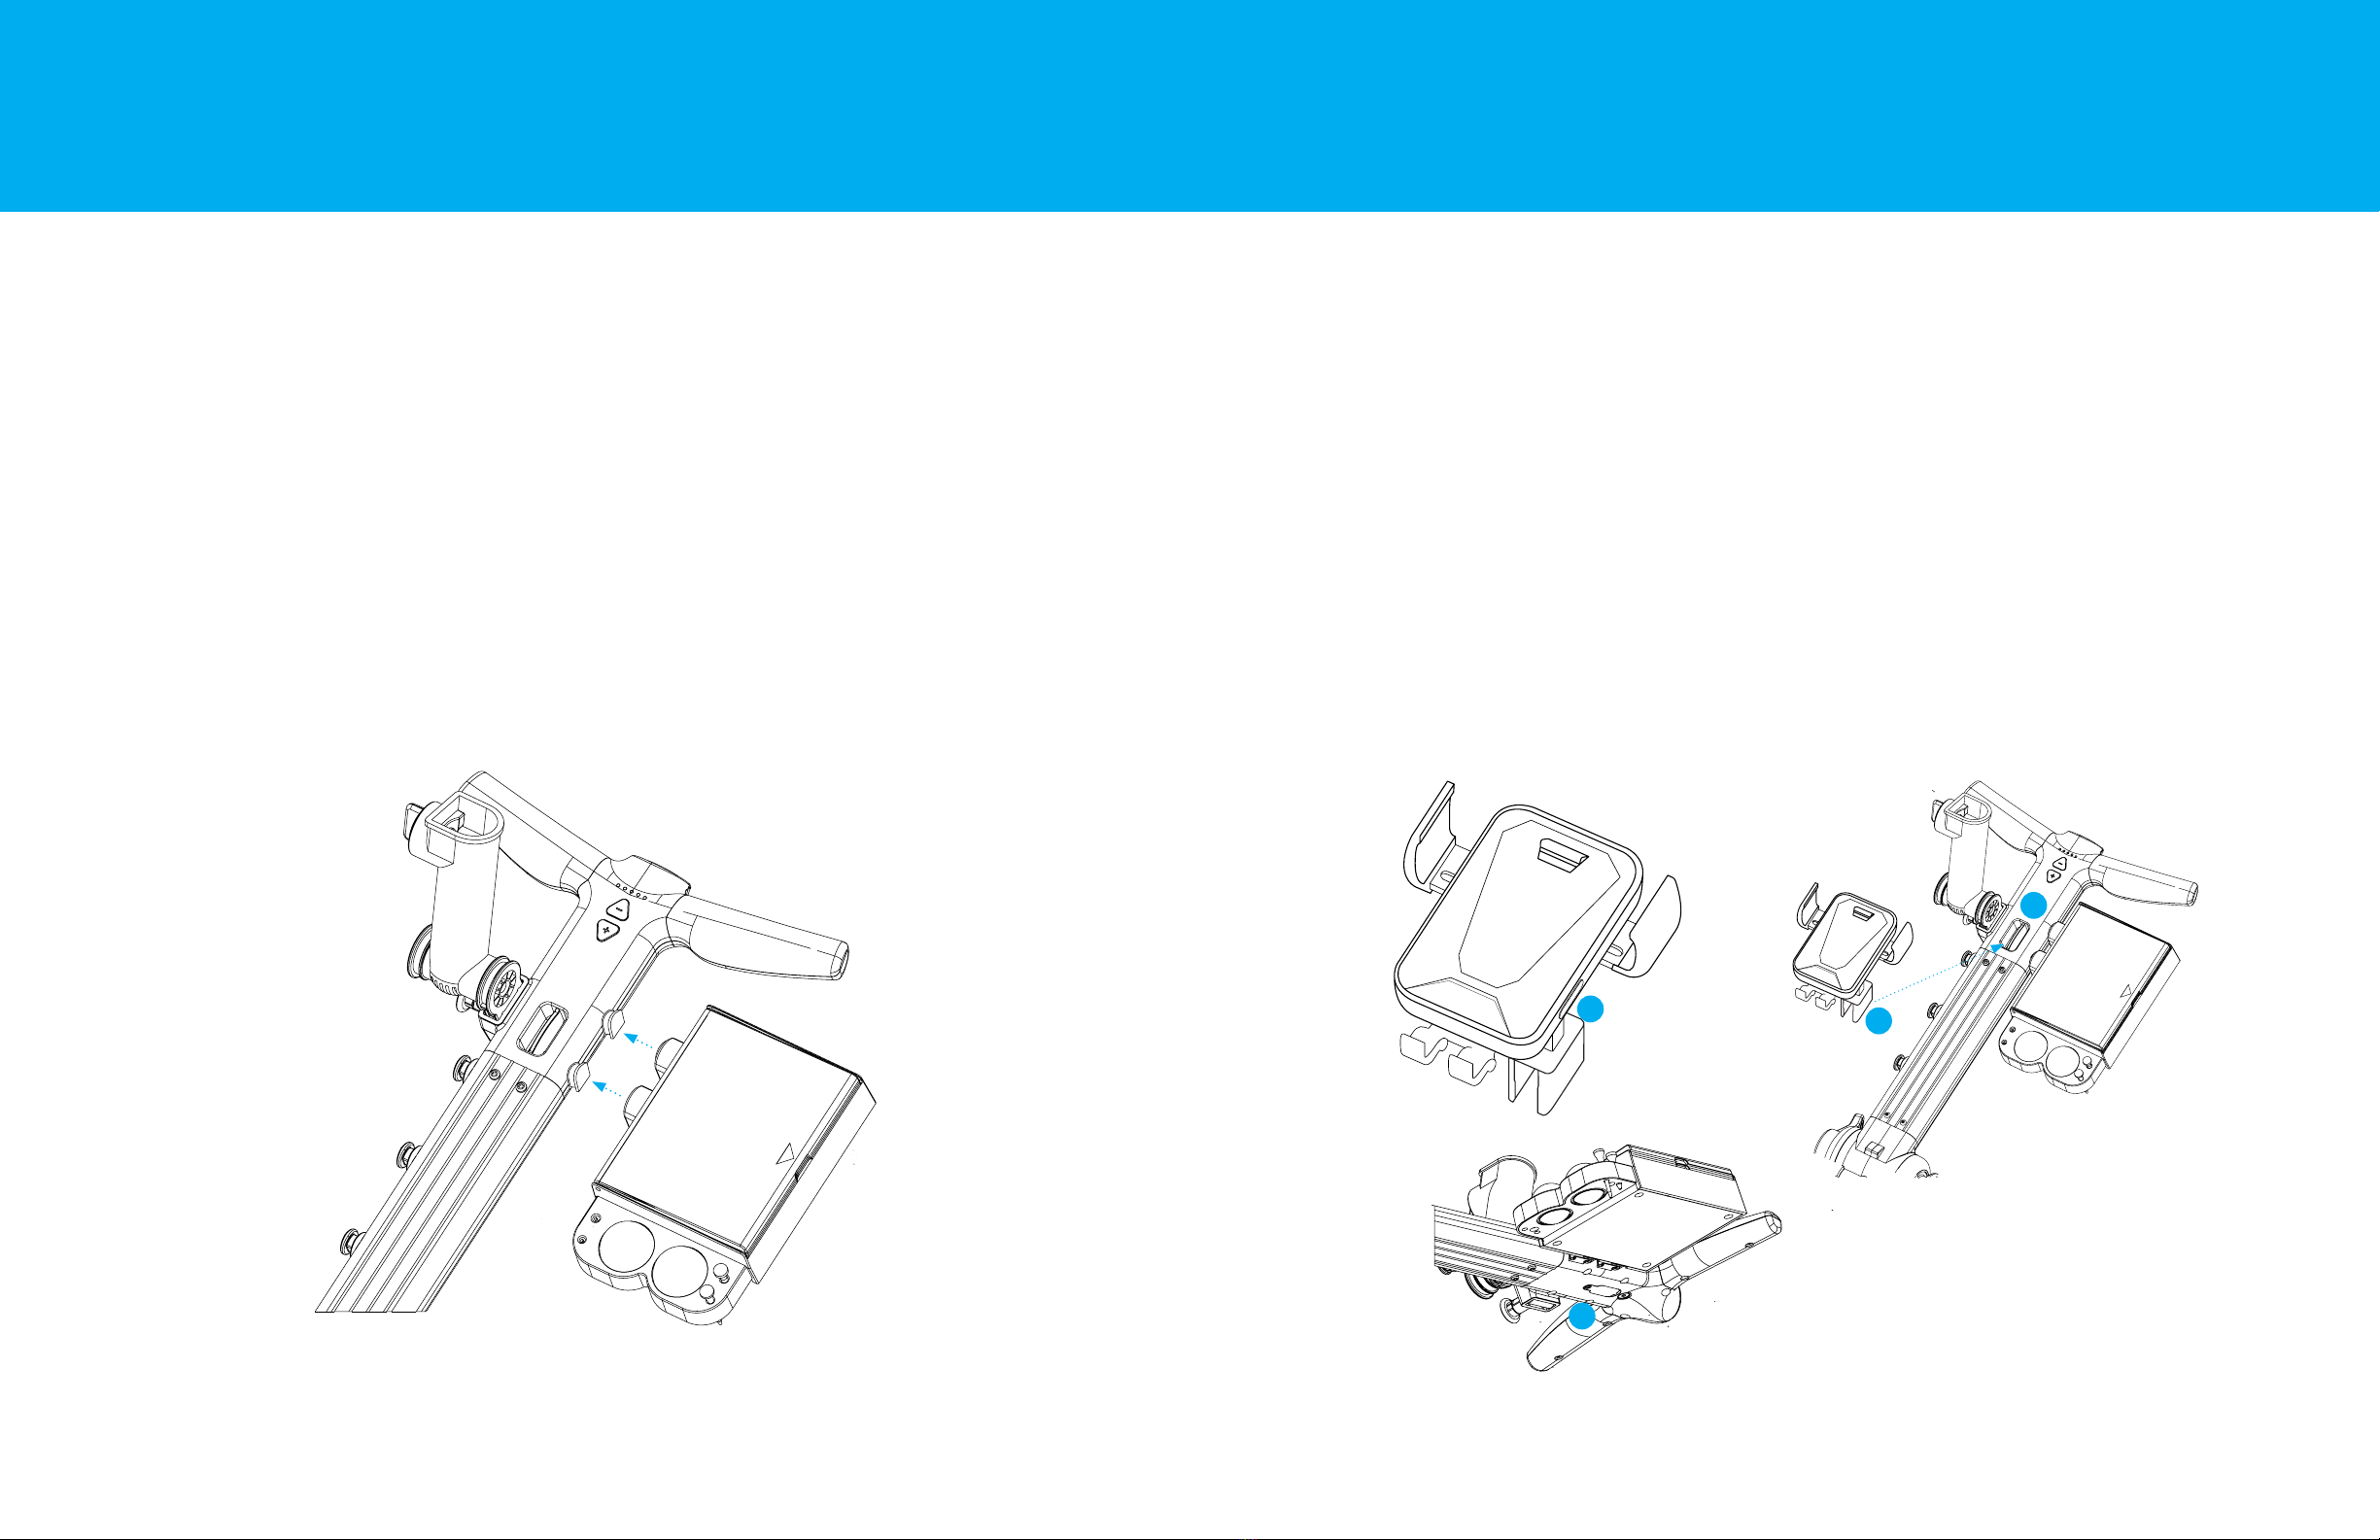
Installing the (accessory) cell phone holder
1. Insert clip A into slot C on the ForeCaddy
2. Press button B to open the phone securing arms. When phone is placed in
the holder it will automatically adjust to your phone’s size.
3. Plug in the USB-C cable from the bottom of the Cell Phone Holder to slot D
on the ForeCaddy.
Installing the (accessory) scorecard/ball holder
1. Hold the Scorecard/Ball Holder with the Foresight Sports Logo right side up
and facing toward you.
2. Slide the two pegs on the left side of the Scorecard/Ball Holder over the
pegs protruding from the cart.
3. The Scorecard/Ball Holder also has a slot to store the remote control.
ForeCaddy Installing AccessoriesForeCaddy Installing Accessories
Installing Accessories
BA
C
D
21 22

The ForeCaddy status lights indicate the following:
ORANGE
Indicates the remote control is not on or not connected to the ForeCaddy.
(Only the Power Assist mode can be used in this state.)
BLUE
Indicates the remote control is connected to the ForeCaddy.
The ForeCaddy is not in Follow mode.
FLASHING GREEN
The ForeCaddy is in Follow mode.
Status Indicator Lights
Mode/Operation Status Indicators
ForeCaddy Mode/Operation status indicators
ForeCaddy Battery Indicator
In fully charged state, all 5 lights will turn GREEN.
With power consumption, the lights will gradually go out.
ForeCaddy Charging Indicator
RED Charging
GREEN Fully Charged
Remote Battery Indicator
GREEN Normal use, battery power is more than 50%
ORANGE Battery power is lower than 50%
RED Battery power is less than 10%
Remote Control & ForeCaddy Power Indicator
External Charger
Charging Port
Charge Indicator
Battery & Charge Indicators
ForeCaddy Battery and Charging Indicators23 24

Remote Control Charging Indicator
Charge the remote control via the USB Type-C port.
The remote control will send a vibration prompt when charging. During the
charging process, only the power button on the remote control remains
functioning.
The indicator light will be blinking RED when the remote control is charging.
The battery is fully charged when the indicator light turns GREEN.
Note: ForeCaddy Full Charging Time: 8hrs
Remote Control Charging Time: 3hrs
USB Charging Port
Battery & Charge Indicators
ForeCaddy Battery and Charging Indicators
ForeCaddy & Remote Control
When the external ForeCaddy battery charging base is being used, or when the
ForeCaddy is charged after it has been turned o, you can view the charging
status based on the charging indicator light. RED lights indicate charging, and
YELLOW lights indicate fully charged.
When using the charging port to charge the ForeCaddy battery, you will be able
to view the charging status based on the power indicator lights on the handle if
the ForeCaddy is turned on.
The remote control can be charged using a 5V charger or via the USB port on
the ForeCaddy.
Note: When the remote control is charging via the USB port on the
ForeCaddy, please make sure the ForeCaddy is powered on.
Additional Charging Instructions
ForeCaddy Additional Charging Instructions25 26

REMOTE CONTROL
FORECADDY
Transmitting Frequency
Transmitting Power
Transmitting Distance
Remote Charger
Battery Capacity
Battery Life
Folded Size
Open Size
Weight
Speed
Motor
Braking
Operating Temperature Range
Battery Capacity
Charger
6.5G
<-41.3dBm/MHz
65.6 ft (open space)
5V / 1A
3.7V / 1000mAh
36-54 holes (On non-hill fairway)
2.69 x 1.97 x 1.15 ft
2.69 x 1.97 x 3.28 ft
36 lbs / 16.3 kg
4.7~7.8 km/h
Anti-tipping dual support motor
Automatic downhill braking
-4ºF to 122ºF
22.2V / 14000mAh
25.2V / 2A
Additional Specifications
ForeCaddy Specications27
Questions?
To speak with one of our US support specialists,
please call +1 (858) 444–4440.
For all International support inquires, please contact your
local Foresight Sports dealer or support center.
For product updates and driver installations,
please visit www.foresightsports.com.

Table of contents
Other Foresight Sports Golf Trolley manuals

Popular Golf Trolley manuals by other brands


Concourse
Concourse SMART WHEELS User instruction manual

TiCad
TiCad Voyage user manual

caddytrek
caddytrek CT-7031-UD user manual

Fantom Professional
Fantom Professional PROCART 420 / PROCART 421 / PROCART 422 / PROCART 423 / PROCART 424 / PROCART 425 / PROCART... Assembly manual

MGI
MGI zip X5 user manual

Concourse
Concourse VOGUE PUSH BUGGY User instruction manual


