Forster Products 010631 User manual
User Instructions for the Bench Rest®Powder Measure
Issue 3
1.0 GENERAL INFORMATION
The Bench Rest Powder Measure keeps your powder flowing
evenly. Its long, narrow, powder-charge reservoir minimizes the
amount of powder shearing for each and every charge.
The vernier scale on the charge arm lets you control minute
changes in capacity. The charge arm meters the powder and
dispenses a flow of consistent charges using your choice of gun
powder. For example, it will measure from 2½ grains of Bullseye®
to 95 grains of IMR®4320 or Alliant Reloder®15.
The powder hopper is designed to eliminate variation in charges
due to changes in the volume of powder contained in the hopper.
The small outlet on the hopper serves as a built-in baffle,
regulating the powder leaving the hopper and entering the
measure in a uniform manner.
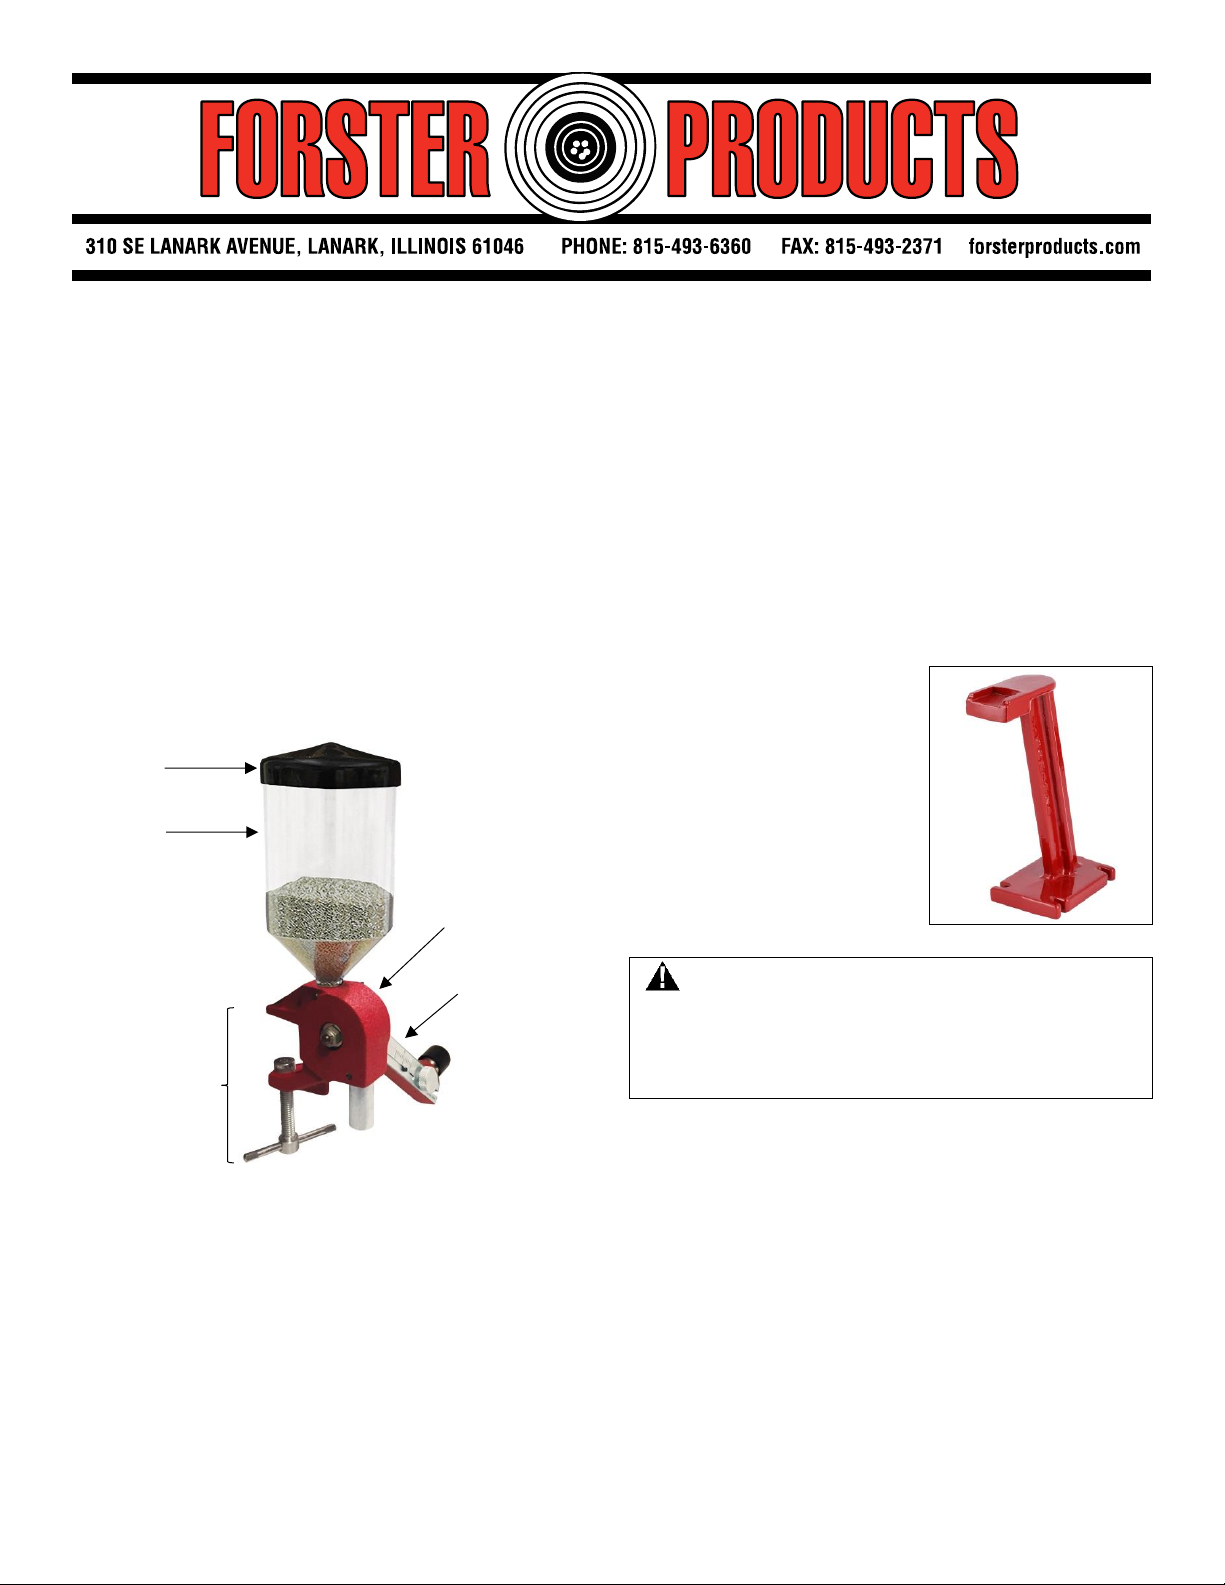
Figure 1. Powder Measure Overview
2.0 SAFETY INFORMATION
Please follow all pertinent safety procedures such as
wearing safety glasses, being in a well-lit and well-ventilated
workspace, and having all reloading tools in top working
condition and no flames, sparks or static electricity.
Always follow instructions and tables from a reliable
reloading manual to determine proper powders, bullet
weights, and primer types.
3.0 INSTALLATION
3.1 Assembly
The Powder Measure is shipped to customers fully assembled.
To begin measuring,
1. Mount the device to your workstation, as described below.
2. Load the Powder Hopper and Cover into the top of the Body
Casting (Fig. 1).
3. Check to see that the Locknut (010631-021) on the Cross
Bolt (010631-026) is tight. This will serve to remove any
excess play between the iron castings (Fig. 3).
4. Secure the Drop Tube (010631-027xx) lightly with the Set
Screw (010631-013).
3.2 Mounting
Three methods are available for securing the Powder Measure to
different work surfaces.
3.2.1. Clamp to Table Edge or Board
The C-clamp (Fig. 1) opens to
receive boards up to 1¼" wide.
3.2.2. Screw to Workbench or
Board
The top of the C-clamp casting
contains a hole for a woodscrew.
3.2.3. Clamp to Optional Powder
Measure Stand
The Bench Rest Powder
Measure Stand (017941)
securely holds the Powder
Measure in place. See Fig. 2.
4.0 PROCEDURE
WARNING
PERSONAL INJURY
Only use smokeless gun powder in the Powder Measure.
Never mix powders.
Failure to comply with these instructions could result in
death or serious injury.
To initialize the charge chamber for a specific volume of powder,
1. First, make sure that the internal powder-flow channels are
thoroughly cleaned of any residue from previous usage.
2. Loosen the Thumbscrew (010631-022) on the Charge Arm,
in order to drop the Charge Bar (010631-024) to its inner
position. Tighten the Thumbscrew.
(The Charge Bar has two settings –inserting the
Thumbscrew into the “outer”hole allows it to hold charges of
approximately 2 to 37 grains of powder, and in the “inner”
hole approximately 37 to 95 grains [see Fig. 3 for the
Thumbscrew setting positions on the Charge Bar].)
This step assumes that you need to reset to the lower “outer”
amount; otherwise, proceed to step 3.
3. With the Charge Arm handle in the down position (at
6 o’clock, when facing the Arm), pour the desired weight of
powder from your scale pan into the empty Hopper (010631-
025). The powder will flow into the Charge Arm.
Figure 2. Optional Stand
Cover
(010631-025-LID)
Iron Body Casting
C-Clamp for
mounting to
reloading bench
Iron Charge Arm
with Vernier Scale
Hopper
(010631-025)

WARRANTY
All Forster Products are warranted against defects in materials and workmanship for the life of the product. Parts excluded from the warranty are those
that, by nature of their function, are subject to normal wear (such as springs, pins, etc.) or that have been altered, abused, or neglected. If the product
is deemed defective by workmanship or materials, it will be repaired, reconditioned or replaced (at Forster’s option). This warranty supersedes all other
warranties for Forster Products, whether written or oral.
forsterproducts.com
010631-001 Issue 3, March 2020
4. Rotate the handle 90° toward you to the neutral position, so
that the Thumbscrew and scale are horizontal to the work
surface (at 9 o’clock).
5. While the Arm is in the neutral position (that is, neither fully
up, filling, nor fully down, dispensing), slowly move the
Charge Bar toward the powder charge until it stops, and lock
in place with the Thumbscrew.
6. Fully lift up the Charge Arm handle (to 12 o’clock) to allow
the powder charge to flow out through the Drop Tube.
7. The Charge Arm/Charge Bar should now be adjusted to the
volume of powder corresponding to the sample charge you
weighed into the Powder Measure. Load your powder into
the Hopper and throw a few charges, weighing each one to
verify accuracy. If needed, make slight adjustments with your
Charge Bar to fine tune.
The Charge Arm is now adjusted for a selected volume. Fill the
Hopper and verify the next 2-3 charges by weighing them. If
necessary, adjust the Charge Bar. The Powder Measure is ready
to charge all your cases. You should be able to throw a charge
every 4 seconds.
4.1 Tips for Effective, Repeatable Measurement
To get acquainted with your Powder Measure, throw several
charges with a given powder and setting. Check each one
on an accurate scale.
Your hand motion needs to be consistent and deliberate.
Practice by moving the handle with a slow, steady downward
movement. Try this experiment: Throw three charges with a
slow and steady movement through the entire 180° and let
the handle stop firmly. Repeat, but use a swift down
movement of the handle –this time, you should find the
charge smaller by ½ grain or more.
The Powder Measure will throw up to 95 grains of smokeless
gun powder. For larger charges, set the volume to half the
total and throw two charges.
Some users find a better feel and more consistent handle
throw by “choking up”on the Arm Casting (010631-015) as
opposed to using the Knob (CT1010-021).
If a coarse grain of powder shears, back up a very small
amount and clear the cutoff.
Visually inspect the cases for unintended double charges by
inspecting them in a loading block.
It is important to remember that charge volumes can vary
from day to day, depending on temperature, humidity, static,
and the type of powder used. For cases of the same caliber,
it is best to verify the powder’s weight and volume in the
empty cartridge, at least at the start of the day’s handloading
5.0 MAINTENANCE
Assure the Locknut (010631-021) stays tight to the Cross
Bolt (010631-026) as the powder should never accumulate
between the machined Powder Measure surfaces.
It is not necessary to remove your Powder Measure from the
bench in order to empty the Hopper (010631-025). Lift the
handle 90°, remove the Charge Bar (010631-024), set the
powder can under the opening in the Handle, and lower the
Handle. Powder will drain from the hopper.
6.0 ORDERING INFORMATION
Order Number
Description
010631
Bench Rest Powder Measure
017941
Bench Rest Powder Measure Stand (optional)
To find a Reseller, go to forsterproducts.com and click
Distributors. If your distributor cannot supply you, or if you need
parts, please contact Forster Products directly by email, phone,
or fax.
Figure 3. Powder Measure Exploded Drawing
Cover
(010631-025-LID)
Set Screws, x 2
(010631-013)
Locknut
(010631-021)
9/32" x 5/8"
Washer
(010631-020)Body Casting
(010631-011)
Small or Large Hole
Drop Tube
(010631-027SM/
010631-027LG)
–or –
Long Drop Tube
(011051)C-Clamp with Screw
Washer & Swivel
(010631-012)
Crossbolt
(010631-026)
1/8" x 1/4" Steel
Roll Expansion Pin
(010631-016)
Thumbscrew
(010631-022)
Slide Rule
(010631-018)
Vernier Sticker
(010631-017)
Charge Bar
(010631-024)
Knob
(CT1010-021)
Knob Screw
(CT1010-022)
Arm Casting
(010631-015)
OuterCharge
Bar Setting
InnerCharge
Bar Setting
Hopper
(010631-025)
This manual suits for next models
1
Other Forster Products Tools manuals


 operating instructions")


