Fort ECSPKY User manual

Smart Security Keypad
ECSPKY
The keypad supports up to 50 RFID tags
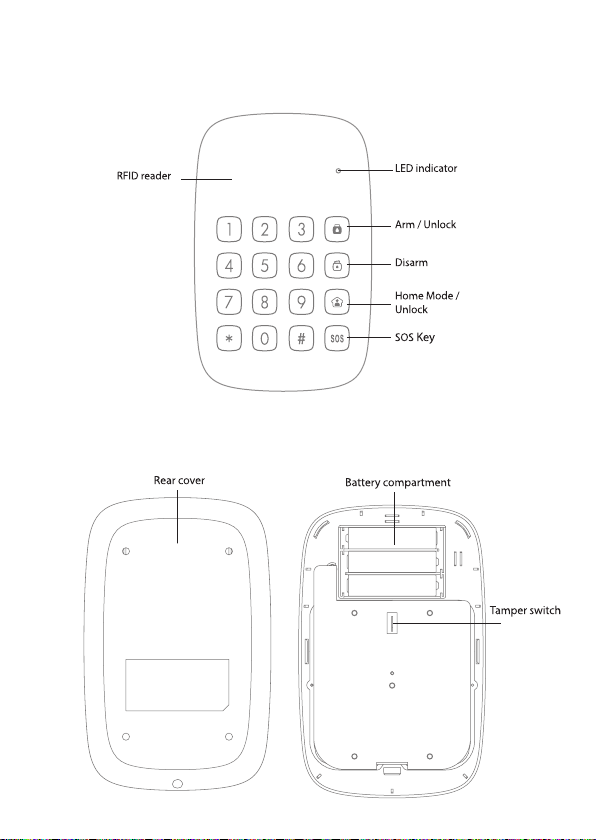
Appearance

Preparation
The ECSPKY is powered by 3 AAA batteries. On first time use, remove the
battery strip.
1. Unscrew and open the case
2. Insert the batteries according the battery polarity
3. Close the case and secure with previously removed screw
Note:
Because of the tamper switch, opening the rear cover of the keypad, when
the system is armed will trigger the alarm. In such an instance, to stop the
alarm, disarm the system.

Installation
1. Unscrew the case and remove the rear cover.
2. Secure the rear cover to the desired surface, using the supplied screws.
3. Reinstall the main unit onto the installed rear cover, and (using the screw
at the bottom) tighten them together.
Note:
Because of the tamper switch, opening the rear cover of the keypad,
when the system is armed will trigger the alarm. In such an instance, to
stop the alarm, disarm the system.

Setup
The ECSPKY operates in 4 different modes;
Normal Mode
The LED indicator flashes once every 5 seconds
Sleep Mode
Under Normal Mode, the keypad switches to Sleep Mode if no operation is
made for 35 seconds. Press the Arm [ ] or Home Mode [ ] keys to exit
Sleep Mode. When the keypad is in Sleep Mode, the LED indicator is off.
RFID Reader Mode
Under Normal Mode, press [*] on the keypad to activate the RFID reader for
10 seconds: The LED indicator turns on. After 10 seconds, the LED light
turns off as the RFID reader turns off automatically.
Setup Mode
To enter Setup Mode, switch to Normal Mode, and then enter
[your admin code +#] on the keypad. The LED indicator flashes once every
second. Press [*] to exit the Setup Mode and switch to the Normal mode.
After 30 seconds without operation, the keypad goes back to Normal Mode.
Note; Default admin code: 123456
Correct operation: 1 bleep and the LED light flashes once.
Incorrect operation: 1 Bleep and the LED light blinks twice.

Registering the ECSPKY to a Hub
Make sure the control panel is in Connection Mode
Press Arm [ ] or Home Mode [ ] on the keypad to unlock it.
Type your user code or admin code on the keypad, and then
press any of the Arm [ ], Disarm [ ] or Home Mode [ ] keys.
You will hear a short bleep if successful.
Default admin code: 123456
Default user code: 1234
The control panel of your alarm system can be controlled from a
distance from the keypad, once it has been successfully
registered.
Registering RFID tags
1. Press Arm [ ] or Home Mode [ ] on the keypad to unlock it.
Then type [admin code + “#”] to enter setup mode.
Default admin code: 123456
If you hear 2 beeps, the code you have entered is incorrect.
2. Type [41#]. You hear one beep and the LED indicator light sup: the
keypad switches to Connection Mode.
3. Swipe the RFID tag in front of the RFID reader. You should hear one
bleep; the connection is successful.
If you hear two bleeps, the RFID tag has already been added.
Press [*] to exit Setup Mode.
To clear all registered tags, press either the Arm [ ] or Home [ ] keys on the
keypad to unlock it, and then type [admin code + #42]. You will then hear
one bleep; the RFID tags have been deleted from the keypad

Usage
The keypad can be used as a remote control. Your user code or your
admin code will be required before arming or disarming the system, or
switching to home Mode or Mute Mode.
Arm the System
1. Press Arm [ ] or Home Mode [ ] on the keypad to unlock it
2. Type your user code or admin code.
3. Press the Arm key [ ]. The LED indicator flashes once, the keypad
bleeps once and sends the arming signal to the system.
Default admin code: 123456
Default user code: 1234
Disarming the system with the keypad
1. Press Arm [ ] or Home Mode [ ] on the keypad to unlock it.
2. Type your user code or admin code.
3. Press the Disarm button [ ]; the LED indicator flashes once, the keypad
bleeps once, and sends the disarm signal to the system
Default admin code: 123456
Default user code: 1234
Disarming by RFID Tag
1. Press Arm [ ] or Home Mode [ ] on the keypad to unlock it.
2. Press [*] to activate the RFID reader for 10 seconds.
3. Within the next 10 seconds, swipe the RFID tag in front of the reader to
disarm the system.
The RFID reader turns off when a tag is swiped in front of it, when the [*]
key is pressed again on the keypad, or after 10 seconds without operation.

Home Mode
1. Press Arm [ ] or Home Mode [ ] on the keypad to unlock it
2. Type you user code or admin code.
3. Press the [ ] key: The LED indicator will flash once, the keypad will bleep
once ,and then send the Home Mode signal to the system.
Emergency Call
Refer to page on how to lock/unlock the SOS button then:
With the SOS button unlocked
1. Press Arm [ ] or Home mode [ ] on the keypad to unlock it.
2. Press [SOS].
3. The LED indicator flashes once, the keypad bleeps once, and the alarm
is triggered immediately.
With the SOS button locked
1. Press Arm [ ] or Home mode [ ] on the keypad to unlock it.
2. Type your user code or admin code.
3. Press [SOS] to trigger the alarm immediately
Low battery Indication
When the battery level is low, the LED indicator flashes 3 times every 5
seconds. In such an instance, please replace the batteries.

Settings
Enter Setup Mode
Press Arm [ ] or Home Mode [ ] on the keypad to unlock it.
Type [admin code + #] to enter Setup mode.
Default admin code: 123456
Under setup mode, if no operation is made for 30 seconds, the keypad will
exit the setup mode automatically. The setup mode can also be exited by
pressing [*].
Exit delay
Detectors start detective potential intrusions immediately after the system
has been armed. To prevent alarms when you leave the property, an exit
delay can be set up. If you have set up an exit delay, the control panel will
receive the signal to arm the system when you press the Arm key [ ] on the
keypad after the time set.
1. Enter Setup Mode.
2. Type [33 + delay time in seconds + #].
3. You hear one bleep; the setup is successful.
To deactivate the Exit delay, set 0 as the delay time.
Note:
The time is set in seconds, which ranges from 0 ~ 255 seconds, default
setting 0
If the exit delay has been set, the control panel will bleep once every
seconds after having pressed the Arm [ ] key. The rhythm of the bleeps will
speed up during the last 15 seconds. After the exit delay has elapsed, the
control panel is armed.
If an exit delay has been set up for both the control panel and the keypad,
the actual delay time will be the combination of both exit delays.

Lock / Unlock the SOS button
Lock the SOS button
1. Enter the Setup Mode.
2. Type [3410#].
3. You hear one bleep: the setup is successful.
If the SOS button is locked, you will need to press Arm [ ], or Home Mode
[ ] to unlock the keypad, then type in either your admin code or user code,
then press [SOS] to trigger the alarm.
Unlock the SOS button
1. Enter Setup mode.
2. Type [3410#]
3. You hear one bleep; the setup is successful.
If the SOS button is locked, you will need to press Arm [ ] or Home Mode
[ ] to unlock the keypad. Then type your admin or user code, and finally
then press [SOS] to trigger the alarm.
Note:
Default setting: SOS button is locked.
Emergency Call
Refer to page on how to lock/unlock the SOS button then:
With the SOS button unlocked
1. Press Arm [ ] or Home mode [ ] on the keypad to unlock it.
2. Press [SOS].
3. The LED indicator flashes once, the keypad bleeps once, and the alarm
is triggered immediately.
With the SOS button locked
1. Press Arm [ ] or Home mode [ ] on the keypad to unlock it.
2. Type your user code or admin code.
3. Press [SOS] to trigger the alarm immediately
Low battery Indication
When the battery level is low, the LED indicator flashes 3 times every 5
seconds. In such an instance, please replace the batteries.

Keypress audible indication
The keys will bleep when pressed, and this can be enabled or disabled.
If the key indication has been disabled, the successfull setup indications will
also be disabled.
Enabling Keypress Audible Indication
1. Enter Setup mode.
2. Type [3510#].
3. You hear one bleep; the setup is successful.
Disabling Keypress Audible Indication
1. Enter Setup mode.
2. Type [3511#].
3. You hear one bleep; the setup is successful.
Note:
Default setting: Audible indication is enabled.

Enable/Disable deactivation by RFID tag
Enable deactivation of the system by RFID
1. Enter setup mode
2. Type [3610#]
3. You hear one bleep: the setup is successful
Disable deactivation of the system by RFID
1. Enter setup mode.
2. Type [3611#]
3. You hear one bleep: the setup is successful
Note:
Default setting: Deactivation of the system VIA RFID tag is enabled.

Changing Codes
Change User Code
1. Enter setup mode
2. Type [38+new user code+#]
3. You hear one bleep: the setup is successful
Note: The user code must be 4 digits. Default user code is “1234”
Change Admin Code
1. Enter setup mode.
2. Type [39+new user code+#]
3. You hear one bleep: the setup is successful
Note: The admin code must be 4 digits. Default user code is “123456”
Reset
1. Enter setup mode.
2. Type [987654321# ]
3. You hear one bleep: the setup is successful
Note: After having reset the kepad, the user code, the admin code, and any other settings will be
restored to default settings. Any programmed RFID tags will not be deleted.

Guidance
>Smart alarm accessories are specified a maximum of 80meters
line of sight in open air. For every obstacle the signal strengh
is reduced.
>Battery life depends on working and environmental factors
For more product information please visit the ESP website
General
Our products are designed to comply with the recommended codes and
practice, and is to be installed and serviced by competent persons in
accordance with the relevant regulations.

Elite Security Products
Redditch B98 8YN
Telephone : 01527 51 51 50
Fax: 01527 51 51 43
Web : www.espuk.com
E&OE - Errors and omissions excepted.G21
Table of contents


