Fortis FSWDTRDMLXA User manual


Table of Contents
Usage Warnings............................................................................................................................................................. 2
Parts List........................................................................................................................................................................... 2
Assembly.......................................................................................................................................................................... 3
Folding......................................................................................................................................................................... 4
Unfolding.................................................................................................................................................................... 4
Technical Specifications.............................................................................................................................................. 4
xercise Instructions..................................................................................................................................................... 5
Warm Up..................................................................................................................................................................... 5
xercising.................................................................................................................................................................... 5
xercise Intensity..................................................................................................................................................... 5
xercise Frequency................................................................................................................................................. 5
xercise Warnings......................................................................................................................................................... 6
Warm Up xercises................................................................................................................................................. 6
Maintenance..................................................................................................................................................................... 7
Cleaning....................................................................................................................................................................... 7
Running Belt & Deck Lubrication........................................................................................................................ 7
Belt Adjustment........................................................................................................................................................ 7
Functions.......................................................................................................................................................................... 8
LCD Screen Layout.................................................................................................................................................. 8
Preset Programs....................................................................................................................................................... 8
Safety Lock Function.............................................................................................................................................. 8
Key Functions............................................................................................................................................................ 8
Display Functions..................................................................................................................................................... 9
Heart Rate Measurement Function.................................................................................................................... 9
Auto Program................................................................................................................................................................ 10
Parameter Settings in 3 Modes........................................................................................................................... 11
Body Fat Test................................................................................................................................................................. 11
Additional Information........................................................................................................................................... 11
rror Messages.............................................................................................................................................................. 12
1

Read all instructions carefully before using this product.
Consult with your doctor or health professional before starting your workout regime, especially if you are
aged over 40 or have any pre-existing health problems. Kogan.com accepts no responsabilities for any
injuries or damage caused by use of this product.
The treadmill should be fully assembled and covered with the motor shield before being connected to a
power supply.
Usage Warnings
•nsure safety clamps are attached before use.
•Do not insert any objects into any parts of the equipment.
•Position the treadmill on a clear, level surface. Do not place the treadmill on thick carpet as it may
interfere with ventilation. Do not place the treadmill near water or outdoors.
•Never start the treadmill while standing on the walking belt. After turning power on and adjusting
the speed control, there may be a short pause before the belt starts to move. Always stand on the
foot rails on the side of the frame until the belt is moving steadily.
•Wear appropriate clothing when exercising on the treadmill. Do not wear long, loose fitting
clothing that may get caught in the treadmill. Always wear running or aerobic shoes with rubber
soles.
•Keep children and pets away from treadmill during use.
•Wait for an hour after a meal before commencing a treadmill workout.
•This product is designed for use by adults. Children will need full adult supervision at all times.
•Hold onto the handrails until you are comfortable and familiar with using the treadmill. Kogan.com
is not liable for any injuries or damage caused by users not holding onto the handrails.
•The treadmill is indoor equipment. Store it in a dry, cool location.
•If the unit malfunctions during use at all, including inexpected speed increases, sudden stopping or
other erratic behaviour, trigger the safety lock on the console and the unit will stop immediately.
•Do not use with an extension cord. Do not place any heavy objects onto the cable.
•When equipment is not being used, unplug the unit from the power supply.
Parts List
I II III
IV 55L 55R
No. Description Specification QTY
I Main Frame - 1
II Safety Lock - 1
III Oil Bottle - 1
IV Bolts & Tools - 1 set
55L 55R Protective Guard - 1 pair
2

Assembly
Step 1
Open carton and take all parts out. Check that all parts are included. Place the main frame onto
clear, flat and level ground.
Step
Turn the console frame, as shown in the image to left. Attach the console frame (5) to the
upright tubes (4L/R), using D8 washer (29) x 2 and M8x20 Bolts (13) x 2, as shown to right.
Step 3
Unfold the upright tube (4L/R). To avoid injury, have another person support the upright tube
during assembly. Lock the upright tube (4L/R) with the base frame (1) using M8x20 Bold (13) x
2, D8 Washers (29) x 3 and M8x50 Bolt (10) x 1, separately.
Then attach the protective guard (55L/R) to the upright tube (4L/R) with M5x10 Screws (19) x 2
separately after ensuring that the upright tubes have been locked tightly.
Step 4
Put the Safety Lock (II) on the console.
3

Folding
Pull up the base frame at position A until you hear the sound of the pressure bar activating.
Unfolding
Support the end of the treadmill with your hand, then press down on the pressure bar (B) with
your foot. Once the pressure is released, the base frame will lower itself automatically. Please
ensure that children and animals are not nearby when lowering base frame.
Technical Specifications
Assembled size (mm) 1810 x 800 x 1330 Input As shown
Folded size (mm) 1060 x 800 x 1570 Output As shown
Running space (mm) 1350 x 480 Speed range 1 ~ 16KM/h
N.G 74KG Max Weight 120KG
LCD Display Speed / Time / Distance / Calories / Pulse
4
A
B

Exercise Instructions
Warm Up
If you are over 35 years old or out of shape, please consult with your doctor before undergoing
a new exercise regime.
Before using the motorized treadmill, please learn how to control the unit. Learn how to start or
stop the treadmill, as well as how to adjust the speed. While learning, do not stand on the
machine. When you are ready to start, stand on the anti-slip pads on either side, and hold onto
the handlebar with both hands. Keep the machine at a low speed (1 ~ 3.5KM/h) then test the
treadmill by using one foot. When you are accustomed to the sensation, move both feet onto
the treadmill while still holding onto the handlebar. Update the speed to 3 ~ 5KM/h and use for
10 minutes, then stop the unit.
Exercising
Learn how to adjust the speed and incline before use. Walk about 1KM at a stable speed and
note the time. It may take you anywhere between 15~25 minutes. If you walk at 4.8KM/h, it will
take you 12 minutes to walk 1KM. If you feel physically comfortable at this rate, you can add to
the speed or incline to increase the exercise rate. Do not add further to the speed or incline until
you are comfortable with your new settings.
Exercise Intensity
Warm up at 4.8KM/h for 2 minutes, then increase to 5.3KM/h for another 2 minutes, then to
5.8KM/h for a further 2 minutes. After that, add an extra 0.3KM/h every 2 minutes until you feel
that you are reaching your limit. Do not exceed your ability to keep up.
Speed Suitability
1.0 ~ 3.0KM/h Beginners, elderly and extremely unfit people
3.0 ~ 4.5KM/h Relaxed walking
4.5 ~ 6.0KM/h Normal walking pace
6.0 ~ 7.5KM/h Fast walking pace
7.5 ~ 9.0KM/h Jogging
9.0 ~ 12.0KM/h Intermediate running speed
12.0 ~ 14.5KM/h xperienced runner
14.5 ~ 16.0KM/h Sprint runner in peak physical condition
Calorie burning – the effective way
Warm up for 5 minutes at 4.8KM/h, then slowly bring the speed up in 0.3KM/h increments every
2 minutes until you are at a stable speed you are comfortable at while still challenging yourself.
Try to keep this pace up for 45 minutes. To best perform this, try to maintain the speed for a
one hour long TV show, increasing the speed by a further 0.3KM/h every ad break, then
dropping back to your normal speed when the TV show resumes. Once the show finishes, you
should drop the speed by 0.3KM/h increments every 2 minutes until you have reached your
starting speed and given your legs a chance to warm-down.
Exercise Frequency
You should do these exercises 3-5 times a week. Try to track the exercises on a calendar to
ensure that you maintain your exercise schedule.
As time passes, you can increase the intensity by adjusting the incline of the treadmill.
5

Exercise Warnings
Consult with your doctor or health professional before starting a workout regime.
They may be able to help you create a suitable exercise time-chart according to your age and
health conditions.
Please stop immediately if you feel tightness in your chest, chest pain, irregular heartbeat,
breathing difficulty, dizziness or any other discomfort during exercise.
Warm Up Exercises
Before exercise, it is best to stretch and warm-up your muscles for 5~10 minutes. Try to do each
of the following stretches, then do the exercises again at the end of your workout to assist the
muscles in warming-down.
1. Down Stretch: with your knees slightly bent, bend your body
forward slowly with your back and shoulders relaxed. Reach
down and try to touch your toes with your fingertips. If you
can't get close to your toes, do not worry. Reach down as far
as you can without straining yourself. Hold for 10~15 seconds,
then relax. Repeat this exercise three times.
2. Hamstring Stretch: while in the sitting position, put one leg
out to the side straight. Tuck your other leg up inwards so
that the sole of your foot is up against your thigh. Try to
touch your toes with the hand on the same side as your
outstretched leg. Maintain for 10~15 seconds, then relax.
Repeat for each leg three times.
3. Leg and Foot Tendon Stretch: while standing against a wall,
rest both hands on the wall at shoulder height, then step
forward with one leg, resting your foot against the base of
the wall. Keep the knee on your back leg straight as you lean
forward, tilting at the ankle towards the wall. Maintain this
stretch for 10~15 seconds, then relax. Repeat for each leg
three times.
4. Quad Stretch: rest your right hand against a wall or table for
balance, then lift your leg up by bending your knee, and
reach back with your left hand to grasp your foot. Press your
foot up against your buttocks, pushing slowly until you feel your front thigh muscles
tensing. Maintain this stretch for 10~15 seconds, then relax. Repeat for each leg three
times.
5. Inner Thigh Muscle Stretch: sit on the floor with the soles of your feet touching and your
knees pointing outwards. Grasp your feet and pull them gently back towards your groin
until you feel like you are reaching your limit. Hold this stretch for 10~15 seconds, then
relax. Repeat this stretch three times.
6

Maintenance
WARNING: Always unplug the treadmill from the electrical supply before performing any
cleaning or servicing on the unit.
Cleaning
General cleaning of the unit will greatly prolong the life of the treadmill.
Keep the treadmill clean by dusting it regularly. Be sure to clean the exposed part of the deck on
either side of the walking belt, as well as the side rails. The will reduce the build-up of foreign
material underneath the walking belt, which will also be aided by the wearing of clean running
shoes. Do not eat food while using the treadmill.
Once a year, remove the motor cover and vacuum under the cover. UNPLUG the unit from the
power supply before removing the motor cover.
Running Belt & Deck Lubrication
The treadmill is requipped with a pre-lubricated, low maintenance deck system. The belt/deck
friction may play a major role in the function and life of your treadmill, thus it will require
periodic lubrication. To lubricate, with the treadmill stopped, lift one side of the running belt up
and apply the lubricant along the center of the running board. Then, turn the treadmill on to its
LOW ST speed and allow the lubricant to spread all over the running board.
We recommend the lubrication of the deck according to the following timetable:
➢Light user (less than 3 hours per week) – Annually
➢Medium user (3~5 hours per week) – very Six Months
➢Heavy user (more than 5 hours per week) – very Three Months
We recommend that you buy suitable lubrication from any reputable sports equipment store.
Belt Adjustment
The belt should be adjusted for optimal fitting. If the belt is too loose, the belt may slip during
use, whereas if the belt is too tight it can affect the performance of the motor and will increase
abrasion to the rollers and belt. The belt should be able to be lifted approximately 50~75mm up
from the deck when well fitted.
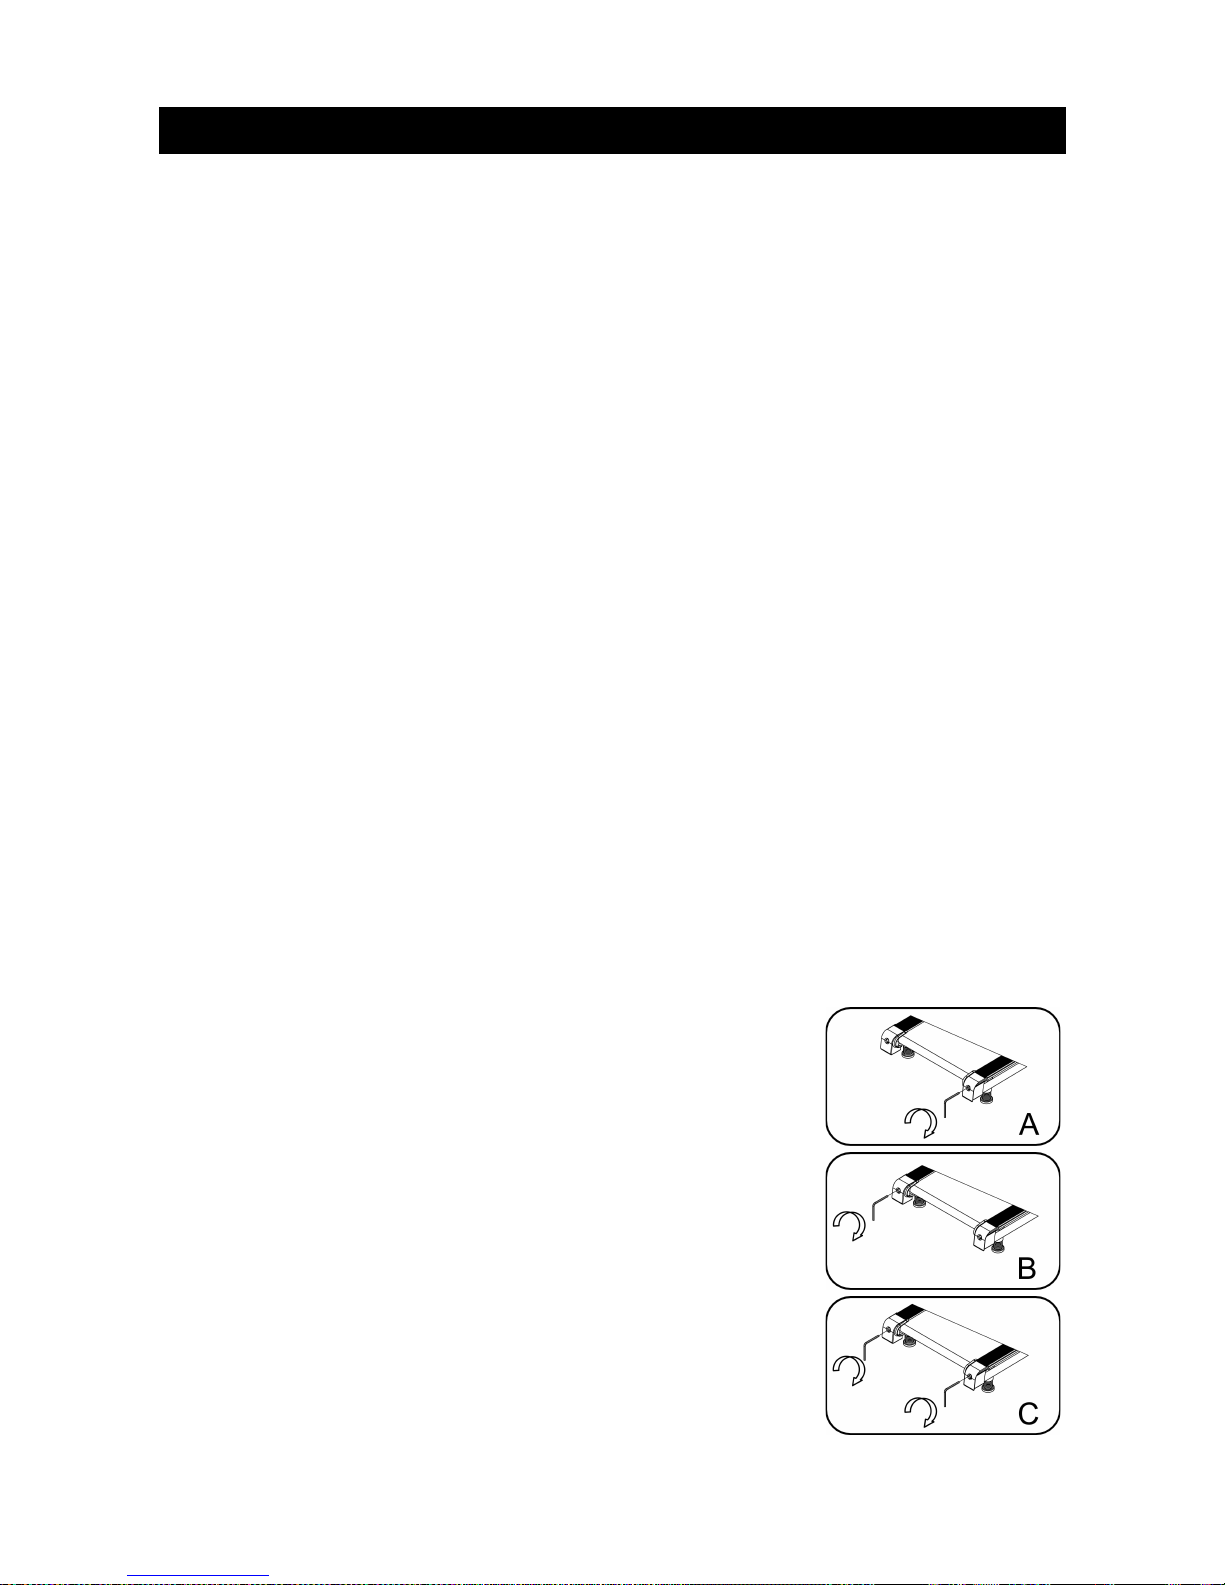
Centering the running belt
A) Place the treadmill on a flat, stable surface. Run the treadmill
at approximately 6~8KM/h and stand directly behind the
treadmill, watching the running condition of the belt. If the
belt is drifting to the right, unplug the unit, then give the
adjusting bolt 1/4 turn clockwise, then run until the belt is
centered.
B) If the belt is drifting to the left, unplug the unit, then give the
left adjusting bolt a 1/4 turn clockwise, then run the unit again
until the belt is centered.
C) Periodically you should check the tightness as the belt will
loosen over time of use. Unplug the unit and check how tight
the belt is. Turn the left and right adjustment bolts clockwise
until both sides appear to be at an equal tightness.
7

Functions
LCD Screen Layout
Preset Programs
P1 ~ P15 automatic programs
Safety Lock Function
If the safety lock is removed, " 7" will be displayed immediately and the treadmill will rapidly
stop and a tone will sound. If the safety lock is reinstalled, the electronic system will come back
online after 2 seconds.
Key Functions
•START/STOP
"START" is the start key. Pressing it while the treadmill is in the stopped state will result
in the treadmill starting and running, with the speed displayed as "1.0". "STOP" is the stop
key. Press it while the treadmill is running and all data will be reset and the system will
return to manual mode after the stable stopping of the treadmill.
•Program
"PROGRAM" is the program key. In standby state, press the PROGRAM button to select
from manual mode "1.0" to auto-program P1 ~ P15 mode; manual mode is the default one
under which the default speed is 1.0KM/h and the maximum running speed is 16KM/h.
•Mode
"MOD " is the mode key. While in a standby state, MOD can select from 3 different
kinds of countdown operations from H-1 to H3. H-1 is time countdown mode. H-2 is
distance countdown. H-3 is calorie countdown. Once the mode is set, SP D+ and
SP D- can be used to set up the relevant countdown value. After the completion of
your settings, press START to start the treadmill.
•Speed Keys
"SP D+" and "SP D-" are acceleration and deceleration keys. They may also be used
to adjust parameter settings when setting up your exercise on the treadmill. When the
treadmill is running, they are used to adjust the speed by 0.1KM per press. Hold speed
keys down for more than 2 seconds for automatic continuous acceleration or
deceleration.
There are two keys on the handle:
•Incline
"INCLIN +" and "INCLIN -" are used to increase or decrease the incline that you are
walking against. They may also be used to adjust the parameter settings when setting up
your exercise. When the treadmill is running, they are used to adjust the incline by 1% per
press. Hold the incline keys down for more than 2 seconds for automatic continuous
increase or reducing of the incline.
8

There are fast/shortcut keys on the handle:
•Speed Shortcut Keys
Speed adjustments can be achieved through the speed shortcut keys to 3, 6, 9, 12, 15.
•Incline Shortcut Keys
The incline can be directly adjusted to grades 2, 4, 6, 8, 10 through the shortcut keys
while the treadmill is running.
Display Functions
•Speed Display
Displays current running speed.
•Time Display
Displays the running time under manual mode, or the countdown running mode under
mode and programmed modes.
•Distance Display
Displays the accumulated distance under manual and programmed modes, or the
countdown distance under mode running states.
•Calorie Display
Displays the accumulated calories under manual and programmed modes, or the
countdown calories under mode running states.
•Heart Rate Display
When heart rate signals are detected, the heart shaped icon flashes and the pulse value
will be displayed.
Data Display Range for various parameters:
•TIM : 0:00 ~ 99.59 (min)
•DISTANC : 0.00 ~ 99.9(KM)
•CALORI S: 0.0 ~ 999(C)
•SP D: 1.0 ~ 16.0(KM/h)
•PULS : 50 ~ 200 (BPM)
Heart Rate Measurement Function
While the treadmill is connected to the power, hold the pulse tester for 5 seconds and the heart
rate value will be displayed. The initial value is the measured heart rate, and it's display range is
50 ~ 200 beats per minute. While the heartbeat measurement is occurring, there will be a
flashing heart shaped icon.
The heart rate displayed is for reference only and can not be used as medical data.
9

Auto Program
The default running time for programs are 10 minutes. Set the running time after choosing the
program. ach program is divided into 10 sections, with each section evenly distributed to each
program section. Below is the 15-section program running diagram.
TIME
PROGRAM
Set time / 10 = running time for each section
1 3 4 5 6 7 8 9 10
P1 SP D 3 3 6 5 5 4 4 4 4 3
P2 SP D 3 3 4 4 5 5 5 6 6 4
P3 SP D 2 4 6 8 7 8 6 2 3 2
P4 SP D 3 3 5 6 7 6 5 4 3 3
P5 SP D 3 6 6 6 8 7 7 5 5 4
P6 SP D 2 6 5 4 8 7 5 3 3 2
P7 SP D 2 9 9 7 7 6 5 3 2 2
P8 SP D 2 4 4 4 5 6 8 8 6 2
P9 SP D 2 4 5 5 6 5 6 3 3 2
P10 SP D 2 5 7 5 8 6 5 2 4 3
P11 SP D 2 5 6 7 8 9 10 5 3 2
P12 SP D 2 3 5 6 8 6 9 6 5 3
P13 SP D 2 5 6 9 7 8 5 2 3 2
P14 SP D 3 4 5 6 7 8 5 4 3 3
P15 SP D 3 5 7 7 8 7 7 5 5 4
TIME
PROGRAM
Set time / 10 = running time for each section
1 3 4 5 6 7 8 9 10
P1 INCLIN 0 3 3 3 4 4 4 1 1 0
P2 INCLIN 2 2 2 3 3 3 3 4 4 2
P3 INCLIN 3 5 4 4 3 4 4 3 4 2
P4 INCLIN 0 3 3 2 2 5 5 3 3 2
P5 INCLIN 3 5 3 4 2 3 4 2 3 2
P6 INCLIN 3 4 5 6 3 5 5 6 4 3
P7 INCLIN 0 3 3 3 4 4 4 1 1 0
P8 INCLIN 1 1 4 4 4 5 5 4 3 2
P9 INCLIN 3 5 3 4 2 3 4 2 3 2
P10 INCLIN 1 5 6 8 12 9 10 9 5 3
P11 INCLIN 3 5 6 8 6 5 8 7 5 2
P12 INCLIN 5 7 5 8 6 5 9 10 6 2
P13 INCLIN 3 3 4 4 3 4 4 3 4 2
P14 INCLIN 0 3 3 2 2 4 4 3 3 2
P15 INCLIN 3 3 3 3 2 3 4 2 3 2
10

Parameter Settings in 3 Modes
•For countdown timer setting, the initial value is 10:00m, with a range of 5:00 ~ 99:00,
with a step range of 1:00.
•For countdown calorie setting, the initial value is 50kcal, with a range of 20 ~ 990kcal,
with a step range of 10.
•For countdown distance setting, the initial value is 1.0km, with a range of 1.0 ~ 99.0km,
and the step range is 1.0.
The switching order is manual, time, distance and calories.
Body Fat Test
In standby mode, you can press the program button to evaluate your body fat reading, with
"FAT" showing in the speed window. Press "MOD " to choose parameters "F1 – S X / F2 –
AG / F3 – H IGHT / F4 – W IGHT", then press SP D+ or SP D- to adjust the data.
After setting, the window will show F5. At this point, hold the handle pulse measurement with
both hands and it will show if your height and weight fits.
The FAT measurement is data that shows the relationship between your height and weight, but
has no information in regards to proportions or distribution. FAT is suitable for either males or
females, together with other health indicators, for adjusting weight based on people.
The ideal FAT measurement is 20-25. If the reading is under 19, then it is considered
underweight, whereas between 25 ~ 29 is considered overweight. A result over 30 is considered
obese.
For reference, please see the following table. (Data is for reference only, not as medical data)
01 Sex 01 male 02 female
02 Age 10 ~ 99
03 Height 100 ~ 200
04 Weight 20 ~ 150
05 FAT <19 Underweight
20 ~ 25 Normal weight
26 ~ 29 Overweight
>30 Obese
Additional Information
•After completion of one of the countdown modes, ND will be displayed on the LCD
screen. The system will sound an alarm until the treadmill stops. Once stopped, the
treadmill will revert to manual mode.
•MP3/Audio playback can be achieved via the audio input hole on the side of the console.
11

Error Messages
Error Code Failure Description Solutions
1 Communication abnormality: there is
abnormal communication between the
controller and the electronic meter
after powering on.
Unplug the unit from the power supply, then check
the connections between the controller and the unit.
Check for damage to the cords. If the problem
persists, please contact the Kogan.com customer
support team.
2 Controller can't detect motor voltage:
while there is voltage output from the
controller to the DC motor, feedback
cannot be received from the unit for
more than 3 seconds.
Check that the cables are securely connected. If the
connections seem to be loose, please reconnect
them. If the problem persists, please contact the
Kogan.com customer support team.
4 Incline motor failure or error Recheck the incline motor by disconnecting the unit
from the power supply for 10 seconds, then
attempting operation again.
5 Over-current protection. This can be triggered by a power surge, or by the
treadmill becoming jammed, not allowing the motor
to rotate. Unplug the unit immediately, then check
the unit for burning odour. If there is no bad smell
and no obvious reason for the treadmill to be
jammed, plug unit in and try operation again.
6 Abnormal power situation Unplug unit for 10 seconds, then plug it back in and
try operation again.
7 Safety lock not in position Put the safety lock back into position.
If you have any further questions or concerns regarding the use of the treadmill, please
contact the Kogan.com customer support team.
12
Other Fortis Treadmill manuals