Foshan YiJiu Paint Tinting Equipment YJ-1A-16D User manual


2
CONTENTS
Page No.
1. USER MANUAL INTRODUCTION.......................................................................3
2. TECHNICAL SPECIFICATIONS .........................................................................3
3. TERMS OF WARRANTY ..................................................................................3
4. SAFETY INSTRUCTIONS ..................................................................................4
5. DISPENSER MACHINE INSTALLATION.............................................................5
6. DRIVER 50 SOFTWARE INSTALLATION...........................................................7
7. USB DRIVER INSTALLATION.............................................................................9
8. GUIDE TO USE DRIVER 50 SOFTWARE.........................................................11
(1)Function Introduction.........................................................................................11
(2)Software Operation Instruction..........................................................................12
①Dispensing............................................................................................12
②Manual dispensing................................................................................18
③Colorant management .........................................................................19
④Debug...................................................................................................22
⑤Pump calibration...................................................................................24
⑥Presentation management....................................................................27
9. UPDATE DATA IN SPECIFIED FILES................................................................28
①Update formula data.......................................................................................29
②Update the colorant data.................................................................................29
③Translate the software display in local language.............................................31
10. TROUBLE SHOOTING.....................................................................................32
11. COMPONENT DETAILS.....................................................................................34
12. SCHEMATIC CONNECTION DIAGRAM............................................................37
3
1. USER MANUAL INTRODUCTION
Automatic paint dispenser, Model: YJ-1A-16D
The manual provides instructions on the routine maintenance needed to uphold the machines
performance over time.
It is aimed at the machine operators and installers, who must have the necessary training and
professional skill to use similar automatic machines.
For the safe use of the machine, it is important:
1. To familiarize yourself with the structure and content.
2. To read the safety chapter in detail and make sure you understand all the instructions.
2. TECHNICAL SPECIFICATIONS
Application Range: water or oil colorants
Dispensing:Sequential
Capacity piston pump: 50 ml
Dispensing amount per minute:0.25L
Minimum dispensing: 1/384 Y or 0.077 ml
Qty of canister:16 stainless cans
Canister Capacity: each 2.3L
Power supply:220V±10% 60Hz
Rated Power: 150W
3. TERMS OF WARRANTY
Limited Warranty: We provide a one year warranty for each equipment. Within guarantee
period, we can help you judge the fault according to the failure phenomenon via Internet way
and send replacement part to you. If the fault has been caused by mis-used or abnormal
conditions of operation, repairs will be billed at a normal cost in this case. An estimate will be
submitted before repair work is started in case requested.
Purpose and use of this manual

4
4. SAFETY INSTRUCTIONS
We declines any responsibility should be following instructions not be followed:
Place the machine on a steady, horizontal surface by using a level.
The surrounding temperature should be kept as constant as possible (anyhow, always
between 0-40℃
Make sure the dispenser machine is only connected to a wall socket assembled according
to regulations.
Connect the machine by carefully following the installation instructions.
Maintenance can only be carried out by a qualified technician.
Whilst functioning, the machine does in a noisy or irregular way, please press the power
button to turn off the machine.
The elastomer parts (O-ring) inside the dosing circuits could undergo damage if other
thinners are used.
When the machine not be used for a long time, please check if the nozzle get blocked. If yes,
you need to clean it.
Don’t touch the electronic board when the machine is power on.
The user must keep the machine in a proper working condition. Broken parts and
accessories must be replaced with original appropriative parts of the machine.
Please read the instructions carefully before installing and operating the machine, as a
personal safety measure as well as to avoid needless damage to the machine.

5
5. DISPENSER MACHINE INSTALLATION
Only qualified or appropriately trained personnel are authorized to install the machine.
Conditions for proper installation
Install an electrical power line in accordance with the voltage and frequency required
by the machine.
Floor must be flat where machine is to be installed.
The line must be protected from overloads, short- circuits and direct contacts
according to current regulations.
Computer operating system Windows XP/ Windows 7 is to be installed with the
computer by user.
UPS is to be provided by user.
Grounding of the power supply system is must.
Installing a Automatic Paint Dispenser Machine involves :
Installing the dispenser machine.
Connecting the computer to the machine
Installing the driver 50 software.
Installing the USB driver
Computer and monitor assembly
The dispenser is provided with a shelf. The shelf can be used to
position the PC,the monitor ,the keyboard and the mouse. After
having positioned the PC, you must connect it to the dispenser
machine. You will find a monitor power plug and PC power plug
connecting with the dispenser. Please connect the other side to
the appropriate socket positioned on the monitor and the PC.
You will also find a USB cable connecting with the dispenser,
please connect the other side to one of the USB sockets on the
PC. It will made possible by using the software to command and
control the dispenser.
Please read the instructions carefully before installing the machine
6
Starting the dispenser
1).Connect the power cables of the dispenser machine to a wall socket then trun on the
dispenser machine and the PC.
2).Install the driver 50 software and USB driver software.
3).Load the colorants into the canisters but be careful not to exceed the limit.
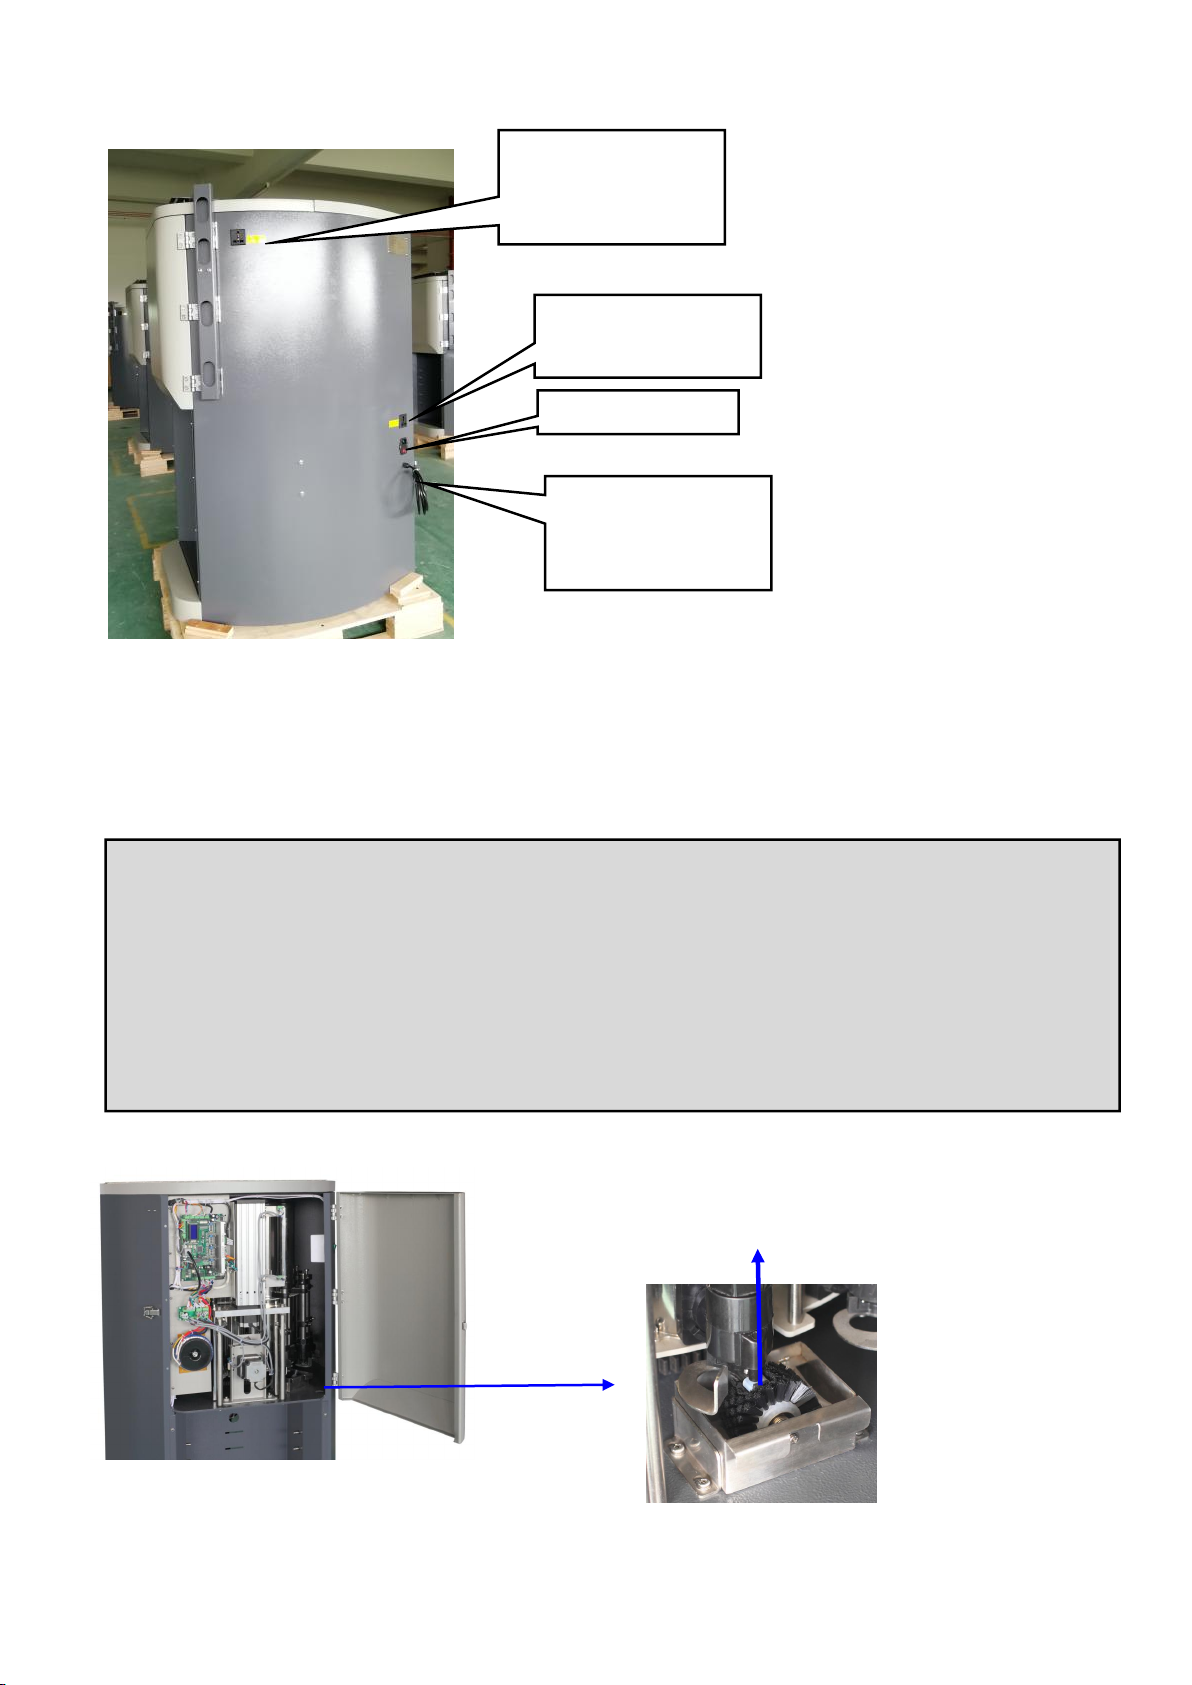
Power plug
USB cable: Connect it
to one of the USB
sockets on the PC.
PC power plug:
connect it to the PC
Monitor power plug:
connect it to the
monitor
Add water into the brush box
nearly to the three quarters lever
every three or four days.
Cautions:
After having loaded all the circuits, the evacuation procedure must be implemented
before being able to use the machine. Otherwise, it will affect the accuracy. Please refer to
“colorant management” instructions regarding evacuation.
You don’t need to calibrate the pumps, we have calibrate all the pumps before shipments.
Please add water into the brush box nearly to the three quarters level every three or four
days.

7
Cautions:
6. DRIVER 50 SOFTWARE INSTALLATION
1). Decompress"Driver 50 setup.rar", you can see “setup.exe”,double click to install.
Click “next” button
2).Select “ I agree to the terms of this license agreement” , click “next” button.
Note: Please exit the anti-virus software,because some anti-virus recognize it as virus.
Pull the stainless steel to support
the top cover as this photo show
when you need to open the top
cover.
8
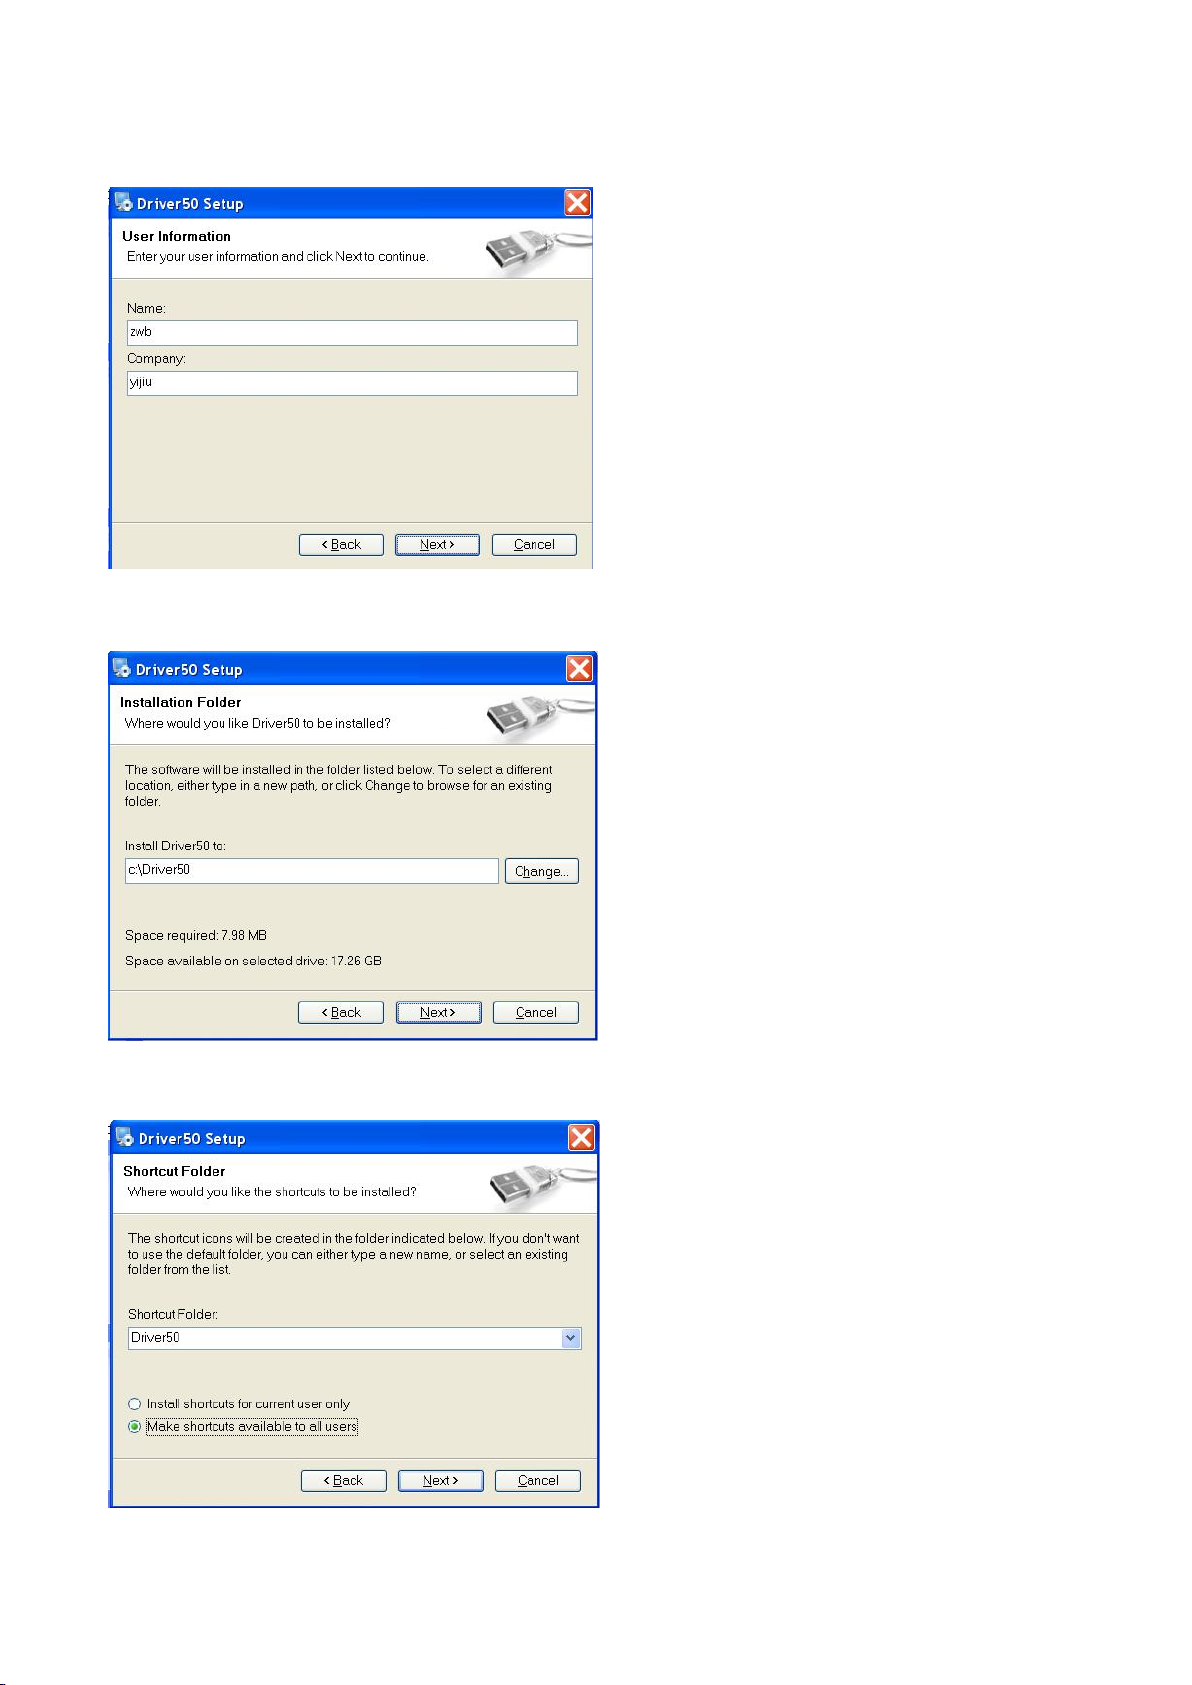
3).Enter the name and company name, click “next” button.
4).Input the install path, click “next” button.
5).Select and click “next” button.
9
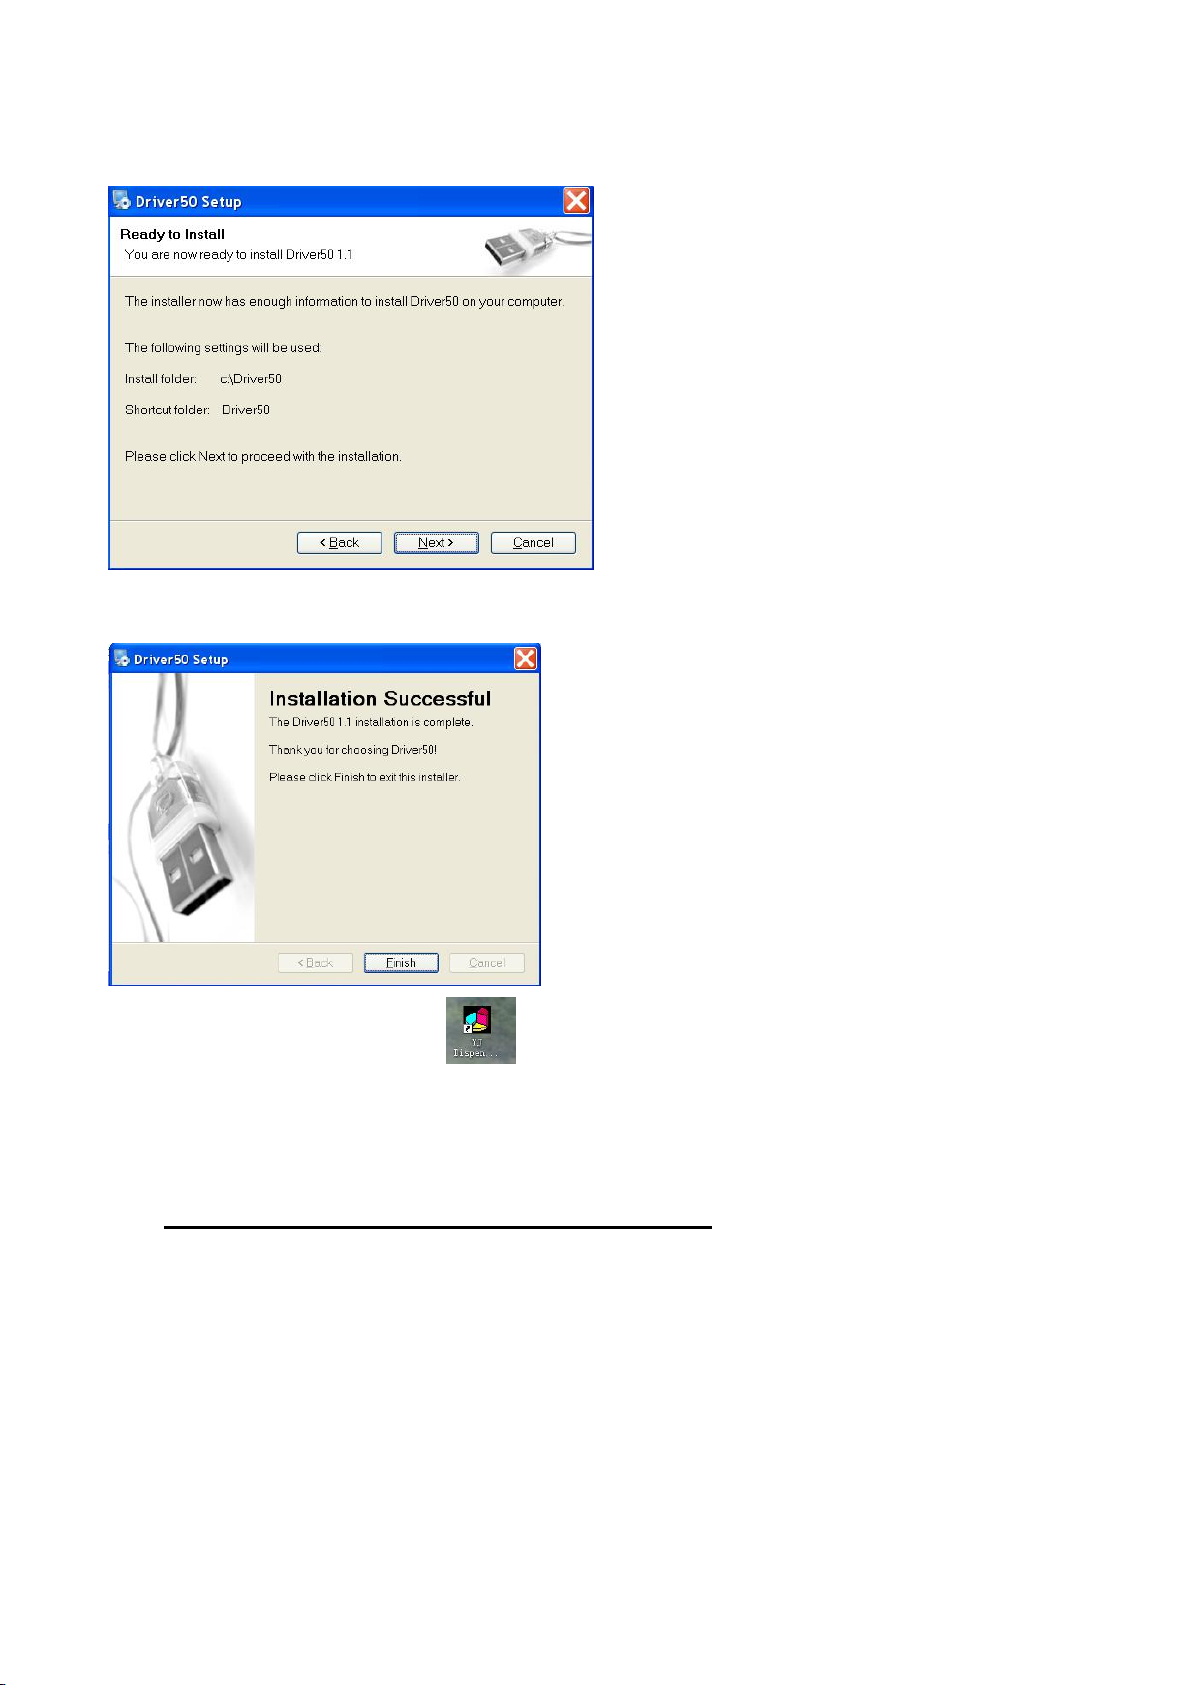
6) Click “next” button.
7). Click “finish” button.
Now you will see a shortcut icon on your desktop .It means that the driver software is
successfully installed in your computer. You can run the driver software by double clicking on the
desktop icon.
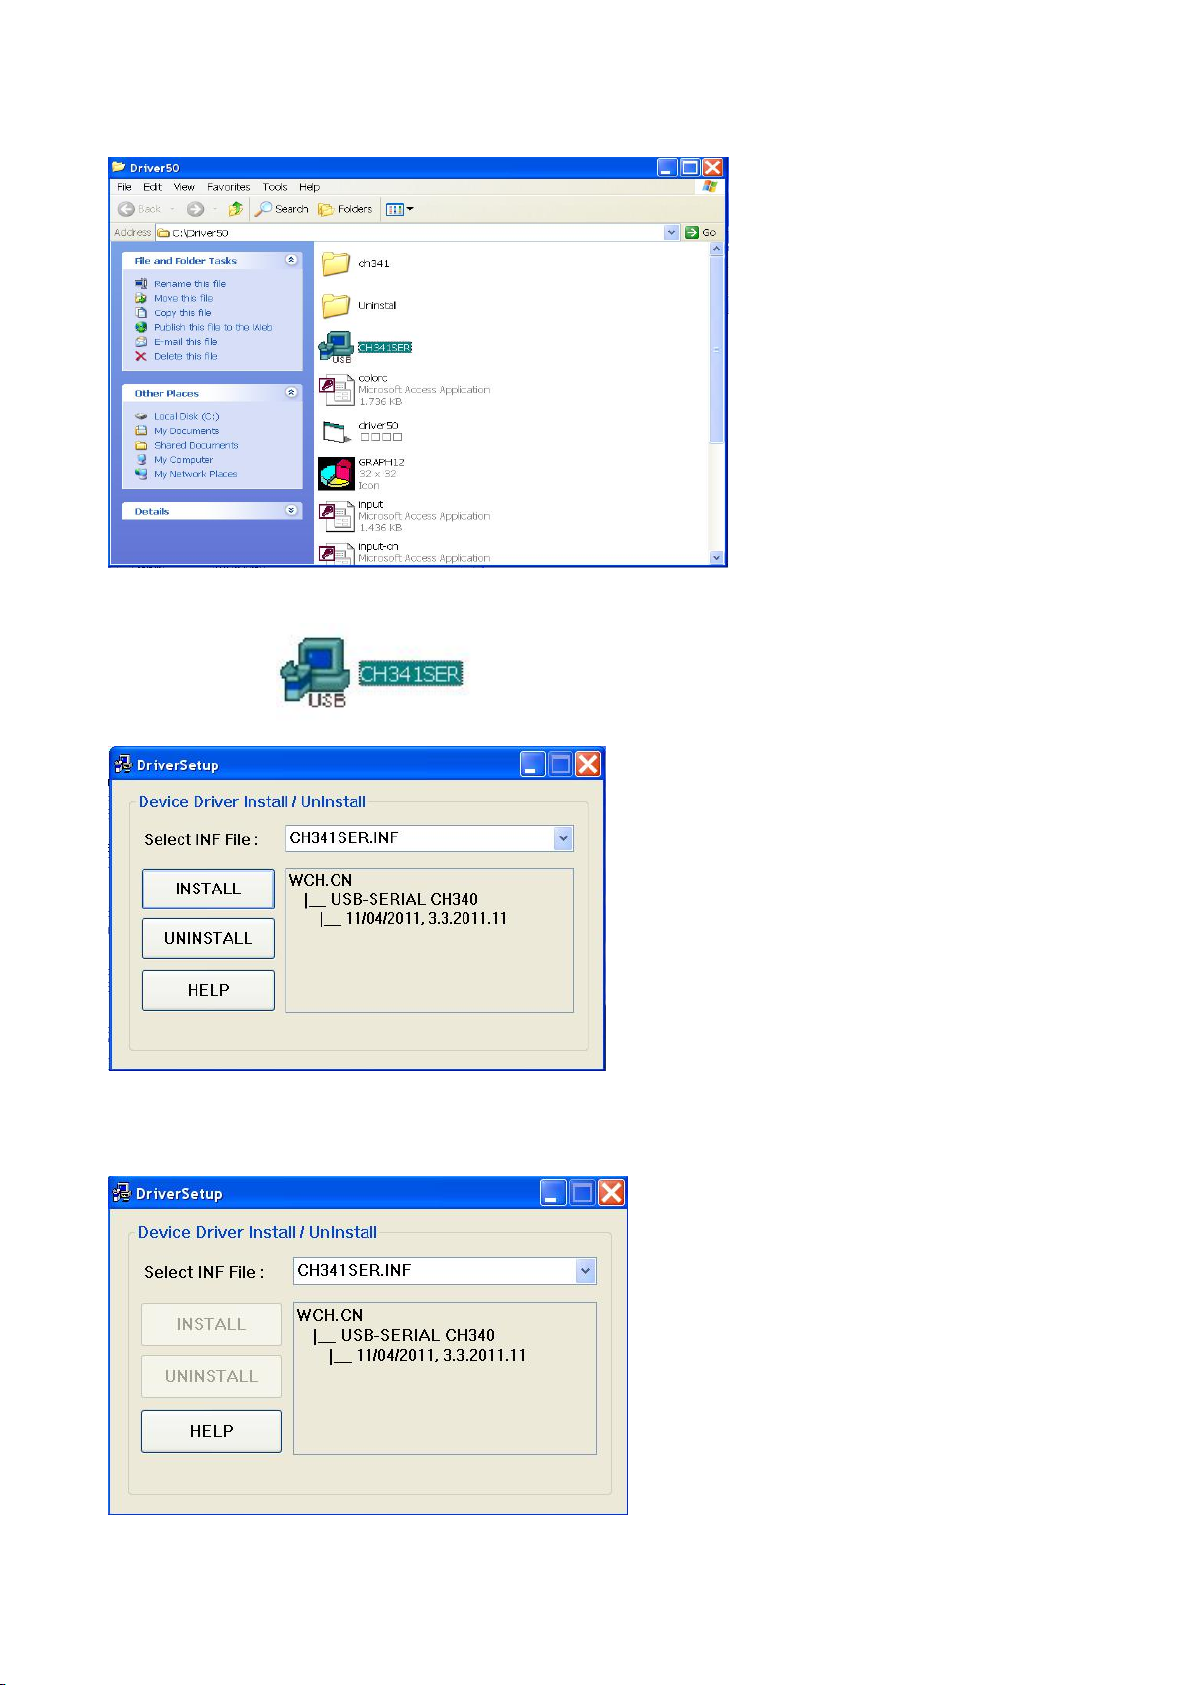
7. USB DRIVER INSTALLATION
Connect the software and machine with USB line,the software will ask you to find CH341.
1). Please open “Driver 50” folder. You will see below interfac
10
2). Double click , you will enter below interface:
Click “INSTALL” botton.
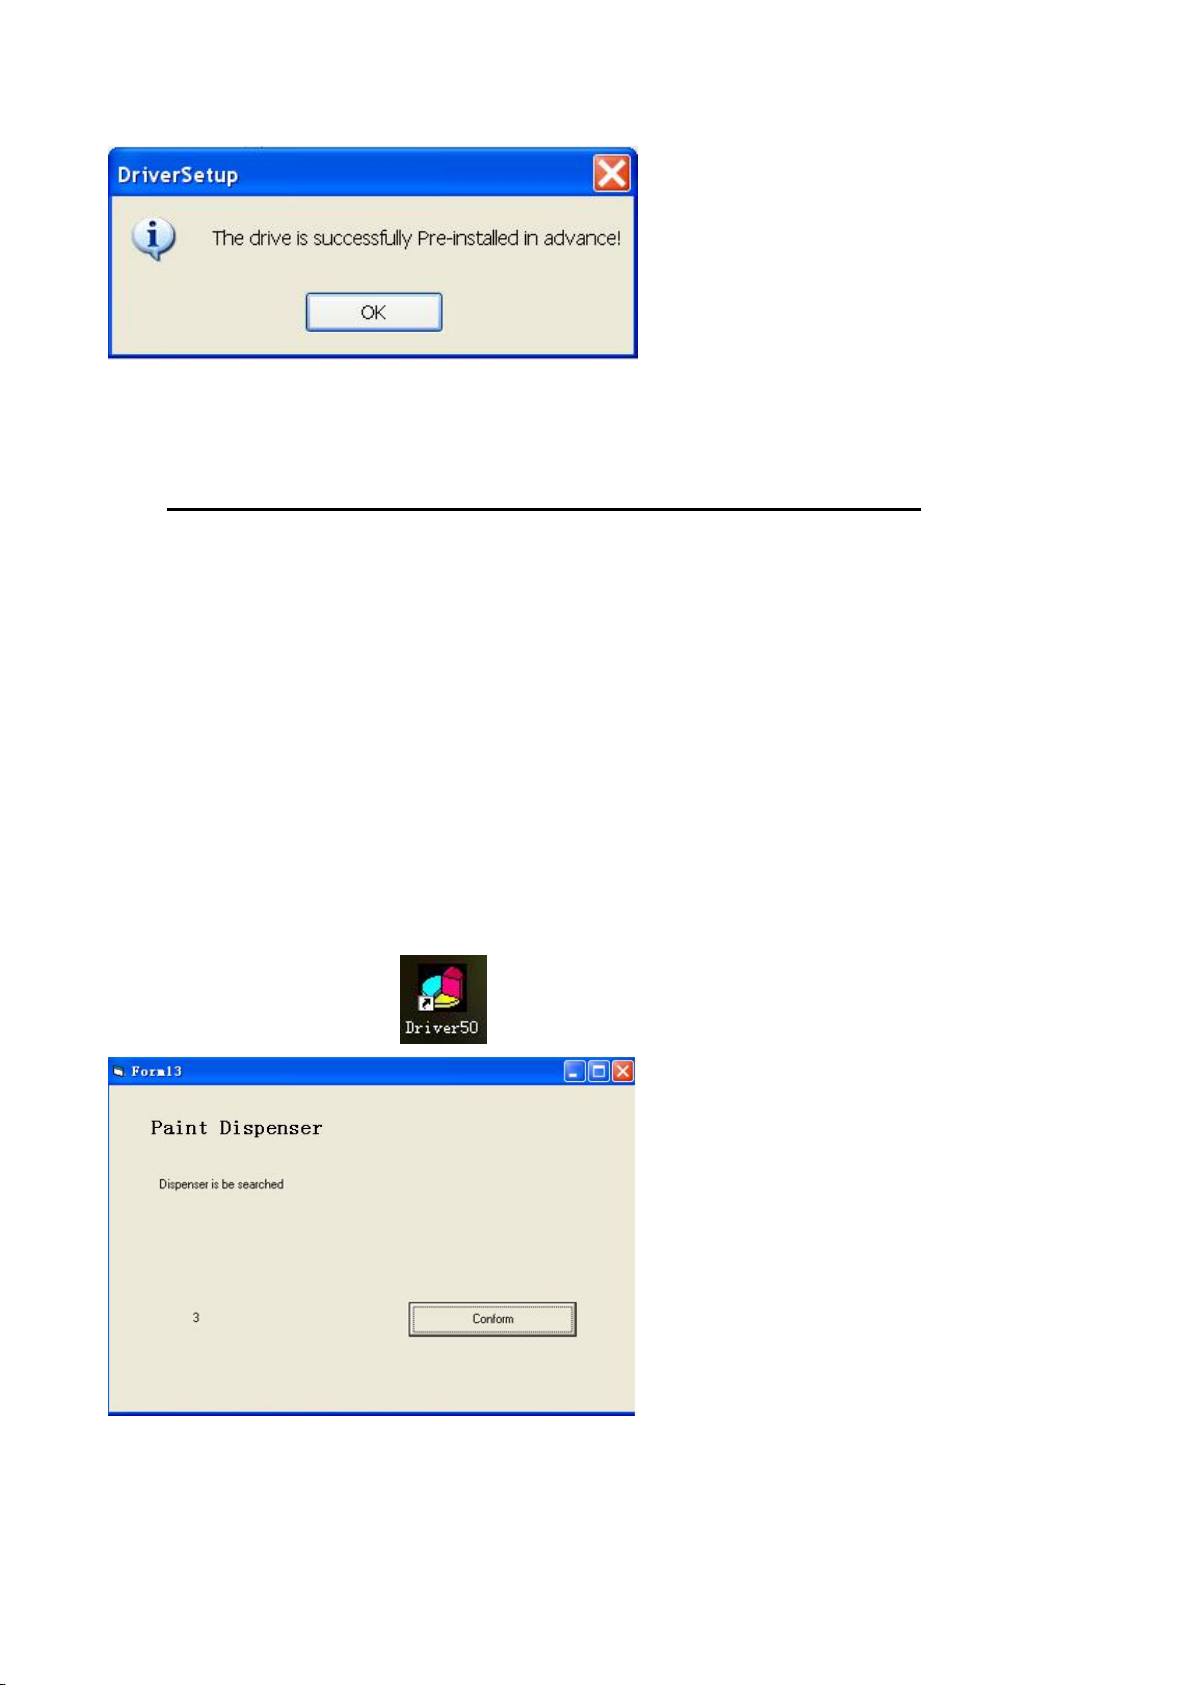
3).Click “OK”.
11
8. GUIDE TO USE DRIVER 50 SOFTWARE
(1) Function Introduction
Driver 50 is a user Software Package developed for our range of Automatic Paint Dispenesr
machines. The package will assist the user in carrying out the following operations:
Dispensing: Read the data from formula software and start dispensing;
Manual Dispensing: The dispensing under this function can be done without formula
software. The user can choose any colorants from the dropdown list, decide the amount for
each colorant, and dispense here.
Colorant management: manage all the datas of colorant.
Debug: test each function of the machine manually;
Pump calibration: calibrate the pulse data of each canister pump;
Presentation management: translate the display language into your local language.
Double click on shortcut icon to start the program,you will see below interface.
Press "Conform"
If the electrical power for machine is turned off or the USB COM is not connected, the driver will

12
show below interface, please check the electrical power and the USB COM accordingly.
Press "Confirm"or"Run offline",you will see the main menu as below picture.
The driver software will enter the dispensing interface automatically if you don't click on any
button for 10 seconds.
(2)Software Operation Instruction.
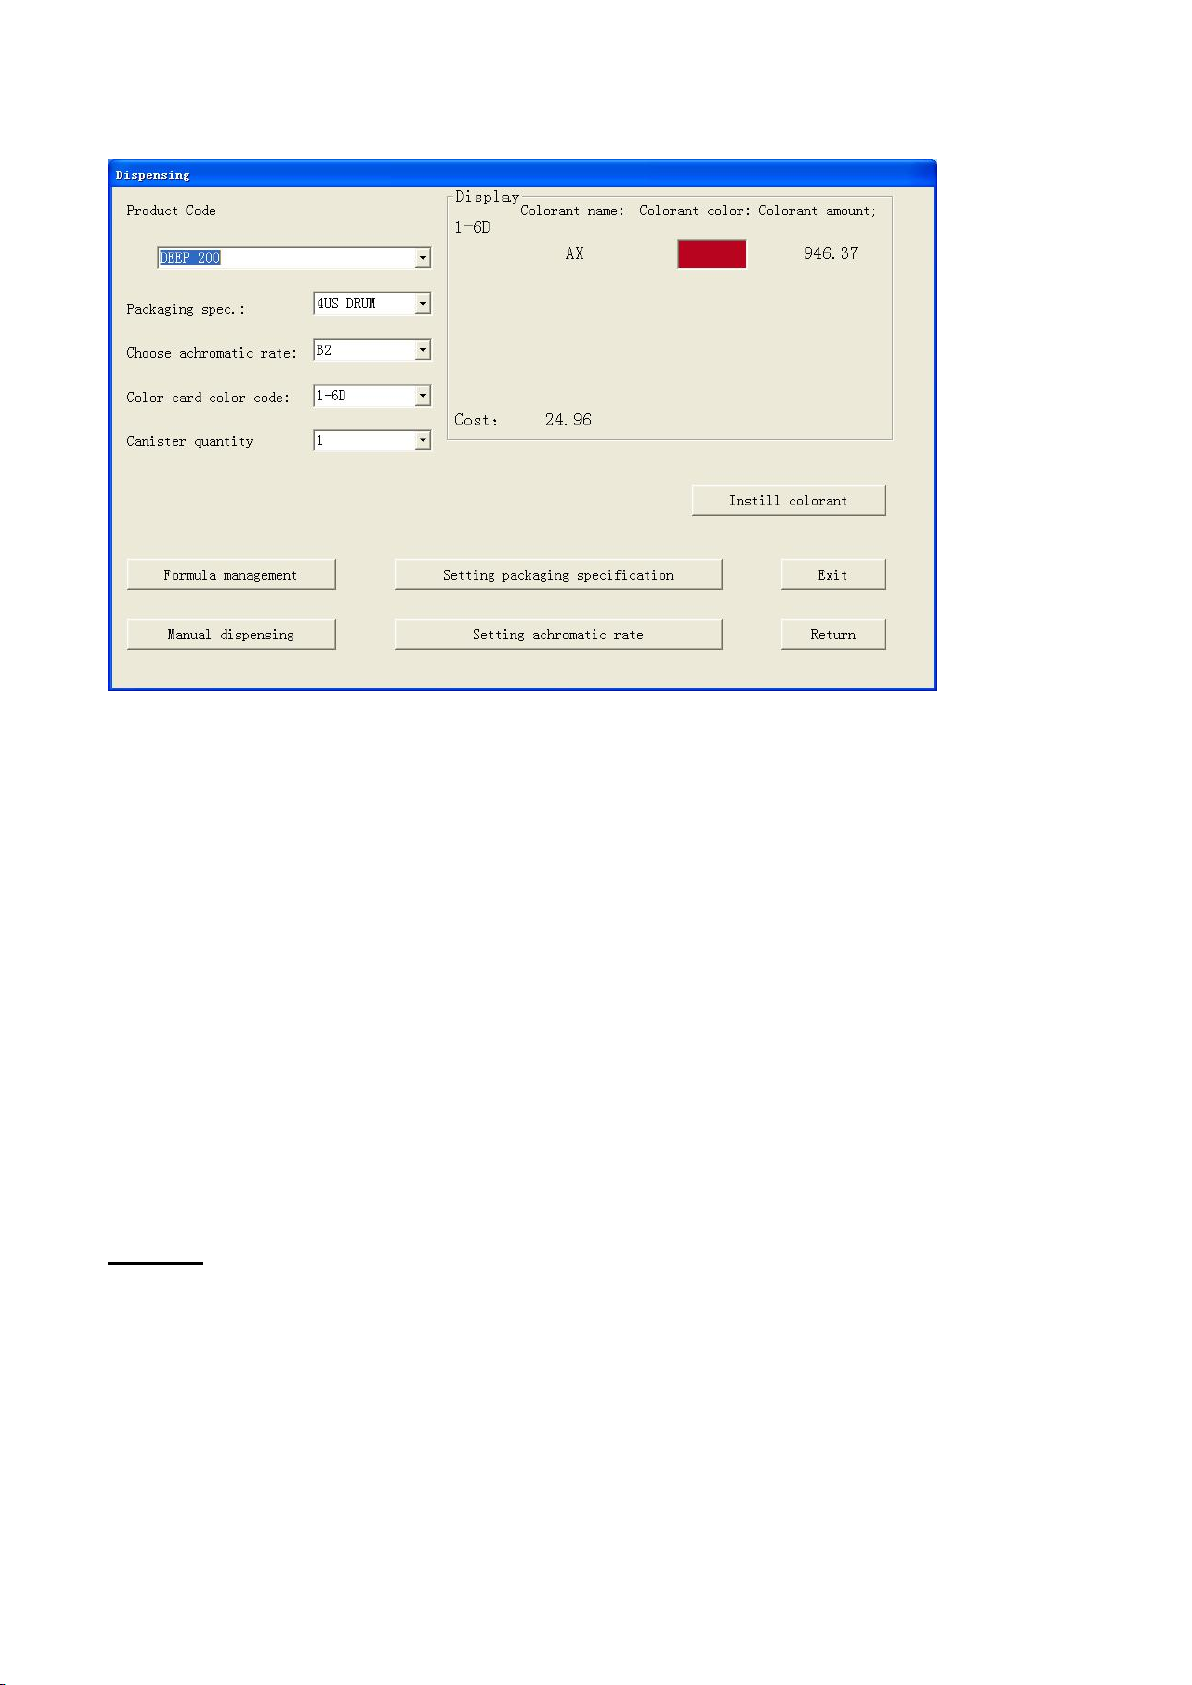
①Dispensing
If the driver select in debug interface was chose “Dispenser”. Click on"dispensing"button,you
will see interface as below.
You can choose colorant color card/ paint type/color code/ base paint/packaging specification/
achromatic rate/canister quantity in this page.
13
"Product code":Click the dropdown arrow to choose product code.
"Packaging spec.":Click the dropdown arrow to choose specification of package.
"Choose achromatic rate":Click the dropdown arrow to choose achromatic rate.
"Color card color code":Click the dropdown arrow to choose color code of color card.
"Canister quantity":input or choose the canister quantity you want to dispend for one color.
"Formula management":Click on this button to enter formula management interface.
"Setting packaging specification":Click on this button to enter packaging specification setting
interface.
"Manual dispensing":Click on this button to enter into manual dispensing interface.
"Setting achromatic rate":Click on this button to enter achromatic rate setting interface.
"Display":Display the information of colorant name, colorant color,colorant amount of the
formula you chose.
"Cost":Total cost of the colorants.
"Exit":Click on this button the machine will implement this formula,and exit this program.
"Return":Return to main menu.
NOTICE:
1.The default achromatic rate is 100%.
2.Colorant amount=colorant data in the formula form×achromatic rate×packaging spec.

14
Click "Formula management",you will see below interface.
In this interface you can create formula or delete formula.
"Add formula":You can create formulas by yourself in this area.
"Product code":Please input the product code of your formula into the corresponding box.
"Color card code":Please input color code of color card into the corresponding box.
"Colorant":Click on the dropdown arrow to choose colorant name of each colorant.
"Colorant amount":Input the colorant quantity into the corresponding box.
"Double click to choose color":Double click the box to choose you wanted color.
"Save":Click on this button to save you created formula.
"Delete formula":You can delete formula in this area.
"Product code":Click on the dropdown arrow to choose the product code of the formula what
you want to delete.
"Color card color code":Click on the dropdown arrow to choose color-card color code of the
formula what you want to delete.
Choose the formula from the list,then press "delete" key on the keyboard.
"Return":Return to dispensing interface.
Double click the box"Double click to change color",you will see below interface.
NOTICE: Base paint name can't be the same as colorant name,otherwise you created formula
can't be saved.
15
In this interface you can choose you wanted color.
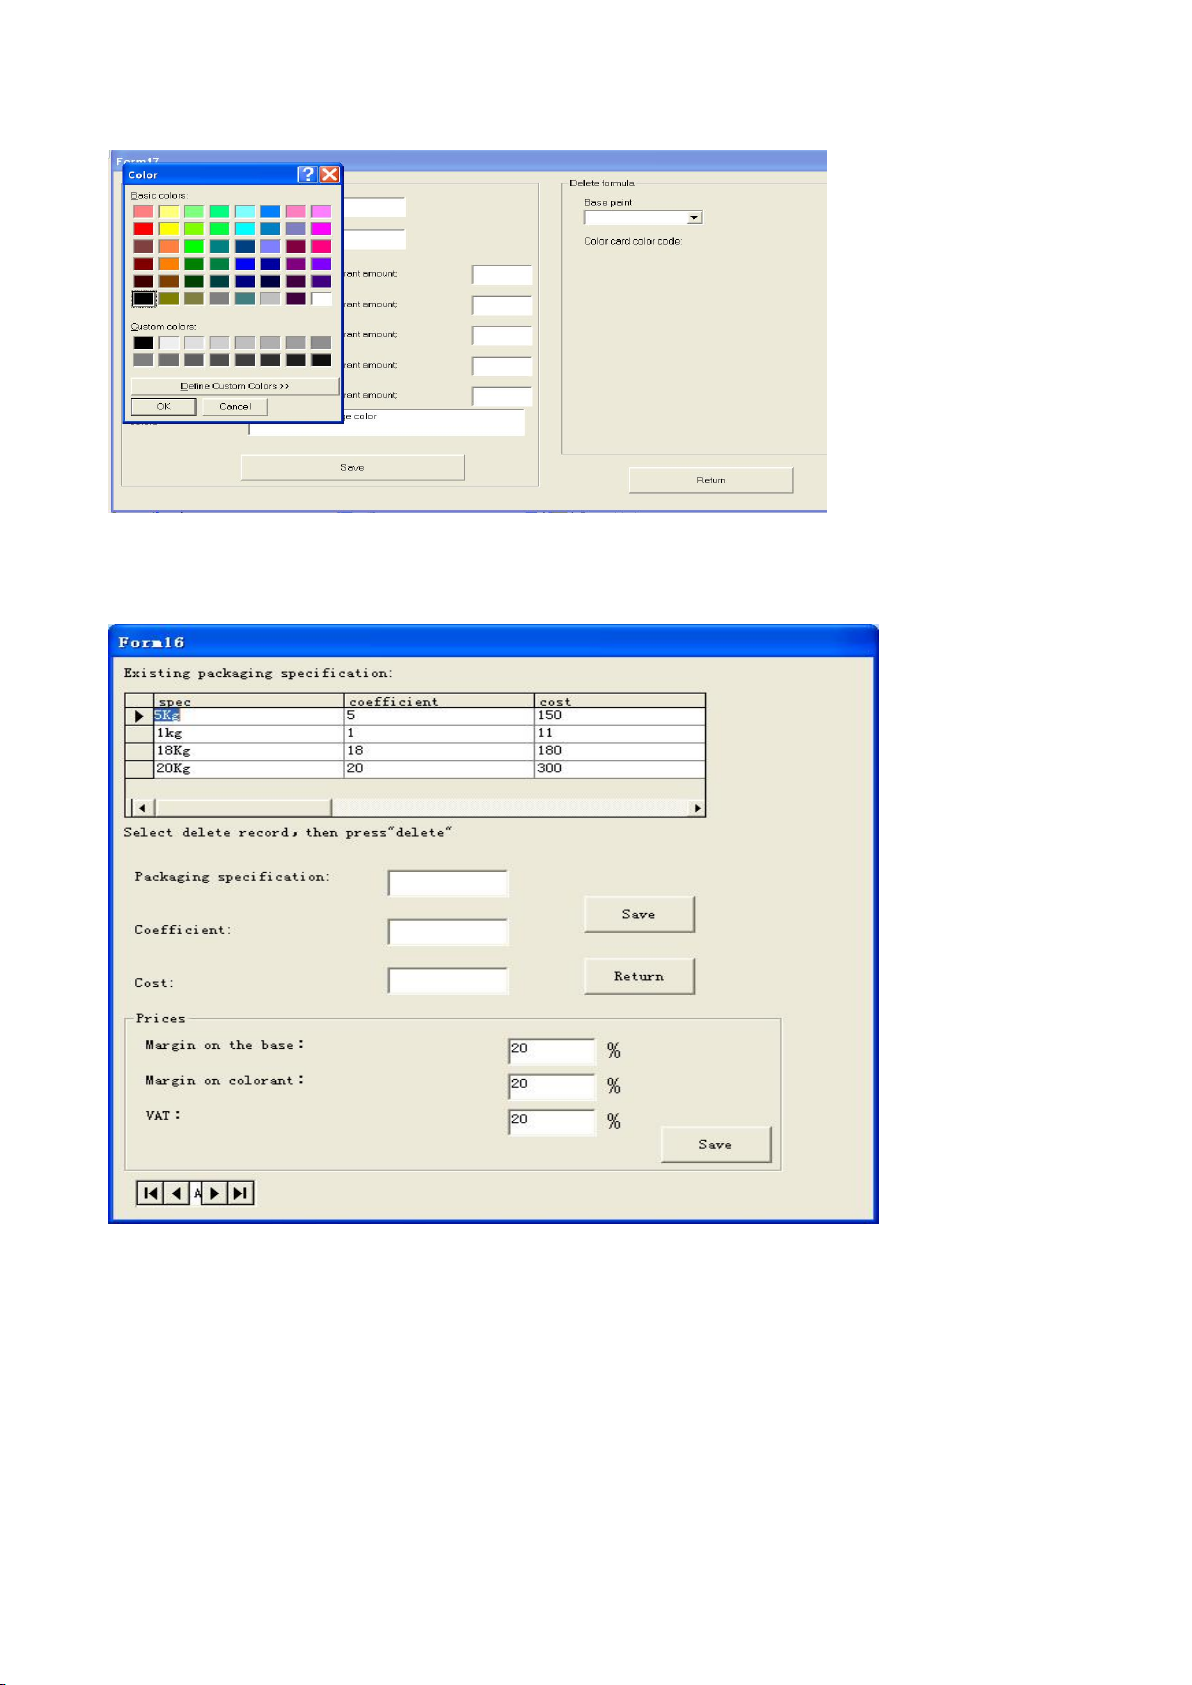
Click “Setting packaging specification”you will see below interface.
You can create or delete packaging specification here.
"Existing packaging specification":Existing packaging specification at present.
"Spec":Packaging specification of base paint.
"Coefficient":Multiple of the color formula data.
"Cost":Cost of base paint.
"Select delete record, the press delete":Choose the record you want to delete first,then
press"Delete "key on the keyboard.
"Packaging specification":Please input packaging specification of base paint into the
corresponding box.

16
"Coefficient":Input coefficient into the corresponding box.
"Cost":Input cost of base paint into the corresponding box.
"Save":Save you created packaging specification.
"Return":Return to dispensing interface.
"Margin on the base":input the margin on base paint.
"Margin on colorant":input the margin on colorant.
"VAT":input the vat
Colorant quantity is bound up with the package setting.
For example, if we set the base paint as "1KG" and "coefficient" as "1", which means 1KG is the
standard unit for its kind, then for spec. "3.5 KG", the "coefficient" should be 3.5, and "18" for
spec. "18kg".
If we use "1L" as base paint standard unit to get the colorant data, then we set the "coefficient"
as 1 for spec. "1L", "3.5" for "3.5L", "18" for "18L".
If we use 10KG as base paint standard to get the colorant data, then in "Package Setting", we
input "0.1" in "coefficient" for spec. "1KG"., "0.35" for "3.5KG", "1.8" for "18KG".
(If you use "KG" as sample unit to get colorant data, then the package unit should be KG as
correspondence. In like manner, if you use "L" as sample unit to get colorant data, then the
package unit should be L. Otherwise the software calculation will go wrong. )
Click "Setting achromatic rate",you will see below interface.
You can create or delete achromatic rate here.
"Existing achromatic rate":Existing achromatic rate at present.
17
"Title":Base paint name.
"Coefficient": Multiple of the color formula data
"Select delete record,then press delete":Choose the record what you want to delete from the
list first,then press "Delete"key on the keyboard.
"Achromatic rate":Input the base paint name into the corresponding box.
"Coefficient":Input the coefficient into the corresponding box.
"Save":Save your inputed information.
"Return":Return to dispensing interface.
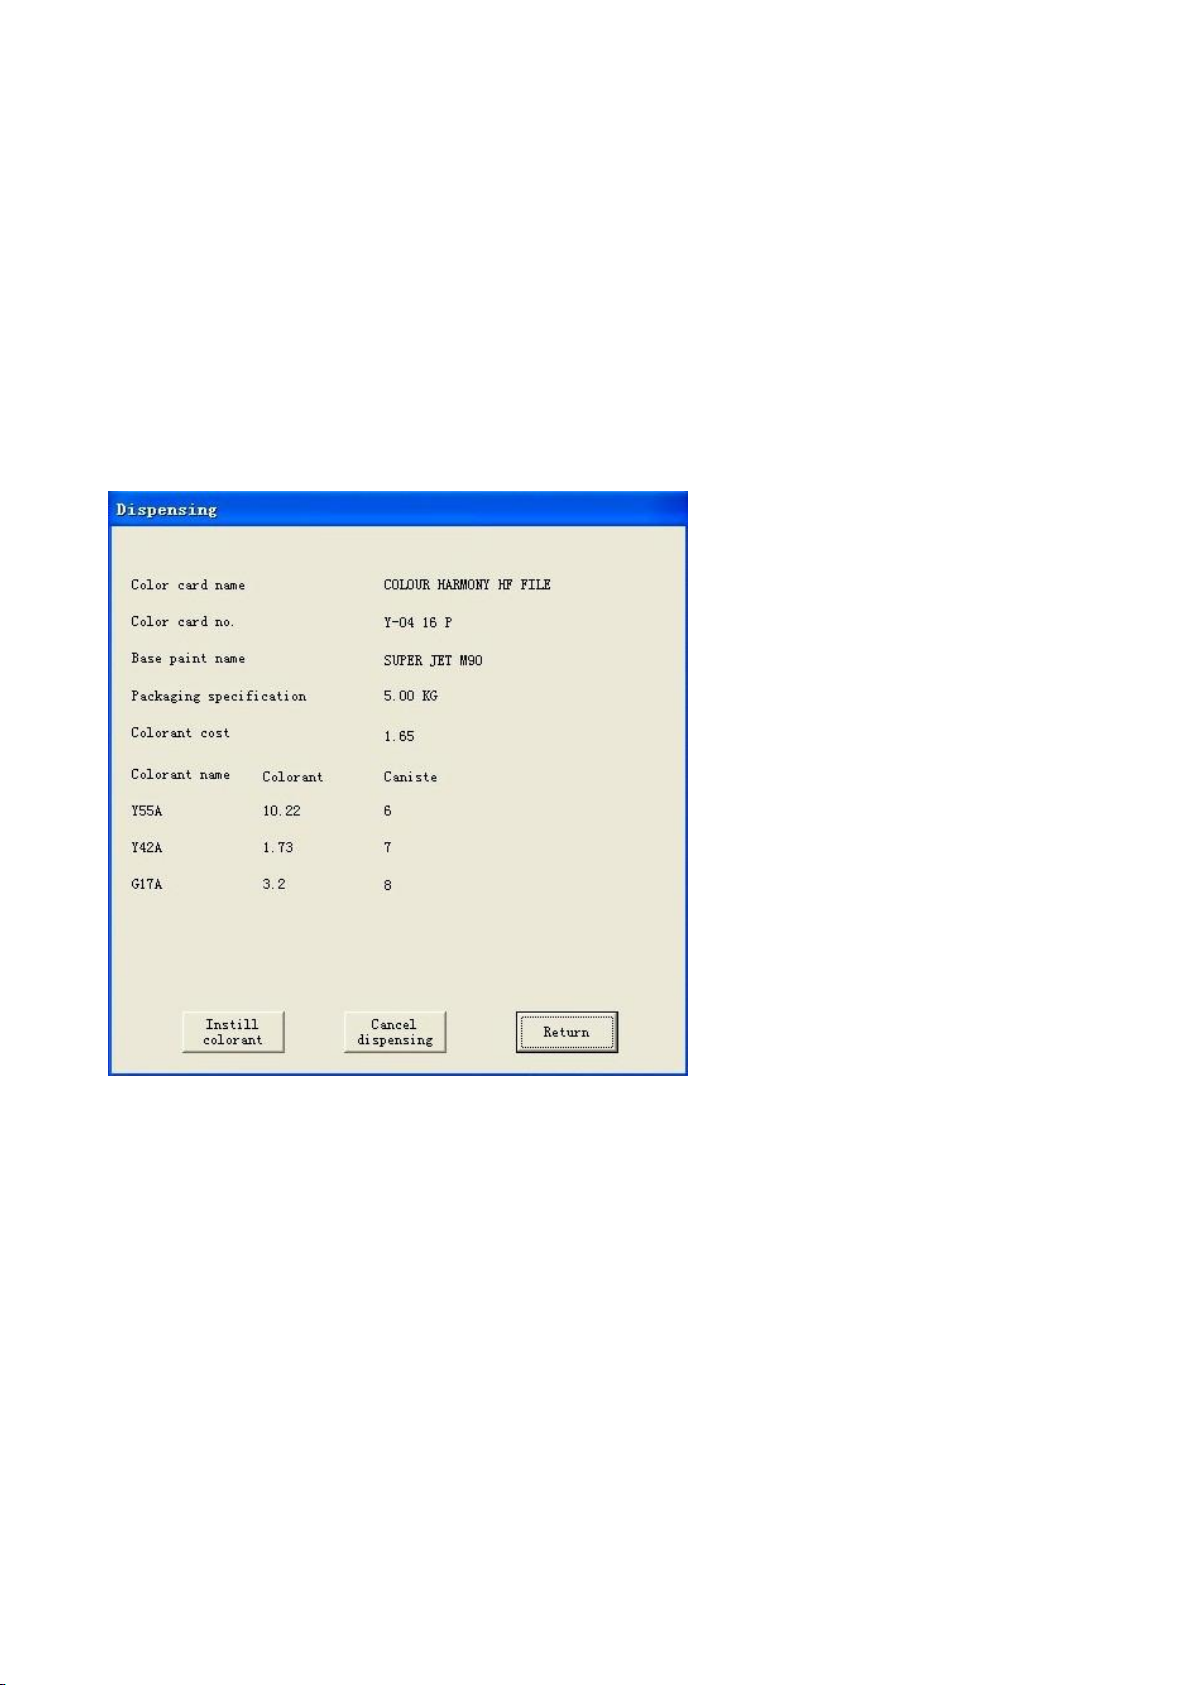
If the driver select in debug interface was choose “CPS Flink.dat”.
Click on"dispensing"button,you will see interface as below.
"Color card name":It shows the name of color card to which the colorants belong.
"Color card no.":It shows the number of color card to which the colorants belong.
"Base paint name":It shows the name of the base paint.
"Packaging specification":It shows the packaging specification of base paint.
"Colorant cost":It shows the cost of colorant.
"Colorant name":It shows the name of colorant,
"Colorant":It shows the amount of each colorant. Please pay attention that all the amount of
colorants shown by the driver are in ml no matter it's ml or grams in the formula software.
"Canister":It shows the canister number for each colorant.
"Instill colorant":Press this button,the machine will instill colorant automatically as per your
formula data,afterwards delete the formula automatically.
"Cancel dispensing":Press this button,the machine will cancel dispense,and delete the
formula.
"Return":Pess this button, return to the main menu.
18
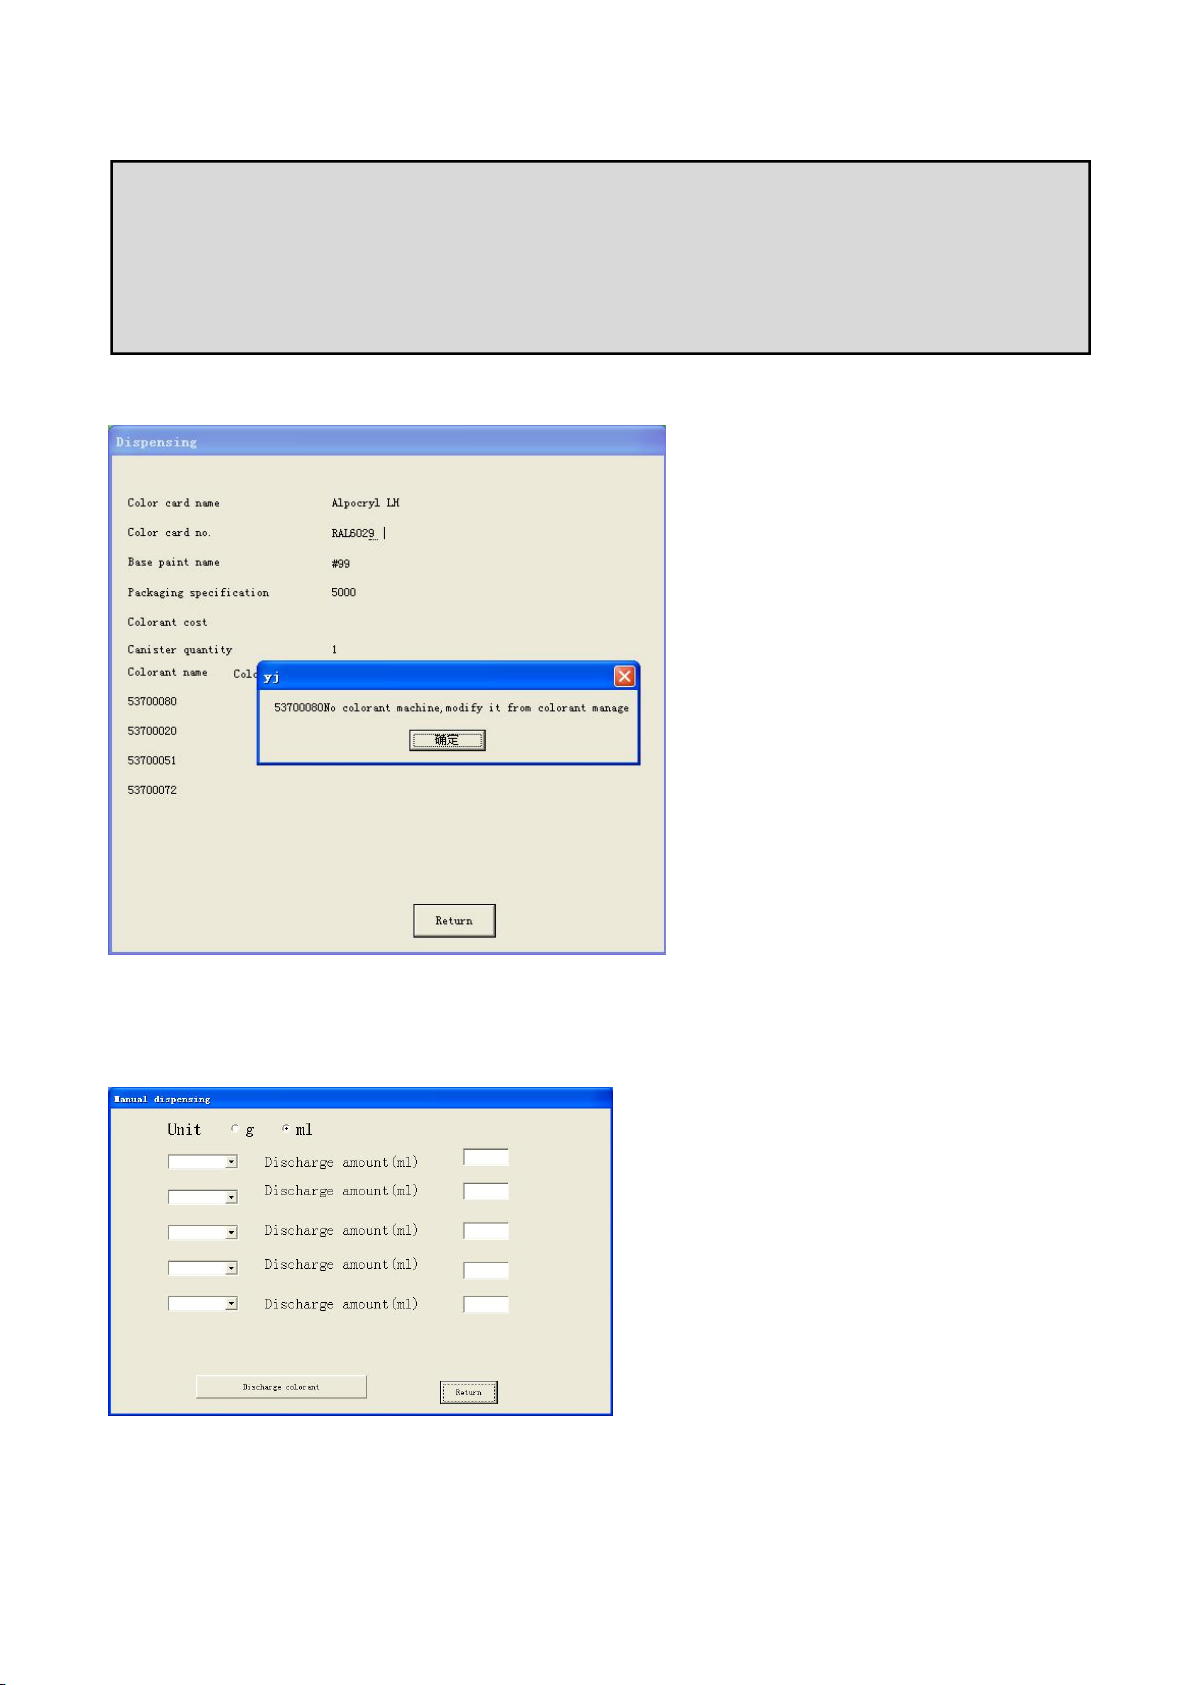
If driver program can't find relevant colorant name from "Colorant Management" as per the
formula,note message will be as below.
②Manual dispensing
Click "manual dispensing" on main menu to enter below interface.
Please choose the unit “g” or “ml”, the default is “ml”.
NOTICE:
1.Except choosing "Dispenser"in "Debug"interface, other protocols need to cooperate with
color software to implement the automatic dispenser.
2..Except choosing "Dispenser"in "Debug"interface, all the information of this interface is
automatically collected from the data you choose from color software.
19
You can choose from the dropdown list which colorant you want to dispense.
"Discharge amount(ml)": You can input the amount for each colorant you choose here.
"Discharge colorant": After the above rows are filled, press on "Discharge colorant" button,
and then the machine will start to dispense and discharge following your formula.
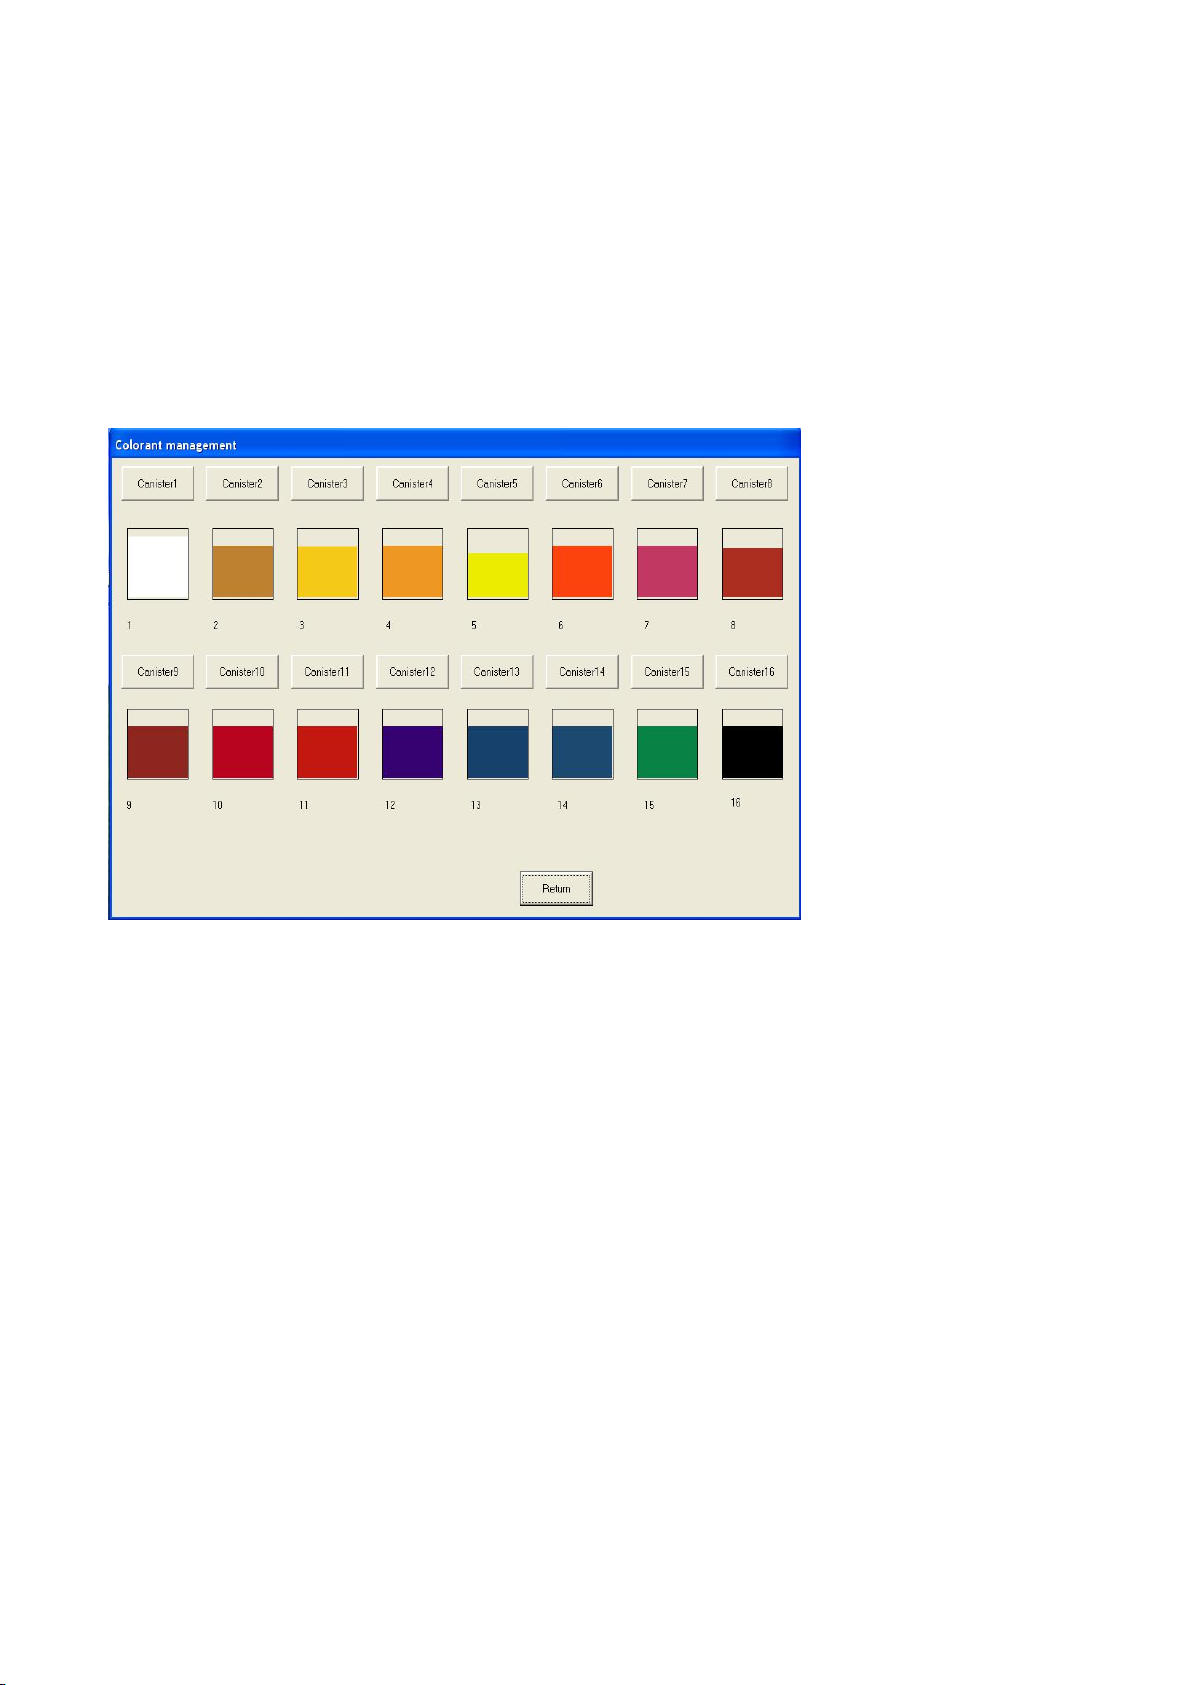
③Colorant management
The user specifies the colors which will be filled in each canister. It is
Please click the colorant canister you want to amend, and then you can set up the canister
(please do not put the same colorant name for two canisters. Otherwise, the accuracy will be
affected when dispensing)
SPECIAL DECLARATION:
Since the density for colorant is not so accurate (the colorant will evaporate automatically in the
air and the machine will discharge automatically to protect the nozzle from being blocked by
colorants), the remain volume of colorant in each canister can only be regarded as a reference.
Please observe the actual remain volume of colorant and add colorant in time. Otherwise, the
color might turn out different from the aim color. Our company will not take responsibility for this.
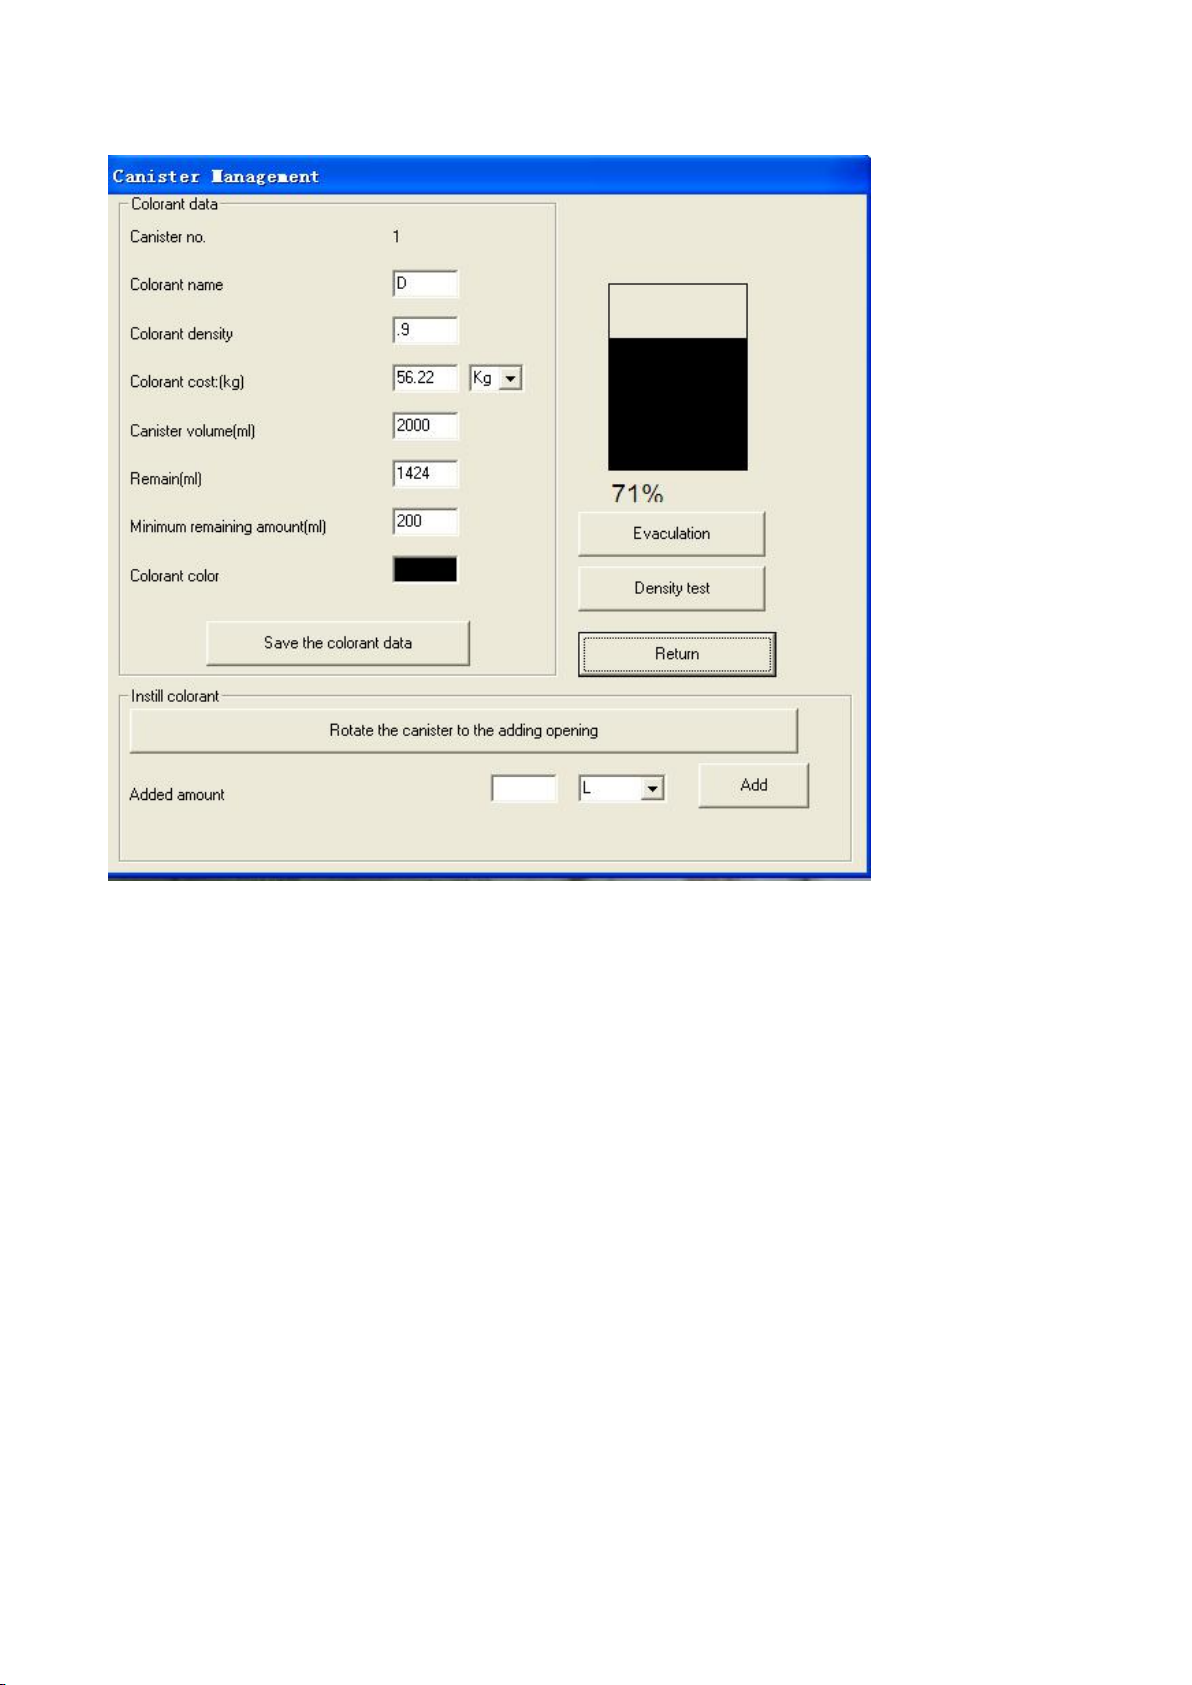
After choosing canister,you will see below interface.
This screen is used to specify the Colorant name, density, cost, Canister volumn, remain amount,
Minimum remaining amount, color shade of the colornant.
20
"Colorant name":It shows the name of colorant.
"Colorant density":It shows the density of colorant.
"Colorant cost":It shows the cost of colorant.
"Canister volume":It shows the volume of canister in ML.
"Remain":It shows the remain amount in ML.
"Minimum remaining amount":It shows must remained amount of colorant.
"Colorant color":It shows the color of colorant. You can double click it to choose the shade.
"Added amount":It shows the added amount of colorant in kg/L/ml.
"Rotate the canister to the adding opening":Rotate the specific canister to the adding
opening,so that you can add colorant.
"Save the colorant data":To save the colorant data you chose.
"Add": Click on it to add colorant.
"Evacuation":Discharge air in the pump.Please note:you have to do evacuation before first
using.
“Density test”:click to test density of the colorant.
"Return":Return to previous menu.
Click on colorant color shade,you will see next interface.
Table of contents
Popular Dispenser manuals by other brands

Silver King
Silver King SKCRM1 Technical manual and replacement parts list

San Jamar
San Jamar TEAR-N-DRY manual

Graco
Graco 24V677 instructions

Adcraft
Adcraft HCD-5 operating instructions

Star Manufacturing
Star Manufacturing Peristaltic Heated Condiment Dispensers... Brochure & specs

GESAME
GESAME MH Super 114 instruction manual


