Fostoria SUN-MITE RPH-240-A User manual

Issue Date: 06-18-99 Rev. Date: 01-13-14 Rev. Level 13 ECN 1-7155 OIPM P/N 8999
OPERATION – INSTALLATION – PARTS MANUAL ELECTRIC INFRARED HEATER
MODEL & PART NOS.:
RPH-208-A (08845039)
RPH-240-A (08845139)
WARNING!
DO NOT ATTEMPT TO INSTALL, OPERATE, OR SERVICE THIS PRODUCT BEFORE READING ALL
INSTRUCTIONS CAREFULLY.
FAILURE TO COMPLY WITH THESE INSTRUCTIONS COULD RESULT IN FIRE, PERSONAL
INJURY AND/OR PROPERTY DAMAGE! RETAIN INSTRUCTIONS FOR FUTURE REFERENCE.
DESCRIPTION
The Fostoria Restaurant Patio Heaters offer high efciency
electric infrared heat.
Recommended for commercial / industrial
indoor spot heating and for unprotected outdoor applications.
The
specially designed aluminum reectors and end caps deliver
infrared heat in a precise pattern to areas such as seating for
outdoor dining or other patio uses.
Not for indoor residential use
UNPACKING
When unpacking, inspect carefully for any damage that may have
occurred during transit. Check for loose, missing, or damaged
parts. (See parts list.)
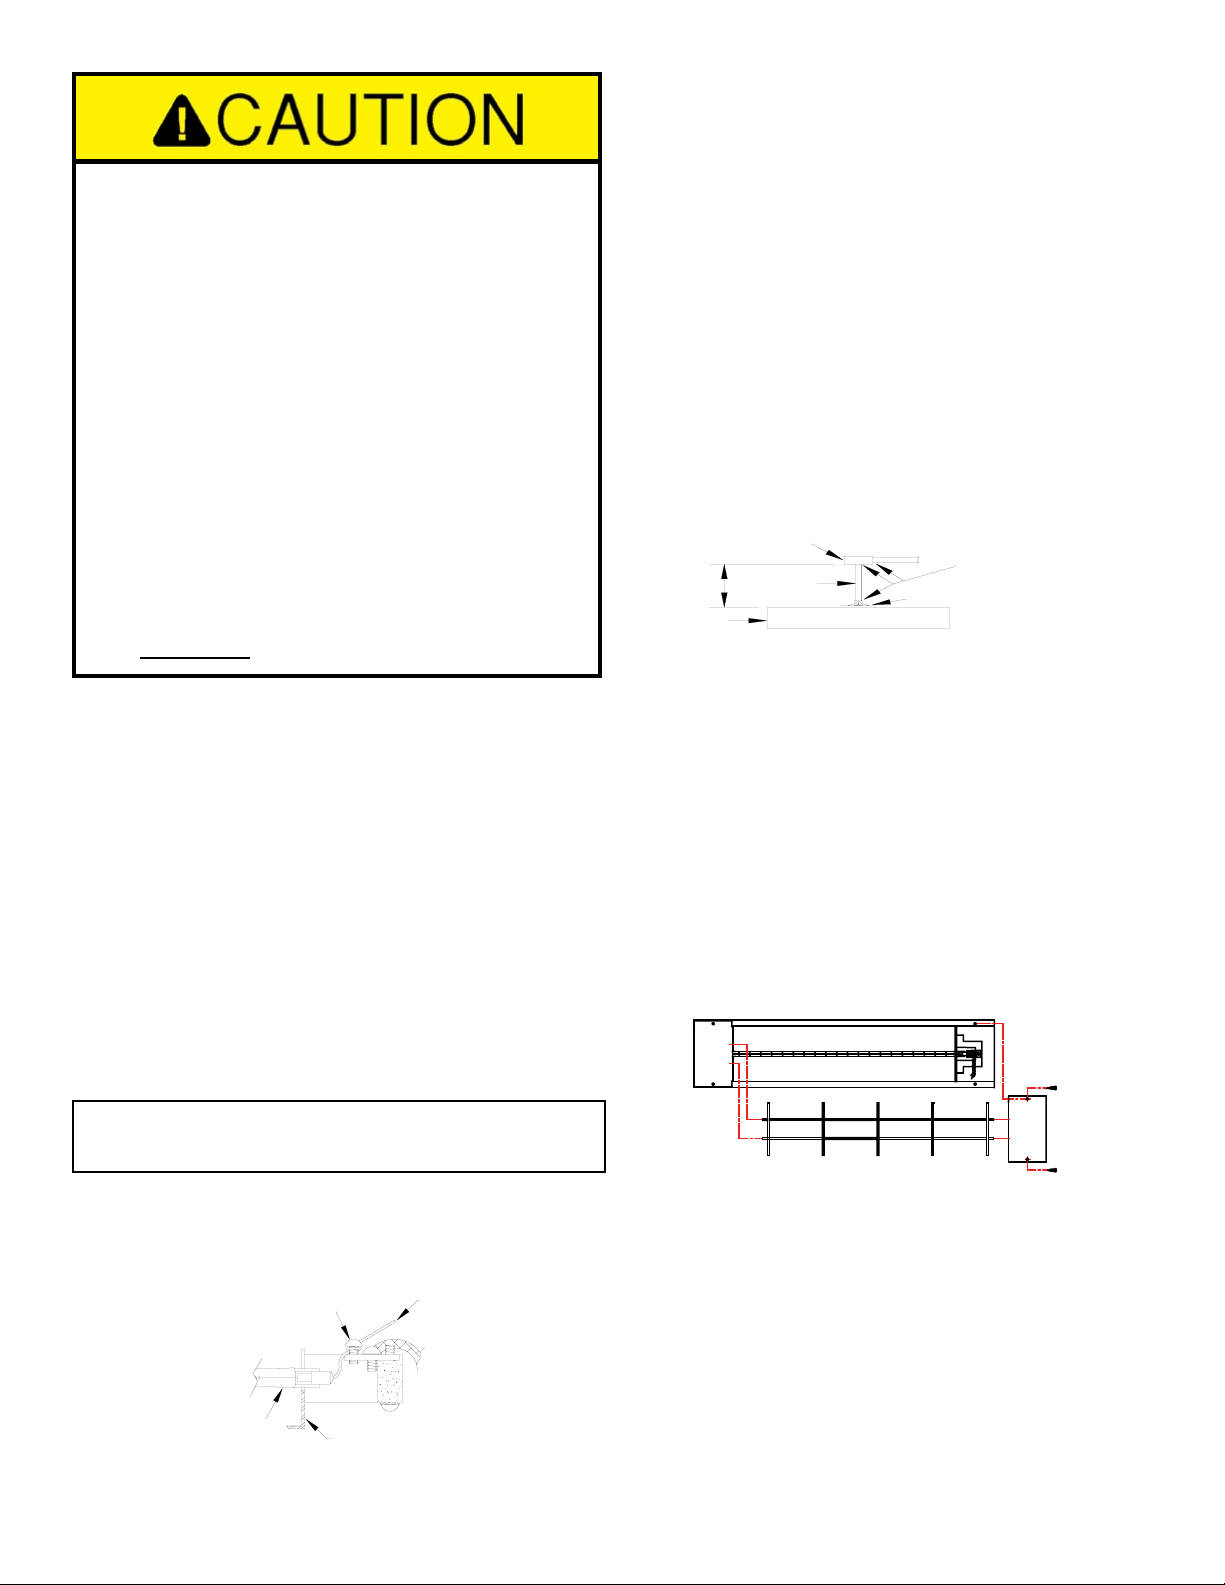
REQUIRED CLEARANCES
Do not install heater closer than 24 inches to a vertical surface,
6 inches to ceiling or 72 inches from oor or any
combustible
surface in direct radiation path.
SPECIFICATIONS
Power requirements.........…...…RPH-208-A: 208 Volts, 7.69 Amps
...................................................RPH-240-A: 240 Volts, 6.67 Amps
Watts............................……..........................................……....1600
BTUs……………………………………......................................5461
Overall dimensions...………………..................24” x 5-3/8” x 4-1/2”
Housing....................……………….......................….Stainless steel
Reector...........................…………........................Bright aluminum
Red sleeves used for visible light reduction are not
recommended for applications near coastal waters.
Purchase lamps with integral light lter from factory
for these applications. See page 3.
CAUTION
IMPORTANT SAFETY INFORMATION
Read all instructions before using this heater.
1. Make certain that the power source conforms to the electrical
requirements of the heater. Disconnect power before installing
or servicing. If the power disconnect is out-of-sight, lock it in
the open position and tag it to prevent unexpected application
of power. Failure to do so could result in fatal electric shock.
WARNING:
DO NOT DEPEND UPON A THERMOSTAT
OR OTHER SWITCH AS THE SOLE MEANS OF
DISCONNECTING POWER WHEN INSTALLING OR
SERVICING THE HEATER.
ALWAYS DISCONNECT
BREAKER AS DESCRIBED ABOVE. FAILURE TO DO SO
COULD RESULT IN FATAL ELECTRIC SHOCK
2. This heater is intended ONLY for permanent installation
in accordance with the National Electric Code (NEC), all
applicable local codes and ordinances, and all sections of
this manual.
Any variance voids the warranty and may create
unsafe conditions. All wiring should be done by a qualied
electrician, using copper wire only.
3. Special attention must be given to any bonding (grounding)
information pertaining to this heater.
To prevent the risk of
electrocution, the heater must be securely and adequately
bonded.
T
his should be accomplished by connecting a conductor
between the service panel and the green grounding screw provided
on the heater.
To ensure a proper bond, the bonding means
must be tested by a qualied electrician.
4. Do not insert ngers or foreign objects into the heater. Do not
block or tamper with the heater while it is in operation. Do not
touch heater while it is in operation or just after it has been
turned off, as some parts may be hot enough to cause injury.
5. This heater is intended for general heating applications ONLY.
It must NOT be used in potentially dangerous locations such
as ammable, explosive or chemical-laden atmospheres.
6. Do not attach ductwork to this heater or attempt to use it as
a make-up air heater. Such use voids the warranty and may
create unsafe conditions.
7. In cases where property damage may result from malfunction
of the heater, a back-up system or a temperature alarm should
be used.
8. CAUTION: Check branch voltage.
Heaters should be operated
at voltages no higher than the heating elements and the heater
are designed for. (Lower voltages, however, pose no problem
other than a loss of wattage).
9. Heaters are not intended for process heating applications.
SAVE THESE INSTRUCTIONS!
Page 1 of 3

Issue Date: 06-18-99 Rev. Date: 01-13-14 Rev. Level 13 ECN 1-7155 OIPM P/N 8999
IMPORTANT INSTRUCTIONS
When using electrical appliances, basic precautions should always be followed to reduce the risk of re, electrical shock,
and injury to persons, including the following:
1. Read all instructions before using this heater.
2. CAUTION: High temperatures. Keep cords and all other combustible material, such as furniture, papers, clothes
and curtains away from the heater. Do not install heater closer than 24 inches to a vertical surface, 6
inches to ceiling or 72 inches from oor or any combustible surface in direct radiation path.
ATTENTION:
Les températures élevées. Gardez les cordons et tout autre matériau combustible, tels que les
meubles, papiers, vêtements et rideaux à l’extérieur de l’appareil de chauffage. Ne pas installer de
chauffage près de 24 pouces sur une surface verticale, 6 pouces au plafond ou 72 pouces du sol ou
toute surface com bustible dans le chemin de rayonnement direct.
3. Extreme caution is necessary when any heater is used by or near children or invalids and whenever the heater is left
operating and unattended.
4. Do not operate any heater after it malfunctions, has been dropped or damaged in any manner. Return heater to
authorized service facility for examination, electrical or mechanical adjustment, or repair.
5. Do not use outdoors.
6. To disconnect heater, turn controls to off, and turn off power to heater circuit at main disconnect panel (or operate
internal disconnect switch if provided).
7. Do not insert or allow foreign objects to enter any ventilation or exhaust opening as this may cause an electric chock
or re, or damage the heater.
8. To prevent a possible re, do not block air intakes or exhaust in any manner.
9. A heater has hot and arcing or sparking parts inside. WARNING: Do not use it in area where gasoline, paint, or ammable
liquids are used or stored.
10. Use this heater only as described in this manual. Any other use not recommended by the manufacturer may cause
re, electric shock, or injury to persons.
11. This heater may include an audible or visual alarm to warn that parts of the heater are getting excessively hot. If the
alarm sounds (or illuminates), immediately turn the heater off and inspect for any objects on or adjacent to the heater
that may have blocked the airow or otherwise caused high temperatures to have occurred. DO NOT OPERATE THE
HEATER WITH THE ALARM SOUNDING (OR ILLUMINATING).
12.SAVE THESE INSTRUCTIONS
Page 2 of 3

Issue Date: 06-18-99 Rev. Date: 01-13-14 Rev. Level 13 ECN 1-7155 OIPM P/N 8999
LAMP INSTALLATION
CAUTION: Disconnect power before installing or replacing
lamps. They can, and should be, installed prior to mounting
heater.
1. Remove the housing end caps.
2. Position quartz lamp in holes in lamp brackets at each end of
reector center lamp between brackets.
3. Carefully wrap heating element pigtail clockwise around
terminal screw (see gure A).
Avoid handling quartz lamp
as much as practical. Lamp should be wiped off with a clean
cloth.
4. Tighten terminal screws (see gure A). CAUTION: Do
not draw pigtail so tight that pressure is put on heating
element. Maintain a partial loop (or looseness) in the
pigtail.
5. IMPORTANT! Cut excess pigtail off at terminal to
prevent lead from touching metal parts. Failure to do so
could result in fatal electric shock or re.
6. Replace end caps using sheet metal screws removed in Step
1.
POSSIBLE LAMP FAILURE
The heating elements used in this product can be damaged by
contamination (salt deposits from perspiration or coastal air)
on the surface of the quartz sleeve
. At high temperatures, these
salts will cause the quartz to become porous and leak allowing
air to come in contact with the tungsten element.
When this
occurs, the element will burn out quickly and the quartz tube
can break. The instructions below must be followed.
• Always wear cotton or latex gloves when installing or
replacing elements.
• Always clean the quartz tube with an alcohol-moistened
soft cloth before using the heater.
• Whenever contamination (milky white appearance
on quartz tube) is observed, the element must be
immediately replaced.
Wrap pigtail clockwise
around screw.
Lamp
Lamp support
FIGURE "A"
Cut off
excess
MOUNTING INSTRUCTIONS
1. Assemble the supplied outlet box cover to the top of the heater
using the two hex head screws.
2. Route the two blue leads and the green (bonding) lead through
a section of 6” conduit (supplied by customer) and thread it into
the cover.
3. Attach an outlet box cover to the other end of the conduit,
make electrical connections and attach cover to customer
supplied junction box.
CAUTION: FOR TOTALLY EXPOSED OUTDOOR
APPLICATIONS (NOT CEILING PROTECTED) THE
CONNECTIONS MUST BE MADE AS ILLUSTRATED
BELOW.
NEMA Type 4 or
equal junction box NEMA Type 4 or equal
connection required
at locations shown
6" Conduit
Housing
Heater
Cover
WIRING
CAUTION: For supply connections use number 12 AWG copper
wires suitable for at least 90oC.
LAMPGUARD INSTALLATION
To install the optional lampguard (Model RPHWG):
1. Remove the screws and end cap from one end of the heater
.
2. Insert the lampguard into the holes provided in each end cap.
3. Replace the end cap and screws removed in step 1. (See
illustration below.)
Heater housing
Screw
End Cap
Lampguard
MAINTENANCE
Always disconnect the heater from the power source
before performing any service or maintenance.
Periodically clean the reector with a soft damp cloth, using a
mild detergent. Rinse with water and wipe dry with a clean soft
cloth.
Page 3 of 3
This manual suits for next models
1
Table of contents
Other Fostoria Heater manuals

Fostoria
Fostoria FSS Series User manual

Fostoria
Fostoria OCH–46-120V User manual

Fostoria
Fostoria FFH-912B Specification sheet

Fostoria
Fostoria MTM 222 User manual

Fostoria
Fostoria FSA Series User manual

Fostoria
Fostoria OCH-SS series User manual

Fostoria
Fostoria RPH-208-A Specification sheet

Fostoria
Fostoria MITEY MIDGET User manual

Fostoria
Fostoria 222 Series User manual

Fostoria
Fostoria CH-6424-1C User manual