Fostoria PCH-48C User manual

Issue Date: 10-1-09 OIPM Page 1 of 4
WARNING!
DO NOT ATTEMPT TO INSTALL, OPERATE, OR SERVICE THIS PRODUCT BEFORE READING ALL
INSTRUCTIONS CAREFULLY. FAILURE TO COMPLY WITH THESE INSTRUCTIONS COULD RESULT IN FIRE
,
PERSONAL
I
NJURY AND/OR PROPERTY DAMAGE! RETAIN INSTRUCTIONS FOR FUTURE REFERENCE.
The PCH
-
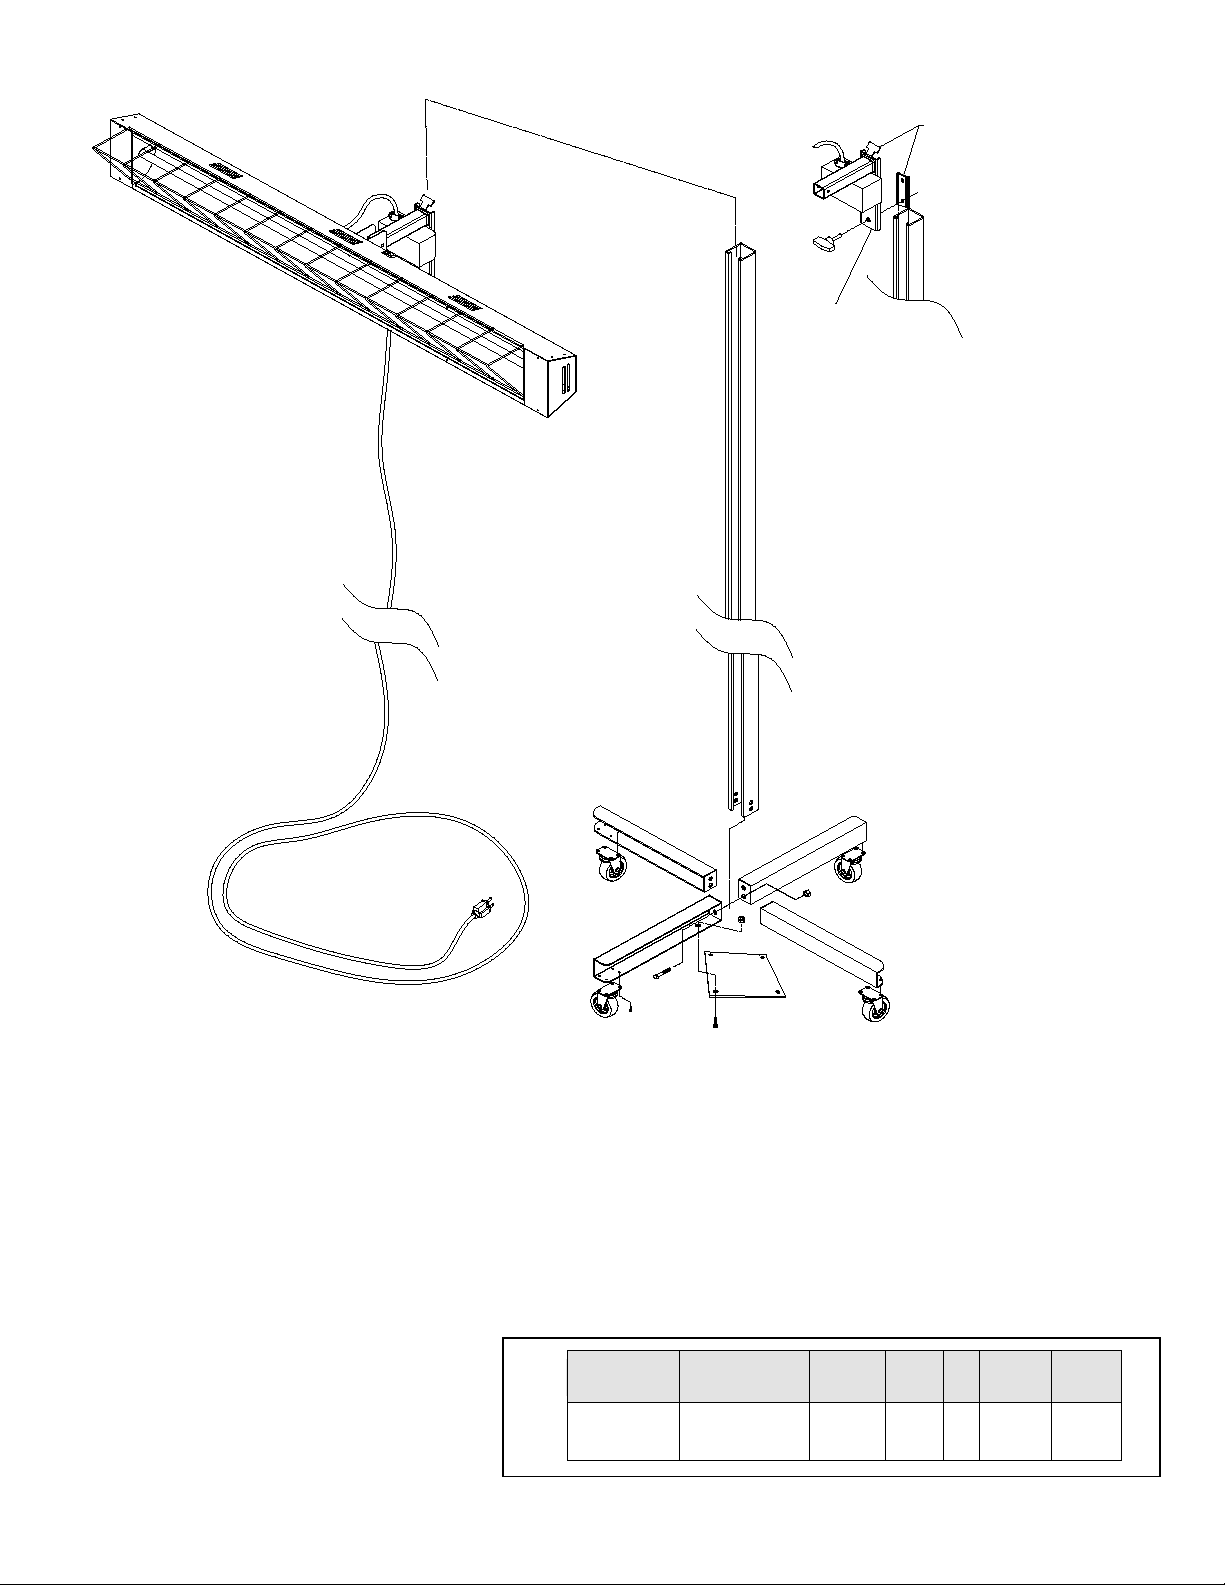
48C Heaters are designed to provide efficient
spot heating for construction sites, farms, warehouses,
garages, truck docks, paint and plaster drying, etc
.
NOT
FOR INDOOR RESIDENTIAL USE.
Heaters are equipped
with steel grid type protective guards. A toggle switch is
supplied for turning the heater on and off. A tip
-
over switch
is also supplied to de
-
energize the element should the
heater be turned over.
DESCRIPTION
MODEL No…………………………………….. PCH-48C
Heat source
……....…………...……………..………5/8” Dia. Quartz Tube
Element Life (Avg.)
……..………................………………….....5000 Hrs.
Wire Guard
...………………..…………………….…0.125” Dia. Steel Wire
Housing
……………………….……….…20 gauge Powder Coated Steel
Powercord
…………..…15’, 14/3 Grounded Type w/ Nema 5-20P Plug
Power Requirements
…………………………………………….……120V
Element Wa
ttage…………………………………………….…………1500
SPECIFICATIONS
Read all instructions before using this heater.
1. Make certain that the power source conforms to the
electrical requirements of the heater
2.
Unplug power cord before installing or servicing.
WARNING: DO NOT DEPEND UPON A THERMOSTAT OR
OTHER SWITCH AS THE SOLE MEANS OF
DISCONNECTING POWER WHEN INSTALLING OR
SERVICING THE HEATER. ALWAYS UNPLUG THE HEATER.
FAILURE TO DO SO COULD RESULT IN FATAL ELECTRIC
SHOCK.
3.
NEVER
leave the heater unattended for extended periods,
while it is in operation.
4.
Power cord is equipped with a three-
wire bonding
(grounding) type plug that must be inserted into a matching
receptacle. Under no circumstances should the bonding
prong be cut off plug. Where a two-
prong wall receptacle is
encountered,
it must be replaced with a properly bonded
(grounded) three-
prong receptacle installed in accordance
with the National Electric Code (NEC) and all applicable
local codes and ordinances. This work must be done only
by a qualified electrician, using copper wire only.
WARNING: USE OF A THREE-PRONG TO TWO-
PRONG
ADAPTER IS NOT RECOMMENDED. Improper
connection may create the risk of electrocution. Use of
such adapters is not permitted in Canada.
IMPORTANT SAFETY INFORMATION
5. All wiring should be performed by a qualified electrician.
6. This heater can be used for 120V, single phase power. These
units are supplied with 3-wire cordsets for portability.
To
reduce the risk of elect
ric shock, the heater must be
securely and adequately bonded (grounded)!
This can be
accomplished by either: 1) Inserting the plug directly into a
properly installed and bonded 3-
prong bonding type
receptacle. 2) Using a separate bonding wire connected
to
the bare metal of the heater. 3) Using other suitable means.
The green (or green and yellow) conductor in the cord is the
bonding (grounding) wire.
WARNING: Never connect the green (or green and yellow)
wire to a live terminal!
7.
Where possible, avo
id the use of extension cords. If they
must be used, minimize the risk of overheating by ensuring
that they are Listed and are of the proper gauge and length,
and that they have 3-
prong bonding (grounding) type plugs.
Use 3-pole receptacles that accept the 3-
prong plugs. Never
use a single extension cord to operate more than one heater.
8. Do not insert fingers or foreign objects into the heater. Do not
block or tamper with the heater while it is in operation. Do not
touch heater while it is in operatio
n or just after it has been
turned off, as some parts may be hot enough to cause injury.
INFRARED HEATER
MODEL NO.:
PCH-48C
OPERATION – INSTALLATION MANUAL
Fostoria Division of:
TPI Corporation
P.O. Box 4973
Johnson City, TN 37602

Issue Date: 10-1-09 OIPM Page 2 of 4
1. Plug heater into a bonded (grounded) receptacle with a power
source conforming to the heater requirements. Ensure that
total current does not exceed circuit rating.
2.
Adjust heater height by sliding adjustment arm up or down the
upright strut, tighten handle.
3. Adjust angle of heater to desired position and tighten handle.
4. To energize heater, flip the toggle switch on housing.
OPERATING INSTRUCTIONS
WARNING: DISCONNECT HEATER FROM POWER
SUPPLY BEFORE SERVICING OR INSPECTING FOR
ANY REASON. FAILURE TO DO SO COULD RESULT IN
ELECTRICAL SHOCK OR INJURY.
Quartz tubes and reflectors should be kept free from
fingerprints, grease and foreign matter. Periodic washing
will assure the most efficient heater operation. Periodically
wipe reflectors and quartz tubes with a clean, soft cloth;
also periodically wipe the tubes with alcohol and a clean,
soft cloth. Be sure to allow tubes to fully
cool down prior to
cleaning or performing maintenance.
Replace or repair damaged or worn cords immediately.
MAINTENANCE
CAUTION: DISCONNECT POWER BEFORE INSTALLING OR
REPLACING QUARTZ TUBES. THESE TUBES CAN AND SHOULD
BE INSTALLED PRIOR TO MOUNTING HEAT
ER.
These heaters
should always be mounted so that the quartz tubes are horizontal, or
tube burnout will occur.
Be sure that the power source conforms to the heater requirements.
Make sure the quartz tube conforms to your power source
requirements.
INSTALLATION OF HEATING ELEMENTS:
The heater is equipped with two hi-
temperature 14 gauge silicone
lead wires and a ground termination. Make sure power source
conforms to the heater requirements. Use only Fostoria quartz
tubes.
1. Remove the sheet metal screws that hold fixture end caps
and lamp guard in place.
2. Insert quartz tube in the “L”-shaped slots in heater housing.
3. On each end of the quartz tube, place (1) lead wire ring
terminal, (1) split washer and (1) hex nut on the threaded
stud and tighten securely (see image below). Split washers
and hex nuts are provided in hardware package.
4. Replace one end cap and insert one end of lamp guard,
place opposite end of lamp guard into the remaining end cap
and secure with screws.
ASSEMBLY
IMPORTANT SAFETY (continued)
9. This heater is intended for general heating applications
ONLY. It must NOT be used in potentially dangerous
locations such as flammable, explosive, chemical
-
laden or wet atmospheres.
10.
Be sure all electrical
parts are enclosed to prevent
personal injury.
NOTE
–
Use a second wrench to hold the inner hex nut in
place while tighte
ning the outer hex nut.
Failure to securely
tighten this connection will cause the element to fail
prematurely.
11. CAUTION: Check branch voltage. Heaters should be
operated at voltages no higher than the heating
elements and the heater are designed for. (Lower
voltages, however, pose no problem other than a loss
of wattage).
12.
This heater is NOT waterproof and is not intended to
be used in saunas, showers, or in potentially wet
locations.
Figure 1

Issue Date: 10-1-09 OIPM Page 3 of 4
STAND ASSEMBLY
1. Mount the (4) legs to support plate. Do not completely tighten bolts at this time.
2. Place column inside of legs and secure with bolts. One bolt in bottom hole of opposing legs and
one bolt in top of second set of opposing legs .
3. Tighten support plate bolts.
4. Secure castors as shown.
5. Assemble heater to column as shown.
TO INSIDE OF COLUMN
OUTIDE OF COLUMN
STEP 1
STEP 2
STEP 4
STEP 5
PART # MODEL Watts Volts Ph BTU's WT.
(Lbs.)
58763001 Quartz tube, stud
termination 1500 120 1 5120 3
REPLACEMENT ELEMENT
(Quartz Tube Series)

Issue Date: 10-1-09 OIPM Page 4 of 4
LIMITED WARRANTY
Products manufactured by TPI Corporation are warranted to the original consumer to be free from defects in material
and workmanship for twelve (12) months from the original purchase date.
The TPI limited warranty does not cover products that have been modified outside of our factory, damage or failure
caused by acts of God, abuse, misuse, connected to or placed on other than rated voltage, abnormal usage, fault,
installation, failure to follow suggested maintenance procedures enclosed with the product, improper maintenance or
any repairs other than those provided by an authorized TPI service center.
There are no obligations or liabilities on the part of the Corporation for consequential damages arising out of
or in connection with the use or performance of the product or other indirect damages with respect to loss of
property, revenues, profit, costs of removal installation, or reinstallation.
All implied warranties with respect to TPI products, including implied warranties for merchantability and
implied warranties for fitness, are limited in duration to twelve (12) months from original date of purchase,
except those products or parts of products which are warranted for long periods thereon.
Some states do not allow the exclusions or limitation of incidental or consequential damages and some states do not
allow limitations on how long an implied warranty lasts. The above exclusions or limitations may not apply to you.
During the warranty period, TPI Corporation will, at its sole option, repair or replace any defective parts or products
returned, freight prepaid, to the TPI Corporation factory or such other locations as TPI Corporation may designate.
Returned products must be packaged carefully and TPI Corporation shall not be responsible for damage in transit.
When returning parts, the owner must provide the model number of the product and nature of difficulty being
experienced. This warranty does not obligate TPI Corporation to bear the cost of labor in replacing any assembly,
unit or component part thereof, nor does the company assume any liability for secondary charges, expenses for
installing or removal, freight or damages. There will be charges rendered for product repairs made after the warranty
period has expired. Proof of purchase, including date, must accompany request for in-warranty service. In any event,
TPI Corporation’s maximum liability shall not in any case exceed the list price for the product claimed to be defective.
This warranty gives to you specific legal rights and you may have other rights, which may vary from state to state. For
the name of your nearest authorized TPI Corporation service center, please write to TPI Corporation, P.O. Box 4973,
Johnson City, TN 37602.
HEATING PRODUCTS WARRANTY COVERAGE
All Heating Products
Thermostats and Controls
1 Year
2 Years
Other Fostoria Heater manuals

Fostoria
Fostoria FSS Series User manual

Fostoria
Fostoria RPH-208-A Specification sheet

Fostoria
Fostoria FSA Series User manual

Fostoria
Fostoria OCH–46-120V User manual

Fostoria
Fostoria CH-6424-1C User manual

Fostoria
Fostoria OCH-SS series User manual

Fostoria
Fostoria MTM 222 User manual

Fostoria
Fostoria 222 Series User manual

Fostoria
Fostoria MITEY MIDGET User manual

Fostoria
Fostoria SUN-MITE RPH-240-A User manual
Popular Heater manuals by other brands

Frico
Frico Elztrip EZ200 Mounting and operating instructions

EUROM
EUROM 33.440.1 instruction manual

Cadet
Cadet BRF12 installation instructions

Ouellet
Ouellet OHV-CC Series Installation and maintenance instructions

Monzana
Monzana MZH3000 manual

2VV
2VV ESSENSSE NEO BASIC Installation and operation instructions