FPI Greenfire GF55-2 User manual

FPI FIREPLACE PRODUCTS INTERNATIONAL, LTD. 6988 Venture St., Delta, BC, Canada V4G 1H4
920-551a 10.21.22
WARNING:
Improper installation, adjustment, alteration,
service or maintenance can cause
injury, property damage, or loss of life.
Refer to this manual. For assistance or
additional information consult an authorized
installer or service agency.
FOR YOUR SAFETY:
Do not store or use gasoline or other ammable
vapoursandliquidsinthevicinityofthisoranyother
appliance.
Installation and service must be performed by an
authorized installer or service agency.
Tested by:
Greenre®GF55-2
OWNER'S MANUAL
Freestanding
Pellet Stove
GF55
IMPORTANT: SAVE THESE INSTRUCTIONS
French Manual: https://bit.ly/3S1JbTD
Manuel en Français : https://bit.ly/3S1JbTD
4001609

Greenre Pellet Stove Owner's Manual
2
TO THE NEW OWNER
Congratulations! You are the owner of a state-of-the-art Pellet Stove.
Thank you for purchasing a
FPI FIREPLACE PRODUCT.
The pride of workmanship that goes into each of our products will give you years of trouble-free
enjoyment. Should you have any questions about your product that are not covered in this manual,
please contact the GREENFIRE DEALER in your area.
Safety Note: If this stove is not properly installed, a house re may result. For your safety,
follow the installation instructions, contact local building, re ocials, or authority having jurisdic-
tion about restrictions and installation inspection requirements in your area.
The authority having jurisdiction should be consulted before installation to determine the need to
obtain a permit.
Emissions and Efficiency - GF55-2: This manual describes the installation and operation of the
Regency GF55-2 pellet heaters. This heater is U.S. ENVIRONMENTAL PROTECTION AGENCY certified
to comply with 2020 particulate emission standards. Under specific test condition this heater has been
shown to deliver heat at rates raging from:
7,751 - 32,739 Btu/hr
Efficiency: 75%* HHV (PFS TECO 21-694)
*When using optional top vent adaptor kit (GF55-920) and 3” to 6” flue adaptor (3PVP-X6). See manual
for further information.
FIRE EXTINGUISHER AND SMOKE DETECTION: All home with a pellet burning stove should have at
least one fire extinguisher in a central location known to all the household. Smoke detectors and carbon
monoxide detectors should be installed maintained in the room containing the stove. If it sounds the alarm,
correct the cause but do not deactivate. You may choose to relocate the smoke the smoke detection device
within the room; DO NOT REMOVE THE SMOKE OR CARBON MONOXIDE DETECTORS FROM THE
ROOM.
WARNING: This wood heater needs periodic inspection and repair for proper operation. It is against
federal regulation to operate this wood heater in a manner inconsistent with operating instructions in this
manual.
WARNING: This wood heater has a manufacturer set minimum low burn rate that must not be altered.
It is against federal regulations to alter this setting or other wise operate this wood heater in a manner
inconsistent with operating instructions in this manual.

Greenre Pellet Stove Owner's Manual 3
TABLE OF CONTENTS
SAFETY LABEL
Copy of Decal ...........................................................4
Decal Location ..........................................................4
INSTALLATION
Safety Warnings & Recommendations.........................5
Important Safety Information.....................................6
Pellet Quality.............................................................6
OPERATING INSTRUCTIONS
Control Board Functions.............................................7
Automatic Safety Features .........................................7
Operating Your Pellet Stove........................................8
Manual Mode .......................................................8
High/Low Mode....................................................8
Auto/O Mode .....................................................8
Slider / Damper Set-Up..............................................9
MAINTENANCE
Routine Cleaning & Maintenance ..............................10
Tools required to clean the unit...........................10
Opening the Door ..............................................10
Burn Pot & Liner ................................................10
Door Glass Cleaning ...........................................10
Ash Pan & Door Gaskets .....................................10
Ash Pan.............................................................11
Heat Exchanger Tubes........................................11
Fresh Air Intake .................................................11
Exhaust Vent .....................................................11
Blower Mechanisms............................................11
All Hinges ..........................................................11
Exhaust Passages...............................................12
Post Season Clean-Up.........................................12
Cleaning Plated Surfaces ....................................12
Firebox Panel.....................................................12
Replacing Door Glass..........................................12
WARRANTY
Warranty ................................................................14
GF55

Greenre Pellet Stove Owner's Manual
4
SAFETY LABEL
On the GF55-2 the safety label is located on the underside of the hopper lid.
The unit can be installed on a hard,
stable non-combustible surface /
L'appareil peut être installé sur une
surface non combustible stable et
dure.
Certified for use in Canada & USA
Certifié pour installation au
Canada et aux Etats-Unis.
DATE OF MANUFACTURE /
DATE DE FABRICATION :
J F M A M J J A S O N D 2022 2023 2024 2025 2026
CAUTION:
Hot while in operation. DO
NOT touch, keep children,
clothing & furniture away.
Contact may cause skin
burns. See nameplate &
instructions
ATTENTION:
Chaud pendant le fonctionnement. NE
PAS toucher, garder les enfants, les
vêtements et les meubles à distance.
Tout contact peut provoquer des
brûlures de la peau. Voir plaque
signalétique et instructions
Combustible floors must be protected by a non-combustible material. - See Owners Manual.
Le plancher combustible doit être protégé par un matériel non combustible. - Consulterle manual.
A Sidewall to Unit (Du mur latéral à l'appareil) 6” (152 mm)
B Backwall to Unit (Du mur arrière à l'appareil) 3” (76 mm)
C Corner to Unit (Du coin à l'appareil) 2” (51 mm)
D Wall to vent (Du mur à l'évacuation) 3” (76 mm)
6” (152 mm)
E From door opening of unit to edge of floor protection
(De l'ouverture de la porte au devant de protection de plancher)
NOTE: A combustible floor must be protected by a non-
combustible material - Width 27" (686mm) by depth 34"
(864mm). (Un plancher combustible doit etre protege par
un materiel non combustible. La largeur de 27 po (686 mm)
par la profondeur de 34 po (864 mm))
Minimum Alcove Width (Largeur minimale de l'alcôve) 36” (914 mm)
Minimum Alcove Height (Hauteur minimale de l'alcôve) 48” (1219 mm)
Maximum Alcove Depth (Profondeur maximale de l'alcôve) 30” (762 mm)
INSTALLED AS A FREESTANDING STOVE MODEL / INSTALLÉCOMME MODÈLE FS,
DE POÊLE AUTOPORTANT :
Minimum clearances to combustible materials./ Dégagements
minimaux par rapport aux matériels combustibles :
Floor Protection
A
B
C
E
Backwall
Sidewall
D
FS Model /
modèle
autoportant
920-553a
580
Serial No. / No. de série :
GF55-2 (stove/poêle)
Greenfire Model / Modèle:
Manufactured in Canada for /
Fabriqué au Canada pour :
FPI Fireplace Products
International Ltd.
Delta, BC, Canada
PFS TECO
REPORT
#21-695
Refer to Intertek’s Directory of Building Products for detailed information. / Reportez-vous à
l'annuaire Intertek des produits du bâtiment pour obtenir des informations détaillées.
Ouput Rating (puissance de sortie): 7,751 to 32,739 BTU/Hr (2.27 to 9.59 kWh)
Listed Room Heater, Pelletized Fuel Type (Appareil de chauffage à granules certifié)
Suitable For Mobile Home Installation (approuvé pour installation dans une maison mobile)
Certified to (agréé):
CAN/ULC-S627:2021, ASTM E1509-22
DO NOT REMOVE THIS LABEL /
NE PAS RETIRERCETTE ÉTIQUETTE
This wood heater needs periodic inspection and repair for proper operation. Consult the owner’s manual for further
information. It is against federal regulations to operate this wood heater in a manner inconsistent with the operating
instructions in the owner’s manual. U.S. ENVIRONMENTAL PROTECTION AGENCY Certified to comply with 2020
particulate emission standards. Under specific test conditions. this heater has been shown to have a particulate
emission level of 1.8 g/hr. Ce poêle à granules nécessite une inspection et une réparation périodiques pour un
fonctionnement correct. Consulterle manuel du propriétaire pour plus d’informations. Il est contraire aux règlements
fédéraux d'utiliser ce poêle à bois d'une manière non conforme aux instructions d'utilisation du manuel du
propriétaire. Certifié U.S. ENVIRONMENTAL PROTECTION AGENCY pour être conforme aux normes d'émission
de particules de 2020. Dans des conditions de test spécifiques, il a été démontré que ce poêle a un niveau
d'émission de particules de 1,8 g/hr.
This pellet appliance has been tested and listed for use in manufactured homes in accordance with Oregon Administration Rules 814-23-900 through 814-23-909.
Install and use only in accordance with the Manufacture’s installation and operating instructions. Contact local building or fire officials about restrictions and
installation inspection in your area. Do not connect this unit to a chimney flue serving another appliance. See local building codes and manufacturers instructions
for precautions required for passing a chimney through a combustible wall or ceiling. Electrical rating: 120 volts, 60 hz, 4.3 Amps. Route cord away from the
heater / Cet appareil a été testé et certifié pour être utilisé dans les maisons mobiles en accord avec les règles administratives de l'Oregon 814-23-900 à
814-23-909. Installeret utiliser cet appareil seulement selon les instructions d'installation et d'utilisation du fabricant. Contacterles autorités locales concernant les
restrictions et les inspections d'installation. Ne pas raccorder cet appareil à une cheminée desservant un autre appareil. Consulterles codes dubâtiment locaux et
les instructions du fabricant pour les précautions à prendre lorsqu'une cheminée doit être installée àtravers un mur ou un plafond combustible. PUISSANCE
ÉLECTRIQUE : 120 Volts, 60 Hz, 4.1 Amps. Placerle câble électrique loin de la chaleur.
For Use With Only Pelletized Wood fuels. Keep viewing and ash removal doors tightly closed during operation. Only replace glass with ceramic glass.
Components required for installation: a 3 inch (75 mm) or 4inch (100 mm) listed PL vent, complete with components. Insert and Hearth mount installations; a
listed single wall chimney liner may be used. Inspect and clean Exhaust Venting system frequently / À utiliser avec des combustibles sous forme de granules
uniquement. Utiliser seulement lorsque les portes avant et la porte du retrait descendressont fermées. Si une ou des vitres doivent être remplacées, utiliser
seulement de la vitrocéramique. Pièces requises pour l'installation : uneévacuation PL certifiéede 3 po (75 mm)ou de 4 po (100 mm)avec ses composantes.
Installations de l'encastrable et dumontage dufoyer: une doublure de cheminée à simple paroi peu être utilisée. Inspecter et nettoyer fréquemment le système de
ventilation et d'évacuation.
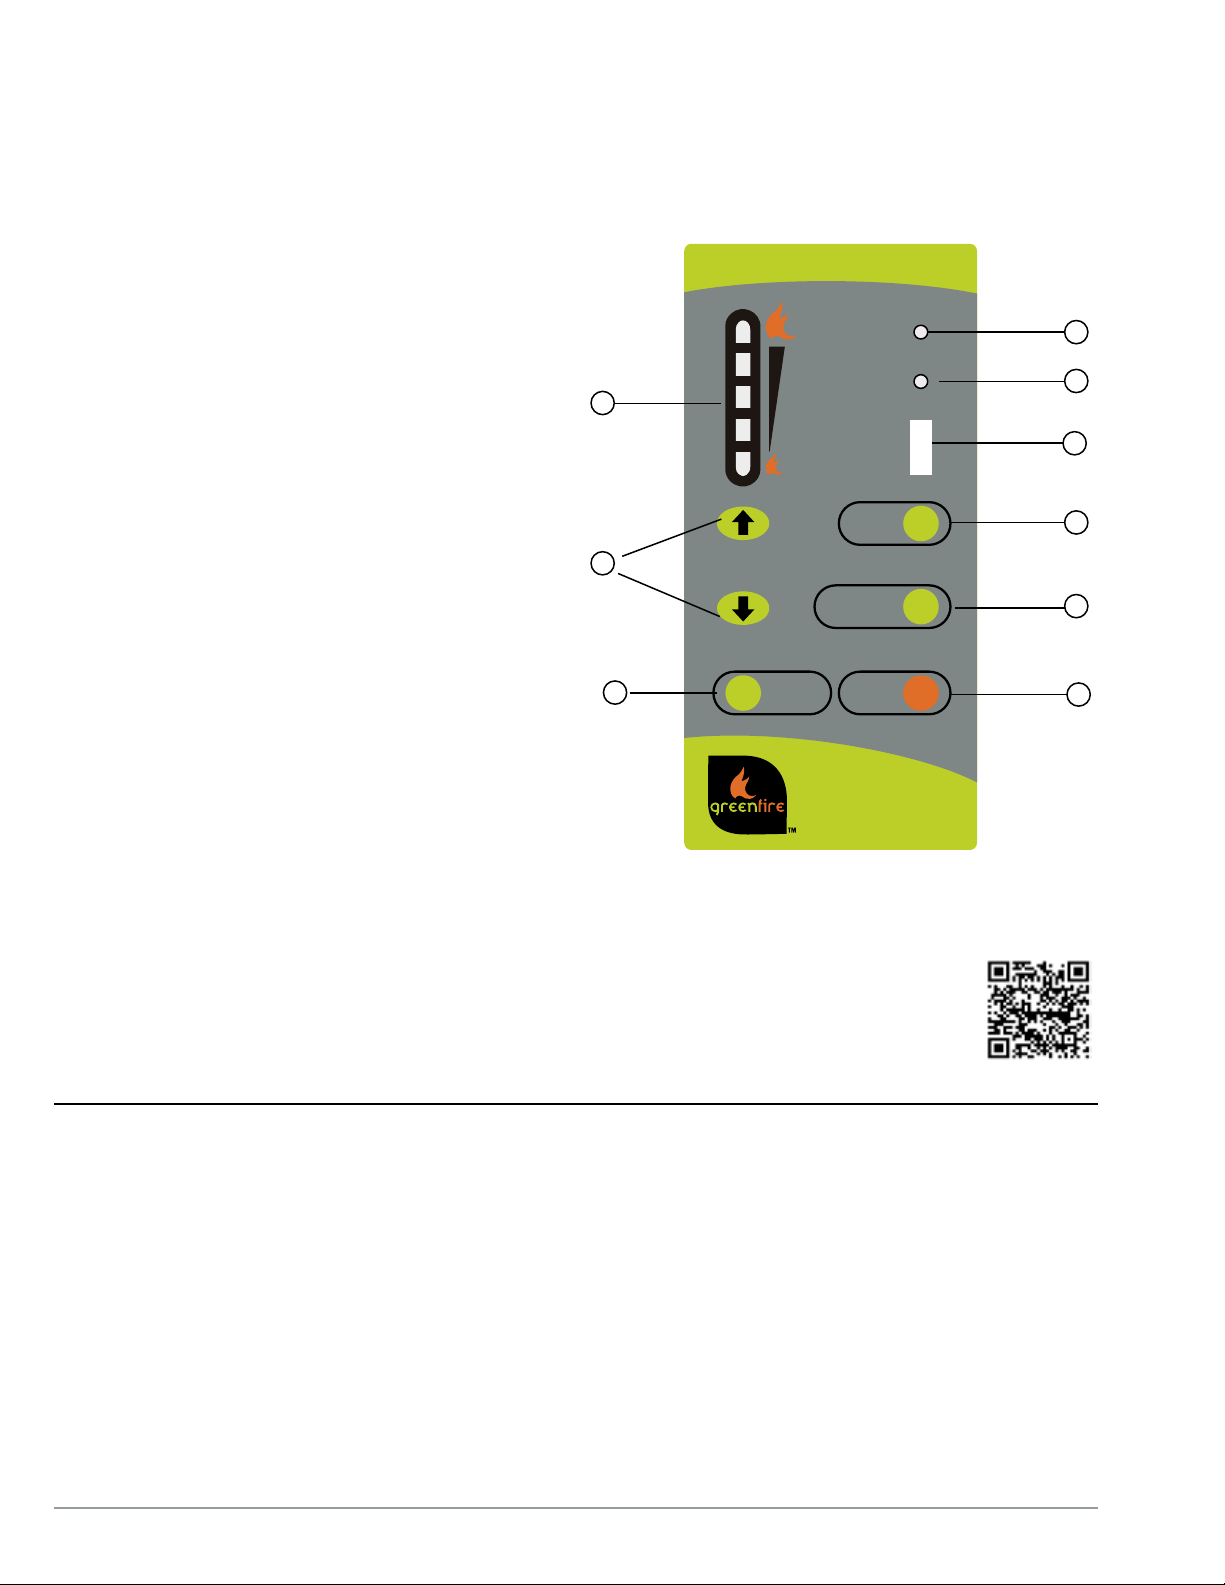
To Start Stove: Press the ON / OFF button. If the auger needs to be primed, press the Manual Auger Feed button until fuel starts to drop into the
Burn Pot.
To Operate Stove: MANUAL MODE: When a fire has been established the stove settings are adjustable. / HIGH/LOW MODE: (Requires a thermostat)
When the thermostat calls for heat the stove settings are adjustable. When the thermostat contacts open, the HEAT LEVEL and Fans will drop down to
the LOW setting until the thermostat contacts close again. / AUTO/OFF MODE: (Requires a thermostat) When the thermostat contacts close, the unit will
light automatically. Once up to temperature the stove settings are adjustable. When the thermostat contacts open, the stove will drop down to the LOW
settings for 30 minutes. If within the 30 min the thermostat contacts close, the HEAT LEVEL will return to previous MANUAL setting or if the thermostat
contacts remain open the stove begin its shutdown routine. To Turn Off Stove: MANUAL and HI / LOW mode: Press the ON / OFF button; AUTO / OFF
mode: Turn the thermostat down or off.
Pour démarrer le poêle : Appuyer sur le bouton “ON/OFF”. Si la vis sans fin doit être amorcée, appuyer sur le bouton manuel d’alimentation de la vis
jusqu'à ce que les granules se déversent dans le pot de combustion.
Pour faire fonctionner le poêle : MODE MANUEL: Lorsque le feu est bien établi, les réglages peuvent être ajustés. / MODE “HIGH/LOW”: (Nécessite un
thermostat) Lorsque le thermostat requiert de la chaleur, les réglages peuvent être ajustés. Lorsque les contacts du thermostat s’ouvrent, le réglage du
niveau de chaleur et les ventilateurs s’ajusteront au réglage “bas” jusqu'à ce que les contacts du thermostat se referment. / MODE “AUTO/OFF”:
(Nécessite un thermostat) Lorsque les contacts du thermostat ferment, le poêle s’allumera automatiquement. Lorsque la température adéquate est
atteinte, les réglages peuvent être ajustés. Lorsque les contacts du thermostat s’ouvrent, le poêle s’ajustera aux réglages bas pendant 30 minutes. Si les
contacts du thermostat se ferment au cours de ces 30 minutes, le réglage duniveau de chaleur retournera en réglage MANUEL ou si les contact du
thermostat restent ouverts, le poêle entamera le processus d'arrêt.
Pour éteindre le poêle :MODE MANUEL ET “HIGH/LOW”: Appuyer sur le bouton “ON/OFF”. MODE “AUTO/OFF”: Baisser le thermostat ou l’éteindre.
GF55-2 DECAL LOCATION
Locate the rating plate on the GF55 by lifting up the hopper lid.
The rating plate will be located on the underside of the hopper
lid. (See below picture)
DO NOT REMOVE DECAL FROM UNIT.

Greenre Pellet Stove Owner's Manual 5
INSTALLATION
CAUTION:
Do not connect to any air distribution duct or system.
Do not burn garbage or ammable uids such as gasoline,
naptha or engine oil.
Unit hot while in operation. Keep children, clothing and
furniture away. Contact may cause skin burns.
FUEL: This pellet stove is designed and approved to only burn wood
pellet fuel with up to 3% ash content. Dirty fuel will adversely aect the
operation and performance of the unit and may void the warranty. Check
with your dealer for fuel recommendations.
THE USE OF CORDWOOD IS PROHIBITED BY LAW.
SOOT: Operation of the stove with insucient combustion air will result
in the formation of soot which will collect on the glass, the heat exchanger,
the exhaust vent system, and may stain the outside of the house. This is
a dangerous situation and is inecient. Frequently check your stove and
adjust the slider/damper as needed to ensure proper combustion. See
"Slider/Damper Setting".
CLEANING: There will be some build up of y ash and small amounts of
creosote in the exhaust. This will vary due to the ash content of the fuel
used and the operation of the stove. It is advisable to inspect and clean
the exhaust vent semi-annually or every two tons of pellets.
ASHES: Disposed ashes should be placed in a metal container with a tight
fitting lid. The closed container of ashes should be on a non-combustible
floor on the ground, well away from all combustible materials pending
final disposal. If the ashes are disposed of by burial in soil or otherwise
locally dispensed, they should be retained in the closed container until all
cinders have been thoroughly cooled.
ELECTRICAL: The use of a surge protected power bar is highly
recommended. The unit must be grounded. The grounded electrical
cord should be connected to a standard 115 volts (4.6 Amps), 60 hertz
electrical outlet. Be careful that the electrical cord is not trapped under
the appliance and that it is clear of any hot surfaces or sharp edges and
also must be accessible. If this power cord should become damaged, a
replacement power cord must be purchased from the manufacture or
a qualied Greenre dealer. This unit's maximum power requirement is
520 watts.
GLASS: Do not abuse the glass by striking or slamming the door. Do
not attempt to operate the stove with broken glass. The stove uses
ceramic glass. Replacement glass must be purchased from an Greenfire
dealer. Do not attempt to open the door and clean the glass while the
unit is in operation or if glass is hot. To clean the glass, use a soft cotton
cloth and mild window cleaner, gas or wood stove glass cleaner, or take
a damp paper towel and dip into the fly ash. This is a very mild abrasive
and will not damage the glass.
FLAMMABLE LIQUIDS: Never use gasoline, gasoline-type lantern
fuel, kerosene, charcoal lighter fluid, or similar liquids to start or “freshen
up” a fire in the heater. Keep all such liquids well away from the heater
while it is in use.
SMOKE DETECTOR: Smoke detectors should be installed and maintained
in the structure when installing and operating a pellet burning appliance.
OPERATION: The ash pan and door must be closed securely for proper
and safe operation of the pellet stove. Also ensure all gaskets on the door
are checked and replaced when necessary.
KEEP ASH PAN FREE OF RAW FUEL.
DO NOT PLACE UNBURNED OR NEW PELLET FUEL IN ASH PAN. A FIRE
IN THE ASH PAN MAY OCCUR.
INSTALLATION: Be sure to maintain the structural integrity of your
home when passing a vent through walls, ceilings, or roofs. It is
recommended that the unit be secured into its position in order to avoid
any displacement.
DO NOT INSTALL A FLUE DAMPER IN THE EXHAUST VENTING SYSTEM
OF THIS UNIT.
DO NOT CONNECT THIS UNIT TO A CHIMNEY FLUE SERVING ANOTHER
APPLIANCE.
FRESH AIR: Outside Fresh Air connection is optional. Must be
connected to all units installed in Mobile and “Air Tight Homes” (R2000)
or where required by local codes. Consider all large air moving devices
when installing your unit and provide room air accordingly. Limited air
for combustion may result in poor performance, smoking and other side
effects of poor combustion.
If you have any questions with regards to your stove or the above-
mentioned information, please feel free to contact your local dealer for
further clarification and comments.
SINCE FPI HAS NO CONTROL OVER THE INSTALLATION OF
YOUR STOVE, FPI GRANTS NO WARRANTY IMPLIED OR STATED
FOR THE INSTALLATION OR MAINTENANCE OF YOUR STOVE.
THEREFORE, FPI ASSUMES NO RESPONSIBILITY FOR ANY
CONSEQUENTIAL DAMAGE(S).
SAFETY WARNINGS & RECOMMENDATIONS

Greenre Pellet Stove Owner's Manual
6
INSTALLATION
PELLET QUALITY
Pellet quality is important, please read the following:
Pellet quality is a major factor in how the Pellet stove will
operate. If the pellets have a high moisture or ash content the
fire will be less efficient and has a higher possibility of the fire
building up and creating clinkers (hard ash build-up).
Your Greenfire Pellet Stove has been designed to burn wood
pellets only. Do not use any other type of fuel, as this will void
any warranties stated in this manual.
The performance of your pellet stove is greatly affected by the
type and quality of wood pellets being burned. As the heat output
of various quality wood pellets differs, so will the performance
and heat output of the pellet stove.
CAUTION: It is important to select and use only pellets that are dry
and free of dirt or any impurities such as high salt content. Dirty fuel will
adversely affect the operation and performance of the unit and will void
the warranty. The Pellet Fuel Industries (P.F.I.) has established standards
for wood pellet manufacturers. We recommend the use of pellets that
meet or exceed these standards. Ask your dealer for a recommended
pellet type.
P.F.I. PELLET STANDARDS:
Fines (fine particles)......1% maximum through a 1/8" screen
Bulk Density.................. 40 pound per cubic foot minimum
Size.............................. 1/4” - 5/16” diameter 1/2" - 1-1/2" long
maximum
Ash Content ..................1% maximum (Premium grade)
..................3% maximum (Standard grade)
Moisture Content...........8% maximum
Heat Content.................approximately 8200 Btu per pound minimum
ASH: The ash content of the fuel and operation of your stove will directly
determine the frequency of cleaning. The use of high ash fuels may
result in the stove needing to be cleaned daily. A low ash fuel may allow
longer intervals between cleaning.
CLINKERING: Clinkers are silica (sand) or other impurities in the
fuel that will form a hard mass during the burning process. This hard
mass will block the air flow through the Burn Pot Liner and affect the
performance of the stove. Any fuel, even approved types, may tend to
clinker. Check the Burn-Pot Liner daily to ensure that the holes are not
blocked with clinkers. If they become blocked, remove the liner (when
the unit is cold) and clean/scrape the clinkers out. Clean the holes with
a small pointed object if required. Refer to the section Routine Cleaning
and Maintenance.
PELLET FEED RATES: Due to different fuel densities and sizes, pellet
feed rates may vary. This may require an adjustment to the slider
damper setting or to the auger feed trim setting on low.
Since FPI has no control over the quality of pellets that you use, we
assume no liability for negative results in selection of wood pellets.
Store pellets at least 36” (1 m) away from the pellet stove.
IMPORTANT SAFETY INFORMATION
Please read thisentireOwner’s Manual beforeinstallation and op-
erating your Greenre Pellet Stove. Failure to follow these instruc-
tions may result in property damage, bodily injury or even death.
Contact your local building or re ocial to obtain a permit and any
information on installation restrictions and inspection requirements for
your area.
To prevent the possibility of a re, ensure that the appliance is properly
installed by adhering to the installation instructions. A Greenre dealer
will be happy to assist you in obtaining information with regards to your
local building codes and installation restrictions.
Be sure to maintain the structural integrity of the home when passing
a vent through walls, ceilings, or roofs.
The stove's exhaust system works with negative combustion chamber
pressure and a slightly positive chimney pressure. It is very important
to ensure that the exhaust system be sealed and airtight. The ash pan
and viewing door must be locked securely for proper and safe opera-
tion of the pellet stove.
Do not burn with insucient combustion air. A periodic check is recom-
mended to ensure proper combustion air is admitted to the combustion
chamber. Setting the proper combustion air is achieved by adjusting
the slider damper located on the left side of the stove.
When installing the stove in a mobile home, it must be electrically
grounded to the steel chassis of the home and bolted to the oor.
Make sure that the structural integrity of the home is maintained and
all construction meets local building codes.
Minor soot or creosote may accumulate when the stove is operated
under incorrect conditions such as an extremely rich burn (black tipped,
lazy orange ames).
If you have any questions with regard to your stove or the above-
mentioned information, please feel free to contact your local dealer for
further clarication and comments.

Greenre Pellet Stove Owner's Manual 7
OPERATING INSTRUCTIONS
1. AUGER LIGHT:
This green light will ash in conjunction with the auger pulse.
2. MODE LIGHT:
Responsible for signaling the state of the control board. When the light
is ashing the stove is in an automatic start mode or the thermostat
has control of the unit. When the light is solid, the Heat Level Setting
can be altered.
3. THERMOSTAT SWITCH:
Used to set the unit’s controls to one of three mode settings; Manual,
High/Low, or Auto/O.
4. FEED RATE TRIM BUTTON:
Used to change the feed rate trims in ¼ second increments for all
feed settings. When this button is pressed, all the light will light up on
the Heat Output Indicator except for the one that shows the current
setting; the default setting is the number 4 light. To adjust the setting
hold the Feed Rate Trim button down and press the Heat Level up or
down buttons to adjust the setting.
5. COMBUSTION BLOWER TRIM BUTTON: Used to change the
Combustion Blower trims in 5 volt increments for all feed settings until
it reaches line voltage. When this button is pressed, all the light will
light up on the Heat Output Indicator except for the one that shows
the current setting; the default setting is the number 2 light. To adjust
the setting hold the Combustion Blower Trim button down and press
the Heat Level up or down buttons to adjust the setting.
6. ON/OFF BUTTON:
Used to turn the unit On and O.
7. ROOM AIR FAN ON/OFF BUTTON:
Used to turn convection fan On or O.
8. HEAT LEVEL ADJUSTMENT BUTTONS:
When pressed, will change the heat level setting of the unit up or
down.
9. HEAT OUTPUT INDICATOR:
Shows the present heat output setting.
CONTROL BOARD FUNCTIONS
AUTOMATIC SAFETY FEATURES
A. The stove and insert have a low limit safety switch located on the housing of the exhaust blower. If the exhaust temperatures drop below 120°F
(49°C) the unit will shut down and will be required to go through a full start up procedure again.
The most common cause for this is an empty hopper. This switch should only be by-passed for testing purposes by a technician.
B. The stove and insert have a high limit safety switch located just below the hopper behind the external body panels. If the temperature of this
switch reaches 200°F (93°C), the auger will stop feeding fuel and as the exhaust temperatures drop below 120°F (49°C), the unit will shut down.
The 200°F (93°C) switch is a manual reset and should only be reset by a service person who can first diagnose the reason for failure.
The two most likely causes are Convection Fan failure or High Limit Switch failure. Either one needs to be properly diagnosed and rectified.
Since this is a safety switch it should never be by-passed for any reason other than the service technician to test the operation.
Figure 3: Circuit Board Control Panel Decal.
GF55-094
ROOM AIR
FAN ON/OFF
HEAT LEVEL
AUTO/OFF
HIGH/LOW
MANUAL
AUGER
MODE
ON/OFF
FEED
TRIM
COMBUSTION
AIR TRIM
1
2
3
4
5
6
8
9
7
Starting a Fire in Your Pellet Stove

Greenre Pellet Stove Owner's Manual
8
OPERATING INSTRUCTIONS
OPERATING YOUR PELLET STOVE
PRE-BURN INSTRUCTIONS:The burn pot liner holes must be clear and the liner installed properly against the ignitor tube for proper
operation. Check the hopper for enough pellets to start the unit.
Note: The thermostat mode can be changed during normal operation.
DO NOT OPERATE THE UNIT WITH THE DOOR OR ASH PAN OPEN.
Figure 2: Thermostat Switch in
HIGH/LOW position.
HIGH/LOW MODE: (Requires a thermostat)
INITIAL START-UP: See manual mode above.
OPERATION: When the thermostat calls for heat (contacts are closed) the stove settings are
adjustable as per Manual Mode. When the thermostat contacts open, the HEAT LEVEL and Fans
will drop down to the LOW setting until the thermostat contacts close again. *The LOW heat
setting can be adjusted for different fuel qualities (see “Operating instructiOns - cOntrOl BOard
FunctiOns”). The stove will come back to the previous HEAT LEVEL setting when the thermostat
contacts close again.
AUTO/OFF MODE: (Requires a thermostat)
INITIAL START-UP: See manual mode above.
OPERATION: When the thermostat contacts close, the unit will light automatically. Once up to
temperature, the stove operates the same as in MANUAL. When the thermostat contacts open, the
stove’s HEAT LEVEL and Fans will drop down to the LOW setting for 30 minutes. If the thermostat
contacts close within the 30 minutes, the HEAT LEVEL will return to the previous MANUAL setting.
If the thermostat contacts remain open the stove automatically begins its shutdown routine. The
ON / OFF button can be pressed at any time and the stove will immediately shut down. The stove
will re-light when the thermostat contacts close again.
TURNING YOUR PELLET STOVE OFF:
• MANUAL and HI / LOW mode: To turn the unit OFF, simply press the ON / OFF button. This will
stop the feed of pellets. The blowers will continue to operate and cool the stove down. When
cool enough, the stove will turn off.
• AUTO / OFF mode: To turn the unit OFF, turn the thermostat down or off. NOTE: The unit will run
on low for three (3) minutes before it turns off.
DO NOT unplug unit while Combustion fan is operating.
This may lead to smoke escaping from the stove.
MANUAL MODE:
All control of circuit board function is adjusted at the circuit board.
To START: Press the ON / OFF button. The stove will turn on. The system light will flash. The
Auger Light will flash with each pulse of the auger (the Auger Feed Rate is pre-programmed during
start-up). The Heat Level Indicator will show the Heat Level that the stove will run at after start-up
and can be adjusted but the change will not take affect until the start -up has finished.
To PRIME AUGER: If this is the first time the unit has been started or the unit has run out of fuel,
the auger will need to be primed. This can be done by restarting the unit five (5) minutes into its
start-up or by putting a small hand full of pellets into the burnpot.
To OPERATE: When a fire has been established, the System Light will turn solid (after
approximately 10 - 15 minutes) and the Auger Light will continue to flash to the corresponding
Heat Level setting.
The convection blower (room air blower) will turn on. The speed of this blower is controlled by the
setting of the heat level output indicator. The convection blower can be turned off by depressing
the room air on/off button. For the best efficiency and to prevent cycling the convection blower
should be left on at all times.
Starting a Fire in Your Pellet Stove
8
Figure 1: Thermostat Switch in
ROOM AIR
FAN ON/OFF
ON/OFF
FEED RATE
TRIM
COMBUSTION
BLOWER TRIM
HEAT LEVEL
AUTO/OFF
HIGH/LOW
MANUAL
AUGER
C-11625
MODE
ROOM AIR
FAN ON/OFF
ON/OFF
COMBUSTION
BLOWER TRIM
AUTO/OFF
HIGH/LOW
MANUAL
AUGER
C-11625
MODE
1
2
3
4
5
6
8
7
9
Figure 3: Thermostat Switch in
ON/OFF position.
ROOM AIR
FAN ON/OFF
ON/OFF
FEED RATE
TRIM
COMBUSTION
BLOWER TRIM
HEAT LEVEL
AUTO/OFF
HIGH/LOW
MANUAL
AUGER
C-11625
MODE
ROOM AIR
FAN ON/OFF
ON/OFF
FEED RATE
TRIM
COMBUSTION
BLOWER TRIM
HEAT LEVEL
AUTO/OFF
HIGH/LOW
MANUAL
AUGER
C-11625
MODE
1
2
3
4
5
6
8
7
9
ROOM AIR
FAN ON/OFF
ON/OFF
FEED RATE
TRIM
COMBUSTION
BLOWER TRIM
HEAT LEVEL
AUTO/OFF
HIGH/LOW
MANUAL
AUGER
C-11625
MODE
ROOM AIR
FAN ON/OFF
ON/OFF
FEED RATE
TRIM
COMBUSTION
BLOWER TRIM
HEAT LEVEL
AUTO/OFF
HIGH/LOW
MANUAL
AUGER
C-11625
MODE
1
2
3
4
5
6
8
7
9
MANUAL position.

Greenre Pellet Stove Owner's Manual 9
OPERATING INSTRUCTIONS
SLIDER / DAMPER SET-UP
THE SLIDER / DAMPER MUST BE SET AT TIME OF INSTALLATION.
A Qualified Service Technician or Installer must set the Slider
Damper. This is used to regulate the airflow through the pellet stove.
The slider damper knob is located on the left cab side (see Figure 7).
Figure 7: Slider / Damper Knob.
If the fire should happen to go out and the heat output indicator has
been set on the lowest setting, the Slider Damper should be pushed in
slightly, decreasing the air in the firebox.
If, after long periods of burning, the re builds up and overows the burn pot
or there is a build up of clinkers, this would be a sign that the pellet quality
is poor, this requires more primary air, the slider damper must be pulled
out to compensate. Pulling the slider damper out gives the re more air.
The easiest way to make sure that an ecient ame is achieved is to
understand the characteristics of the re.
• A tall, lazy ame with dark orange tips requires more air – Open
slider (pull out) slightly.
• A short, brisk ame, like a blowtorch, has too much air – Close slider
(push in) slightly.
• If the ame is in the middle of these two characteristics with a bright
yellow/orange, active ame with no black tips then the air is set for
proper operation, refer to Figure 8.
The combustion exhaust blower is a variable speed blower controlled by
the heat output button. This blower will decrease the vacuum pressure
inside the stove and as the heat output button is turned down.
SPECIAL NOTES:
Pellet quality is a major factor in how the Pellet stove will operate. If the
pellets have a high moisture or ash content the fire will be less efficient
and has a higher possibility of the fire building up and creating clinkers
(hard ash build-up).
Figure 8: Ecient Flame.
NOTE:
Incorrect use of the Damper will cause malfunction and
poor results from your stove or insert.
If all of these steps are followed, there should be no visible
emissions.
Starting a Fire in Your Pellet Stove

Greenre Pellet Stove Owner's Manual
10
MAINTENANCE
ROUTINE CLEANING & MAINTENANCE
The following list of components should be inspected and maintained
routinely to ensure that the appliance is operating at its optimum and
giving you excellent heat value:
2-3 Days / Weekly Semi-Annually or 2 Tons of
Fuel
Burn Pot & Liner Exhau Vent
Ash Pan Fresh Air Intake Tube
Inside Firebox Blower Mechanisms
Door Glass Behind Firebox Liners
Heat Exchanger Tubes All Hinges
Ash Pan & Door Gaskets Po Season Clean-Up
Door Latch
TOOLS REQUIRED TO CLEAN UNIT
a) Torx T-20 Screwdriver
b) 5/16" Wrench or Socket
c) 1" Soft Paint Brush
d) Soft Cloth
e) Vacuum with ne Filter Bag
BURN POT AND LINER (2-3 days)
Cleaning of the burn pot and liner must only be done when stove is cold.
To remove the burn pot and burn pot liner, open the door using the door
handle provided (located on the right-hand side of the stove). Swing the
door open. Lift the liner from the burn pot. Lift the burn pot from the
rebox by gently lifting up the front of the burn pot, then sliding the as-
sembly from the air intake tube and the ignitor cartridge. See gure 9.
This is the ‘pot’ where the pellets are burned. Every two (2) to three (3)
days (when the unit is cold), remove the burn-pot liner from the stove
and inspect it to ensure proper air ow through the liner. Failure to keep
the liner clean may cause a build up of fuel past the burn pot
liner and up the drop tube. This will cause the auger to jam and
may result in pellets burning in the drop tube and hopper. Using
a metal scraper, remove material that has accumulated or is clogging the
liner’s holes. Then dispose of ashes from the liner and from inside the
burn-pot. Place the burn-pot back into the stove, making sure that the
pipes are properly inserted into the burn pot and locater tabs (see gure
9) are properly seated in the locater holes. Place the liner back into the
burn-pot, making sure that the ignitor hole in the liner is aligned with the
ignitor tube. Push the liner up against the ignitor tube.
Figure 9: Burn Pot Assembly.
DOOR GLASS CLEANING (2-3 days)
Cleaning of the glass must only be done when stove is cold. Open the
door by lifting the handle. The glass can be cleaned by wiping down the
outside and inside of the glass with a dry soft cloth.
If the glass has build up that can not be removed with only the cloth,
clean the glass using paper towel and a gas appliance glass cleaner, this
may be purchased through most dealers. If a gas appliance glass cleaner
is not available, use a damp paper towel dipped in y ash to clean the
glass. After the glass has been cleaned use the dry soft cloth to wiping
down the outside and inside of the glass.
ASH PAN AND DOOR GASKETS (weekly)
After extended use the gasketing may come loose. To repair this, glue the
gasketing on using high-temperature berglass gasket glue / RTU silicone
available from your local Greenre dealer. This is important to maintain
an airtight assembly.
OPENING THE DOOR
The door lever can be found behind the right side of the door frame. To
open the door, pivet the lever outwards and upwards until it unlocks.
If after long periods of burning, the re continually builds up and overows
the burn pot or there is a build up of clinkers, this is an indication that
the pellet fuel quality is poor or the stove may need cleaning. Check the
stove for ash build up (clean if required) and adjust the slider / damper
to produce the proper clean combustion.
Starting a Fire in Your Pellet Stove
IMPORTANT : The purchaser is responsible for the annual maintenance
of the Appliance, as outlined in the owner’s manual. The warranty may
be voided due to problems caused by a lack of maintenance. Records/
receipts of all maintenance completed by service companies must be
kept in case asked for if there is warranty on the product.

Greenre Pellet Stove Owner's Manual 11
MAINTENANCE
ASH PAN
(weekly)
The ash pan is located under the burner. Always dispose of the ashes into
a metal container (never use cardboard, plastic or wood containers) stored
away from combustibles. Monitor the ash level every week. Remember
dierent pellet fuels will have dierent ash contents. Ash content is a
good indication of fuel eciency and quality. Refer to "Safety Warnings
and Recommendations" for disposal of ashes.
Freestanding: To remove the ash pan, simply turn the knob and pull
out towards the front.
Insert: To remove the ash pan open the door, remove the burn pot liner
and the burn pot, then pull the ash pan out.
DO NOT PLACE UNBURNED OR RAW PELLET FUEL IN ASH PAN.
HEAT EXCHANGER TUBES
(weekly)
Open the door and the rod is located under the unit top, in the center
of the stove just behind the door (see Figure 11). This handle is to be
pushed in and out a few times (ONLY WHEN THE UNIT IS COLD)
in order to clean away any y ash that may have collected on the heat
exchanger tubes. As dierent types of pellets produce dierent amounts
of ash, cleaning of the tubes should be done on a regular basis to enable
the unit to run eciently.
Figure 11: Heat Exchanger Tube Cleaner.
FRESH AIR INTAKE
(season)
Inspect periodically to be sure that the intake pipe is not clogged with
any foreign materials.
EXHAUST VENT
(season)
This vent should be cleaned every year or after two (2) tons of pellets
(whichever happens rst). We recommend contacting your dealer for
professional cleaning. To clean the vent pipe, tap lightly on the pipe to
dislodge any loose ash. Open the bottom of the “T” to dump the ash, then
vacuum as much of the ash out of the vent pipe as possible.
BLOWER MECHANISMS
(bi-annual)
Unplug the stove then open the right and left side panels to access the
two blowers. Vacuum all dust from motors and impellers. The convec-
tion blower should be oiled twice yearly using 3 in 1 oil or similar light
oil. The combustion blower requires no lubrication. Check gaskets and
replace if needed.
ALL HINGES
(season)
Check all the hinges on the unit to ensure proper movement.
Ash Pan Door Lock
Locked 12:00 o'clock position
Open 9:00 o'clock position
Figure 10: Ash Pan Door Lock
shown in 12:00 o'clock position.
Cleaning Your Pellet Stove

Greenre Pellet Stove Owner's Manual
12
EXHAUST PASSAGES
(season)
Removal of the firebox backing for bi-annual cleaning (refer to
Figure 12):
a)Open the door by lifting the handle, remove the burn pot and burn
pot liner.
b)Before trying to remove screws, lubricate all screws with penetrating
oil. ie. WD-40.
c) Loosen (do not remove) the four (4) screws that hold the brick liner
retainers in place. Remove side brick liners by sliding them from
under the screwheads.
d)Pull the center panel out. Ensure not to damage the 1" insulation
attached to the back of the center panel.
e)Vacuum and clean thoroughly.
Installation of firebox backing:
a)Return center panel to its original position.
b)Place the two (2) side panels back into the firebox, secure the two
(2) retainers and lock down by tightening the two (2) screws on each
side.
c) Replace the burn pot and burn pot liner.
d)Close the glass door and secure.
POST SEASON CLEAN-UP
Once you are nished using the pellet appliance for the season, unplug the
stove for added electrical protection. It is very important that the stove
be cleaned and serviced as stated above. Also remove any remaining fuel
from the hopper and auger.
CLEANING PLATED SURFACES
Painted surfaces should be wiped with a damp cloth periodically.
It is important to note that ngerprints and other marks can leave a per-
manent stain on plated nishes. To avoid this, give the surface a quick
wipe with denatured alcohol on a soft cloth BEFORE lighting the replace.
Never clean surfaces when they are hot. Do not use other cleaners or
abrasives as they may leave a residue or scratches, which can become
permanently etched into the surface.
FIREBOX PANEL
The paint on the steel rebox panels may peel. This is due to extreme
conditions applied to the paint and is not covered under warranty.
REPLACING DOOR GLASS
It is recommended that your Greenfire dealer replace the glass
if broken.
The door glass is made of high temperature PYRO CERAMIC 5 mm thick.
The center panel is 15.4” x 9.0” (39.0 cm x 22.9 cm) and side panels are
2.6 x 9.0 inches (6.7 cm x 22.9 cm). They must be replaced with Parts #
GF55-028 & GF55-029. Substitute materials will not be permitted.
MAINTENANCE
Figure 12: Firebox Components Removal.
Cleaning Your Pellet Stove

Greenre Pellet Stove Owner's Manual 13
NOTES
____________________________________________________
____________________________________________________
____________________________________________________
____________________________________________________
____________________________________________________
____________________________________________________
____________________________________________________
____________________________________________________
____________________________________________________
____________________________________________________
____________________________________________________
____________________________________________________
____________________________________________________
____________________________________________________
____________________________________________________
____________________________________________________
____________________________________________________
____________________________________________________
____________________________________________________
____________________________________________________
____________________________________________________
____________________________________________________
____________________________________________________
____________________________

Greenre Pellet Stove Owner's Manual
14
WARRANTY
Revision Date: February 2019
Regency Pellet Products Warranty
Limited Lifetime Warranty
FPI Fireplace Products International Ltd. (for Canadian customers) and Fireplace Products U.S., Inc. (for U.S.
customers) (collectively referred to herein as “FPI”) extends this Limited Lifetime Warranty to the original
purchaser of this appliance provided the product remains in the original place of installation. The items covered by
this limited warranty and the period of such coverage is set forth in the table below.
Some conditions apply (see below).
The policy is not transferable, amendable or negotiable under any circumstances.
Pellet Products
Warranty Coverage for Components
and labor is as follows:
Component
Coverage
7 years
2 years
Labour Coverage
(Years)
Firebox/Heat exchanger
2
Surrounds, castings, door assembly.
2
Burn Pot, Log sets, Firebox panels,
2
Ceramic Glass ( Thermal Breakage)
2
Pedestals, legs
2
Burn Pot Liner
2
Agitator
2
Auger Motor, Combustion blower,
Convection blower
2
Wiring, all switches, Wiring harness,
Power cords
2
Circuit boards, Circuit board ribbon
cable
2
Vacuum switch, Ignitor, Air pump,
Temperature sensors, Wall
thermostat
2
Auger
2
Circuit Board Decals
Hopper Rails/ Baffle
2
Conditions:
Warranty protects against defect in manufacture or FPI factory assembled components only, unless herein
specified otherwise.
Any part(s) found to be defective during the warranty period as outlined above will be repaired or replaced at FPI’s
option through an accredited distributor, dealer or pre-approved and assigned agent provided that the defective
part is returned to the distributor, dealer or agent for inspection if requested by FPI. Alternatively, FPI may at its
own discretion fully discharge all of its obligations under the warranty by refunding the verified purchase price of
the product to the original purchaser. The purchase price must be confirmed by the original Bill of Sale.
The authorized selling dealer, or an alternative authorized FPI dealer if pre-approved by FPI, is responsible for all
in-field diagnosis and service work related to all warranty claims. FPI is not responsible for results or costs of
workmanship of unauthorized FPI dealers or agents in the negligence of their service work.
At all times FPI reserves the right to inspect reported complaints on location in the field claimed to be defective
prior to processing or authorizing of any claim. Failure to allow this upon request will void the warranty.
All warranty claims must be submitted by the dealer servicing the claim, including a copy of the Bill of Sale (proof
of purchase by you). All claims must be complete and provide full details as requested by FPI to receive
consideration for evaluation. Incomplete claims may be rejected.

Greenre Pellet Stove Owner's Manual 15
WARRANTY
Revision Date: February 2019
Regency Pellet Products Warranty
Replacement units are limited to one per warranty term. Airtube and baffle replacements are limited to one
replacement per term.
Unit must be installed according to all manufacturers’ instructions as per the manual.
All Local and National required codes must be met.
The installer is responsible to ensure the unit is operating as designed at the time of installation.
The original purchaser is responsible for annual maintenance of the unit, as outlined in the owner’s manual. As
outlined below, the warranty may be voided due to problems caused by lack of maintenance.
Repair/replacement parts purchased by the consumer from FPI after the original coverage has expired on the unit
will carry a 90 day warranty, valid with a receipt only. Any item shown to be defective will be repaired or replaced
at our discretion. No labor coverage is included with these parts
Exclusions:
This Limited Lifetime Warranty does not extend to paint, rust or corrosion of any kind due to a lack of maintenance
or improper venting, combustion air provision, corrosive chemicals (i.e. chlorine, salt, air, etc.), inner panels, door
or glass gasketing, or any other additional factory fitted gasketing.
Malfunction, damage or performance based issues as a result of environmental conditions, location, chemical
damages, downdrafts, installation error, installation by an unqualified installer, incorrect chimney components
(including but not limited to cap size or type), operator error, abuse, misuse, use of improper fuels (plastics,
garbage, solvents, cardboard, coal or coal products, oil based products, waxed cartons, compressed pre-
manufactured logs), lack of regular maintenance and upkeep, acts of God, weather related problems from
hurricanes, tornados, earthquakes, floods, lightning strikes/bolts or acts of terrorism or war, which result in
malfunction of the appliance are not covered under the terms of this Limited Lifetime Warranty.
FPI has no obligation to enhance or modify any unit once manufactured (i.e. as products evolve, field modifications
or upgrades will not be performed on existing appliances).
This warranty does not cover dealer travel costs for diagnostic or service work. All labor rates paid to authorized
dealers are subsidized, pre-determined rates. Dealers may charge homeowner for travel and additional time
beyond their subsidy.
Any unit showing signs of neglect or misuse will not be covered under the terms of this warranty policy and may
void this warranty. This includes units with rusted or corroded fireboxes which have not been reported as rusted or
corroded within three (3) months of installation/purchase.
Units which show evidence of being operated while damaged, or with problems known to the purchaser and
causing further damages will void this warranty.
Units where the serial no. has been altered, deleted, removed or made illegible will void this warranty.
Minor movement, expansion and contraction of the steel is normal and is not covered under the terms of this
warranty.
FPI is not liable for the removal or replacement of facings or finishing in order to repair or replace any appliance in
the field.
Freight damages for products or parts are not covered under the terms of the warranty.
Products made or provided by other manufacturers and used in conjunction with the FPI appliance without prior
authorization from FPI may void this warranty.

Greenre Pellet Stove Owner's Manual
16
WARRANTY
Revision Date: February 2019
Regency Pellet Products Warranty
Limitations of Liability:
The original purchaser’s exclusive remedy under this warranty, and FPI’s sole obligation under this warranty,
express or implied, in contract or in tort, shall be limited to replacement, repair, or refund, as outlined above. IN
NO EVENT WILL FPI BE LIABLE UNDER THIS WARRANTY FOR ANY INCIDENTAL OR CONSEQUENTIAL COMMERCIAL
DAMAGES OR DAMAGES TO PROPERTY. TO THE EXTENT PERMITTED BY APPLICABLE LAW, FPI MAKES NO EXPRESS
WARRANTIES OTHER THAN THE WARRANTY SPECIFIED HEREIN. THE DURATION OF ANY IMPLIED WARRANTY IS
LIMITED TO DURATION OF THE EXPRESSED WARRANTY SPECIFIED ABOVE. IF IMPLIED WARRANTIES CANNOT BE
DISCLAIMED, THEN SUCH WARRANTIES ARE LIMITED IN DURATION TO THE DURATION OF THIS WARRANTY.
Some U.S. states do not allow limitations on how long an implied warranty lasts, or allow exclusion or limitation of
incidental or consequential damages, so the above limitations or exclusions may not apply to you.
Customers located outside the U.S. should consult their local, provincial or national legal codes for additional
terms which may be applicable to this warranty.
How to Obtain Warranty Service:
Customers should contact the authorized selling dealer to obtain warranty service. In the event the authorized
selling dealer is unable to provide warranty service, please contact FPI by mail at the address listed below. Please
include a brief description of the problem and your address, email and telephone contact information. A
representative will contact you to make arrangements for an inspection and/or warranty service.
Canadian Warrantor:
FPI Fireplace Products International Ltd.
6988 Venture St.
Delta, British Columbia
Canada, V4G 1H4
U.S. Warrantor:
Fireplace Products U.S., Inc.
PO Box 2189 PMB 125
Blaine, WA
United States, 98231
Or contact the Regency Customer Care Centre at 1-800-442-7432 (phone) / 604-946-4349 (fax)
Product Registration and Customer Support:
Thank you for choosing a Regency Fireplace. Regency strives to be a world leader in the design, manufacture, and
marketing of hearth products. To provide the best support for your product, we request that you complete a
product registration form at http://www.regency-fire.com/Customer-Care/Warranty-Registration.aspx within
ninety (90) days of purchase.

Greenre Pellet Stove Owner's Manual 17
WARRANTY
Product Registration and Customer Support:
Thank you for choosing a Regency Fireplace. Regency strives to be a world leader in the design, manufacture, and
marketing of hearth products. To provide the best support for your product, we request that you complete a product
registration form found on our Web Site under Customer Care within ninety (90) days of purchase.
For purchases made in CANADA or the UNITED STATES:
http://www.regency-fire.com/Customer-Care/Warranty-Registration.aspx
For purchases made in AUSTRALIA:
http://www.regency-fire.com.au/Customer-Care/Warranty-Registration.aspx
You may also complete the warranty registration form below to register your Regency Fireplace Product and mail and/or
fax it back to us, and we will register the warranty for you. It is important you provide us with all the information below in
order for us to serve you better.
Warranty Registration Form (or Register online immediately at the above Web Site):
Warranty Details
Serial Number (required):
Purchase Date (required) (mm/dd/yyyy):
Product Details
Product Model (required):
Dealer Details
Dealer Name (required):
Dealer Address:
Dealer Phone #:
Installer:
Date Installed (mm/dd/yyyy):
Your Contact Details (required)
Name:
Address:
Phone:
Email:
For purchases made in CANADA:
FPI Fireplace Products
International Ltd.
6988 Venture St.
Delta, British Columbia
Canada, V4G 1H4
Phone: 604-946-5155
Fax: 1-866-393-2806
For purchases made in the UNITED STATES:
Fireplace Products US, Inc.
PO Box 2189 PMB 125
Blaine, WA
United States, 98231
Phone: 604-946-5155
Fax: 1-866-393-2806
For purchases made in AUSTRALIA:
Fireplace Products Australia Pty Ltd
99 Colemans Road
Dandenong South, Vic. 3175
Australia
Phone: +61 3 9799 7277
Fax: +61 3 9799 7822
For fireplace care and tips and answers to most common questions please visit our Customer Care section on our Web Site.
Please feel free to contact your selling dealer if you have any questions about your Regency product.

Greenre Pellet Stove Owner's Manual
18
WARRANTY

Greenre Pellet Stove Owner's Manual 19

Printed in Canada
Greenre is a trademark of FPI Fireplace Products International Ltd.
© Copyright 2022, FPI Fireplace Products International Ltd. All rights reserved.
GF55
Installer: Please complete the following information
Dealer Name & Address: _______________________________________
___________________________________________________________
Installer: ___________________________________________________
Phone #: ___________________________________________________
Date Installed: _______________________________________________
Serial #:____________________________________________________
Table of contents
Other FPI Stove manuals
Popular Stove manuals by other brands

Cascade
Cascade Dragonfly instruction manual

FRANCO BELGE
FRANCO BELGE Normandie 174 10 44 Technical manual

Primus
Primus 3279 GRAVITY II EF Instructions for use

HTW
HTW FREYA HTW-EPE-14FREINOX Owners and installation manual

HASE
HASE Delhi 124 operating instructions

THERMOROSSI
THERMOROSSI CHIC installation guide